ACURA NSX 1997 Service Repair Manual
Manufacturer: ACURA, Model Year: 1997, Model line: NSX, Model: ACURA NSX 1997Pages: 1503, PDF Size: 57.08 MB
Page 1221 of 1503
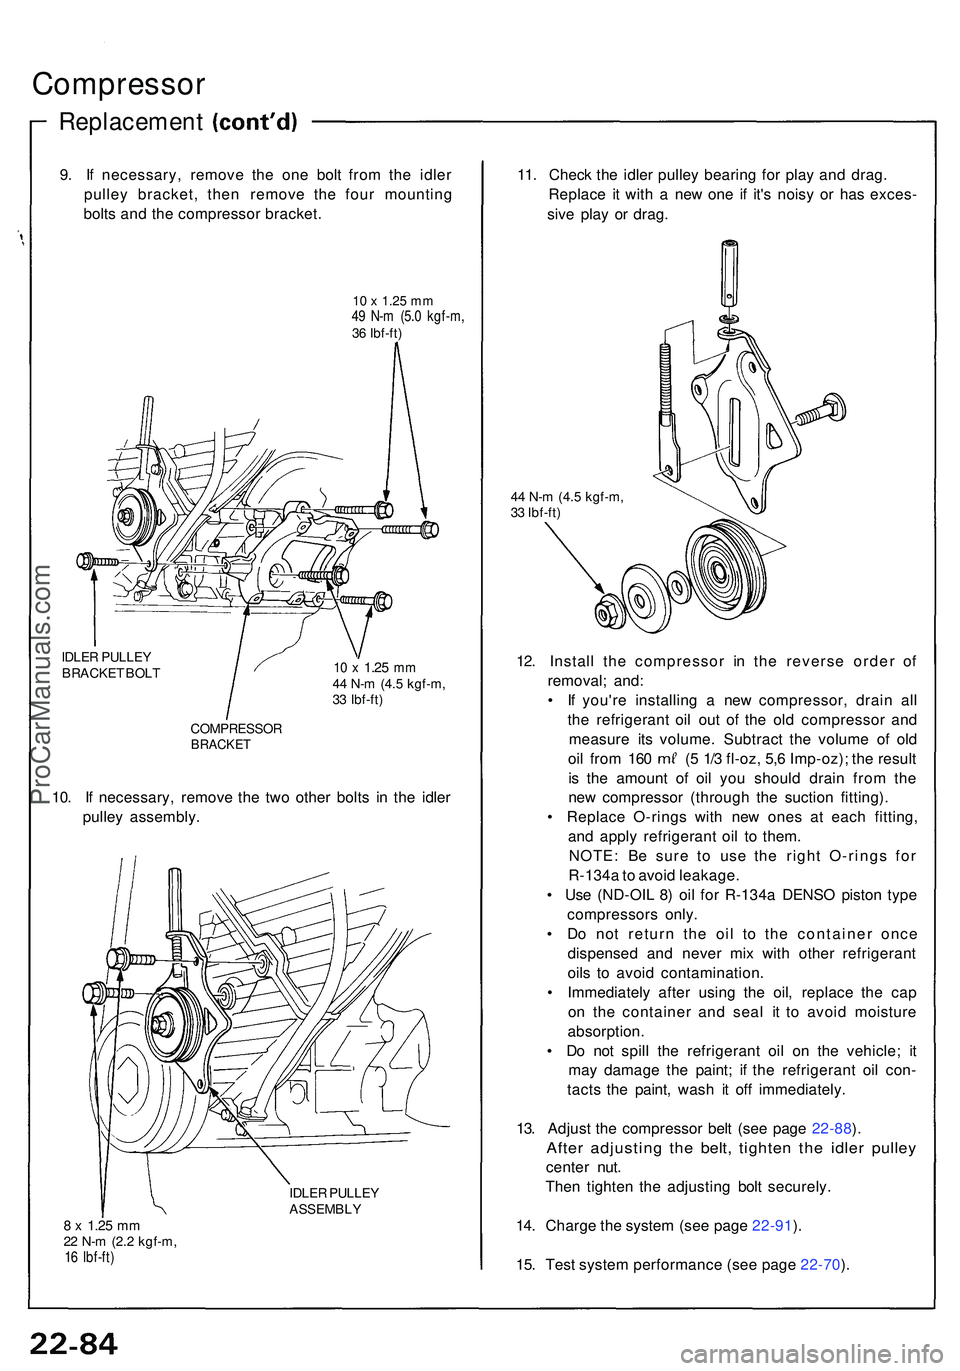
Compressor
Replacemen t
9. I f necessary , remov e th e on e bol t fro m th e idle r
pulle y bracket , the n remov e th e fou r mountin g
bolt s an d th e compresso r bracket .
10 x 1.25 mm49 N- m (5. 0 kgf-m ,36 Ibf-ft )
IDLE R PULLE Y
BRACKE T BOL T
10 x 1.2 5 mm44 N- m (4. 5 kgf-m ,
3 3 Ibf-ft )
COMPRESSO R
BRACKET
10. I f necessary , remov e th e tw o othe r bolt s i n th e idle r
pulle y assembly .
IDLER PULLE Y
ASSEMBL Y
8 x 1.2 5 mm22 N- m (2. 2 kgf-m ,16 Ibf-ft )
11. Chec k th e idle r pulle y bearin g fo r pla y an d drag .
Replac e i t wit h a ne w on e i f it' s nois y o r ha s exces -
siv e pla y o r drag .
44 N- m (4. 5 kgf-m ,
3 3 Ibf-ft )
12. Instal l th e compresso r i n th e revers e orde r o f
removal ; and :
• I f you'r e installin g a ne w compressor , drai n al l
th e refrigeran t oi l ou t o f th e ol d compresso r an d
measur e it s volume . Subtrac t th e volum e o f ol d
oil fro m 16 0 ( 5 1/ 3 fl-oz , 5, 6 Imp-oz) ; th e resul t
i s th e amoun t o f oi l yo u shoul d drai n fro m th e
ne w compresso r (throug h th e suctio n fitting) .
• Replac e O-ring s wit h ne w one s a t eac h fitting ,
an d appl y refrigeran t oi l t o them .
NOTE : B e sur e t o us e th e righ t O-ring s fo r
R-134 a to avoi d leakage .
• Us e (ND-OI L 8 ) oi l fo r R-134 a DENS O pisto n typ e
compressor s only .
• D o no t retur n th e oi l t o th e containe r onc e
dispense d an d neve r mi x wit h othe r refrigeran t
oil s t o avoi d contamination .
• Immediatel y afte r usin g th e oil, replac e th e ca p
o n th e containe r an d sea l i t t o avoi d moistur e
absorption .
• D o no t spil l th e refrigeran t oi l o n th e vehicle ; i t
ma y damag e th e paint ; i f th e refrigeran t oi l con -
tact s th e paint , was h i t of f immediately .
13 . Adjus t th e compresso r bel t (se e pag e 22-88 ).
Afte r adjustin g th e belt , tighte n th e idle r pulle y
center nut .
The n tighte n th e adjustin g bol t securely .
14 . Charg e th e syste m (se e pag e 22-91 ).
15 . Tes t syste m performanc e (se e pag e 22-70 ).
ProCarManuals.com
Page 1222 of 1503
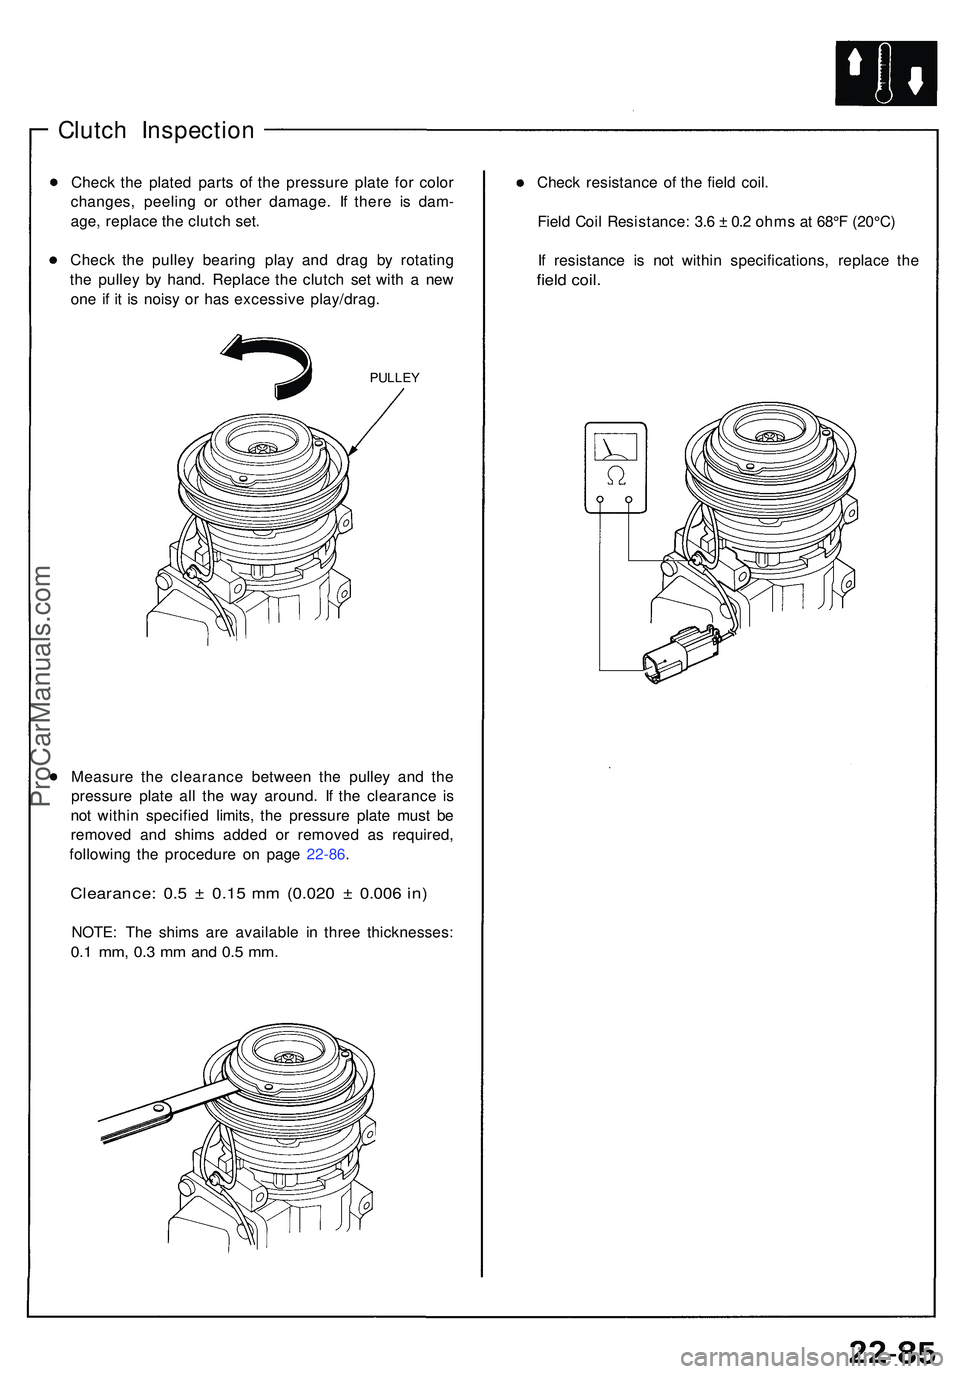
Clutch Inspectio n
Check th e plate d part s o f th e pressur e plat e fo r colo r
changes , peelin g o r othe r damage . I f ther e i s dam -
age , replac e th e clutc h set .
Chec k th e pulle y bearin g pla y an d dra g b y rotatin g
th e pulle y b y hand . Replac e th e clutc h se t wit h a ne w
on e i f i t i s nois y o r ha s excessiv e play/drag .
PULLEY
Measur e th e clearanc e betwee n th e pulle y an d th e
pressur e plat e al l th e wa y around . I f th e clearanc e i s
no t withi n specifie d limits , th e pressur e plat e mus t b e
remove d an d shim s adde d o r remove d a s required ,
followin g th e procedur e o n pag e 22-86 .
Clearance : 0. 5 ± 0.1 5 m m (0.02 0 ± 0.00 6 in )
NOTE : Th e shim s ar e availabl e i n thre e thicknesses :
0.1 mm , 0. 3 m m an d 0. 5 mm .
Chec k resistanc e o f th e fiel d coil .
Fiel d Coi l Resistance : 3. 6 ± 0. 2 ohm s a t 68° F (20°C )
I f resistanc e i s no t withi n specifications , replac e th e
field coil .
ProCarManuals.com
Page 1223 of 1503
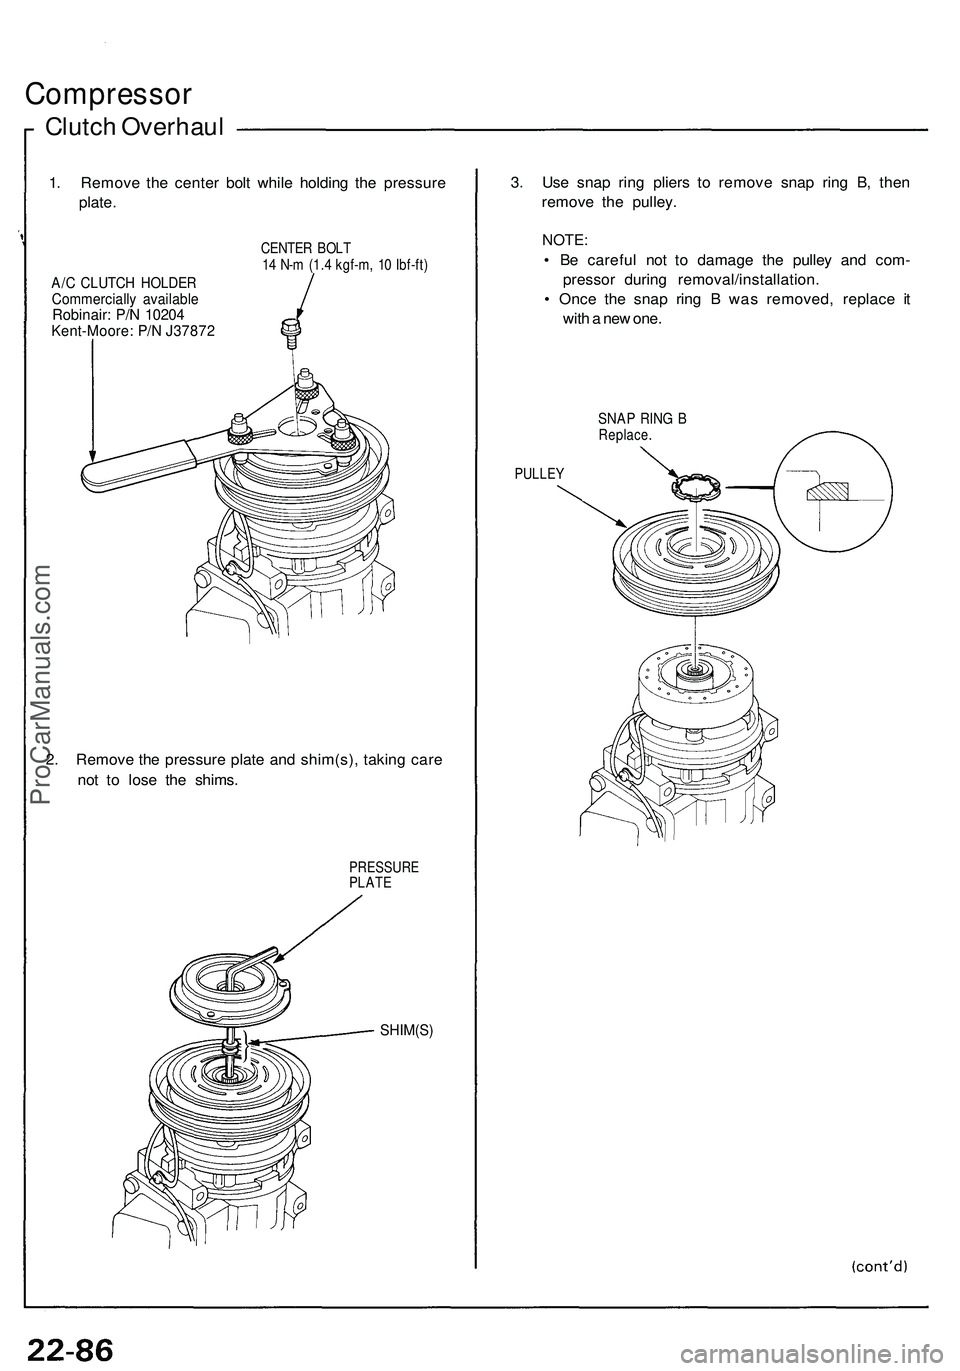
Compressor
Clutch Overhau l
1. Remov e th e cente r bol t whil e holdin g th e pressur e
plate .
CENTE R BOL T14 N- m (1. 4 kgf-m , 1 0 Ibf-ft )
A/C CLUTC H HOLDE RCommerciall y availabl eRobinair: P/ N 1020 4Kent-Moore : P/ N J3787 2
2. Remov e th e pressur e plat e an d shim(s) , takin g car e
no t t o los e th e shims .
PRESSUR EPLATE
SHIM(S )
3. Us e sna p rin g plier s t o remov e sna p rin g B , the n
remov e th e pulley .
NOTE:
• B e carefu l no t t o damag e th e pulle y an d com -
presso r durin g removal/installation .
• Onc e th e sna p rin g B wa s removed , replac e i t
wit h a ne w one .
SNA P RIN G BReplace .
PULLEY
ProCarManuals.com
Page 1224 of 1503
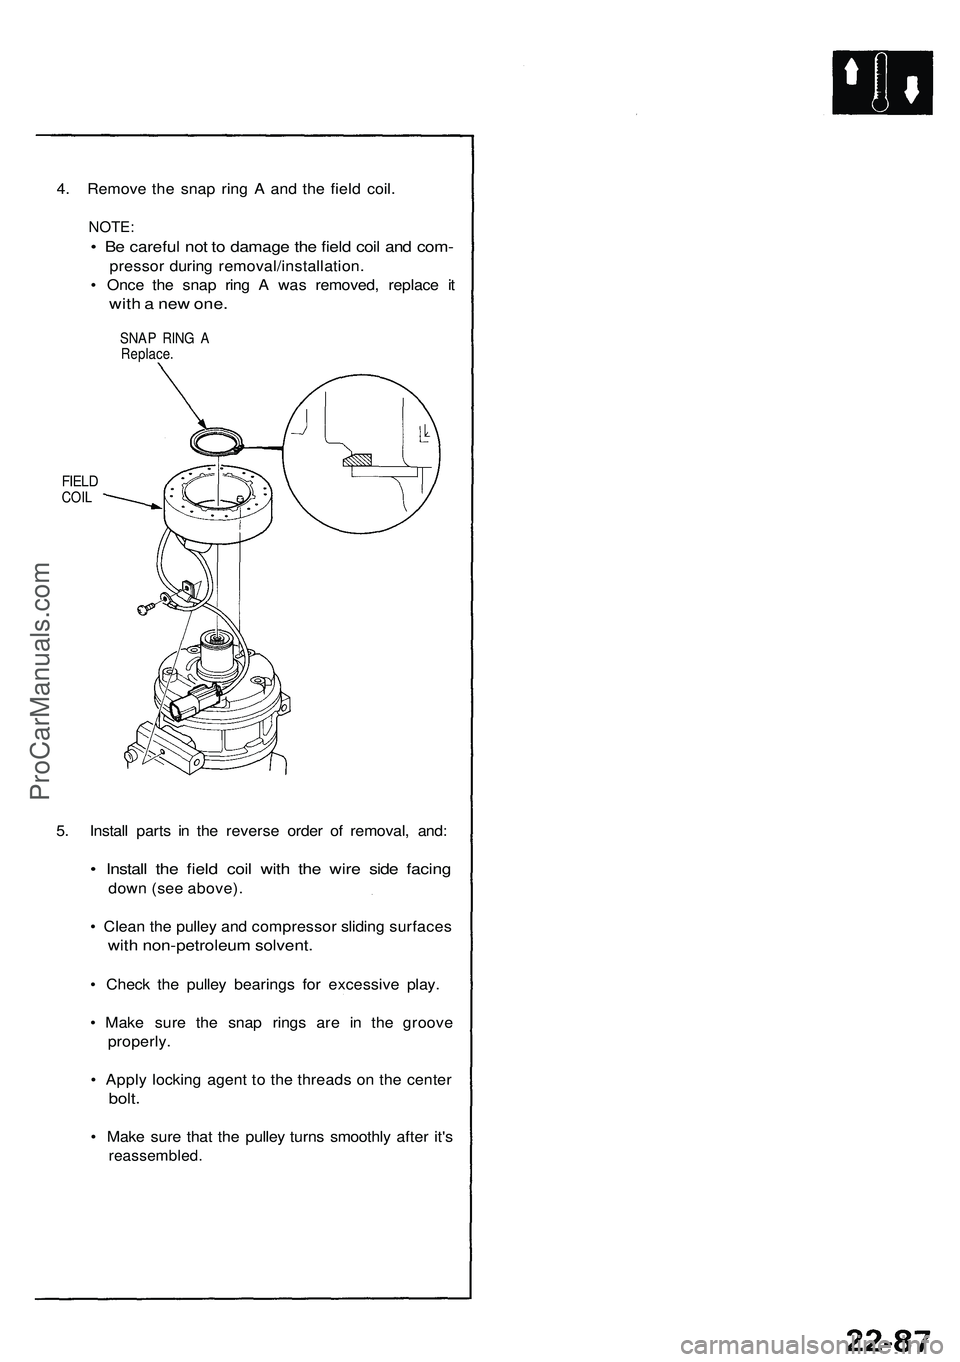
4. Remove the snap ring A and the field coil.
NOTE:
• Be careful not to damage the field coil and com-
pressor during removal/installation.
• Once the snap ring A was removed, replace it
with a new one.
SNAP RING A
Replace.
FIELD
COIL
5. Install parts in the reverse order of removal, and:
• Install the field coil with the wire side facing
down (see above).
• Clean the pulley and compressor sliding surfaces
with non-petroleum solvent.
• Check the pulley bearings for excessive play.
• Make sure the snap rings are in the groove
properly.
• Apply locking agent to the threads on the center
bolt.
• Make sure that the pulley turns smoothly after it's
reassembled.ProCarManuals.com
Page 1225 of 1503
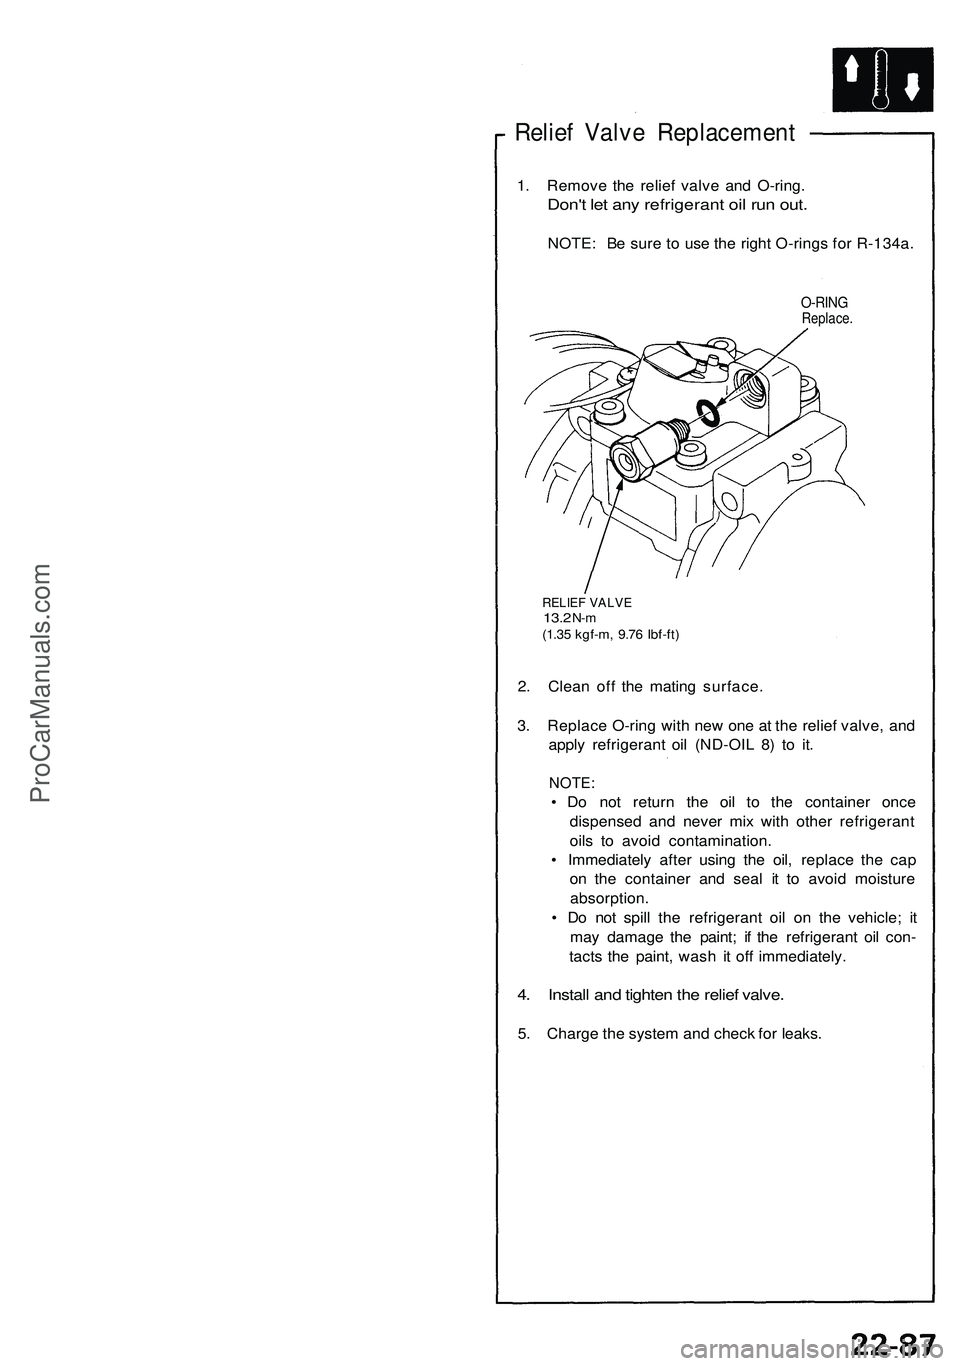
Relief Valve Replacement
1. Remove the relief valve and O-ring.
Don't let any refrigerant oil run out.
NOTE: Be sure to use the right O-rings for R-134a.
O-RING
Replace.
RELIEF VALVE
13.2
N-m
(1.35 kgf-m, 9.76 Ibf-ft)
2. Clean off the mating surface.
3. Replace O-ring with new one at the relief valve, and
apply refrigerant oil (ND-OIL 8) to it.
NOTE:
• Do not return the oil to the container once
dispensed and never mix with other refrigerant
oils to avoid contamination.
• Immediately after using the oil, replace the cap
on the container and seal it to avoid moisture
absorption.
• Do not spill the refrigerant oil on the vehicle; it
may damage the paint; if the refrigerant oil con-
tacts the paint, wash it off immediately.
4. Install and tighten the relief valve.
5. Charge the system and check for leaks.ProCarManuals.com
Page 1226 of 1503
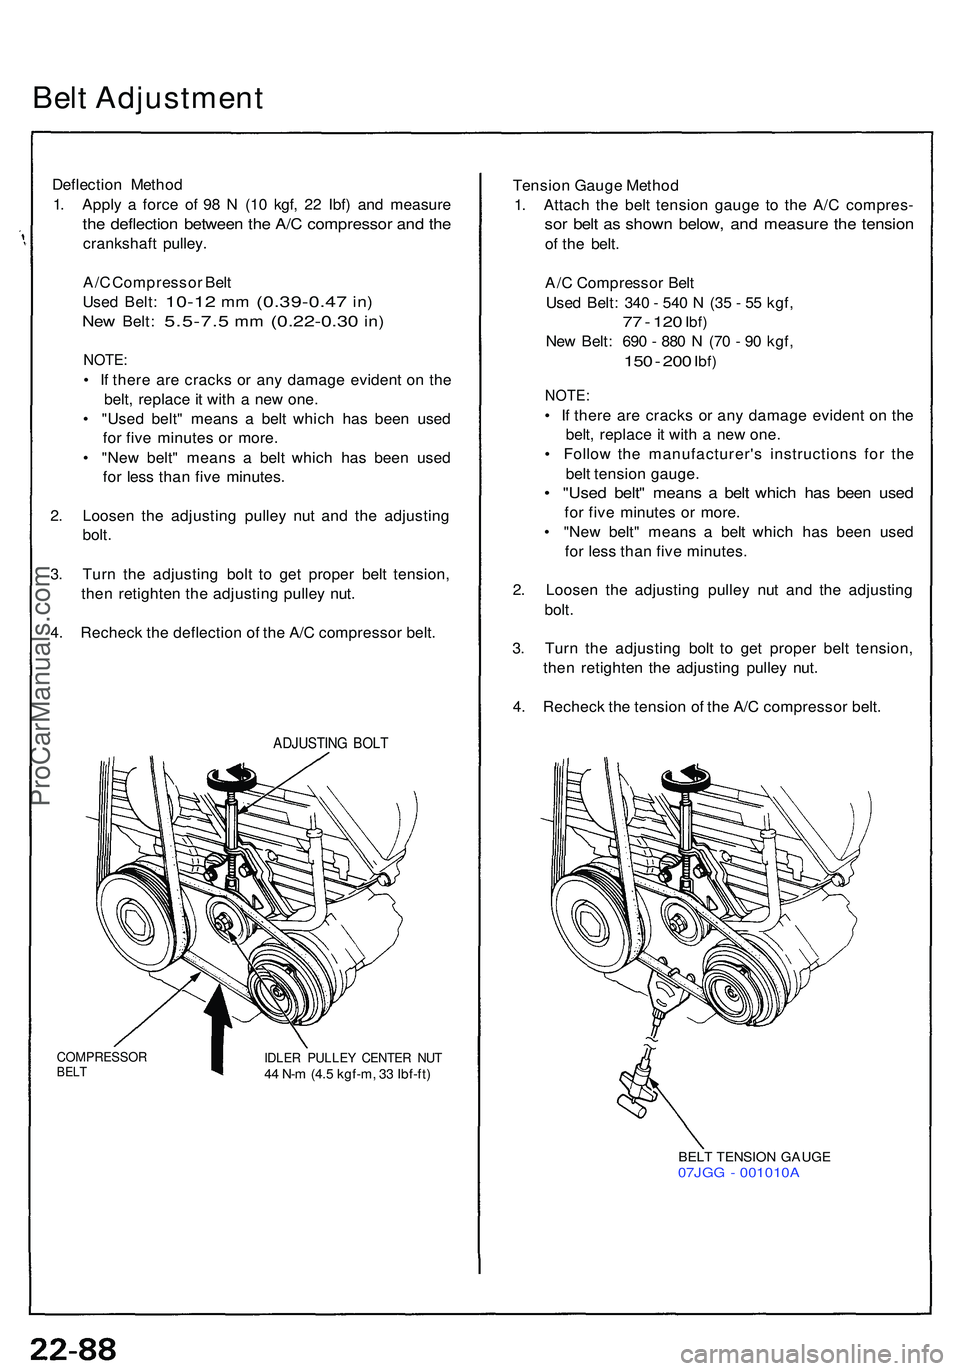
Belt Adjustmen t
Deflection Metho d
1 . Appl y a forc e o f 9 8 N (1 0 kgf , 2 2 Ibf ) an d measur e
the deflectio n betwee n th e A/ C compresso r an d th e
crankshaf t pulley .
A/ C Compresso r Bel t
Use d Belt :
10-1 2 mm (0.39-0.4 7 in)
Ne w Belt : 5.5-7. 5 mm (0.22-0.3 0 in)
NOTE :
• I f ther e ar e crack s o r an y damag e eviden t o n th e
belt , replac e it wit h a ne w one .
• "Use d belt " mean s a bel t whic h ha s bee n use d
fo r fiv e minute s o r more .
• "Ne w belt " mean s a bel t whic h ha s bee n use d
fo r les s tha n fiv e minutes .
2 . Loose n th e adjustin g pulle y nu t an d th e adjustin g
bolt .
3 . Tur n th e adjustin g bol t t o ge t prope r bel t tension ,
the n retighte n th e adjustin g pulle y nut .
4 . Rechec k th e deflectio n o f th e A/ C compresso r belt .
ADJUSTIN G BOL T
COMPRESSO RBELTIDLE R PULLE Y CENTE R NU T44 N- m (4. 5 kgf-m , 3 3 Ibf-ft )
Tensio n Gaug e Metho d
1 . Attac h th e bel t tensio n gaug e t o th e A/ C compres -
sor bel t a s show n below , an d measur e th e tensio n
of th e belt .
A/ C Compresso r Bel t
Use d Belt : 34 0 - 54 0 N (3 5 - 5 5 kgf ,
77 - 12 0 Ibf )
New Belt : 69 0 - 88 0 N (7 0 - 9 0 kgf ,
150 - 20 0 Ibf )
NOTE :
• I f ther e ar e crack s o r an y damag e eviden t o n th e
belt , replac e it wit h a ne w one .
• Follo w th e manufacturer' s instruction s fo r th e
bel t tensio n gauge .
• "Use d belt " mean s a bel t whic h ha s bee n use d
for fiv e minute s o r more .
• "Ne w belt " mean s a bel t whic h ha s bee n use d
fo r les s tha n fiv e minutes .
2 . Loose n th e adjustin g pulle y nu t an d th e adjustin g
bolt .
3 . Tur n th e adjustin g bol t t o ge t prope r bel t tension ,
the n retighte n th e adjustin g pulle y nut .
4 . Rechec k th e tensio n o f th e A/ C compresso r belt .
BELT TENSIO N GAUG E07JGG - 001010 A
ProCarManuals.com
Page 1227 of 1503
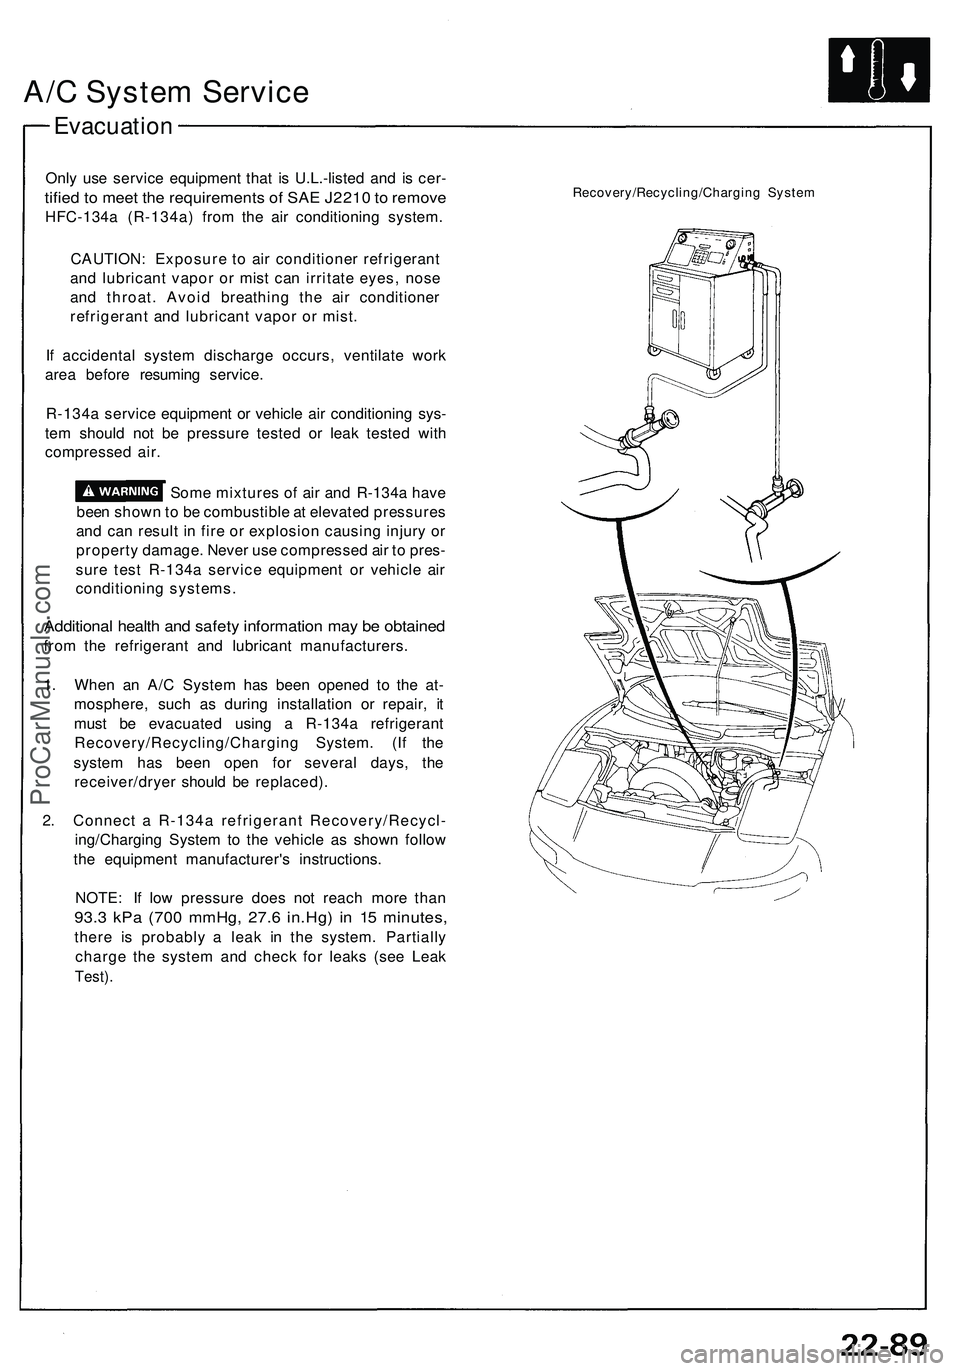
A/C System Service
Evacuation
Only use service equipment that is U.L.-listed and is cer-
tified to meet the requirements of SAE J2210 to remove
HFC-134a (R-134a) from the air conditioning system.
CAUTION: Exposure to air conditioner refrigerant
and lubricant vapor or mist can irritate eyes, nose
and throat. Avoid breathing the air conditioner
refrigerant and lubricant vapor or mist.
If accidental system discharge occurs, ventilate work
area before resuming service.
R-134a service equipment or vehicle air conditioning sys-
tem should not be pressure tested or leak tested with
compressed air.
Some mixtures of air and R-134a have
been shown to be combustible at elevated pressures
and can result in fire or explosion causing injury or
property damage. Never use compressed air to pres-
sure test R-134a service equipment or vehicle air
conditioning systems.
Additional health and safety information may be obtained
from the refrigerant and lubricant manufacturers.
1. When an A/C System has been opened to the at-
mosphere, such as during installation or repair, it
must be evacuated using a R-134a refrigerant
Recovery/Recycling/Charging System. (If the
system has been open for several days, the
receiver/dryer should be replaced).
2. Connect a R-134a refrigerant Recovery/Recycl-
ing/Charging System to the vehicle as shown follow
the equipment manufacturer's instructions.
NOTE: If low pressure does not reach more than
93.3 kPa (700 mmHg, 27.6 in.Hg) in 15 minutes,
there is probably a leak in the system. Partially
charge the system and check for leaks (see Leak
Test).
Recovery/Recycling/Charging SystemProCarManuals.com
Page 1228 of 1503
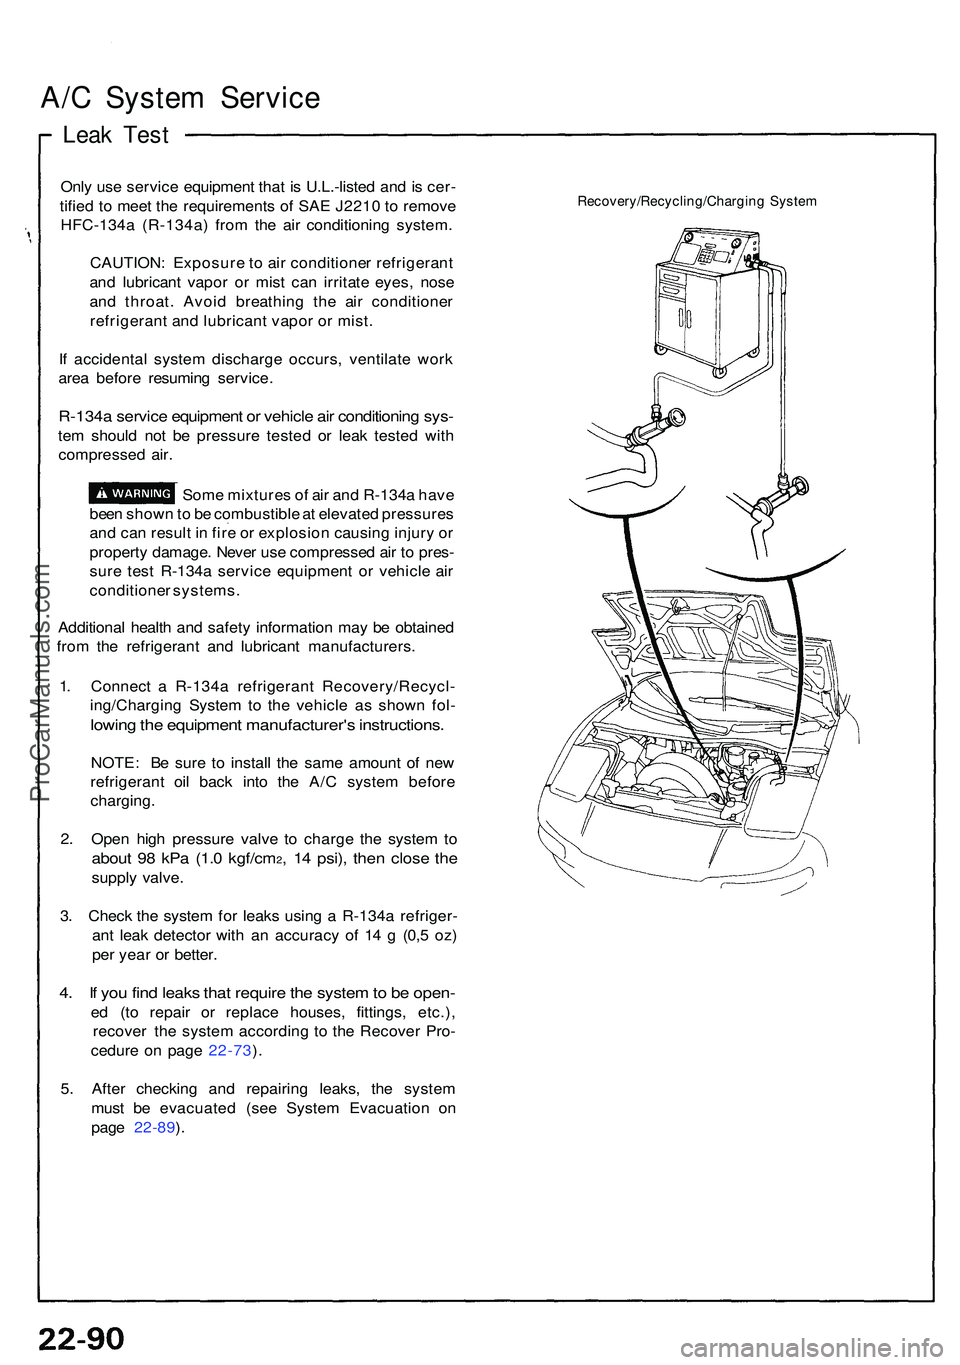
A/C Syste m Servic e
Leak Tes t
Only us e servic e equipmen t tha t i s U.L.-liste d an d is cer -
tifie d t o mee t th e requirement s o f SA E J221 0 t o remov e
HFC-134 a (R-134a ) fro m th e ai r conditionin g system .
CAUTION : Exposur e t o ai r conditione r refrigeran t
an d lubrican t vapo r o r mis t ca n irritat e eyes , nos e
an d throat . Avoi d breathin g th e ai r conditione r
refrigeran t an d lubrican t vapo r o r mist .
I f accidenta l syste m discharg e occurs , ventilat e wor k
are a befor e resumin g service .
R-134a servic e equipmen t o r vehicl e ai r conditionin g sys -
tem shoul d no t b e pressur e teste d o r lea k teste d wit h
compresse d air .
Som e mixture s o f ai r an d R-134 a hav e
bee n show n to b e combustibl e a t elevate d pressure s
an d ca n resul t i n fir e o r explosio n causin g injur y o r
propert y damage . Neve r us e compresse d ai r t o pres -
sur e tes t R-134 a servic e equipmen t o r vehicl e ai r
conditione r systems.
Additiona l healt h an d safet y informatio n ma y b e obtaine d
fro m th e refrigeran t an d lubrican t manufacturers .
1 . Connec t a R-134 a refrigeran t Recovery/Recycl -
ing/Chargin g Syste m to th e vehicl e a s show n fol -
lowin g th e equipmen t manufacturer' s instructions .
NOTE: B e sur e t o instal l th e sam e amoun t o f ne w
refrigeran t oi l bac k int o th e A/ C syste m befor e
charging .
2 . Ope n hig h pressur e valv e t o charg e th e syste m to
abou t 9 8 kP a (1. 0 kgf/cm2, 1 4 psi) , the n clos e th e
suppl y valve .
3 . Chec k th e syste m fo r leak s usin g a R-134 a refriger -
an t lea k detecto r wit h a n accurac y o f 1 4 g (0, 5 oz )
pe r yea r o r better .
4. I f yo u fin d leak s tha t requir e th e syste m to b e open -
ed (t o repai r o r replac e houses , fittings , etc.) ,
recove r th e syste m accordin g t o th e Recove r Pro -
cedur e o n pag e 22-73 ).
5 . Afte r checkin g an d repairin g leaks , th e syste m
mus t b e evacuate d (se e Syste m Evacuatio n o n
pag e 22-89 ).
Recovery/Recycling/Chargin g Syste m
ProCarManuals.com
Page 1229 of 1503
Charging
Only use service equipment that is U.L.-listed and is
certified to meet the requirements of SAE J2210 to
remove HFC-134a (R-134a) from the air conditioner
system.
CAUTION: Exposure to air conditioner refrigerant
and lubricant vapor or mist can irritate eyes, nose
and throat. Avoid breathing the air conditioner
refrigerant and lubricant vapor or mist.
If accidental system discharge occurs, ventilate work
area before resuming service. Additional health and safe-
ty information may be obtained from the refrigerant and
lubricant manufacturers.
Refrigerant capacity: 850
CAUTION: Do not overcharge the system; the
compressor will be damaged.
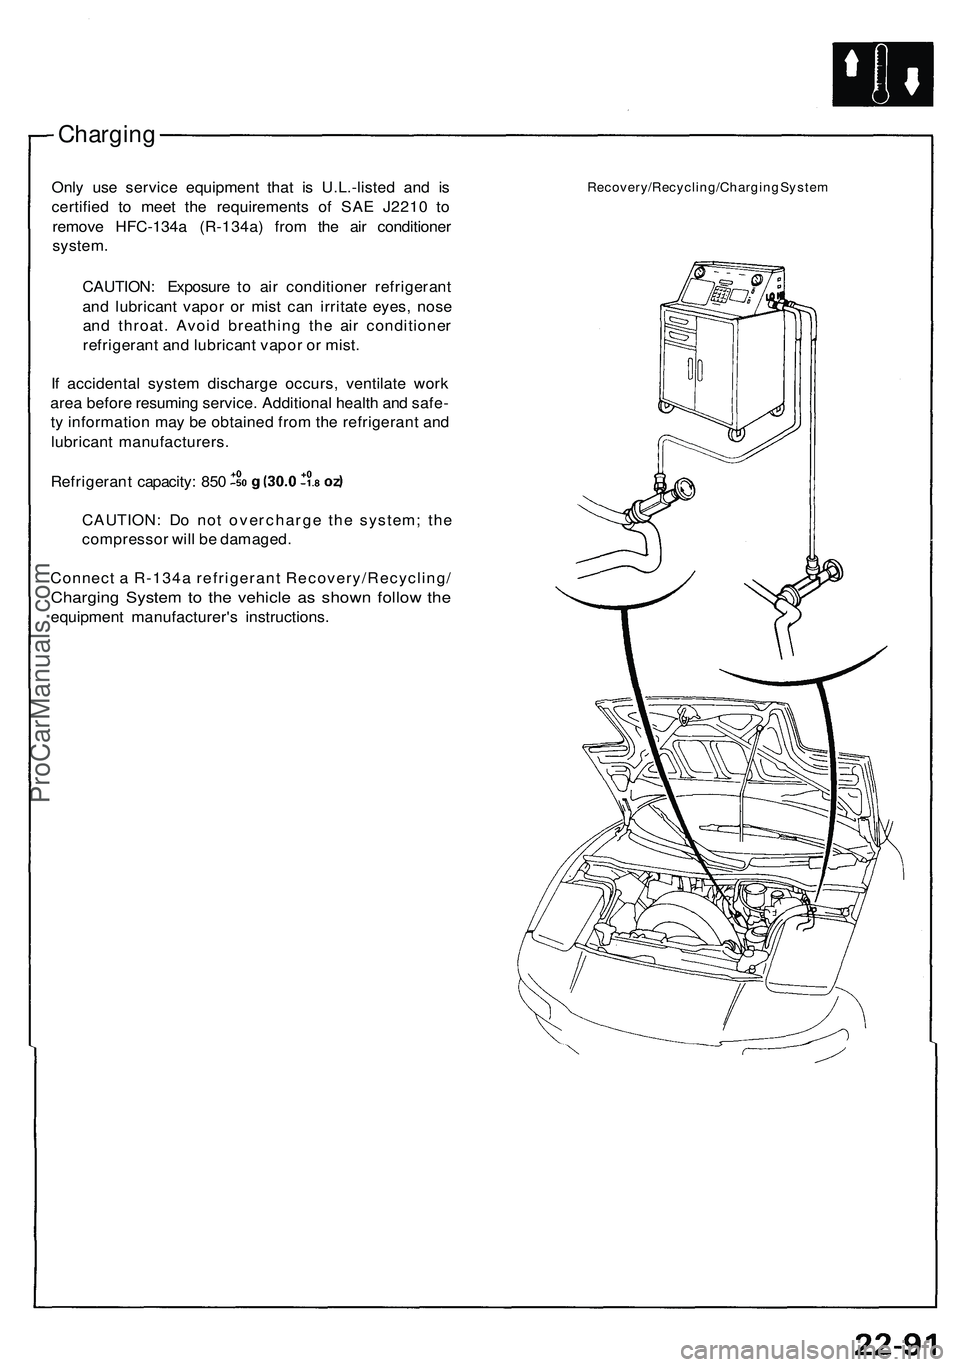
Connect a R-134a refrigerant Recovery/Recycling/
Charging System to the vehicle as shown follow the
equipment manufacturer's instructions.
Recovery/Recycling/Charging SystemProCarManuals.com
Page 1230 of 1503
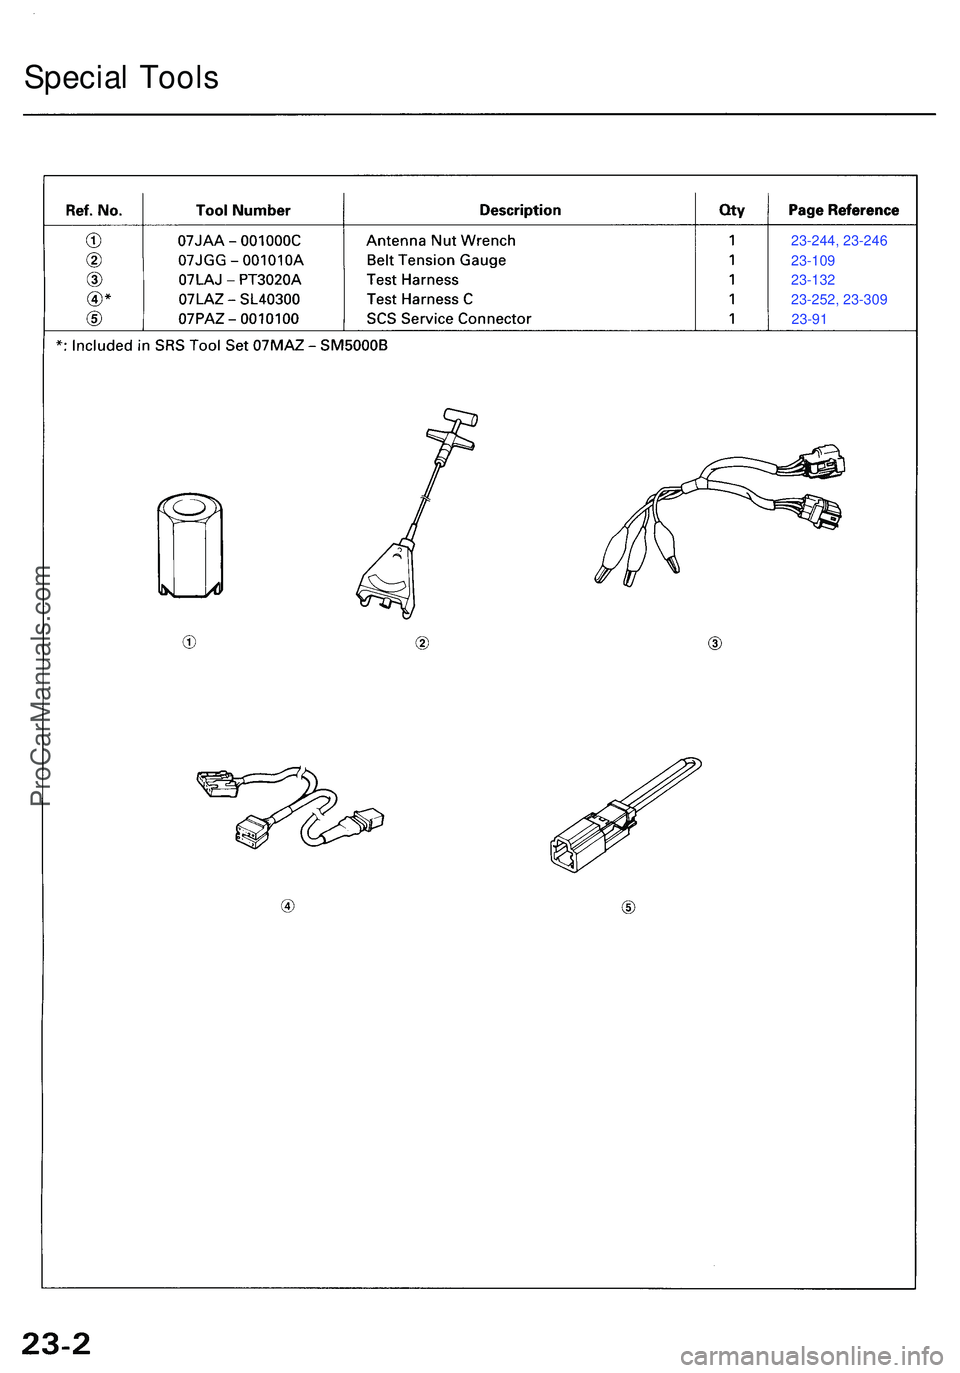
Special Tool s
23-244, 23-246
23-109
23-132
23-252, 23-309
23-91
ProCarManuals.com