ACURA NSX 1997 Service Repair Manual
Manufacturer: ACURA, Model Year: 1997, Model line: NSX, Model: ACURA NSX 1997Pages: 1503, PDF Size: 57.08 MB
Page 1151 of 1503
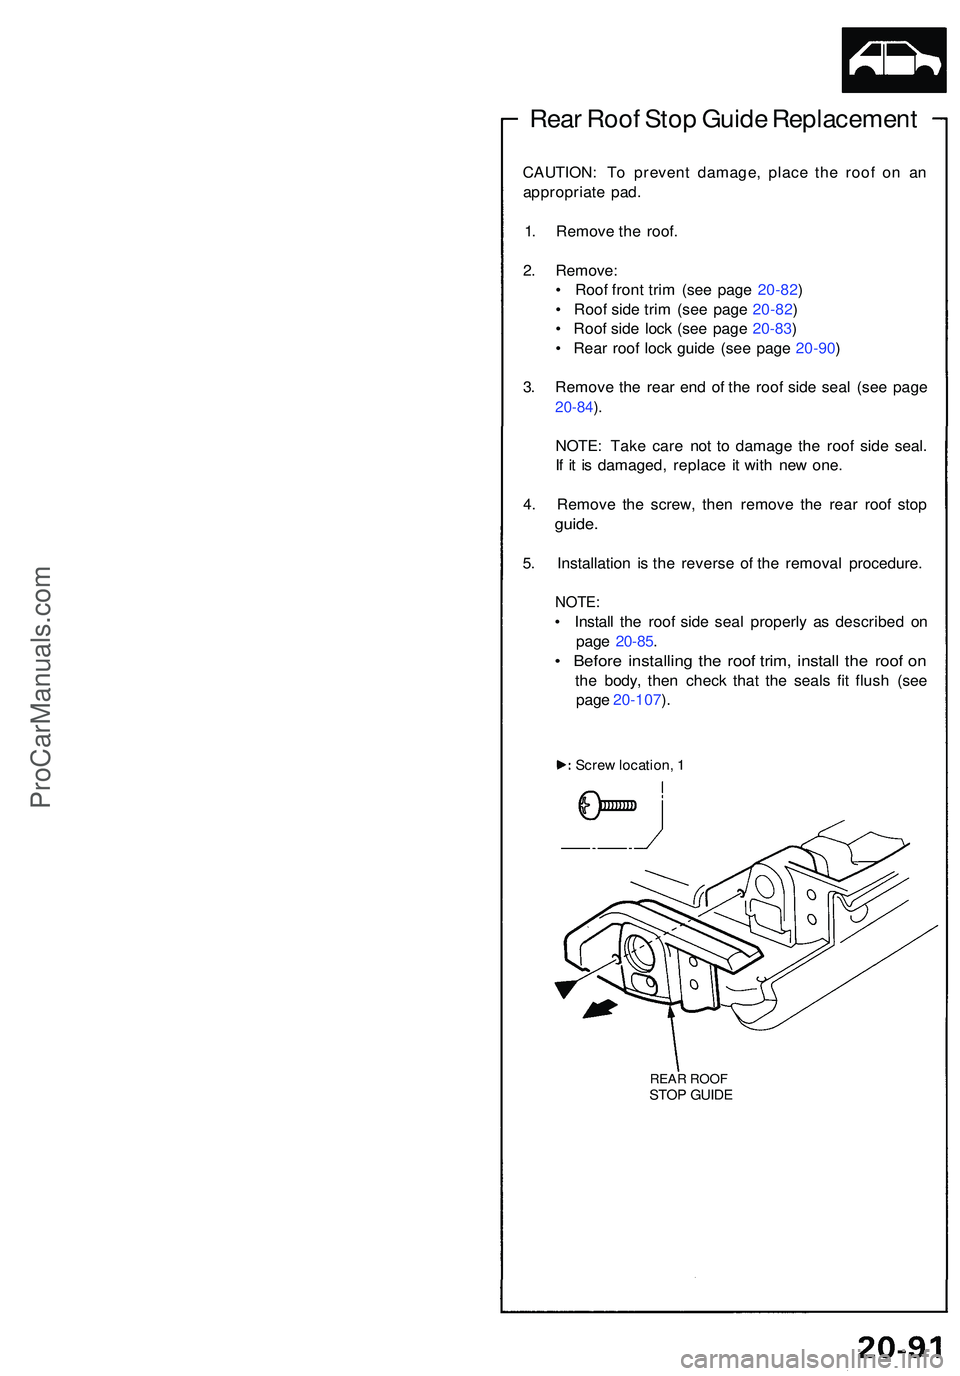
Rear Roo f Sto p Guid e Replacemen t
CAUTION: T o preven t damage , plac e th e roo f o n a n
appropriat e pad .
1 . Remov e th e roof .
2 . Remove :
• Roo f fron t tri m (se e pag e 20-82 )
• Roo f sid e tri m (se e pag e 20-82 )
• Roo f sid e loc k (se e pag e 20-83 )
• Rea r roo f loc k guid e (se e pag e 20-90 )
3 . Remov e th e rea r en d o f th e roo f sid e sea l (se e pag e
20-84 ).
NOTE : Tak e car e no t t o damag e th e roo f sid e seal .
I f i t i s damaged , replac e i t wit h ne w one .
4 . Remov e th e screw , the n remov e th e rea r roo f sto p
guide .
5. Installatio n i s th e revers e of the remova l procedure .
NOTE:
• Instal l th e roo f sid e sea l properl y a s describe d o n
pag e 20-85 .
• Befor e installin g th e roo f trim , instal l th e roo f o n
the body , the n chec k tha t th e seal s fi t flus h (se e
pag e 20-107 ).
Scre w location , 1
REA R ROO FSTOP GUID E
ProCarManuals.com
Page 1152 of 1503
Roof
Lock Receiver s Replacemen t
1. Remov e th e roof .
2. Remov e th e fron t an d rea r roo f rai l tri m (se e pag e
20-79 ).
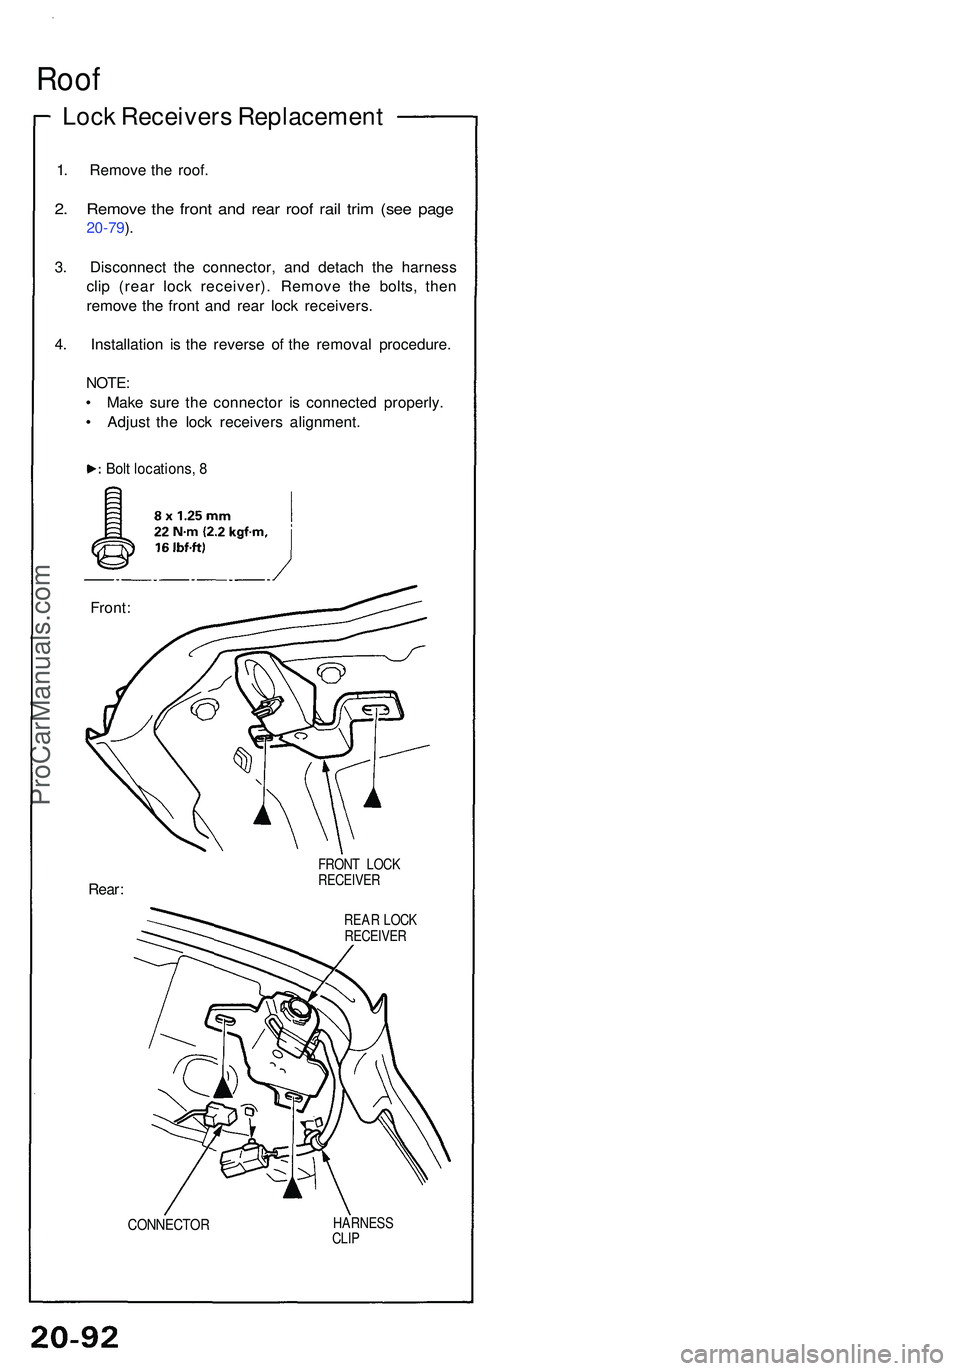
3 . Disconnec t th e connector , an d detac h th e harnes s
cli p (rea r loc k receiver) . Remov e th e bolts , the n
remov e th e fron t an d rea r loc k receivers .
4 . Installatio n i s th e revers e o f th e remova l procedure .
NOTE :
• Mak e sur e th e connecto r i s connecte d properly .
• Adjus t th e loc k receiver s alignment .
Front :
Rear :
FRON T LOC K
RECEIVE R
REA R LOC K
RECEIVE R
CONNECTO R HARNES
S
CLI P
Bolt locations , 8
ProCarManuals.com
Page 1153 of 1503
Roof
- Loc k Receiver s Adjustmen t
NOTE: Thi s adjustmen t shoul d b e don e i n th e followin g
orde r afte r removin g o r replacin g th e loc k receiver .
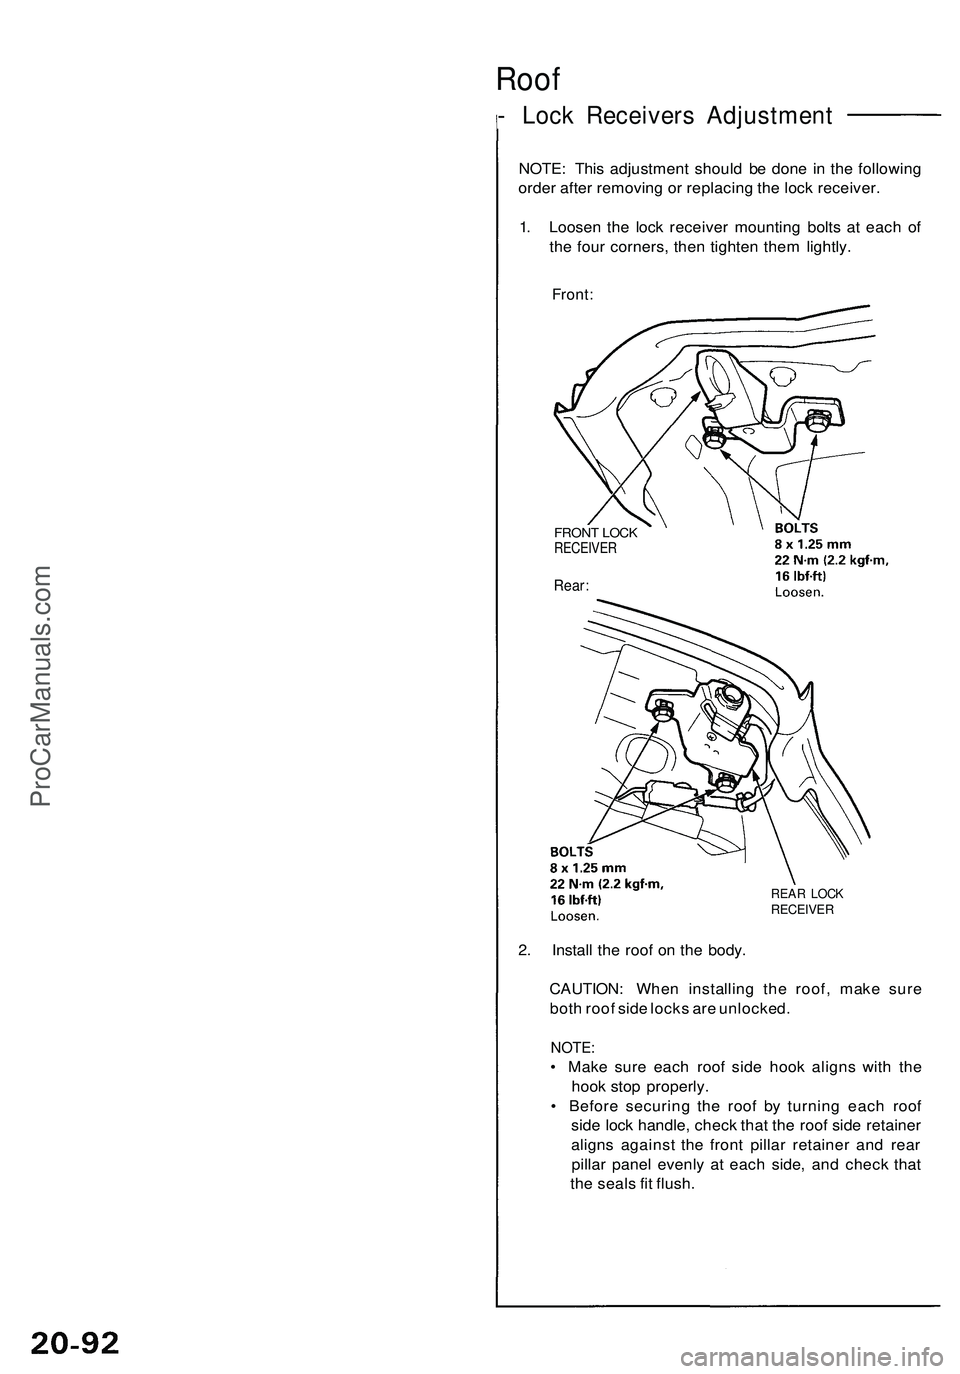
1 . Loose n th e loc k receive r mountin g bolt s a t eac h o f
th e fou r corners , the n tighte n the m lightly .
Front:
FRON T LOC KRECEIVE R
Rear:
2. Instal l th e roo f o n th e body .
REAR LOC KRECEIVE R
CAUTION : Whe n installin g th e roof , mak e sur e
bot h roo f sid e lock s ar e unlocked .
NOTE:
• Mak e sur e eac h roo f sid e hoo k align s wit h th e
hoo k sto p properly .
• Befor e securin g th e roo f b y turnin g eac h roo f
sid e loc k handle , chec k tha t th e roo f sid e retaine r
align s agains t th e fron t pilla r retaine r an d rea r
pilla r pane l evenl y a t eac h side , an d chec k tha t
th e seal s fi t flush .
ProCarManuals.com
Page 1154 of 1503
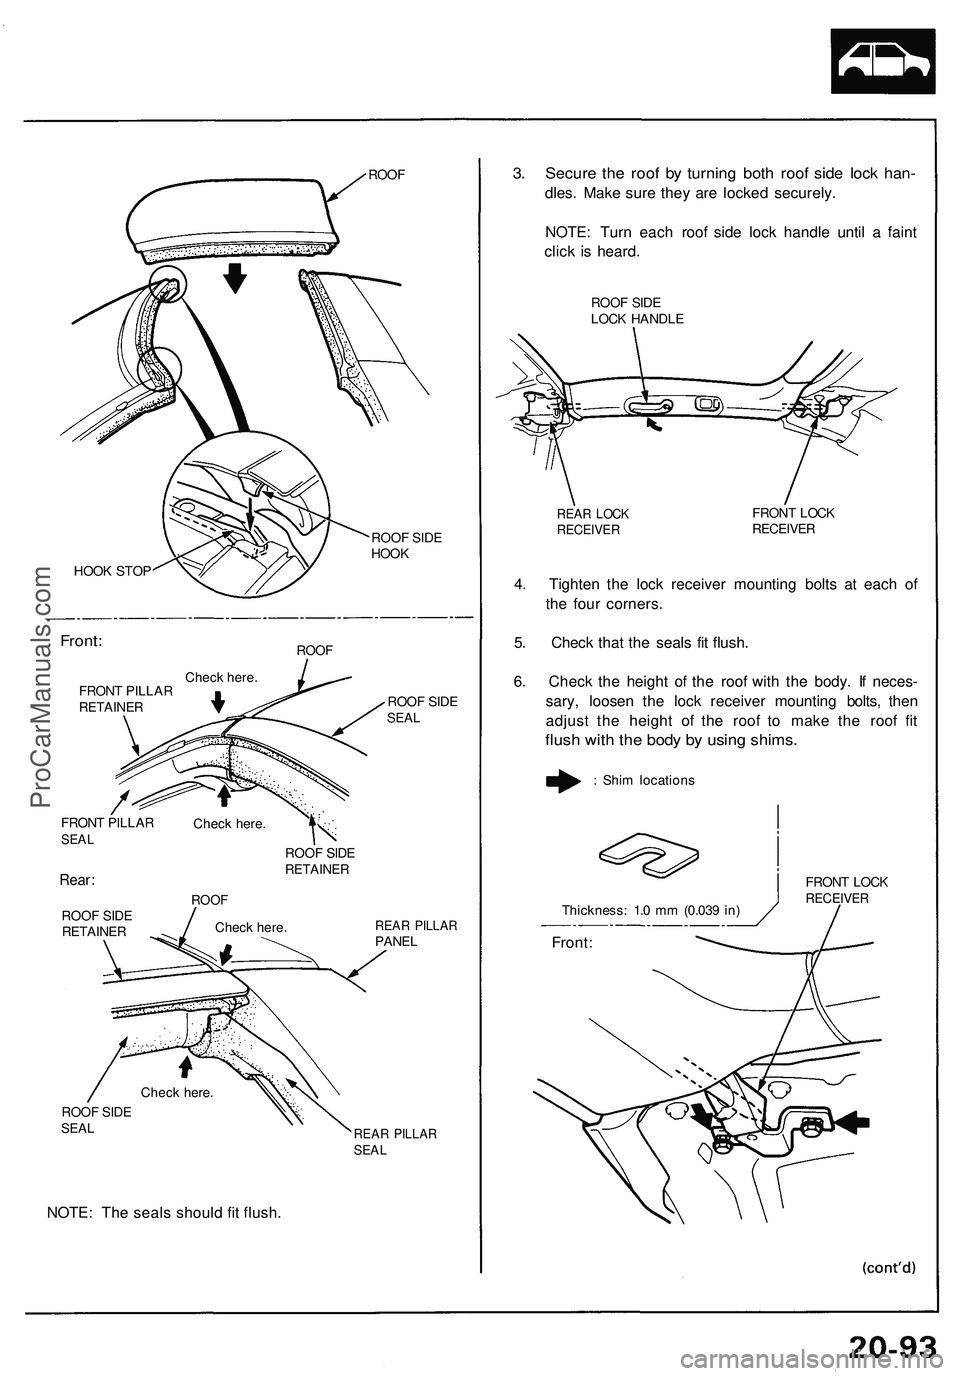
ROOF
ROO F SID E
HOO K
HOO K STO P
Front :ROOF
ROOF SID ESEA L
FRON T PILLA RSEAL
Rear :
ROO F SID ERETAINE R
ROOF SID ERETAINE R
ROOF
Chec k here .REAR PILLA RPANEL
ROOF SID ESEA L
NOTE : Th e seal s shoul d fi t flush .
REAR PILLA RSEAL
3. Secur e th e roo f b y turnin g bot h roo f sid e loc k han -
dles. Mak e sur e the y ar e locke d securely .
NOTE : Tur n eac h roo f sid e loc k handl e unti l a fain t
clic k i s heard .
ROOF SID E
LOC K HANDL E
REAR LOC KRECEIVE RFRONT LOC KRECEIVE R
4. Tighte n th e loc k receive r mountin g bolt s a t eac h o f
th e fou r corners .
5 . Chec k tha t th e seal s fi t flush .
6 . Chec k th e heigh t o f th e roo f wit h th e body . I f neces -
sary , loose n th e loc k receive r mountin g bolts , the n
adjus t th e heigh t of the roo f t o mak e th e roo f fi t
flus h wit h th e bod y b y usin g shims .
FRONT LOC KRECEIVE R
FRONT PILLA RRETAINE R
Check here .
Chec k here .
Chec k here .
Front :
Thickness : 1. 0 m m (0.03 9 in )
:
Shi m location s
ProCarManuals.com
Page 1155 of 1503
Roof
Lock Receiver s Adjustmen t
(cont'd )
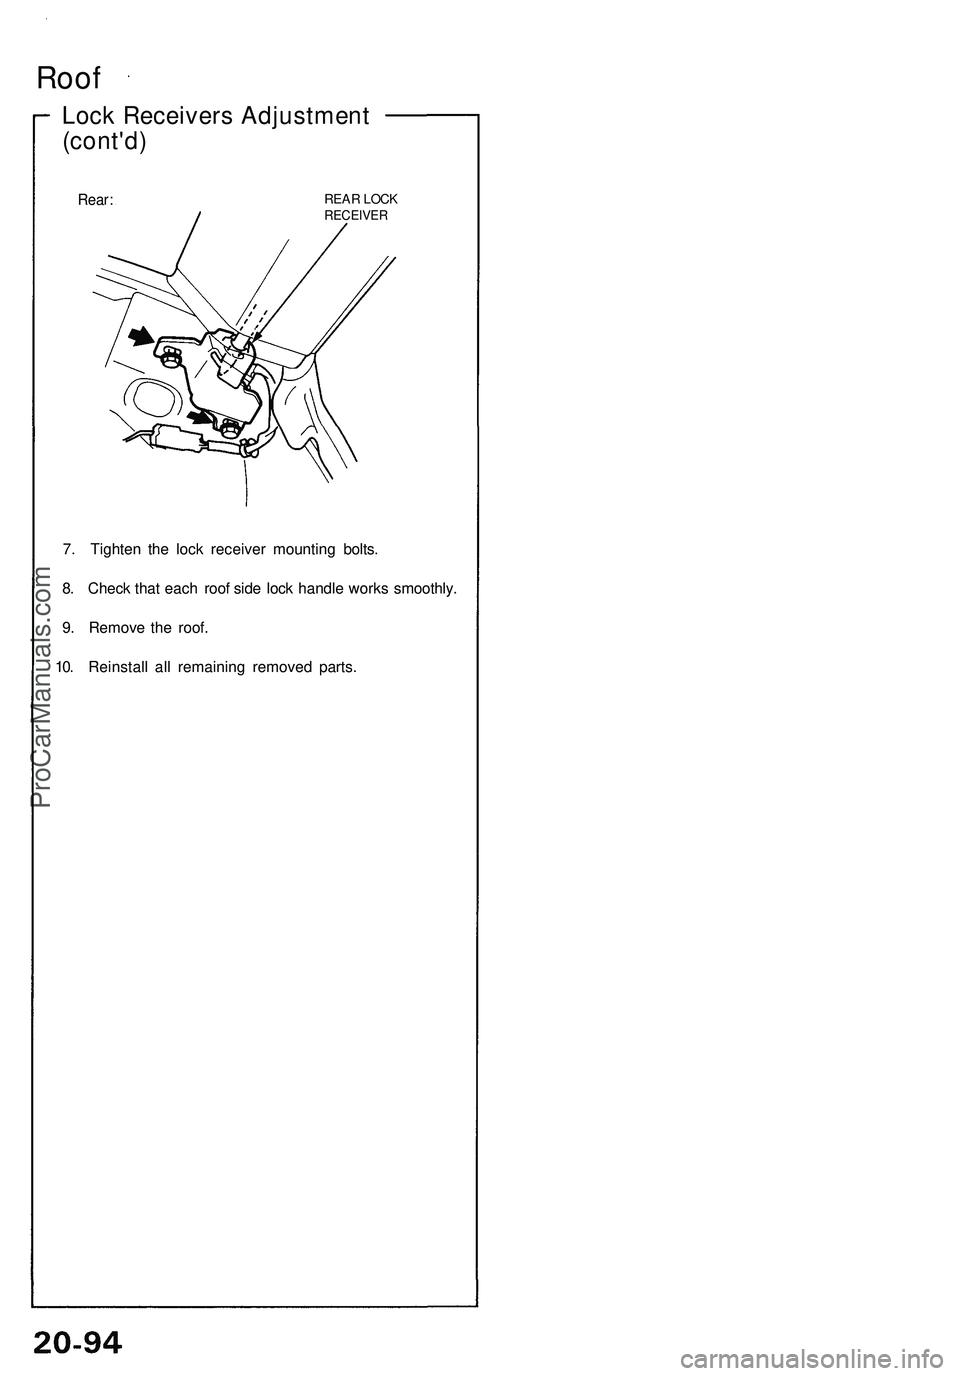
Rear: REA R LOC KRECEIVE R
7. Tighte n th e loc k receive r mountin g bolts .
8 . Chec k tha t eac h roo f sid e loc k handl e work s smoothly .
9 . Remov e th e roof .
10 . Reinstal l al l remainin g remove d parts .
ProCarManuals.com
Page 1156 of 1503
Front Pilla r Seal/Retaine r
Replacement
NOTE:
• Whe n th e fron t pilla r sea l ha s bee n removed , an d o r
i t i s damaged , replac e i t wit h ne w one .
• Hav e a n assistan t hel p replac e th e fron t pilla r seal .
1 . Remov e th e roof .
2 . Remov e th e fron t roo f rai l tri m (se e pag e 20-79 ).
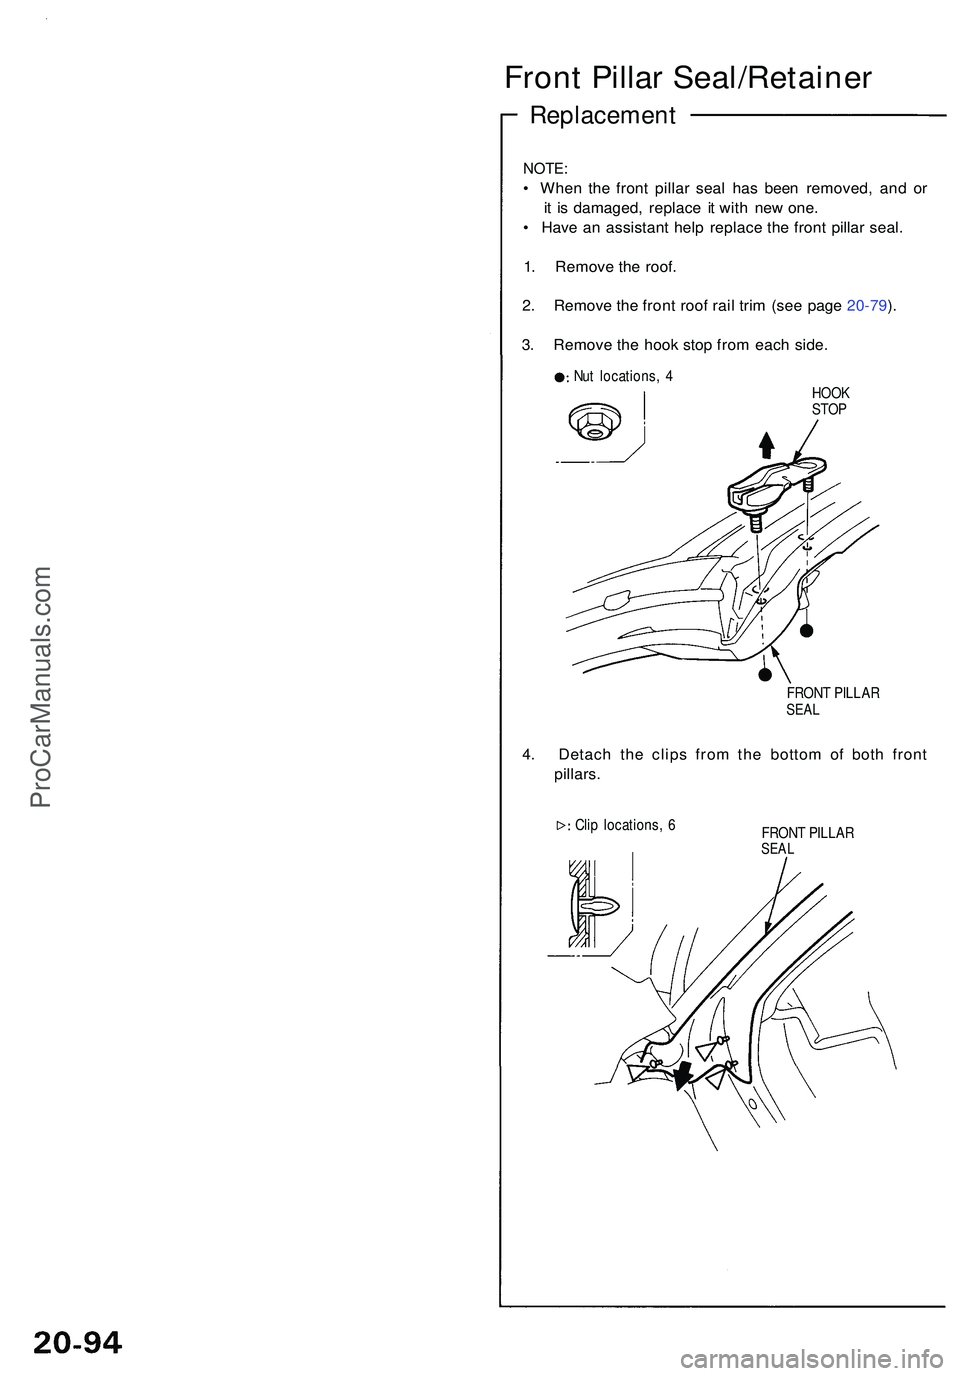
3 . Remov e th e hoo k sto p fro m eac h side .
Nut locations , 4
HOOK
STO P
FRON T PILLA R
SEAL
4. Detac h th e clip s fro m th e botto m o f bot h fron t
pillars .
Clip locations , 6
FRONT PILLA R
SEAL
ProCarManuals.com
Page 1157 of 1503
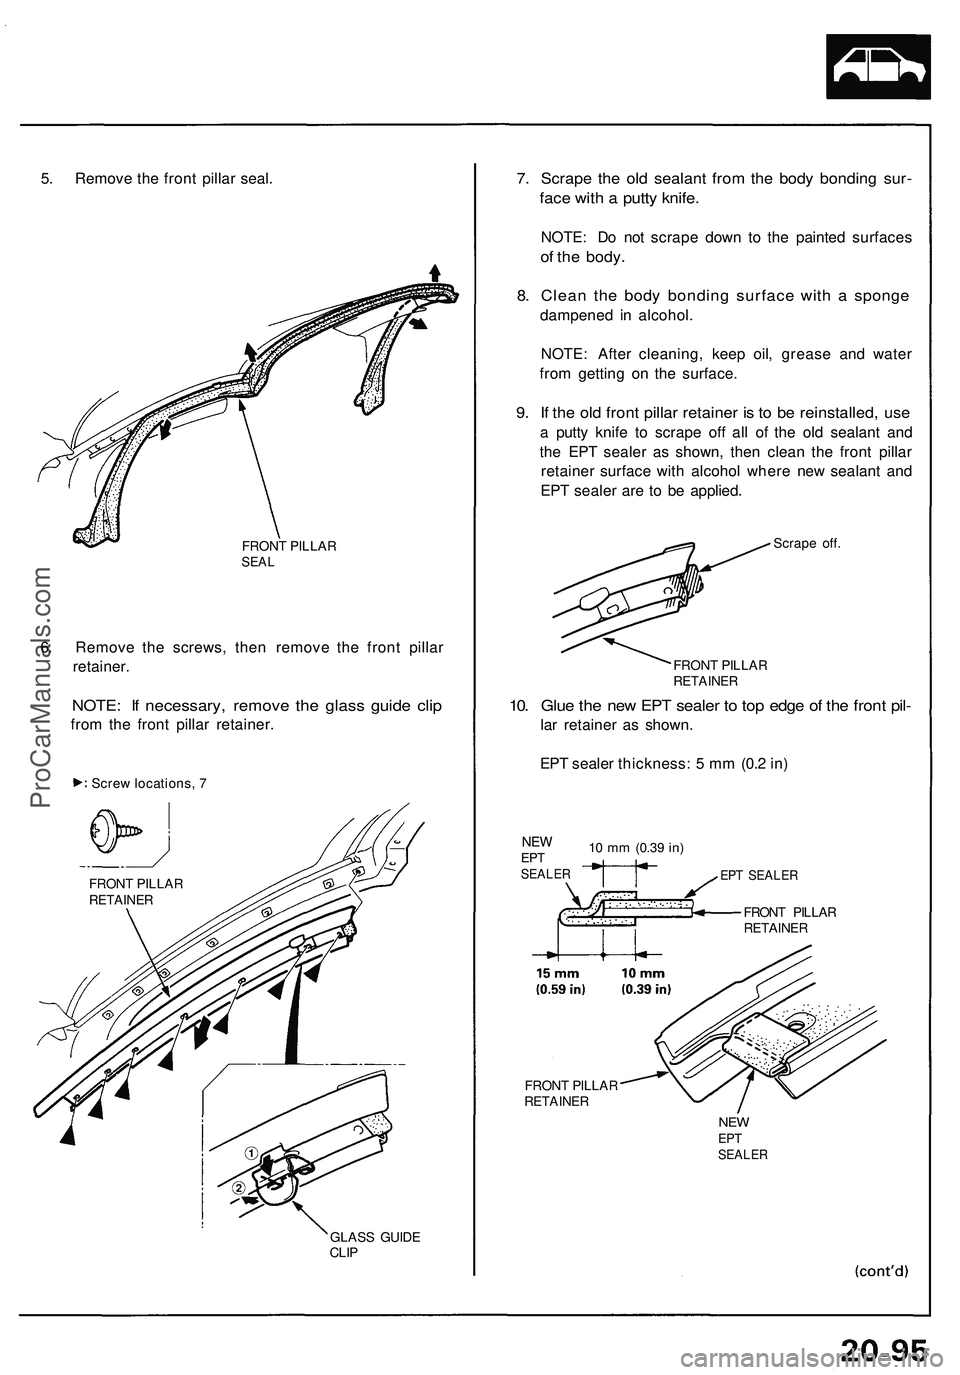
5. Remov e th e fron t pilla r seal .
FRON T PILLA RSEAL
6. Remov e th e screws , the n remov e th e fron t pilla r
retainer .
NOTE: I f necessary , remov e th e glas s guid e cli p
from th e fron t pilla r retainer .
Screw locations , 7
GLASS GUID E
CLIP
7. Scrap e th e ol d sealan t fro m th e bod y bondin g sur -
face wit h a putt y knife .
NOTE : D o no t scrap e dow n t o th e painte d surface s
of th e body .
8. Clea n th e bod y bondin g surfac e wit h a spong e
dampene d i n alcohol .
NOTE : Afte r cleaning , kee p oil , greas e an d wate r
fro m gettin g o n th e surface .
9. I f th e ol d fron t pilla r retaine r i s t o b e reinstalled , us e
a putt y knif e t o scrap e of f al l o f th e ol d sealan t an d
th e EP T seale r a s shown , the n clea n th e fron t pilla r
retaine r surfac e wit h alcoho l wher e ne w sealan t an d
EP T seale r ar e t o b e applied .
Scrape off .
FRON T PILLA R
RETAINE R
10. Glu e th e ne w EP T seale r t o to p edg e o f th e fron t pil -
lar retaine r a s shown .
EP T seale r thickness : 5 m m (0. 2 in )
10 m m (0.3 9 in)
EP T SEALE R
FRONT PILLA RRETAINE R
FRONT PILLA RRETAINE R
FRONT PILLA RRETAINE R
NEWEPTSEALE R
NEWEPTSEALE R
ProCarManuals.com
Page 1158 of 1503
Front Pilla r Seal/Retaine r
Replacement (cont'd )
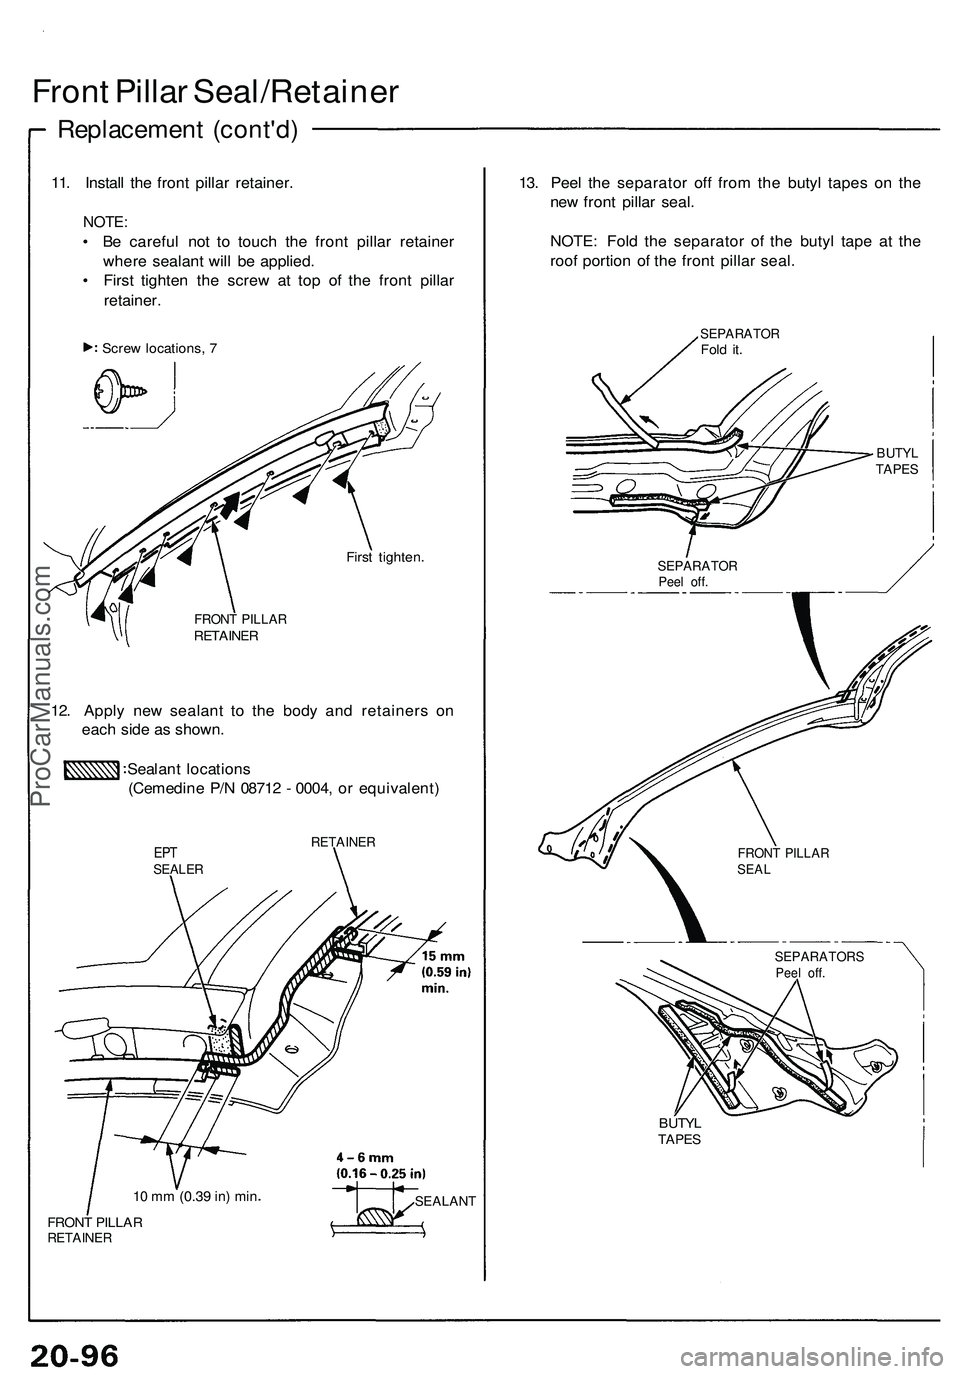
11. Instal l th e fron t pilla r retainer .
NOTE:
• B e carefu l no t t o touc h th e fron t pilla r retaine r
wher e sealan t wil l b e applied .
• Firs t tighte n th e scre w a t to p o f th e fron t pilla r
retainer .
First tighten .
FRONT PILLA RRETAINE R
12. Appl y ne w sealan t t o th e bod y an d retainer s o n
eac h sid e a s shown .
Sealan t location s
(Cemedin e P/ N 0871 2 - 0004 , o r equivalent )
EPTSEALE R
RETAINE R
10 m m (0.3 9 in) mi n
FRON T PILLA RRETAINE R
13. Pee l th e separato r of f fro m th e buty l tape s o n th e
ne w fron t pilla r seal .
NOTE : Fol d th e separato r of the buty l tap e a t th e
roo f portio n o f th e fron t pilla r seal .
SEPARATO RFold it .
BUTY LTAPES
Screw locations , 7
SEALAN T
SEPARATOR SPeel off .
FRON T PILLA RSEAL
SEPARATO RPeel off .
BUTY LTAPES
ProCarManuals.com
Page 1159 of 1503
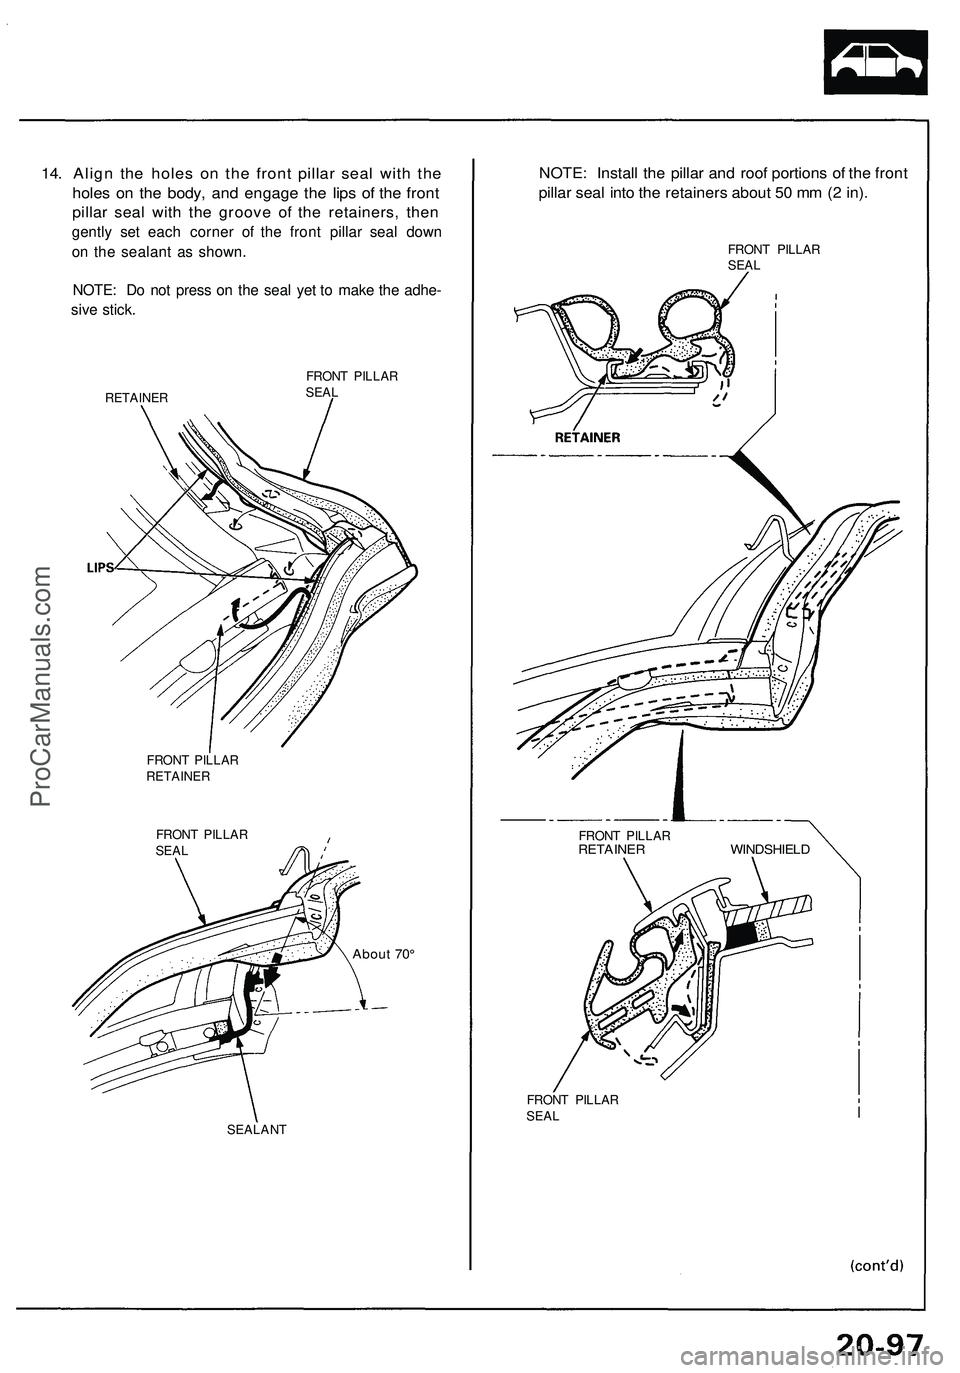
14. Alig n th e hole s o n th e fron t pilla r sea l wit h th e
hole s o n th e body , an d engag e th e lip s o f th e fron t
pillar sea l wit h th e groov e o f th e retainers , the n
gentl y se t eac h corne r o f th e fron t pilla r sea l dow n
o n th e sealan t a s shown .
NOTE : D o no t pres s o n th e sea l ye t t o mak e th e adhe -
siv e stick .
RETAINE R FRON
T PILLA R
SEA L
FRON T PILLA R
RETAINE R
FRON T PILLA R
SEA L
Abou t 70 °
SEALAN T
NOTE: Instal l th e pilla r an d roo f portion s o f th e fron t
pillar sea l int o th e retainer s abou t 5 0 m m (2 in) .
FRON T PILLA R
SEA L
FRON T PILLA R
RETAINE R WINDSHIEL D
FRONT PILLA R
SEA L
ProCarManuals.com
Page 1160 of 1503
Front Pilla r Seal/Retaine r
Replacement (cont'd )
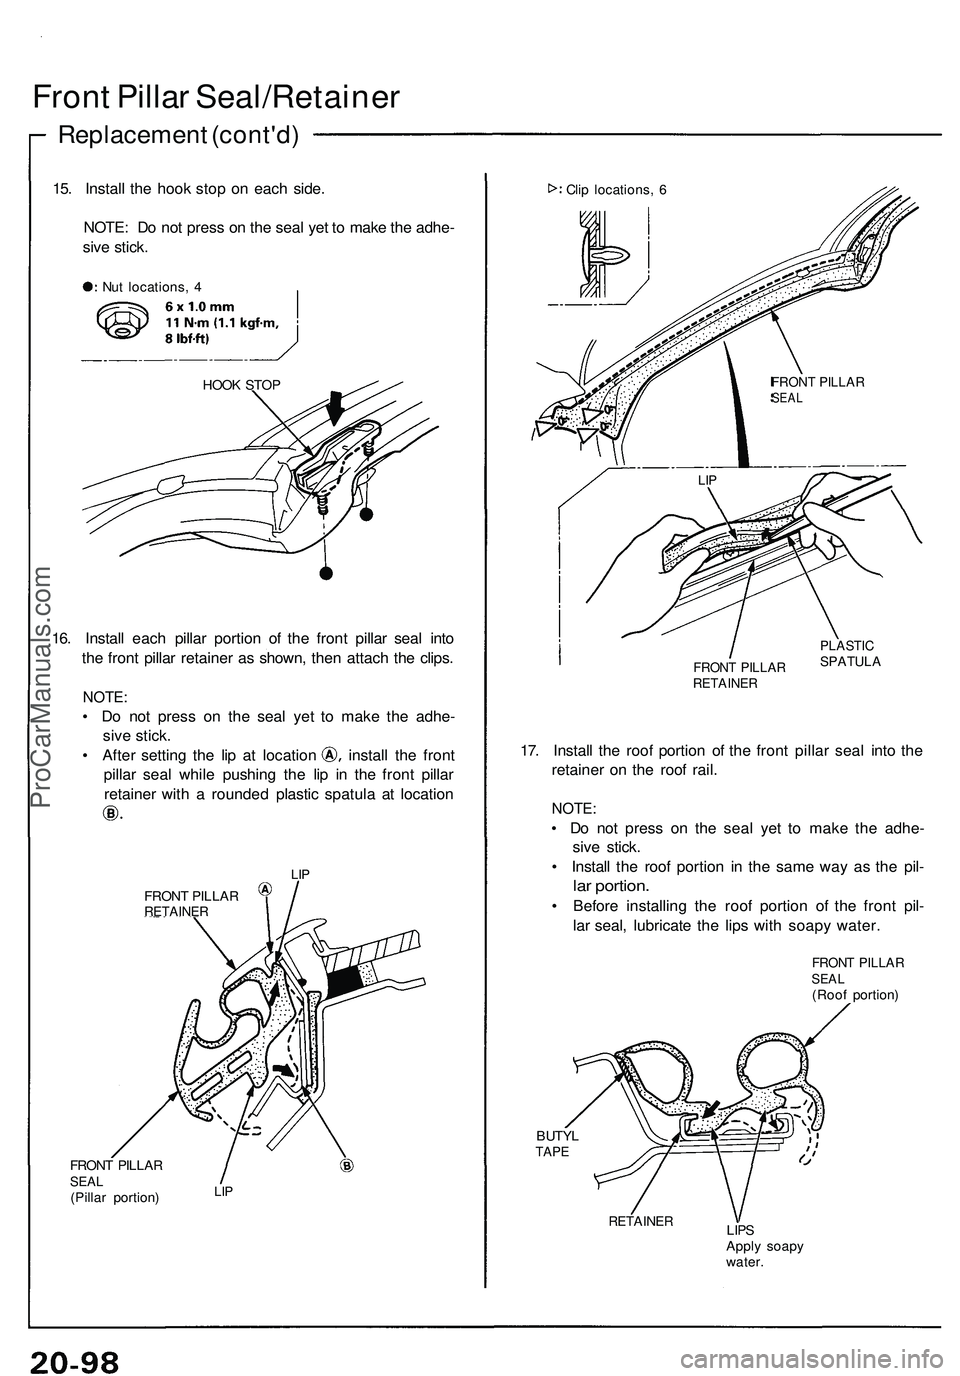
15. Instal l th e hoo k sto p o n eac h side .
NOTE : D o no t pres s o n th e sea l ye t t o mak e th e adhe -
siv e stick .
HOOK STO P
16. Instal l eac h pilla r portio n o f th e fron t pilla r sea l int o
th e fron t pilla r retaine r a s shown , the n attac h th e clips .
NOTE :
• D o no t pres s o n th e sea l ye t t o mak e th e adhe -
siv e stick.
• Afte r settin g th e li p a t locatio n instal l th e fron t
pilla r sea l whil e pushin g th e li p i n th e fron t pilla r
retaine r wit h a rounde d plasti c spatul a a t locatio n
FRONT PILLA RRETAINE R
FRONT PILLA RSEAL(Pilla r portion ) LI P
Cli p locations , 6
FRON T PILLA RRETAINE R
PLASTICSPATUL A
17. Instal l th e roo f portio n o f th e fron t pilla r sea l int o th e
retaine r o n th e roo f rail .
NOTE :
• D o no t press on th e sea l ye t t o mak e th e adhe -
siv e stick .
• Instal l th e roo f portio n i n th e sam e wa y a s th e pil -
lar portion .
• Befor e installin g th e roo f portio n o f th e fron t pil -
la r seal , lubricat e th e lip s wit h soap y water .
BUTYLTAPE
RETAINE RLIPSAppl y soap y
water .
Nu
t locations , 4
LI P LI
P
FFRON T PILLA RSEAL
FRONT PILLA RSEAL(Roo f portion )
ProCarManuals.com