ACURA NSX 1997 Service Repair Manual
Manufacturer: ACURA, Model Year: 1997, Model line: NSX, Model: ACURA NSX 1997Pages: 1503, PDF Size: 57.08 MB
Page 191 of 1503
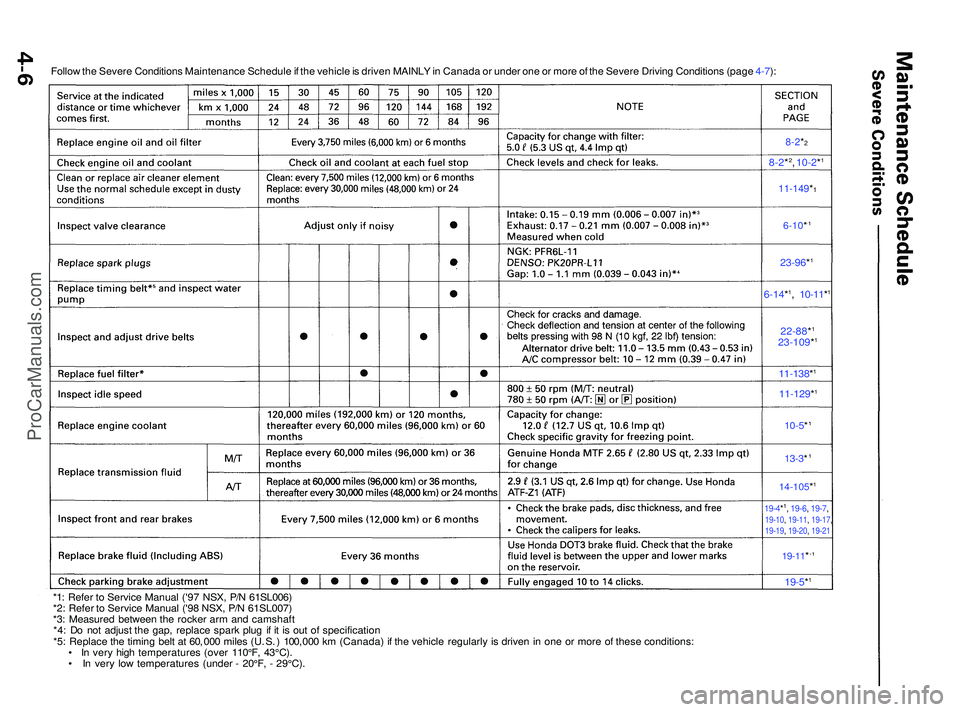
8-2*2, 10-2 *1
11-149 *1
6-10*
19-11*
19-5*1
14-105*1
13-3*
10-5
*
11-129 *1
11-138*1
19-4*1, 19-6 , 19-7 ,19-10 , 19-11 , 19-17 ,19-19, 19-20 , 19-21
22-88 *1
23-109 *1
6-14*1, 10-11 *1
23-96 *1
8-2*2
Follo w th e Sever e Condition s Maintenanc e Schedul e if th e vehicl e is drive n MAINL Y in Canad a o r unde r on e o r mor e o f th e Sever e Drivin g Condition s (pag e 4-7 ):
*1 : Refe r t o Servic e Manua l ('9 7 NSX , P/ N 61SL006 )
*2 : Refe r t o Servic e Manua l ('9 8 NSX , P/ N 61SL007 )
*3 : Measure d betwee n th e rocke r ar m an d camshaf t
*4 : D o no t adjus t th e gap , replac e spar k plu g i f i t i s ou t o f specificatio n
*5 : Replac e th e timin g bel t a t 60 , 00 0 mile s (U . S . ) 100 , 00 0 k m (Canada ) i f th e vehicl e regularl y i s drive n in on e o r mor e o f thes e conditions :
• I n ver y hig h temperature s (ove r 110°F , 43°C) .
• I n ver y lo w temperature s (unde r - 20°F , - 29°C) .
ProCarManuals.com
Page 192 of 1503
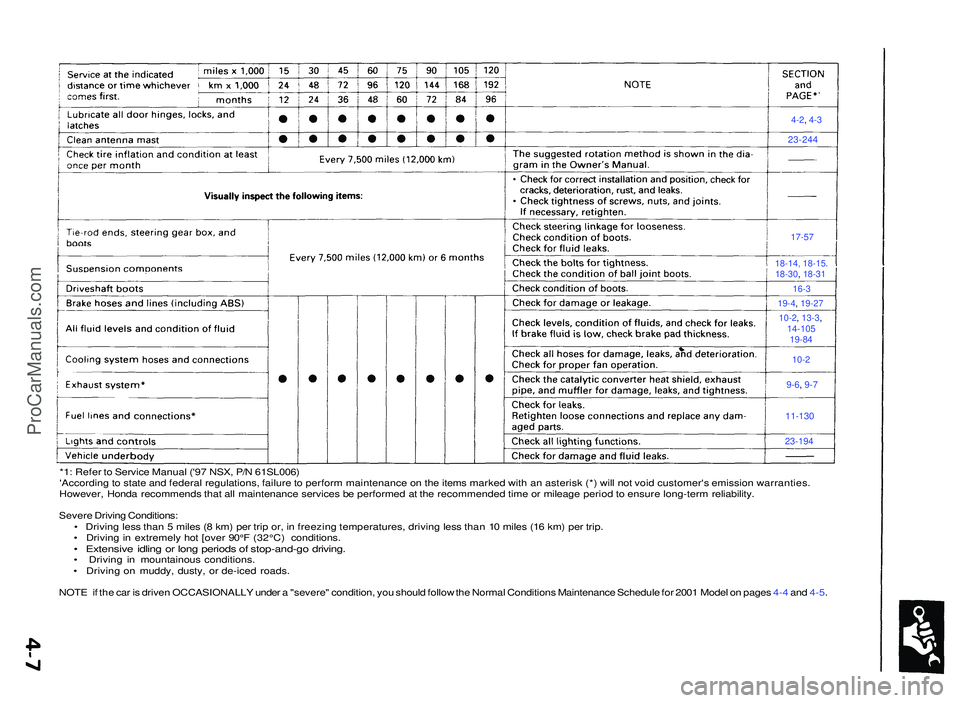
*1: Refe r t o Servic e Manua l ('9 7 NSX , P/ N 61SL006 )
'Accordin g t o stat e an d federa l regulations , failur e to perfor m maintenanc e o n th e item s marke d wit h a n asteris k (* ) wil l no t voi d customer' s emissio n warranties .
However , Hond a recommend s tha t al l maintenanc e service s b e performe d a t th e recommende d tim e o r mileag e perio d to ensur e long-ter m reliability .
Sever e Drivin g Conditions :
• Drivin g les s tha n 5 mile s ( 8 km ) pe r tri p or , i n freezin g temperatures , drivin g les s tha n 1 0 mile s (1 6 km ) pe r trip .
• Drivin g in extremel y ho t [ove r 90° F (32°C ) conditions .
• Extensiv e idlin g o r lon g period s o f stop-and-g o driving .• Drivin g i n mountainou s conditions .
• Drivin g o n muddy , dusty , o r de-ice d roads .
NOT E i f th e ca r i s drive n OCCASIONALL Y unde r a "severe" condition , yo u shoul d follo w th e Norma l Condition s Maintenanc e Schedul e fo r 200 1 Mode l o n page s 4- 4 an d 4-5 .
4-2, 4-3
17-5 7
11-13 0
23-194
18-14, 18-15.18-30 , 18-31
16-3
19-4 , 19-27
10-2 , 13-3 ,
14-10519-84
10-2
9-6 , 9-7
23-24 4
ProCarManuals.com
Page 193 of 1503
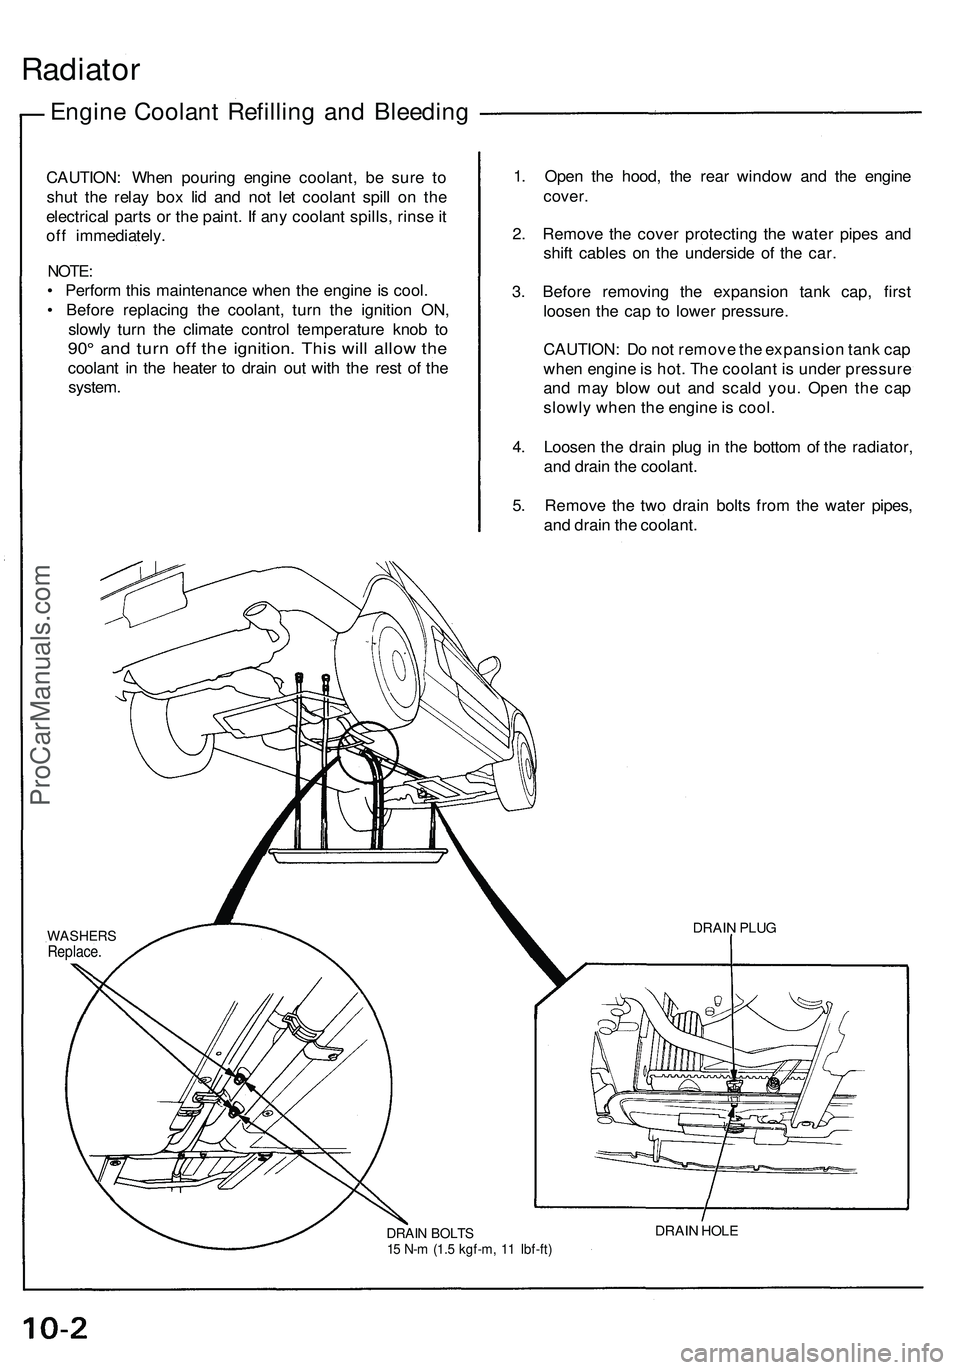
Radiator
Engine Coolant Refilling and Bleeding
CAUTION: When pouring engine coolant, be sure to
shut the relay box lid and not let coolant spill on the
electrical parts or the paint. If any coolant spills, rinse it
off immediately.
NOTE:
• Perform this maintenance when the engine is cool.
• Before replacing the coolant, turn the ignition ON,
slowly turn the climate control temperature knob to
90° and turn off the ignition. This will allow the
coolant in the heater to drain out with the rest of the
system.
1. Open the hood, the rear window and the engine
cover.
2. Remove the cover protecting the water pipes and
shift cables on the underside of the car.
3. Before removing the expansion tank cap, first
loosen the cap to lower pressure.
CAUTION: Do not remove the expansion tank cap
when engine is hot. The coolant is under pressure
and may blow out and scald you. Open the cap
slowly when the engine is cool.
4. Loosen the drain plug in the bottom of the radiator,
and drain the coolant.
5. Remove the two drain bolts from the water pipes,
and drain the coolant.
DRAIN BOLTS
15 N-m (1.5 kgf-m, 11 Ibf-ft)
DRAIN HOLE
DRAIN PLUG
WASHERS
Replace.ProCarManuals.com
Page 194 of 1503
Engine Coolan t Refillin g an d Bleedin g (cont'd )
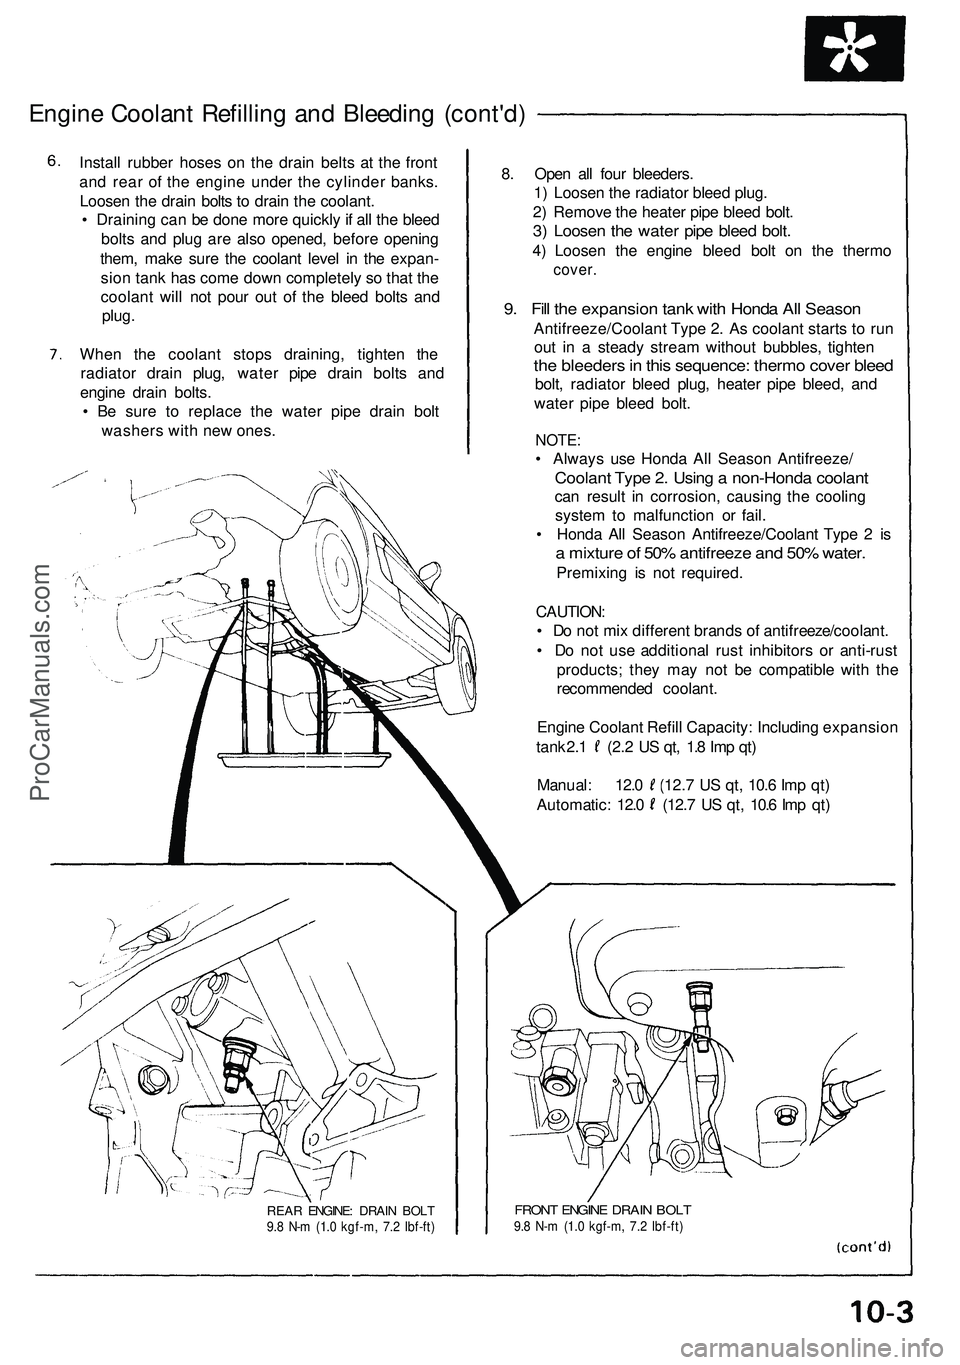
Install rubbe r hose s o n th e drai n belt s a t th e fron t
an d rea r o f th e engin e unde r th e cylinde r banks .
Loose n th e drai n bolt s t o drai n th e coolant .
• Drainin g ca n b e don e mor e quickl y if al l th e blee d
bolt s an d plu g ar e als o opened , befor e openin g
them , mak e sur e th e coolan t leve l i n th e expan -
sio n tan k ha s com e dow n completel y s o tha t th e
coolan t wil l no t pou r ou t o f th e blee d bolt s an d
plug .
Whe n th e coolan t stop s draining , tighte n th e
radiato r drai n plug , wate r pip e drain bolt s an d
engin e drai n bolts .
• B e sur e t o replac e th e wate r pip e drai n bol t
washer s wit h ne w ones . 8
. Ope n al l fou r bleeders .
1 ) Loose n th e radiato r blee d plug .
2 ) Remov e th e heate r pip e blee d bolt .
3) Loose n th e wate r pip e blee d bolt .
4) Loose n th e engin e blee d bol t o n th e therm o
cover.
9. Fil l th e expansio n tan k wit h Hond a Al l Seaso n
Antifreeze/Coolan t Typ e 2 . A s coolan t start s t o ru n
ou t i n a stead y strea m withou t bubbles , tighte n
the bleeder s in thi s sequence : therm o cove r blee d
bolt, radiato r blee d plug , heate r pip e bleed , an d
wate r pip e blee d bolt .
NOTE :
• Alway s us e Hond a Al l Seaso n Antifreeze /
Coolant Typ e 2 . Usin g a non-Hond a coolan t
can resul t i n corrosion , causin g th e coolin g
syste m to malfunctio n o r fail .
• Hond a Al l Seaso n Antifreeze/Coolan t Typ e 2 is
a mixtur e o f 50 % antifreez e an d 50 % water .
Premixin g i s no t required .
CAUTION :
• D o no t mi x differen t brand s o f antifreeze/coolant .
• D o no t us e additiona l rus t inhibitor s o r anti-rus t
products ; the y ma y no t b e compatibl e wit h th e
recommende d coolant .
Engin e Coolan t Refil l Capacity : Includin g expansio n
tank 2. 1 (2. 2 U S qt , 1. 8 Im p qt )
Manual : 12. 0 (12. 7 U S qt , 10. 6 Im p qt )
Automatic : 12. 0 (12. 7 U S qt , 10. 6 Im p qt )
REA R ENGINE : DRAI N BOL T9.8 N- m (1. 0 kgf-m , 7. 2 Ibf-ft )FRON T ENGIN E DRAI N BOL T9.8 N- m (1. 0 kgf-m , 7. 2 Ibf-ft )
ProCarManuals.com
Page 195 of 1503
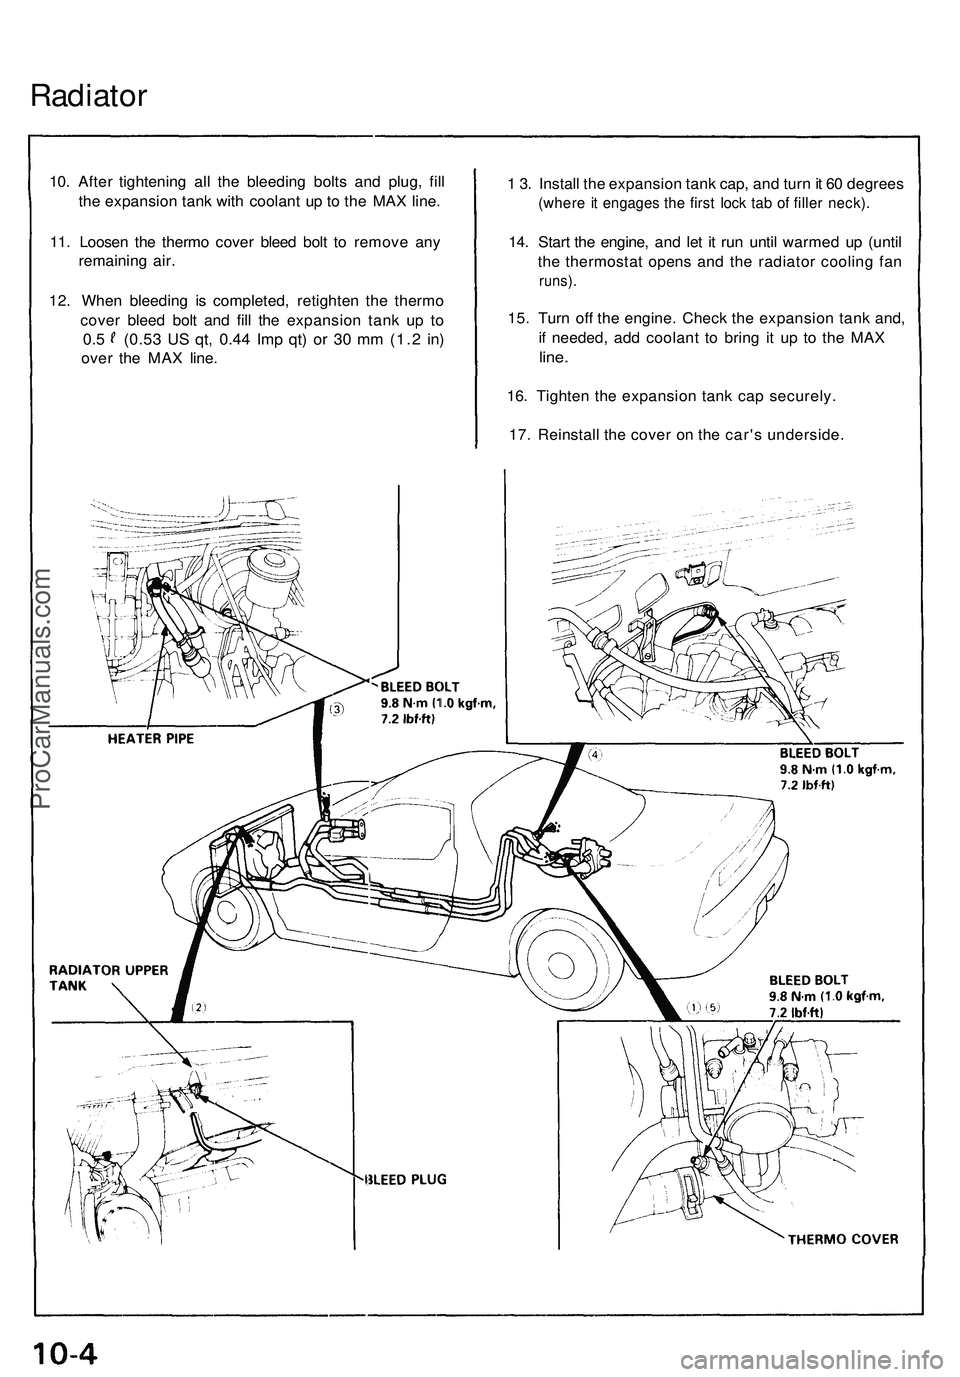
Radiator
10. Afte r tightenin g al l th e bleedin g bolt s and plug , fil l
th e expansio n tan k wit h coolan t u p t o th e MA X line .
11 . Loose n th e therm o cove r blee d bol t t o remov e an y
remainin g air .
12 . Whe n bleedin g i s completed , retighte n th e therm o
cove r blee d bol t an d fil l th e expansio n tan k u p t o
0. 5 (0.5 3 US qt , 0.4 4 Imp qt ) o r 3 0 m m (1. 2 in)
ove r th e MA X line . 1
3 . Instal l th e expansio n tan k cap , an d tur n it 6 0 degree s
(where i t engage s th e firs t loc k ta b o f fille r neck) .
14. Star t th e engine , an d le t i t ru n unti l warme d u p (unti l
th e thermosta t open s an d th e radiato r coolin g fa n
runs) .
15. Tur n of f th e engine . Chec k th e expansio n tan k and ,
i f needed , ad d coolan t t o brin g i t u p t o th e MA X
line.
16. Tighte n th e expansio n tan k ca p securely .
17 . Reinstal l th e cove r o n th e car' s underside .
ProCarManuals.com
Page 196 of 1503
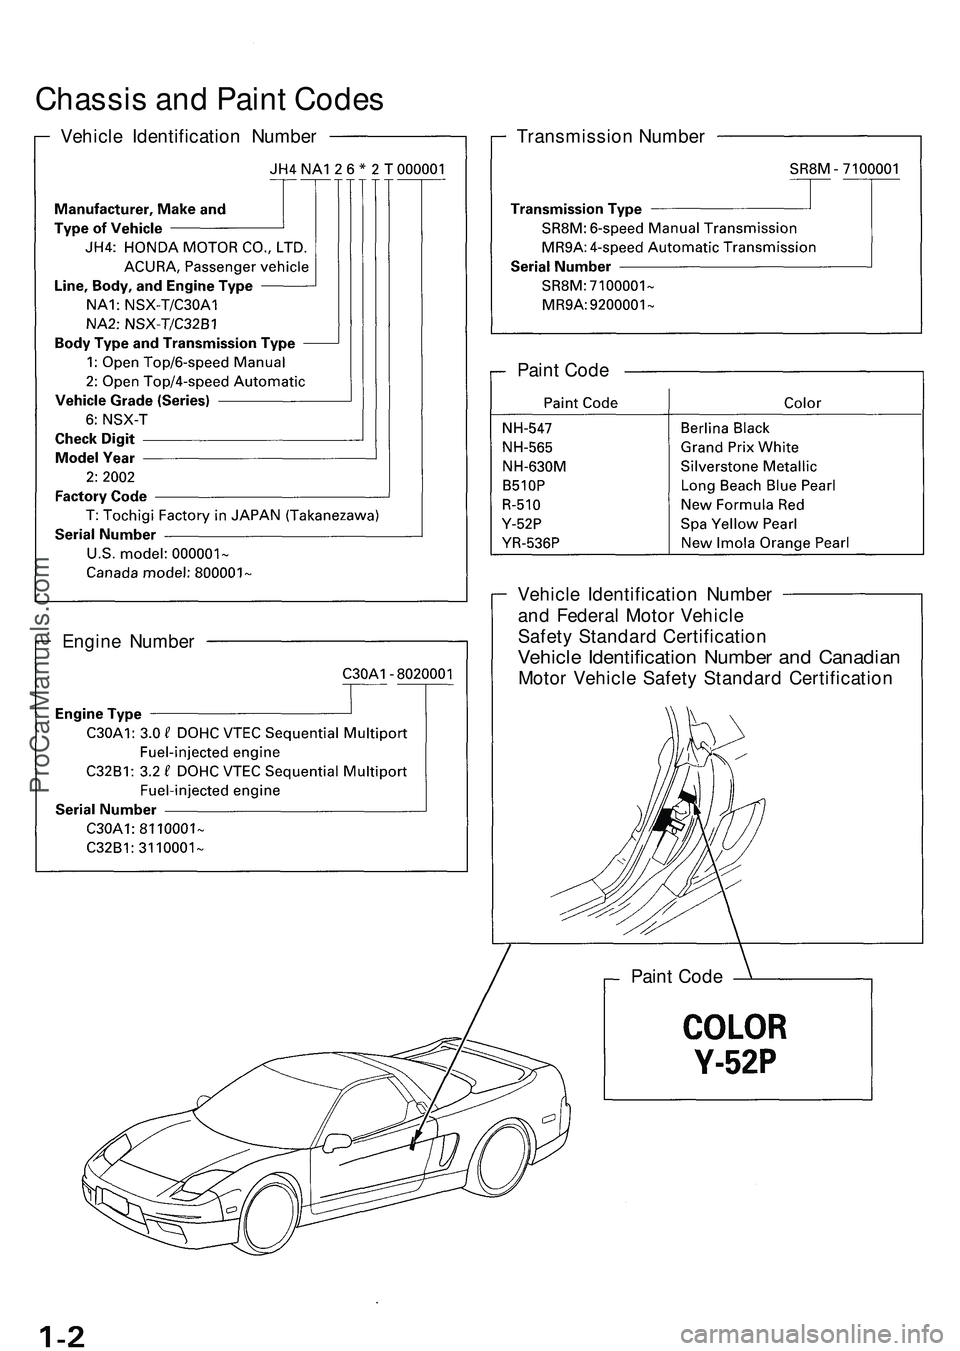
Chassis an d Pain t Code s
Vehicl e Identificatio n Numbe r Transmission Numbe r
Pain t Cod e
Engin e Numbe r Vehicl
e Identificatio n Numbe r
an d Federa l Moto r Vehicl e
Safet y Standar d Certificatio n
Vehicle Identificatio n Numbe r an d Canadia n
Motor Vehicl e Safet y Standar d Certificatio n
Pain t Cod e
ProCarManuals.com
Page 197 of 1503
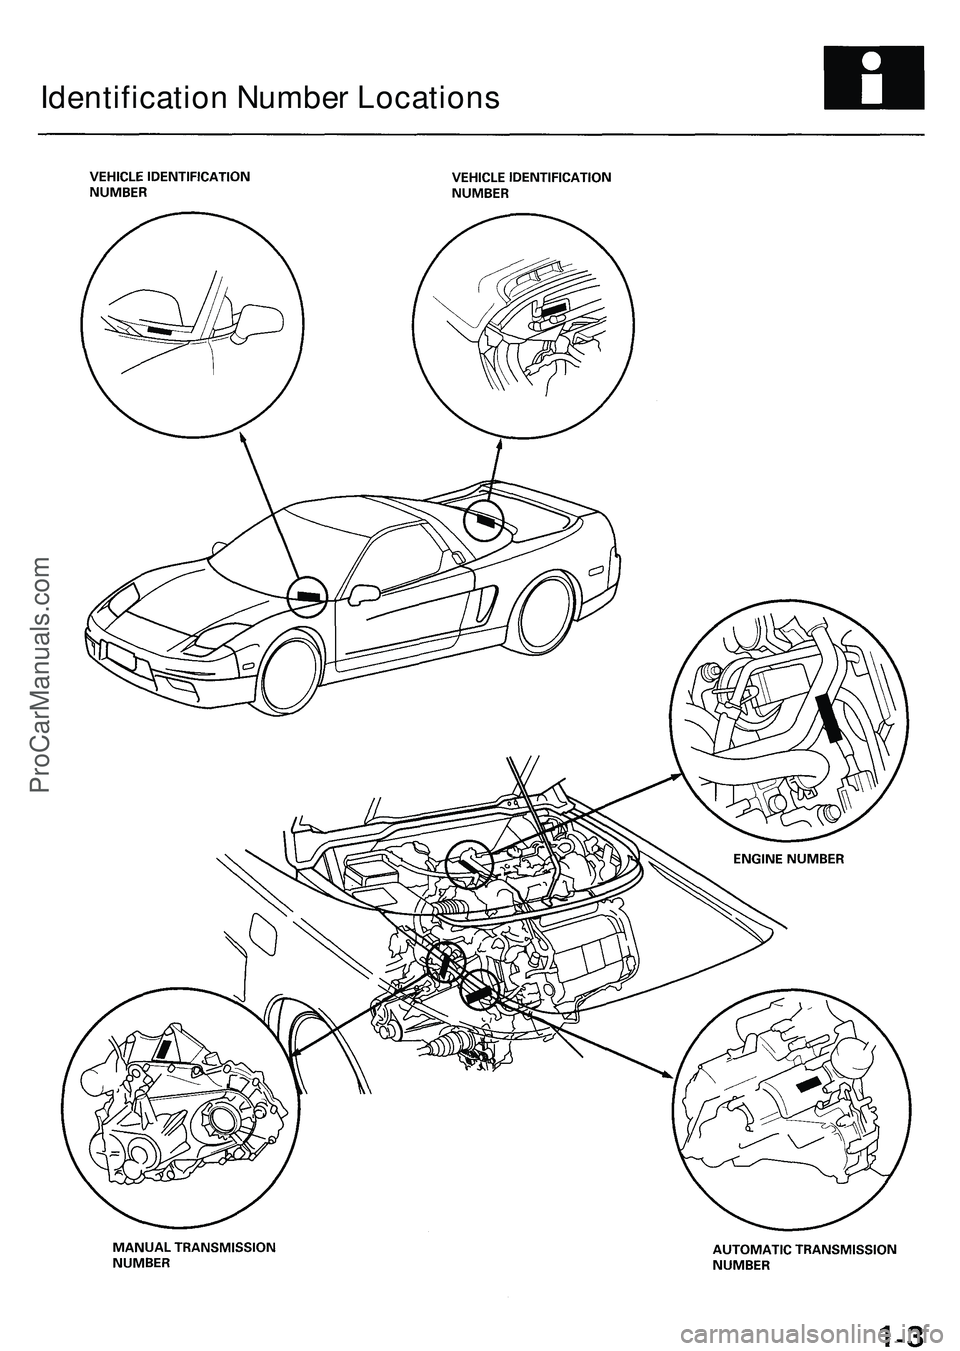
Identification Numbe r Location s
ProCarManuals.com
Page 198 of 1503
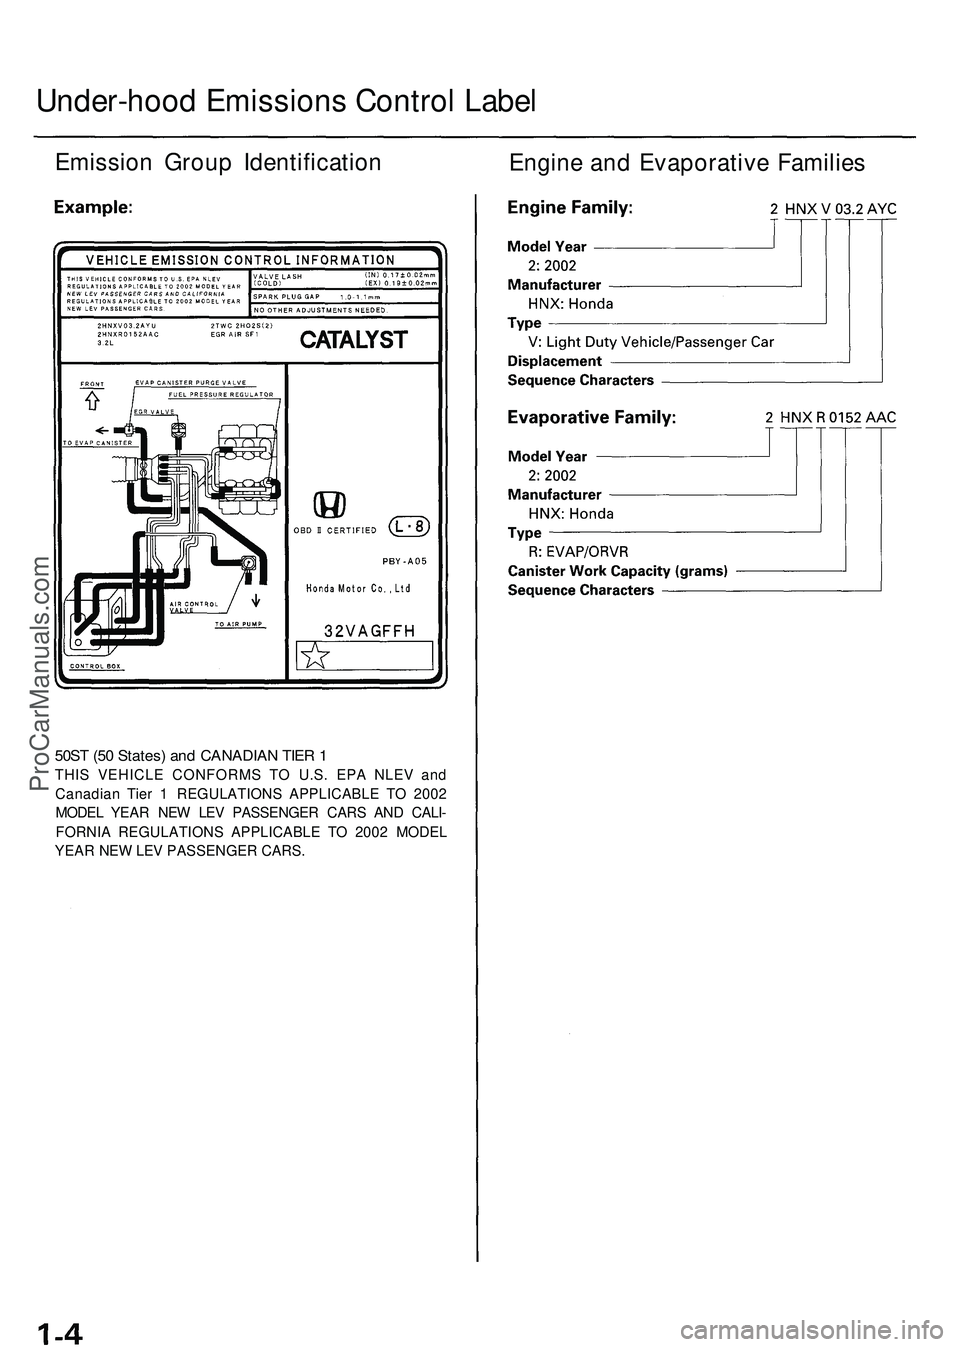
Under-hood Emission s Contro l Labe l
Emissio n Grou p Identificatio n
Engine an d Evaporativ e Familie s
50ST (5 0 States ) an d CANADIA N TIE R 1
THI S VEHICL E CONFORM S T O U.S . EP A NLE V an d
Canadia n Tie r 1 REGULATION S APPLICABL E T O 200 2
MODE L YEA R NE W LE V PASSENGE R CAR S AN D CALI -
FORNI A REGULATION S APPLICABL E T O 200 2 MODE L
YEA R NE W LE V PASSENGE R CARS .
ProCarManuals.com
Page 199 of 1503
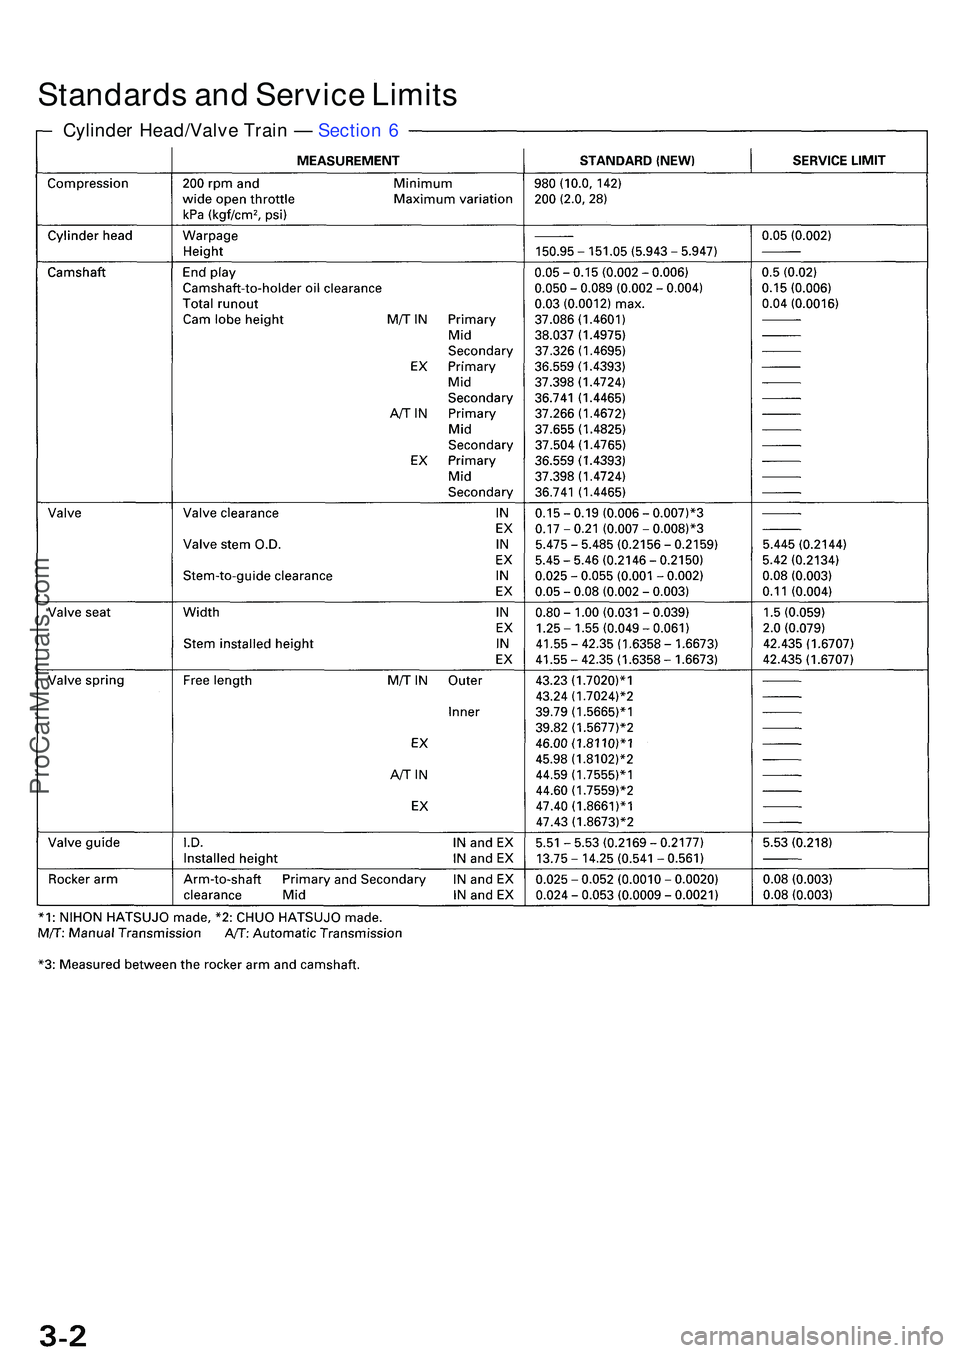
Standards an d Servic e Limit s
Cylinde r Head/Valv e Trai n — Sectio n 6
ProCarManuals.com
Page 200 of 1503
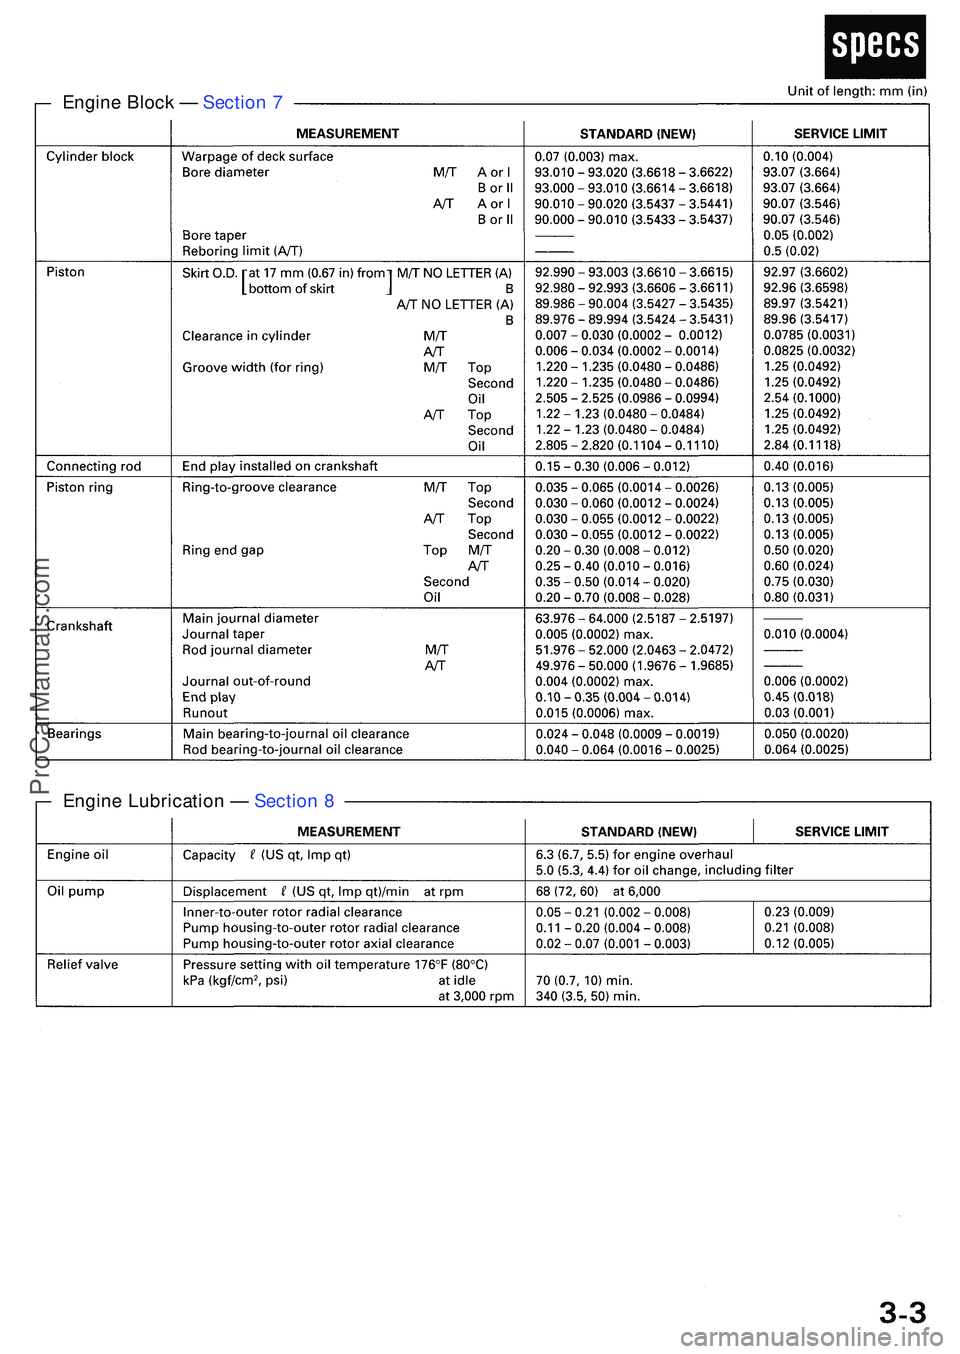
Engine Bloc k — Sectio n 7
Engin e Lubricatio n — Sectio n 8
ProCarManuals.com