ACURA RL KA9 1996 Service Repair Manual
Manufacturer: ACURA, Model Year: 1996, Model line: RL KA9, Model: ACURA RL KA9 1996Pages: 1954, PDF Size: 61.44 MB
Page 831 of 1954
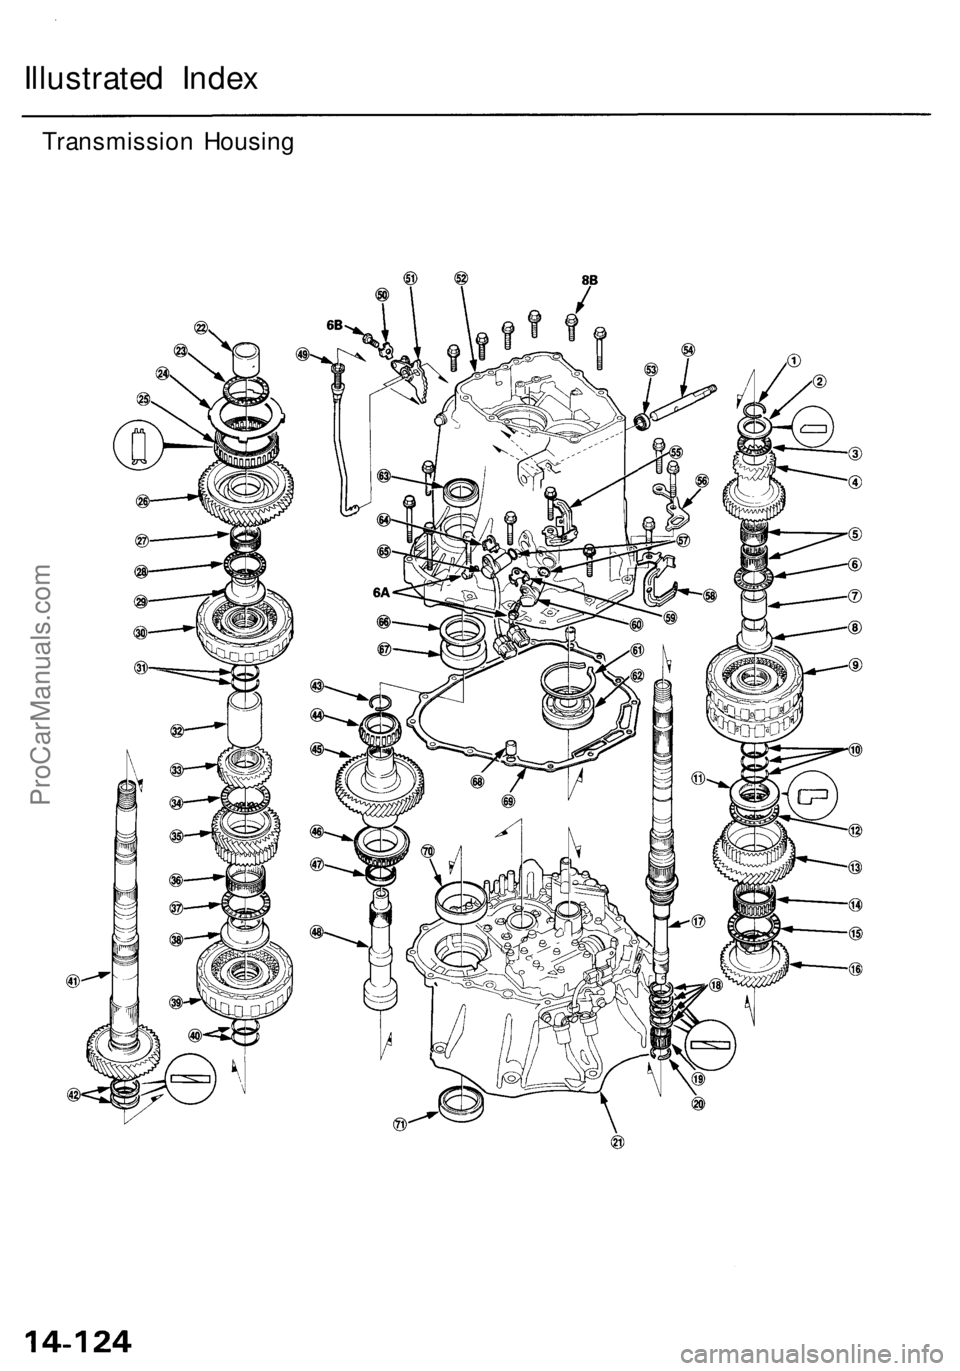
Illustrated Index
Transmission HousingProCarManuals.com
Page 832 of 1954
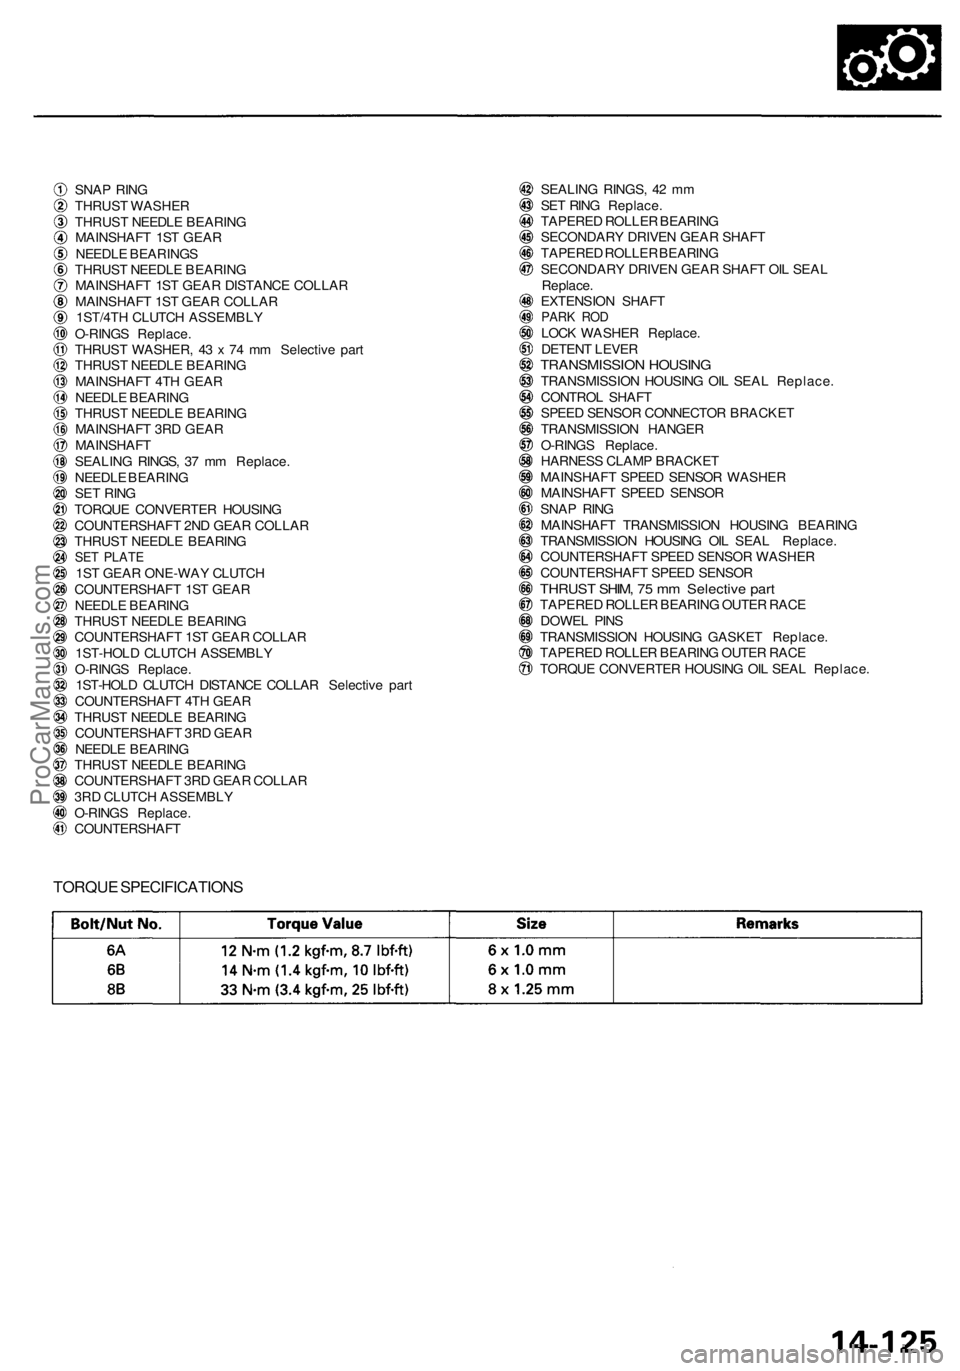
SNAP RIN G
THRUS T WASHE R
THRUS T NEEDL E BEARIN G
MAINSHAF T 1S T GEA R
NEEDL E BEARING S
THRUS T NEEDL E BEARIN G
MAINSHAF T 1S T GEA R DISTANC E COLLA R
MAINSHAF T 1S T GEA R COLLA R
1ST/4T H CLUTC H ASSEMBL Y
O-RING S Replace .
THRUS T WASHER , 4 3 x 7 4 m m Selectiv e par t
THRUS T NEEDL E BEARIN G
MAINSHAF T 4T H GEA R
NEEDL E BEARIN G
THRUS T NEEDL E BEARIN G
MAINSHAF T 3R D GEA R
MAINSHAF T
SEALIN G RINGS , 3 7 m m Replace .
NEEDL E BEARIN G
SE T RIN G
TORQU E CONVERTE R HOUSIN G
COUNTERSHAF T 2N D GEA R COLLA R
THRUS T NEEDL E BEARIN G
SET PLAT E1ST GEA R ONE-WA Y CLUTC H
COUNTERSHAF T 1S T GEA R
NEEDL E BEARIN G
THRUS T NEEDL E BEARIN G
COUNTERSHAF T 1S T GEA R COLLA R
1ST-HOL D CLUTC H ASSEMBL Y
O-RING S Replace .
1ST-HOL D CLUTC H DISTANC E COLLA R Selectiv e par t
COUNTERSHAF T 4T H GEA R
THRUS T NEEDL E BEARIN G
COUNTERSHAF T 3R D GEA R
NEEDL E BEARIN G
THRUS T NEEDL E BEARIN G
COUNTERSHAF T 3R D GEA R COLLA R
3R D CLUTC H ASSEMBL Y
O-RING S Replace .
COUNTERSHAF T SEALIN
G RINGS , 4 2 m m
SE T RIN G Replace .
TAPERE D ROLLE R BEARIN G
SECONDAR Y DRIVE N GEA R SHAF T
TAPERE D ROLLE R BEARIN G
SECONDAR Y DRIVE N GEA R SHAF T OI L SEA L
Replace .
EXTENSIO N SHAF T
PARK RO DLOC K WASHE R Replace .
DETEN T LEVE R
TRANSMISSIO N HOUSIN GTRANSMISSIO N HOUSIN G OI L SEA L Replace .
CONTRO L SHAF T
SPEE D SENSO R CONNECTO R BRACKE T
TRANSMISSIO N HANGE R
O-RING S Replace .
HARNES S CLAM P BRACKE T
MAINSHAF T SPEE D SENSO R WASHE R
MAINSHAF T SPEE D SENSO R
SNA P RIN G
MAINSHAF T TRANSMISSIO N HOUSIN G BEARIN G
TRANSMISSIO N HOUSIN G OI L SEA L Replace .
COUNTERSHAF T SPEE D SENSO R WASHE R
COUNTERSHAF T SPEE D SENSO R
THRUST SHIM , 7 5 m m Selectiv e par tTAPERE D ROLLE R BEARIN G OUTE R RAC E
DOWE L PIN S
TRANSMISSIO N HOUSIN G GASKE T Replace .
TAPERE D ROLLE R BEARIN G OUTE R RAC E
TORQU E CONVERTE R HOUSIN G OI L SEA L Replace .
TORQUE SPECIFICATION S
ProCarManuals.com
Page 833 of 1954
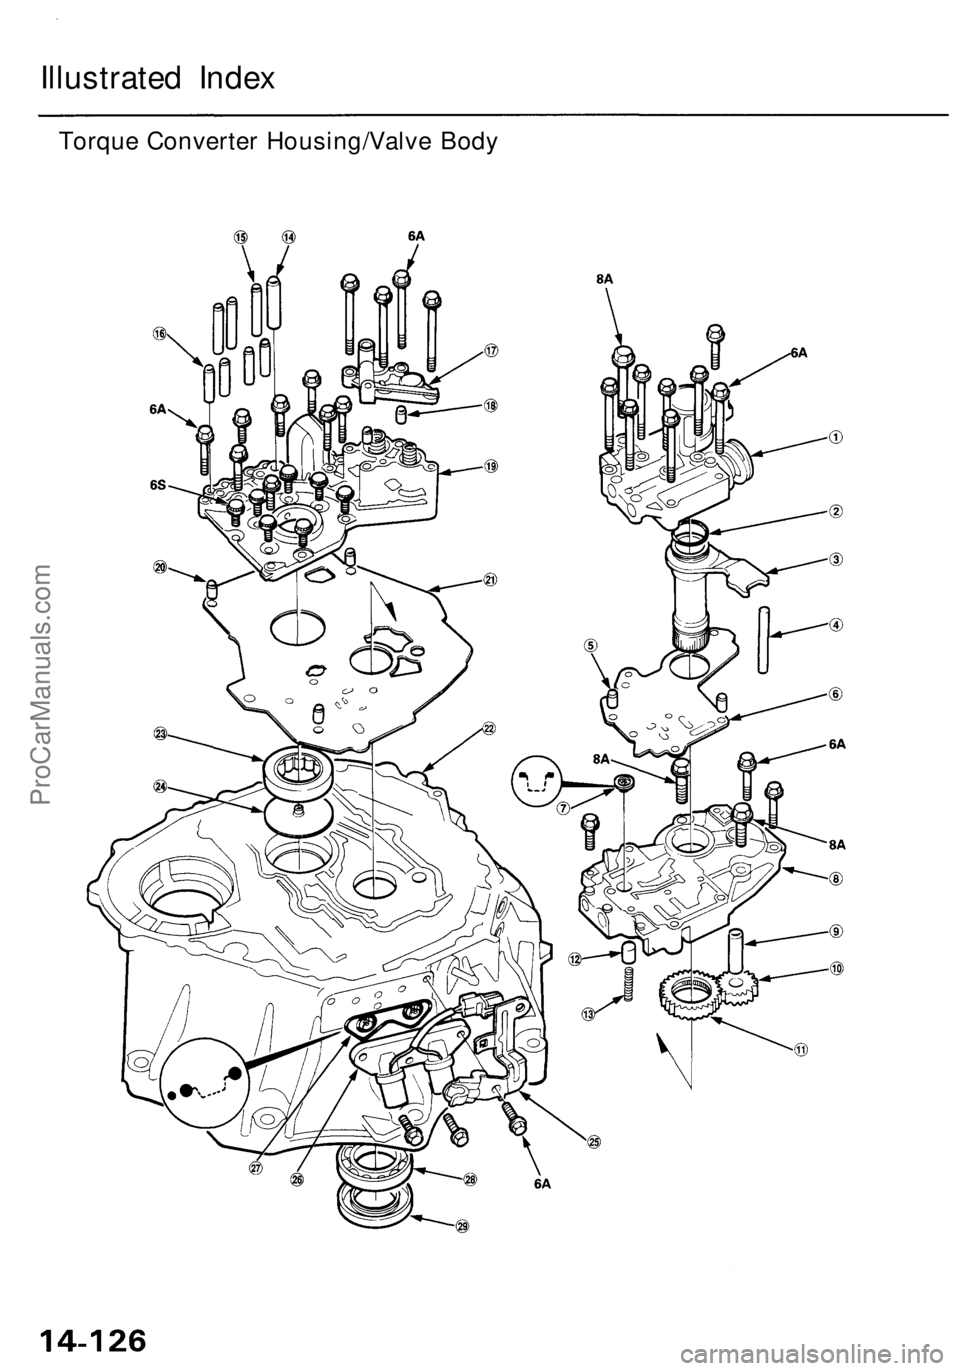
Illustrated Index
Torque Converter Housing/Valve BodyProCarManuals.com
Page 834 of 1954
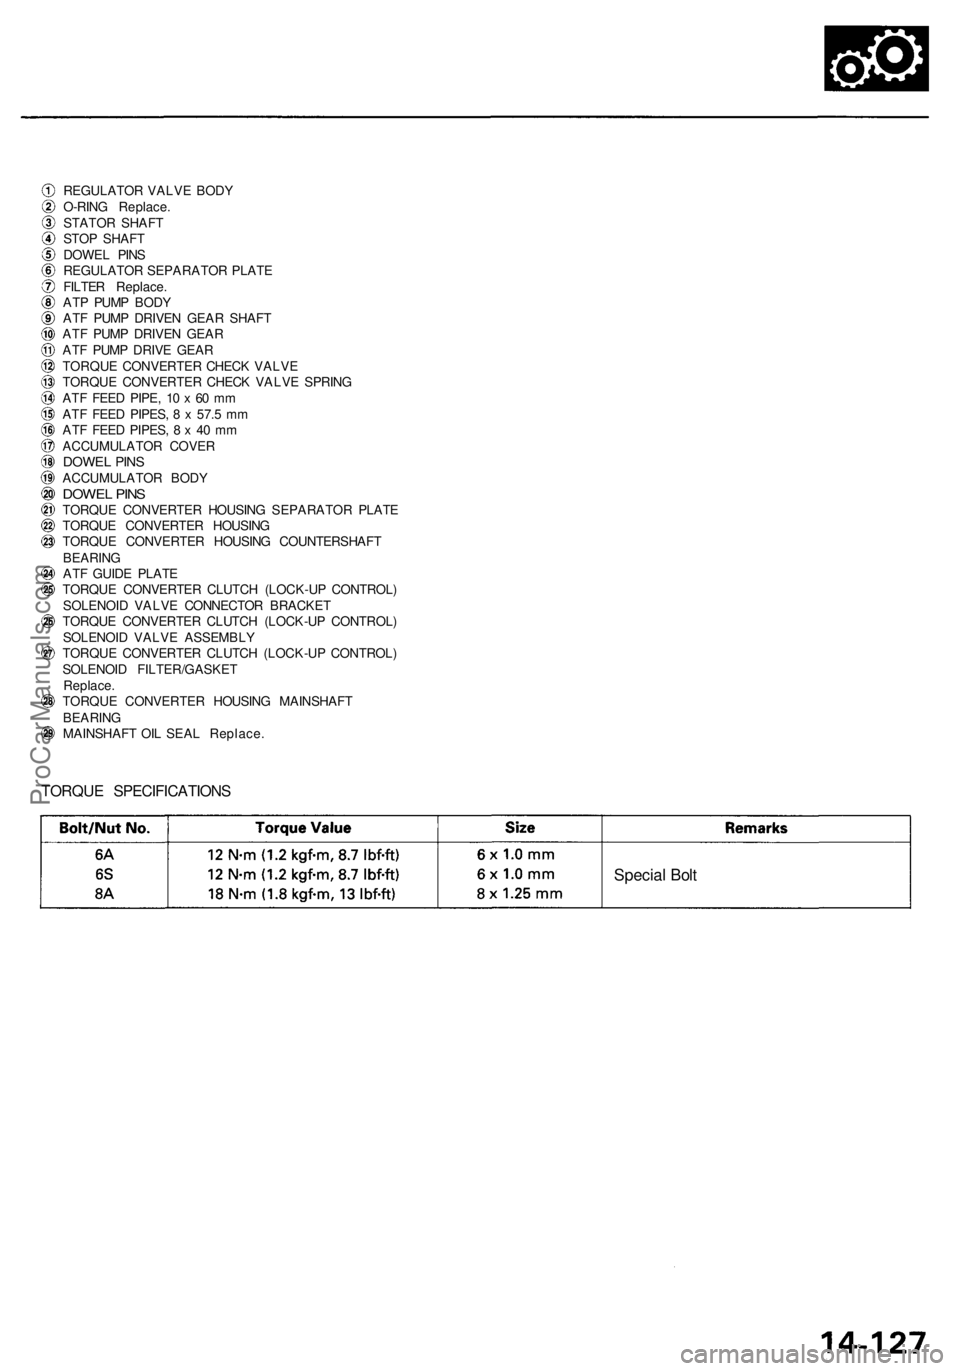
REGULATOR VALV E BOD Y
O-RIN G Replace .
STATO R SHAF T
STO P SHAF T
DOWE L PIN S
REGULATO R SEPARATO R PLAT E
FILTE R Replace .
AT P PUM P BOD Y
AT F PUM P DRIVE N GEA R SHAF T
AT F PUM P DRIVE N GEA R
AT F PUM P DRIV E GEA R
TORQU E CONVERTE R CHEC K VALV E
TORQU E CONVERTE R CHEC K VALV E SPRIN G
AT F FEE D PIPE , 1 0 x 60 m m
AT F FEE D PIPES , 8 x 57. 5 m m
AT F FEE D PIPES , 8 x 4 0 m m
ACCUMULATO R COVE R
DOWEL PIN SACCUMULATO R BOD YDOWE L PIN STORQU E CONVERTE R HOUSIN G SEPARATO R PLAT E
TORQU E CONVERTE R HOUSIN G
TORQU E CONVERTE R HOUSIN G COUNTERSHAF T
BEARIN G
AT F GUID E PLAT E
TORQU E CONVERTE R CLUTC H (LOCK-U P CONTROL )
SOLENOI D VALV E CONNECTO R BRACKE T
TORQU E CONVERTE R CLUTC H (LOCK-U P CONTROL )
SOLENOI D VALV E ASSEMBL Y
TORQU E CONVERTE R CLUTC H (LOCK-U P CONTROL )
SOLENOI D FILTER/GASKE T
Replace .
TORQU E CONVERTE R HOUSIN G MAINSHAF T
BEARIN G
MAINSHAF T OI L SEA L Replace .
TORQUE SPECIFICATION S
Special Bol t
ProCarManuals.com
Page 835 of 1954
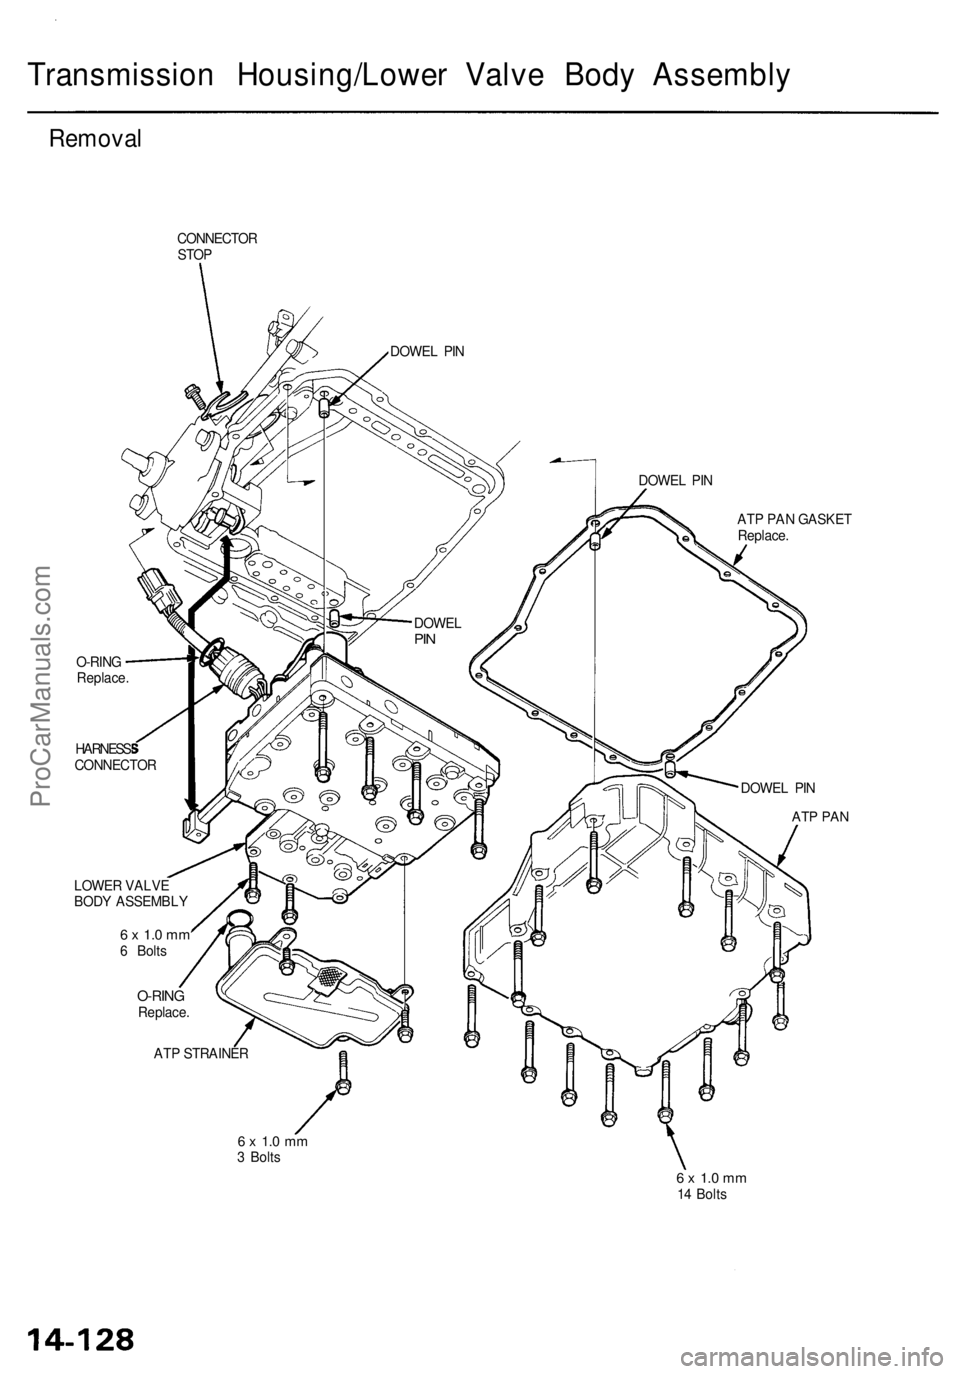
Transmission Housing/Lower Valve Body Assembly
Removal
CONNECTOR
STOP
DOWEL PIN
O-RING
Replace.
HARNESS
CONNECTOR
DOWEL PIN
O-RING
Replace.
ATP STRAINER
6 x 1.0 mm
3 Bolts
ATP PAN GASKET
Replace.
DOWEL PIN
ATP PAN
6 x 1.0 mm
14 Bolts
DOWEL
PIN
LOWER VALVE
BODY ASSEMBLY
6 x 1.0 mm
6 BoltsProCarManuals.com
Page 836 of 1954
NOTE:
• Clean all parts thoroughly in solvent or carburetor
cleaner, and dry with compressed air.
• Blow out all passages.
• When removing the lower valve body assembly,
replace the following:
— O-rings
— ATP pan gasket
CAUTION: Do not turn over the transmission before
removing the ATP pan.
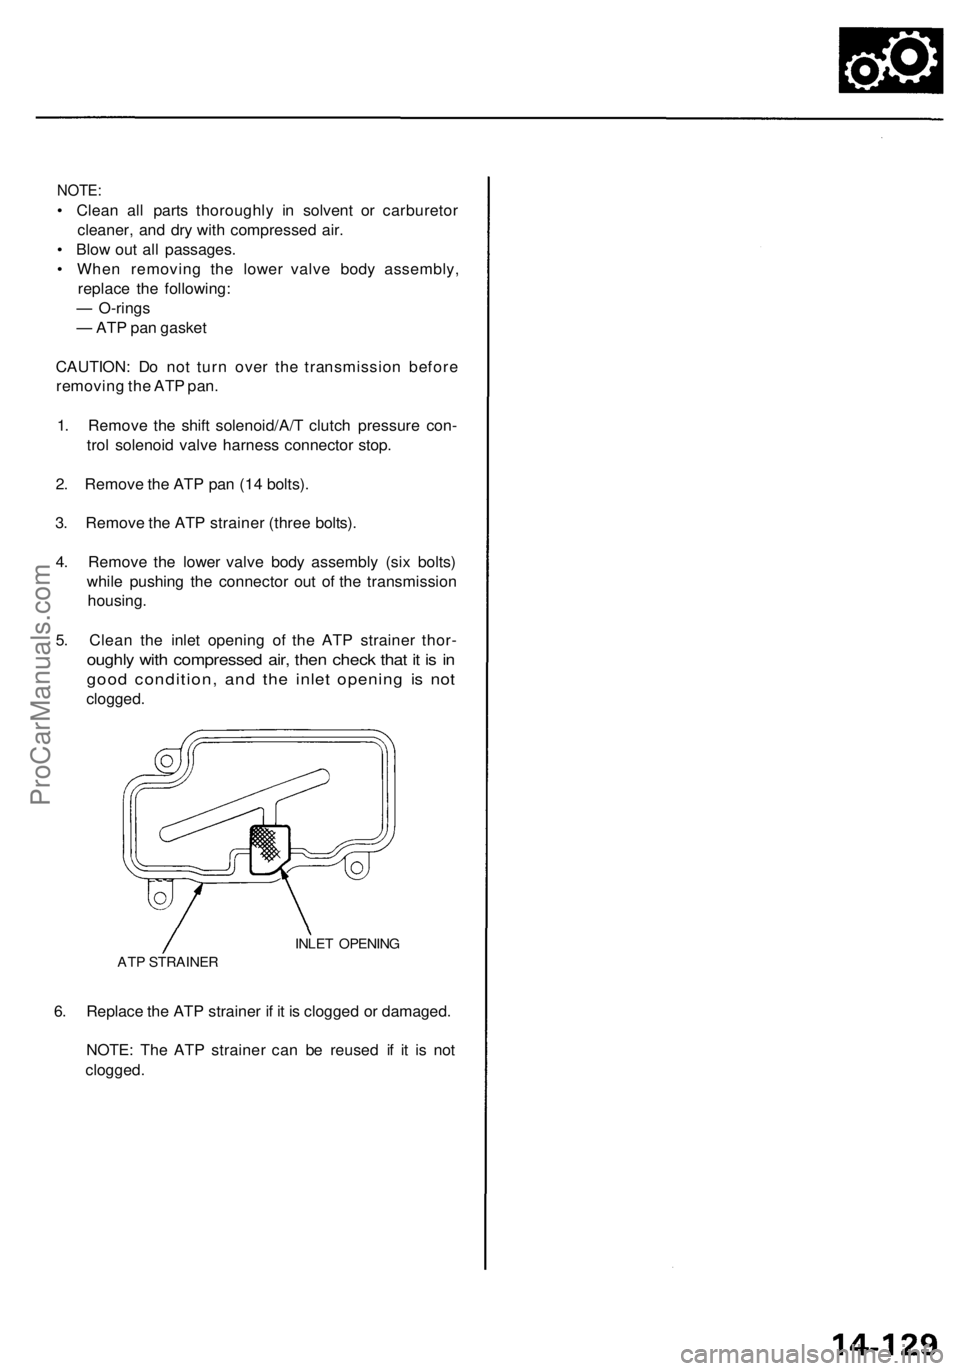
1. Remove the shift solenoid/A/T clutch pressure con-
trol solenoid valve harness connector stop.
2. Remove the ATP pan (14 bolts).
3. Remove the ATP strainer (three bolts).
4. Remove the lower valve body assembly (six bolts)
while pushing the connector out of the transmission
housing.
5. Clean the inlet opening of the ATP strainer thor-
oughly with compressed air, then check that it is in
good condition, and the inlet opening is not
clogged.
INLET OPENING
ATP STRAINER
6. Replace the ATP strainer if it is clogged or damaged.
NOTE: The ATP strainer can be reused if it is not
clogged.ProCarManuals.com
Page 837 of 1954
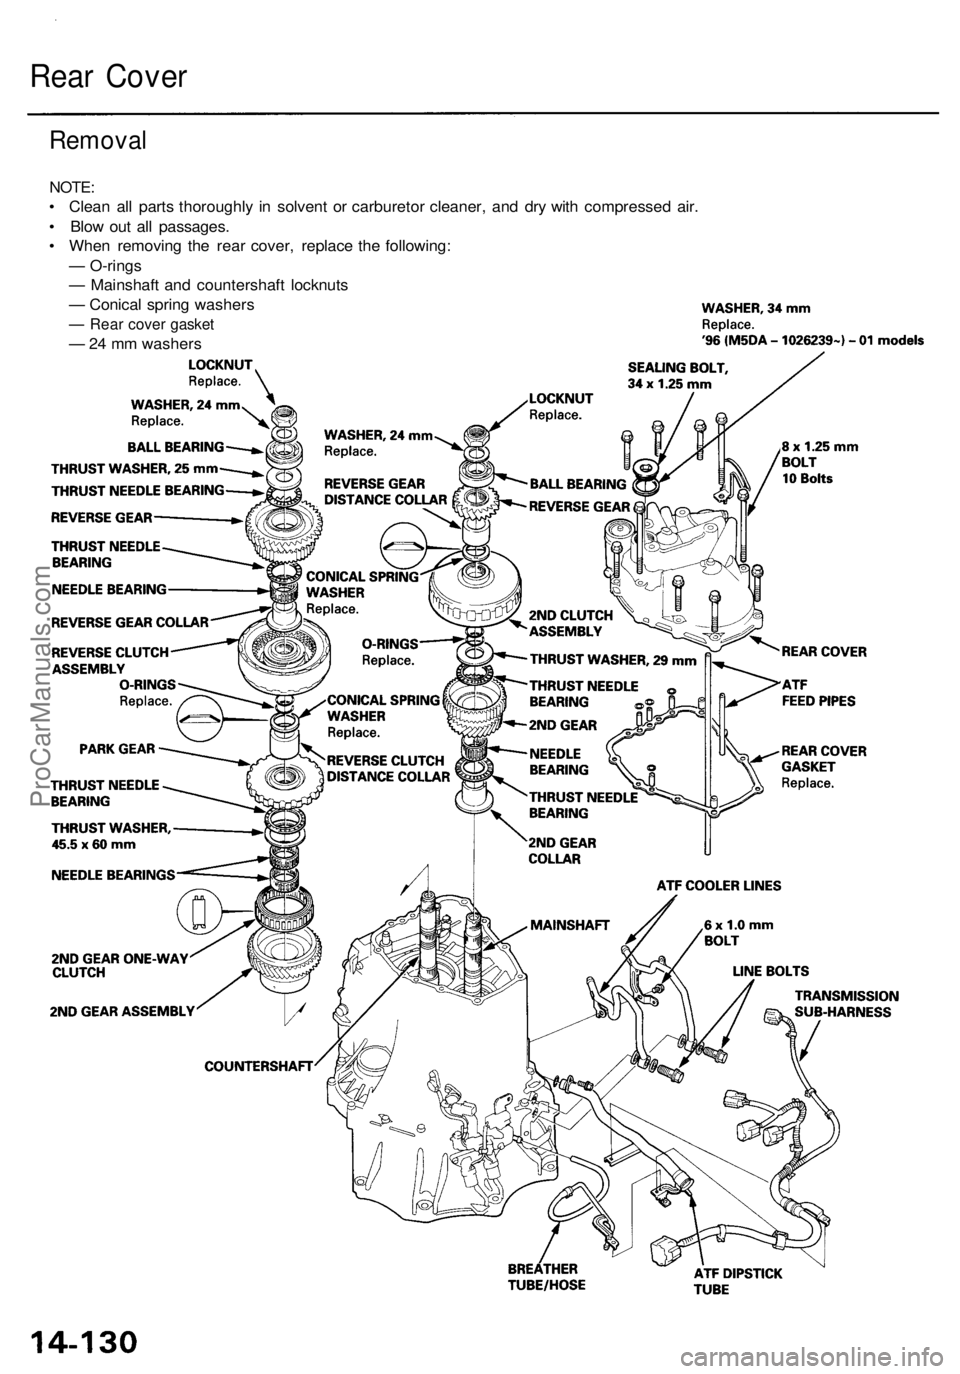
Rear Cover
Removal
NOTE:
• Clean all parts thoroughly in solvent or carburetor cleaner, and dry with compressed air.
• Blow out all passages.
• When removing the rear cover, replace the following:
— O-rings
— Mainshaft and countershaft locknuts
— Conical spring washers
— Rear cover gasket
— 24 mm washersProCarManuals.com
Page 838 of 1954
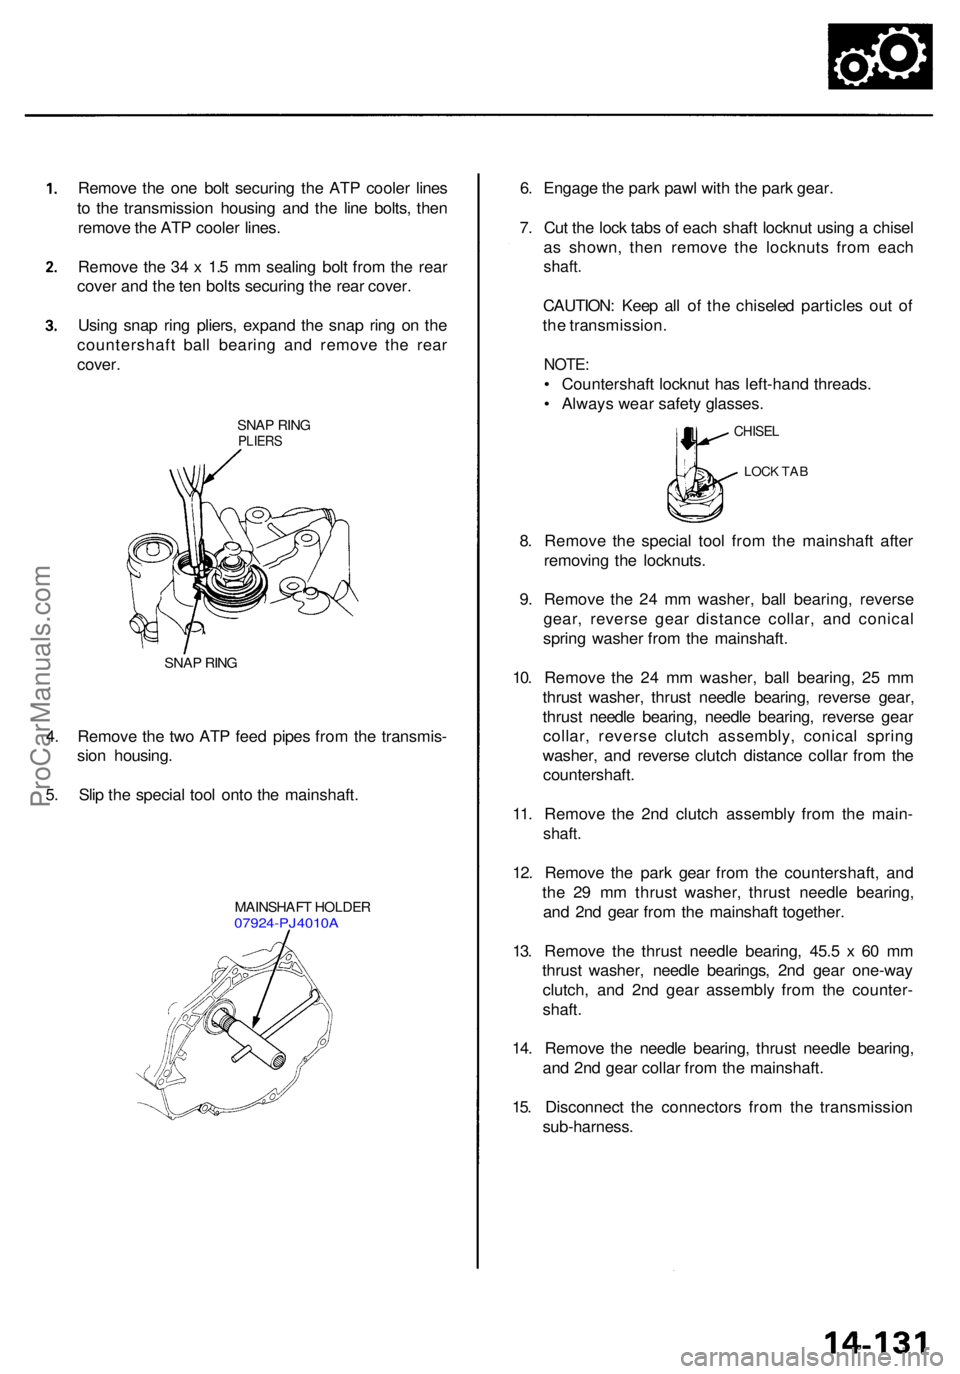
Remove th e on e bol t securin g th e AT P coole r line s
t o th e transmissio n housin g an d th e lin e bolts , the n
remov e th e AT P coole r lines .
Remov e th e 3 4 x 1. 5 m m sealin g bol t fro m th e rea r
cove r an d th e te n bolt s securin g th e rea r cover .
Usin g sna p rin g pliers , expan d th e sna p rin g o n th e
countershaf t bal l bearin g an d remov e th e rea r
cover .
SNAP RIN GPLIER S
SNAP RIN G
4. Remov e th e tw o AT P fee d pipe s fro m th e transmis -
sio n housing .
5 . Sli p th e specia l too l ont o th e mainshaft .
MAINSHAF T HOLDE R07924-PJ4010 A
6. Engag e th e par k paw l wit h th e par k gear .
7 . Cu t th e loc k tab s o f eac h shaf t locknu t usin g a chise l
a s shown , the n remov e th e locknut s fro m eac h
shaft .
CAUTION : Kee p al l o f th e chisele d particle s ou t o f
th e transmission .
NOTE:
• Countershaf t locknu t ha s left-han d threads .
• Alway s wea r safet y glasses .
LOCK TA B
8. Remov e th e specia l too l fro m th e mainshaf t afte r
removin g th e locknuts .
9 . Remov e th e 2 4 m m washer , bal l bearing , revers e
gear , revers e gea r distanc e collar , an d conica l
sprin g washe r fro m th e mainshaft .
10 . Remov e th e 2 4 m m washer , bal l bearing , 2 5 m m
thrus t washer , thrus t needl e bearing , revers e gear ,
thrus t needl e bearing , needl e bearing , revers e gea r
collar , revers e clutc h assembly , conica l sprin g
washer , an d revers e clutc h distanc e colla r fro m th e
countershaft .
11 . Remov e th e 2n d clutc h assembl y fro m th e main -
shaft.
12. Remov e th e par k gea r fro m th e countershaft , an d
th e 2 9 m m thrus t washer , thrus t needl e bearing ,
an d 2n d gea r fro m th e mainshaf t together .
13 . Remov e th e thrus t needl e bearing , 45. 5 x 6 0 m m
thrus t washer , needl e bearings , 2n d gea r one-wa y
clutch , an d 2n d gea r assembl y fro m th e counter -
shaft .
14 . Remov e th e needl e bearing , thrus t needl e bearing ,
an d 2n d gea r colla r fro m th e mainshaft .
15 . Disconnec t th e connector s fro m th e transmissio n
sub-harness .
CHISEL
ProCarManuals.com
Page 839 of 1954
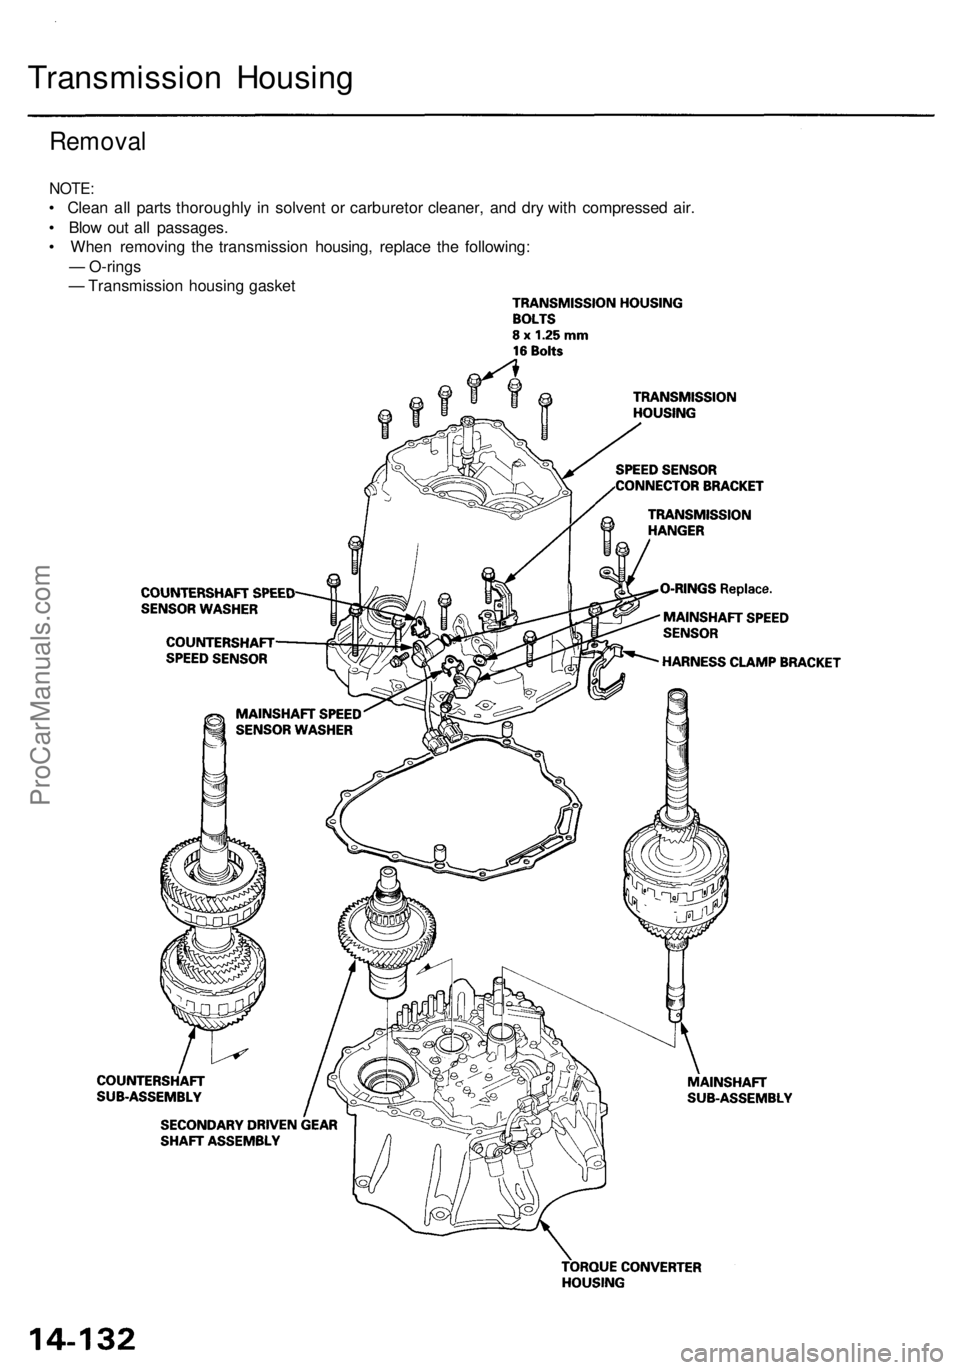
Transmission Housing
Removal
NOTE:
• Clean all parts thoroughly in solvent or carburetor cleaner, and dry with compressed air.
• Blow out all passages.
• When removing the transmission housing, replace the following:
— O-rings
— Transmission housing gasketProCarManuals.com
Page 840 of 1954
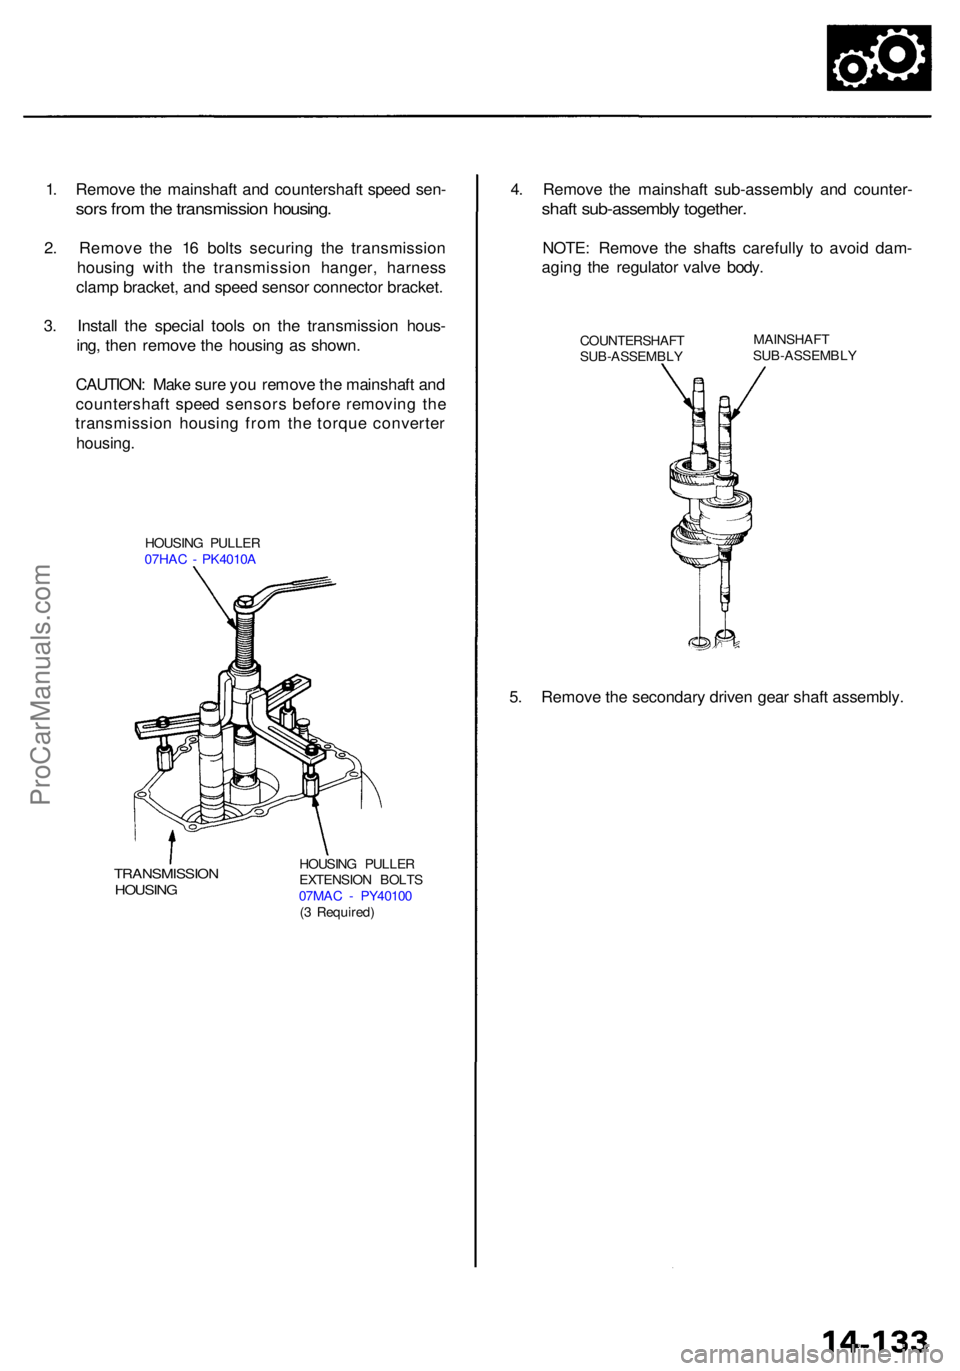
1. Remov e th e mainshaf t an d countershaf t spee d sen -
sors fro m th e transmissio n housing .
2. Remov e th e 1 6 bolts securin g th e transmissio n
housin g wit h th e transmissio n hanger , harnes s
clam p bracket , an d spee d senso r connecto r bracket .
3 . Instal l th e specia l tool s o n th e transmissio n hous -
ing , the n remov e th e housin g a s shown .
CAUTION : Mak e sur e yo u remov e th e mainshaf t an d
countershaf t spee d sensor s befor e removin g th e
transmissio n housin g fro m th e torqu e converte r
housing.
HOUSIN G PULLE R
07HA C - PK4010 A
TRANSMISSIO NHOUSING
HOUSING PULLE R
EXTENSIO N BOLT S
07MA C - PY4010 0
( 3 Required )
4. Remov e th e mainshaf t sub-assembl y an d counter -
shaft sub-assembl y together .
NOTE: Remov e th e shaft s carefull y t o avoi d dam-
agin g th e regulato r valv e body .
COUNTERSHAF T
SUB-ASSEMBL YMAINSHAF
T
SUB-ASSEMBL Y
5. Remov e th e secondar y drive n gea r shaf t assembly .
ProCarManuals.com