ACURA RL KA9 1996 Service Repair Manual
Manufacturer: ACURA, Model Year: 1996, Model line: RL KA9, Model: ACURA RL KA9 1996Pages: 1954, PDF Size: 61.44 MB
Page 861 of 1954
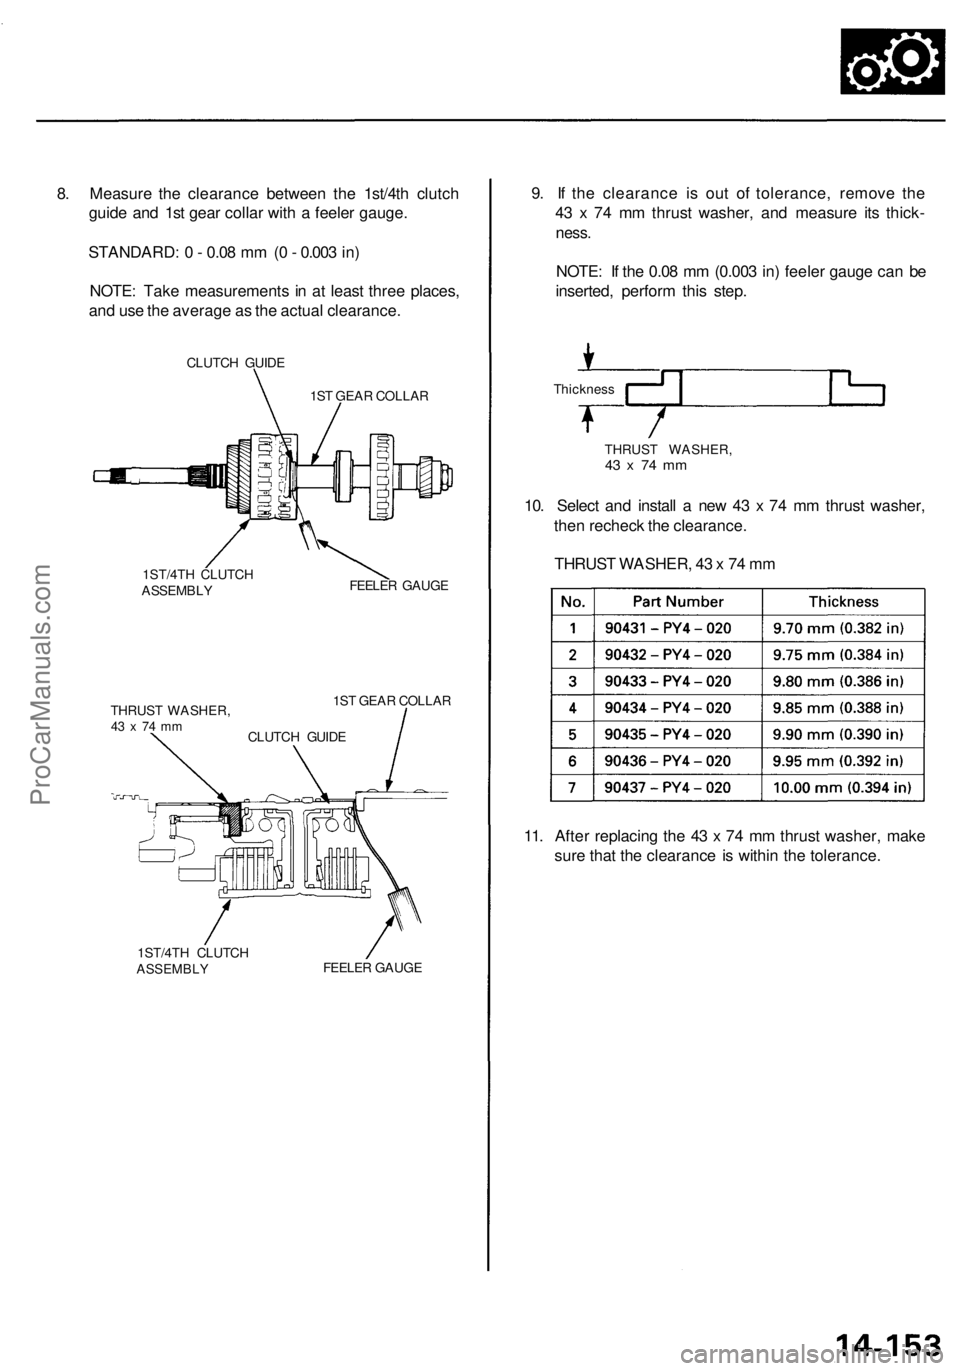
8. Measure the clearance between the 1st/4th clutch
guide and 1st gear collar with a feeler gauge.
STANDARD: 0 - 0.08 mm (0 - 0.003 in)
NOTE: Take measurements in at least three places,
and use the average as the actual clearance.
CLUTCH GUIDE
1ST GEAR COLLAR
1ST/4TH CLUTCH
ASSEMBLY
FEELER GAUGE
THRUST WASHER,
43 x 74 mm
1ST GEAR COLLAR
1ST/4TH CLUTCH
ASSEMBLY
FEELER GAUGE
9. If the clearance is out of tolerance, remove the
43 x 74 mm thrust washer, and measure its thick-
ness.
NOTE: If the 0.08 mm (0.003 in) feeler gauge can be
inserted, perform this step.
Thickness
10. Select and install a new 43 x 74 mm thrust washer,
then recheck the clearance.
11. After replacing the 43 x 74 mm thrust washer, make
sure that the clearance is within the tolerance.
CLUTCH GUIDE
THRUST WASHER,
43 x 74 mm
THRUST WASHER, 43 x 74 mmProCarManuals.com
Page 862 of 1954
Mainshaft
Sub-assembl y
NOTE:
• Lubricat e al l part s wit h AT F durin g assembly .
• Befor e installin g th e O-rings , wra p th e shaf t spline s
wit h tap e t o preven t damag e t o th e O-rings .
• Assembl e th e mainshaf t sub-assembl y whe n assem -
bling th e transmission .
• Refe r t o pag e 14-15 1 an d 14-152 , whe n installin g th e
3r d gear , 4t h gear , an d 4 3 x 7 4 m m thrus t washer .
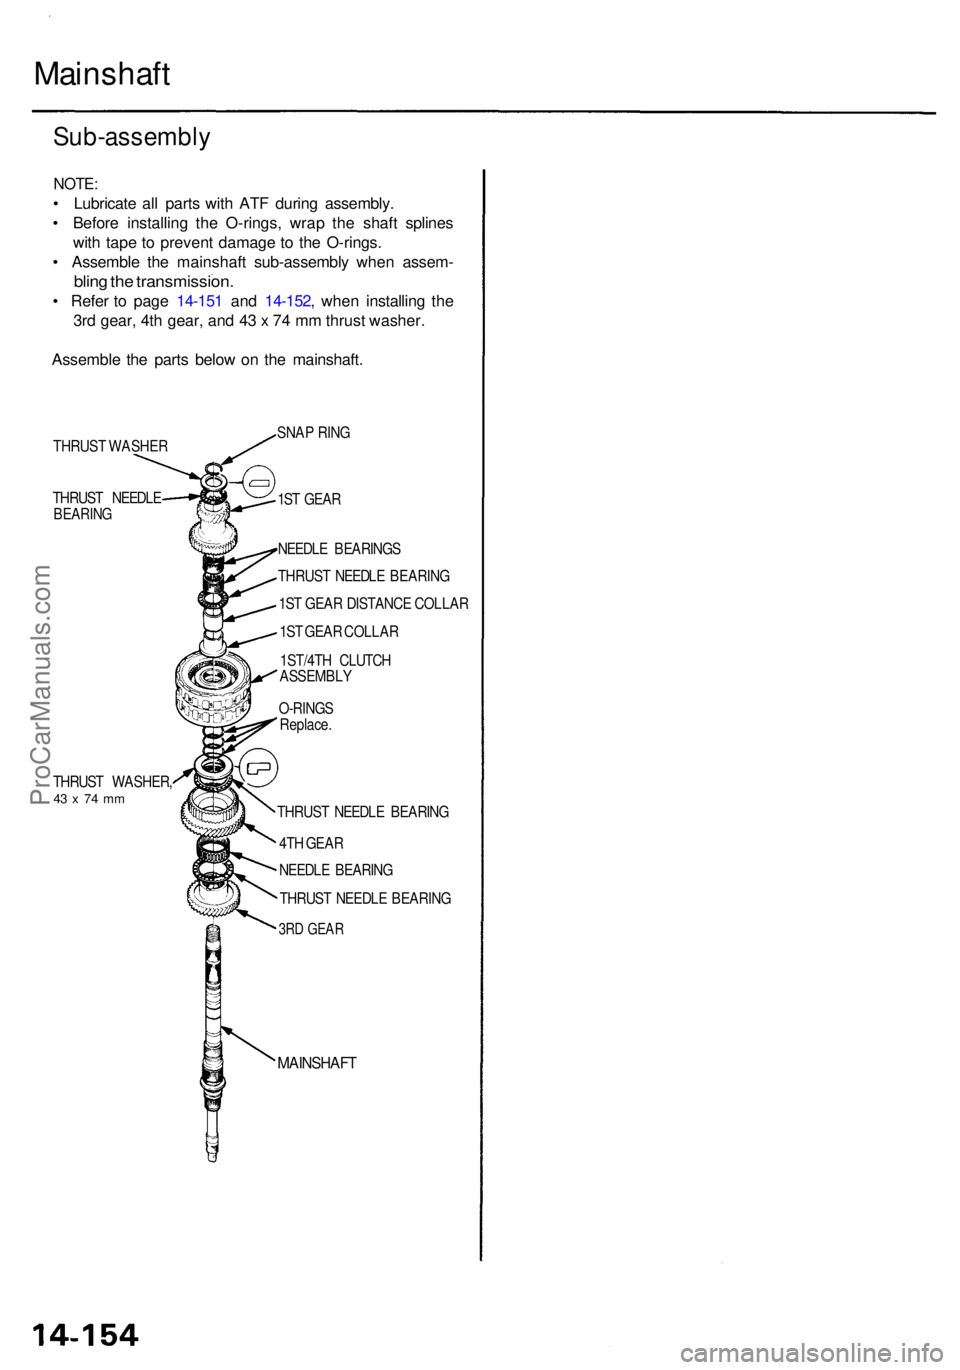
Assembl e th e part s belo w o n th e mainshaft .
THRUST WASHE R
THRUS T NEEDL E
BEARIN G
THRUST WASHER ,43 x 74 m m
MAINSHAF T
SNAP RIN G
1S T GEA R
NEEDL E BEARING S
THRUS T NEEDL E BEARIN G
1S T GEA R DISTANC E COLLA R
1S T GEA R COLLA R
1ST/4T H CLUTC H
ASSEMBL Y
O-RING S
Replace .
THRUS T NEEDL E BEARIN G
4T H GEA R
NEEDL E BEARIN G
THRUS T NEEDL E BEARIN G
3RD GEA R
ProCarManuals.com
Page 863 of 1954
Countershaft
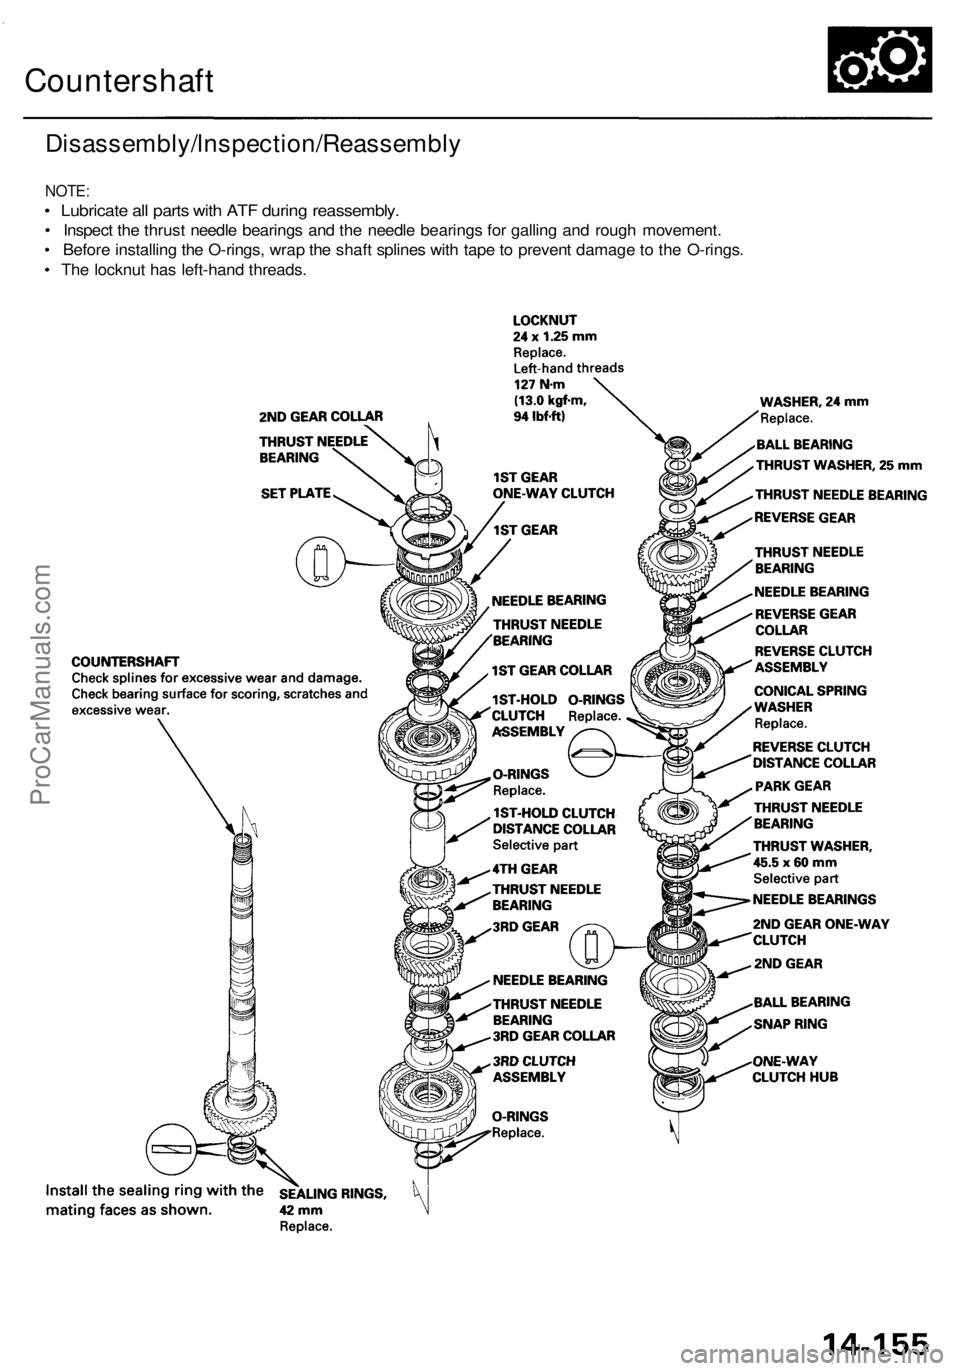
Disassembly/lnspection/Reassembly
NOTE:
• Lubricate all parts with ATF during reassembly.
• Inspect the thrust needle bearings and the needle bearings for galling and rough movement.
• Before installing the O-rings, wrap the shaft splines with tape to prevent damage to the O-rings.
• The locknut has left-hand threads.ProCarManuals.com
Page 864 of 1954
Countershaft
Inspection
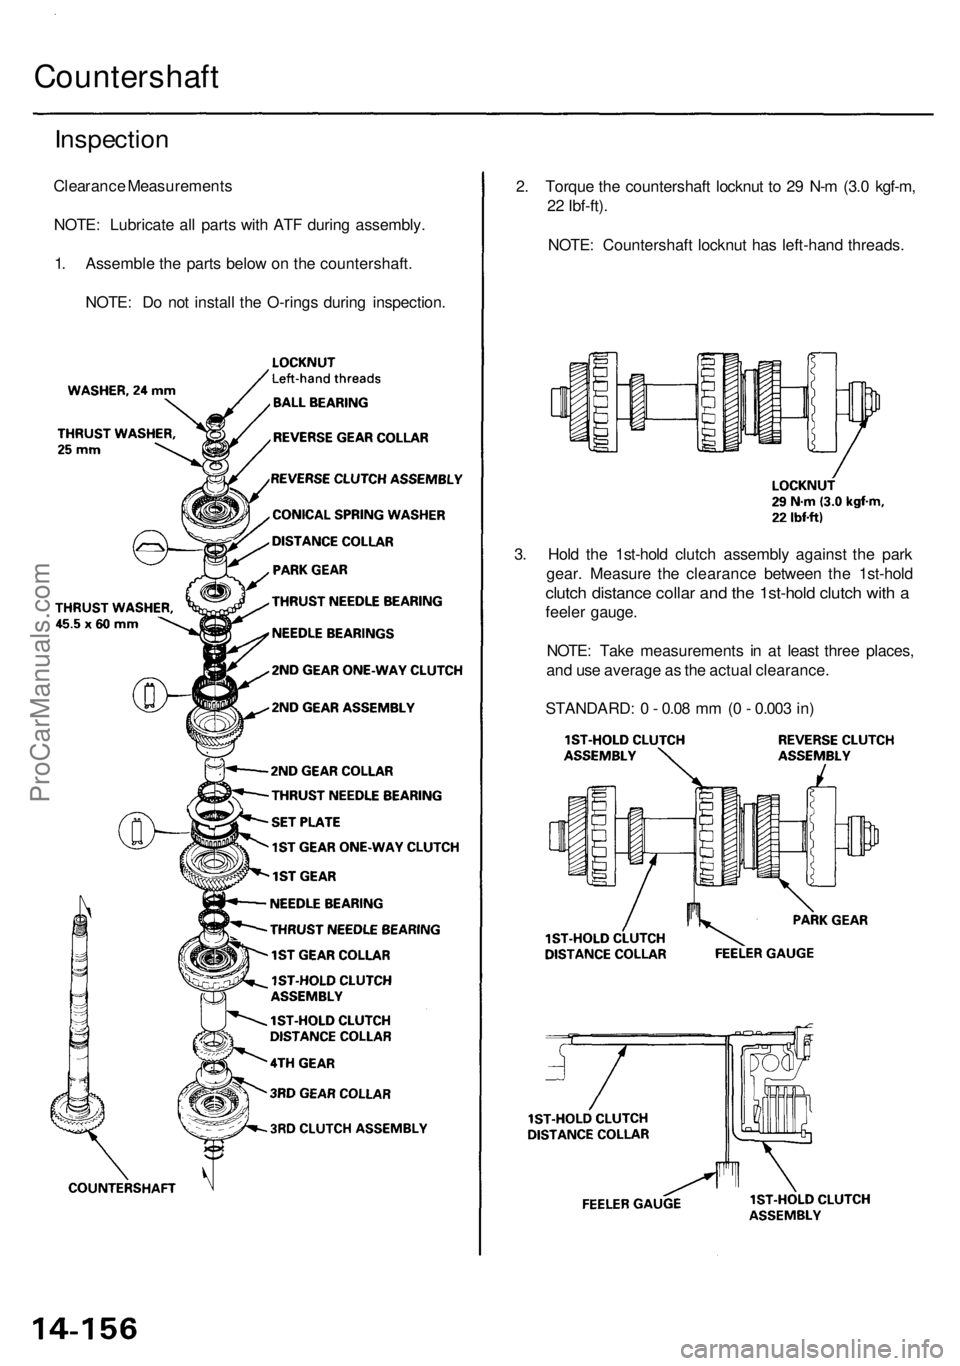
Clearance Measurements
NOTE: Lubricate all parts with ATF during assembly.
1. Assemble the parts below on the countershaft.
NOTE: Do not install the O-rings during inspection.
2. Torque the countershaft locknut to 29 N-m (3.0 kgf-m,
22 Ibf-ft).
NOTE: Countershaft locknut has left-hand threads.
3. Hold the 1st-hold clutch assembly against the park
gear. Measure the clearance between the 1st-hold
clutch distance collar and the 1st-hold clutch with a
feeler gauge.
NOTE: Take measurements in at least three places,
and use average as the actual clearance.
STANDARD: 0 - 0.08 mm (0 - 0.003 in)ProCarManuals.com
Page 865 of 1954
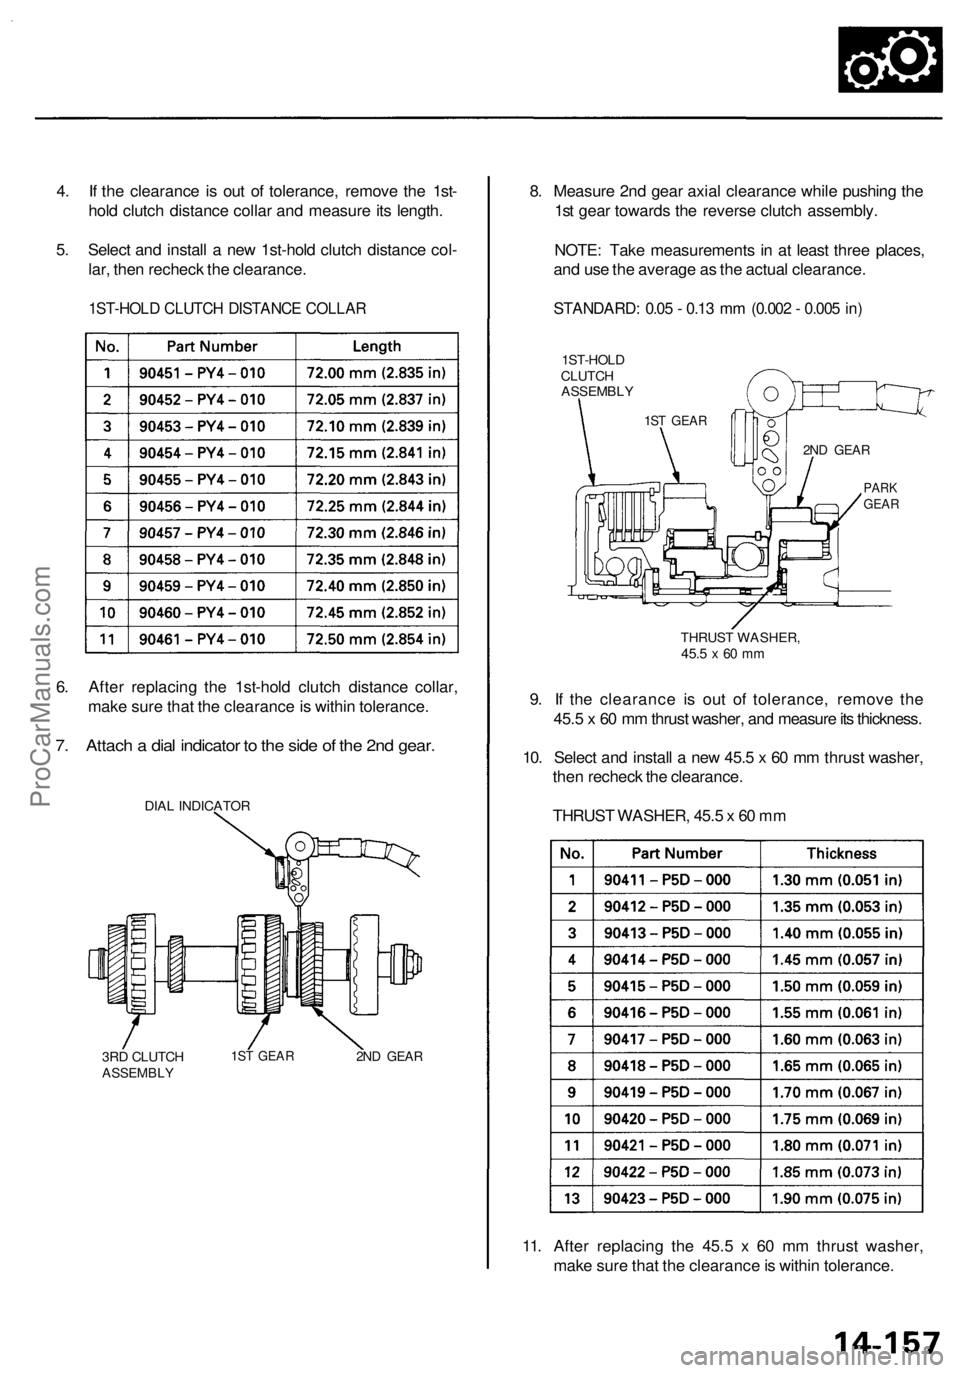
4. I f th e clearanc e i s ou t o f tolerance , remov e th e 1st -
hol d clutc h distanc e colla r an d measur e it s length .
5 . Selec t an d instal l a ne w 1st-hol d clutc h distanc e col -
lar , the n rechec k th e clearance .
1ST-HOLD CLUTC H DISTANC E COLLA R
6. Afte r replacin g th e 1st-hol d clutc h distanc e collar ,
mak e sur e tha t th e clearanc e is withi n tolerance .
7. Attac h a dia l indicato r t o th e sid e o f th e 2n d gear .
DIAL INDICATO R
3R D CLUTC H
ASSEMBL Y1ST GEA R2ND GEA R
8. Measur e 2n d gea r axia l clearanc e whil e pushin g th e
1s t gea r toward s th e revers e clutc h assembly .
NOTE : Tak e measurement s i n a t leas t thre e places ,
an d us e th e averag e a s th e actua l clearance .
STANDARD : 0.0 5 - 0.1 3 m m (0.00 2 - 0.00 5 in )
11. Afte r replacin g th e 45. 5 x 6 0 m m thrus t washer ,
mak e sur e tha t th e clearanc e is withi n tolerance .
9
. I f th e clearanc e i s ou t o f tolerance , remov e th e
45. 5 x 6 0 m m thrus t washer , an d measur e it s thickness .
10 . Selec t an d instal l a ne w 45. 5 x 6 0 m m thrus t washer ,
the n rechec k th e clearance .
THRUS T WASHER , 45. 5 x 60 m m
1ST-HOL D
CLUTC H
ASSEMBL Y
1ST GEA R
2ND GEA R
PARKGEA R
THRUS T WASHER ,45.5 x 60 m m
ProCarManuals.com
Page 866 of 1954
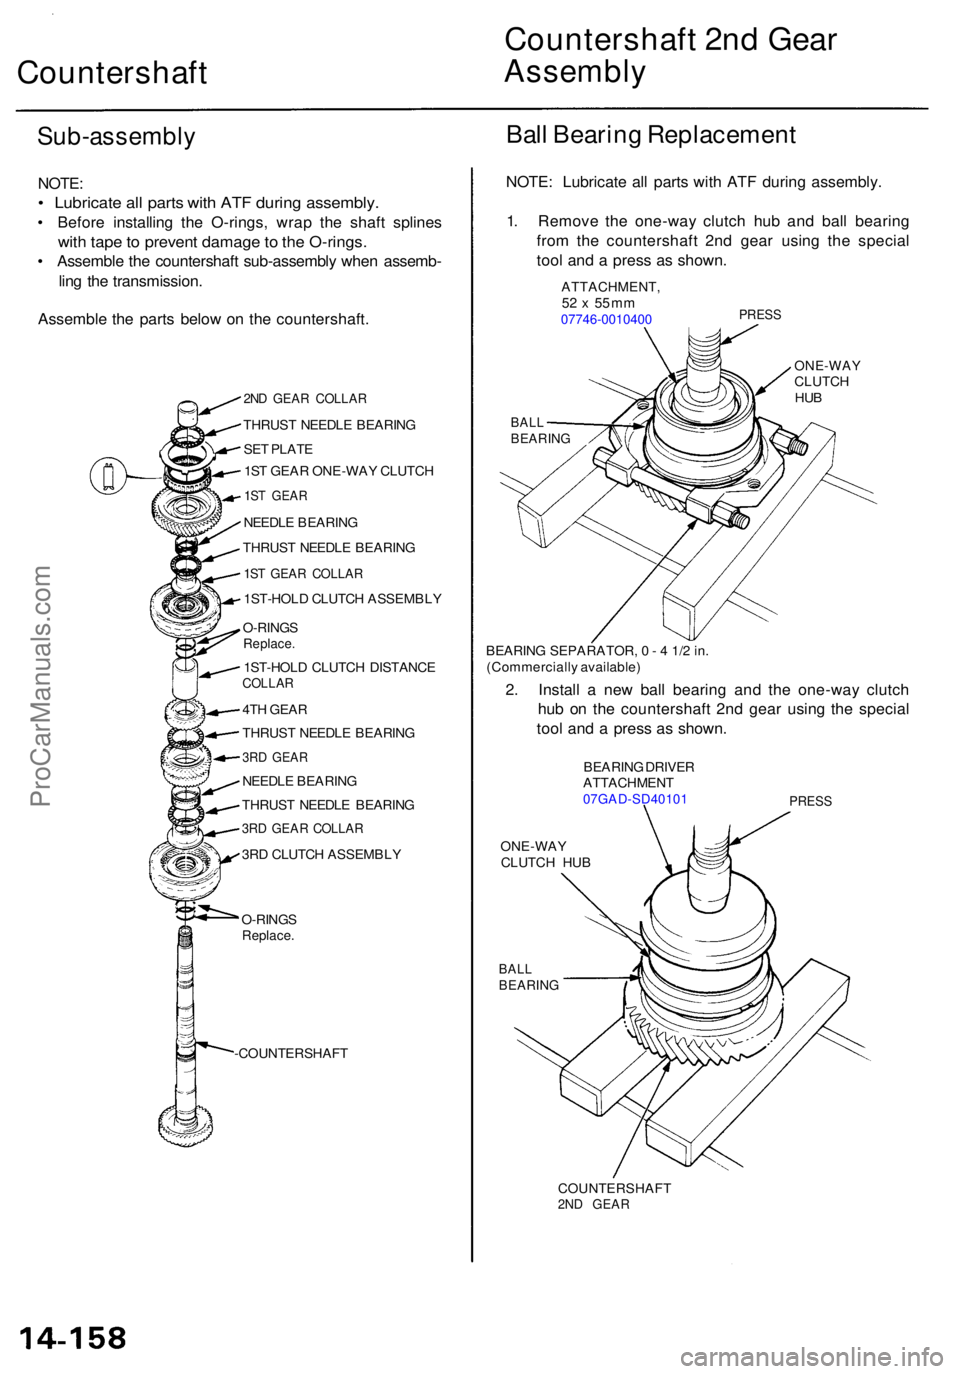
Countershaft Countershaf
t 2n d Gea rAssembl y
Sub-assembl y
NOTE:
• Lubricat e al l part s wit h AT F durin g assembly .
• Befor e installin g th e O-rings , wra p th e shaf t spline s
with tap e to preven t damag e to th e O-rings .
• Assembl e th e countershaf t sub-assembl y whe n assemb -
lin g th e transmission .
Assembl e th e part s belo w o n th e countershaft .
2ND GEA R COLLA R
THRUST NEEDL E BEARIN G
SE T PLAT E
1S T GEA R ONE-WA Y CLUTC H
1ST GEA R
NEEDL E BEARIN G
THRUS T NEEDL E BEARIN G
1ST GEA R COLLA R
1ST-HOL D CLUTC H ASSEMBL Y
O-RING S
Replace .
1ST-HOL D CLUTC H DISTANC ECOLLAR
4TH GEA R
THRUS T NEEDL E BEARIN G
3RD GEA R
NEEDL E BEARIN G
THRUS T NEEDL E BEARIN G
3RD GEA R COLLA R
3RD CLUTC H ASSEMBL Y
O-RING S
Replace .
-COUNTERSHAF T
Ball Bearin g Replacemen t
NOTE: Lubricat e al l part s wit h AT F during assembly .
1 . Remov e th e one-wa y clutc h hu b an d bal l bearin g
fro m th e countershaf t 2n d gea r usin g th e specia l
too l an d a pres s a s shown .
ATTACHMENT ,52 x 5 5 m m07746-001040 0 PRESS
ONE-WA YCLUTCHHUB
2. Instal l a ne w bal l bearin g an d th e one-wa y clutc h
hu b o n th e countershaf t 2n d gea r usin g th e specia l
too l an d a pres s a s shown .
BEARIN G DRIVE R
ATTACHMEN T
07GAD-SD4010 1PRESS
ONE-WA Y
CLUTC H HU B
BAL LBEARIN G
COUNTERSHAF T2ND GEA R
BALLBEARIN G
BEARING SEPARATOR , 0 - 4 1/ 2 in .
(Commerciall y available )
ProCarManuals.com
Page 867 of 1954
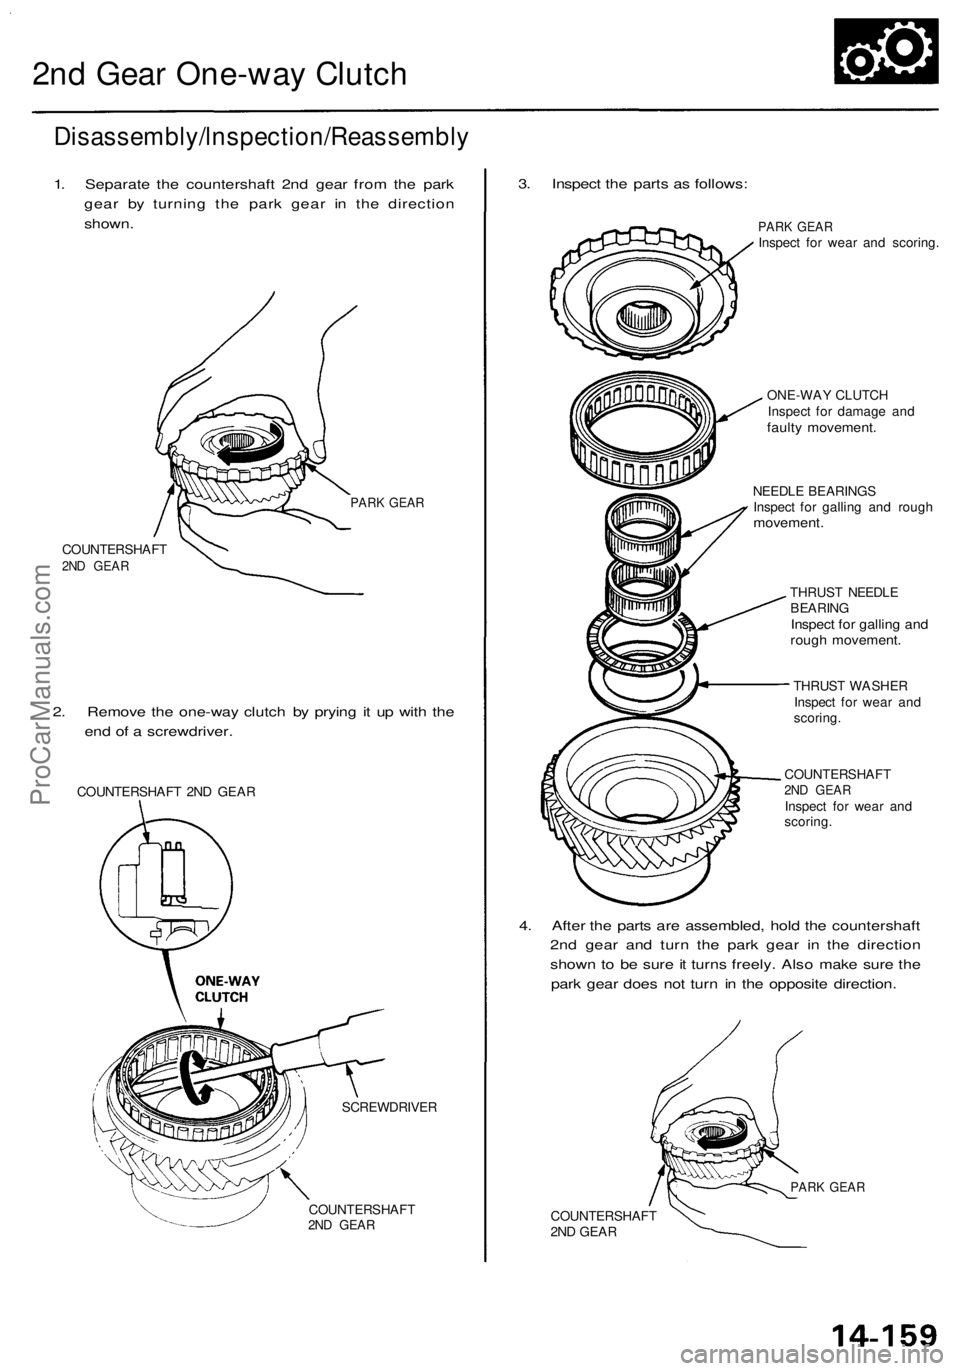
2nd Gear One-way Clutch
Disassembly/lnspection/Reassembly
1. Separate the countershaft 2nd gear from the park
gear by turning the park gear in the direction
shown.
COUNTERSHAFT
2ND GEAR
PARK GEAR
2. Remove the one-way clutch by prying it up with the
end of a screwdriver.
COUNTERSHAFT 2ND GEAR
SCREWDRIVER
COUNTERSHAFT
2ND GEAR
3. Inspect the parts as follows:
PARK GEAR
Inspect for wear and scoring.
ONE-WAY CLUTCH
Inspect for damage and
faulty movement.
NEEDLE BEARINGS
Inspect for galling and rough
movement.
THRUST NEEDLE
BEARING
Inspect for galling and
rough movement.
THRUST WASHER
Inspect for wear and
scoring.
COUNTERSHAFT
2ND GEAR
Inspect for wear and
scoring.
4. After the parts are assembled, hold the countershaft
2nd gear and turn the park gear in the direction
shown to be sure it turns freely. Also make sure the
park gear does not turn in the opposite direction.
COUNTERSHAFT
2ND GEAR
PARK GEARProCarManuals.com
Page 868 of 1954
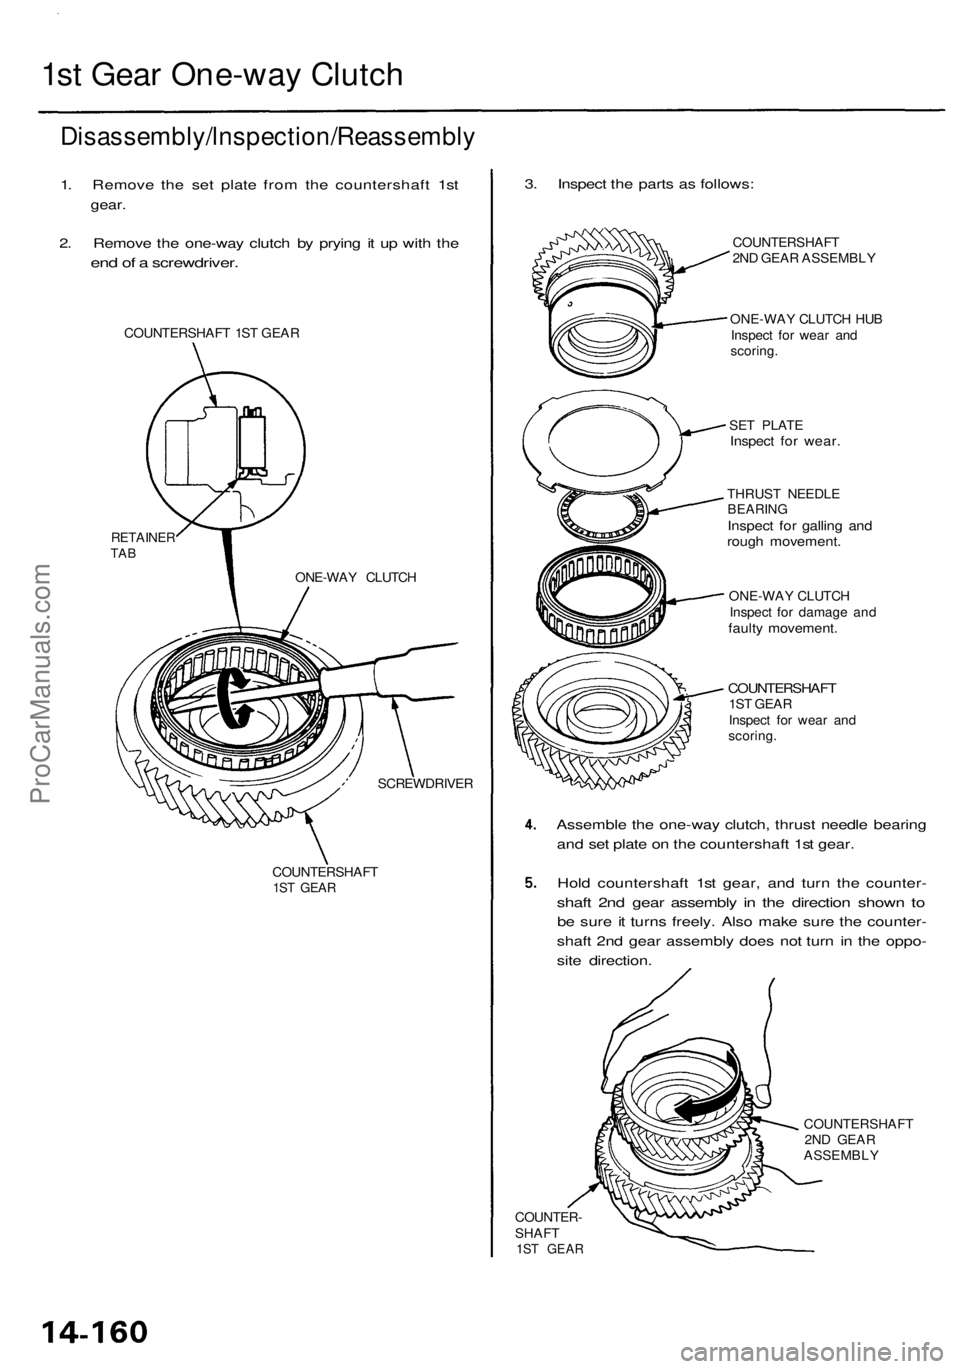
1st Gear One-way Clutch
Disassembly/lnspection/Reassembly
1. Remove the set plate from the countershaft 1st
gear.
2. Remove the one-way clutch by prying it up with the
end of a screwdriver.
COUNTERSHAFT 1ST GEAR
RETAINER
TAB
SCREWDRIVER
COUNTERSHAFT
1ST GEAR
3. Inspect the parts as follows:
COUNTERSHAFT
2ND GEAR ASSEMBLY
ONE-WAY CLUTCH HUB
Inspect for wear and
scoring.
SET PLATE
Inspect for wear.
THRUST NEEDLE
BEARING
Inspect for galling and
rough movement.
ONE-WAY CLUTCH
Inspect for damage and
faulty movement.
COUNTERSHAFT
1ST GEAR
Inspect for wear and
scoring.
Assemble the one-way clutch, thrust needle bearing
and set plate on the countershaft 1st gear.
Hold countershaft 1st gear, and turn the counter-
shaft 2nd gear assembly in the direction shown to
be sure it turns freely. Also make sure the counter-
shaft 2nd gear assembly does not turn in the oppo-
site direction.
COUNTER-
SHAFT
1ST GEAR
COUNTERSHAFT
2ND GEAR
ASSEMBLY
ONE-WAY CLUTCHProCarManuals.com
Page 869 of 1954
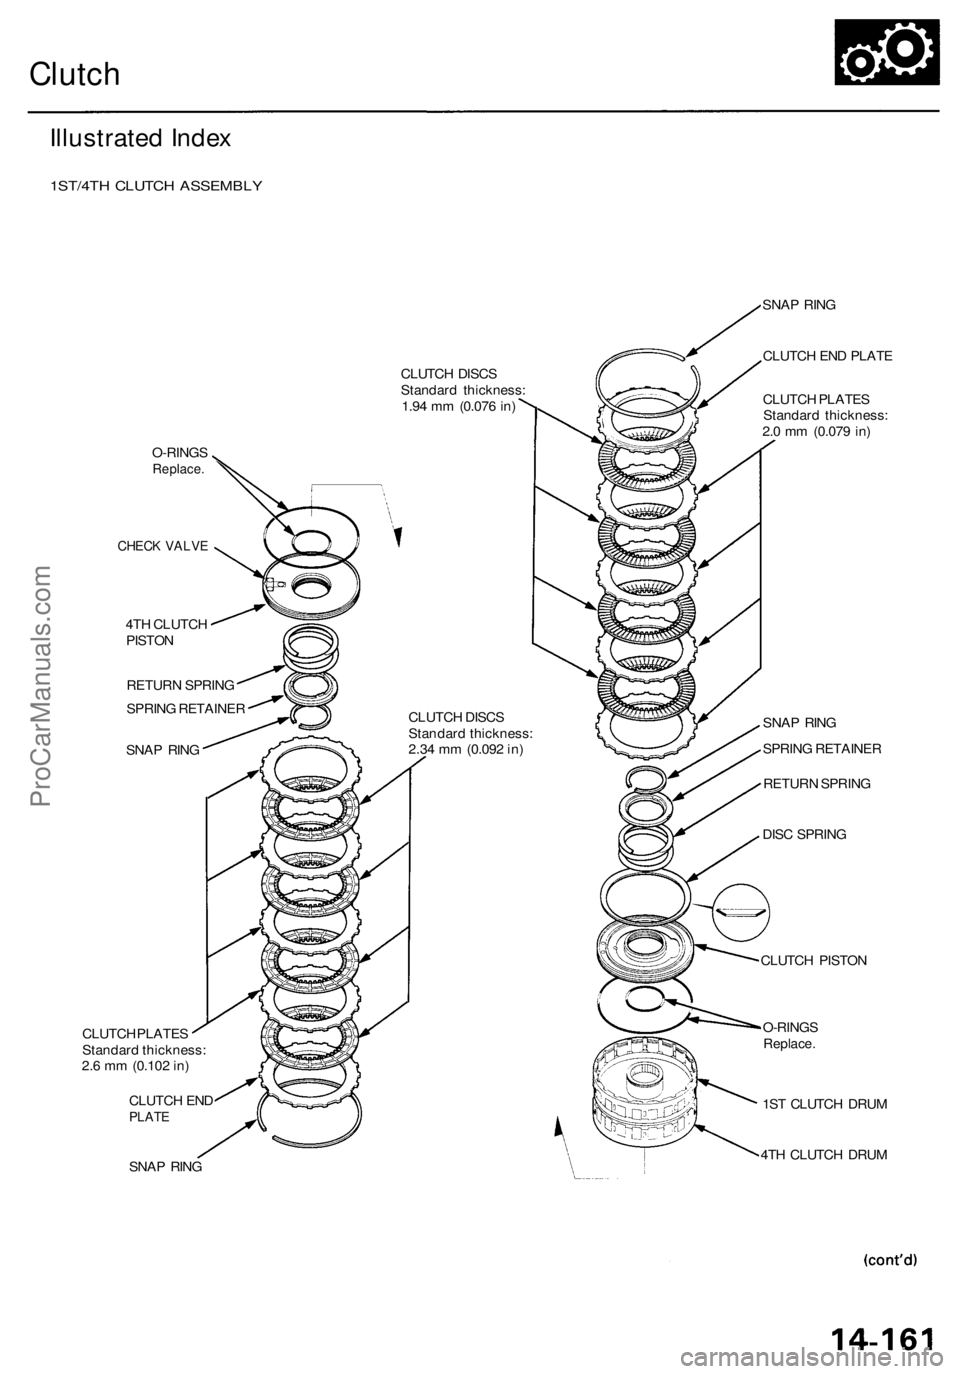
Clutch
Illustrated Index
1ST/4TH CLUTCH ASSEMBLY
O-RINGS
Replace.
CHECK VALVE
4TH CLUTCH
PISTON
RETURN SPRING
SPRING RETAINER
SNAP RING
CLUTCH PLATES
Standard thickness:
2.6 mm (0.102 in)
CLUTCH END
PLATE
SNAP RING
CLUTCH DISCS
Standard thickness:
1.94 mm (0.076 in)
CLUTCH DISCS
Standard thickness:
2.34 mm (0.092 in)
SNAP RING
CLUTCH END PLATE
CLUTCH PLATES
Standard thickness:
2.0 mm (0.079 in)
SNAP RING
SPRING RETAINER
RETURN SPRING
DISC SPRING
CLUTCH PISTON
O-RINGS
Replace.
1ST CLUTCH DRUM
4TH CLUTCH DRUMProCarManuals.com
Page 870 of 1954
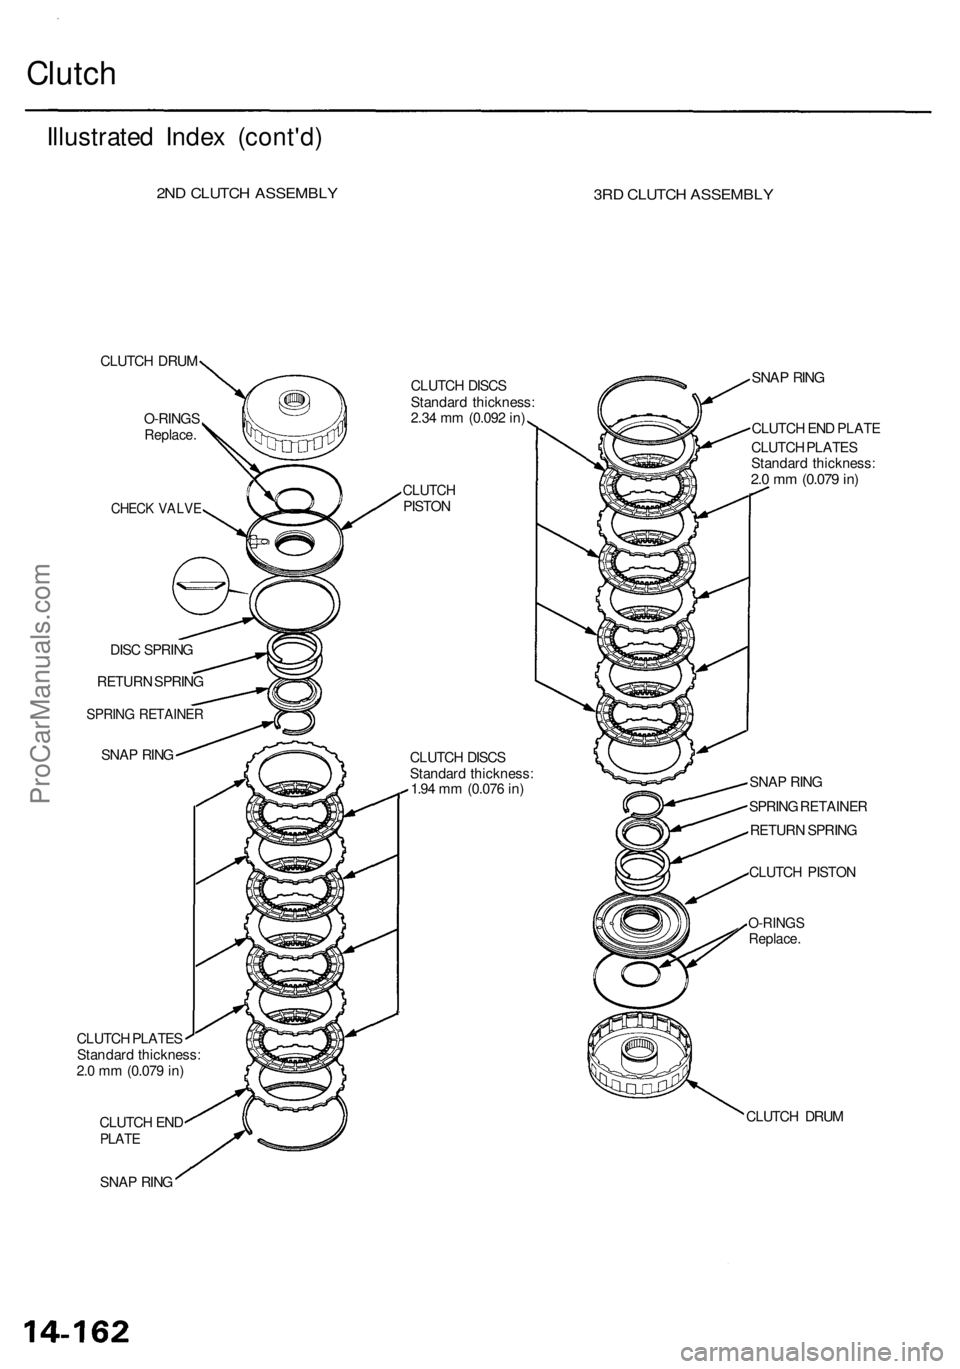
Clutch
Illustrate d Inde x (cont'd )
2ND CLUTC H ASSEMBL Y3RD CLUTC H ASSEMBL Y
CLUTCH DRU M
O-RING S
Replace .
CHECK VALV E
CLUTC H PLATE S
Standar d thickness :
2. 0 m m (0.07 9 in )
CLUTC H EN D
PLAT E
SNAP RIN G CLUTC
H DISC S
Standar d thickness :
2.3 4 m m (0.09 2 in )
CLUTC HPISTON
CLUTC H DISC S
Standar d thickness :
1.9 4 m m (0.07 6 in )
SNA P RIN G
CLUTC H EN D PLAT E
CLUTC H PLATE S
Standar d thickness :
2.0 m m (0.07 9 in )
SNA P RIN G
SPRIN G RETAINE R
RETUR N SPRIN G
CLUTC H PISTO N
O-RING SReplace .
CLUTCH DRU M
DIS
C SPRIN G
RETUR N SPRIN G
SPRING RETAINE R
SNAP RIN G
ProCarManuals.com