ACURA RL KA9 1996 Service Repair Manual
Manufacturer: ACURA, Model Year: 1996, Model line: RL KA9, Model: ACURA RL KA9 1996Pages: 1954, PDF Size: 61.44 MB
Page 891 of 1954
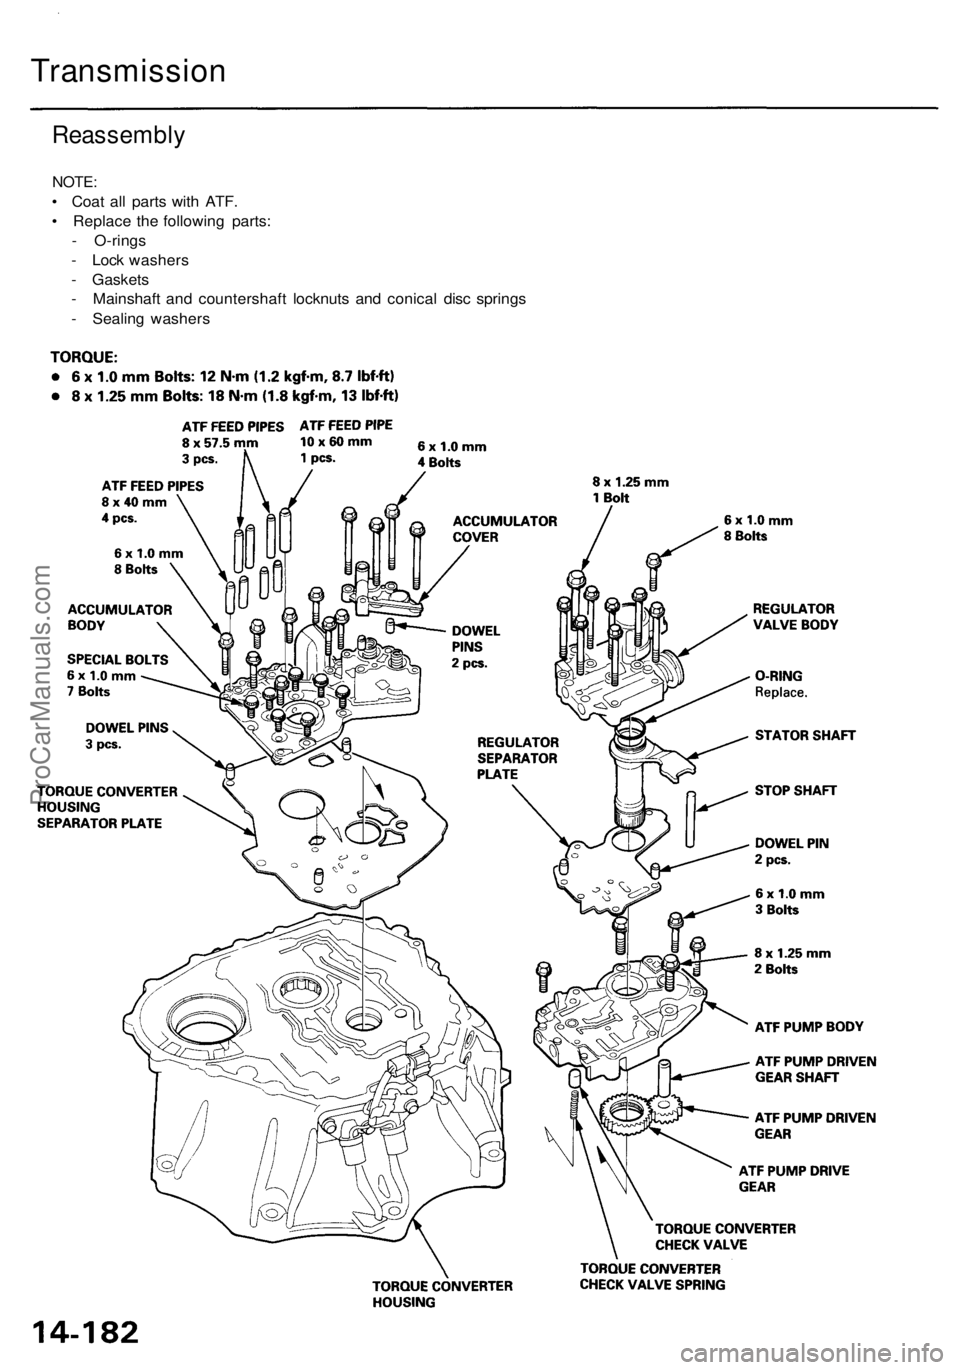
Transmission
Reassembly
NOTE:
• Coat all parts with ATF.
• Replace the following parts:
- O-rings
- Lock washers
- Gaskets
- Mainshaft and countershaft locknuts and conical disc springs
- Sealing washersProCarManuals.com
Page 892 of 1954
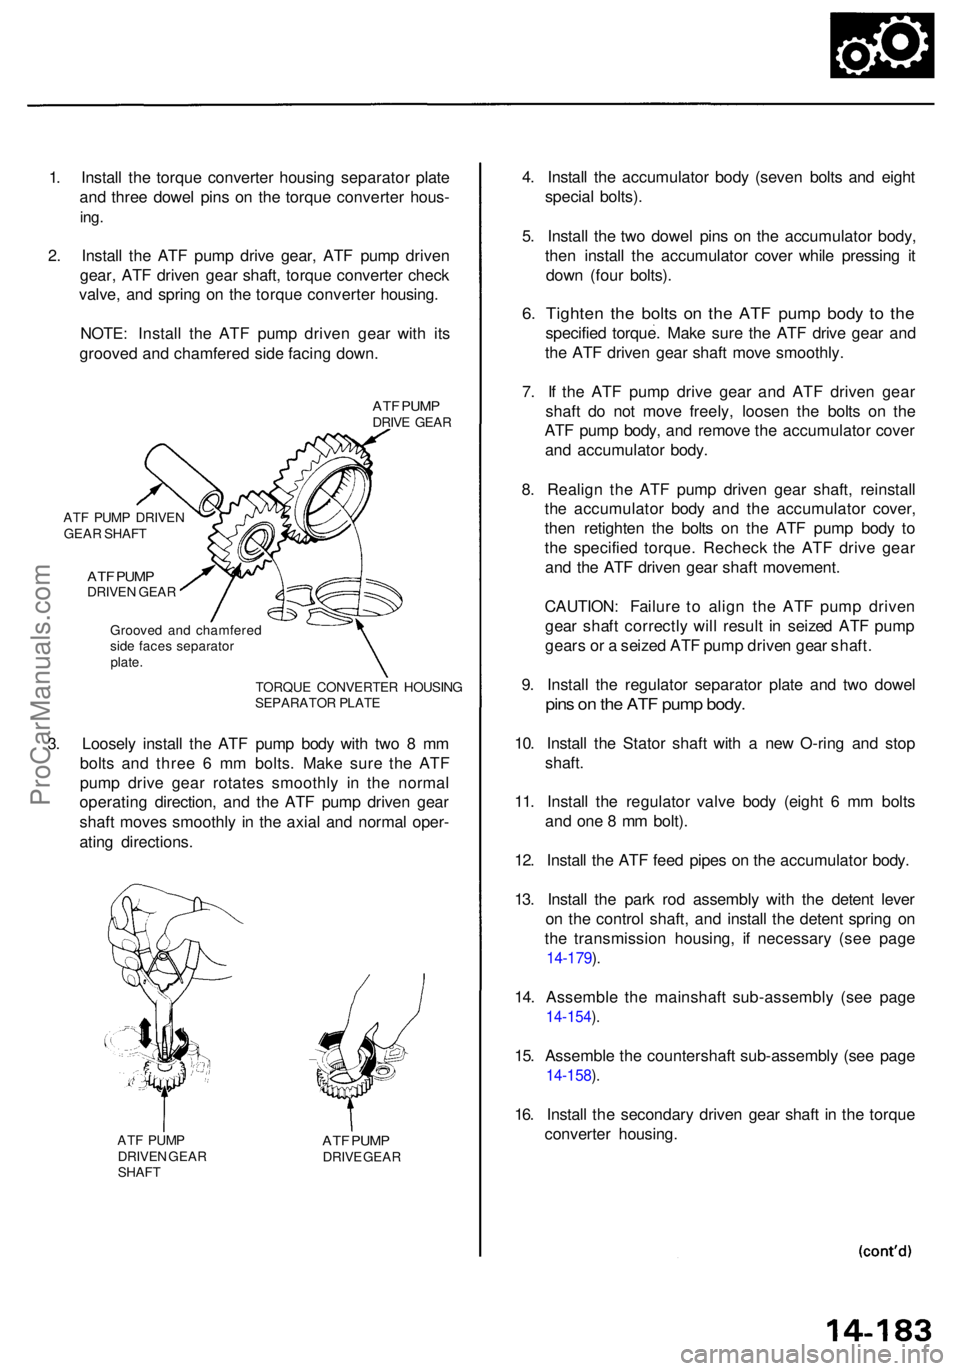
1. Instal l th e torqu e converte r housin g separato r plat e
an d thre e dowe l pin s o n th e torqu e converte r hous -
ing.
2. Instal l th e AT F pum p driv e gear , AT F pum p drive n
gear , AT F drive n gea r shaft , torqu e converte r chec k
valve , an d sprin g o n th e torqu e converte r housing .
NOTE : Instal l th e AT F pum p drive n gea r wit h it s
groove d an d chamfere d sid e facin g down .
ATF PUM PDRIVE GEA R
AT F PUM P
DRIVE N GEAR
SHAF T
ATF PUM PDRIV E GEA R
4. Instal l th e accumulato r bod y (seve n bolt s an d eigh t
specia l bolts) .
5 . Instal l th e tw o dowe l pin s o n th e accumulato r body ,
the n instal l th e accumulato r cove r whil e pressin g i t
dow n (fou r bolts) .
6. Tighte n th e bolt s o n th e AT F pum p bod y t o th e
specifie d torque . Mak e sur e th e AT F driv e gea r an d
th e AT F drive n gea r shaf t mov e smoothly .
7 . I f th e AT F pum p driv e gea r an d AT F drive n gea r
shaf t d o no t mov e freely , loose n th e bolt s o n th e
AT F pum p body , an d remov e th e accumulato r cove r
an d accumulato r body .
8 . Realig n th e AT F pum p drive n gea r shaft , reinstal l
th e accumulato r bod y an d th e accumulato r cover ,
the n retighte n th e bolt s o n th e AT F pum p bod y t o
th e specifie d torque . Rechec k th e AT F driv e gea r
an d th e AT F drive n gea r shaf t movement .
CAUTION : Failur e t o alig n th e AT F pum p drive n
gea r shaf t correctl y wil l resul t i n seize d AT F pum p
gear s o r a seize d AT F pum p drive n gea r shaft .
9 . Instal l th e regulato r separato r plat e an d tw o dowe l
pins o n th e AT F pum p body .
10. Instal l th e Stato r shaf t wit h a ne w O-rin g an d sto p
shaft .
11 . Instal l th e regulato r valv e bod y (eigh t 6 m m bolt s
an d on e 8 m m bolt) .
12 . Instal l th e AT F fee d pipe s o n th e accumulato r body .
13 . Instal l th e par k ro d assembl y wit h th e deten t leve r
o n th e contro l shaft , an d instal l th e deten t sprin g o n
th e transmissio n housing , i f necessar y (se e pag e
14-179 ).
14 . Assembl e th e mainshaf t sub-assembl y (se e pag e
14-154 ).
15 . Assembl e th e countershaf t sub-assembl y (se e pag e
14-158 ).
16 . Instal l th e secondar y drive n gea r shaf t i n th e torqu e
converte r housing .
3
. Loosel y instal l th e AT F pum p bod y wit h tw o 8 m m
bolt s an d thre e 6 m m bolts . Mak e sur e th e AT F
pum p driv e gea r rotate s smoothl y i n th e norma l
operatin g direction , an d th e AT F pum p drive n gea r
shaf t move s smoothly in th e axia l an d norma l oper -
atin g directions .
TORQUE CONVERTE R HOUSIN G
SEPARATO R PLAT E
Groove
d an d chamfere d
sid e face s separato r
plate .
AT
F PUM P DRIVE N
GEA R SHAF T
ATF PUM PDRIVE N GEA R
ProCarManuals.com
Page 893 of 1954
Transmission
Reassembly (cont'd )
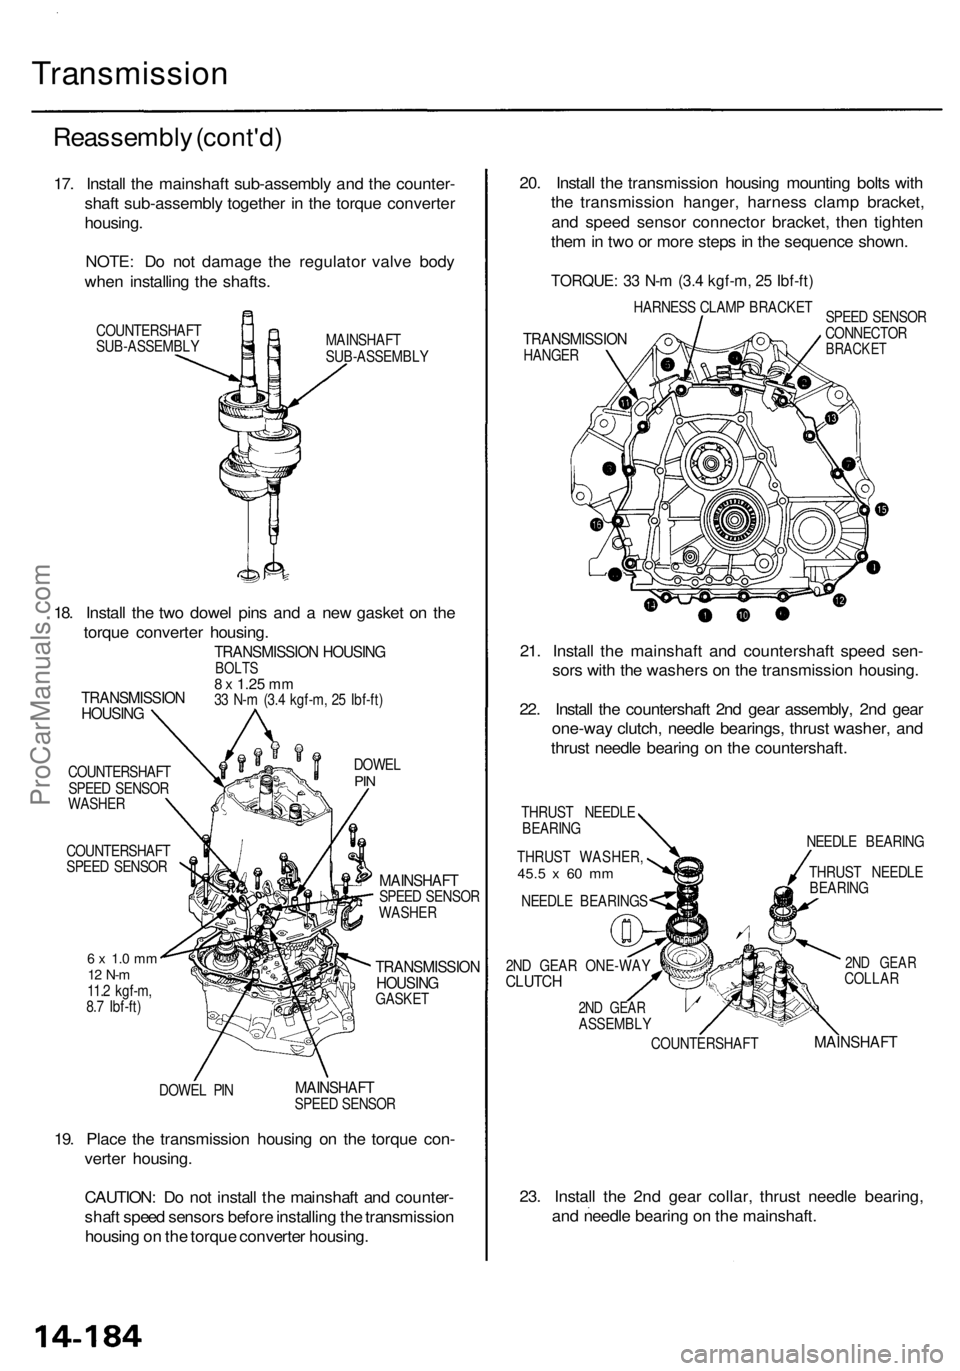
17. Instal l th e mainshaf t sub-assembl y an d th e counter -
shaf t sub-assembl y togethe r i n th e torqu e converte r
housing .
NOTE : D o no t damag e th e regulato r valv e bod y
whe n installin g th e shafts .
COUNTERSHAF T
SUB-ASSEMBL Y MAINSHAF
T
SUB-ASSEMBL Y
COUNTERSHAF T
SPEE D SENSO R
WASHE R
COUNTERSHAF T
SPEE D SENSO R
6 x 1. 0 m m12 N- m11.2 kgf-m ,
8. 7 Ibf-ft )
DOWE L PI N DOWE
L
PIN
MAINSHAF TSPEED SENSO R
WASHE R
TRANSMISSIO NHOUSINGGASKET
MAINSHAF TSPEED SENSO R
19. Plac e th e transmissio n housin g o n th e torqu e con -
verte r housing .
CAUTION : D o no t instal l th e mainshaf t an d counter -
shaf t spee d sensor s befor e installin g th e transmissio n
housin g o n th e torqu e converte r housing . 20
. Instal l th e transmissio n housin g mountin g bolt s wit h
th e transmissio n hanger , harnes s clam p bracket ,
an d spee d senso r connecto r bracket , the n tighte n
the m in tw o o r mor e step s in th e sequenc e shown .
TORQUE : 3 3 N- m (3. 4 kgf-m , 2 5 Ibf-ft )
HARNES S CLAM P BRACKE T
TRANSMISSIO NHANGER SPEE
D SENSO R
CONNECTO RBRACKET
21. Instal l th e mainshaf t an d countershaf t spee d sen -
sor s wit h th e washer s o n th e transmissio n housing .
22 . Instal l th e countershaf t 2n d gea r assembly , 2n d gea r
one-wa y clutch , needl e bearings , thrus t washer , an d
thrus t needl e bearin g o n th e countershaft .
THRUST NEEDL E
BEARIN G
THRUS T WASHER ,
45.5 x 60 m m
NEEDL E BEARING S NEEDL
E BEARIN G
COUNTERSHAF TTHRUS
T NEEDL E
BEARIN G
2ND GEA RCOLLA R
MAINSHAF T
23. Instal l th e 2n d gea r collar , thrus t needl e bearing ,
an d needl e bearin g o n th e mainshaft .
TRANSMISSIO NHOUSING
TRANSMISSIO N HOUSIN GBOLTS8 x 1.2 5 mm33 N- m (3. 4 kgf-m , 2 5 Ibf-ft )
18. Instal l th e tw o dowe l pin s an d a ne w gaske t o n th e
torqu e converte r housing .
2ND GEA R ONE-WA YCLUTCH
2ND GEA RASSEMBL Y
ProCarManuals.com
Page 894 of 1954
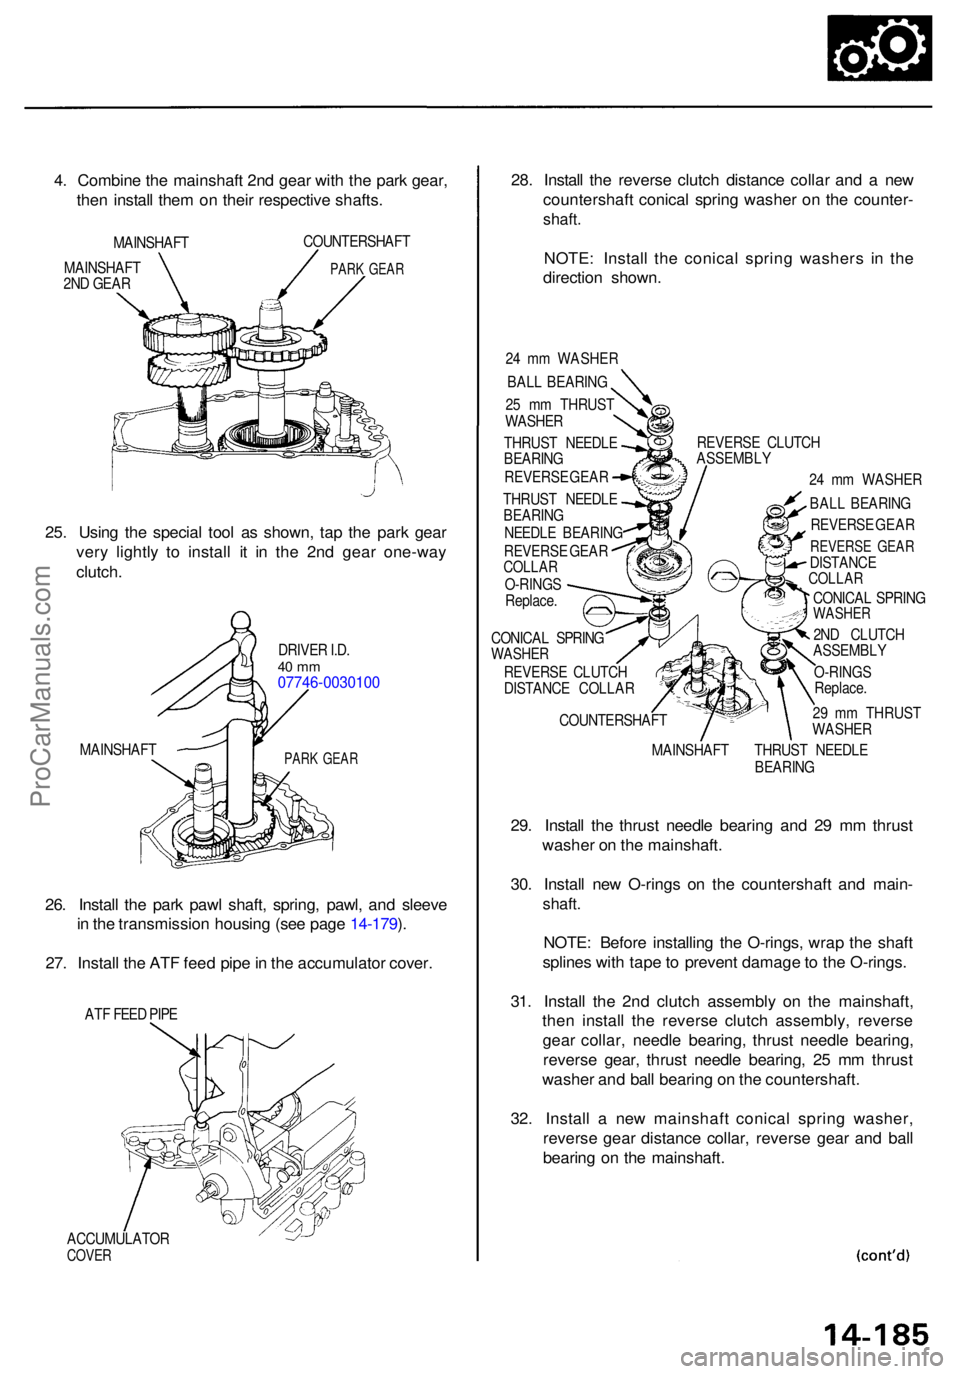
4. Combin e th e mainshaf t 2n d gea r wit h th e par k gear ,
the n instal l the m o n thei r respectiv e shafts .
MAINSHAF T
MAINSHAF T
2N D GEA R COUNTERSHAF
T
PARK GEA R
25. Usin g th e specia l too l a s shown , ta p th e par k gea r
ver y lightl y t o instal l i t i n th e 2n d gea r one-wa y
clutch .
DRIVE R I.D .40 m m07746-003010 0
MAINSHAFTPARK GEA R
26. Instal l th e par k paw l shaft , spring , pawl , an d sleev e
i n th e transmissio n housin g (se e pag e 14-179 ).
27 . Instal l th e AT F fee d pip e in th e accumulato r cover .
ATF FEE D PIP E
ACCUMULATO R
COVER
28. Instal l th e revers e clutc h distanc e colla r an d a ne w
countershaf t conica l sprin g washe r o n th e counter -
shaft.
NOTE : Instal l th e conica l sprin g washer s i n th e
directio n shown .
24 m m WASHE R
BAL L BEARIN G
2 5 m m THRUS T
WASHE R
THRUS T NEEDL E
BEARIN G
REVERS E GEA R
THRUS T NEEDL E
BEARIN G
NEEDL E BEARIN G
REVERS E GEA R
COLLA RO-RING S
Replace . REVERS
E CLUTC H
ASSEMBL Y
24 m m WASHE R
BAL L BEARIN G
REVERS E GEA R
REVERS E GEA RDISTANC ECOLLAR
CONICA L SPRIN GWASHE R
2ND CLUTC H
ASSEMBL Y
O-RING S
Replace .
2 9 m m THRUS T
WASHE R
MAINSHAF T THRUS T NEEDL E
BEARIN G
CONICA
L SPRIN G
WASHE R
REVERS E CLUTC H
DISTANC E COLLA R
COUNTERSHAF T
29. Instal l th e thrus t needl e bearin g an d 2 9 m m thrus t
washe r o n th e mainshaft .
30 . Instal l ne w O-ring s o n th e countershaf t an d main -
shaft.
NOTE : Befor e installin g th e O-rings , wra p th e shaf t
spline s wit h tap e to preven t damag e to th e O-rings .
31 . Instal l th e 2n d clutc h assembl y o n th e mainshaft ,
the n instal l th e revers e clutc h assembly , revers e
gea r collar , needl e bearing , thrus t needl e bearing ,
revers e gear , thrus t needl e bearing , 2 5 m m thrus t
washe r an d bal l bearin g o n th e countershaft .
32 . Instal l a ne w mainshaf t conica l sprin g washer ,
revers e gea r distanc e collar , revers e gea r an d bal l
bearin g o n th e mainshaft .
ProCarManuals.com
Page 895 of 1954
Transmission
Reassembly (cont'd )
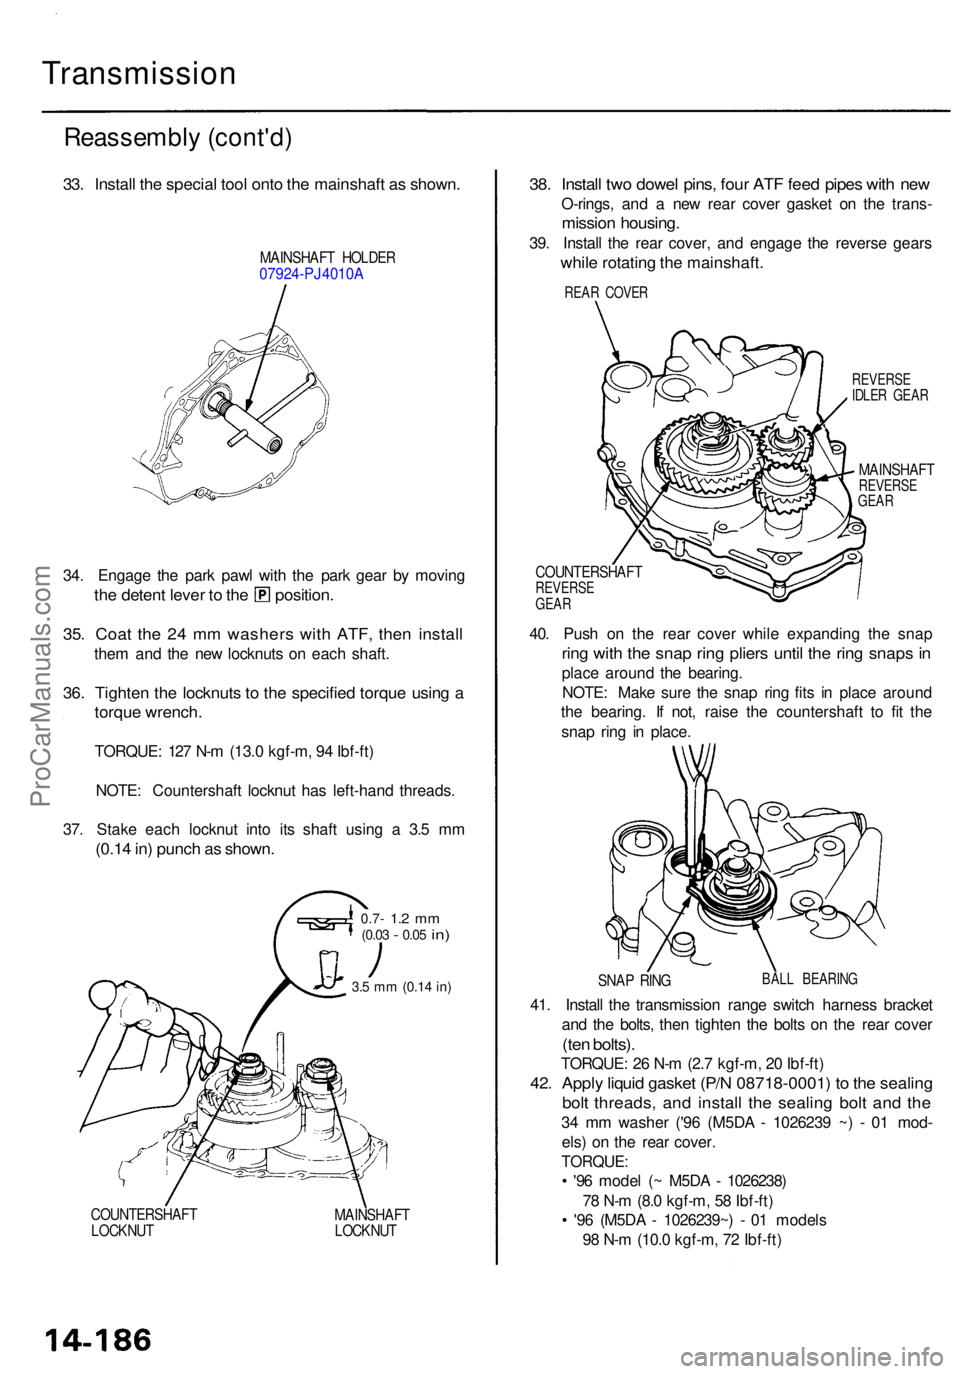
33. Instal l th e specia l too l ont o th e mainshaf t a s shown .
MAINSHAF T HOLDE R07924-PJ4010 A
34. Engag e th e par k paw l wit h th e par k gea r b y movin g
the deten t leve r t o th e position .
35. Coa t th e 2 4 m m washer s wit h ATF , the n instal l
them an d th e ne w locknut s o n eac h shaft .
36. Tighte n th e locknut s t o th e specifie d torqu e usin g a
torqu e wrench .
TORQUE : 12 7 N- m (13. 0 kgf-m , 9 4 Ibf-ft )
NOTE : Countershaf t locknu t ha s left-han d threads .
37 . Stak e eac h locknu t int o it s shaf t usin g a 3. 5 m m
(0.1 4 in ) punc h a s shown .
0.7- 1.2 m m(0.0 3 - 0.05 in)
3.5 m m (0.1 4 in )
COUNTERSHAF T
LOCKNU T MAINSHAF
T
LOCKNU T
38. Instal l tw o dowe l pins , fou r AT F fee d pipe s wit h ne w
O-rings , an d a ne w rea r cove r gaske t o n th e trans -
mission housing .
39. Instal l th e rea r cover , an d engag e th e revers e gear s
while rotatin g th e mainshaft .
REVERSE
IDLE R GEA R
MAINSHAF TREVERSE
GEA R
COUNTERSHAF TREVERSEGEAR
40. Pus h o n th e rea r cove r whil e expandin g th e sna p
ring wit h th e sna p rin g plier s unti l th e rin g snap s i n
plac e aroun d th e bearing .
NOTE : Mak e sur e th e sna p rin g fit s i n plac e aroun d
th e bearing . I f not , rais e th e countershaf t t o fi t th e
sna p rin g i n place .
SNAP RIN GBAL L BEARIN G
41. Instal l th e transmissio n rang e switc h harnes s bracke t
an d th e bolts , the n tighte n th e bolt s o n th e rea r cove r
(ten bolts) .
TORQUE : 2 6 N- m (2. 7 kgf-m , 2 0 Ibf-ft )
42. Appl y liqui d gaske t (P/ N 08718-0001 ) t o th e sealin g
bolt threads , an d instal l th e sealin g bol t an d th e
34 m m washe r ('9 6 (M5D A - 102623 9 ~ ) - 0 1 mod -
els ) o n th e rea r cover .
TORQUE :
• '9 6 mode l ( ~ M5D A - 1026238 )
7 8 N- m (8. 0 kgf-m , 5 8 Ibf-ft )
• '9 6 (M5D A - 1026239~ ) - 0 1 model s
9 8 N- m (10. 0 kgf-m , 7 2 Ibf-ft )
REAR COVE R
ProCarManuals.com
Page 896 of 1954
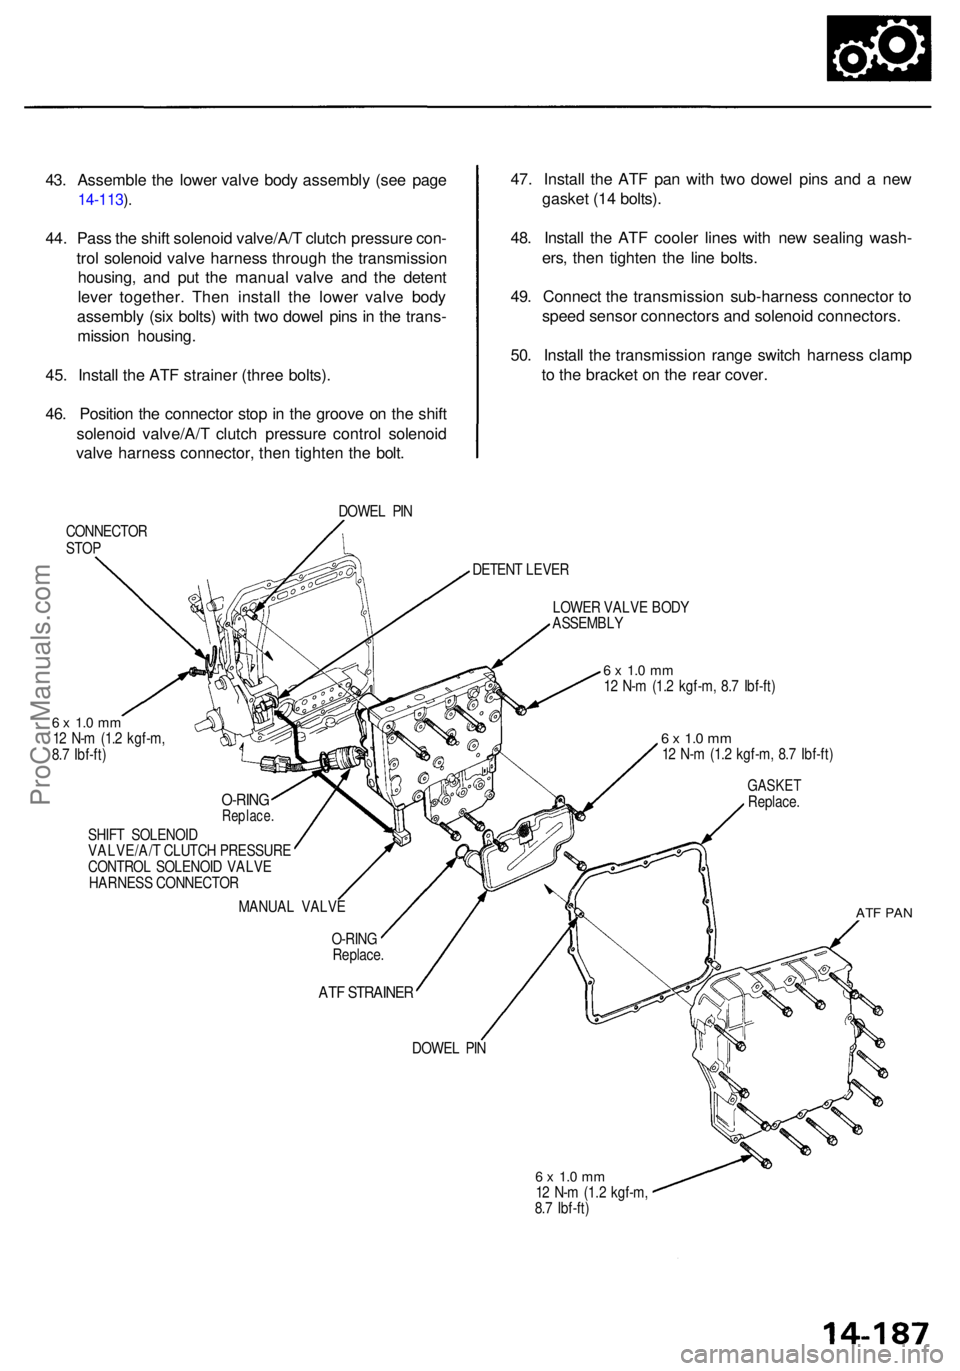
43. Assembl e th e lowe r valv e bod y assembl y (se e pag e
14-113 ).
44 . Pas s th e shif t solenoi d valve/A/ T clutc h pressur e con -
tro l solenoi d valv e harnes s throug h th e transmissio n
housing , an d pu t th e manua l valv e an d th e deten t
leve r together . The n instal l th e lowe r valv e bod y
assembl y (si x bolts ) wit h tw o dowe l pin s i n th e trans -
missio n housing .
45 . Instal l th e AT F straine r (thre e bolts) .
46 . Positio n th e connecto r sto p in th e groov e o n th e shif t
solenoi d valve/A/ T clutc h pressur e contro l solenoi d
valv e harnes s connector , the n tighte n th e bolt . 47
. Instal l th e AT F pa n wit h tw o dowe l pin s an d a ne w
gaske t (1 4 bolts) .
48 . Instal l th e AT F coole r line s wit h ne w sealin g wash -
ers , the n tighte n th e lin e bolts .
49 . Connec t th e transmissio n sub-harnes s connecto r t o
spee d senso r connector s an d solenoi d connectors .
50 . Instal l th e transmissio n rang e switc h harnes s clam p
t o th e bracke t o n th e rea r cover .
DOWE L PI N
CONNECTO R
STO P
DETENT LEVE R
LOWE R VALV E BOD Y
ASSEMBL Y
6 x 1. 0 m m12 N- m (1. 2 kgf-m ,
8. 7 Ibf-ft )
O-RIN GReplace .
SHIFT SOLENOI D
VALVE/A/ T CLUTC H PRESSUR E
CONTRO L SOLENOI D VALV E
HARNES S CONNECTO R
6 x 1. 0 m m12 N- m (1. 2 kgf-m , 8. 7 Ibf-ft )
6 x 1. 0 m m12 N- m (1. 2 kgf-m , 8. 7 Ibf-ft )
GASKE TReplace .
MANUA L VALV E
ATF PA N
O-RIN G
Replace .
ATF STRAINE R
DOWEL PI N
6 x 1. 0 m m12 N- m (1. 2 kgf-m ,
8. 7 Ibf-ft )
ProCarManuals.com
Page 897 of 1954
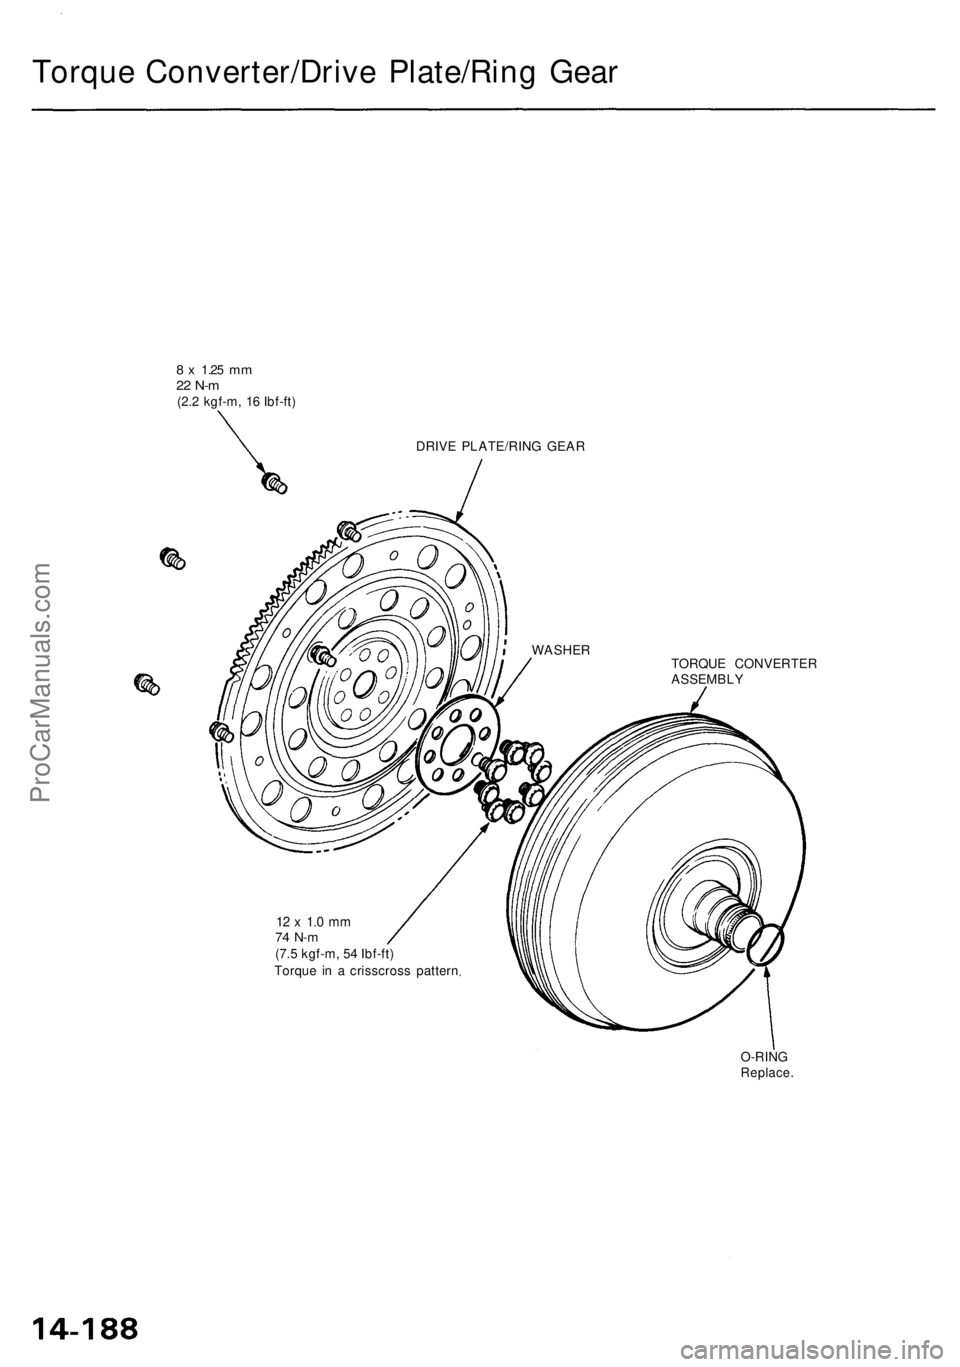
Torque Converter/Drive Plate/Ring Gear
8 x
1.25
mm
22 N-m
(2.2 kgf-m, 16 Ibf-ft)
DRIVE PLATE/RING GEAR
TORQUE CONVERTER
ASSEMBLY
12 x 1.0 mm
74 N-m
(7.5 kgf-m, 54 Ibf-ft)
Torque in a crisscross pattern
O-RING
Replace.
WASHERProCarManuals.com
Page 898 of 1954
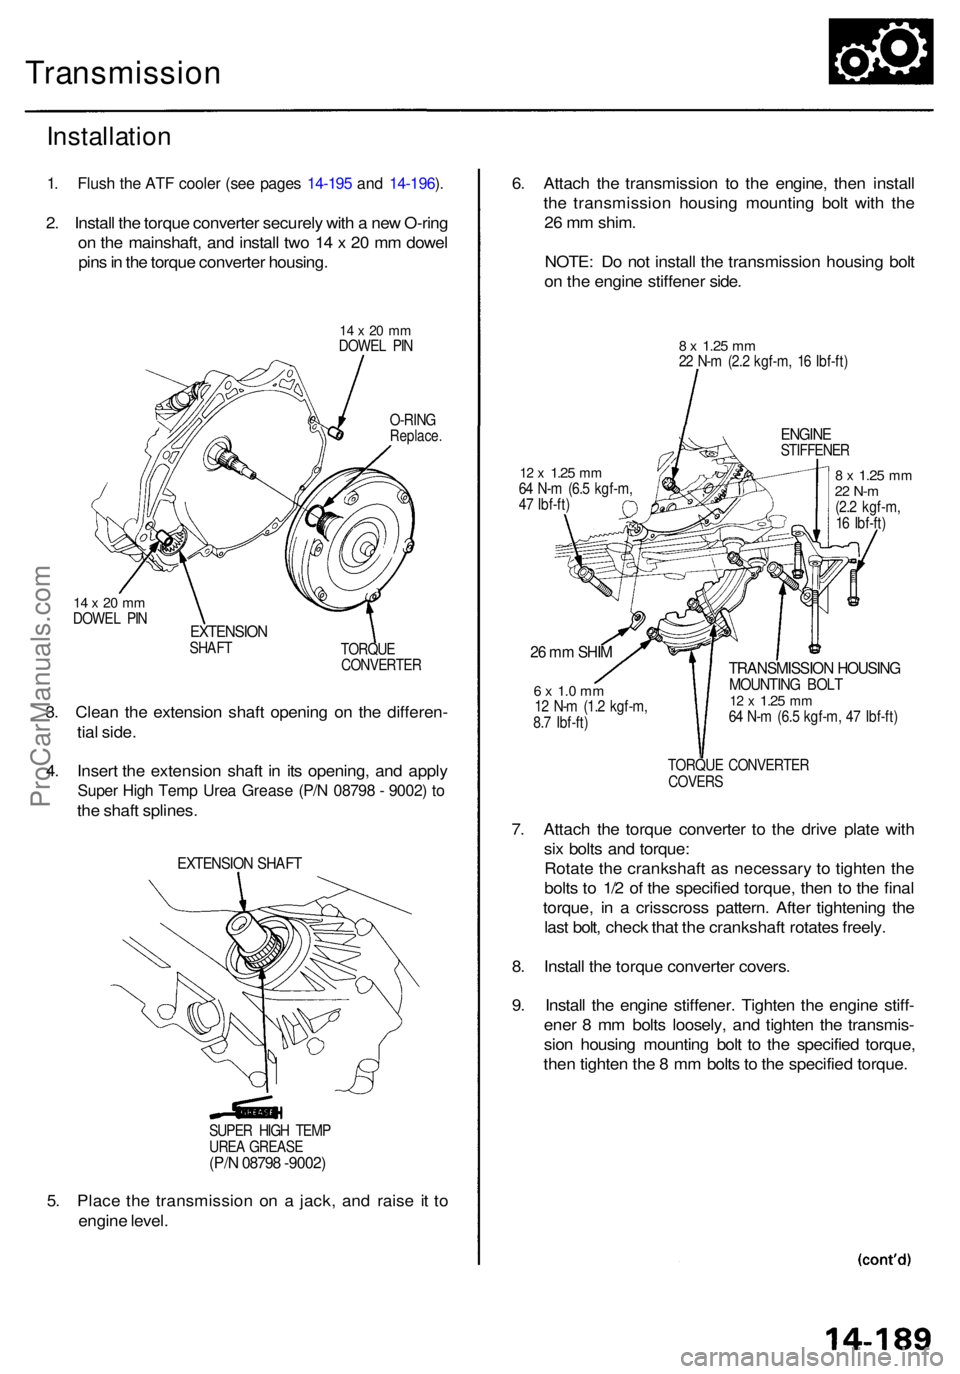
Transmission
Installation
1. Flus h th e AT F coole r (se e page s 14-19 5 an d 14-196 ).
2 . Instal l th e torqu e converte r securel y wit h a ne w O-rin g
o n th e mainshaft , an d instal l tw o 1 4 x 2 0 m m dowe l
pin s in th e torqu e converte r housing .
14 x 20 m mDOWE L PI N
O-RIN G
Replace .
14 x 20 m mDOWE L PI NEXTENSIO NSHAFT
TORQUE
CONVERTE R
3. Clea n th e extensio n shaf t openin g o n th e differen -
tia l side .
4 . Inser t th e extensio n shaf t i n it s opening , an d appl y
Supe r Hig h Tem p Ure a Greas e (P/ N 0879 8 - 9002 ) t o
th e shaf t splines .
EXTENSIO N SHAF T
5. Plac e th e transmissio n o n a jack , an d rais e i t t o
engin e level . 6
. Attac h th e transmissio n t o th e engine , the n instal l
th e transmissio n housin g mountin g bol t wit h th e
2 6 m m shim .
NOTE : D o no t instal l th e transmissio n housin g bol t
o n th e engin e stiffene r side .
8 x 1.2 5 mm22 N- m (2. 2 kgf-m , 1 6 Ibf-ft )
ENGIN ESTIFFENE R
12 x 1.2 5 mm64 N- m (6. 5 kgf-m ,
4 7 Ibf-ft )8 x 1.2 5 mm22 N- m(2.2 kgf-m ,
1 6 Ibf-ft )
26 m m SHI M
6 x 1. 0 m m12 N- m (1. 2 kgf-m ,
8. 7 Ibf-ft )
TRANSMISSIO N HOUSIN GMOUNTIN G BOL T12 x 1.2 5 mm64 N- m (6. 5 kgf-m , 4 7 Ibf-ft )
TORQU E CONVERTE R
COVER S
7. Attac h th e torqu e converte r t o th e driv e plat e wit h
si x bolt s an d torque :
Rotat e th e crankshaf t a s necessar y t o tighte n th e
bolt s t o 1/ 2 o f th e specifie d torque , the n t o th e fina l
torque , i n a crisscros s pattern . Afte r tightenin g th e
las t bolt , chec k tha t th e crankshaf t rotate s freely .
8 . Instal l th e torqu e converte r covers .
9 . Instal l th e engin e stiffener . Tighte n th e engin e stiff -
ene r 8 m m bolt s loosely , an d tighte n th e transmis -
sio n housin g mountin g bol t t o th e specifie d torque ,
the n tighte n th e 8 m m bolt s t o th e specifie d torque .
SUPER HIG H TEM P
URE A GREAS E
(P/N 0879 8 -9002 )
ProCarManuals.com
Page 899 of 1954
Transmission
Installation (cont'd )
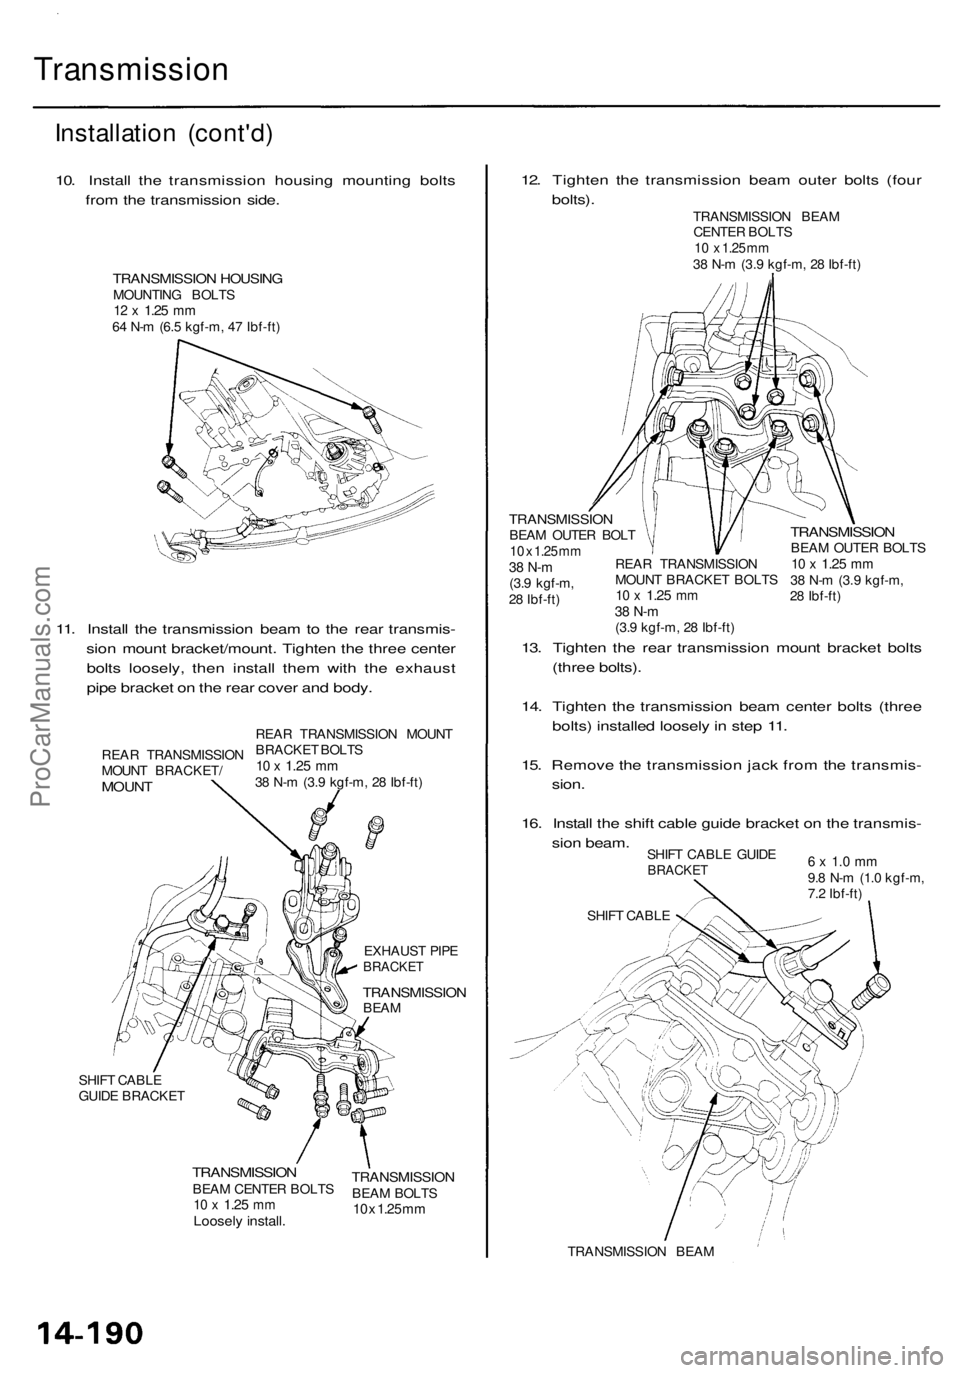
10. Instal l th e transmissio n housin g mountin g bolt s
fro m th e transmissio n side .
TRANSMISSIO N HOUSIN GMOUNTIN G BOLT S12 x 1.2 5 mm64 N- m (6. 5 kgf-m , 4 7 Ibf-ft )
11. Instal l th e transmissio n bea m to th e rea r transmis -
sio n moun t bracket/mount . Tighte n th e thre e cente r
bolt s loosely , the n instal l the m with the exhaus t
pip e bracke t o n th e rea r cove r an d body .
EXHAUS T PIP EBRACKE T
TRANSMISSIO NBEAM
SHIF T CABL E
GUID E BRACKE T
TRANSMISSIO NBEAM CENTE R BOLT S10 x 1.2 5 mmLoosel y install .
12. Tighte n th e transmissio n bea m oute r bolt s (fou r
bolts) .
13 . Tighte n th e rea r transmissio n moun t bracke t bolt s
(thre e bolts) .
14 . Tighte n th e transmissio n bea m cente r bolt s (thre e
bolts ) installe d loosel y in ste p 11 .
15 . Remov e th e transmissio n jac k fro m th e transmis -
sion .
16 . Instal l th e shif t cabl e guid e bracke t o n th e transmis -
sio n beam .
SHIFT CABL E GUID EBRACKE T
TRANSMISSIO N BEA M
6 x 1. 0 m m9.8 N- m (1. 0 kgf-m ,
7. 2 Ibf-ft )
SHIF T CABL E
TRANSMISSIO NBEAM BOLT S10 x 1.2 5 m m
REA R TRANSMISSIO N
MOUN T BRACKET /
MOUNT
REAR TRANSMISSIO N MOUN T
BRACKE T BOLT S
10 x 1.2 5 mm38 N- m (3. 9 kgf-m , 2 8 Ibf-ft ) TRANSMISSIO
N BEA M
CENTE R BOLT S
10 x 1.2 5 m m38 N- m (3. 9 kgf-m , 2 8 Ibf-ft )
TRANSMISSIO NBEAM OUTE R BOL T10 x 1.2 5 m m38 N- m(3.9 kgf-m ,
2 8 Ibf-ft )
TRANSMISSIO NBEAM OUTE R BOLT S10 x 1.2 5 mm38 N- m (3. 9 kgf-m ,
2 8 Ibf-ft )
REA
R TRANSMISSIO N
MOUN T BRACKE T BOLT S10 x 1.2 5 mm38 N- m(3.9 kgf-m , 2 8 Ibf-ft )
ProCarManuals.com
Page 900 of 1954
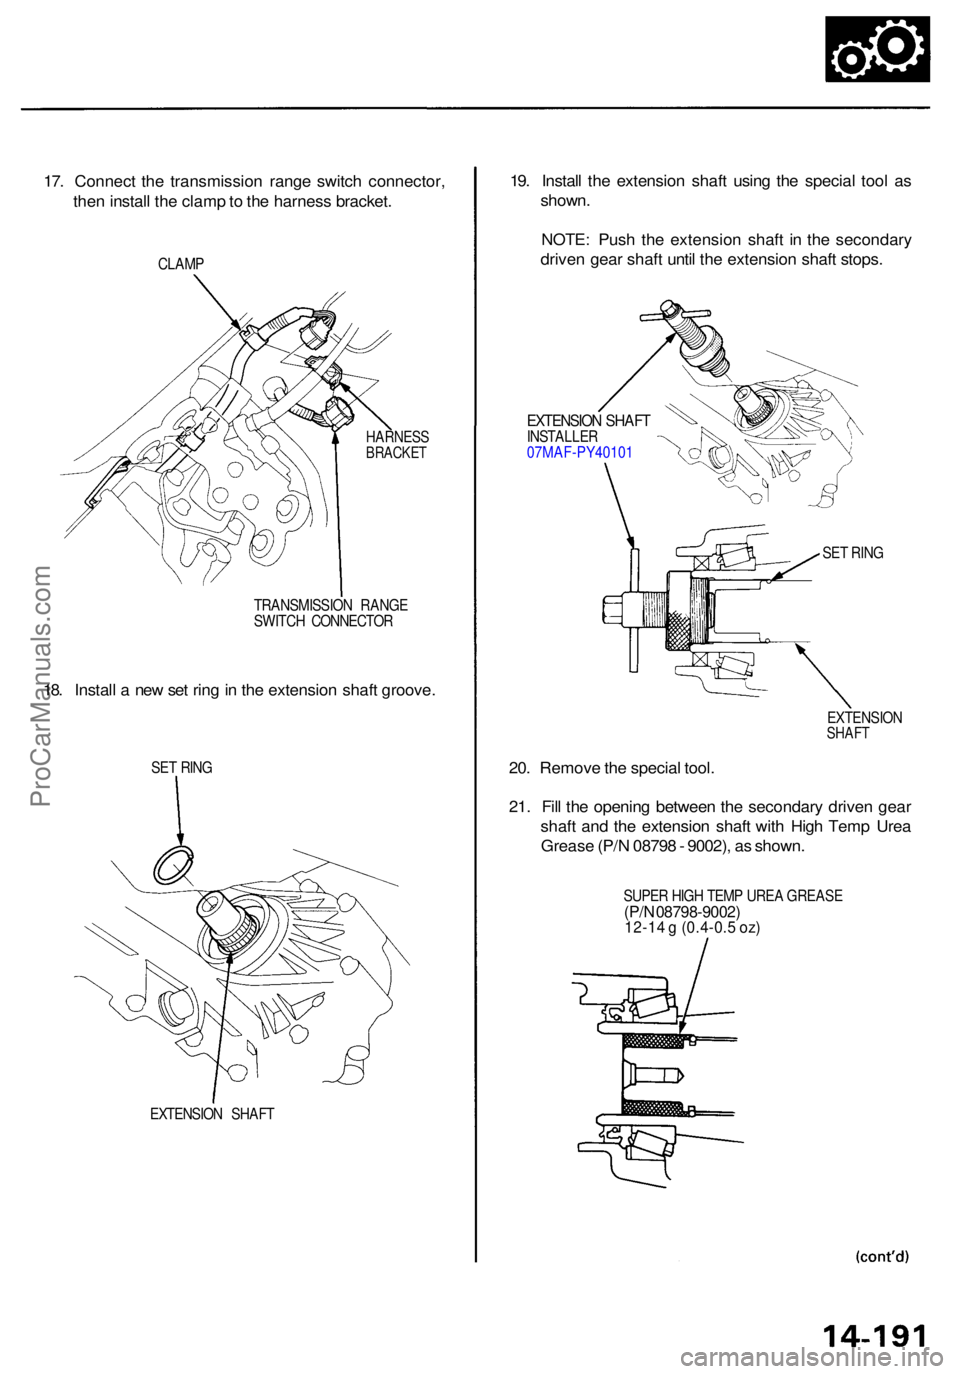
17. Connec t th e transmissio n rang e switc h connector ,
the n instal l th e clam p to th e harnes s bracket .
CLAMP
HARNES SBRACKET
TRANSMISSIO N RANG E
SWITC H CONNECTO R
18. Instal l a ne w se t rin g in th e extensio n shaf t groove .
SET RIN G
EXTENSIO N SHAF T
19. Instal l th e extensio n shaf t usin g th e specia l too l a s
shown .
NOTE : Pus h th e extensio n shaf t i n th e secondar y
drive n gea r shaf t unti l th e extensio n shaf t stops .
EXTENSIO N SHAF TINSTALLE R
07MAF-PY4010 1
SET RIN G
EXTENSIO N
SHAFT
20. Remov e th e specia l tool .
21 . Fil l th e openin g betwee n th e secondar y drive n gea r
shaf t an d th e extensio n shaf t wit h Hig h Tem p Ure a
Greas e (P/ N 0879 8 - 9002) , a s shown .
SUPER HIG H TEM P URE A GREAS E(P/N 08798-9002 )12-14 g (0.4-0. 5 oz )
ProCarManuals.com