ACURA TL 1995 Service Repair Manual
Manufacturer: ACURA, Model Year: 1995, Model line: TL, Model: ACURA TL 1995Pages: 1771, PDF Size: 62.49 MB
Page 1561 of 1771
Starting System
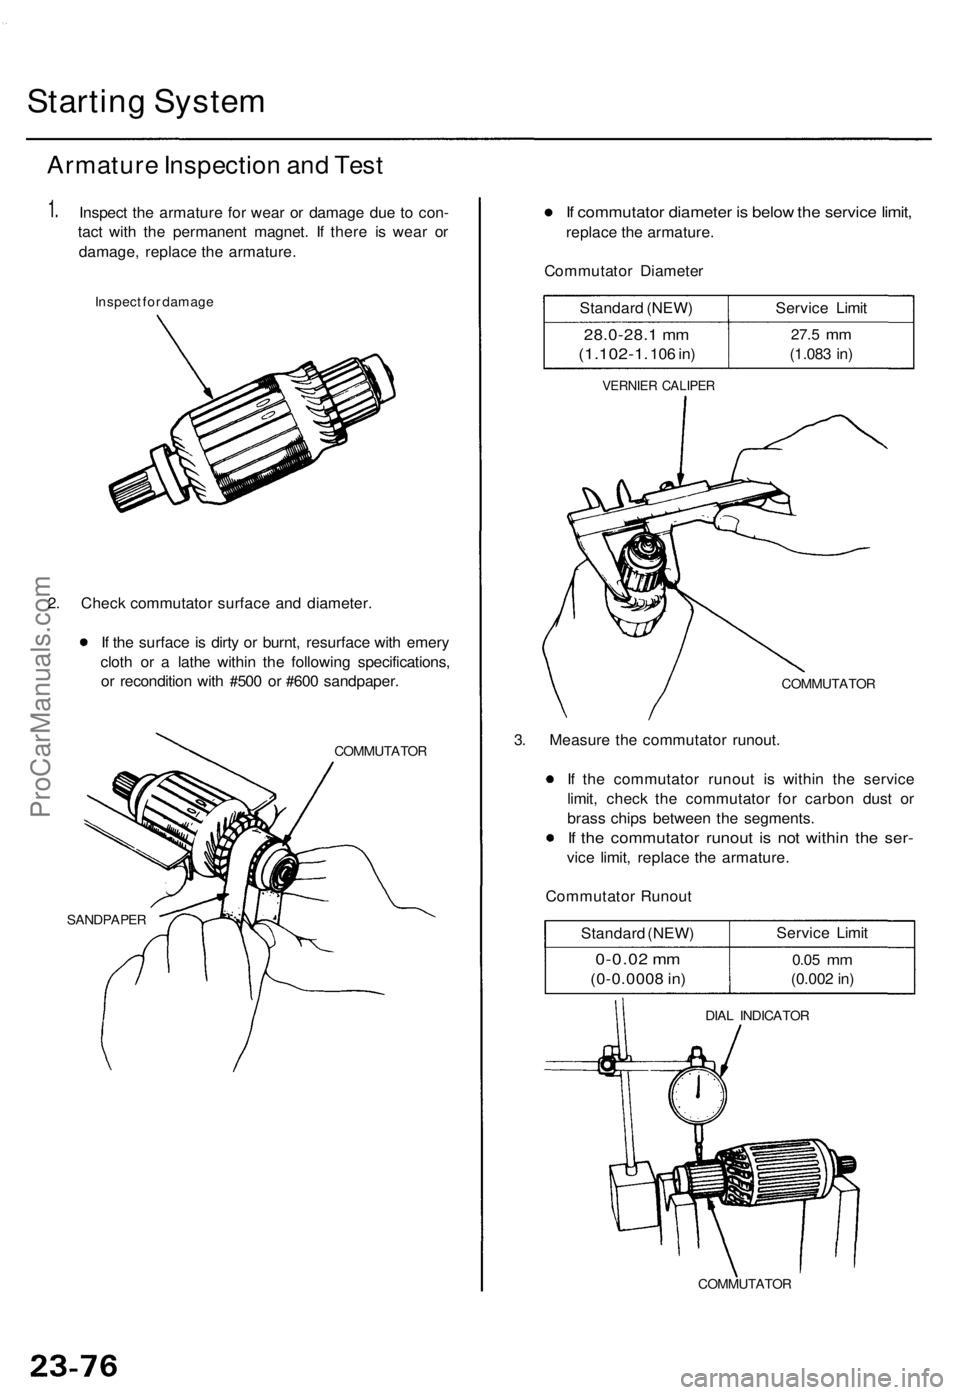
Armature Inspection and Test
1.
Inspect the armature for wear or damage due to con-
tact with the permanent magnet. If there is wear or
damage, replace the armature.
Inspect for damage
2. Check commutator surface and diameter.
If the surface is dirty or burnt, resurface with emery
cloth or a lathe within the following specifications,
or recondition with #500 or #600 sandpaper.
COMMUTATOR
SANDPAPER
If commutator diameter is below the service limit,
replace the armature.
Commutator Diameter
Standard (NEW)
28.0-28.1 mm
(1.102-1.
106 in)
Service Limit
27.5
mm
(1.083 in)
VERNIER CALIPER
COMMUTATOR
3. Measure the commutator runout.
If the commutator runout is within the service
limit, check the commutator for carbon dust or
brass chips between the segments.
If the commutator runout is not within the ser-
vice limit, replace the armature.
Commutator Runout
Standard (NEW)
0-0.02 mm
(0-0.0008 in)
Service Limit
0.05
mm
(0.002 in)
DIAL INDICATOR
COMMUTATORProCarManuals.com
Page 1562 of 1771
4.
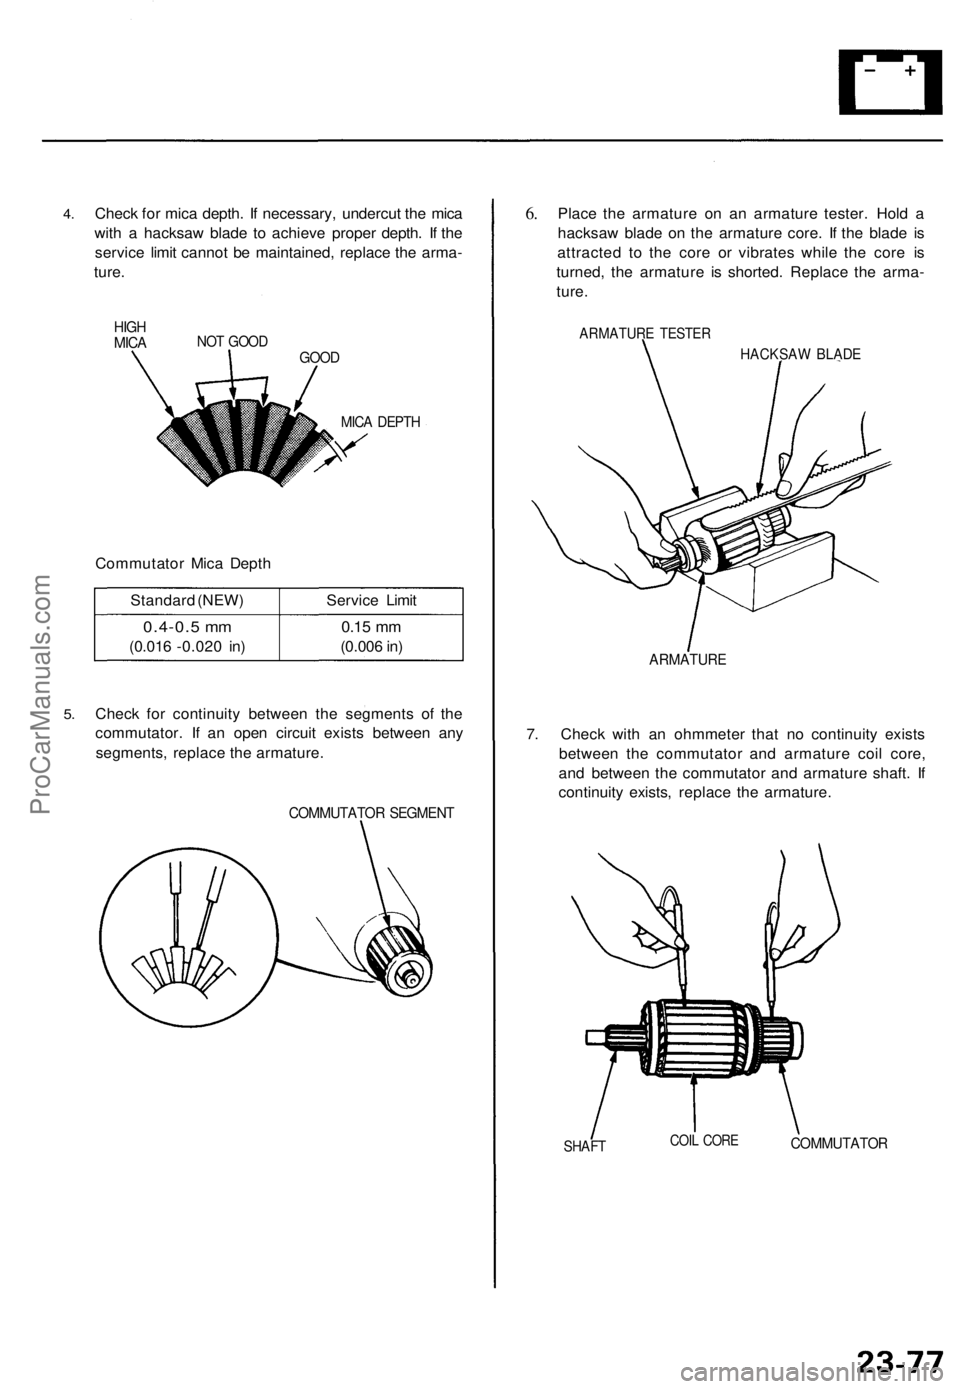
Check for mica depth. If necessary, undercut the mica
with a hacksaw blade to achieve proper depth. If the
service limit cannot be maintained, replace the arma-
ture.
HIGH
MICA
NOT GOOD
GOOD
MICA DEPTH
Commutator Mica Depth
Standard (NEW)
0.4-0.5 mm
(0.016 -0.020 in)
Service Limit
0.15
mm
(0.006 in)
5.
Check for continuity between the segments of the
commutator. If an open circuit exists between any
segments, replace the armature.
COMMUTATOR SEGMENT
6.
Place the armature on an armature tester. Hold a
hacksaw blade on the armature core. If the blade is
attracted to the core or vibrates while the core is
turned, the armature is shorted. Replace the arma-
ture.
ARMATURE TESTER
HACKSAW BLADE
ARMATURE
7. Check with an ohmmeter that no continuity exists
between the commutator and armature coil core,
and between the commutator and armature shaft. If
continuity exists, replace the armature.
SHAFT
COIL CORE
COMMUTATORProCarManuals.com
Page 1563 of 1771
Starting Syste m
Starter Brus h Holde r Tes t
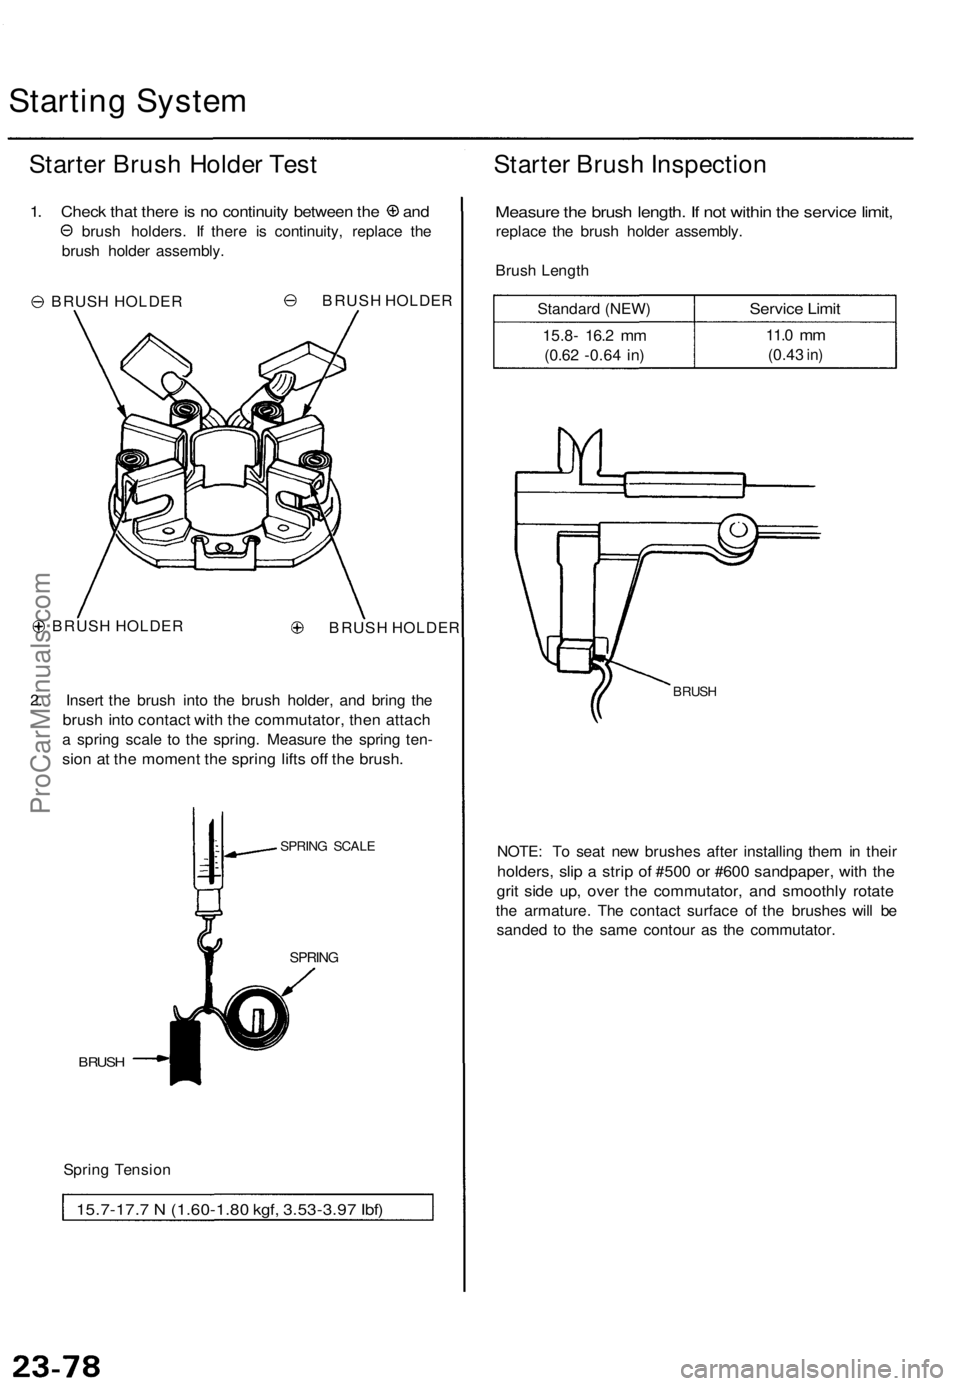
1. Chec k tha t ther e is n o continuit y betwee n th e an d
brush holders . I f ther e i s continuity , replac e th e
brus h holde r assembly .
BRUS H HOLDE R BRUS
H HOLDE R
BRUS H HOLDE R
BRUSH HOLDE R
2 . Inser t th e brus h int o th e brus h holder , an d brin g th e
brus h int o contac t wit h th e commutator , the n attac h
a sprin g scal e t o th e spring . Measur e th e sprin g ten -
sion a t th e momen t th e sprin g lift s of f th e brush .
SPRIN G SCAL E
BRUSH
SPRIN G
Spring Tensio n
15.7-17. 7 N (1.60-1.8 0 kgf , 3.53-3.9 7 Ibf )
Starte r Brus h Inspectio n
Measure th e brus h length . I f no t withi n th e servic e limit ,
replac e th e brus h holde r assembly .
Brus h Lengt h
Standar d (NEW )
15.8- 16. 2 mm
(0.6 2 -0.6 4 in)
Servic e Limi t
11.0 mm
(0.4 3 in)
BRUS H
NOTE : T o sea t ne w brushe s afte r installin g the m in thei r
holders , sli p a stri p of #50 0 o r #60 0 sandpaper , wit h th e
grit sid e up , ove r th e commutator , an d smoothl y rotat e
the armature . Th e contac t surfac e o f th e brushe s wil l b e
sande d t o th e sam e contou r a s th e commutator .
ProCarManuals.com
Page 1564 of 1771
Overrunning Clutc h Inspectio n
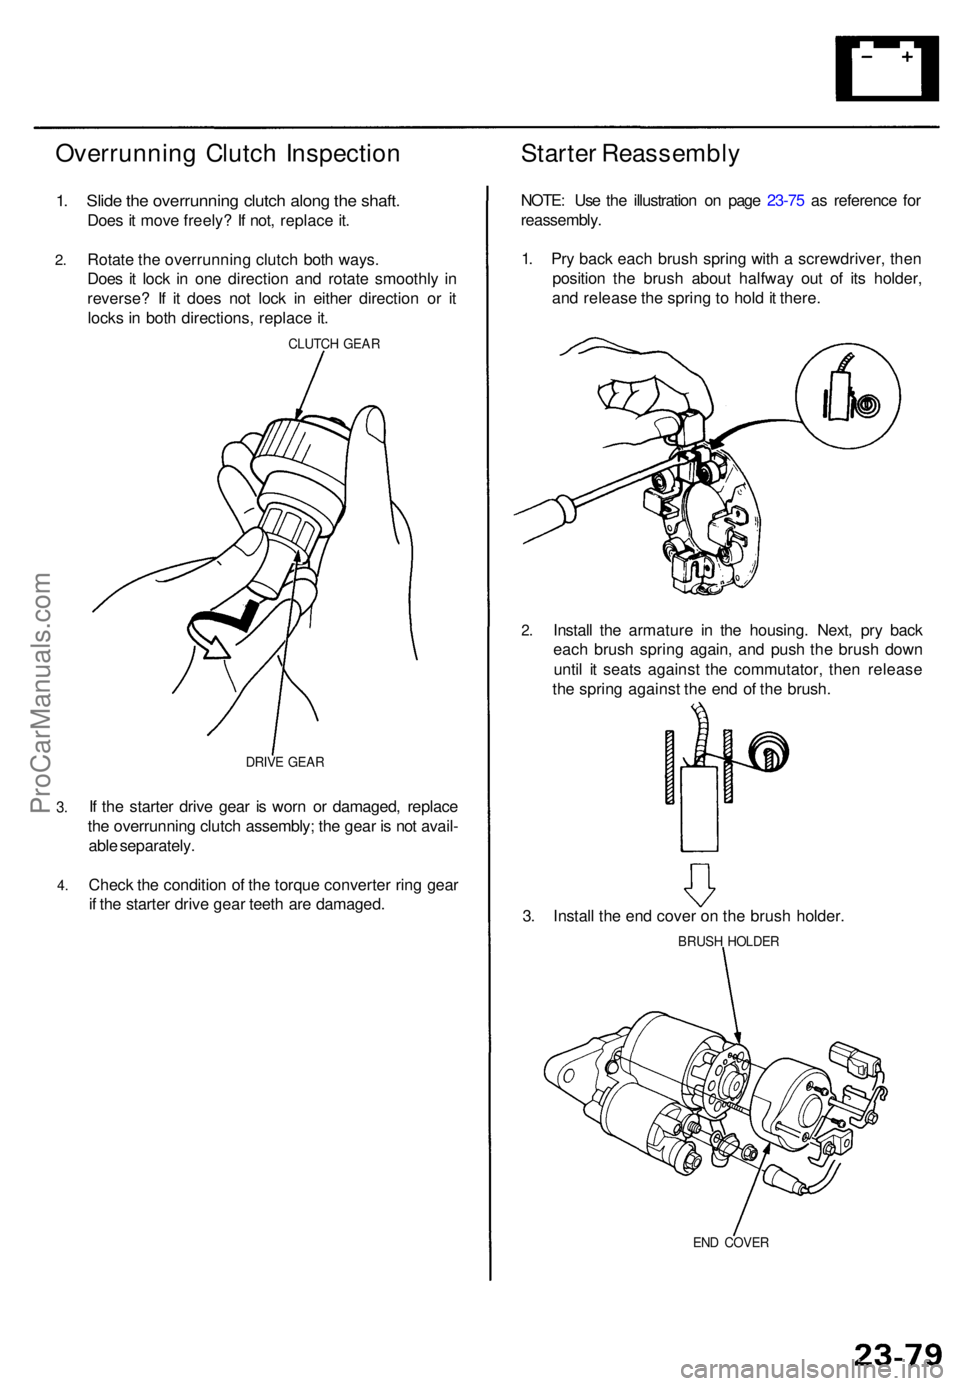
1. Slid e th e overrunnin g clutc h alon g th e shaft .
Does i t mov e freely ? I f not , replac e it .
Starte r Reassembl y
2.Rotat e th e overrunnin g clutc h bot h ways .
Doe s i t loc k i n on e directio n an d rotat e smoothly in
reverse ? I f i t doe s no t loc k i n eithe r directio n o r i t
lock s in bot h directions , replac e it .
CLUTC H GEA R
3.
4 .
DRIV E GEA R
If th e starte r driv e gea r i s wor n o r damaged , replac e
th e overrunnin g clutc h assembly ; th e gea r i s no t avail -
abl e separately .
Chec k th e conditio n o f th e torqu e converte r rin g gea r
i f th e starte r driv e gea r teet h ar e damaged . NOTE
: Us e th e illustratio n o n pag e 23-7 5 a s referenc e fo r
reassembly .
1 . Pr y bac k eac h brus h sprin g wit h a screwdriver , the n
positio n th e brus h abou t halfwa y ou t o f it s holder ,
an d releas e th e sprin g t o hol d it there .
2.Instal l th e armatur e i n th e housing . Next , pr y bac k
eac h brus h sprin g again , an d pus h th e brus h dow n
unti l i t seat s agains t th e commutator , the n releas e
th e sprin g agains t th e en d o f th e brush .
3 . Instal l th e en d cove r o n th e brus h holder .
BRUSH HOLDE R
END COVE R
ProCarManuals.com
Page 1565 of 1771
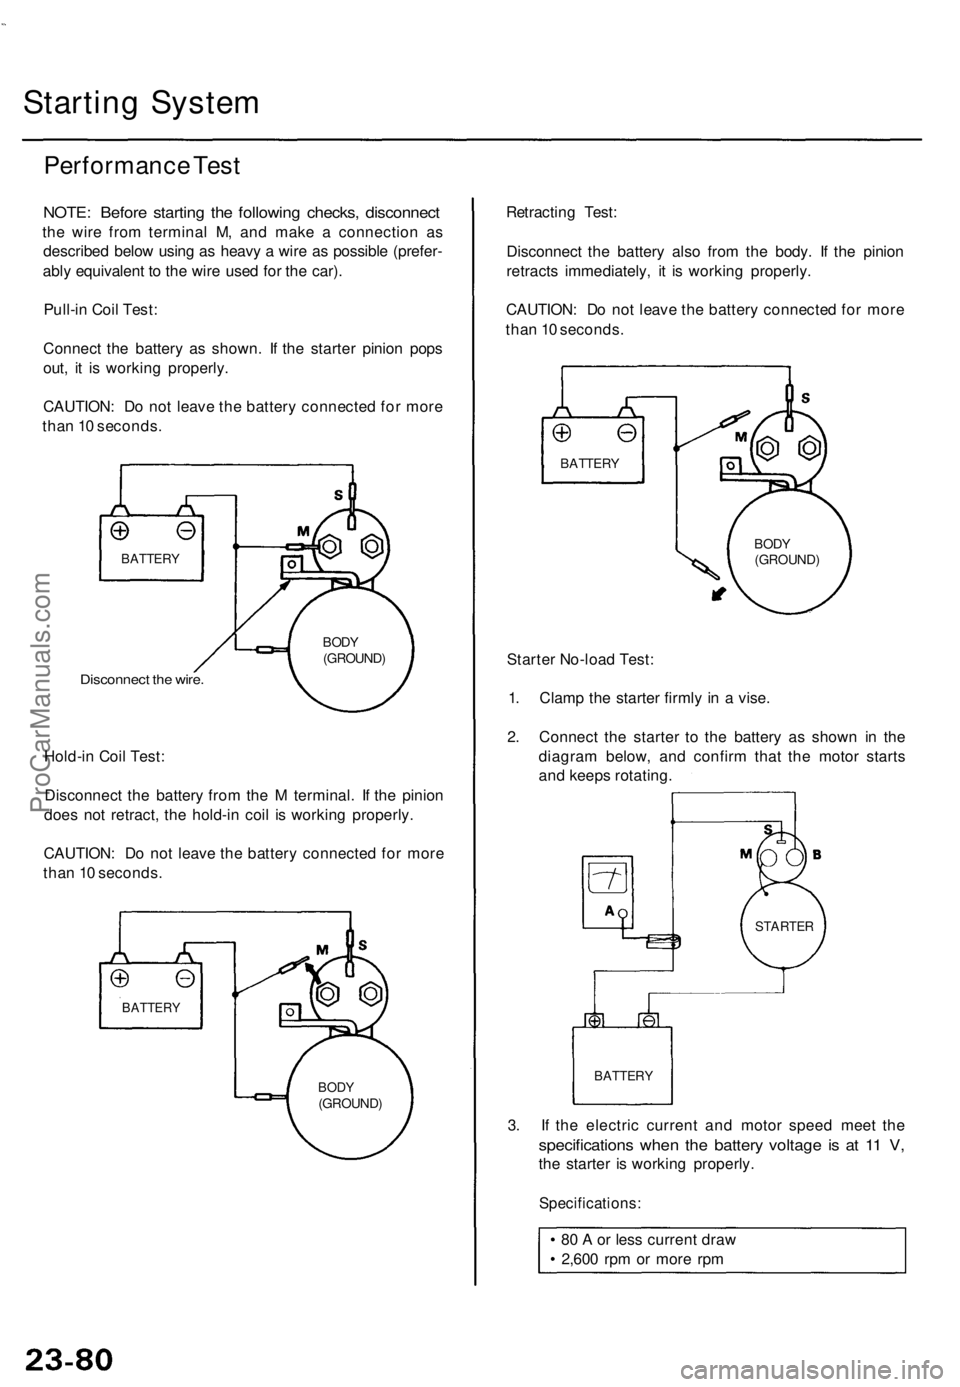
Starting System
Performance Test
NOTE: Before starting the following checks, disconnect
the wire from terminal M, and make a connection as
described below using as heavy a wire as possible (prefer-
ably equivalent to the wire used for the car).
Pull-in Coil Test:
Connect the battery as shown. If the starter pinion pops
out, it is working properly.
CAUTION: Do not leave the battery connected for more
than 10 seconds.
Disconnect the wire.
Hold-in Coil Test:
Disconnect the battery from the M terminal. If the pinion
does not retract, the hold-in coil is working properly.
CAUTION: Do not leave the battery connected for more
than 10 seconds.
Retracting Test:
Disconnect the battery also from the body. If the pinion
retracts immediately, it is working properly.
CAUTION: Do not leave the battery connected for more
than 10 seconds.
Starter No-load Test:
1. Clamp the starter firmly in a vise.
2. Connect the starter to the battery as shown in the
diagram below, and confirm that the motor starts
and keeps rotating.
3. If the electric current and motor speed meet the
specifications when the battery voltage is at 11 V,
the starter is working properly.
Specifications:
80 A or less current draw
2,600 rpm or more rpm
BATTERY
BODY
(GROUND)
BATTERY
STARTER
BODY
(GROUND)
BATTERY
BODY
(GROUND)
BATTERYProCarManuals.com
Page 1566 of 1771
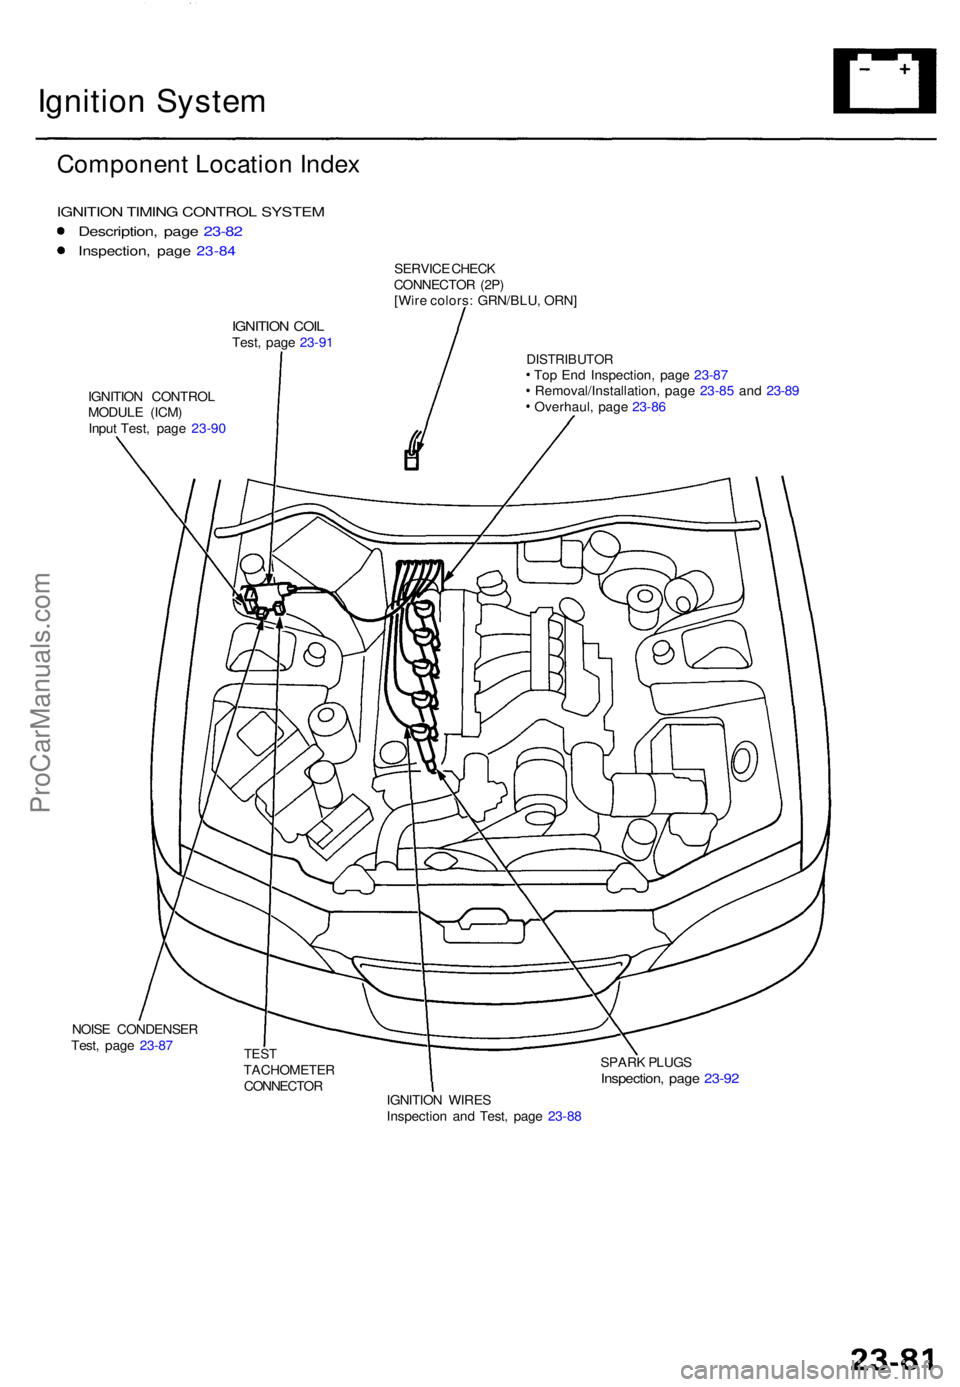
Ignition Syste m
Componen t Locatio n Inde x
IGNITIO N TIMIN G CONTRO L SYSTE M
Description , pag e 23-8 2
Inspection , pag e 23-8 4
IGNITIO N COI LTest , pag e 23-9 1 SERVIC
E CHEC K
CONNECTO R (2P )
[Wir e colors : GRN/BLU , ORN ]
IGNITIO N CONTRO L
MODUL E (ICM )
Inpu t Test , pag e 23-9 0DISTRIBUTO RTop En d Inspection , pag e 23-8 7
Removal/Installation , pag e 23-8 5 an d 23-8 9
Overhaul , pag e 23-8 6
NOIS E CONDENSE R
Test , pag e 23-8 7
TESTTACHOMETE R
CONNECTO R SPAR
K PLUG SInspection , pag e 23-9 2
IGNITIO N WIRE S
Inspectio n an d Test , pag e 23-8 8
ProCarManuals.com
Page 1567 of 1771
Ignition Syste m
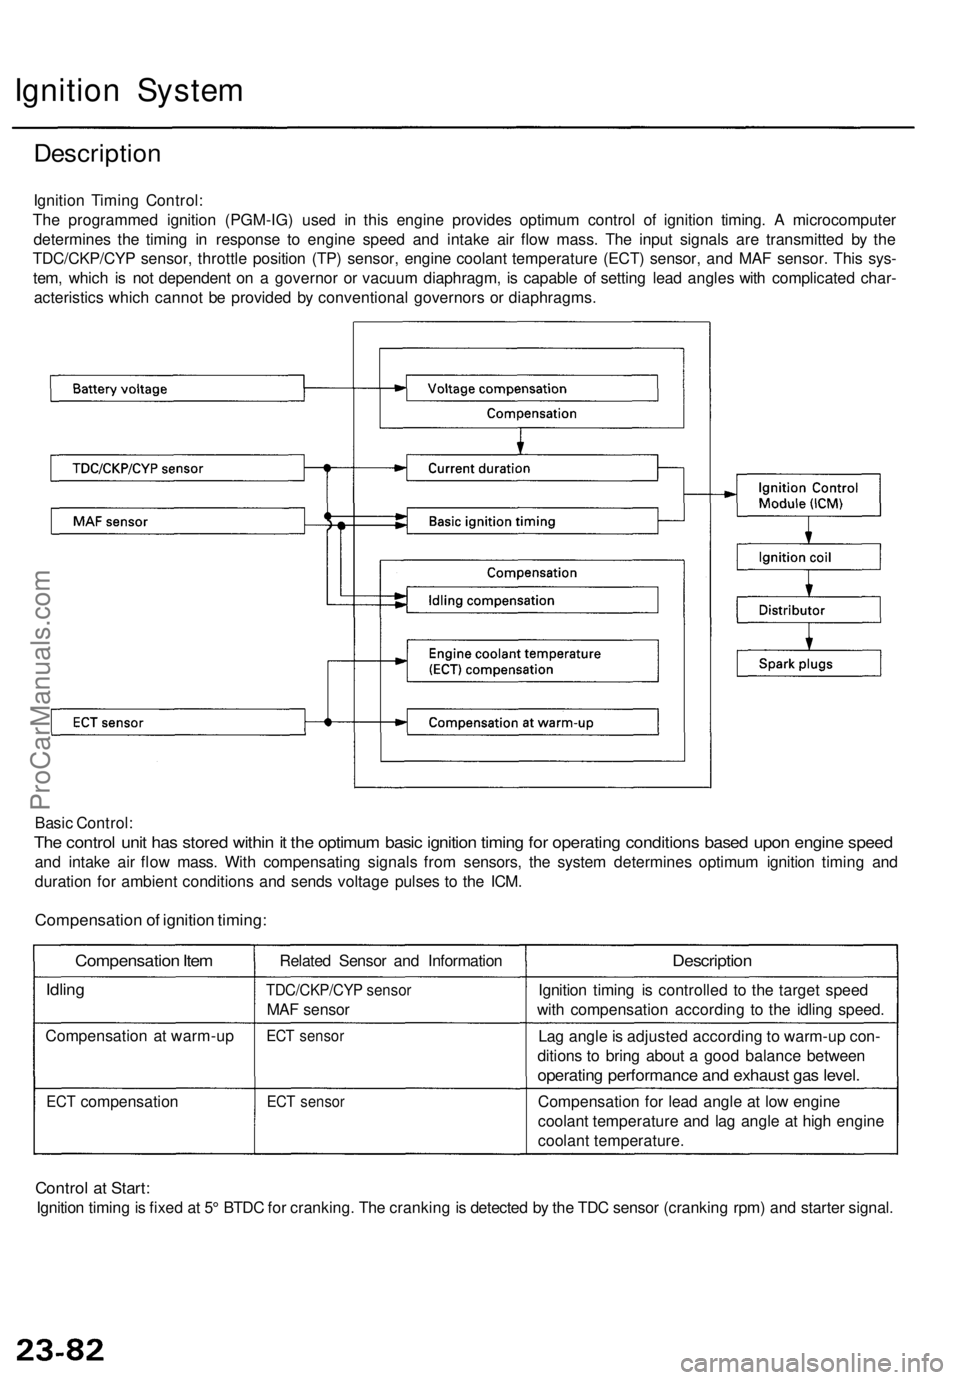
Descriptio n
Ignition Timin g Control :
Th e programme d ignitio n (PGM-IG ) use d i n thi s engin e provide s optimu m contro l o f ignitio n timing . A microcompute r
determine s th e timin g i n respons e t o engin e spee d an d intak e ai r flo w mass . Th e inpu t signal s ar e transmitte d b y th e
TDC/CKP/CY P sensor , throttl e positio n (TP ) sensor , engine coolant temperatur e (ECT ) sensor , an d MA F sensor . Thi s sys -
tem , whic h i s no t dependen t o n a governo r o r vacuu m diaphragm , i s capabl e o f settin g lea d angle s wit h complicate d char -
acteristic s whic h canno t b e provide d b y conventiona l governor s o r diaphragms .
Basi c Control :
The contro l uni t ha s store d withi n it th e optimu m basi c ignitio n timin g fo r operatin g condition s base d upo n engin e spee d
and intak e ai r flo w mass . Wit h compensatin g signal s fro m sensors , th e syste m determine s optimu m ignitio n timin g an d
duratio n fo r ambien t condition s an d send s voltag e pulse s t o th e ICM .
Compensatio n of ignitio n timing :
Compensatio n Ite m
Idlin g
Compensatio n a t warm-u p
ECT compensatio n Relate
d Senso r an d Informatio n
TDC/CKP/CY P senso r
MAF senso r
ECT senso r
ECT senso r
Descriptio n
Ignition timin g i s controlle d t o th e targe t spee d
wit h compensatio n accordin g t o th e idlin g speed .
La g angl e is adjuste d accordin g t o warm-u p con -
dition s t o brin g abou t a goo d balanc e betwee n
operating performanc e an d exhaus t ga s level .
Compensatio n fo r lea d angl e a t lo w engin e
coolan t temperatur e an d la g angl e a t hig h engin e
coolan t temperature .
Control a t Start :
Ignitio n timin g is fixe d a t 5 ° BTD C fo r cranking . Th e crankin g is detecte d b y th e TD C senso r (crankin g rpm ) an d starte r signal .
ProCarManuals.com
Page 1568 of 1771
Ignition Syste m
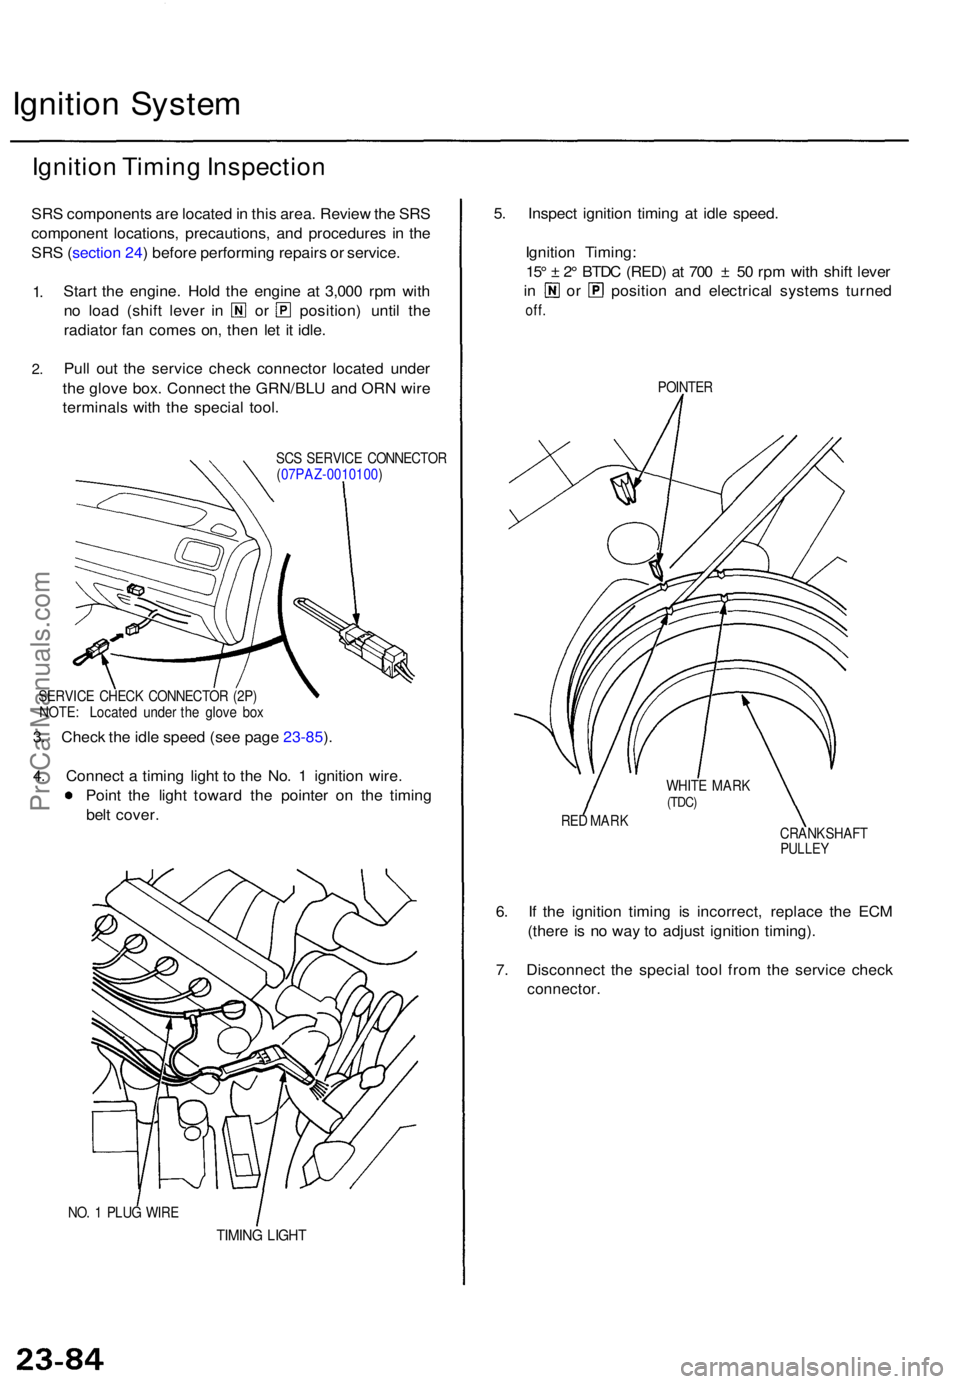
Ignition Timin g Inspectio n
SRS component s ar e locate d in thi s area . Revie w th e SR S
componen t locations , precautions , an d procedure s i n th e
SR S (sectio n 24 ) befor e performin g repair s o r service .
1.
2 .
Star t th e engine . Hol d th e engine at 3,00 0 rp m wit h
no loa d (shif t leve r i n o r position ) unti l th e
radiato r fa n come s on , the n le t i t idle .
Pul l ou t th e servic e chec k connecto r locate d unde r
th e glov e box . Connec t th e GRN/BL U an d OR N wir e
terminal s wit h th e specia l tool .
SCS SERVIC E CONNECTO R
( 07PAZ-0010100 )
SERVIC E CHEC K CONNECTO R (2P)
NOTE : Locate d unde r th e glov e bo x
3. Chec k th e idl e spee d (se e pag e 23-85 ).
4 . Connec t a timin g ligh t t o th e No . 1 ignitio n wire .
Poin t th e ligh t towar d th e pointe r o n th e timin g
bel t cover .
NO. 1 PLU G WIR E
TIMIN G LIGH T
5. Inspec t ignitio n timin g a t idl e speed .
Ignitio n Timing :
15 ° ± 2° BTD C (RED ) a t 70 0 ± 50 rp m wit h shif t leve r
in o r positio n an d electrica l system s turne d
off.
POINTE R
RE D MAR K
CRANKSHAFT
PULLEY
6. I f th e ignitio n timin g i s incorrect , replac e th e EC M
(ther e is n o wa y t o adjus t ignitio n timing) .
7 . Disconnec t th e specia l too l fro m th e servic e chec k
connector .
WHITE MAR K(TDC)
ProCarManuals.com
Page 1569 of 1771
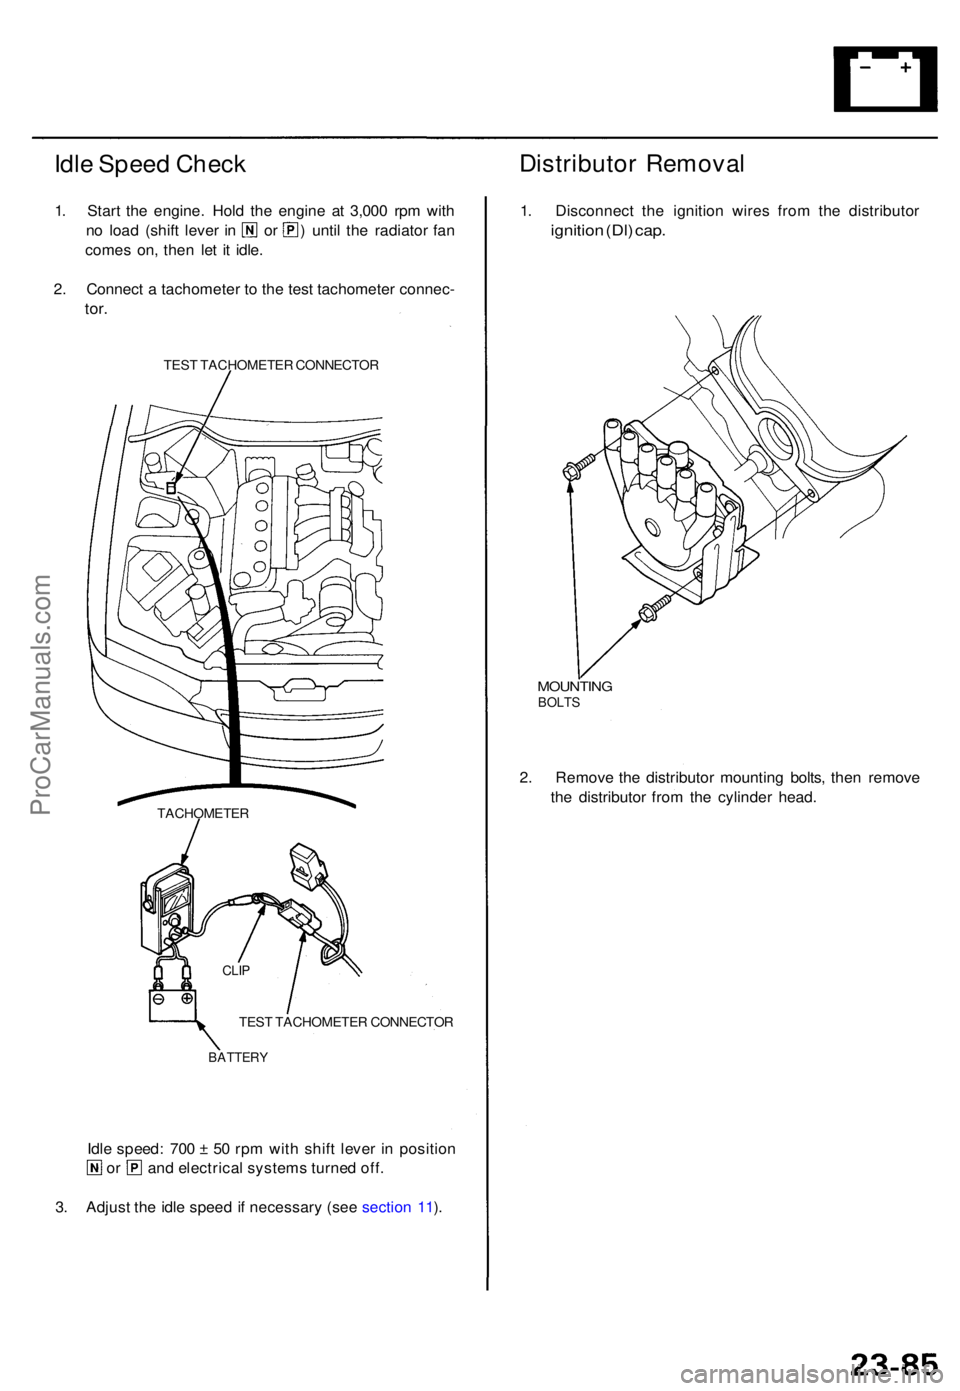
Idle Spee d Chec k
1. Star t th e engine . Hol d th e engin e a t 3,00 0 rp m wit h
no loa d (shif t leve r i n o r ) unti l th e radiato r fa n
come s on , the n le t i t idle .
2 . Connec t a tachomete r t o th e tes t tachomete r connec -
tor.
TES T TACHOMETE R CONNECTO R
TES T TACHOMETE R CONNECTO R
BATTERY
Idle speed : 70 0 ± 5 0 rp m wit h shif t leve r i n positio n
or an d electrica l system s turne d off .
3 . Adjus t th e idl e spee d if necessar y (se e sectio n 11 ).
Distributo r Remova l
1. Disconnec t th e ignitio n wire s fro m th e distributo r
ignition (Dl ) cap .
MOUNTIN GBOLTS
2. Remov e th e distributo r mountin g bolts , the n remov e
th e distributo r fro m th e cylinde r head .
CLIP
TACHOMETE R
ProCarManuals.com
Page 1570 of 1771
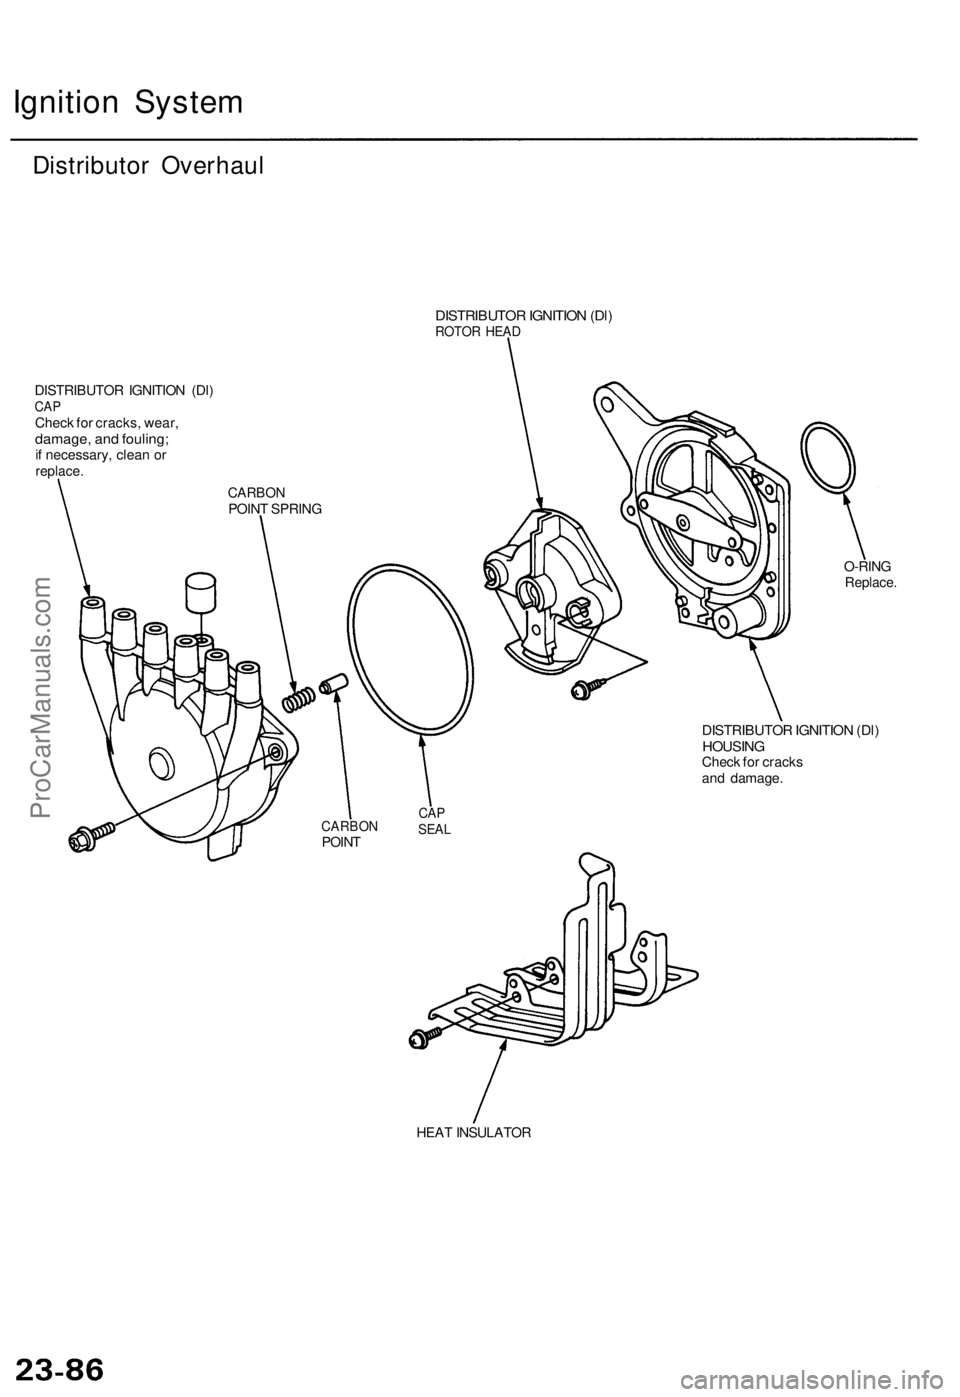
Ignition System
Distributor Overhaul
DISTRIBUTOR IGNITION (Dl)
CAP
Check for cracks, wear,
damage, and fouling;
if necessary, clean or
replace.
DISTRIBUTOR IGNITION (Dl)
ROTOR HEAD
O-RING
Replace.
DISTRIBUTOR IGNITION (Dl)
HOUSING
Check for cracks
and damage.
CARBON
POINT
CAP
SEAL
HEAT INSULATOR
CARBON
POINT SPRINGProCarManuals.com