AUDI TT ROADSTER 2016 Service Manual
Manufacturer: AUDI, Model Year: 2016, Model line: TT ROADSTER, Model: AUDI TT ROADSTER 2016Pages: 306, PDF Size: 31.82 MB
Page 41 of 306
Downloaded from www.Manualslib.com manuals search engine 0
N
,.....
N
......
0
,.....
Vl
CX) Soft
top (folding roof)
Soft top
General notes
The soft top opens and closes automatically.
When the top opens, it folds away completely in
to the storage box. The soft top can be opened or
closed at a speed of up to SO km/h.
In normal conditions the soft top is windproof
and waterproof. In extremely bad weather (such
as torrential or continuous rain), a few droplets
of water may possibly form inside the car. This is
quite normal, and no cause for concern.
To preserve the appearance of the soft top and
keep it waterproof, please follow the instructions
for cleaning and care ¢page 263, Care of vehi
cle and cleaning. You should also note the fol
lowing points:
- Open and stow the soft top only when it is
clean and dry. Pressure creases can form if the
soft top is stowed when damp, and mildew or
other damage can occur if left for long periods.
To avoid scratching or damaging the soft top,
do not use sharp objects to remove ice and
snow. A normal ice scraper can be used to clear
the rear window.
- Do not leave the soft top open for weeks at a
time to prevent any discolouration in the folds
of the fabric.
- Do not open the soft top at temperatures be
low O 0
C. The fabric loses its elasticity at sub
zero temperatures.
Opening / closing the soft top
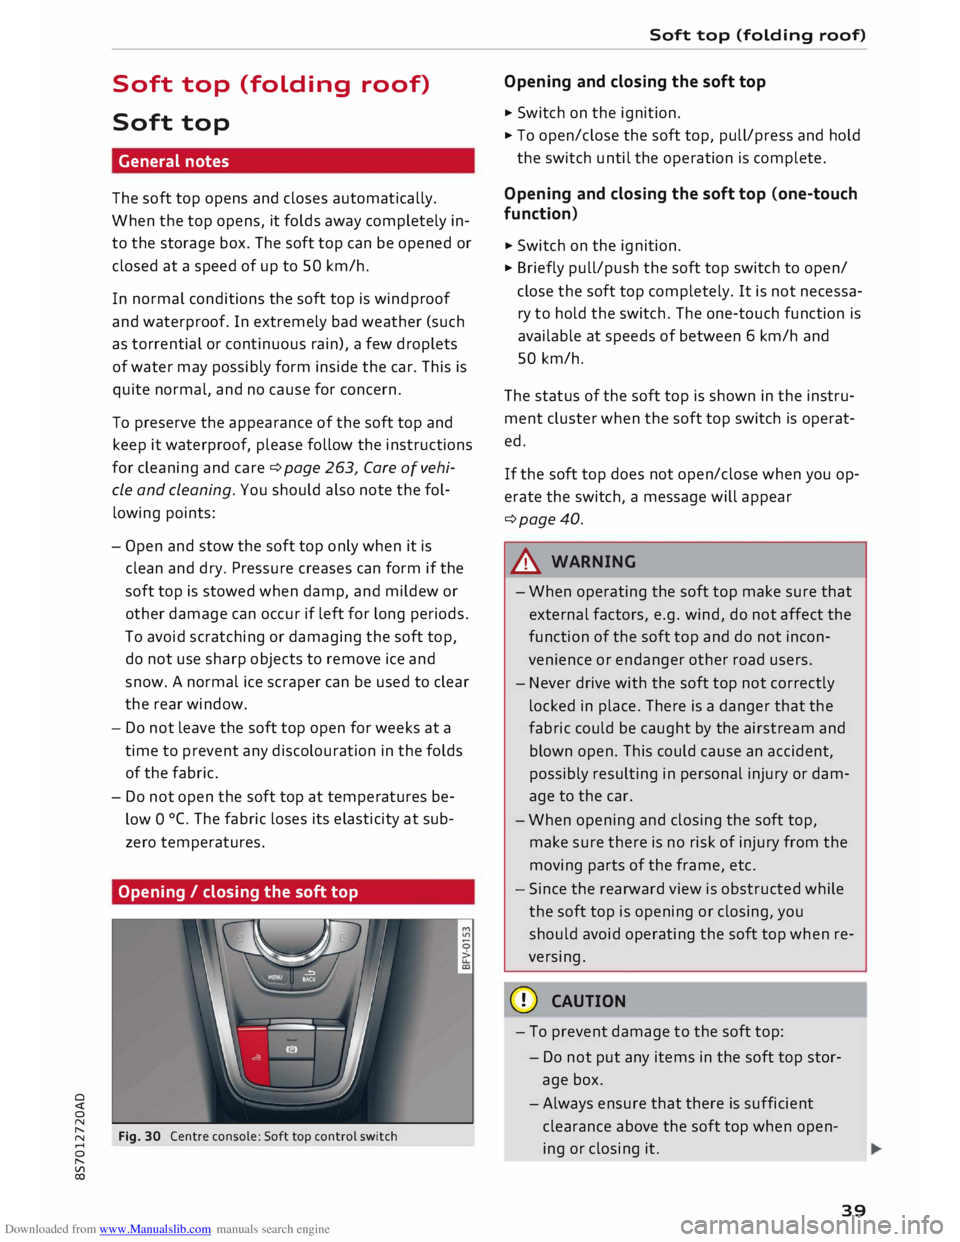
Fig. 30 Centre console: Soft top control switch Soft
top (folding roof)
Opening and closing the soft top
� Switch on the ignition.
� To open/close the soft top, pull/press and hold
the switch until the operation is complete.
Opening and closing the soft top (one-touch
function)
� Switch on the ignition.
� Briefly pull/push the soft top switch to open/
close the soft top completely. It is not necessa
ry to hold the switch. The one-touch function is
available at speeds of between 6 km/h and
SO km/h.
The status of the soft top is shown in the instru
ment cluster when the soft top switch is operat
ed.
If the soft top does not open/close when you op
erate the switch, a message will appear
¢page 40.
A WARNING
- When operating the soft top make sure that
external factors, e.g. wind, do not affect the
function of the soft top and do not incon
venience or endanger other road users.
- Never drive with the soft top not correctly
locked in place. There is a danger that the
fabric could be caught by the airstream and
blown open. This could cause an accident,
possibly resulting in personal injury or dam
age to the car.
- When opening and closing the soft top,
make sure there is no risk of injury from the
moving parts of the frame, etc.
- Since the rearward view is obstructed while
the soft top is opening or closing, you
should avoid operating the soft top when re
versing.
CD CAUTION
- To prevent damage to the soft top:
- Do not put any items in the soft top stor-
age box.
- Always ensure that there is sufficient
clearance above the soft top when open
ing or closing it .
39
Page 42 of 306
Downloaded from www.Manualslib.com manuals search engine Soft
top (folding roof)
� Note
- To avoid draining the vehicle battery, do not
operate the soft top repeatedly with the en
gine switched off.
-A message will be displayed in the instru
ment cluster if a soft top malfunction oc
curs ¢ page 40.
- The soft top can also be operated manually
in the event of a malfunction ¢page 41,
Manual operation of the soft top. The cause
of the fault should be traced and rectified
by a qualified workshop as soon as possible.
- If you park the car with the soft top open,
remember that this leaves the interior ex
posed to intruders and to potential damage
in sudden adverse weather. Lock any be
longings you leave behind in the luggage
compartment. Close the soft top before you
leave the vehicle unattended.
- The windows in the doors are automatically
lowered slightly while the soft top is open
ing/closing.
Convenience open/close function for soft
top
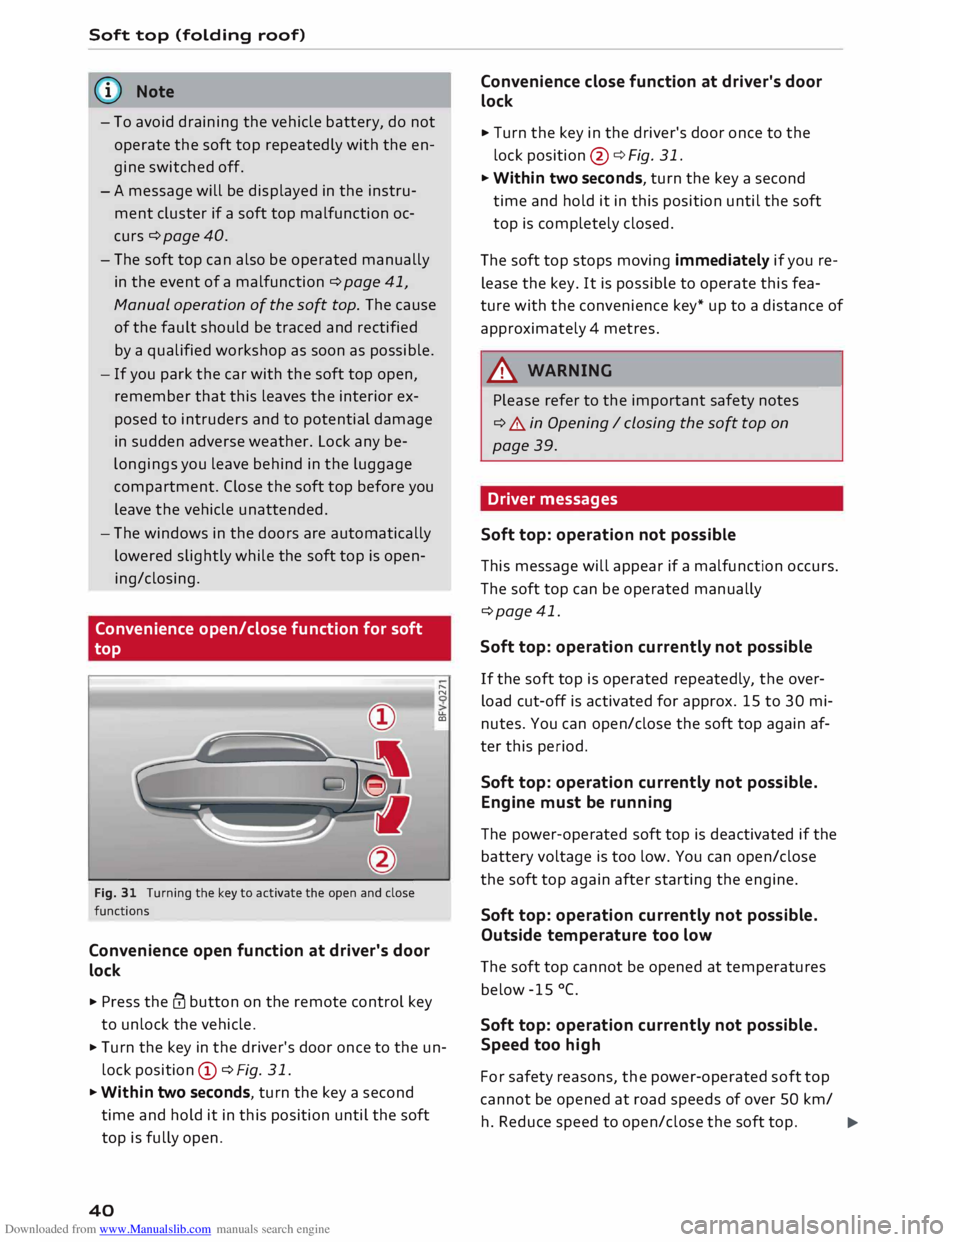
Fig. 31 Turning the key to activate the open and close
functions
Convenience open function at driver's door
lock
.. Press the@ button on the remote control key
to unlock the vehicle. .....
N
u..
a:,
.. Turn the key in the driver's door once to the un
lock position CD ¢Fig. 31.
.. Within two seconds, turn the key a second
time and hold it in this position until the soft
top is fully open.
40 Convenience
close function at driver's door
lock
.. Turn the key in the driver's door once to the
lock position @¢ Fig. 31.
.. Within two seconds, turn the key a second
time and hold it in this position until the soft
top is completely closed.
The soft top stops moving immediately if you re
lease the key. It is possible to operate this fea
ture with the convenience key* up to a distance of
approximately 4 metres.
A WARNING
Please refer to the important safety notes
¢ A in Opening I closing the soft top on
page 39.
Driver messages
Soft top: operation not possible -
This message will appear if a malfunction occurs.
The soft top can be operated manually
¢page 41.
Soft top: operation currently not possible
If the soft top is operated repeatedly, the over
load cut-off is activated for approx. 15 to 30 mi
nutes. You can open/close the soft top again af
ter this period.
Soft top: operation currently not possible.
Engine must be running
The power-operated soft top is deactivated if the
battery voltage is too low. You can open/close
the soft top again after starting the engine.
Soft top: operation currently not possible.
Outside temperature too low
The soft top cannot be opened at temperatures
below -15 °C.
Soft top: operation currently not possible.
Speed too high
For safety reasons, the power-operated soft top
cannot be opened at road speeds of over 50 km/
h. Reduce speed to open/close the soft top.
�
Page 43 of 306
Downloaded from www.Manualslib.com manuals search engine 0
N
,.....
N
....
0
,.....
Vl
CX) Soft
top: not secure. Speed too high
This message will appear if you exceed a speed of
SO km/h while the soft top is opening or closing.
Reduce speed and open or close the soft top
again.
Soft top: fault. You can continue driving
(limited functionality). See owner's manual
This message will appear if a system malfunction
occurs. Try to open or close the soft top again. If
the message still appears, drive to a qualified
workshop (but do not exceed SO km/h) and have
the fault rectified.
,8. WARNING
Never drive with the soft top not correctly
Locked in place. There is a danger that the
fabric could be caught by the airstream and
blown open. This could cause an accident,
possibly resulting in personal injury or dam
age to the car.
Windbreak
Applies to: vehicles with windbreak
The windbreak reduces draughts inside the vehi
cle for greater comfort when driving with the
soft top open.
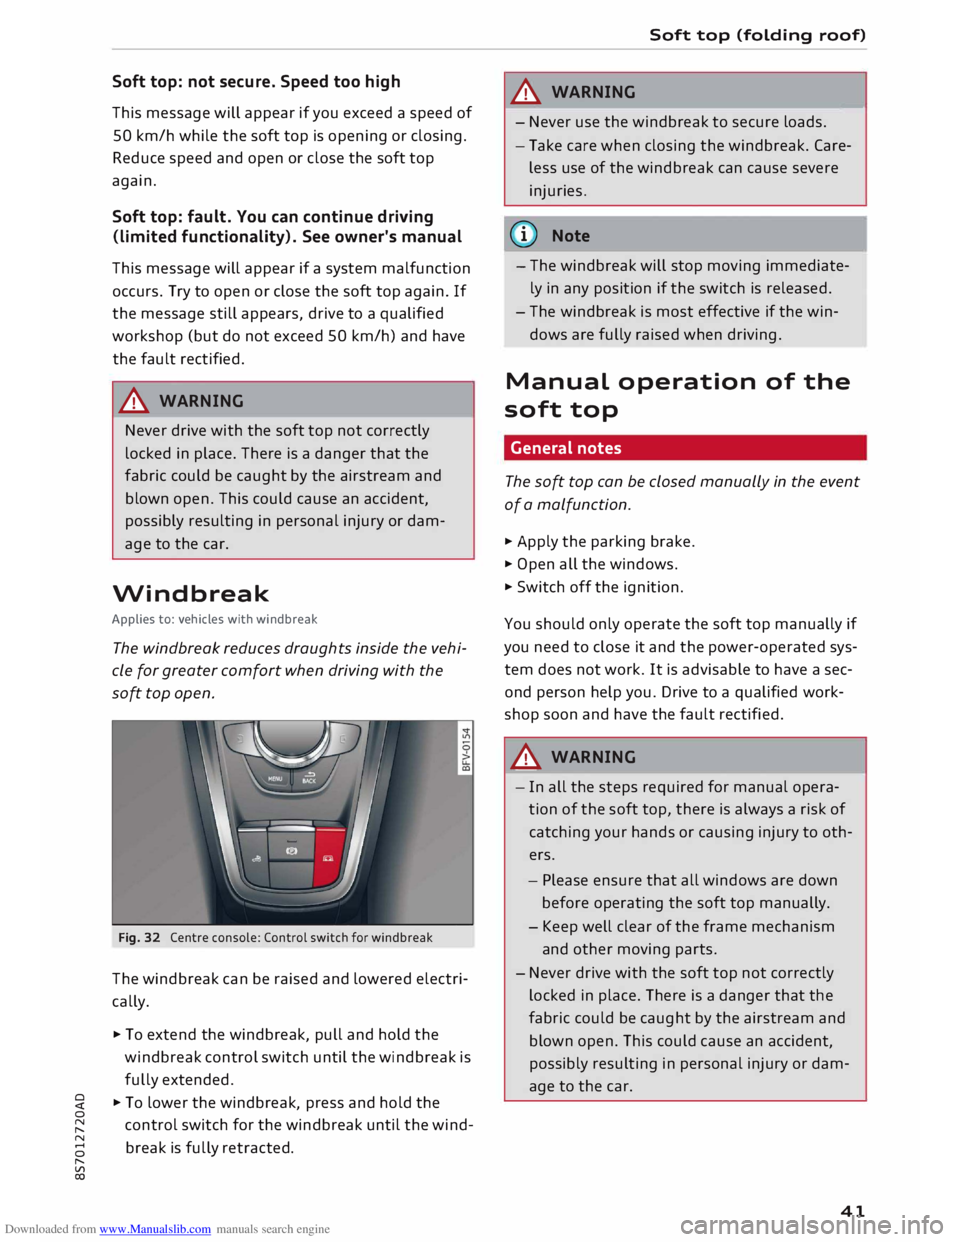
Fig. 32 Centre console: Control switch for windbreak
The windbreak can be raised and Lowered electri
cally.
""To extend the windbreak, pull and hold the
windbreak control switch until the windbreak is
fully extended.
""To Lower the windbreak, press and hold the
control switch for the windbreak until the wind
break is fully retracted . Soft
top (folding roof)
,8. WARNING
-
- Never use the windbreak to secure Loads.
- Take care when closing the windbreak. Care-
less use of the windbreak can cause severe
injuries.
{(D) Note
- The windbreak will stop moving immediate
ly in any position if the switch is released.
- The windbreak is most effective if the win
dows are fully raised when driving.
Manual operation of the
soft top
General notes
The soft top can be closed manually in the event
of a malfunction.
""Apply the parking brake.
"" Open all the windows.
"" Switch off the ignition.
You should only operate the soft top manually if
you need to close it and the power-operated sys
tem does not work. It is advisable to have a sec
ond person help you. Drive to a qualified work
shop soon and have the fault rectified.
,8. WARNING
- In all the steps required for manual opera
tion of the soft top, there is always a risk of
catching your hands or causing injury tooth
ers.
- Please ensure that all windows are down
before operating the soft top manually.
- Keep well clear of the frame mechanism
and other moving parts.
- Never drive with the soft top not correctly
Locked in place. There is a danger that the
fabric could be caught by the airstream and
blown open. This could cause an accident,
possibly resulting in personal injury or dam
age to the car.
41
Page 44 of 306
Downloaded from www.Manualslib.com manuals search engine Soft
top (folding roof)
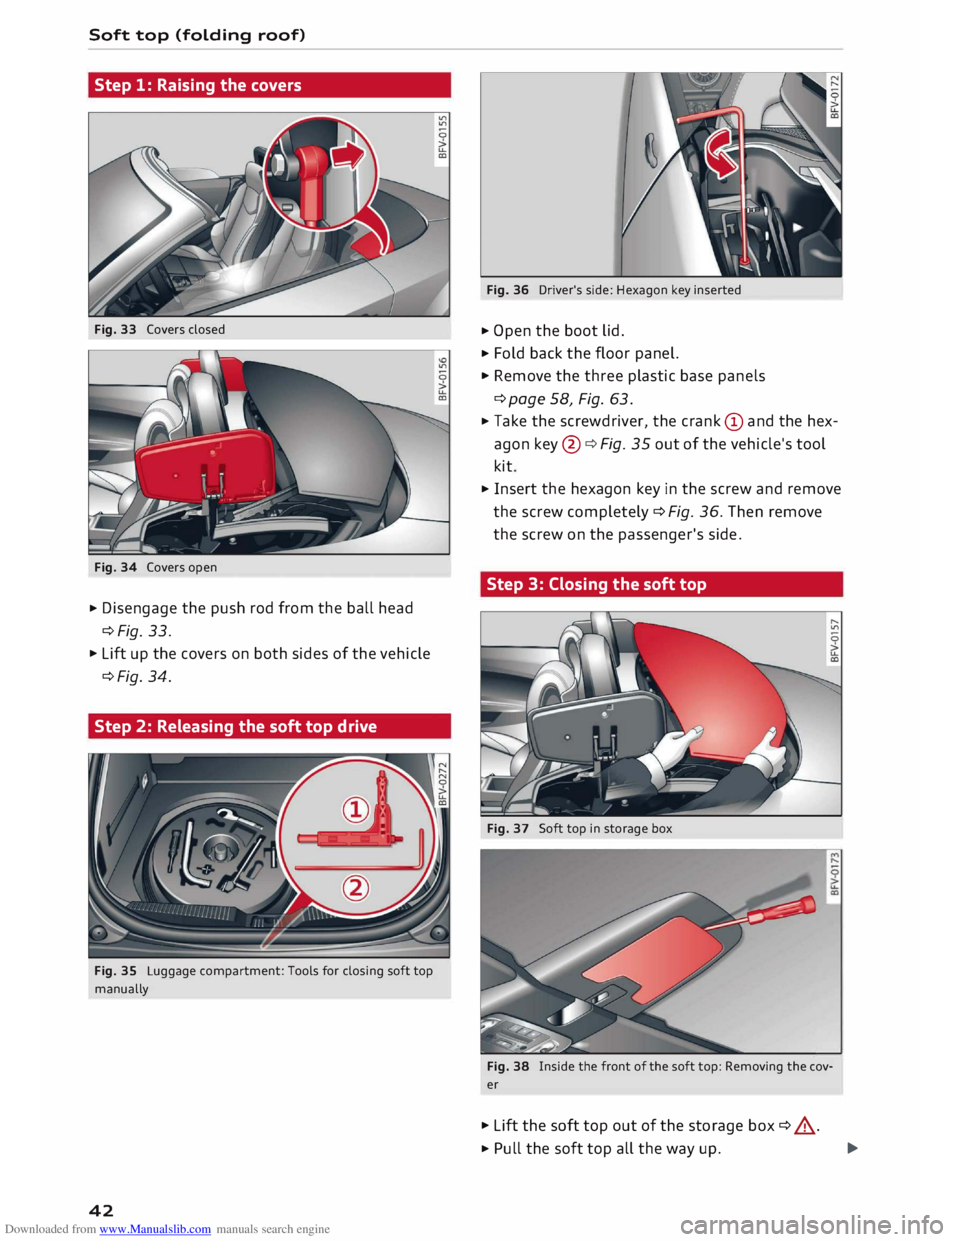
Step 1: Raising the covers
Fig. 33 Covers closed
Fig. 34 Covers open
.., Disengage the push rod from the ball head
¢Fig. 33 .
.., Lift up the covers on both sides of the vehicle
¢Fig. 34.
Step 2: Releasing the soft top drive
Fig. 35 Luggage compartment: Tools for closing soft top
manually
42 Fig.
36 Driver's side: Hexagon key inserted
.., Open the boot lid.
.., Fold back the floor panel.
.., Remove the three plastic base panels
¢ page 58, Fig. 63 .
.., Take the screwdriver, the crank (D and the hex
agon key@¢ Fig. 35 out of the vehicle's tool
kit
.., Insert the hexagon key in the screw and remove
the screw completely¢ Fig. 36. Then remove
the screw on the passenger's side.
Step 3: Closing the soft top
Fig. 37 Soft top in storage box
Fig. 38 Inside the front of the soft top: Removing the cov
er
.., Lift the soft top out of the storage box ¢ ,&. .
.., Pull the soft top all the way up.
.,..
Page 45 of 306
Downloaded from www.Manualslib.com manuals search engine 0
N
,.....
N
......
0
,.....
Vl
CX) ...
Use the screwdriver to remove the cover in the
centre of the soft top at the front ¢ Fig. 38.
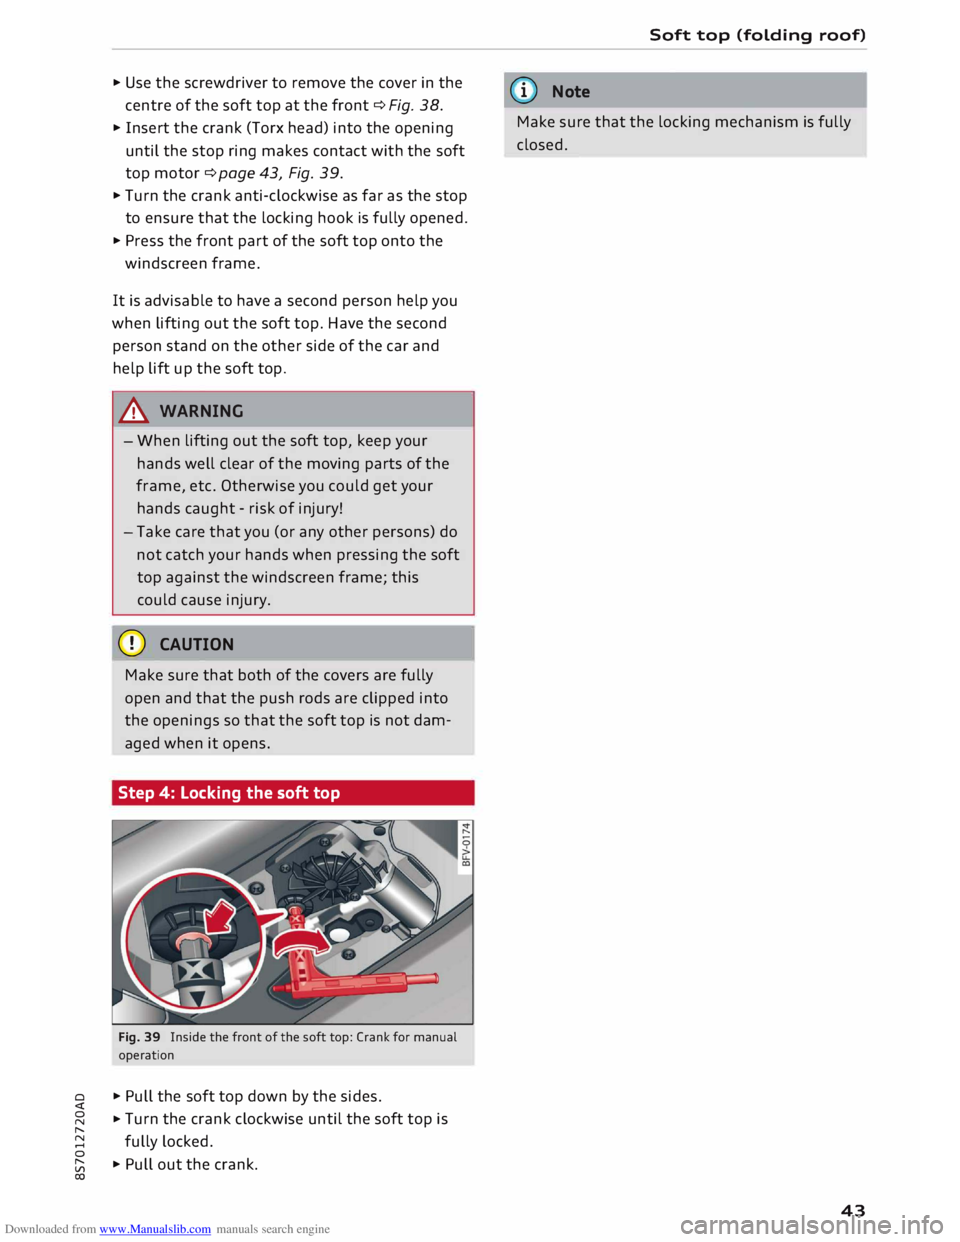
... Insert the crank (Torx head) into the opening
until the stop ring makes contact with the soft
top motor ¢ page 43, Fig. 39 .
... Turn the crank anti-clockwise as far as the stop
to ensure that the locking hook is fully opened .
... Press the front part of the soft top onto the
windscreen frame.
It is advisable to have a second person help you
when lifting out the soft top. Have the second
person stand on the other side of the car and
help lift up the soft top.
& WARNING
- When lifting out the soft top, keep your
hands well clear of the moving parts of the
frame, etc. Otherwise you could get your
hands caught -risk of injury!
- Take care that you (or any other persons) do
not catch your hands when pressing the soft
top against the windscreen frame; this
could cause injury.
CD CAUTION
Make sure that both of the covers are fully
open and that the push rods are clipped into
the openings so that the soft top is not dam
aged when it opens.
Step 4: Locking the soft top
Fig. 39 Inside the front of the soft top: Crank for manual
operation
... Pull the soft top down by the sides.
... Turn
the crank clockwise until the soft top is
fully locked.
... Pull out the crank. Soft
top (folding roof)
ijj) Note
Make sure that the locking mechanism is fully
closed.
43
Page 46 of 306
Downloaded from www.Manualslib.com manuals search engine Lights
and vision
Lights and vision
Exterior lights
Switching lights on and off
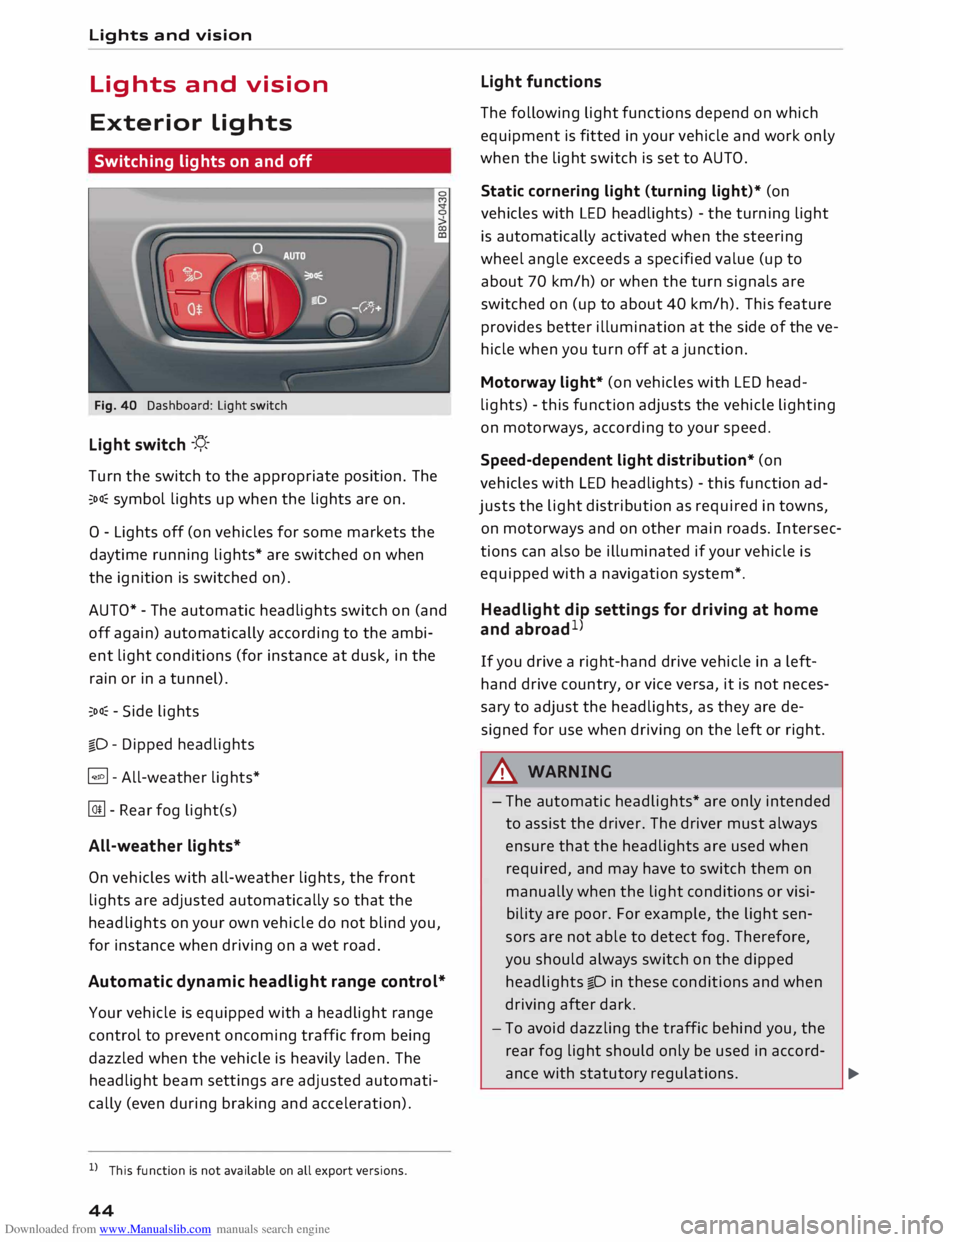
Fig. 40 Dashboard: Light switch
Light switch -f/_-
T urn the switch to the appropriate position. The
::oo� symbol lights up when the lights are on.
0 - Lights off (on vehicles for some markets the
daytime running lights* are switched on when
the ignition is switched on).
AUTO* -The automatic headlights switch on (and
off again) automatically according to the ambi
ent light conditions (for instance at dusk, in the
rain or in a tunnel).
::oo� -Side lights
io -Dipped headlights
�- All-weather lights*
@!l - Rear fog Lig ht(s)
All-weather lights*
On vehicles with all-weather lights, the front
lights are adjusted automatically so that the
headlights on your own vehicle do not blind you,
for instance when driving on a wet road.
Automatic dynamic headlight range control*
Your vehicle is equipped with a headlight range
control to prevent oncoming traffic from being
dazzled when the vehicle is heavily laden. The
headlight beam settings are adjusted automati
cally (even during braking and acceleration).
l l
This function is not available on all export versions.
44 Light
functions
The following Light functions depend on which
equipment is fitted in your vehicle and work only
when the Light switch is set to AUTO.
Static cornering light (turning light)* (on
vehicles with LED headlights) -the turning Light
is automatically activated when the steering
wheel angle exceeds a specified value (up to
about 70 km/h) or when the turn signals are
switched on (up to about 40 km/h). This feature
provides better illumination at the side of the ve
hicle when you turn off at a junction.
Motorway light* (on vehicles with LED head
lights) -this function adjusts the vehicle Lighting
on motorways, according to your speed.
Speed-dependent light distribution* (on
vehicles with LED headlights) -this function ad
justs the light distribution as required in towns,
on motorways and on other main roads. Intersec
tions can also be illuminated if your vehicle is
equipped with a navigation system*.
Headlight dip settings for driving at home
and abroad 1
)
If you drive a right-hand drive vehicle in a left
hand drive country, or vice versa, it is not neces
sary to adjust the headlights, as they are de
signed for use when driving on the left or right.
A WARNING
- The automatic headlights* are only intended
to assist the driver. The driver must always
ensure that the headlights are used when
required, and may have to switch them on
manually when the Light conditions or visi
bility are poor. For example, the light sen
sors are not able to detect fog. Therefore,
you should always switch on the dipped
headlights io in these conditions and when
driving after dark.
- To avoid dazzling the traffic behind you, the
rear fog light should only be used in accord-
ance with statutory regulations.
..,.
Page 47 of 306
Downloaded from www.Manualslib.com manuals search engine 0
N
,.....
N
....
0
,.....
Vl
CX) -
If the battery has been losing charge for a
while, the side lights or parking lights may
be switched off automatically. Always park
your car in a safe and suitably lit place ac
cording to the applicable regulations. Avoid
using the side lights for long periods (sever
al hours). If possible, switch the left or right
parking lights on.
- Observe all relevant statutory requirements
when using the lighting systems described
here.
(D} Note
- The light sensor for the automatic head
lights* is located in the mounting for the in
terior mirror. Do not affix any stickers on
this section of the windscreen.
- Some of the settings for the exterior light
ing can be adjusted ¢ page 47.
-A buzzer will sound if you switch off the ig
nition and open the door when the exterior
lighting is on.
- On vehicles for some markets, the rear
lights switch on together with the daytime
running lights.
- In cool or damp weather, the inside of the
headlights, turn signals or rear lights can
sometimes mist up, due to the temperature
difference between the interior and exterior
of the car. They should clear again partially
or completely soon after you switch on the
headlights. This phenomenon has no influ
ence on the life expectancy of the vehicle
lights. Lights
and vision
Turn signal and main beam lever
The turn signal Lever also operates the main
beam headlights, parking Lights and headlight
flasher.
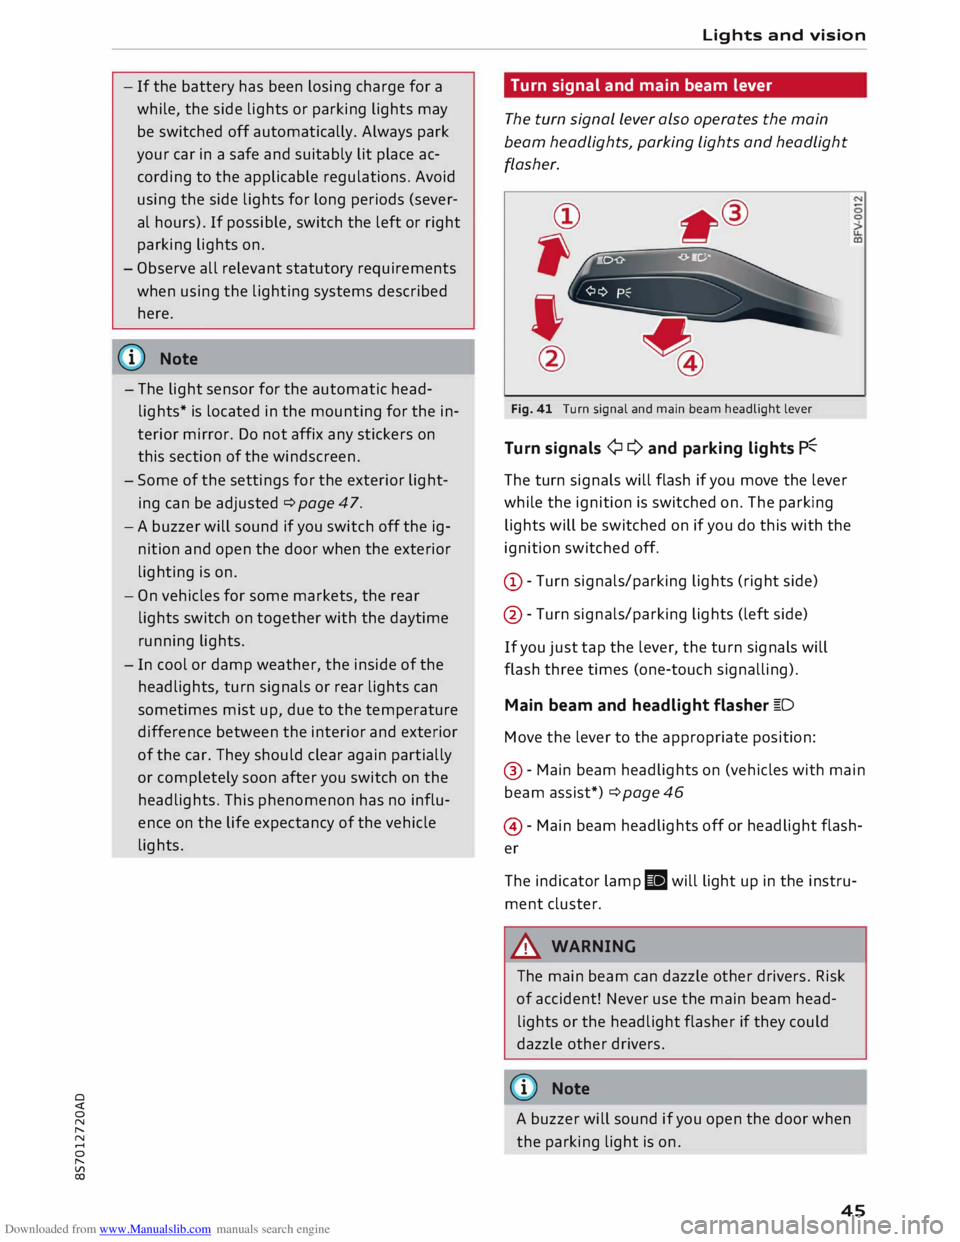
Fig. 41 Turn signal and main beam headlight lever
Turn signals ¢ Q and parking lights P�
The turn signals will flash if you move the lever
while the ignition is switched on. The parking
lights will be switched on if you do this with the
ignition switched off.
(D -Turn signals/parking lights (right side)
@ -Turn signals/parking lights (left side)
If you just tap the lever, the turn signals will
flash three times (one-touch signalling).
Main beam and headlight flasher �D
Move the lever to the appropriate position:
@ -Main beam headlights on (vehicles with main
beam assist*) ¢ page 46
@ -Main beam headlights off or headlight flash
er
The indicator lamp II will light up in the instru
ment cluster.
A WARNING
The main beam can dazzle other drivers. Risk
of accident! Never use the main beam head
lights or the headlight flasher if they could
dazzle other drivers.
(© Note
A buzzer will sound if you open the door when
the parking light is on .
45
Page 48 of 306
Downloaded from www.Manualslib.com manuals search engine Lights
and vision
Main beam assist
Applies to: vehicles with main beam assist
The main beam assist automatically switches
the main beam headlights on or off depending
on the surrounding light conditions.
A sensor (Located in the mounting for the interior
mirror) detects light sources from other road
users. The main beams are activated or deactiva
ted automatically depending on the position of
vehicles on either side of the road, on the road
speed, and on other traffic and ambient condi
tions.
On vehicles with matrix LED headlights, individu
al segments of the main beam are activated or
deactivated. The relevant sector in front of the
vehicle is masked, while the surrounding areas
remain lit. The ambient surroundings are thus il
luminated optimally without dazzling other road
users.
Activating the main beam assist
Important: The light switch must be set to AUTO,
the dipped beam headlights must be on and the
main beam assist must be activated on the info
tainment system¢ page 47.
... Press the lever forwards ®¢ page 45, Fig. 41
to activate the main beam assist. The indicator
lamp� will light up in the infotainment dis
play and the main beams will be switched on/
off automatically. An indicator lamp. lights
up when the main beams are switched on.
Switching the main beams on/off manually
If the main beams are not switched on or if the
headlights are not dipped as expected, you can
control the dip function manually:
.., To switch on the main beams manually, push
the lever to position @. The indicator lamp.
will light up .
... To dip the headlights manually, pull the lever
towards you@. The main beam assist will be
deactivated.
Flashing the headlights
... Pull the lever towards you© to flash the head
lights when the main beam assist is activated
46 and
the main beams are dipped. The main
beam assist will remain activated.
Driver messages on the infotainment display
Main beam assist: fault. See owner's manual
Drive to a qualified workshop soon and have the
fault rectified. You can still switch the main
beam headlights on and off manually.
Main beam assist: currently unavailable. Cam
era view restricted due to surroundings. See
owner's manual
The camera vision is impaired, e.g. by stickers or
dirt.
The sensor is located between the interior mirror
and the windscreen. Do not affix any stickers on
this section of the windscreen.
A WARNING
The main beam assist is only intended to as
sist the driver. The driver must always ensure
that the headlights are used when required,
and may have to switch them on or off man
ually, e.g. when the light conditions or visibili
ty are poor. In the following situations man
ual intervention may be necessary:
- Hazardous weather conditions such as fog,
heavy rain and snow or water splashes
- Roads on which oncoming traffic is partially
concealed (e.g. on motorways)
- Indiscernible road users (e.g. cyclists with
insufficient lighting or vehicles with dirty
rear lights)
- Tight corners, steep hill crests or valleys
- Poorly lit towns
- Highly reflective objects, such as road signs
- Windscreen misted up, dirty, frosted or cov-
ered by stickers in front of the sensor
(CD) Note
The main beam assist is deactivated whenever
you intervene by switching the main beams
on or off manually @.
Page 49 of 306
Downloaded from www.Manualslib.com manuals search engine 0
N
,.....
N Adjusting
the settings for the exterior
lighting
You can change the settings for these functions
on the infotainment system .
.., Select the following on the infotainment sys
tem: I MENU
I button >Car> left control button
> Vehicle settings > Exterior lighting.
Automatic headlights
The following settings are available in the Auto
matic headlights menu:
Activation time -You can determine how soon
the lights are switched on by using the settings
early, medium or late to adjust the sensitivity of
the light sensor.
Main beam assist* -You can switch the main
beam assist* on and off.
Audi adaptive light* -You can switch the adap
tive light on and off.
Headlight dip settings for driving at home
and abroad
If you drive a rig ht-hand drive vehicle in a left
hand drive country, or vice versa, it is not neces
sary to adjust the headlights, as they are de
signed for use when driving on the left or right.
Entry/exit lights
The entry lights illuminate the area around the
vehicle after dark when the vehicle is unlocked.
To activate this function, select Entry/exit lights.
The exit lights illuminate the area around the ve
hicle after dark when the ignition has been
switched off and the driver's door opened. To ac
tivate this function, select Entry/exit lights.
The entry and exit lights are operational after
dark when the light switch is set to AUTO.
8 l} This function is not available on all models or export ver
,.....
� sions. Lights
and vision
Hazard warning lights
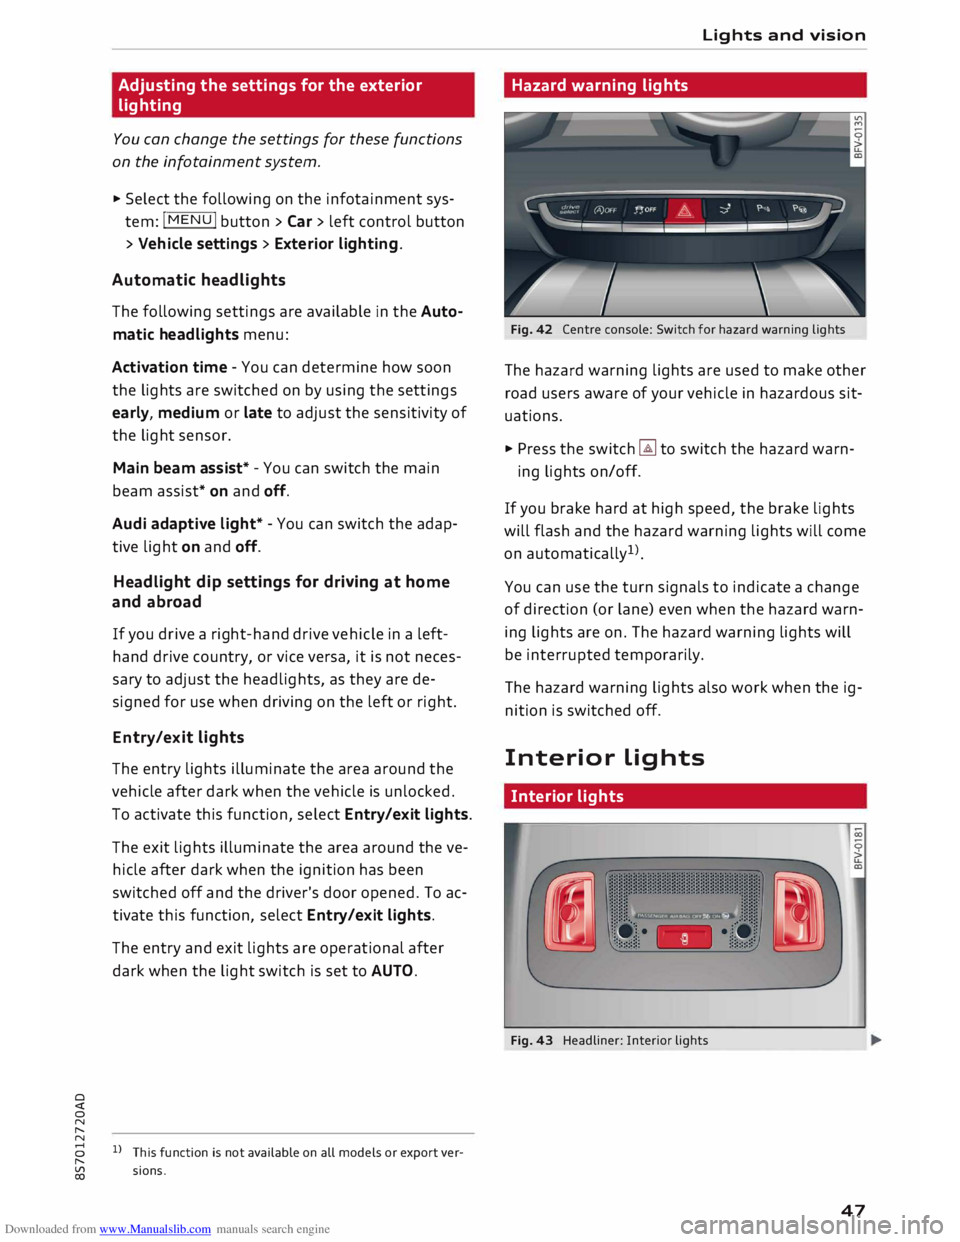
Fig. 42 Centre console: Switch for hazard warning lights
The hazard warning lights are used to make other
road users aware of your vehicle in hazardous sit
uations.
.., Press the switch � to switch the hazard warn-
ing lights on/off.
If you brake hard at high speed, the brake lights
will flash and the hazard warning lights will come
on automatically 1
).
You can use the turn signals to indicate a change
of direction (or lane) even when the hazard warn
ing lights are on. The hazard warning lights will
be interrupted temporarily.
The hazard warning lights also work when the ig
nition is switched off.
Interior Lights
Interior lights
Fig. 43 Headliner: Interior lights
47
Page 50 of 306
![AUDI TT ROADSTER 2016 Service Manual Downloaded from www.Manualslib.com manuals search engine Lights
and vision
[i]- Courtesy light position. The interior lights are
switched on and off automatically when this
function is acti AUDI TT ROADSTER 2016 Service Manual Downloaded from www.Manualslib.com manuals search engine Lights
and vision
[i]- Courtesy light position. The interior lights are
switched on and off automatically when this
function is acti](/img/6/57670/w960_57670-49.png)
Downloaded from www.Manualslib.com manuals search engine Lights
and vision
[i]- Courtesy light position. The interior lights are
switched on and off automatically when this
function is activated.
It is no longer necessary to operate a switch to
turn on the reading lights. Simply swipe or tap
your finger on the light to switch it on or off. The
light can be dimmed by keeping your finger in
contact with the reading light after switching it
on.
Interior lights
Various optional lighting functions are available
for the vehicle interior. The settings for certain
functions can be adjusted on the infotainment
system. Select the following on the infotainment
system: I MENU I button > Car > left control but
ton > Vehicle settings> Background lighting.
Instrument lighting
Fig. 44 Instrument lighting
The brightness of the lighting in the instrument
cluster and the centre console can be adjusted as
required.
.,. Briefly press the knob to release it.
.,. Turn the knob towards "-" or"+" to reduce or in
crease the brightness of the lighting.
.,. Briefly press the knob again to engage it.
48 Clear
vision
Adjusting the exterior mirrors
Fig. 45 Driver's door: Adjuster knob for exterior mirrors
Turn the knob to the appropriate position:
Q/P - To adjust the exterior mirror (left or right
side). Move the knob in the desired direction.
(fill - To heat the mirrors (depends on the outside
temperature).
8 - To fold in the exterior mirrors*. One of the
infotainment settings allows you to control
whether or not the mirrors are folded in when
you lock the vehicle �page 31.
Tilt function for exterior mirror on passenger
side*
The mirror is tilted slightly to provide a better
view of the kerb when parking backwards. This
feature only works when the knob is in the posi
tion for adjusting the mirror on the passenger
side.
You can adjust the tilted mirror surface by mov
ing the knob in the desired direction. This new
position is automatically stored and assigned to
the remote control key when you take the car out
of reverse .
The mirror returns to its original position as soon
as you drive forwards at over 15 km/h or switch
off the ignition.
A WARNING
Convex or wide-angle* exterior mirrors give a
larger field of vision. However, they make ob-
jects look smaller and further away than they
�