replacing BMW 540i 1997 E39 Manual Online
[x] Cancel search | Manufacturer: BMW, Model Year: 1997, Model line: 540i, Model: BMW 540i 1997 E39Pages: 1002
Page 557 of 1002
Downloaded from www.Manualslib.com manuals search engine
21 0-1 5
Clutch
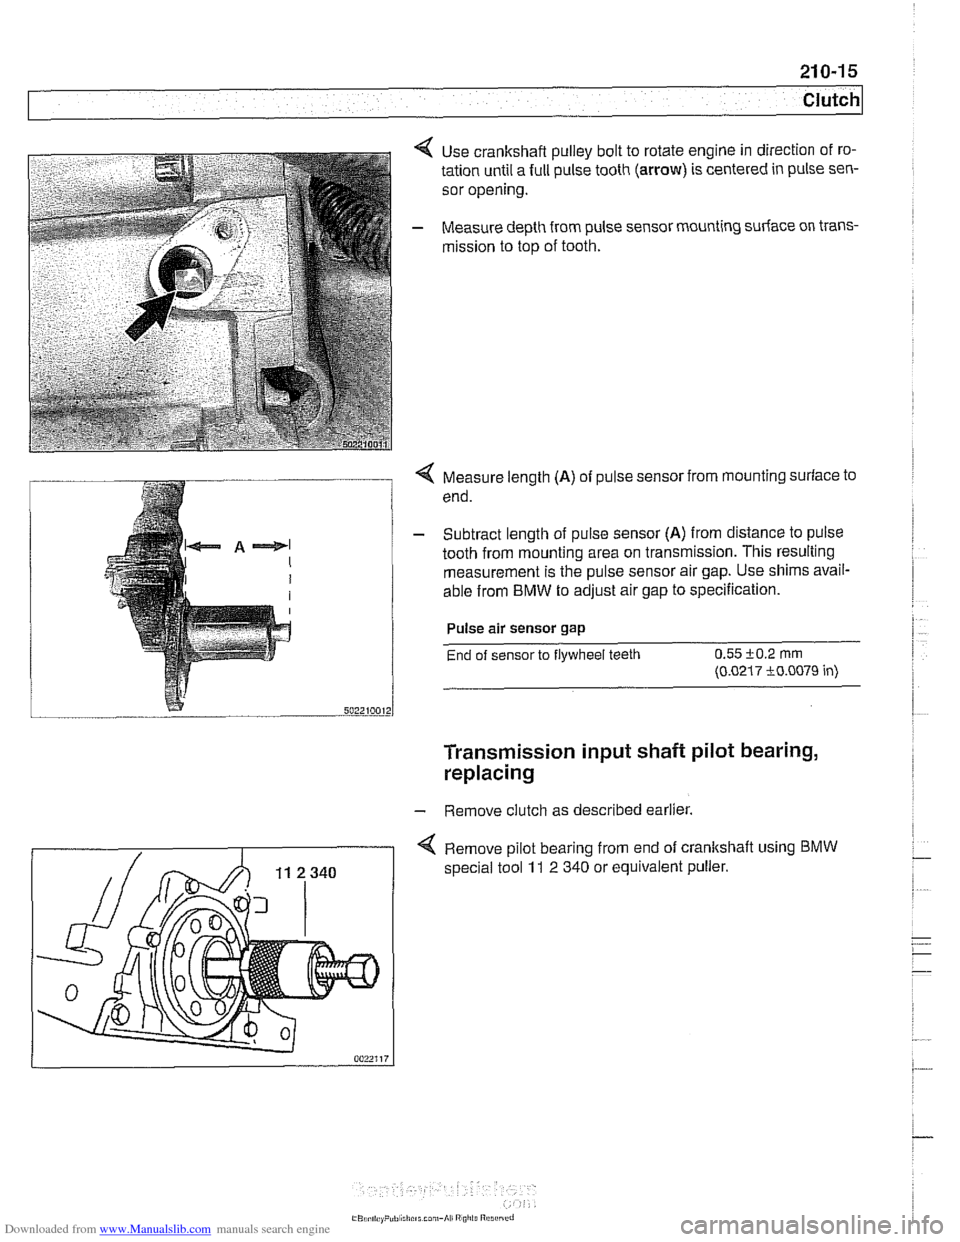
Use crankshaft pulley bolt to rotate engine in direction of ro-
tation until a full pulse tooth
(arrow) is centered in pulse sen-
sor opening.
Measure depth from pulse sensor mounting surface on trans-
mission to top of tooth.
Q Measure length (A) of pulse sensor from mounting surface to
end.
- Subtract length of pulse sensor (A) from distance to pulse
tooth from mounting area on transmission. This resulting
measurement is the pulse sensor air gap. Use shims avail-
able from
BMW to adjust air gap to specification.
Pulse air sensor gap
End of sensor to flywheel teeth 0.55 i-0.2 rnrn
(0.0217 i0.0079 in)
Transmission input shaft pilot bearing,
replacing
- Remove clutch as described earlier.
4 Remove pilot bearing from end of crankshaft using BMW
special tool 11 2 340 or equivalent puller.
Page 565 of 1002
Downloaded from www.Manualslib.com manuals search engine
230 Manual Transmission
General ........................... .23 0.2 Output shaft
seal. replacing (5-speed
.... Special tools ........................ .23 0.2 transmission) (transmission installed) 230-10
Manual transmission aoolications ....... .23 0.5 Output shaft seal. replacing (6-speed . . .... transmission) (transmission installed) 230-12 ........ Transmission Fluid Service .23 0.6 put shaft seal. replacing
Transmission fluid level. checking ....... .23 0.6 (transmission ............... 230-15
........... Transmission fluid, replacing .23 0.6
Transmission Removal ................... ..... Transmission External Service .23 0-7 and installation 230-1
Back-up light switch, replacing .......... .23 0-' Transmission, removing and installing 230-16 ...
Selector shaft seal. reolacina .
(transmission installed) ................ .23 0.8
Page 570 of 1002
Downloaded from www.Manualslib.com manuals search engine
230-6
Manual Transmission
Manual transmissions installed in the 5 Series are normally
filled with a "Lifetime" manual transmission fluid
(BMW MTF
LT-I) and do not require periodic fluid changes. Transmis-
sions filled with MTF LT-I lifetime oil are identified with a yel-
low label near the transmission fill plug labeled "Lifetime Oil
MTF-LT-1".
Transmission fluid level, checking
- Drive vehicle for a few miles to warm transmission.
- Raise and safely support vehicle to access transmission
filler plug.
CAUTION-
Make sure the car is stable and well supporfedat all times.
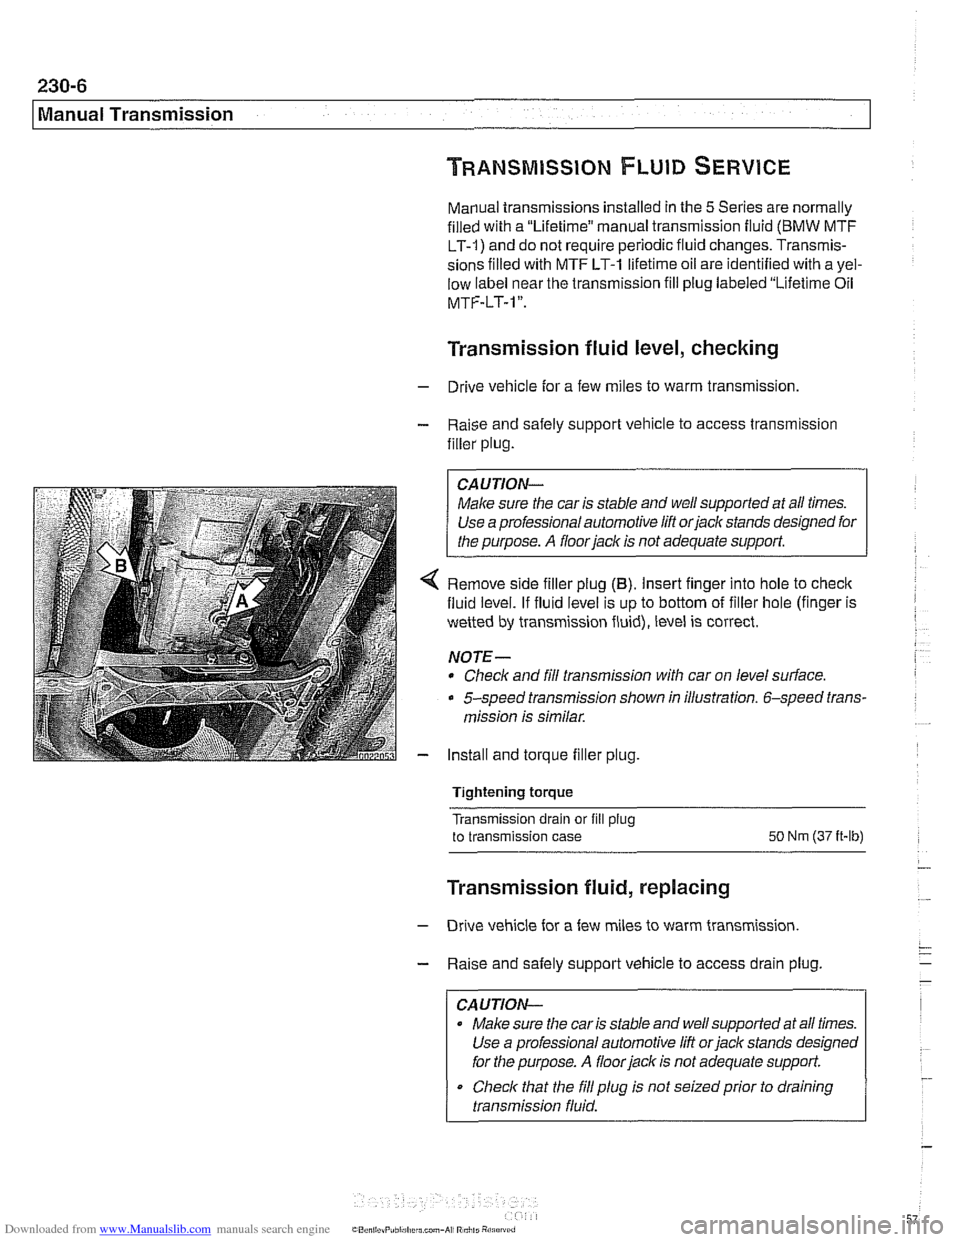
4 Remove side filler plug (B). Insert finger into hole to check
fluid level. If fluid level is up to bottom of filler hole (finger is
wetted by transmission fluid), level is correct.
NOTE-
* Check and fill transmission with car on level surface.
5-speed transmission shown in illustration. 6-speed trans-
mission is similar.
- Install and torque filler plug.
Tightening torque
Transmission drain or fill
plug
to transmission case SO Nm (37 it-lb)
Transmission fluid, replacing
- Drive vehicle for a few miles to warm transmission.
- Raise and safely support vehicle to access drain plug.
CAUTION-
Make sure the car is stable and well supported at all times.
Use a professional automotive lift
orjack stands designed
for the purpose.
A floor jack is not adequate support.
Check that the
fill plug is not seizedprior to draining
transmission fluid.
Page 571 of 1002
Downloaded from www.Manualslib.com manuals search engine
230-7
Manual Transmission
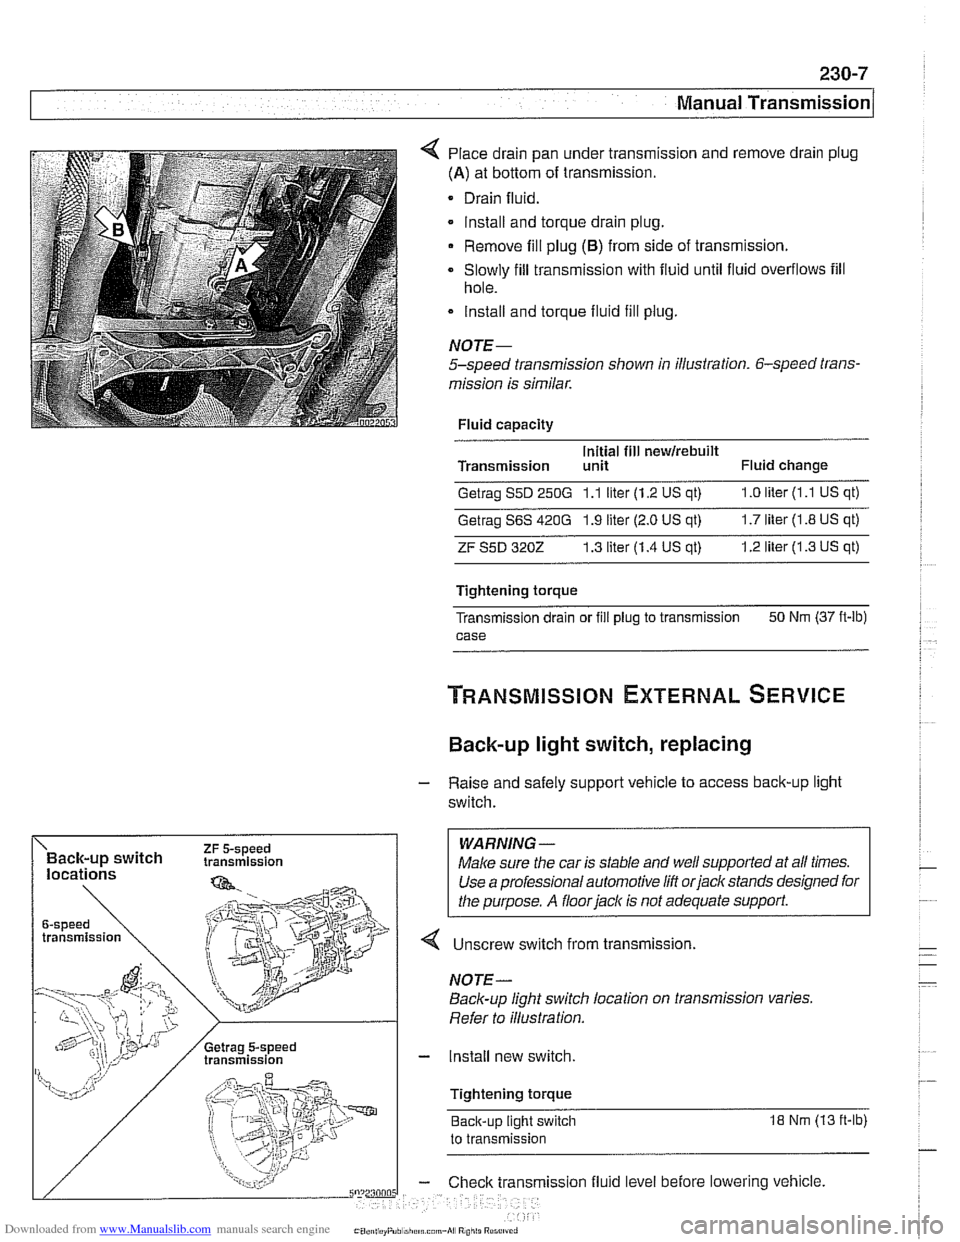
Place drain pan under transmission and remove drain plug
(A) at bottom of transmission.
Drain fluid.
lnstall and torque drain plug.
Remove fill plug
(6) from side of transmission.
Slowly fill transmission with fluid until fluid overflows fill
hole.
lnstall and torque fluid fill
plug.
NOJE-
5-speed transmission shown in illustration. 6-speed trans-
mission is similar.
Fluid capacity
Initial fill
newirebuilt Transmission unit Fluid change
Getrag S5D 250G 1.1 liter (1.2 US qt) 1.0 liter (1 .l US qt)
Getrag S6S 420G 1.9 liter (2.0 US qt) 1.7 liter (1.8 US qt)
ZF S5D 3202 1.3 liter (1.4 US at) 1.2 liter (1.3 US qt)
Tightening torque
Transmission drain or
fill plug to transmission 50
Nm (37 ft-lb)
case
Back-up light switch, replacing
- Raise and safely support vehicle to access back-up light
switch.
WARNING -
4 Unscrew switch from transmission.
Back-up light switch location on transmission varies.
Refer to illustration.
- Install new switch.
Tightening torque Back-up light switch
18 Nm (13 ft-lb)
to transmission
ission fluid level before lowering vehicle.
Page 572 of 1002
Downloaded from www.Manualslib.com manuals search engine
Manual Transmission Selector shaft seal, replacing
(transmission installed)
- Put transmission into second gear.
- Raise and safely support vehicle.
WARNING-
Make sure the car is stable and well supported at all times.
Use a professional automotive lift
orjack stands designed for
the purpose.
A floorjack is not adequate support
- 6-speed transmission: Remove rear engine splash shield
- Remove exhaust system and heat shields. See 180 Exhaust
System.
- Support transmission with transmission jack.
- Disconnect driveshaft at transmission and tie to side. See
260 Driveshaft.
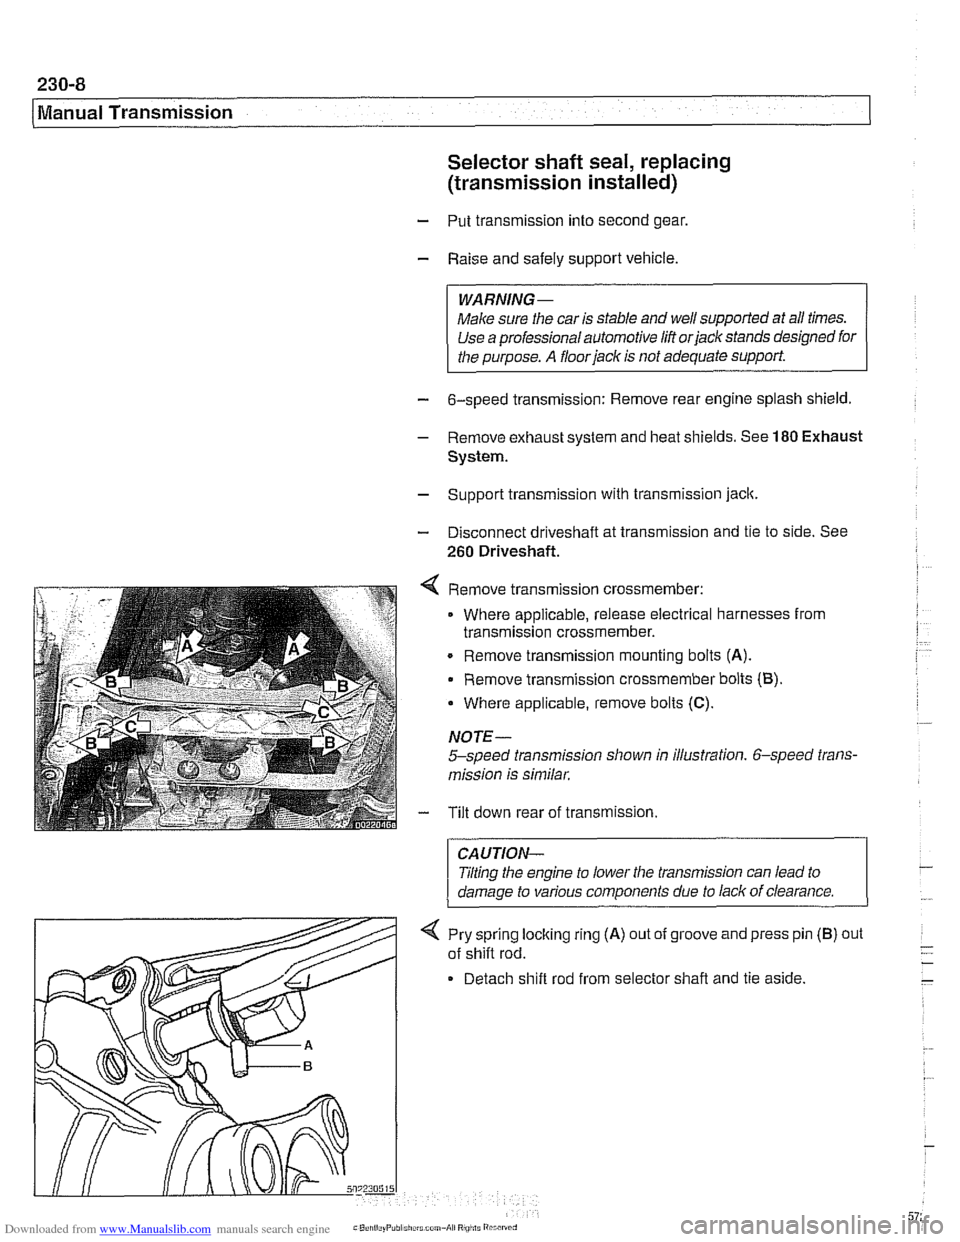
4 Remove transmission crossmember:
Where applicable, release electrical harnesses from
transmission crossmember.
. Remove transmission mounting bolts (A).
Remove transmission crossmember bolts (B).
Where applicable, remove bolts
(C).
NOTE-
5-speed transmission shown in illustration. 6-speed trans-
mission is similar.
- Tilt down rear of transmission.
CAUTION-
Jilting the engine to lower the transmission can lead to
damaae to various components due to lack of clearance.
-
4 Pry sprlng locking rlng (A) out of groove and press pin
of
sh~fl rod.
Detach
sh~ft rod from selector shafl and tie as~de.
(B) out
Page 574 of 1002
Downloaded from www.Manualslib.com manuals search engine
230-1 0
I Manual Transmission
Output shaft seal, replacing (5-speed
transmission) (transmission installed)
- Raise and safely support vehicle.
WARNING -
Make sure the car is stable and well supported at all times.
Use a professional automotive
lilt orjack stands designed
for the purpose.
A floorjack is not adequate support.
- Remove exhaust system and heat shields. See 180 Exhaust
System
Support transmission with transmission jack.
Disconnect driveshafi at transmission output flange, and
hang driveshaft to side. See
260 Driveshaft.
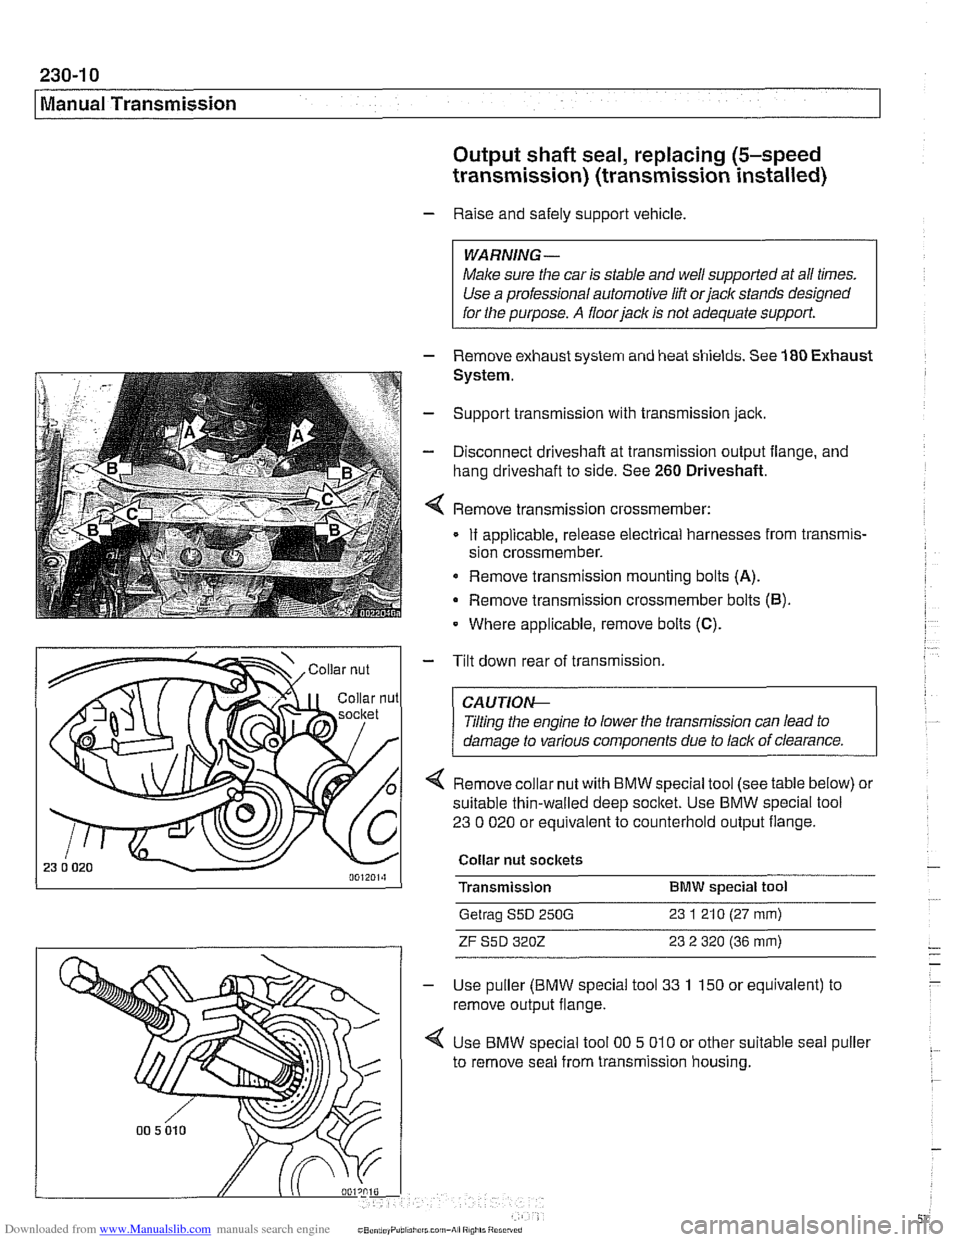
Remove transmission crossmember:
If applicable, release electrical harnesses from transmis-
sion crossmember.
Remove transmission mounting bolts
(A).
Remove transmission crossmember bolts (6).
Where applicable, remove bolts (C).
- Tilt down rear of transmission.
CAUTIOI\C
Tilting the engine to lower the transmission can lead to
damage to various components due to lack of clearance.
4 Remove collar nut with BMW special tool (see table below) or
suitable thin-walled deep
socltet. Use BMW special tool
23 0 020 or equivalent to counterhold output flange.
Collar nut sockets
Transmission
BMW special tool
Getrag S5D 250G 23 1 21 0 (27 mm)
ZF S5D 3202 23 2 320 (36 mm)
Use puller (BMW special tool 33 1 150 or equivalent) to
remove output flange.
Use BMW special tool
00 5 010 or other suitable seal puller
to remove seal from transmission housing.
Page 576 of 1002
Downloaded from www.Manualslib.com manuals search engine
230-12
/ Manual Transmission
Output shaft seal, replacing (6-speed
transmission) (transmission installed)
- Raise and safely support vehicle.
WARNING-
Make sure the car is stable and well supported at all times.
Use a professional automotive lift
orjack stands designed for
the purpose.
A floorjack is not adequate support.
- Remove exhaust system and heat shields. See 180 Exhaust
System.
- Support transmission with transmission jack
- Disconnect driveshaft at transmission output flange, and
hang driveshaft to side. See
260 Driveshaft.
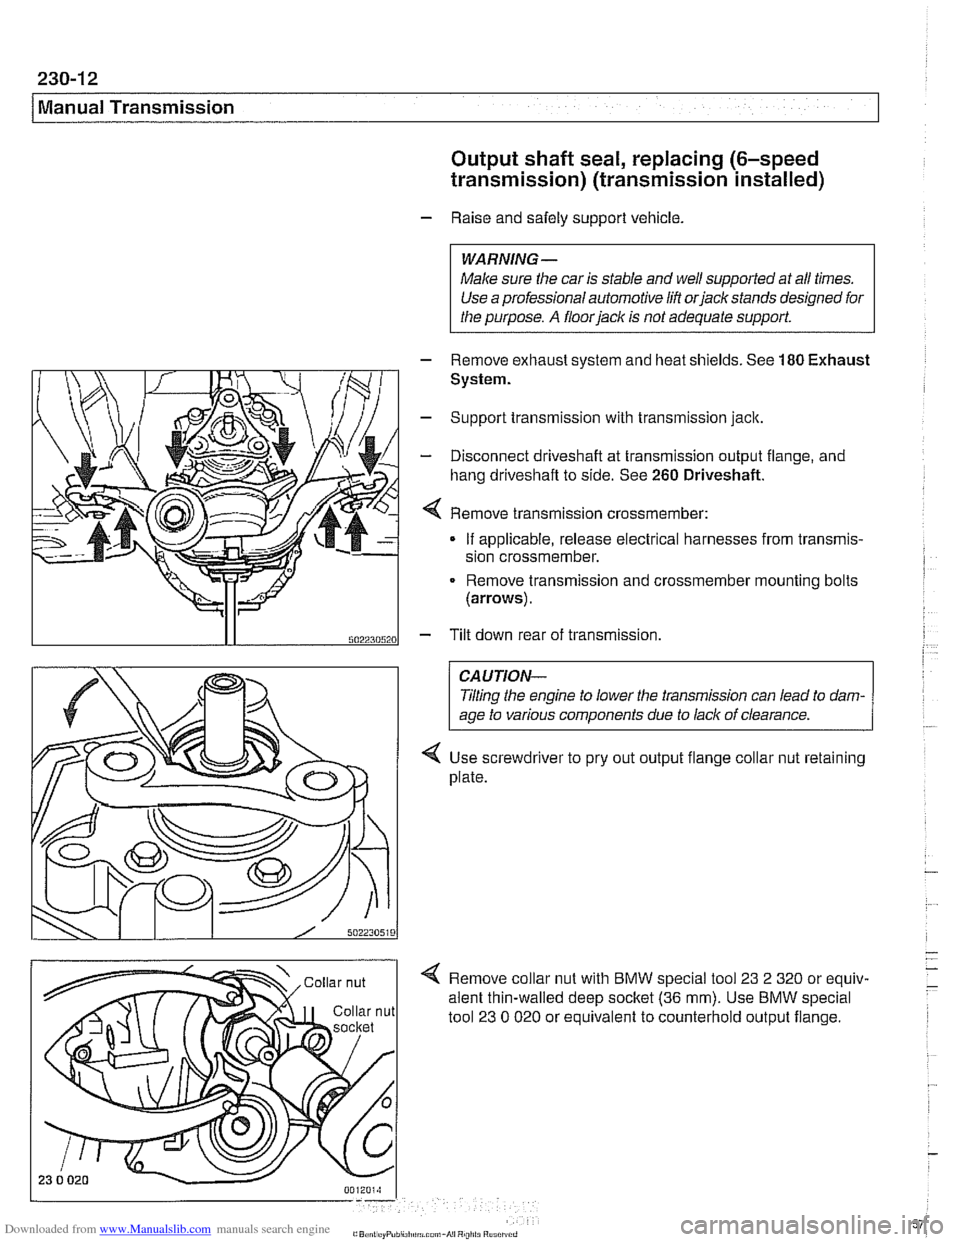
Remove transmission crassmember:
If applicable, release electrical harnesses from transmis-
sion crossmember.
Remove transmission and crossmember mounting bolts
(arrows).
5022305201 - Tilt down rear of transmission
CAUTION-
Tlting the engine to lower the transmission can lead to dam-
age to various components due to lack of clearance.
Use screwdriver to pry out output flange collar nut retaining
plate.
Remove collar nut with BMW special tool
23 2 320 or equiv-
alent thin-walled deep socltet
(36 mm). Use BMW special
tool
23 0 020 or equivalent to counterhold output flange.
Page 579 of 1002
Downloaded from www.Manualslib.com manuals search engine
Manual Transmission
Input shaft seal, replacing
(transmission removed)
- Remove transmission from vehicle as described later in this
group.
- Remove clutch release bearing end release bearing lever
from inside bellhousing.
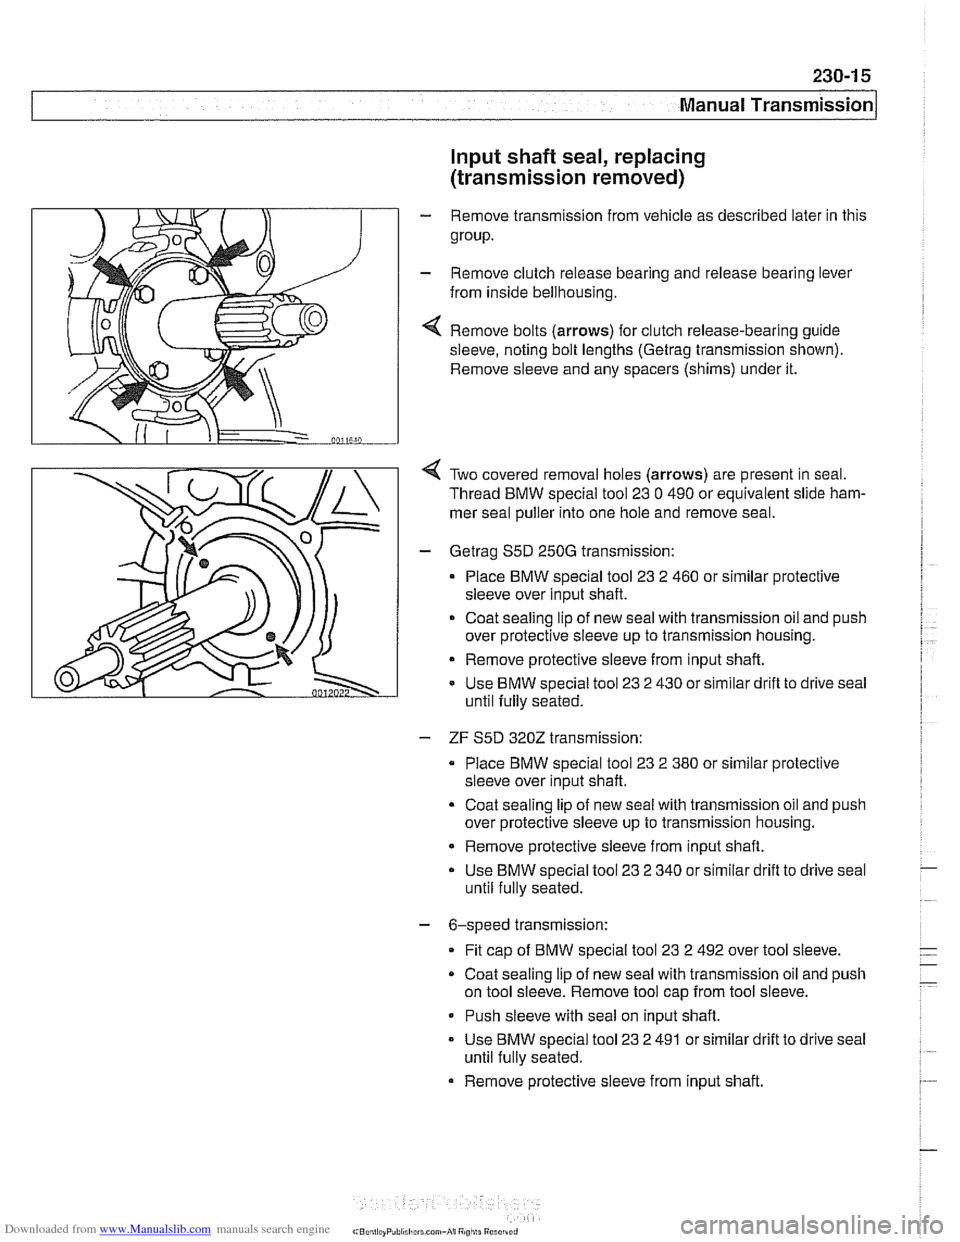
4 Remove bolts (arrows) for clutch release-bearing guide
sleeve, noting bolt lengths
(Getrag trensmission shown).
Remove sleeve and any spacers (shims) under it.
Two covered removal holes (arrows) are present in seal.
Thread BMW special tool
23 0 490 or equivalent slide ham-
mer seal puller into one hole and remove seal.
- Getreg S5D 250G transmission:
Place BMW special tool
23 2 460 or similar protective
sleeve over input shaft.
Coat sealing lip of new
seel with trensmission oil and push
over protective sleeve up to transmission housing.
Remove protective sleeve from input shaft.
Use BMW special tool
23 2 430 or similar drifl to drive seal
until fully seated.
- ZF S5D 3202 transmission:
Place BMW special tool
23 2 380 or similar protective
sleeve over input shaft.
Coat sealing lip of new seal with transmission oil and push
over protective sleeve up to transmission housing.
* Remove protective sleeve from input shaft.
Use BMW special tool
23 2 340 or similar drift to drive seal
until fully seated.
- 6-speed transmission:
Fit
cap of BMW special tool 23 2 492 over tool sleeve.
Coat sealing
lip of new seal with transmission oil and push
on tool sleeve. Remove tool cap from tool sleeve.
- Push sleeve with seal on input shaft.
- Use BMW special tool 23 2 491 or similar drift to drive seel
until fully seated.
Remove protective sleeve from input shaft.
Page 607 of 1002
Downloaded from www.Manualslib.com manuals search engine
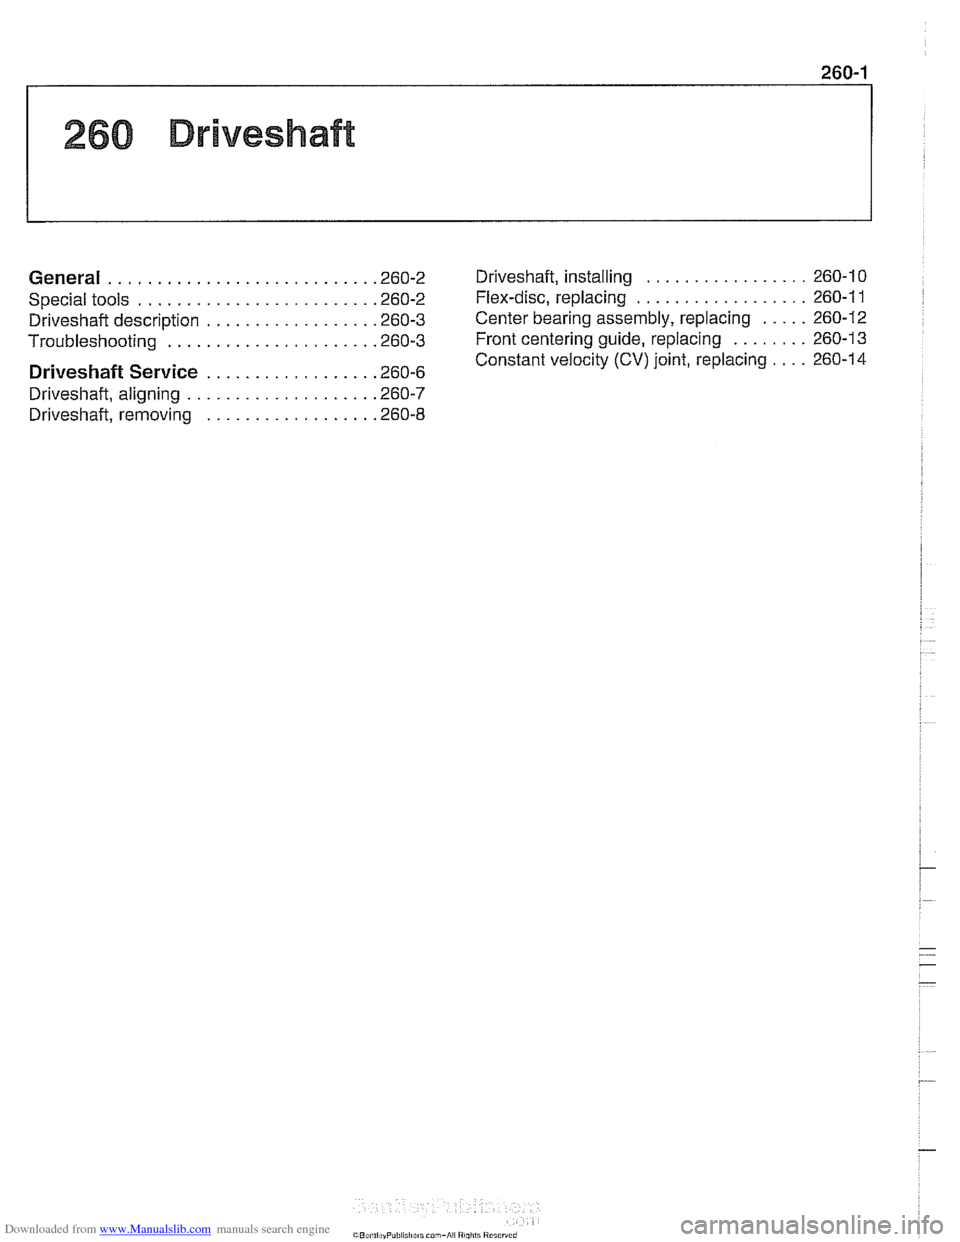
................. General ............................ 260-2 Driveshaft. installing 260-10
.................. Special tools ........................ .26 0.2 Flex.disc. replacing 260-1 1
..... Driveshaft description ................. .26 0.3 Center bearing assembly. replacing 260-12
........ Troubleshooting ..................... .26 0.3 Front centering guide. replacing 260-13
Constant velocity
(CV) joint. replacing .... 260-14 Driveshaft Service ................. .26 0.6
Driveshaft. aligning
................... .26 0.7
Driveshaft. removing
................. .26 0.8
Page 617 of 1002
Downloaded from www.Manualslib.com manuals search engine
Driveshaft
- Road test vehicle to check for noise or vibration
CAUTION-
Do not reuse self-locking nuts. These nuts are designed to
be used only once.
Avoid stressing the flex-disc when torquing the bolts.
Do this by counterholding the bolts and turning the nuts
on the flange side.
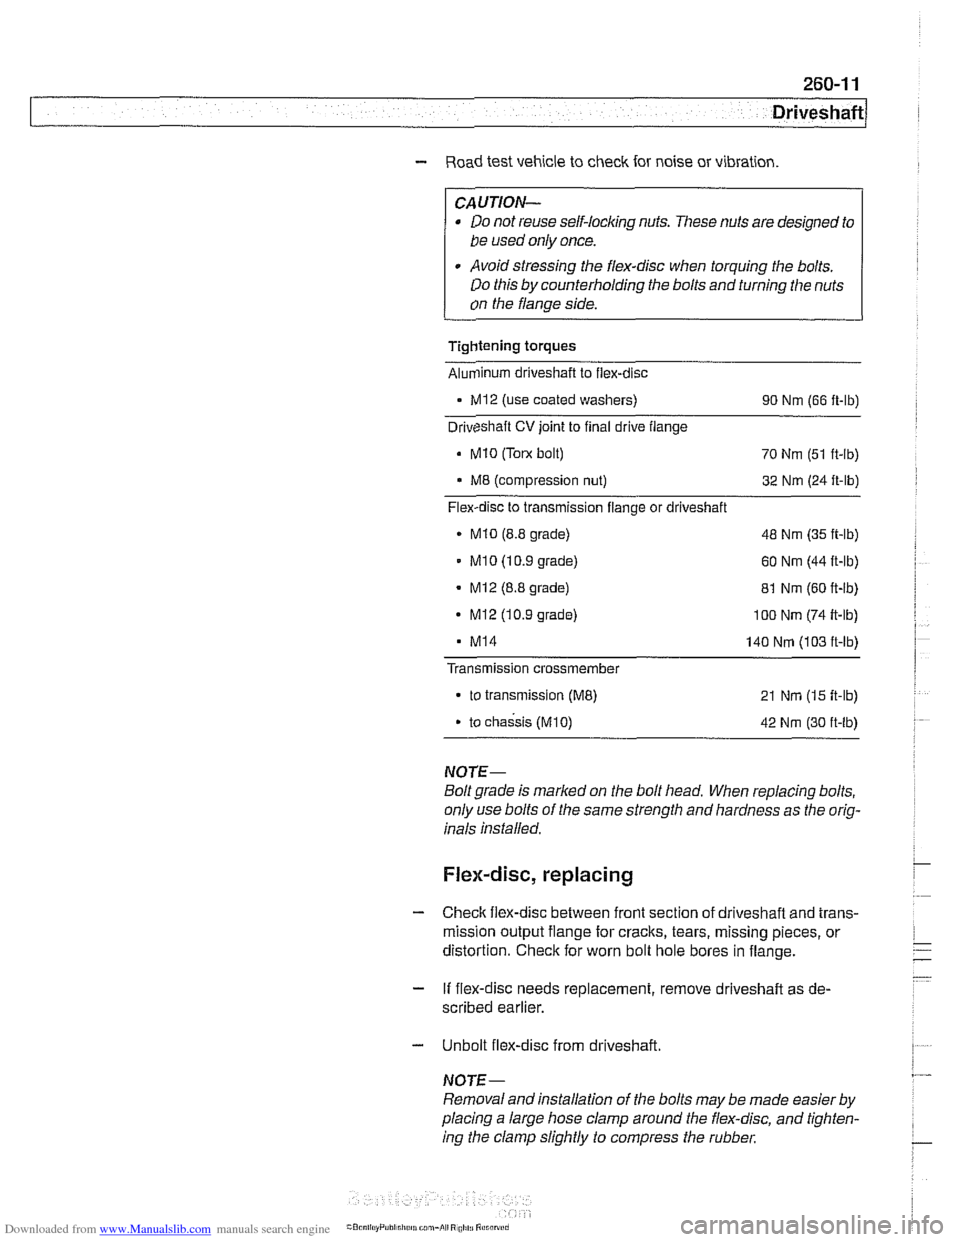
Tightening torques
Alunlinum driveshaft to flex-disc
- MI2 (use coated washers)
90 Nm (66 ft-lb)
Driveshaft
CV joint to final drive flange
Mi0 (Tom bolt)
70 Nm (51 ft-lb)
M8 (compression nut) 32 Nm (24 ft-lb)
Flex-disc to transmission flange or driveshaft
MI0 (8.8 grade) 48 Nm (35 ft-lb)
MI 0 (1 0.9 grade) 60 Nm (44 ft-lb)
- Mi2 (8.8 grade)
81 Nm (60 ft-lb)
- MI2 (10.9 grade) I00 Nm (74 ft-lb)
MI4 140 Nm (103 ft-lb)
Transmission
crossmember
to transmission (ME) 21 Nm (15 ft-lb)
. to chassis (M10) 42 Nm (30 ft-lb)
NOTE-
Boltgrade is marked on the bolt head. When replacing bolts,
only use bolts of the same strength and hardness as the orig-
inals installed.
Flex-disc, replacing
- Checlc flex-disc between front section of driveshafl and trans-
mission output flange for craclts, tears, missing pieces, or
distortion. Check for worn bolt hole bores in flange.
- If flex-disc needs replacement, remove driveshafl as de-
scribed earlier.
- Unbolt flex-disc from driveshaft.
NOTE-
Removal andinstallation of the bolts may be made easier by
placing a large hose clamp around the flex-disc, and tighten-
ing the clamp slightly to compress the rubber.