CHEVROLET CAMARO 1967 1.G Chassis Workshop Manual
Manufacturer: CHEVROLET, Model Year: 1967, Model line: CAMARO, Model: CHEVROLET CAMARO 1967 1.GPages: 659, PDF Size: 114.24 MB
Page 471 of 659

STEERING 9-31
Fig.
63—Freeing Ball Stud
rod threads with EP Chassis lube and install ends on
tie rod making sure both ends are threaded ah equal
distance from the tie rod.
2.
Make sure that threads on ball stud and in ball stud
nuts are perfectly clean and smooth. Install neoprene
seals on ball studs.
NOTE: If threads are not clean and smooth,
ball studs may turn in tie rod ends when at-
tempting to tighten nut.
3.
Install ball studs in steering arms and relay rod.
4.
Install ball stud nut, and install cotter pins. Lubri-
cate tie rod ends.
5.
Adjust toe-in as described in Section 3.
NOTE: Before locking clamp bolts on the rods,
make sure that the tie rod ends are in alignment
with their ball studs (each ball joint is in the
center of its travel). If the tie rod is not in
alignment with the studs, binding will result.
RELAY ROD-ALL MODELS EXCEPT CORVETTE
Removal
1.
Remove inner ends of tie rods from relay rod as
described under Tie Rod - Removal.
2.
Remove cotter pin and nut from relay rod ball stud
attachment at pitman arm.
3.
Detach relay rod from pitman arm. Shift steering
linkage as required to free pitman arm from relay
rod.
4.
Remove cotter pin and nut from idler arm and re-
move relay rod from idler arm.
Installation
1.
Install relay rod to idler arm, making certain idler
stud seal is in place, then install and tighten nut.
Advance nut just enough to align castellation with
cotter pin hole and install pin.
2.
Raise end of rod and install on pitman arm. Secure
with nut and cotter pin.
3.
Install tie rod ends to relay rod as previously
described under Tie Rods. Lubricate tie rod ends.
4.
Adjust toe-in (see Section 3) and align steering wheel
as described previously in this section under Steer-
ing Wheel Alignment and High Point Centering.
RELAY ROD-CORVETTE
Removal
1.
Remove steering damper from relay rod as outlined
under Steering Damper-Removal. Remove anchor
bracket from relay rod by disconnecting two mount-
ing bolts.
2.
Remove inner ends of tie rods from relay rod as
described under Tie Rod--Removal.
3.
Remove cotter pin from end of relay rod at pitman
arm ball stud attachment, and remove stud nut.
4.
Tap brJl stud out of pitman arm and lower relay rod.
5.
Remove cotter key and nut from idler arm and re-
move relay rod from idler arm. Remove washer and
seal from idler arm.
Installation
1.
Place relay rod on idler arm stud, making certain
idler stud seal and washer are in place, then install
and tighten nut. Advance nut just enough to align
castellation with cotter pin hole and install pin.
2.
Install new seal and clamp over ball at end of pitman
arm.
3.
Install inner spring seat and spring to relay rod.
4.
Raise end of rod and install on pitman arm.
5.
Install spring seat, spring, and end plug.
6. Tighten end plug until springs are compressed and
plug bottoms, then back off 3/4 turn plug amount
necessary to insert cotter pin. Insert cotter pin to
lock adjustment.
7.
Install tie rod ends to relay rod as previously de-
scribed under Tie Rods.
8. Lubricate tie rod ends and pitman arm to relay rod
ball joint.
9. Install steering damper bracket and tighten bolts.
Install damper as outlined under Steering Damper--
Installation.
10.
Adjust toe-in and align steering wheel as described
previously in this section.
IDLER ARM
Chevrolet, Chevelle, Comoro, and Corvette (Fig. 62)
Removal
1.
Remove idler arm to frame nut, washer, and bolt.
No washer is used on Corvette.
2.
Remove cotter pin and nut from idler arm to relay
rod ball stud.
3.
Remove relay rod from idler arm by tapping relay
rod with a hammer using a heavy hammer as a
backing.
4.
Remove idler arm.
Installation
1.
On Chevrolet, place seal in position on idler arm
stud; position stud up through frame, and secure with
lock washer and nut.
2.
On Chevelle, Camaro, and Corvette, position idler
CHEVROLET CHASSIS SERVICE MANUAL
Page 472 of 659

STEERING
9-32
arm on frame and install mounting bolts, washers
and nuts. No washer is used on Corvette.
Install relay rod to idler arm, ^making certain seal
is on stud. Install and tighten nut.
Install cotter pin.
Refer to torque specifications at rear of manual for'
correct torque values.
Chevy II (Fig. 62}
Removal
1.
Remove cotter pin, nut and washer securing idler
arm to relay rod.
2.
Remove relay rod from idler arm.
3.
If equipped with power steering disconnect power
cylinder shaft from idler arm bracket.
4.
Remove three idler bracket to frame bolts and nuts
and remove bracket and idler arm assembly.
5.
Remove cotter pin, nut, washer and bolt securing the
idler arm to the bracket.
6. Press out the idler arm bushing for replacement.
Installation
NOTE: Installation must be done with front
wheels straight ahead or the car will lead to one
side.
1.
Install idler arm bushing, if previously removed.
NOTE: Make certain the outer sleeve of the
bushing does not protrude above surface of idler
arm.
2.
Reverse removal procedure and torque all nuts ac-
cording to specifications.
PITMAN ARM
Removal
1.
Remove cotter pin from pitman arm ball stud and
remove nut.
2.
Remove relay rod from pitman arm by tapping on
side of rod or arm in which the stud mounts with a
hammer while using a heavy hammer or similar tool
as a backing. Pull down on relay rod to remove
from stud.
3.
Remove pitman arm nut from sector shaft and mark
relation of arm position to shaft.
4.
Remove pitman arm with Tool J-6632 as shown in
Figure 2.
Installation
1.
Install pitman arm on sector shaft, lining up the
• marks made upon removal.
2.
Install sector shaft nut.
3.
Position relay rod on to pitman arm. Install nut.
Continue to tighten arm enough to align castellation
with hole in stud and install cotter pin.
STEERING ARM
If, through collision or other damage, it becomes nec-
essary to remove and replace either steering arm, pro-
ceed as follows:
Removal
1.
Remove tie rod from steering arm as outlined in this
section.
2.
Remove front wheel, hub and brake drum as a unit
by removing hub cap and dust cap, cotter pin from
spindle nut and the spindle nut. Pull assembly to-
ward outside of vehicle. If removal is difficult, it
may be necessary to back off brake adjustment to
increase brake shoe-to-drum clearance; see Hy-
draulic Brake Adjustment, Section 5. On models
with disc brakes, remove caliper and disc.
3.
With wheel and drum assembly or caliper and disc
removed, steering arm retaining bolt heads are ac-
cessible and removal of steering arm from vehicle
may be accomplished by removing retaining nuts.
Installation
1.
Place steering arm in position on vehicle and install
retaining bolts*
2.
Install nuts. Use only the special locknut listed for
this use in the Chevrolet Parts Catalog.
3.
Pack wheel bearings using a high quality wheel
bearing lubricant. Install bearings and wheel-hub-
brake drum assembly removed previously. On disc
brake models, install disc and caliper.
4.
Install keyed washer and spindle nut. Proceed as out-
lined under t{ Front Wheel Bearing Adjustment" in
Section 3.
5.
Install tie rod ball stud in steering arm. Be sure that
the dust cover is in place on ball stud.
6. Install castellated nut on ball stud, tighten securely
and install cotter pin.
7.
Following directions given in Section 3 to check cor-
nering wheel relationship and toe-in; correct as
required.
STEERING DAMPER-CORVETTE
Removal
1.
Remove bolt from damper pivot bracket at relay rod.
2.
Remove nut from damper pivot at frame bracket and
withdraw damper assembly.
Damper is serviced as a unit. Replace damper if
3.
damaged or excessively worn.
Installation
1.
Place piston rod end into frame bracket and install
retainers, bushings, and nut.
2.
Insert cylinder end pivot into relay rod bracket and
install through bolt.
CHEVROLET CHASSIS SERVICE MANUAL
Page 473 of 659
STEERING
9-33
POWER STEERING
INDEX
Page
General Description
. 9-33
Maintenance
and
Adjustments
9-33
Bleeding Hydraulic System
9-33
Fluid Level
. 9-33
Adjustments
. 9-34
Power Steering Gear
. . 9-34
Pump Belt Tension
9-34
Hydraulic System Checks
9-34
Component Replacement
and
Repairs
. 9-35
Power Steering Pump.
. 9-35
Power Steering Gear
9-36
Control Valve
and
Adapter Assembly
9.35
Power Cylinder
9.37
Power Steering Hoses
9.39
GENERAL DESCRIPTION
Two types
of
power steering
are
used
for 1967.
One
is
the conventional linkage type
for
Chevy
n and
Corvette
vehicles
and the
other
is the
integral gear type
for
Chevrolet, Chevelle,
and
Camaro.
For
both types
the
hydraulic pressure
is
provided
by an
engine-driven vane-
type pump.
On
the
Chevy
n and
Corvette linkage type power steer-
ing, hydraulic pressure
is
delivered through
a
hose from
the pump
to a
valve which senses
the
requirement
for
power assistance
and
supplies
the
power cylinder
ac-
cordingly.
The
steering gear used with this power steer-
ing
is the
same basic unit used
on
manually steered
vehicles;
it is
serviced
as
outlined
in the
manual steering
part
of
this section except
for
adjustment, which
is
covered
in the
following pages.
The
steering linkage also
is serviced the same
as
manual counterparts.
The Chevrolet, Chevelle
and
Camaro integral gear type
power steering
has the
hydraulic pressure delivered
from
the
pump through two hoses
to the
steering gear.
In
the power steering gear
the
steering shaft, hydraulic
valve, worm, and rack-piston
nut are all in
line making
a
compact
and
space saving assembly.
All oil
passages
are
internal within
the
gear except
the
pressure
and
return
hoses.
The steering gear
is a
recirculating ball system
in
which steel balls
act as a
rolling thread between
the
steering worm
and
rack-piston
nut. The
rack-piston
nut
is
all one
piece
and is
geared
to the
sector
of
the piston
shaft.
The
valve
is
contained
in the
gear housing elimi-
nating
the
need
of
bolts
or
seals
to
attach
a
separate
valve housing.
The valve
is an
open-center, rotary-type three
way
valve.
The
spool
is
held
in
neutral position by means
of a
torsion
bar. The
spool
is
attached
by
means
of
the stub
shaft
to one end of the
torsion
bar
and
to the
valve body
on
the
other
end.
Twisting
of the
torsion bar allows
the
spool
to
move
in
relation
to the
valve body thereby oper-
ating
the
valve.
MAINTENANCE
AND
ADJUSTMENTS
BLEEDING HYDRAULIC SYSTEM
1.
Fill
oil
reservoir
to
proper level and
let oil
remain
undistrubed
for at
least two minutes.
2.
Start engine
and run
only
for
about
two
seconds.
3.
Add
oil if
necessary.
4.
Repeat above procedure until
oil
level remains
con-
stant after running engine.
5. Raise front
end of
vehicle
so
that wheels
are off
the
ground.
6. Increase engine speed
to
approximately
1500 rpm.
7. Turn
the
wheels
(off
ground) right
and
left, lightly
contacting
the
wheel stops.
8. Add
oil if
necessary.
9. Lower
the car and
turn wheels right and left
on the
ground.
10.
Check
oil
level and refill
as
required.
11.
If oil is
extremely foamy, allow vehicle
to
stand
a
few minutes with engine
off and
repeat above
procedure.
,
a.
Check belt tightness
and
check
for a
bent
or
loose
pulley. (Pulley should
not
wobble with engine
running.)
b.
Check
to
make sure hoses
are not
touching
any
other parts
of the car,
particularly sheet metal.
c. Check
oil
level, filling
to
proper level
if
neces-
sary, following operations
1
through
10.
This
step
and
Step
"D" are
extremely important
as
low
oil
level and/or
air in the oil are the
most
frequent causes
of
objectionable pump noise.
d. Check
the
presence
of air in the oil. If air is
present, attempt
to
bleed system
as
described
in
operations
1
through
10. If it
becomes obvious
that
the
pump will
not
bleed after
a few
trials,
proceed
as
outlined under Hydraulic System
Checks.
FLUID
LEVEL
1.
Check
oil
level
in the
reservoir
by
checking
the dip
stick when
oil is at
operating temperature.
On
Chevelle models equipped with remote reservoir,
the reservoir should
be
maintained approximately
3/4 full when
oil is at
operating temperature.
2.
Fill,
if
necessary,
to
proper level with
GM
Power
Steering Fluid
or, if
this
is not
available, automatic
CHEVROLET CHASSIS SERVICE MANUAL
Page 474 of 659
STEERING 9-34
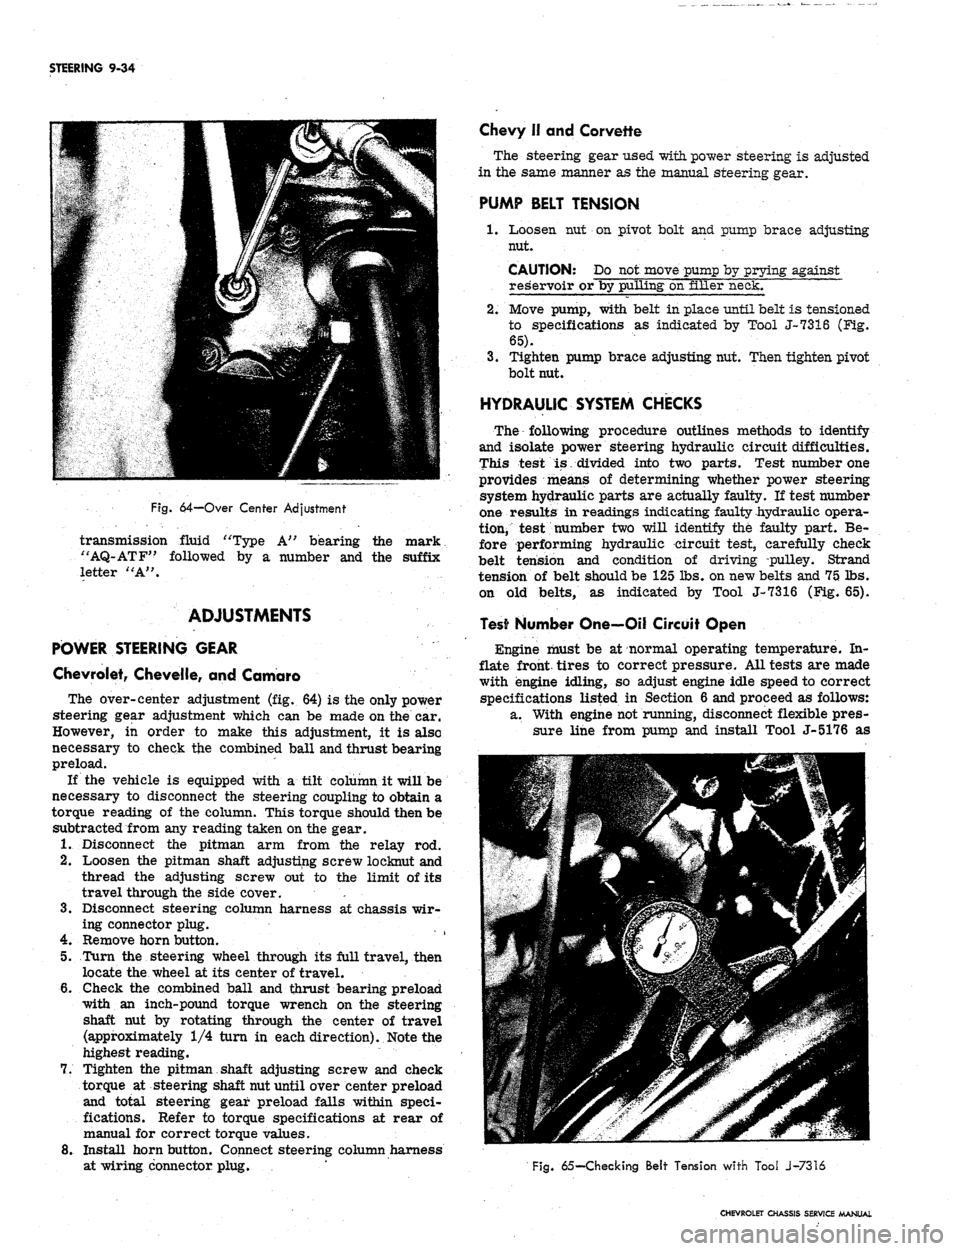
Fig.
64-Over Center Adjustment
transmission fluid "Type A" bearing the mark
"AQ-ATF" followed by a number and the suffix
letter "A".
ADJUSTMENTS
POWER STEERING GEAR
Chevrolet, Chevelle, and Camaro
The over-center adjustment (fig. 64) is the only power
steering gear adjustment which can be made on the car.
However, in order to make this adjustment, it is also
necessary to check the combined ball and thrust bearing
preload.
If the vehicle is equipped with a tilt column it will be
necessary to disconnect the steering coupling to obtain a
torque reading of the column. This torque should then be
subtracted from any reading taken on the gear.
1.
Disconnect the pitman arm from the relay rod.
2.
Loosen the pitman shaft adjusting screw loeknut and
thread the adjusting screw out to the limit of its
travel through the side cover. '. •
3.
Disconnect steering column harness at chassis wir-
ing connector plug.
4.
Remove horn button.
5.
Turn the steering wheel through its full travel, then
locate the wheel at its center of travel.
6. Gheck the combined ball and thrust bearing preload
with an inch-pound torque wrench on the steering
shaft nut by rotating through the center of travel
(approximately 1/4 turn in each direction). Note the
highest reading.
7.
Tighten the pitman shaft adjusting screw and check
torque at steering shaft nut until over center preload
and total steering gear preload falls within speci-
fications. Refer to torque specifications at rear of
manual for correct torque values.
8. Install horn button. Connect steering column harness
at wiring connector plug.
Chevy II and Corvette
The steering gear used with power steering is adjusted
in the same manner as the manual steering gear.
PUMP BELT TENSION
1.
Loosen nut on pivot bolt and pump brace adjusting
nut.
CAUTION: Do not move pump by prying against
reservoir or by pulling on filler neck.
2.
Move pump, with belt in place until belt is tensioned
to specifications as indicated by Tool J-7316 (Fig-.
65).
3.
Tighten pump brace adjusting nut. Then tighten pivot
bolt nut.
HYDRAULIC SYSTEM CHECKS
The following procedure outlines methods to identify
and isolate power steering hydraulic circuit difficulties.
This test is divided into two parts. Test number one
provides means of determining whether power steering
system hydraulic parts are actually faulty. If test number
one results in readings indicating faulty hydraulic opera-
tion, test number two will identify the faulty part. Be-
fore performing hydraulic circuit test, carefully check
belt tension and condition of driving pulley. Strand
tension of belt should be 125 lbs. on new belts and 75 lbs.
on old belts, as indicated by Tool J-7316 (Fig. 65).
Test Number One—Oil Circuit Open
Engine must be at normal operating temperature. In-
flate front, tires to correct pressure. All tests are made
with engine idling, so adjust engine idle speed to correct
specifications listed in Section 6 and proceed as follows:
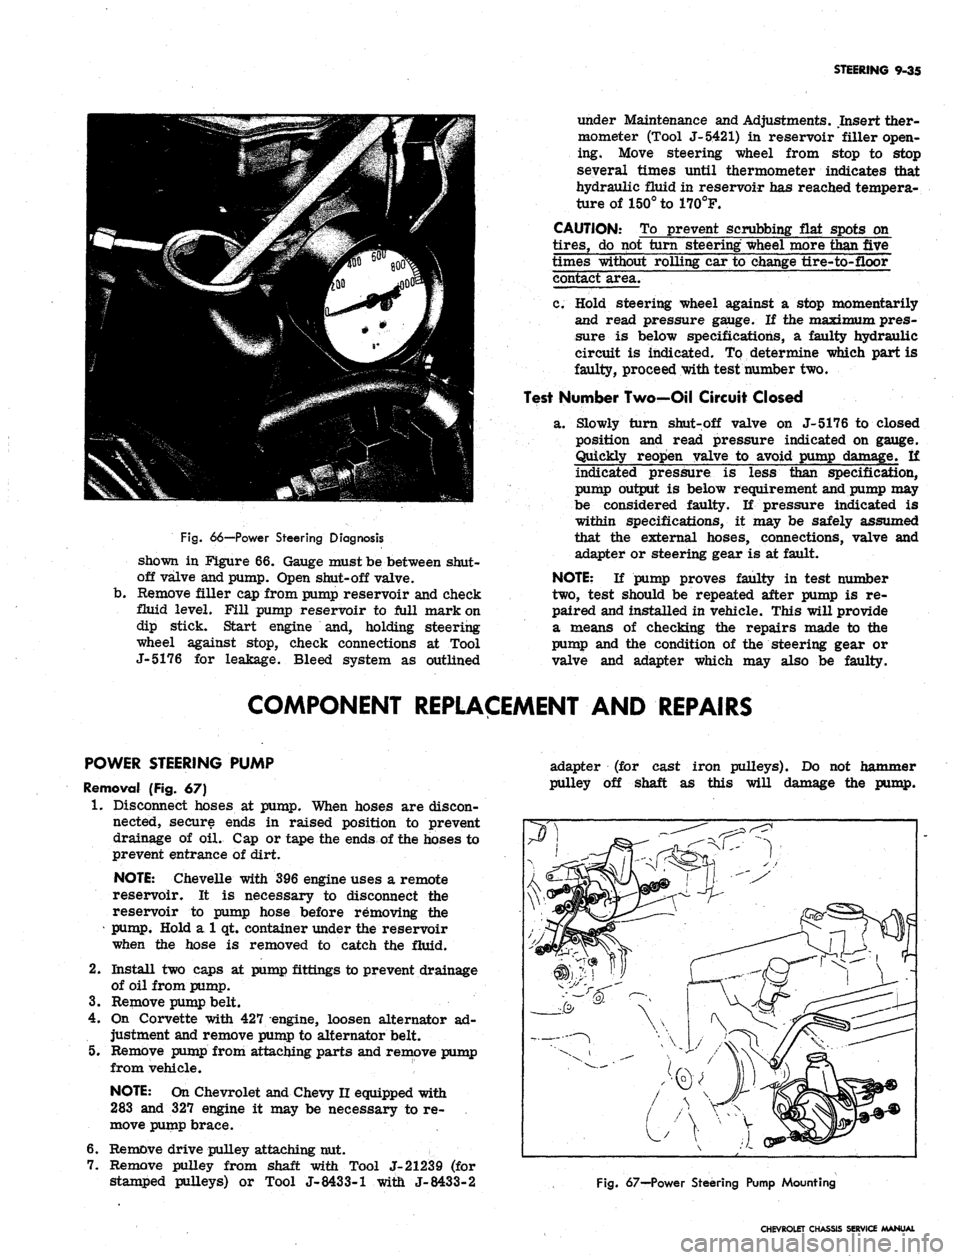
a. With engine not running, disconnect flexible pres-
sure line from pump and install Tool J-5176 as
Fig.
65— Checking Belt Tension with Tool J-7316
CHEVROLET CHASSIS SERVICE MANUAL
Page 475 of 659
STEERING 9-35
Fig.
66—Power Steering Diagnosis
shown in Figure 66. Gauge must be between shut-
off valve and pump. Open shut-off valve,
b.
Remove filler cap from pump reservoir and check
fluid level. Fill pump reservoir to full mark on
dip stick. Start engine and, holding steering
wheel against stop, check connections at Tool
J-5176 for leakage. Bleed system as outlined
under Maintenance and Adjustments. Insert ther-
mometer (Tool J-5421) in reservoir filler open-
ing. Move steering wheel from stop to stop
several times until thermometer indicates that
hydraulic fluid in reservoir has reached tempera-
ture of 150° to 170°F.
CAUTION: To prevent scrubbing flat spots on
tires,
do not turn steering wheel more than five
times without rolling car to change tire-to-floor
contact area.
c. Hold steering wheel against a stop momentarily
and read pressure gauge. If the maximum pres-
sure is below specifications, a faulty hydraulic
circuit is indicated. To determine which part is
faulty, proceed with test number two.
Test Number Two—Oil Circuit Closed
a. Slowly turn shut-off valve on J-5176 to closed
position and read pressure indicated on gauge.
Quickly reopen valve to avoid pump damage, if
indicated pressure is less than specification,
pump output is below requirement and pump may
be considered faulty. If pressure indicated is
within specifications, it may be safely assumed
that the external hoses, connections, valve and
adapter or steering gear is at fault.
NOTE:
If pump proves faulty in test number
two,
test should be repeated after pump is re-
paired and installed in vehicle. This will provide
a means of checking the repairs made to the
pump and the condition of the steering gear or
valve and adapter which may also be faulty.
COMPONENT REPLACEMENT AND REPAIRS
POWER STEERING PUMP
Removal (Fig. 67)
1.
Disconnect hoses at pump. When hoses are discon-
nected, secure ends in raised position to prevent
drainage of oil. Cap or tape the ends of the hoses to
prevent entrance of dirt.
NOTE:
Chevelle with 396 engine uses a remote
reservoir. It is necessary to disconnect the
reservoir to pump hose before removing the
pump.
Hold a 1 qt. container under the reservoir
when the hose is removed to catch the fluid.
2.
Install two caps at pump fittings to prevent drainage
of oil from pump.
3.
Remove pump belt.
4.
On Corvette with 427 engine, loosen alternator ad-
justment and remove pump to alternator belt.
5. Remove pump from attaching parts and remove pump
from vehicle.
NOTE:
On Chevrolet and Chevy II equipped with
283 and 327 engine it may be necessary to re-
move pump brace.
6. Remove drive pulley attaching nut.
7. Remove pulley from shaft with Tool J-21239 (for
stamped pulleys) or Tool J-8433-1 with J-8433-2
adapter (for cast iron pulleys). Do not hammer
pulley off shaft as this will damage the pump.
Fig.
67—Power Steering Pump Mounting
CHEVROLET CHASSIS SERVICE MANUAL
Page 476 of 659
STEERING 9-36
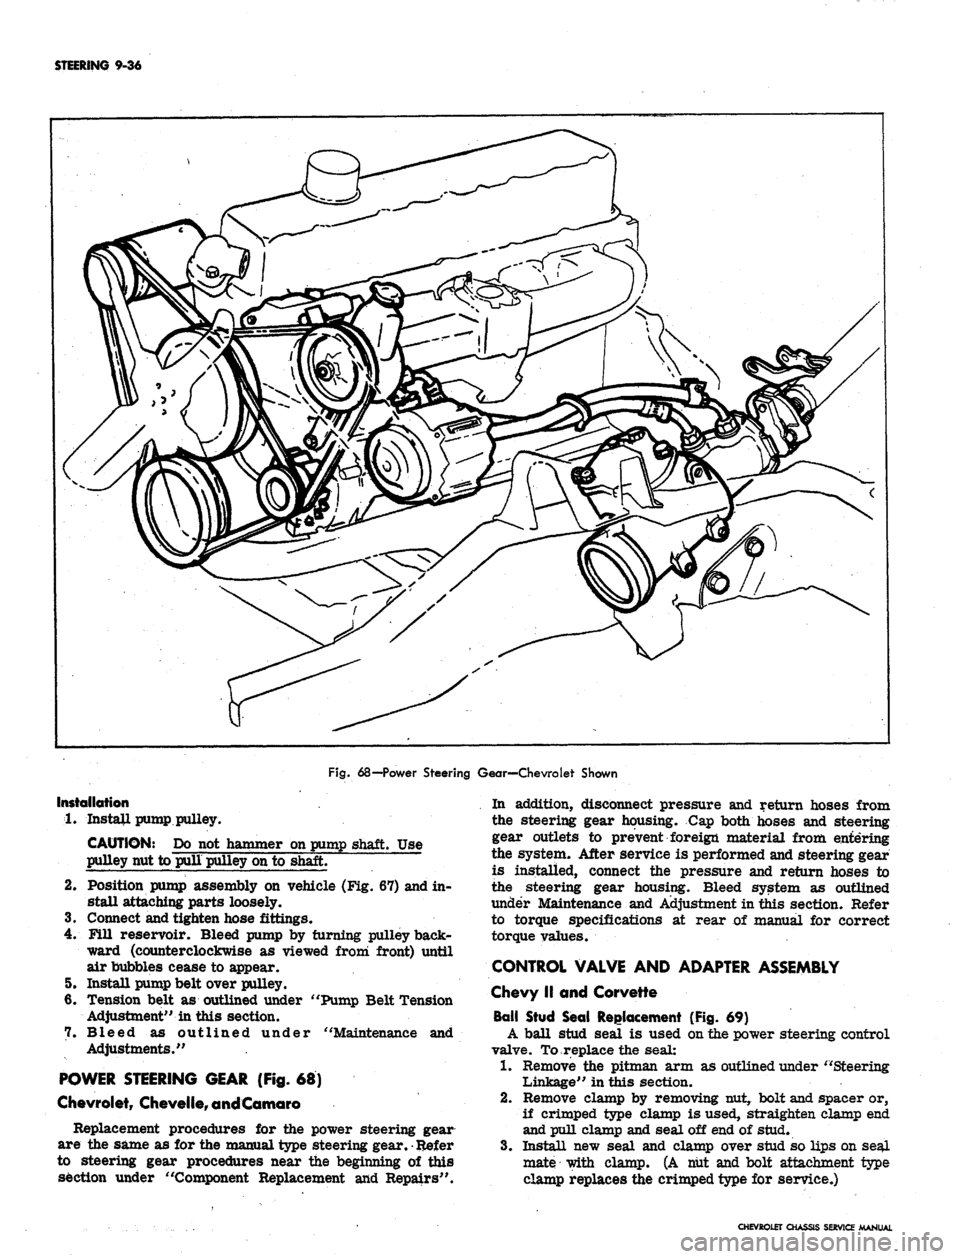
Fig.
68—Power Steering Gear—Chevrolet Shown
Installation
1.
Install pump pulley.
CAUTION: Do not hammer on pump shaft. Use
pulley nut to pull pulley on to shaft.
2.
Position pump assembly on vehicle (Fig. 67) and in-
stall attaching parts loosely.
3.
Connect and tighten hose fittings.
4.
Fill reservoir. Bleed pump by turning pulley back-
ward (counterclockwise as viewed from front) until
air bubbles cease to appear.
5. Install pump belt over pulley.
6. Tension belt as outlined under "Pump Belt Tension
Adjustment" in this section.
7. Bleed as outlined under "Maintenance and
Adjustments."
POWER STEERING GEAR (Fig. 68)
Chevrolet,
Chevelfe,
and Comoro
Replacement procedures for the power steering gear
are the same as for the manual type steering gear.
•
Refer
to steering gear procedures near the beginning of this
section under "Component Replacement and Repairs".
In addition, disconnect pressure and return hoses from
the steering gear housing. Cap both hoses and steering
gear outlets to prevent foreign material from entering
the system. After service is performed and steering gear
is installed, connect the pressure and return hoses to
the steering gear housing. Bleed system as outlined
under Maintenance and Adjustment in this section. Refer
to torque specifications at rear of manual for correct
torque values.
CONTROL VALVE AND ADAPTER ASSEMBLY
Chevy II and Corvette
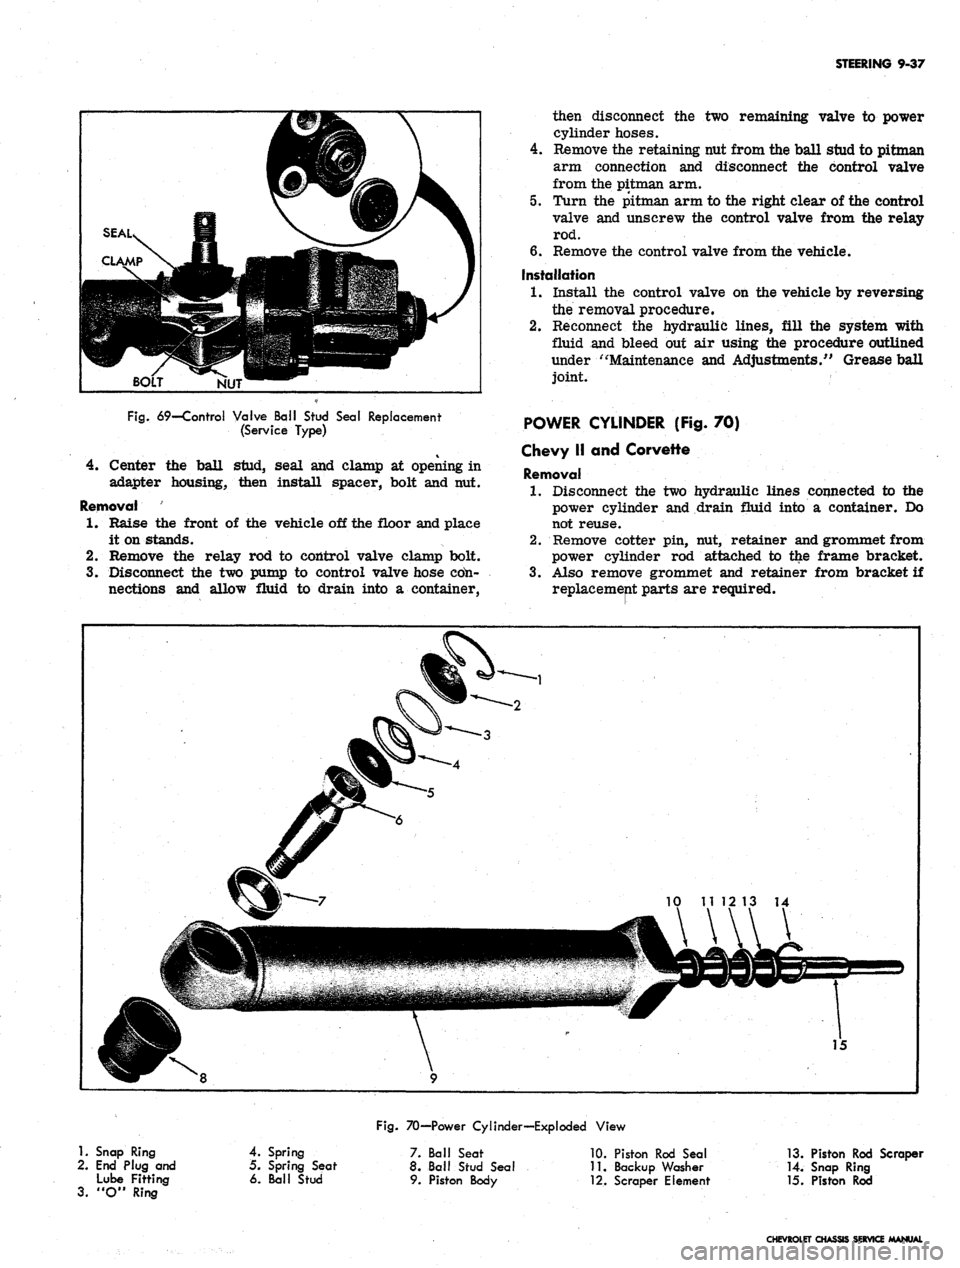
Ball Stud Seal Replacement (Fig. 69)
A ball stud seal is used on the power steering control
valve. To replace the seal:
1.
Remove the pitman arm as outlined under "Steering
Linkage" in this section.
2.
Remove clamp by removing nut, bolt and spacer or,
if crimped type clamp is used, straighten clamp end
and pull clamp and seal off end of stud.
3.
Install new seal and clamp over stud so lips on seal
mate with clamp. (A nut and bolt attachment type
clamp replaces the crimped type for service.)
CHEVROLET CHASSIS
SERVICE
MANUAL
Page 477 of 659
STEERING 9-37
NUT
Fig.
69—Control Valve Ball Stud Seal Replacement
(Service Type)
4.
Center the ball stud, seal and clamp at opening in
adapter housing, then install spacer, bolt and nut.
Removal
1.
Raise the front of the vehicle off the floor and place
it on stands.
2.
Remove the relay rod to control valve clamp bolt.
3.
Disconnect the two pump to control valve hose cdn-
nections and allow fluid to drain into a container,
then disconnect the two remaining valve to power
cylinder hoses.
4.
Remove the retaining nut from the ball stud to pitman
arm connection and disconnect the control valve
from the pitman arm.
5. Turn the pitman arm to the right clear of the control
valve and unscrew the control valve from the relay
rod.
6. Remove the control valve from the vehicle.
Installation
1.
Install the control valve on the vehicle by reversing
the removal procedure.
2.
Reconnect the hydraulic lines, fill the system with
fluid and bleed out air using the procedure outlined
under "Maintenance and Adjustments/' Grease ball
joint.
POWER CYLINDER (Fig. 70)
Chevy II and Corvette
Removal
1.
Disconnect the two hydraulic lines connected to the
power cylinder and drain fluid into a container. Do
not reuse.
2.
Remove cotter pin, nut, retainer and grommet from
power cylinder rod attached to the frame bracket.
3.
Also remove grommet and retainer from bracket if
replacement parts are required.
1.
Snap Ring
2.
End Plug and
Lube Fitting
3.
"O" Ring
Fig.
70—Power Cylinder—Exploded View
4.
Spring
5. Spring Seat
6. Ball Stud
7. Ball Seat
8. Ball Stud Seal
9. Piston Body
10.
Piston Rod Seal
11.
Backup Washer
•12.
Scraper Element
13.
Piston Rod Scraper
14.
Snap Ring
15.
Piston Rod
CHEVROLET CHASSIS SERVICE MANUAL
Page 478 of 659
STEERING 9-38
CHEVROLET
CHEVELLE
CAMARO
Fig.
71—Power Steering Hose Installation
CHEVROLET CHASSIS SERVICE MANUAL
Page 479 of 659
STEERING 9-39
4.
Remove cotter pin, nut and ball stud at relay rod.
5. Remove the power cylinder from the vehicle.
Inspection
1.
Inspect the seals for leaks; if leaks are present,
replace the seals using the procedure outlined under
"Disassembly."
2.
Examine the brass fitted hose connection seats for
cracks or damage and replace if necessary.
3.
For service other than ball seat or seal replacement
and ball stud removal, replace the power cylinder.
4.
Check the frame bracket parts for wear.
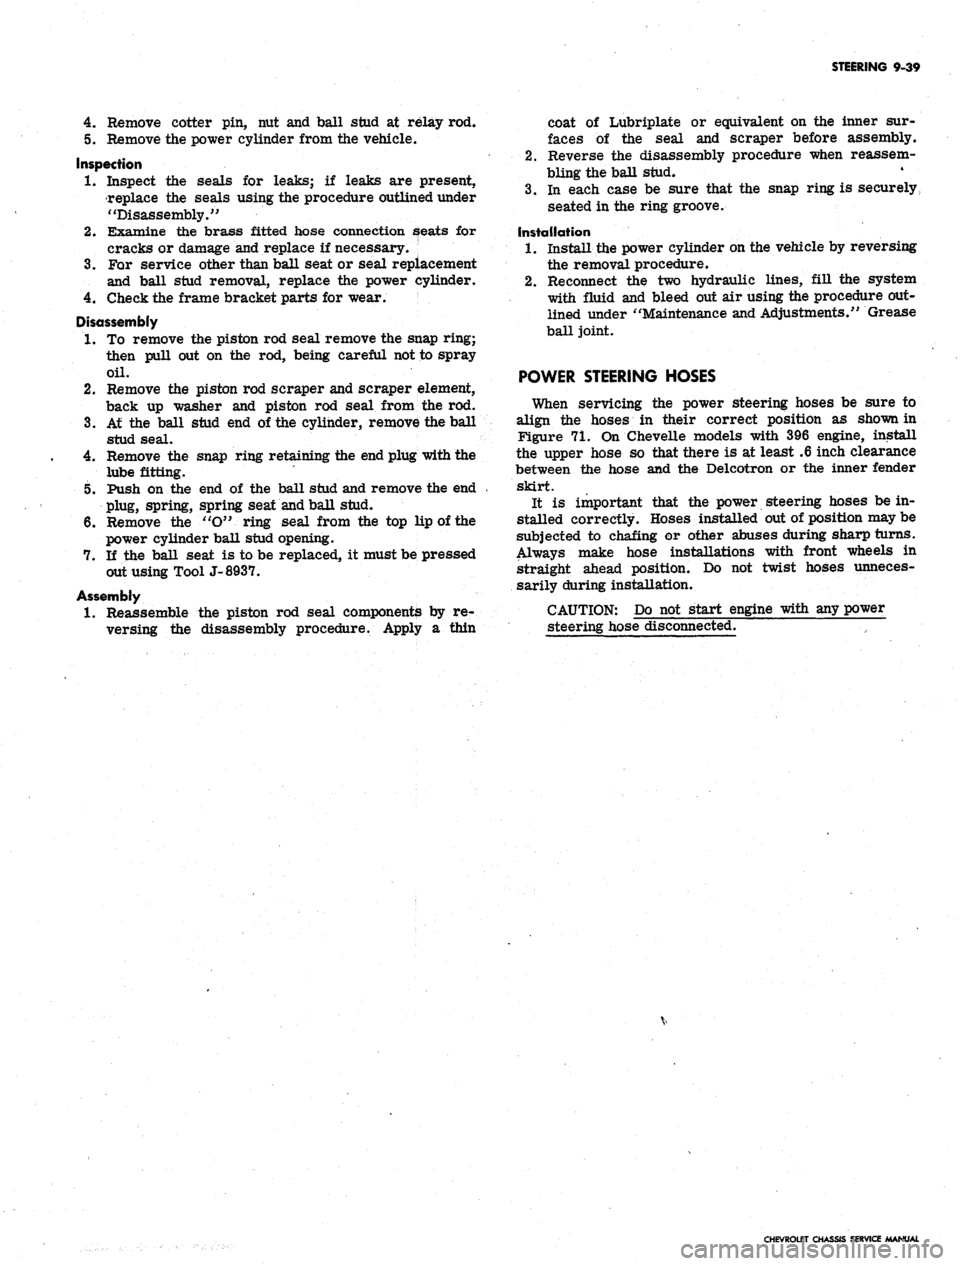
Disassembly
1.
To remove the piston rod seal remove the snap ring;
then pull out on the rod, being careful not to spray
oil.
2.
Remove the piston rod scraper and scraper element,
back up washer and piston rod seal from the rod.
3.
At the ball stud end of the cylinder, remove the ball
stud seal.
4.
Remove the snap ring retaining the end plug with the
lube fitting.
5. Push on the end of the ball stud and remove the end
plug, spring, spring seat and ball stud.
6. Remove the "O" ring seal from the top lip of the
power cylinder ball stud opening.
7. If the ball seat is to be replaced, it must be pressed
out using Tool J-8937.
Assembly
1.
Reassemble the piston rod seal components by re-
versing the disassembly procedure. Apply a thin
coat of Lubriplate or equivalent on the inner sur-
faces of the seal and scraper before assembly.
2.
Reverse the disassembly procedure when reassem-
bling the ball stud.
3.
In each case be sure that the snap ring is securely,
seated in the ring groove.
Installation
1.
Install the power cylinder on the vehicle by reversing
the removal procedure.
2.
Reconnect the two hydraulic lines, fill the system
with fluid and bleed out air using the procedure out-
lined under "Maintenance and Adjustments." Grease
ball joint.
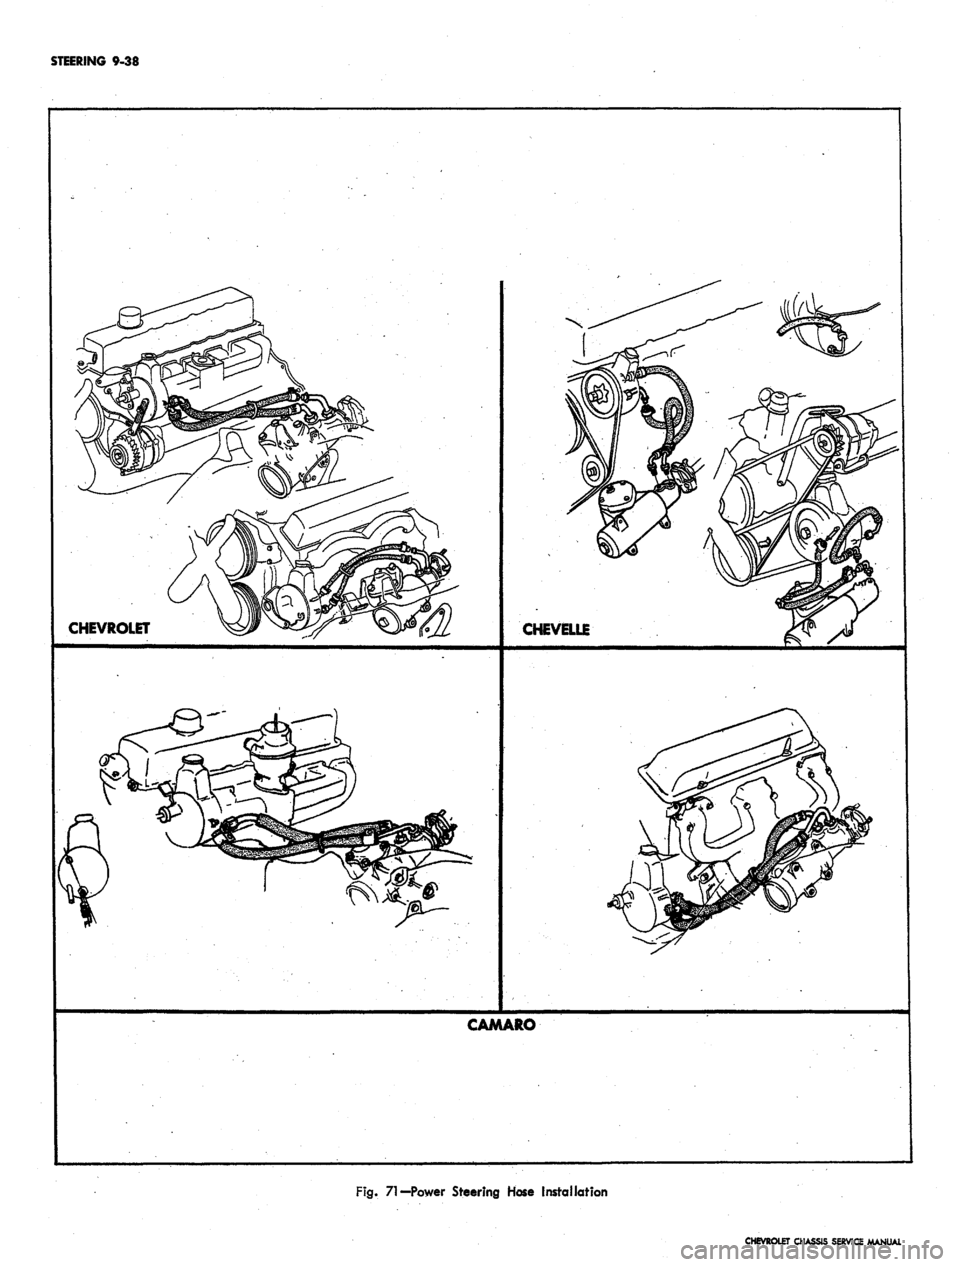
POWER STEERING HOSES
When servicing the power steering hoses be sure to
align the hoses in their correct position as shown in
Figure 71. On Chevelle models with 396 engine, install
the upper hose so that there is at least .6 inch clearance
between the hose and the Delcotron or the inner fender
skirt.
It is important that the power steering hoses be in-
stalled correctly. Hoses installed out of position may be
subjected to chafing or other abuses during sharp turns.
Always make hose installations with front wheels in
straight ahead position. Do not twist hoses unneces-
sarily during installation.
CAUTION: Do not start engine with any power
steering hose disconnected.
CHEVROLET CHASSIS SERVICE MANUAL
Page 480 of 659
STEERING 9-40
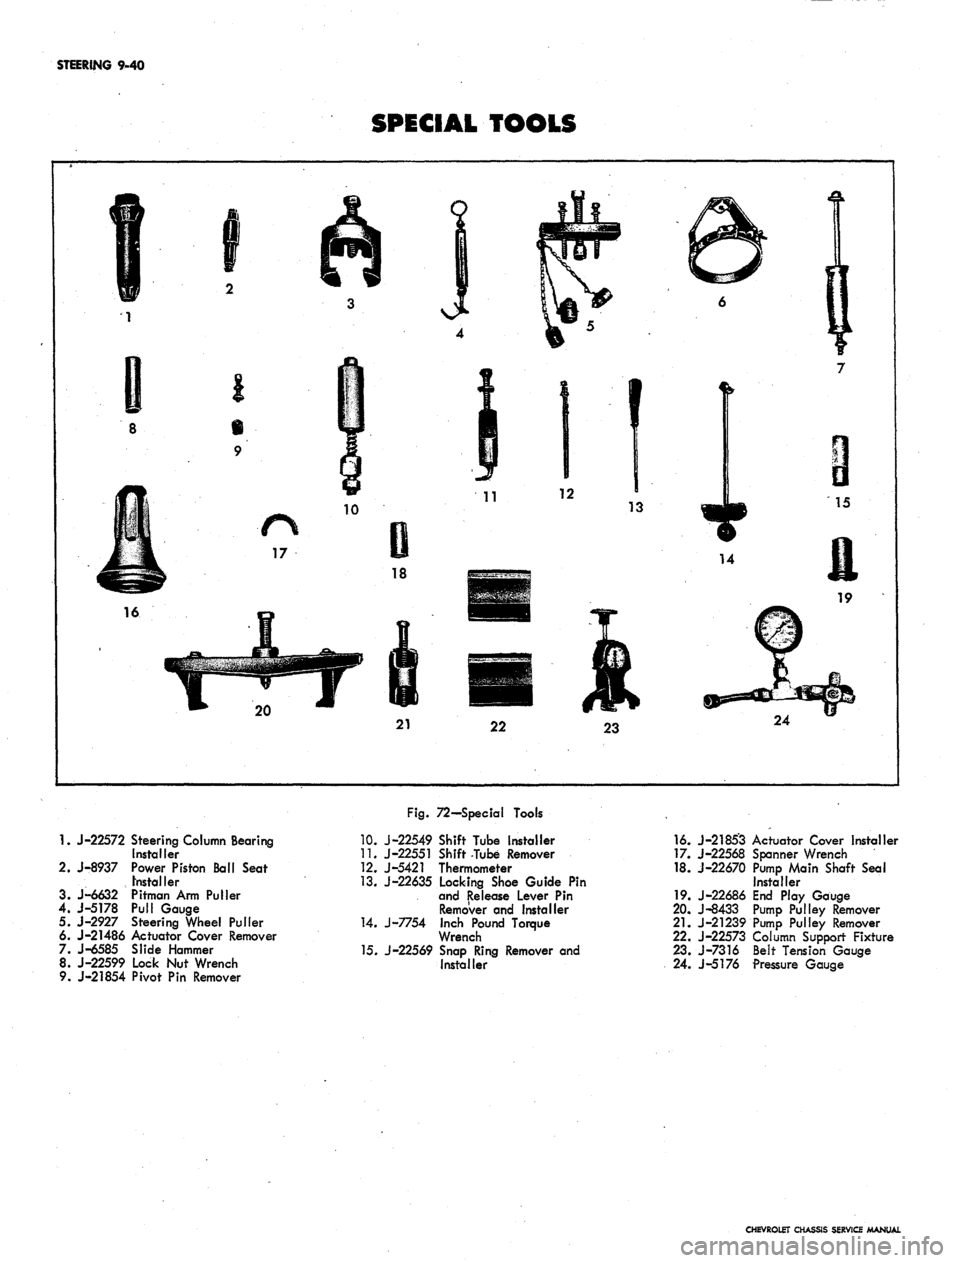
SPECIAL TOOLS
1.
J-22572 Steering Column Bearing
Installer
2.
J-8937 Power Piston Ball Seat
Installer
3. J-6632 Pitman Arm Puller
4.
J-5178 Pull Gauge
5. J-2927 Steering Wheel Puller
6. J-21486 Actuator Cover Remover
7. J-6585 Slide Hammer
8. J-22599 Lock Nut Wrench
9. J-21854 Pivot Pin Remover
Fig.
72—Special Tools
10.
J-22549 Shift Tube Installer
11.
J-22551 Shift Tube Remover
12.
J-5421 Thermometer
13.
J-22635 Locking Shoe Guide Pin
and Release Lever Pin
Remover and Installer
14.
J-7754 Inch Pound Torque
Wrench
15.
J-22569 Snap Ring Remover and
Installer
16.
J-2185'3
17.
J-22568
18.
J-22670
19.
J-22686
20.
J-8433
21.
J-21239
22.
J-22573
23.
J-7316
24.
J-5176
Actuator Cover Installer
Spanner Wrench
Pump Main Shaft Seal
Installer
End Play Gauge
Pump Pulley Remover
Pump Pulley Remover
Column Support Fixture
Belt Tension Gauge
Pressure Gauge
CHEVROLET CHASSIS SERVICE MANUAL