CHEVROLET CAMARO 1982 Repair Guide
Manufacturer: CHEVROLET, Model Year: 1982, Model line: CAMARO, Model: CHEVROLET CAMARO 1982Pages: 875, PDF Size: 88.64 MB
Page 751 of 875

GM – CAMARO 1982-1992 – Repair Guide (Checked by WxMax) 751
13. Lubricate a new outlet tube 0-ring and in
stall it on the end of the tube.
14. Connect the regulator base to the fuel outlet tube, then to the fuel rail.
15. Finger-tighten the base-to-rail screw.
16. Install the pressure regulator br acket. Finger-tighten the screws only.
17. Lubricate a new rear crossover tube O-ring and install it on the end of the
tube.
18. Install the rear crossover tube to the regulator base.
19. Install the crossover tube reta iner and finger-tighten the screw.
20. Tighten all attaching screws to 44 inch lbs. (5 Nm).
21. Install the fuel rail assembly.
22. Temporarily connect the negative battery cable. a. With the engine OFF and the igniti on ON, check for fuel leaks.
b. Disconnect the negative battery cable.
23. Install the intake plenum and runners.
24. Connect the negative battery cable.
IDLE AIR CONTROL VALVE
REMOVAL & INSTALLATION 1. Unplug the electrical connector from idle air control valve.
2. Remove the idle air control valve.
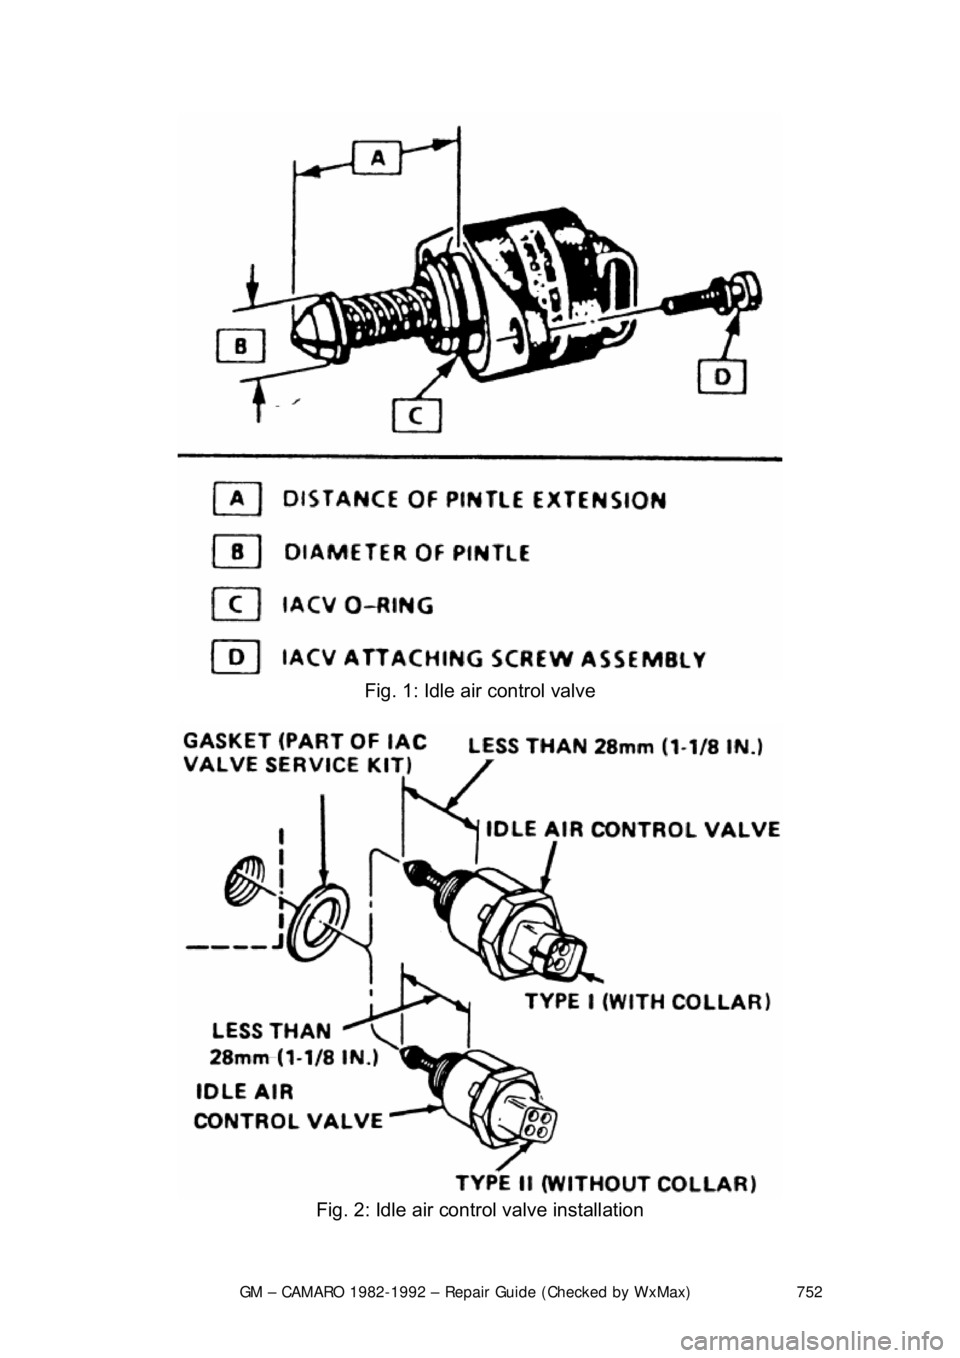
To install: 3. Before installing the idle air contro l valve, measure the distance that the
valve is extended. Measurement s hould be made from the motor housing
to the end of the cone. It should not exceed 28.5mm (1
1/8 in.), or damage
to the valve may occur when installed.
4. On 1985-1992 models, identify the replacement IAC valve as being
either Type 1 (with collar at electric terminal end) or Type 2 (without
collar). If measuring distance is great er than specified above, proceed as
follows:
• Type 1: Use finger pressure to slowly retract the pintle.
• Type 2: Compress retaining spring from valve while turning valve
in with a clockwise motion. Return spring to original position with
straight portion of spring end aligned with flat surface of valve.
On IAC valves that have already been in service, do not push or pull on the
valve pintle. The force required to move the pintle may damage the threads on
the worm drive.
5. Use a new gasket or O-ring and install the IAC valve into the throttle body.
6. Allow the ECM to reset the idle air control valve using the procedure
described earlier in this section.
Page 752 of 875
GM – CAMARO 1982-1992 – Repair Guide (Checked by WxMax) 752
Fig. 1: Idle air control valve
Fig. 2: Idle air control valve installation
Page 753 of 875

GM – CAMARO 1982-1992 – Repair Guide (Checked by WxMax) 753
THROTTLE POSITION SENSOR (TPS)
REMOVAL & INSTALLATION
1. Disconnect the negative battery cable.
2. Detach the electrical connector from the sensor.
3. Remove the attaching screws, lockw ashers and retainers. Some models
use a seal between the throttle body and the sensor, do not lose this! \
4. Remove the throttle position sensor.
To install: 5. Install the throttle position sensor seal, if applicable.
6. With the throttle valve in the norma l closed idle position, install the
sensor on the throttle body assembly. Make sure the sensor pickup lever
is properly located on the th rottle actuator lever.
7. Install the retainers, screws and lockwashers using a thread locking
compound. On models up to 1989, DO NOT tighten the screws until the
sensor is adjusted. Follow the procedures outlined earli er in this section.
COLD START VALVE
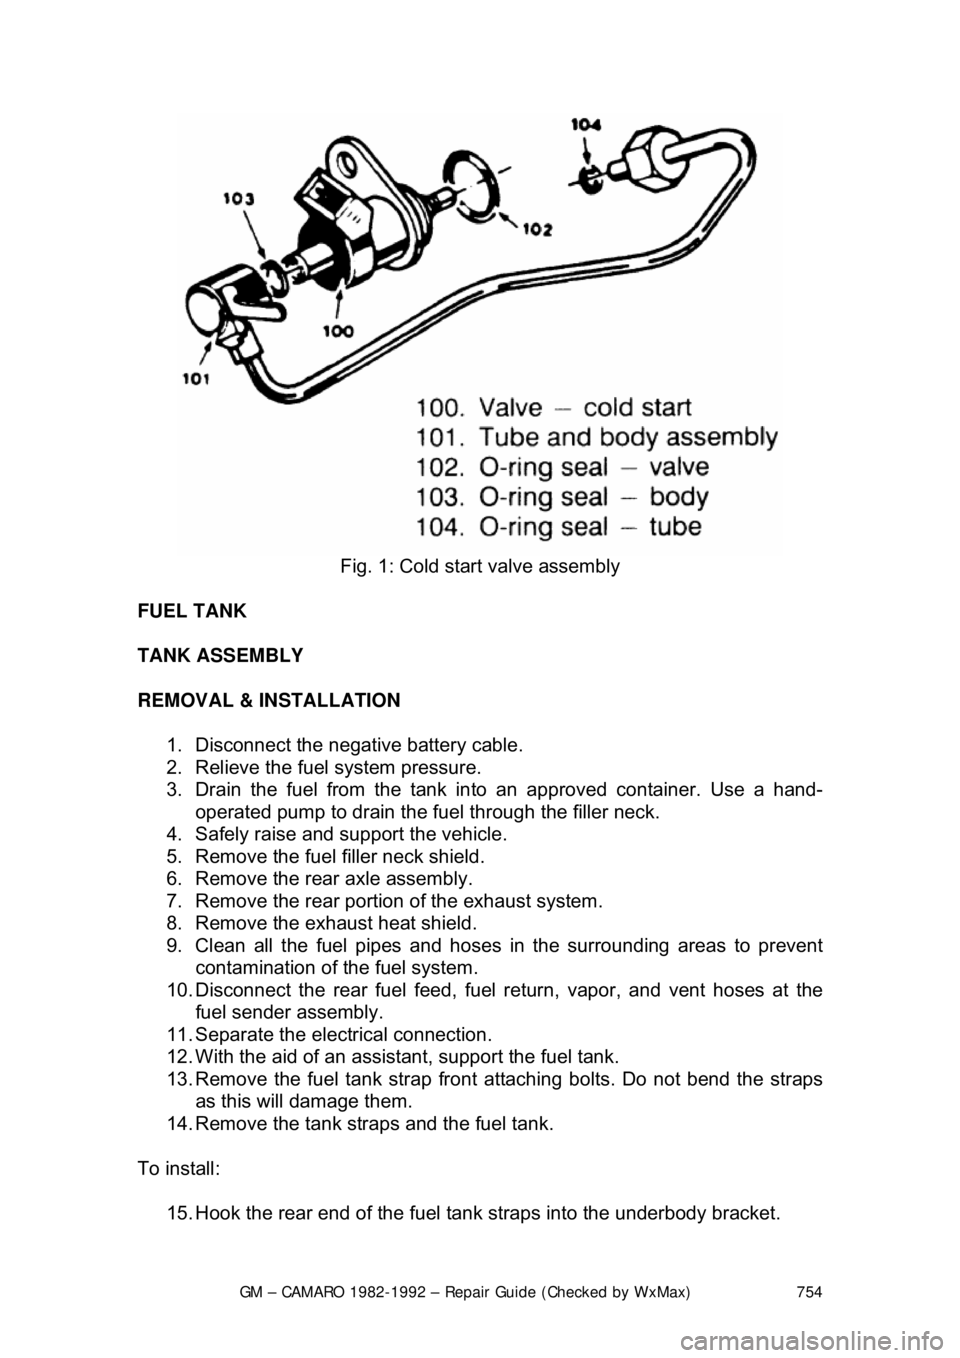
REMOVAL & INSTALLATION 1. Disconnect the negative battery cable.
2. Relieve the fuel system pressure.
3. Remove the intake manifold plenum.
4. Unplug the electrical connection.
5. Clean the fuel rail around the cold start valve tube fitting.
6. Remove the tube fitting from t he fuel rail. Use a backup wrench to
prevent it from turning.
7. Remove the cold start valve retain ing bolt and remove the valve from the
intake manifold.
To install: 8. Use new O-rings and install the valve and bolt.
9. Connect the wiring harness.
10. Connect the cold start tube at the f uel rail. Use a wrench to prevent it
from turning.
11. Install the intake manifold plenum.
12. Connect the negative battery cable. With the engine OFF and the ignition
ON, check for fuel leaks.
Page 754 of 875
GM – CAMARO 1982-1992 – Repair Guide (Checked by WxMax) 754
Fig. 1: Cold start valve assembly
FUEL TANK
TANK ASSEMBLY
REMOVAL & INSTALLATION 1. Disconnect the negative battery cable.
2. Relieve the fuel system pressure.
3. Drain the fuel from the tank in to an approved container. Use a hand-
operated pump to drain the fuel through the filler neck.
4. Safely raise and support the vehicle.
5. Remove the fuel filler neck shield.
6. Remove the rear axle assembly.
7. Remove the rear portion of the exhaust system.
8. Remove the exhaust heat shield.
9. Clean all the fuel pipes and hoses in the surrounding areas to prevent
contamination of the fuel system.
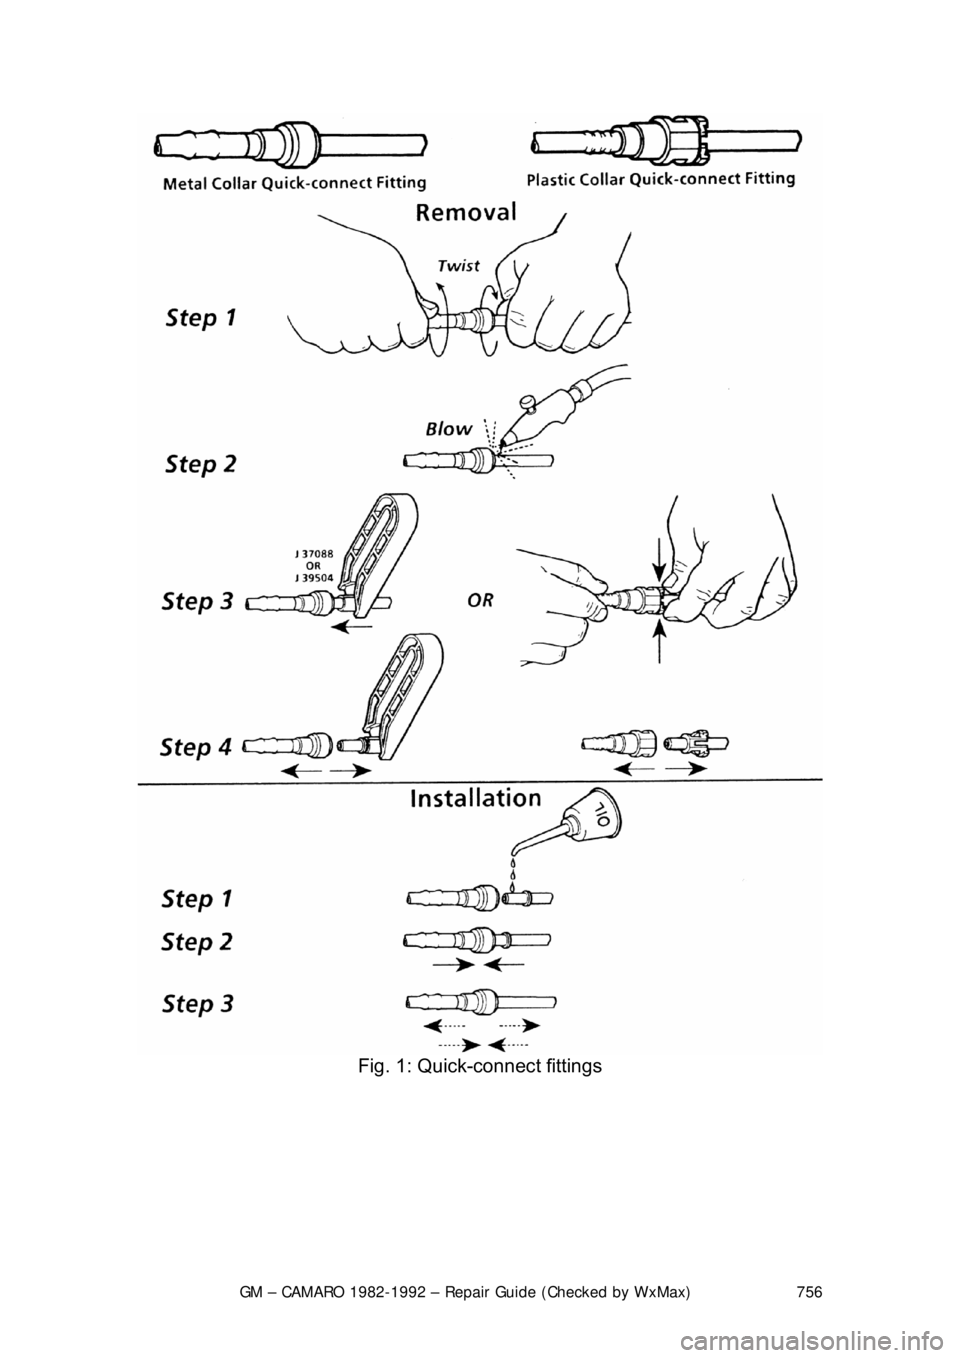
10. Disconnect the rear fuel feed, fuel return, vapor, and vent hoses at the
fuel sender assembly.
11. Separate the electrical connection.
12. With the aid of an assist ant, support the fuel tank.
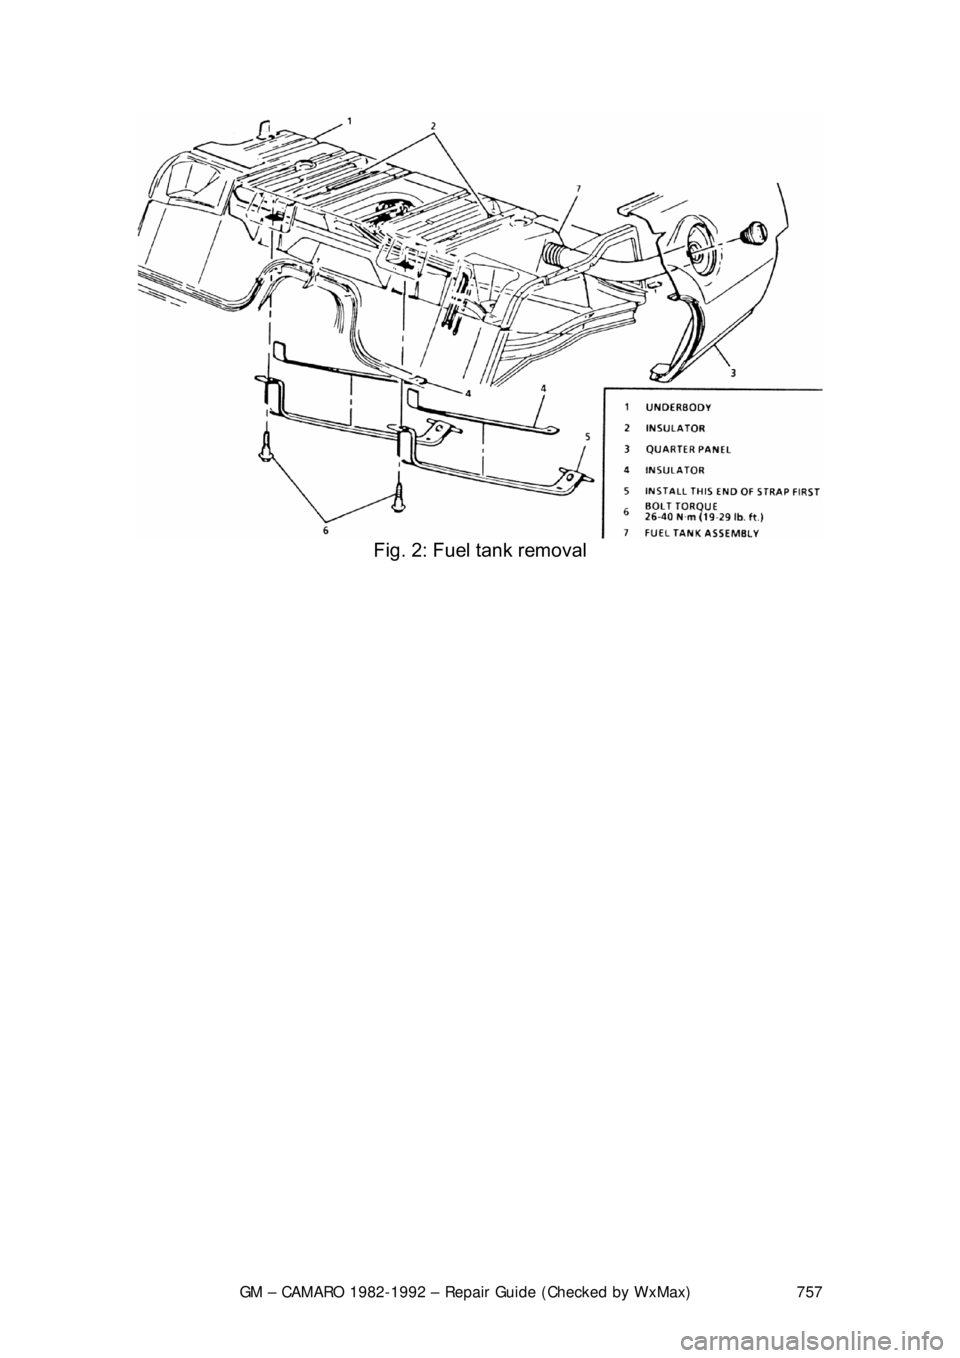
13. Remove the fuel tank strap front attaching bolts. Do not bend the straps
as this will damage them.
14. Remove the tank straps and the fuel tank.
To install: 15. Hook the rear end of the fuel t ank straps into the underbody bracket.
Page 755 of 875

GM – CAMARO 1982-1992 – Repair Guide (Checked by WxMax) 755
16. With the aid of an assistant, posit
ion and support the fuel tank with the
straps. Loosely install the front fuel tank attaching bolts.
17. Engage the electrical connection.
18. Connect the fuel hoses and li nes separated during removal.
19. Install the muffler heat sh ield and the exhaust system.
20. Install the rear axle and the fuel filler neck shield.
21. Lower the vehicle.
22. Add fuel and install the filler cap.
23. Connect the negative battery cable.
24. With the engine OFF, turn the igni tion switch to the ON position for 2
seconds, then turn it to the OFF positi on for 10 seconds. Again turn it to
the ON position and check for fuel leaks.
SENDING UNIT REPLACEMENT 1. Remove the fuel tank.
2. Clean the area surrounding t he sender assembly to prevent
contamination of the fuel system.
3. Using tool J-24187 or equivalent, re move the sending unit retaining cam.
Remove the fuel sender and O-rings fr om the tank. Discard the O-rings.
4. If necessary, separate the fuel pum p from the sending unit assembly.
To install: 5. If removed, install the fuel pump to the sending unit. If the strainer was
removed, it must be re placed with a new one.
6. Inspect and clean the O-ring mating surfaces.
7. Install a new O-ring in the groove around the tank opening. If applicable,
install a new O-ring on t he fuel sender feed tube.
8. Install the fuel sender assembly as follows: a. The fuel pump strainer must be in a horizontal position, and when
installed, must not block the travel of the float arm. Gently fold the
strainer over itself an d slowly position the sending assembly in the
tank so the strainer is not dam aged or trapped by the sump walls.
9. Install the retaining cam us ing tool J-24187 or equivalent.
10. Install the fuel tank assembly.
Page 756 of 875
GM – CAMARO 1982-1992 – Repair Guide (Checked by WxMax) 756
Fig. 1: Quick-connect fittings
Page 757 of 875
GM – CAMARO 1982-1992 – Repair Guide (Checked by WxMax) 757
Fig. 2: Fuel tank removal
Page 758 of 875
GM – CAMARO 1982-1992 – Repair Guide (Checked by WxMax) 758
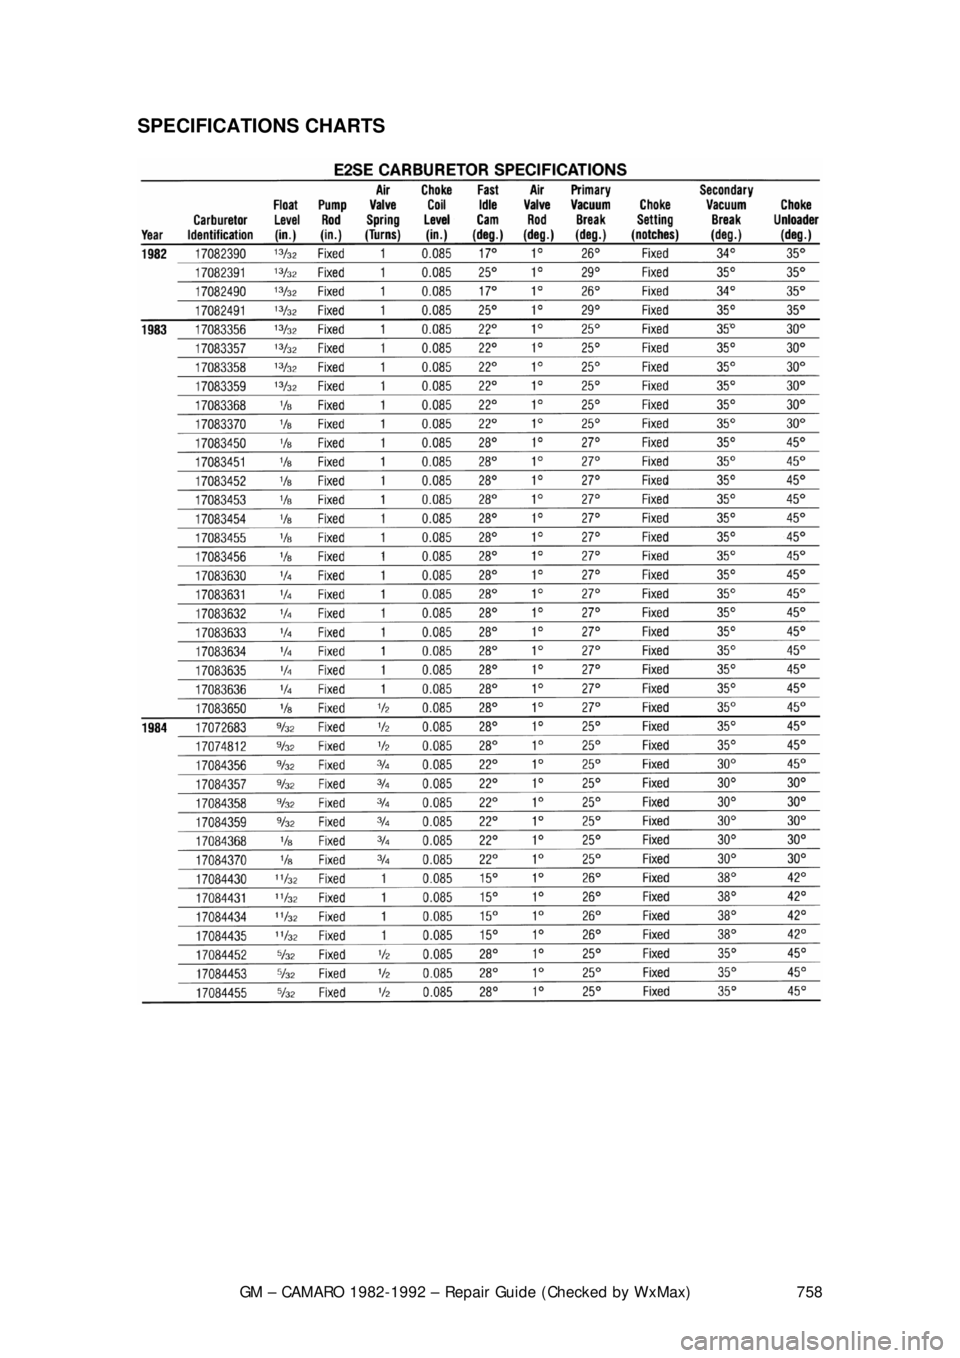
SPECIFICATIONS CHARTS
Page 759 of 875
GM – CAMARO 1982-1992 – Repair Guide (Checked by WxMax) 759
Page 760 of 875

GM – CAMARO 1982-1992 – Repair Guide (Checked by WxMax) 760
GENERAL INFORMATION & MAINTENANCE
HOW TO USE THIS INFORMATION
The introductory part of this repair gui de is intended to help you learn more
about the inner workings of your Camaro while saving you money on its upkeep
and operation.
The beginning of the repair guide will likely be referred to the most, since that is
where you will find information for maintenance and tune-up. The other
information deals with the more complex systems of your vehicle. Systems
(from engine through brakes) are covered to the extent that the average do-it-
yourselfer can attempt. This repair guide will not explain such things as
rebuilding a differential because the ex pertise required and the special tools
necessary make this uneconomical. It will, however, give you detailed
instructions to help you change your own brake pads and shoes, replace spark
plugs, and perform many more jobs that can save you money and help avoid
expensive problems.
A secondary purpose of this repair guide is a reference for owners who want to
understand their vehicle and/or their mechanics better.
WHERE TO BEGIN
Before removing any bolts, read through t he entire procedure. This will give you
the overall view of what tools and supplies will be required. So read ahead and
plan ahead. Each operation should be approached logically and all procedures
thoroughly understood before attempting any work.
If repair of a component is not considered practical, we tell you how to remove
the part and then how to insta ll the new or rebuilt replacement. In this way, you
at least save labor costs.
AVOIDING TROUBLE
Many procedures in this repair guide r equire you to "label and disconnect ..." a
group of lines, hoses or wires. Don't be think you can remember where
everything goes - you won't. If you hook up va cuum or fuel lines incorrectly, the
vehicle may run poorly, if at all. If you hook up electrical wiring incorrectly, you
may instantly learn a very expensive lesson.
You don't need to know the proper name for each hose or line. A piece of
masking tape on the hose and a piece on its fitting will allow you to assign your
own label. As long as you remember your own code, the lines can be
reconnected by matching your tags. Re member that tape will dissolve in
gasoline or solvents; if a part is to be washed or cleaned, use another method
of identification. A permanent felt-tipped marker or a metal scribe can be very
handy for marking metal parts. Remove any tape or paper labels after
assembly.