torque CHRYSLER VOYAGER 1996 Service Manual
[x] Cancel search | Manufacturer: CHRYSLER, Model Year: 1996, Model line: VOYAGER, Model: CHRYSLER VOYAGER 1996Pages: 1938, PDF Size: 55.84 MB
Page 1183 of 1938
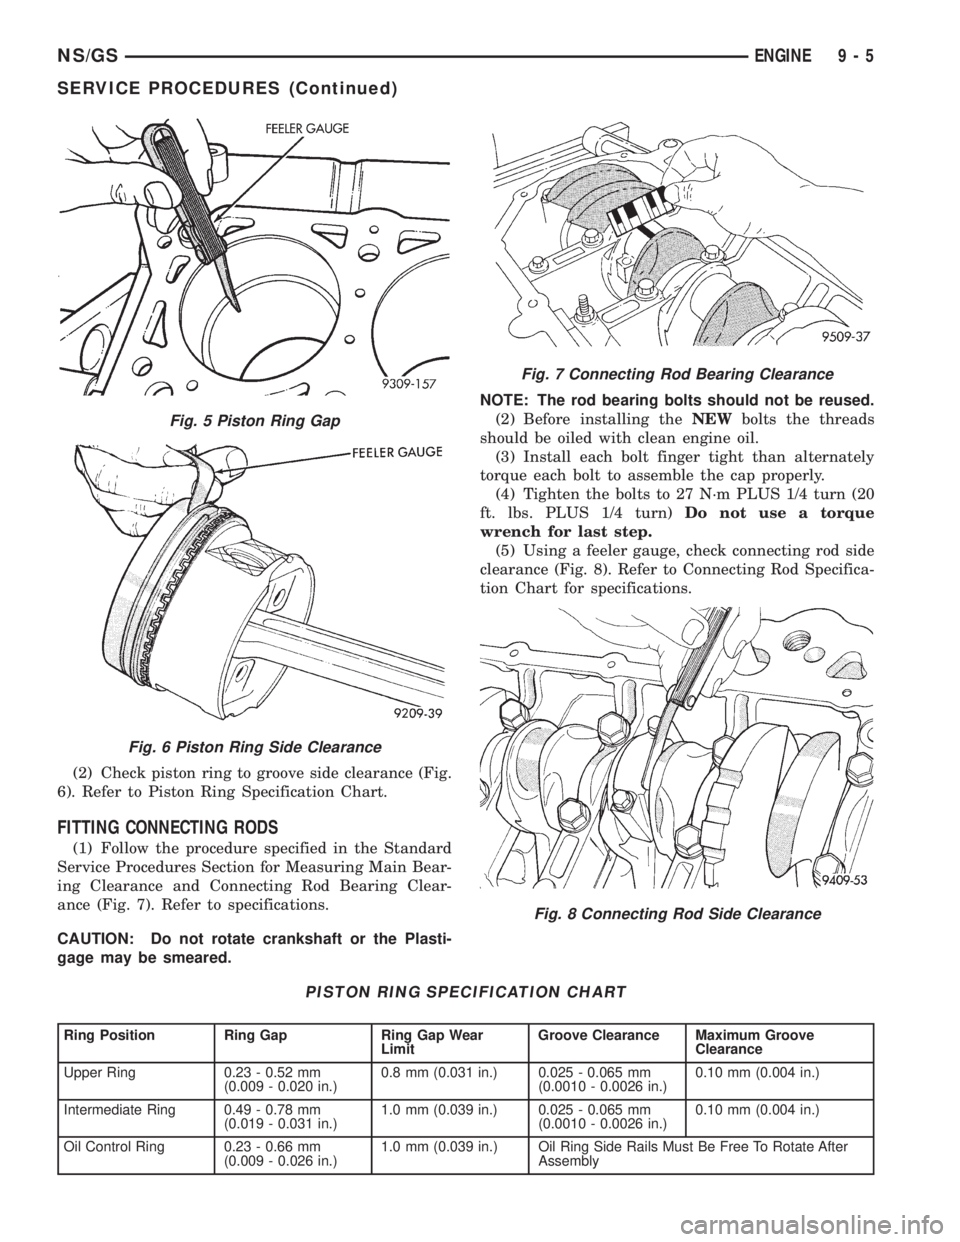
(2) Check piston ring to groove side clearance (Fig.
6). Refer to Piston Ring Specification Chart.
FITTING CONNECTING RODS
(1) Follow the procedure specified in the Standard
Service Procedures Section for Measuring Main Bear-
ing Clearance and Connecting Rod Bearing Clear-
ance (Fig. 7). Refer to specifications.
CAUTION: Do not rotate crankshaft or the Plasti-
gage may be smeared.NOTE: The rod bearing bolts should not be reused.
(2) Before installing theNEWbolts the threads
should be oiled with clean engine oil.
(3) Install each bolt finger tight than alternately
torque each bolt to assemble the cap properly.
(4) Tighten the bolts to 27 N´m PLUS 1/4 turn (20
ft. lbs. PLUS 1/4 turn)Do not use a torque
wrench for last step.
(5) Using a feeler gauge, check connecting rod side
clearance (Fig. 8). Refer to Connecting Rod Specifica-
tion Chart for specifications.
Fig. 5 Piston Ring Gap
Fig. 6 Piston Ring Side Clearance
PISTON RING SPECIFICATION CHART
Ring Position Ring Gap Ring Gap Wear
LimitGroove Clearance Maximum Groove
Clearance
Upper Ring 0.23 - 0.52 mm
(0.009 - 0.020 in.)0.8 mm (0.031 in.) 0.025 - 0.065 mm
(0.0010 - 0.0026 in.)0.10 mm (0.004 in.)
Intermediate Ring 0.49 - 0.78 mm
(0.019 - 0.031 in.)1.0 mm (0.039 in.) 0.025 - 0.065 mm
(0.0010 - 0.0026 in.)0.10 mm (0.004 in.)
Oil Control Ring 0.23 - 0.66 mm
(0.009 - 0.026 in.)1.0 mm (0.039 in.) Oil Ring Side Rails Must Be Free To Rotate After
Assembly
Fig. 7 Connecting Rod Bearing Clearance
Fig. 8 Connecting Rod Side Clearance
NS/GSENGINE 9 - 5
SERVICE PROCEDURES (Continued)
Page 1189 of 1938
(13) Remove timing belt and camshaft sprocket.
Refer to procedure outlined in this section.
(14) Remove rocker arm shaft assemblies.
(15) Remove cylinder head bolts.
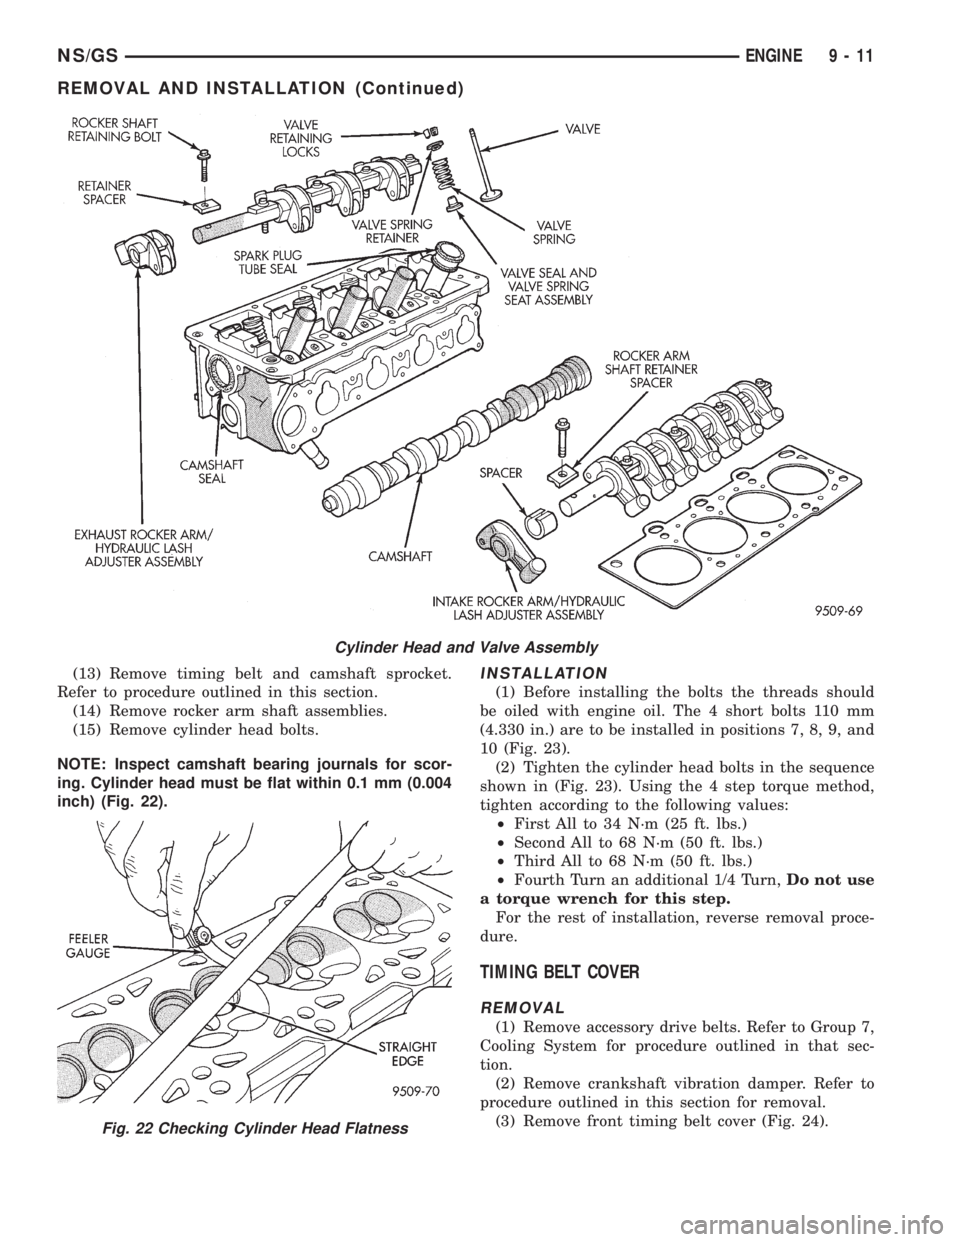
NOTE: Inspect camshaft bearing journals for scor-
ing. Cylinder head must be flat within 0.1 mm (0.004
inch) (Fig. 22).INSTALLATION
(1) Before installing the bolts the threads should
be oiled with engine oil. The 4 short bolts 110 mm
(4.330 in.) are to be installed in positions 7, 8, 9, and
10 (Fig. 23).
(2) Tighten the cylinder head bolts in the sequence
shown in (Fig. 23). Using the 4 step torque method,
tighten according to the following values:
²First All to 34 N´m (25 ft. lbs.)
²Second All to 68 N´m (50 ft. lbs.)
²Third All to 68 N´m (50 ft. lbs.)
²Fourth Turn an additional 1/4 Turn,Do not use
a torque wrench for this step.
For the rest of installation, reverse removal proce-
dure.
TIMING BELT COVER
REMOVAL
(1) Remove accessory drive belts. Refer to Group 7,
Cooling System for procedure outlined in that sec-
tion.
(2) Remove crankshaft vibration damper. Refer to
procedure outlined in this section for removal.
(3) Remove front timing belt cover (Fig. 24).
Cylinder Head and Valve Assembly
Fig. 22 Checking Cylinder Head Flatness
NS/GSENGINE 9 - 11
REMOVAL AND INSTALLATION (Continued)
Page 1193 of 1938
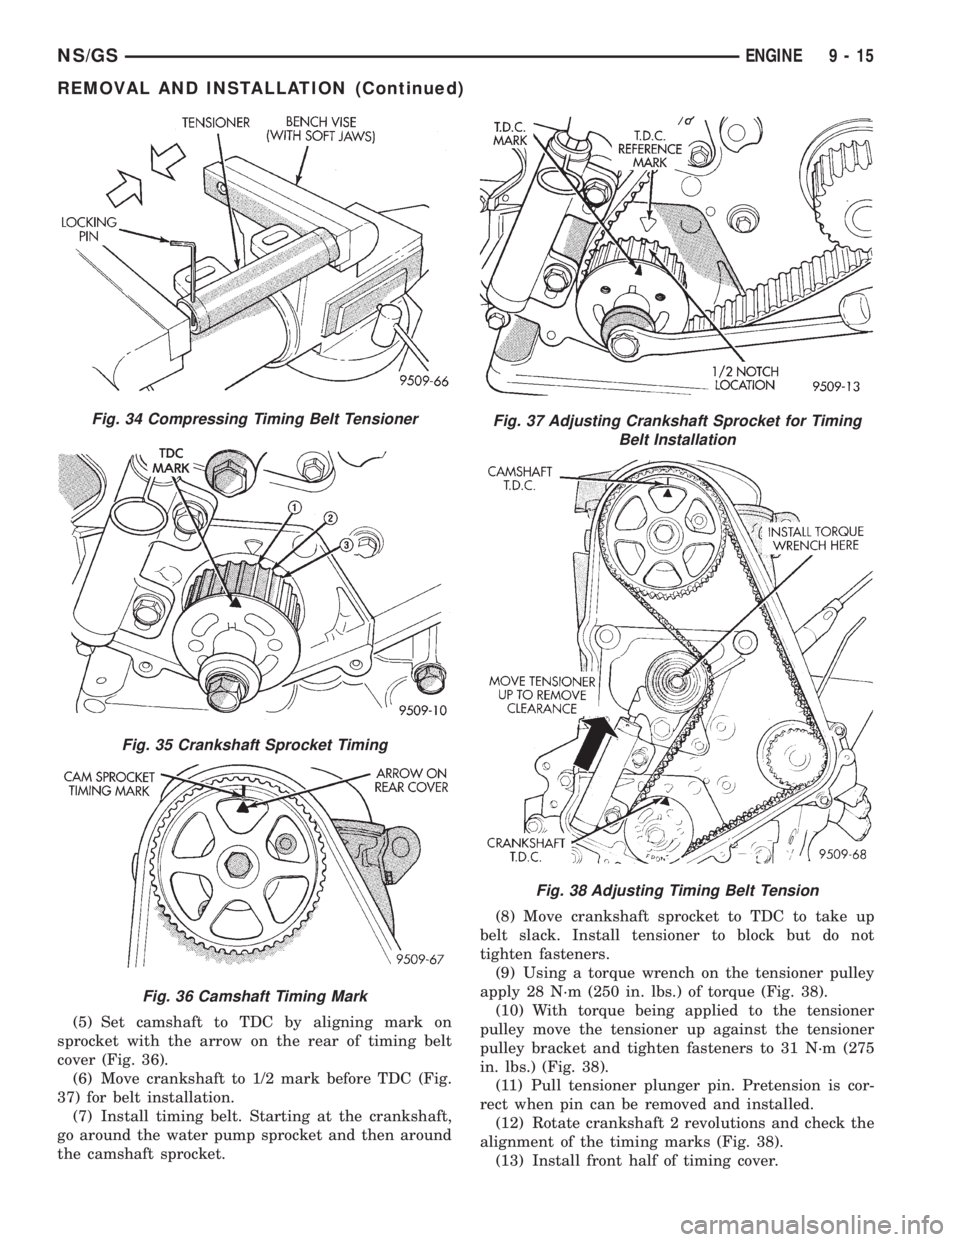
(5) Set camshaft to TDC by aligning mark on
sprocket with the arrow on the rear of timing belt
cover (Fig. 36).
(6) Move crankshaft to 1/2 mark before TDC (Fig.
37) for belt installation.
(7) Install timing belt. Starting at the crankshaft,
go around the water pump sprocket and then around
the camshaft sprocket.(8) Move crankshaft sprocket to TDC to take up
belt slack. Install tensioner to block but do not
tighten fasteners.
(9) Using a torque wrench on the tensioner pulley
apply 28 N´m (250 in. lbs.) of torque (Fig. 38).
(10) With torque being applied to the tensioner
pulley move the tensioner up against the tensioner
pulley bracket and tighten fasteners to 31 N´m (275
in. lbs.) (Fig. 38).
(11) Pull tensioner plunger pin. Pretension is cor-
rect when pin can be removed and installed.
(12) Rotate crankshaft 2 revolutions and check the
alignment of the timing marks (Fig. 38).
(13) Install front half of timing cover.
Fig. 34 Compressing Timing Belt Tensioner
Fig. 35 Crankshaft Sprocket Timing
Fig. 36 Camshaft Timing Mark
Fig. 37 Adjusting Crankshaft Sprocket for Timing
Belt Installation
Fig. 38 Adjusting Timing Belt Tension
NS/GSENGINE 9 - 15
REMOVAL AND INSTALLATION (Continued)
Page 1201 of 1938
(3) Oil the bearings and journals and install
crankshaft and O-ring in cylinder block.
CAUTION: Use only the specified anaerobic sealer
on the bedplate or damage may occur to the
engine.
(4) Apply 1.5 to 2.0 mm (0.059 to 0.078 in.) bead of
Mopar Torque Cure Gasket Maker to cylinder block
as shown in (Fig. 66).
(5) Install lower main bearings into main bearing
cap/bedplate. Make certain the bearing tabs areseated into the bedplate slots. Install the main bear-
ing/bedplate into engine block.
(6) Before installing the bolts oil threads with
clean engine oil, wipe off any excess oil.
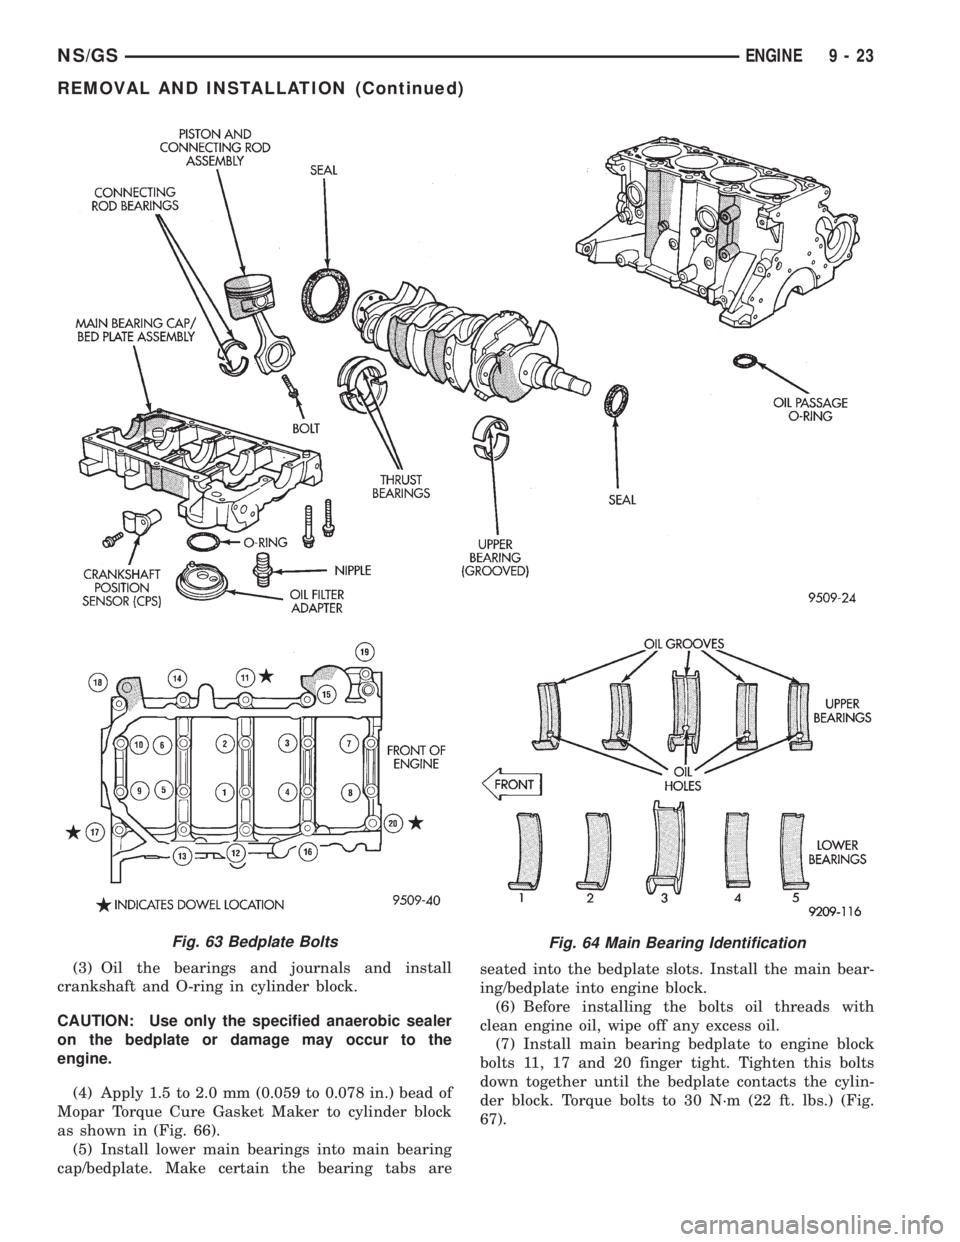
(7) Install main bearing bedplate to engine block
bolts 11, 17 and 20 finger tight. Tighten this bolts
down together until the bedplate contacts the cylin-
der block. Torque bolts to 30 N´m (22 ft. lbs.) (Fig.
67).
Fig. 63 Bedplate BoltsFig. 64 Main Bearing Identification
NS/GSENGINE 9 - 23
REMOVAL AND INSTALLATION (Continued)
Page 1202 of 1938
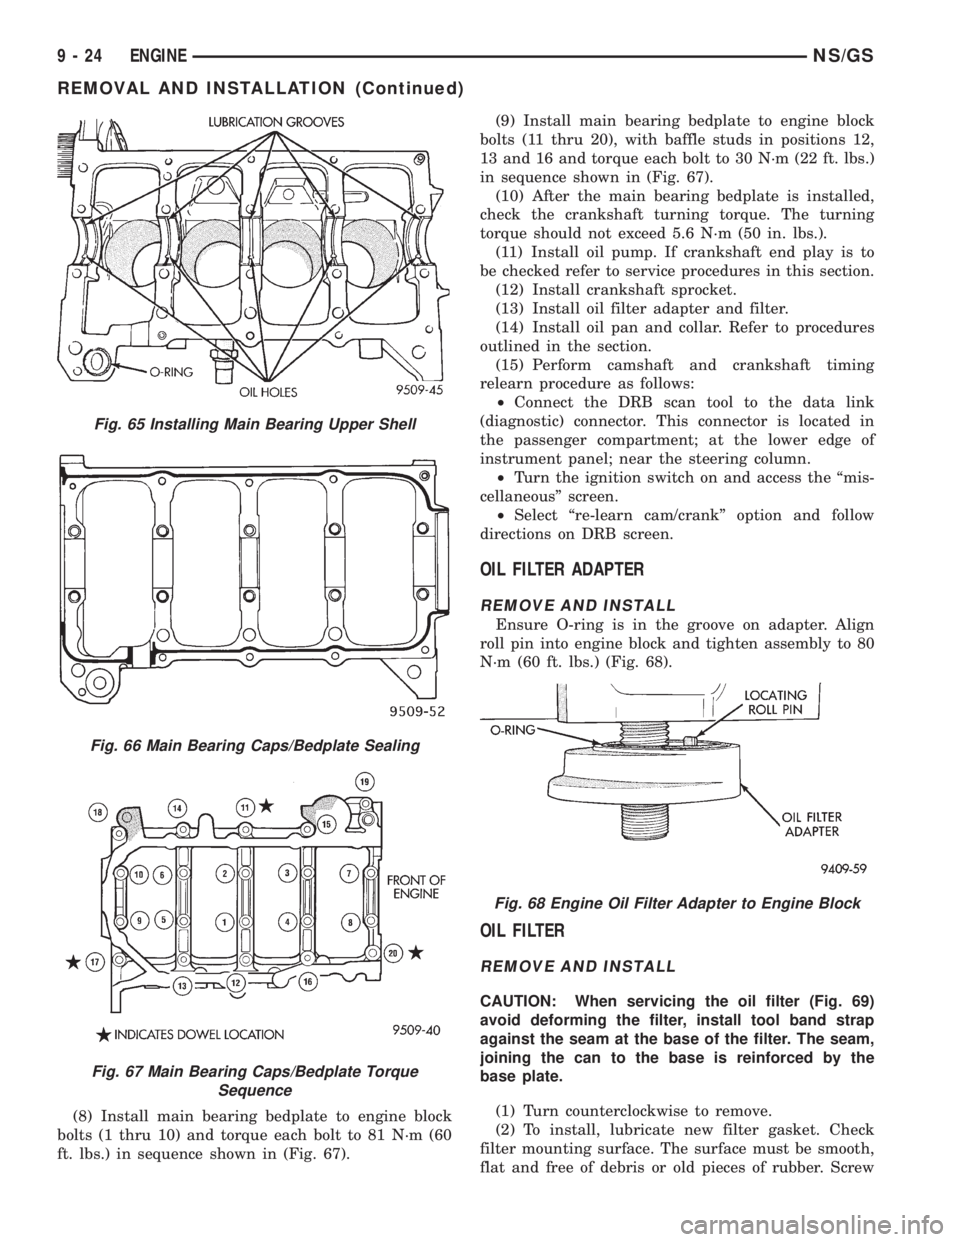
(8) Install main bearing bedplate to engine block
bolts (1 thru 10) and torque each bolt to 81 N´m (60
ft. lbs.) in sequence shown in (Fig. 67).(9) Install main bearing bedplate to engine block
bolts (11 thru 20), with baffle studs in positions 12,
13 and 16 and torque each bolt to 30 N´m (22 ft. lbs.)
in sequence shown in (Fig. 67).
(10) After the main bearing bedplate is installed,
check the crankshaft turning torque. The turning
torque should not exceed 5.6 N´m (50 in. lbs.).
(11) Install oil pump. If crankshaft end play is to
be checked refer to service procedures in this section.
(12) Install crankshaft sprocket.
(13) Install oil filter adapter and filter.
(14) Install oil pan and collar. Refer to procedures
outlined in the section.
(15) Perform camshaft and crankshaft timing
relearn procedure as follows:
²Connect the DRB scan tool to the data link
(diagnostic) connector. This connector is located in
the passenger compartment; at the lower edge of
instrument panel; near the steering column.
²Turn the ignition switch on and access the ªmis-
cellaneousº screen.
²Select ªre-learn cam/crankº option and follow
directions on DRB screen.
OIL FILTER ADAPTER
REMOVE AND INSTALL
Ensure O-ring is in the groove on adapter. Align
roll pin into engine block and tighten assembly to 80
N´m (60 ft. lbs.) (Fig. 68).
OIL FILTER
REMOVE AND INSTALL
CAUTION: When servicing the oil filter (Fig. 69)
avoid deforming the filter, install tool band strap
against the seam at the base of the filter. The seam,
joining the can to the base is reinforced by the
base plate.
(1) Turn counterclockwise to remove.
(2) To install, lubricate new filter gasket. Check
filter mounting surface. The surface must be smooth,
flat and free of debris or old pieces of rubber. Screw
Fig. 65 Installing Main Bearing Upper Shell
Fig. 66 Main Bearing Caps/Bedplate Sealing
Fig. 67 Main Bearing Caps/Bedplate Torque
Sequence
Fig. 68 Engine Oil Filter Adapter to Engine Block
9 - 24 ENGINENS/GS
REMOVAL AND INSTALLATION (Continued)
Page 1203 of 1938
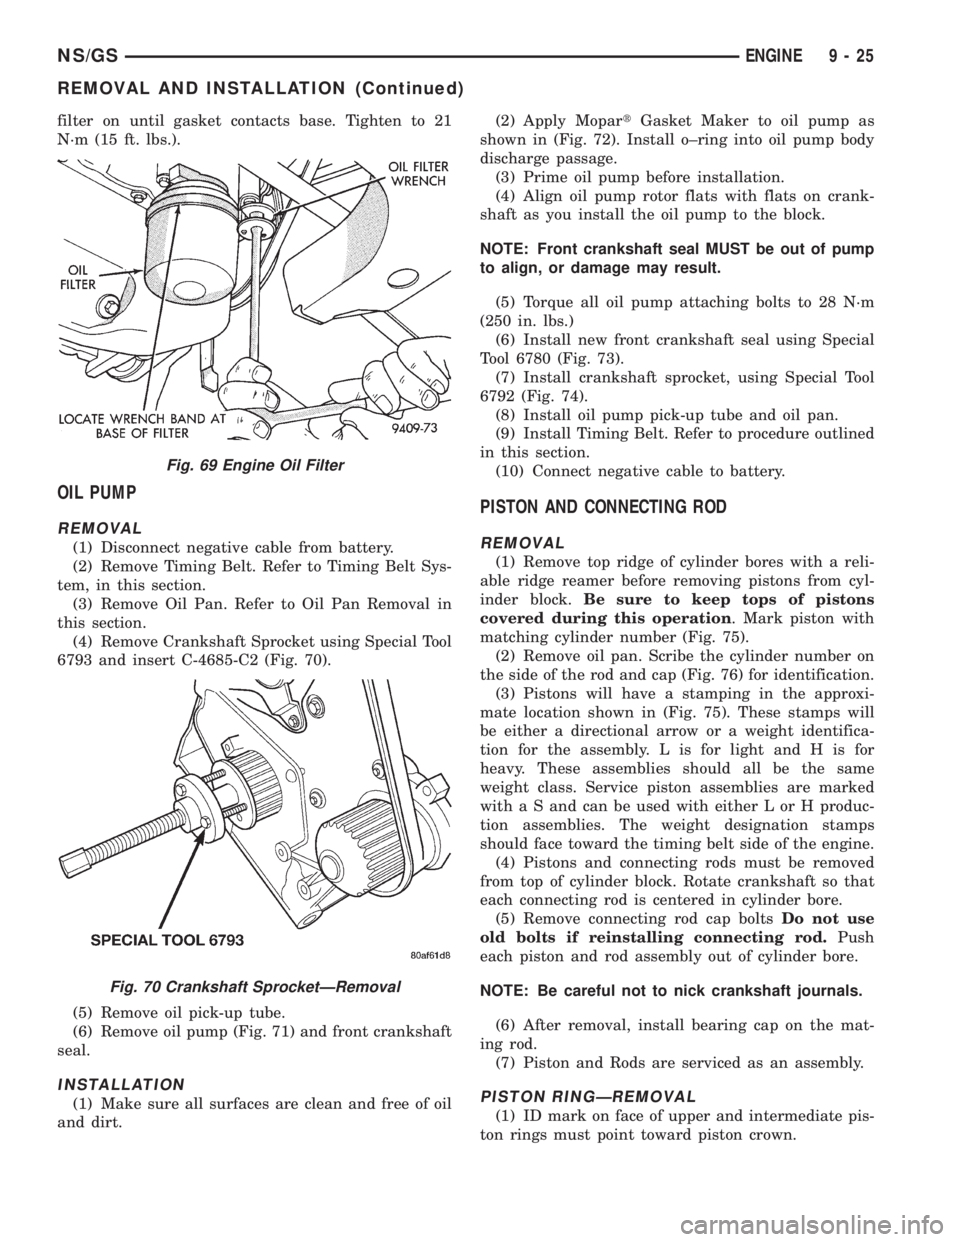
filter on until gasket contacts base. Tighten to 21
N´m (15 ft. lbs.).
OIL PUMP
REMOVAL
(1) Disconnect negative cable from battery.
(2) Remove Timing Belt. Refer to Timing Belt Sys-
tem, in this section.
(3) Remove Oil Pan. Refer to Oil Pan Removal in
this section.
(4) Remove Crankshaft Sprocket using Special Tool
6793 and insert C-4685-C2 (Fig. 70).
(5) Remove oil pick-up tube.
(6) Remove oil pump (Fig. 71) and front crankshaft
seal.
INSTALLATION
(1) Make sure all surfaces are clean and free of oil
and dirt.(2) Apply MopartGasket Maker to oil pump as
shown in (Fig. 72). Install o±ring into oil pump body
discharge passage.
(3) Prime oil pump before installation.
(4) Align oil pump rotor flats with flats on crank-
shaft as you install the oil pump to the block.
NOTE: Front crankshaft seal MUST be out of pump
to align, or damage may result.
(5) Torque all oil pump attaching bolts to 28 N´m
(250 in. lbs.)
(6) Install new front crankshaft seal using Special
Tool 6780 (Fig. 73).
(7) Install crankshaft sprocket, using Special Tool
6792 (Fig. 74).
(8) Install oil pump pick-up tube and oil pan.
(9) Install Timing Belt. Refer to procedure outlined
in this section.
(10) Connect negative cable to battery.
PISTON AND CONNECTING ROD
REMOVAL
(1) Remove top ridge of cylinder bores with a reli-
able ridge reamer before removing pistons from cyl-
inder block.Be sure to keep tops of pistons
covered during this operation. Mark piston with
matching cylinder number (Fig. 75).
(2) Remove oil pan. Scribe the cylinder number on
the side of the rod and cap (Fig. 76) for identification.
(3) Pistons will have a stamping in the approxi-
mate location shown in (Fig. 75). These stamps will
be either a directional arrow or a weight identifica-
tion for the assembly. L is for light and H is for
heavy. These assemblies should all be the same
weight class. Service piston assemblies are marked
with a S and can be used with either L or H produc-
tion assemblies. The weight designation stamps
should face toward the timing belt side of the engine.
(4) Pistons and connecting rods must be removed
from top of cylinder block. Rotate crankshaft so that
each connecting rod is centered in cylinder bore.
(5) Remove connecting rod cap boltsDo not use
old bolts if reinstalling connecting rod.Push
each piston and rod assembly out of cylinder bore.
NOTE: Be careful not to nick crankshaft journals.
(6) After removal, install bearing cap on the mat-
ing rod.
(7) Piston and Rods are serviced as an assembly.
PISTON RINGÐREMOVAL
(1) ID mark on face of upper and intermediate pis-
ton rings must point toward piston crown.
Fig. 69 Engine Oil Filter
Fig. 70 Crankshaft SprocketÐRemoval
NS/GSENGINE 9 - 25
REMOVAL AND INSTALLATION (Continued)
Page 1208 of 1938
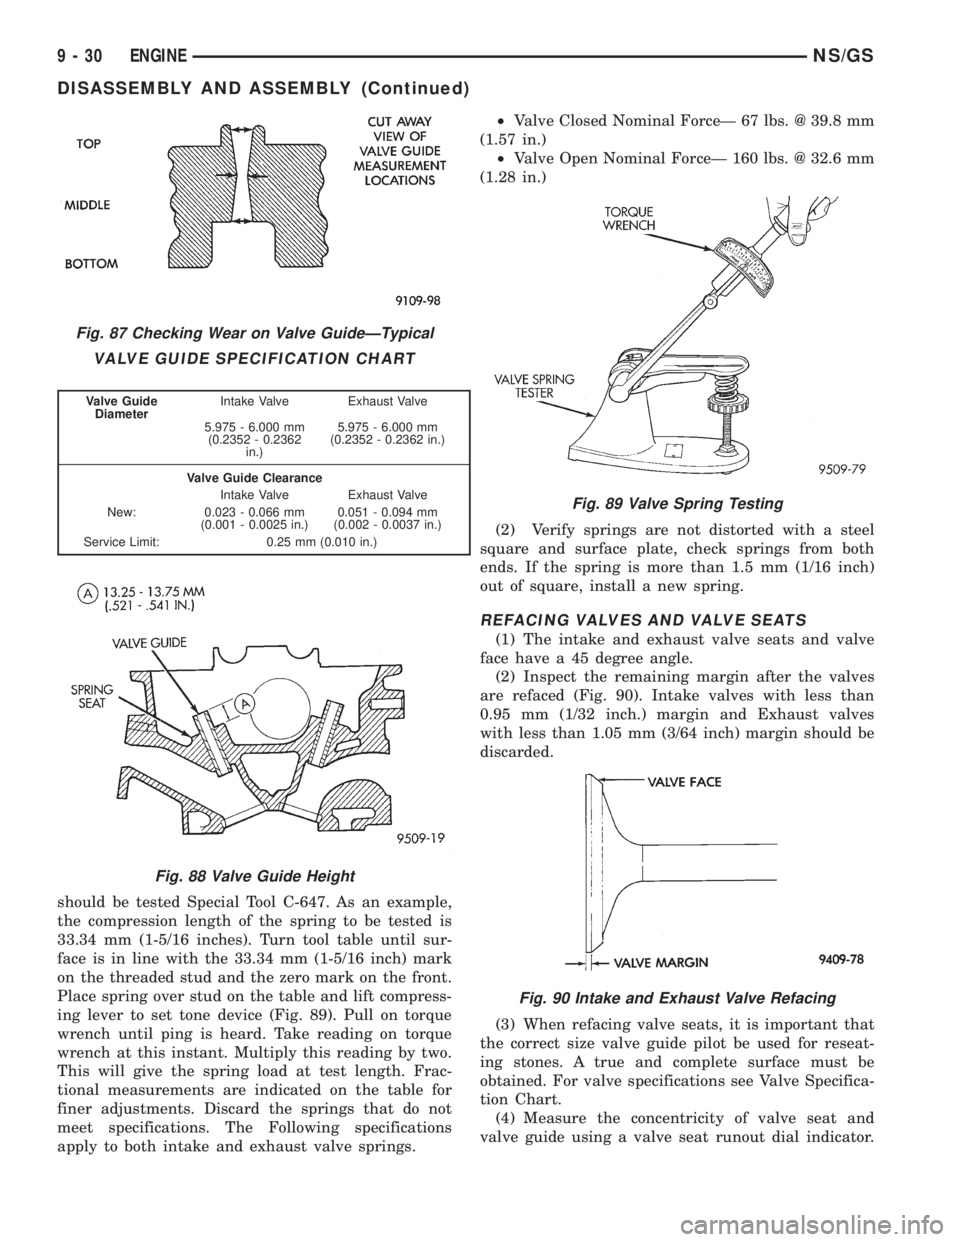
should be tested Special Tool C-647. As an example,
the compression length of the spring to be tested is
33.34 mm (1-5/16 inches). Turn tool table until sur-
face is in line with the 33.34 mm (1-5/16 inch) mark
on the threaded stud and the zero mark on the front.
Place spring over stud on the table and lift compress-
ing lever to set tone device (Fig. 89). Pull on torque
wrench until ping is heard. Take reading on torque
wrench at this instant. Multiply this reading by two.
This will give the spring load at test length. Frac-
tional measurements are indicated on the table for
finer adjustments. Discard the springs that do not
meet specifications. The Following specifications
apply to both intake and exhaust valve springs.²Valve Closed Nominal ForceÐ 67 lbs. @ 39.8 mm
(1.57 in.)
²Valve Open Nominal ForceÐ 160 lbs. @ 32.6 mm
(1.28 in.)
(2) Verify springs are not distorted with a steel
square and surface plate, check springs from both
ends. If the spring is more than 1.5 mm (1/16 inch)
out of square, install a new spring.
REFACING VALVES AND VALVE SEATS
(1) The intake and exhaust valve seats and valve
face have a 45 degree angle.
(2) Inspect the remaining margin after the valves
are refaced (Fig. 90). Intake valves with less than
0.95 mm (1/32 inch.) margin and Exhaust valves
with less than 1.05 mm (3/64 inch) margin should be
discarded.
(3) When refacing valve seats, it is important that
the correct size valve guide pilot be used for reseat-
ing stones. A true and complete surface must be
obtained. For valve specifications see Valve Specifica-
tion Chart.
(4) Measure the concentricity of valve seat and
valve guide using a valve seat runout dial indicator.
Fig. 87 Checking Wear on Valve GuideÐTypical
VALVE GUIDE SPECIFICATION CHART
Valve Guide
DiameterIntake Valve Exhaust Valve
5.975 - 6.000 mm
(0.2352 - 0.2362
in.)5.975 - 6.000 mm
(0.2352 - 0.2362 in.)
Valve Guide Clearance
Intake Valve Exhaust Valve
New: 0.023 - 0.066 mm
(0.001 - 0.0025 in.)0.051 - 0.094 mm
(0.002 - 0.0037 in.)
Service Limit: 0.25 mm (0.010 in.)
Fig. 88 Valve Guide Height
Fig. 89 Valve Spring Testing
Fig. 90 Intake and Exhaust Valve Refacing
9 - 30 ENGINENS/GS
DISASSEMBLY AND ASSEMBLY (Continued)
Page 1214 of 1938
Valve Margin
Intake.....1.15 ± 1.48 mm (0.0452 ± 0.0582 in.)
Exhaust....1.475 ± 1.805 mm (0.058 ± 0.071 in.)
Valve Length (Overall)
Intake....114.69 ± 115.19 mm (4.515 ± 4.535 in.)
Exhaust . . 109.59 ± 110.09 mm (4.603 ± 4.623 in.)
Valve Stem Tip Height
Intake.......45.01 ± 46.07 mm (1.77 ± 1.81 in.)
Exhaust......43.51 ± 44.57 mm (1.71 ± 1.75 in.)
Stem Diameter
Intake.....5.934 ± 5.952 mm (0.234 ± 0.234 in.)
Exhaust....5.906 ± 5.924 mm (0.233 ± 0.233 in.)
Stem to Guide Clearance
Intake . . . 0.048 ± 0.066 mm (0.0018 ± 0.0025 in.)
Exhaust . 0.0736 ± 0.094 mm (0.0029 ± 0.0037 in.)
Max. Allowable Intake.....0.076 mm (0.003 in.)
Max. Allowable Exhaust....0.101 mm (0.004 in.)
Valve Springs
Free Length (Approx.)......44.4 mm (1.747 in.)
Nominal Force (Valve closed) . 91 N´m @ 39.8 mm
(67 ft. lbs. @ 1.57 in.)
Nominal Force (Valve open) . 239 N´m @ 32.6 mm
(176 lbs. @ 1.28 in.)
Installed Height..........40.18 mm (1.580 in.)
* SERVICE AS AN ASSEMBLY WITH ROCKER
ARM.
** ALL READINGS IN CRANKSHAFT DEGREES,
AT 0.5 mm (0.019 in.) OF VALVE LIFT.
TORQUE CHART 2.0L SOHC
DESCRIPTION...................TORQUE
Camshaft Sensor Pick Up
Bolts...................9.6N´m(85in.lbs.)
Camshaft Sprocket
Bolt....................115N´m(85ft.lbs.)
Connecting Rod Cap
Bolts.........27N´m(20ft.lbs.) Plus 1/4 Turn
CollarÐOil Pan to Transaxle
Step 1: Collar to Oil Pan Bolts . 3 N´m (30 in. lbs.)
Step 2: Collar to Transaxle
Bolts...................108N´m(80ft.lbs.)
Step 3: Collar to Oil Pan
Bolts....................54N´m(40ft.lbs.)
Crankshaft Main Bearing Cap/Bedplate
M8 Bedplate Bolts..........30N´m(22ft.lbs.)
M11 Main Cap Bolts........81N´m(60ft.lbs.)
Crankshaft Damper
Bolt...................142N´m(105 ft. lbs.)
Cylinder Head
Bolts.......Refer To Cylinder Head Installation
Cylinder Head Cover
Bolts...................12N´m(105 in. lbs.)
Engine Mount BracketÐRight
Bolts....................61N´m(45ft.lbs.)DESCRIPTION...................TORQUE
Engine Mounting
Bolts.......Refer to Engine Mount Installation
Exhaust Manifold to Cylinder Head
Bolts...................23N´m(200 in. lbs.)
Exhaust Manifold Heat Shield
Bolts...................12N´m(105 in. lbs.)
Intake Manifold
Bolts...................12N´m(105 in. lbs.)
Oil Filter Adapter
Fastener.................80N´m(60ft.lbs.)
Oil Filter.................20N´m(15ft.lbs.)
Oil Pan
Bolts...................12N´m(105 in. lbs.)
Drain Plug...............27N´m(20ft.lbs.)
Oil Pump Attaching
Bolts...................28N´m(250 in. lbs.)
Oil Pump Cover Fastener . . . 12 N´m (105 in. lbs.)
Oil Pump Pick-up Tube Bolt . 28 N´m (250 in. lbs.)
Oil Pump Relief Valve Cap . . . 41 N´m (30 ft. lbs.)
Rocker Arm Shaft
Bolts...................28N´m(250 in. lbs.)
Spark Plugs...............28N´m(20ft.lbs.)
Thermostat Housing
Bolts...................23N´m(200 in lbs.)
Timing Belt Cover
Bolts M6................12N´m(105 in. lbs.)
Timing Belt Mechanical Tensioner Assembly
Bolts...................28N´m(250 in. lbs.)
Timing Belt Hydraulic Tensioner
Pulley Bolt...............68N´m(50ft.lbs.)
Pivot Bracket Bolt..........31N´m(23ft.lbs.)
Tensioner Bolts............31N´m(23ft.lbs.)
Water Pump Mounting
Bolts...................12N´m(105 in. lbs.)
SPECIAL TOOLS
ENGINE 2.0L SOHC
Puller 1026
9 - 36 ENGINENS/GS
SPECIFICATIONS (Continued)
Page 1218 of 1938
2.5L VM DIESEL
INDEX
page page
GENERAL INFORMATION
ENGINE IDENTIFICATION................ 41
GENERAL SPECIFICATION............... 40
DESCRIPTION AND OPERATION
LUBRICATION SYSTEM.................. 41
DIAGNOSIS AND TESTING
ENGINE DIAGNOSISÐMECHANICAL....... 44
ENGINE DIAGNOSISÐPERFORMANCE..... 43
HYDRAULIC TAPPETS................... 47
SERVICE PROCEDURES
CHANGING ENGINE OIL AND FILTER....... 47
CHECKING OIL LEVEL................... 47
CRANKSHAFT END PLAY................ 50
FITTING PISTON RING.................. 50
TIMING PROCEDURE................... 49
VALVE AND SEAT REFACING............. 49
REMOVAL AND INSTALLATION
CAMSHAFT........................... 62
CAMSHAFT BEARINGS.................. 63
CRANKSHAFT MAIN BEARINGS........... 63
CRANKSHAFTÐREMOVAL............... 72
CYLINDER HEAD....................... 55
CYLINDER HEAD COVER................ 54
CYLINDER LINER...................... 72
ENGINE ASSEMBLY..................... 53
ENGINE MOUNTÐFRONT................ 51
ENGINE MOUNTÐREAR................. 52
ENGINE MOUNTÐRIGHT................ 51
HYDRAULIC TAPPETS................... 60
INJECTION PUMP...................... 61
MOUNTÐLEFT SIDE.................... 51
OIL FILTER ADAPTER AND OIL COOLER.... 68
OILPAN .............................. 66OIL PUMP............................ 67
OIL PUMP PRESSURE RELIEF VALVE...... 67
PISTONS AND CONNECTING ROD......... 68
REAR CRANKSHAFT OIL SEAL............ 72
ROCKER ARMS AND PUSH RODS......... 54
TIMING GEAR COVER................... 61
TIMING GEAR COVER OIL SEAL........... 61
VACUUM PUMP........................ 68
VALVE SPRINGSÐCYLINDER HEAD NOT
REMOVED.......................... 55
VALVES AND VALVE SPRINGSÐHEAD OFF . . 60
VIBRATION DAMPER.................... 61
DISASSEMBLY AND ASSEMBLY
HYDRAULIC TAPPETS................... 73
CLEANING AND INSPECTION
CRANKSHAFT......................... 77
CRANKSHAFT MAIN BEARING............ 77
CYLINDER HEAD....................... 75
CYLINDER HEAD COVERS............... 74
CYLINDER LINER...................... 78
HYDRAULIC TAPPETS................... 76
OILPAN .............................. 78
OIL PUMP............................ 76
PISTON AND CONNECTING ROD.......... 76
ROCKER ARMS AND PUSH RODS......... 74
TIMING GEAR COVER................... 75
VALVES AND VALVE SPRINGS............ 76
SPECIFICATIONS
2.5L VM DIESEL........................ 78
TORQUE............................. 80
SPECIAL TOOLS
2.5L VM DIESEL........................ 81
GENERAL INFORMATION
GENERAL SPECIFICATION
Type ........................425CLIEE (36B)
Displacement...................2.5L (2499 cc)
Bore.............................92.00 mm
Stroke............................94.00 mm
Compression Ratio....................20.95:1
Vacuum at Idle..........600mm/Hg (23.6 In/Hg)
Thermostat Opening................80ÉC62ÉC
Generator Rating............Bosch 50/120 Amp
Cooling System Capacity..............9.5Liter
Power Steering Capacity.............0.75 LiterType ........................425CLIEE (36B)
Engine Oil Capacity.....6.5Liters With Oil Filter
Change
Timing System . Pushrod Operated Overhead valves,
With Gear-Driven Camshaft.
Air Intake........................DryFilter
Fuel Feed...........Vacuum Pump Incorporated
in Injection Pump.
Fuel System.............Indirect Fuel Injection
(Precombustion Chamber)
Combustion Cycle....................4Stroke
Cooling System..................Water Cooled
Injection Pump.......Rotary Pump Electronically
Controlled.
9 - 40 ENGINENS/GS
Page 1229 of 1938
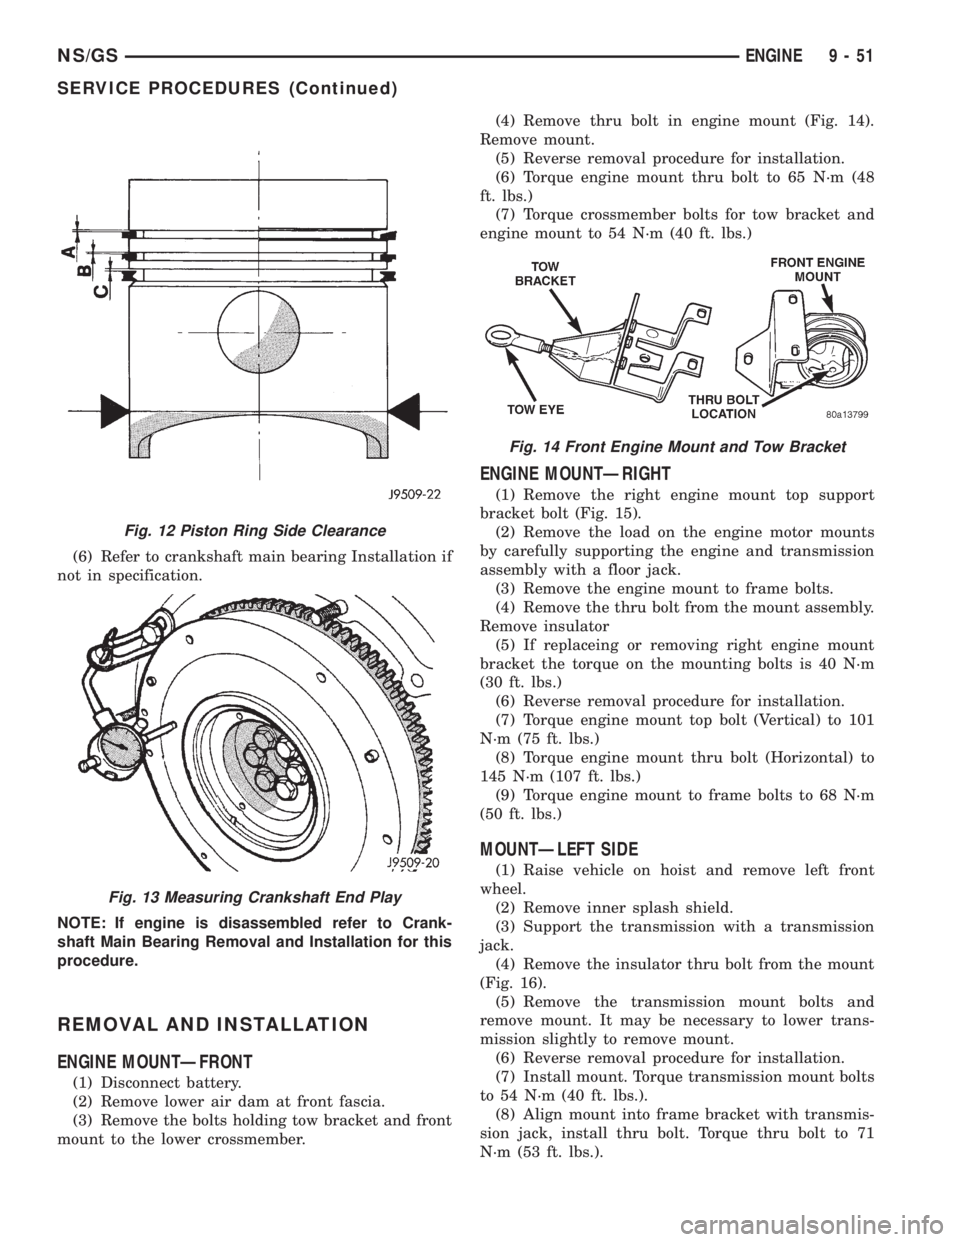
(6) Refer to crankshaft main bearing Installation if
not in specification.
NOTE: If engine is disassembled refer to Crank-
shaft Main Bearing Removal and Installation for this
procedure.
REMOVAL AND INSTALLATION
ENGINE MOUNTÐFRONT
(1) Disconnect battery.
(2) Remove lower air dam at front fascia.
(3) Remove the bolts holding tow bracket and front
mount to the lower crossmember.(4) Remove thru bolt in engine mount (Fig. 14).
Remove mount.
(5) Reverse removal procedure for installation.
(6) Torque engine mount thru bolt to 65 N´m (48
ft. lbs.)
(7) Torque crossmember bolts for tow bracket and
engine mount to 54 N´m (40 ft. lbs.)
ENGINE MOUNTÐRIGHT
(1) Remove the right engine mount top support
bracket bolt (Fig. 15).
(2) Remove the load on the engine motor mounts
by carefully supporting the engine and transmission
assembly with a floor jack.
(3) Remove the engine mount to frame bolts.
(4) Remove the thru bolt from the mount assembly.
Remove insulator
(5) If replaceing or removing right engine mount
bracket the torque on the mounting bolts is 40 N´m
(30 ft. lbs.)
(6) Reverse removal procedure for installation.
(7) Torque engine mount top bolt (Vertical) to 101
N´m (75 ft. lbs.)
(8) Torque engine mount thru bolt (Horizontal) to
145 N´m (107 ft. lbs.)
(9) Torque engine mount to frame bolts to 68 N´m
(50 ft. lbs.)
MOUNTÐLEFT SIDE
(1) Raise vehicle on hoist and remove left front
wheel.
(2) Remove inner splash shield.
(3) Support the transmission with a transmission
jack.
(4) Remove the insulator thru bolt from the mount
(Fig. 16).
(5) Remove the transmission mount bolts and
remove mount. It may be necessary to lower trans-
mission slightly to remove mount.
(6) Reverse removal procedure for installation.
(7) Install mount. Torque transmission mount bolts
to 54 N´m (40 ft. lbs.).
(8) Align mount into frame bracket with transmis-
sion jack, install thru bolt. Torque thru bolt to 71
N´m (53 ft. lbs.).
Fig. 12 Piston Ring Side Clearance
Fig. 13 Measuring Crankshaft End Play
Fig. 14 Front Engine Mount and Tow Bracket
NS/GSENGINE 9 - 51
SERVICE PROCEDURES (Continued)