torque CHRYSLER VOYAGER 1996 Service Manual
[x] Cancel search | Manufacturer: CHRYSLER, Model Year: 1996, Model line: VOYAGER, Model: CHRYSLER VOYAGER 1996Pages: 1938, PDF Size: 55.84 MB
Page 1230 of 1938
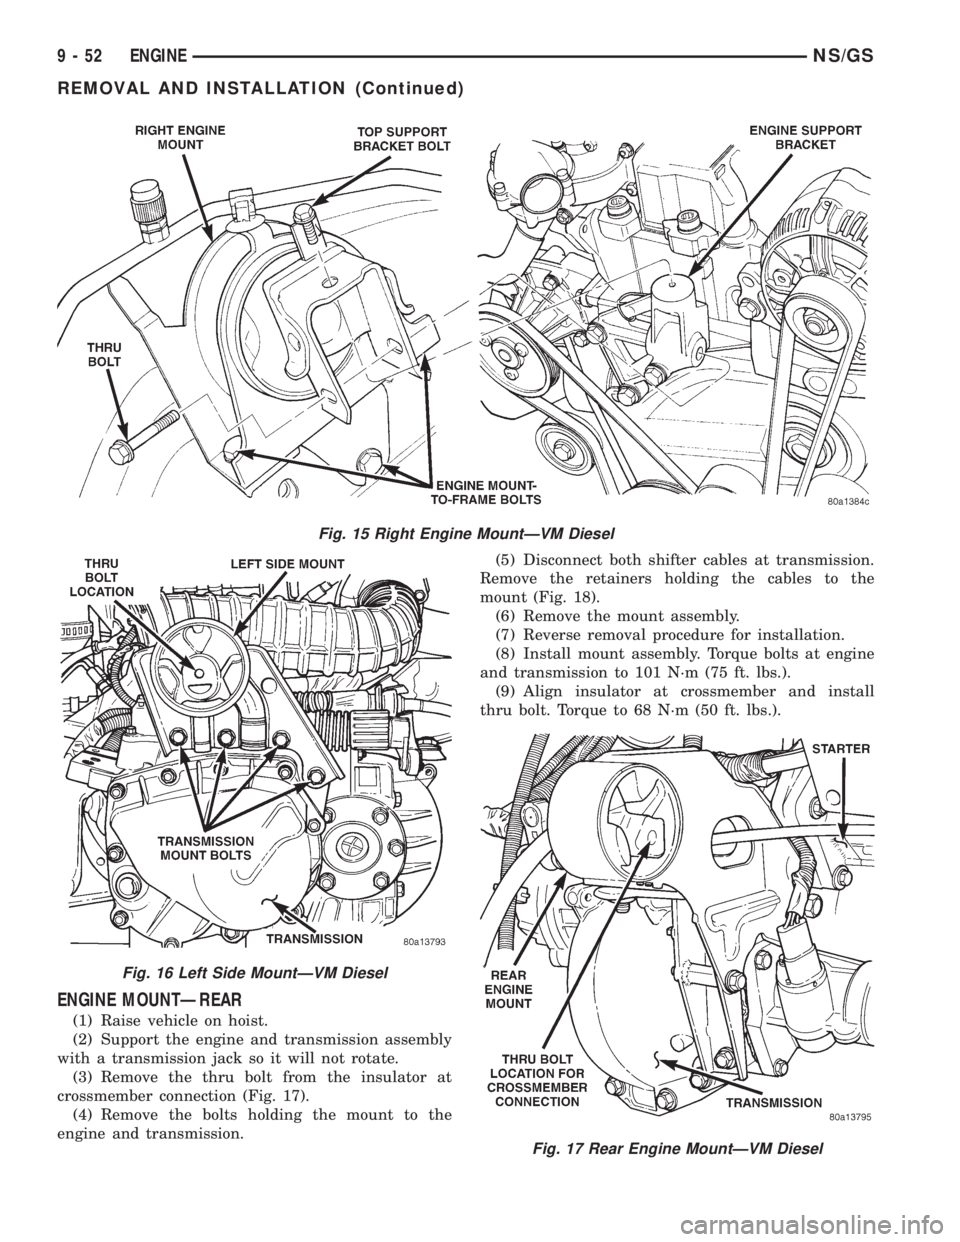
ENGINE MOUNTÐREAR
(1) Raise vehicle on hoist.
(2) Support the engine and transmission assembly
with a transmission jack so it will not rotate.
(3) Remove the thru bolt from the insulator at
crossmember connection (Fig. 17).
(4) Remove the bolts holding the mount to the
engine and transmission.(5) Disconnect both shifter cables at transmission.
Remove the retainers holding the cables to the
mount (Fig. 18).
(6) Remove the mount assembly.
(7) Reverse removal procedure for installation.
(8) Install mount assembly. Torque bolts at engine
and transmission to 101 N´m (75 ft. lbs.).
(9) Align insulator at crossmember and install
thru bolt. Torque to 68 N´m (50 ft. lbs.).
Fig. 15 Right Engine MountÐVM Diesel
Fig. 16 Left Side MountÐVM Diesel
Fig. 17 Rear Engine MountÐVM Diesel
9 - 52 ENGINENS/GS
REMOVAL AND INSTALLATION (Continued)
Page 1232 of 1938
(28) Remove radiator support bolts.It is neces-
sary to loosen the receiver/dryer to gain access
to the radiator bolts.
(29) Remove radiator and fans as an assembly.
(30) Remove accessory drive belt generator/power
steering. Refer to Group 7, for procedure.
(31) Remove both power steering lines at pump,
and cap both lines.
NOTE: It is not necessary to discharge A/C system
for engine removal.
(32) Remove A/C compressor. Secure compressor
away from engine for clearance during engine
removal.
(33) Remove Generator and adjusting bracket.
NOTE: Do not remove the mounting base from the
generator. It is aligned at the factory and cannot be
realigned in the field.
(34) Hoist vehicle.
(35) Remove exhaust pipe at turbo outlet.
(36) Remove connections at starter.
(37) Remove power steering high pressure line
bracket at rear of oil pan.
(38) Remove both driveshafts from transaxle. Refer
to Group 2, Suspension and Driveshafts.
(39) Disconnect clutch cable at transaxle.
(40) Remove reinforcement plate on lower cross-
member.
(41) Remove front and rear engine mounts. Refer
to procedure outlined in this section.
(42) Drain engine oil and remove oil filter if neces-
sary.
(43) Mount both special tool, engine support brack-
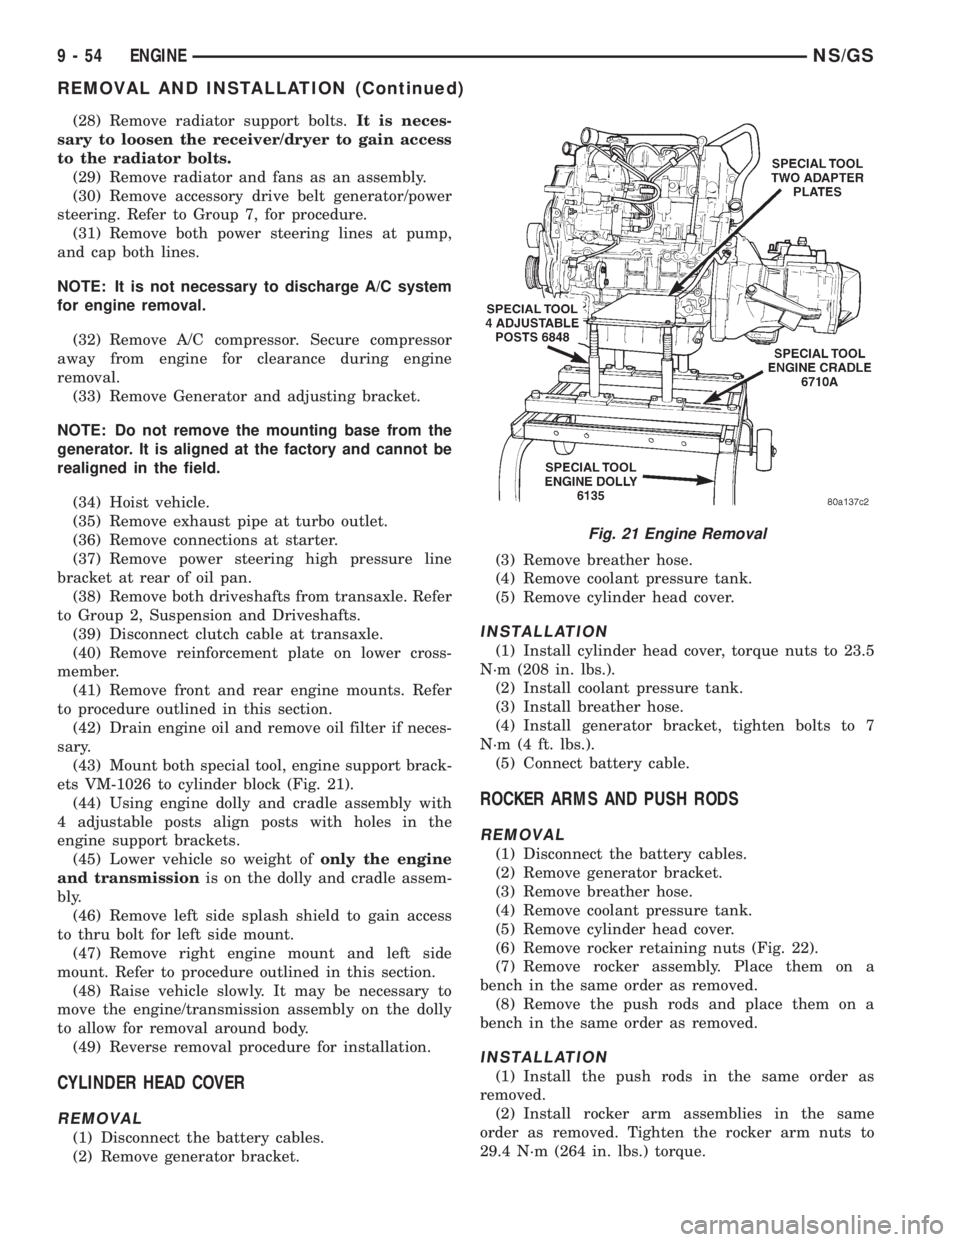
ets VM-1026 to cylinder block (Fig. 21).
(44) Using engine dolly and cradle assembly with
4 adjustable posts align posts with holes in the
engine support brackets.
(45) Lower vehicle so weight ofonly the engine
and transmissionis on the dolly and cradle assem-
bly.
(46) Remove left side splash shield to gain access
to thru bolt for left side mount.
(47) Remove right engine mount and left side
mount. Refer to procedure outlined in this section.
(48) Raise vehicle slowly. It may be necessary to
move the engine/transmission assembly on the dolly
to allow for removal around body.
(49) Reverse removal procedure for installation.
CYLINDER HEAD COVER
REMOVAL
(1) Disconnect the battery cables.
(2) Remove generator bracket.(3) Remove breather hose.
(4) Remove coolant pressure tank.
(5) Remove cylinder head cover.
INSTALLATION
(1) Install cylinder head cover, torque nuts to 23.5
N´m (208 in. lbs.).
(2) Install coolant pressure tank.
(3) Install breather hose.
(4) Install generator bracket, tighten bolts to 7
N´m (4 ft. lbs.).
(5) Connect battery cable.
ROCKER ARMS AND PUSH RODS
REMOVAL
(1) Disconnect the battery cables.
(2) Remove generator bracket.
(3) Remove breather hose.
(4) Remove coolant pressure tank.
(5) Remove cylinder head cover.
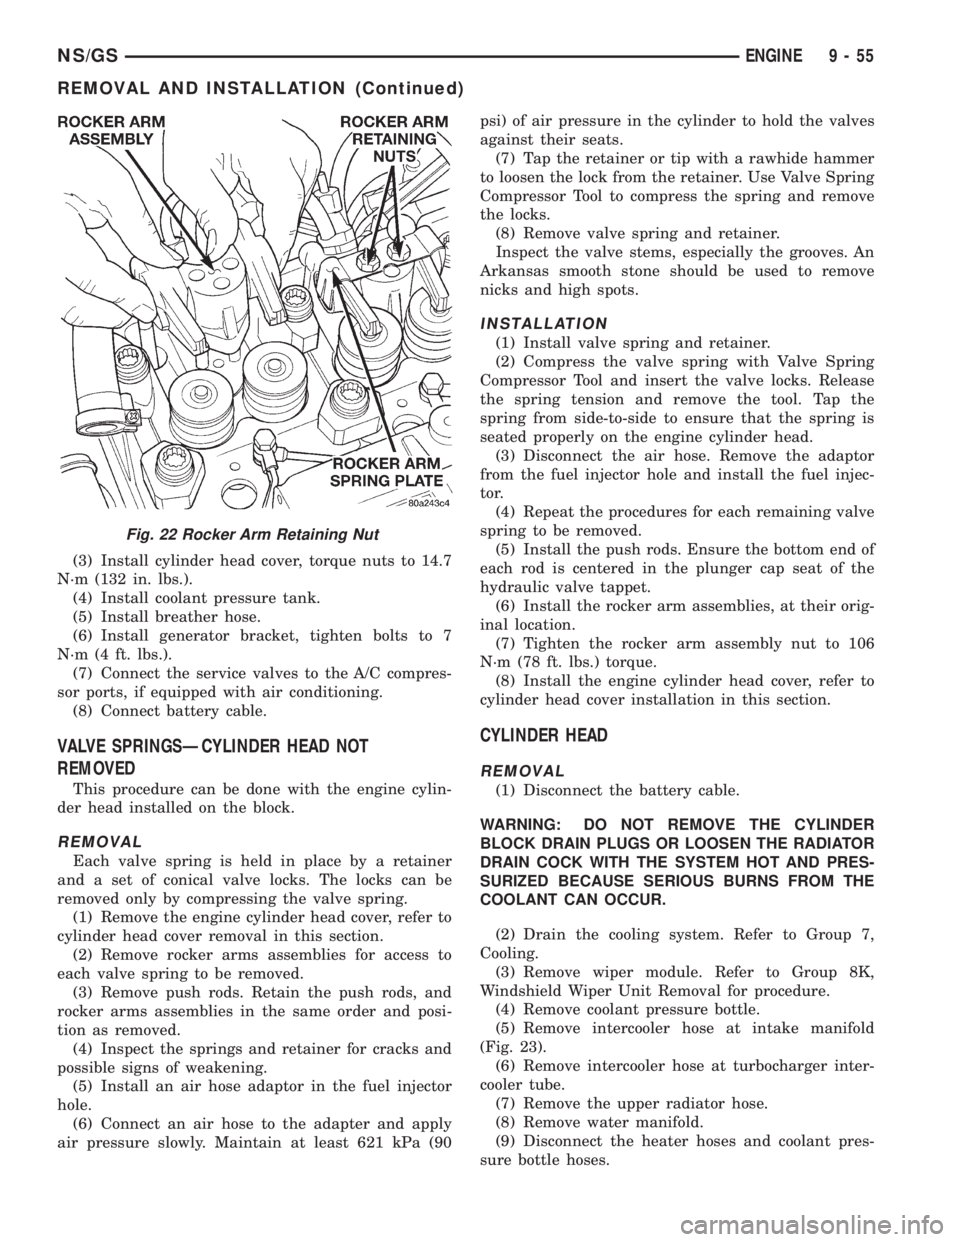
(6) Remove rocker retaining nuts (Fig. 22).
(7) Remove rocker assembly. Place them on a
bench in the same order as removed.
(8) Remove the push rods and place them on a
bench in the same order as removed.
INSTALLATION
(1) Install the push rods in the same order as
removed.
(2) Install rocker arm assemblies in the same
order as removed. Tighten the rocker arm nuts to
29.4 N´m (264 in. lbs.) torque.
Fig. 21 Engine Removal
9 - 54 ENGINENS/GS
REMOVAL AND INSTALLATION (Continued)
Page 1233 of 1938
(3) Install cylinder head cover, torque nuts to 14.7
N´m (132 in. lbs.).
(4) Install coolant pressure tank.
(5) Install breather hose.
(6) Install generator bracket, tighten bolts to 7
N´m (4 ft. lbs.).
(7) Connect the service valves to the A/C compres-
sor ports, if equipped with air conditioning.
(8) Connect battery cable.
VALVE SPRINGSÐCYLINDER HEAD NOT
REMOVED
This procedure can be done with the engine cylin-
der head installed on the block.
REMOVAL
Each valve spring is held in place by a retainer
and a set of conical valve locks. The locks can be
removed only by compressing the valve spring.
(1) Remove the engine cylinder head cover, refer to
cylinder head cover removal in this section.
(2) Remove rocker arms assemblies for access to
each valve spring to be removed.
(3) Remove push rods. Retain the push rods, and
rocker arms assemblies in the same order and posi-
tion as removed.
(4) Inspect the springs and retainer for cracks and
possible signs of weakening.
(5) Install an air hose adaptor in the fuel injector
hole.
(6) Connect an air hose to the adapter and apply
air pressure slowly. Maintain at least 621 kPa (90psi) of air pressure in the cylinder to hold the valves
against their seats.
(7) Tap the retainer or tip with a rawhide hammer
to loosen the lock from the retainer. Use Valve Spring
Compressor Tool to compress the spring and remove
the locks.
(8) Remove valve spring and retainer.
Inspect the valve stems, especially the grooves. An
Arkansas smooth stone should be used to remove
nicks and high spots.
INSTALLATION
(1) Install valve spring and retainer.
(2) Compress the valve spring with Valve Spring
Compressor Tool and insert the valve locks. Release
the spring tension and remove the tool. Tap the
spring from side-to-side to ensure that the spring is
seated properly on the engine cylinder head.
(3) Disconnect the air hose. Remove the adaptor
from the fuel injector hole and install the fuel injec-
tor.
(4) Repeat the procedures for each remaining valve
spring to be removed.
(5) Install the push rods. Ensure the bottom end of
each rod is centered in the plunger cap seat of the
hydraulic valve tappet.
(6) Install the rocker arm assemblies, at their orig-
inal location.
(7) Tighten the rocker arm assembly nut to 106
N´m (78 ft. lbs.) torque.
(8) Install the engine cylinder head cover, refer to
cylinder head cover installation in this section.
CYLINDER HEAD
REMOVAL
(1) Disconnect the battery cable.
WARNING: DO NOT REMOVE THE CYLINDER
BLOCK DRAIN PLUGS OR LOOSEN THE RADIATOR
DRAIN COCK WITH THE SYSTEM HOT AND PRES-
SURIZED BECAUSE SERIOUS BURNS FROM THE
COOLANT CAN OCCUR.
(2) Drain the cooling system. Refer to Group 7,
Cooling.
(3) Remove wiper module. Refer to Group 8K,
Windshield Wiper Unit Removal for procedure.
(4) Remove coolant pressure bottle.
(5) Remove intercooler hose at intake manifold
(Fig. 23).
(6) Remove intercooler hose at turbocharger inter-
cooler tube.
(7) Remove the upper radiator hose.
(8) Remove water manifold.
(9) Disconnect the heater hoses and coolant pres-
sure bottle hoses.
Fig. 22 Rocker Arm Retaining Nut
NS/GSENGINE 9 - 55
REMOVAL AND INSTALLATION (Continued)
Page 1236 of 1938
(3) Zero the dial indicator on the cylinder block
mating surface.
(4) Setup the dial indicator on the piston crown
(above the center of the piston pin) 5mm (1/8 in.)
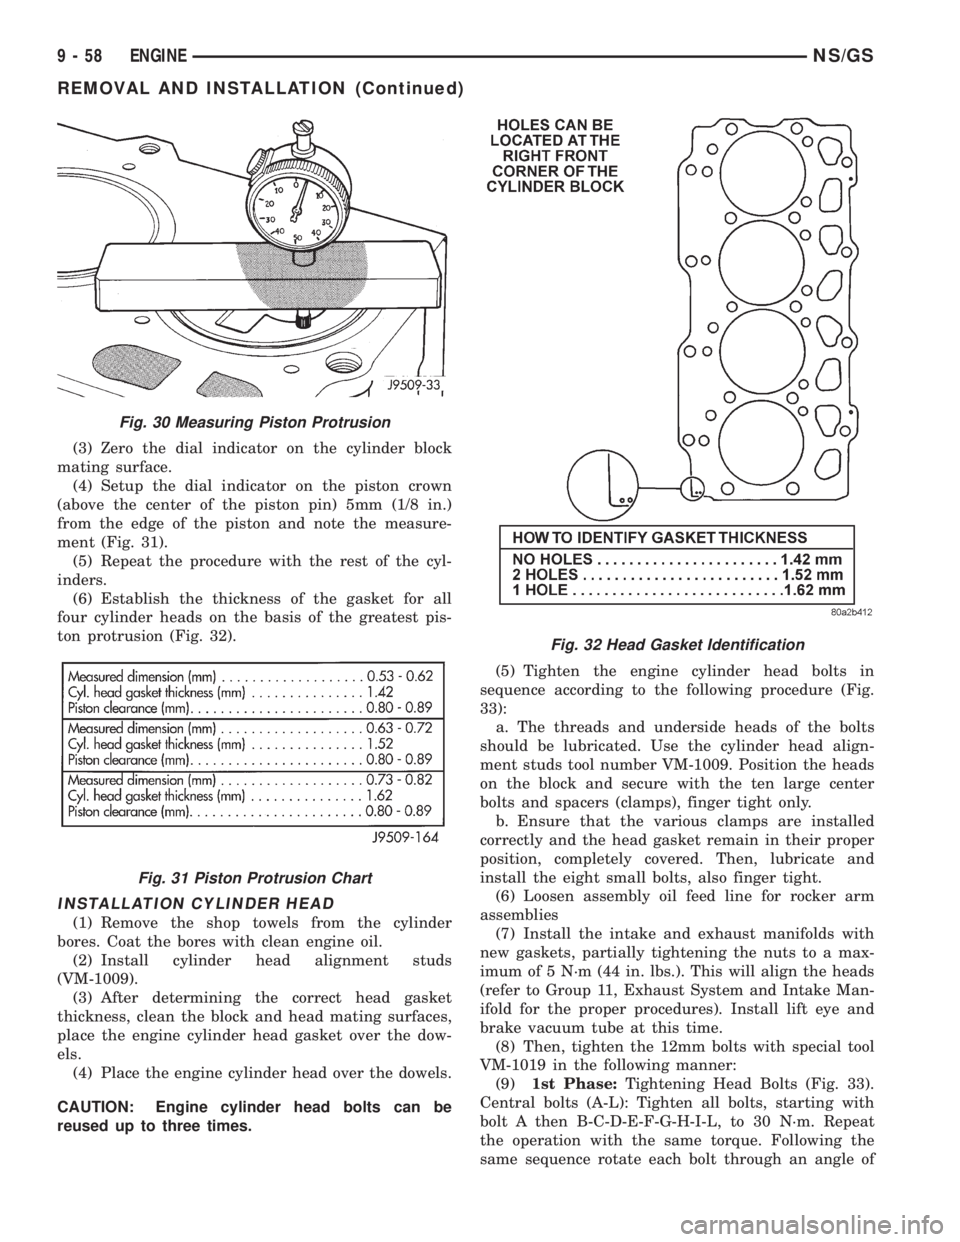
from the edge of the piston and note the measure-
ment (Fig. 31).
(5) Repeat the procedure with the rest of the cyl-
inders.
(6) Establish the thickness of the gasket for all
four cylinder heads on the basis of the greatest pis-
ton protrusion (Fig. 32).
INSTALLATION CYLINDER HEAD
(1) Remove the shop towels from the cylinder
bores. Coat the bores with clean engine oil.
(2) Install cylinder head alignment studs
(VM-1009).
(3) After determining the correct head gasket
thickness, clean the block and head mating surfaces,
place the engine cylinder head gasket over the dow-
els.
(4) Place the engine cylinder head over the dowels.
CAUTION: Engine cylinder head bolts can be
reused up to three times.(5) Tighten the engine cylinder head bolts in
sequence according to the following procedure (Fig.
33):
a. The threads and underside heads of the bolts
should be lubricated. Use the cylinder head align-
ment studs tool number VM-1009. Position the heads
on the block and secure with the ten large center
bolts and spacers (clamps), finger tight only.
b. Ensure that the various clamps are installed
correctly and the head gasket remain in their proper
position, completely covered. Then, lubricate and
install the eight small bolts, also finger tight.
(6) Loosen assembly oil feed line for rocker arm
assemblies
(7) Install the intake and exhaust manifolds with
new gaskets, partially tightening the nuts to a max-
imum of 5 N´m (44 in. lbs.). This will align the heads
(refer to Group 11, Exhaust System and Intake Man-
ifold for the proper procedures). Install lift eye and
brake vacuum tube at this time.
(8) Then, tighten the 12mm bolts with special tool
VM-1019 in the following manner:
(9)1st Phase:Tightening Head Bolts (Fig. 33).
Central bolts (A-L): Tighten all bolts, starting with
bolt A then B-C-D-E-F-G-H-I-L, to 30 N´m. Repeat
the operation with the same torque. Following the
same sequence rotate each bolt through an angle of
Fig. 30 Measuring Piston Protrusion
Fig. 31 Piston Protrusion Chart
Fig. 32 Head Gasket Identification
9 - 58 ENGINENS/GS
REMOVAL AND INSTALLATION (Continued)
Page 1237 of 1938
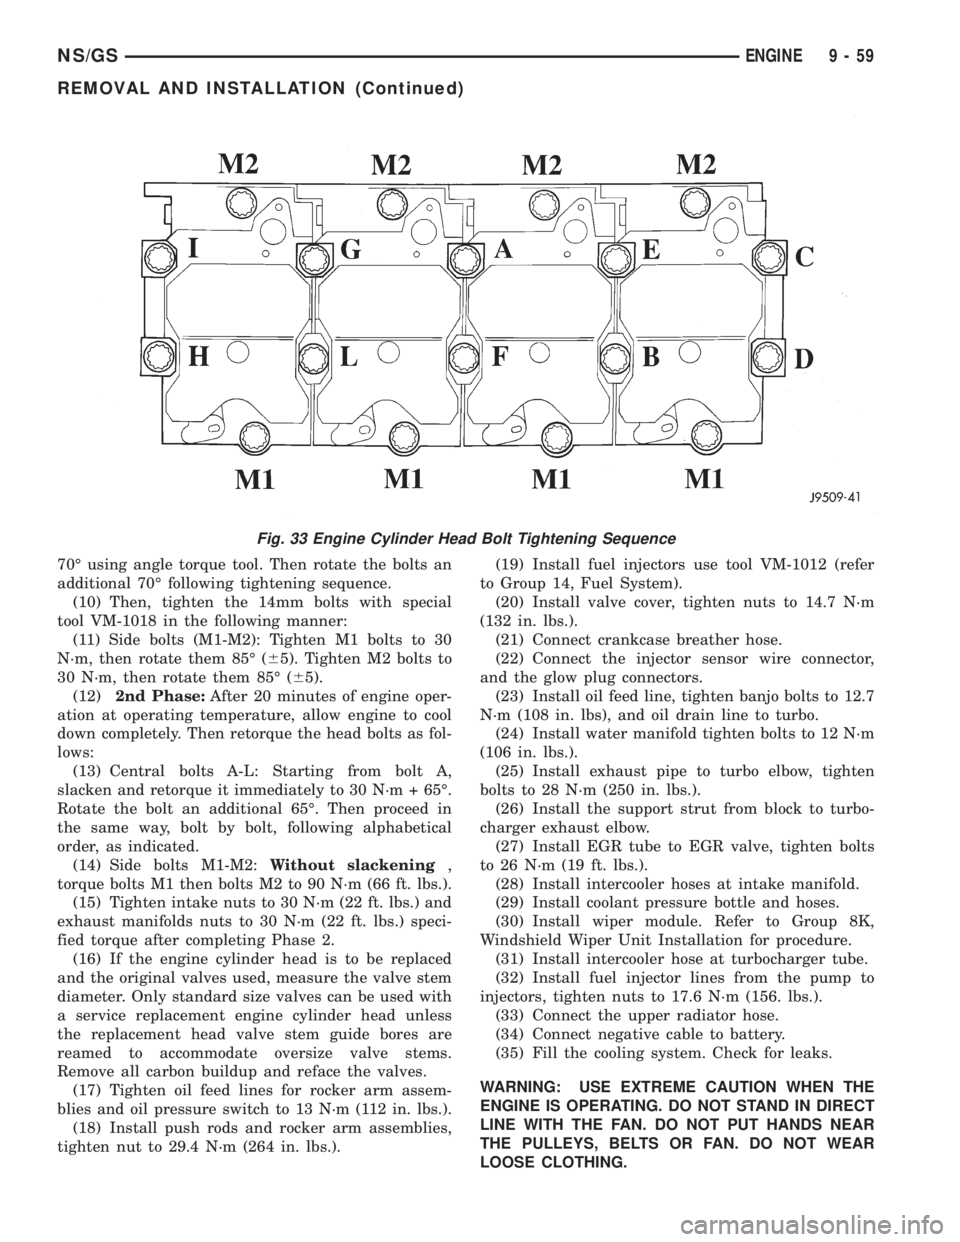
70É using angle torque tool. Then rotate the bolts an
additional 70É following tightening sequence.
(10) Then, tighten the 14mm bolts with special
tool VM-1018 in the following manner:
(11) Side bolts (M1-M2): Tighten M1 bolts to 30
N´m, then rotate them 85É (65). Tighten M2 bolts to
30 N´m, then rotate them 85É (65).
(12)2nd Phase:After 20 minutes of engine oper-
ation at operating temperature, allow engine to cool
down completely. Then retorque the head bolts as fol-
lows:
(13) Central bolts A-L: Starting from bolt A,
slacken and retorque it immediately to 30 N´m + 65É.
Rotate the bolt an additional 65É. Then proceed in
the same way, bolt by bolt, following alphabetical
order, as indicated.
(14) Side bolts M1-M2:Without slackening,
torque bolts M1 then bolts M2 to 90 N´m (66 ft. lbs.).
(15) Tighten intake nuts to 30 N´m (22 ft. lbs.) and
exhaust manifolds nuts to 30 N´m (22 ft. lbs.) speci-
fied torque after completing Phase 2.
(16) If the engine cylinder head is to be replaced
and the original valves used, measure the valve stem
diameter. Only standard size valves can be used with
a service replacement engine cylinder head unless
the replacement head valve stem guide bores are
reamed to accommodate oversize valve stems.
Remove all carbon buildup and reface the valves.
(17) Tighten oil feed lines for rocker arm assem-
blies and oil pressure switch to 13 N´m (112 in. lbs.).
(18) Install push rods and rocker arm assemblies,
tighten nut to 29.4 N´m (264 in. lbs.).(19) Install fuel injectors use tool VM-1012 (refer
to Group 14, Fuel System).
(20) Install valve cover, tighten nuts to 14.7 N´m
(132 in. lbs.).
(21) Connect crankcase breather hose.
(22) Connect the injector sensor wire connector,
and the glow plug connectors.
(23) Install oil feed line, tighten banjo bolts to 12.7
N´m (108 in. lbs), and oil drain line to turbo.
(24) Install water manifold tighten bolts to 12 N´m
(106 in. lbs.).
(25) Install exhaust pipe to turbo elbow, tighten
bolts to 28 N´m (250 in. lbs.).
(26) Install the support strut from block to turbo-
charger exhaust elbow.
(27) Install EGR tube to EGR valve, tighten bolts
to 26 N´m (19 ft. lbs.).
(28) Install intercooler hoses at intake manifold.
(29) Install coolant pressure bottle and hoses.
(30) Install wiper module. Refer to Group 8K,
Windshield Wiper Unit Installation for procedure.
(31) Install intercooler hose at turbocharger tube.
(32) Install fuel injector lines from the pump to
injectors, tighten nuts to 17.6 N´m (156. lbs.).
(33) Connect the upper radiator hose.
(34) Connect negative cable to battery.
(35) Fill the cooling system. Check for leaks.
WARNING: USE EXTREME CAUTION WHEN THE
ENGINE IS OPERATING. DO NOT STAND IN DIRECT
LINE WITH THE FAN. DO NOT PUT HANDS NEAR
THE PULLEYS, BELTS OR FAN. DO NOT WEAR
LOOSE CLOTHING.
Fig. 33 Engine Cylinder Head Bolt Tightening Sequence
NS/GSENGINE 9 - 59
REMOVAL AND INSTALLATION (Continued)
Page 1239 of 1938
(3) Install cylinder head, intake manifold, and
exhaust manifold. Refer to cylinder head installation
in this section.
(4) Install push rods in original positions.
(5) Install rocker arms in original positions.
(6) Install cylinder head cover. Refer to cylinder
valve cover installation in this section.
(7) Start and operate engine. Warm up to normal
operating temperature.
CAUTION: To prevent damage to valve mechanism,
engine must not be run above fast idle until all
hydraulic tappets have filled with oil and have
become quiet.
VIBRATION DAMPER
REMOVAL
(1) Disconnect the battery cable.
(2) Raise vehicle on hoist.
(3) Remove right side lower splash shield.
(4) Remove generator, power steering belt. Refer to
Group 7, Cooling.
(5) Remove water pump belt. Refer to Group 7,
Cooling.
(6) Remove engine starter. Refer to Group, 8B for
procedure
(7) Install flywheel locking tool VM.1014 to pre-
vent engine rotation.
NOTE: Crankshaft damper nut is left handed
thread.
(8) Remove vibration damper nut.
(9) Remove vibration damper. No special tool is
needed for removal.
CAUTION: If thread sealant is used it is important
to remove all the old thread sealant from the
threads on the crankshaft.
INSTALLATION
NOTE: Before installing damper be sure the O-ring
inside the center of the damper is in its grove.
(1) Install vibration damper.
CAUTION: Correct torque on the vibration damper
nut is important or engine damage can occur.
(2) Install vibration damper nut and tighten to 441
N´m (325 ft. lbs.).
(3) Remove flywheel locking tool, and install
engine starter.(4) Install both accessary drive belts. Refer to
Group 7, Cooling.
(5) Install right splash shield.
(6) Lower vehicle.
(7) Connect the battery cable.
TIMING GEAR COVER OIL SEAL
REMOVAL
(1) Disconnect the battery cable.
(2) Remove vibration damper. Refer to vibration
damper removal in this section.
(3) Pry out seal (Fig. 36).
INSTALLATION
Remove the oil seal ring. The seating diameter
must be 68.000 - 68.030 mm.
(1) Install new seal using special tool VM-1015.
(2) Install vibration damper. Refer to vibration
damper installation in this section.
(3) Connect the battery cable.
INJECTION PUMP
For removal and installation of injection pump
refer to Group 14, Fuel.
TIMING GEAR COVER
REMOVAL
(1) Disconnect the battery cable.
(2) Raise vehicle on hoist.
(3) Remove right splash shield.
(4) Remove accessary drive belts. Refer to Group 7,
Cooling.
(5) Remove vibration damper nut.
NOTE: Crankshaft damper nut is left handed
thread.
(6) Remove vibration damper.
Fig. 36 Front Cover Seal
NS/GSENGINE 9 - 61
REMOVAL AND INSTALLATION (Continued)
Page 1240 of 1938
(7) Remove power steering/air conditioning pulley
nut. Remove pulley.
CAUTION: Remove old loctite from threads on
pump.
(8) Remove pump shaft support bracket assembly.
(9) Disconnect the water drain pipe hose at the
timing cover.
CAUTION: When separating the timing geat cover
from the block take care not to damage the mating
surface of the timing gear cover or block. Also take
care not to damage the timing gears or components
located inside the timing gear cover near the edge.
(10) Remove timing gear cover.
INSTALLATION
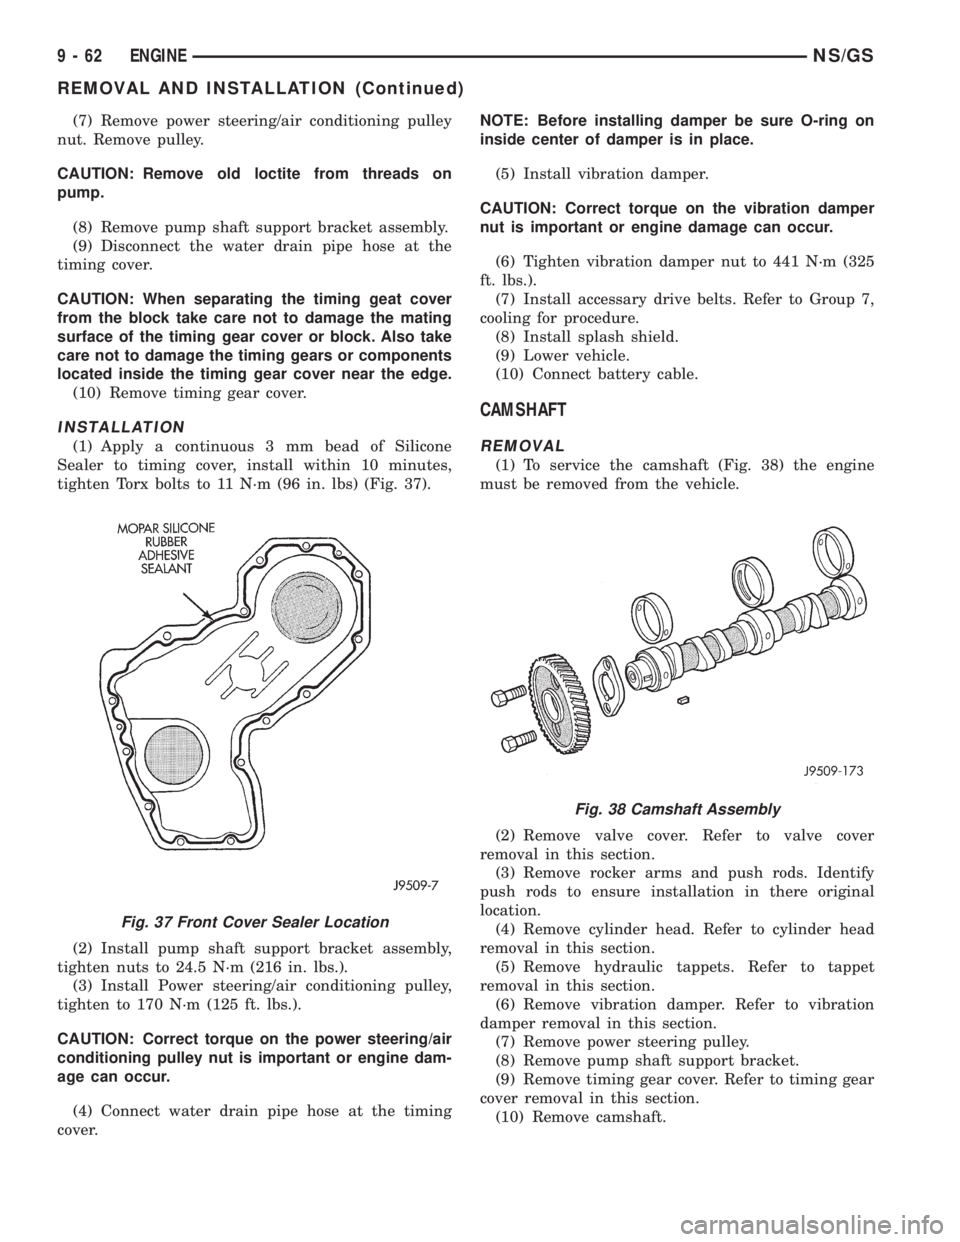
(1) Apply a continuous 3 mm bead of Silicone
Sealer to timing cover, install within 10 minutes,
tighten Torx bolts to 11 N´m (96 in. lbs) (Fig. 37).
(2) Install pump shaft support bracket assembly,
tighten nuts to 24.5 N´m (216 in. lbs.).
(3) Install Power steering/air conditioning pulley,
tighten to 170 N´m (125 ft. lbs.).
CAUTION: Correct torque on the power steering/air
conditioning pulley nut is important or engine dam-
age can occur.
(4) Connect water drain pipe hose at the timing
cover.NOTE: Before installing damper be sure O-ring on
inside center of damper is in place.
(5) Install vibration damper.
CAUTION: Correct torque on the vibration damper
nut is important or engine damage can occur.
(6) Tighten vibration damper nut to 441 N´m (325
ft. lbs.).
(7) Install accessary drive belts. Refer to Group 7,
cooling for procedure.
(8) Install splash shield.
(9) Lower vehicle.
(10) Connect battery cable.
CAMSHAFT
REMOVAL
(1) To service the camshaft (Fig. 38) the engine
must be removed from the vehicle.
(2) Remove valve cover. Refer to valve cover
removal in this section.
(3) Remove rocker arms and push rods. Identify
push rods to ensure installation in there original
location.
(4) Remove cylinder head. Refer to cylinder head
removal in this section.
(5) Remove hydraulic tappets. Refer to tappet
removal in this section.
(6) Remove vibration damper. Refer to vibration
damper removal in this section.
(7) Remove power steering pulley.
(8) Remove pump shaft support bracket.
(9) Remove timing gear cover. Refer to timing gear
cover removal in this section.
(10) Remove camshaft.
Fig. 37 Front Cover Sealer Location
Fig. 38 Camshaft Assembly
9 - 62 ENGINENS/GS
REMOVAL AND INSTALLATION (Continued)
Page 1242 of 1938
(13) Remove pistons and connecting rods from
block.
(14) Remove vibration damper. Refer to procedure
in this section.
(15) Remove front cover. Refer to procedure in this
section.
(16) Remove oil pump drive gear.
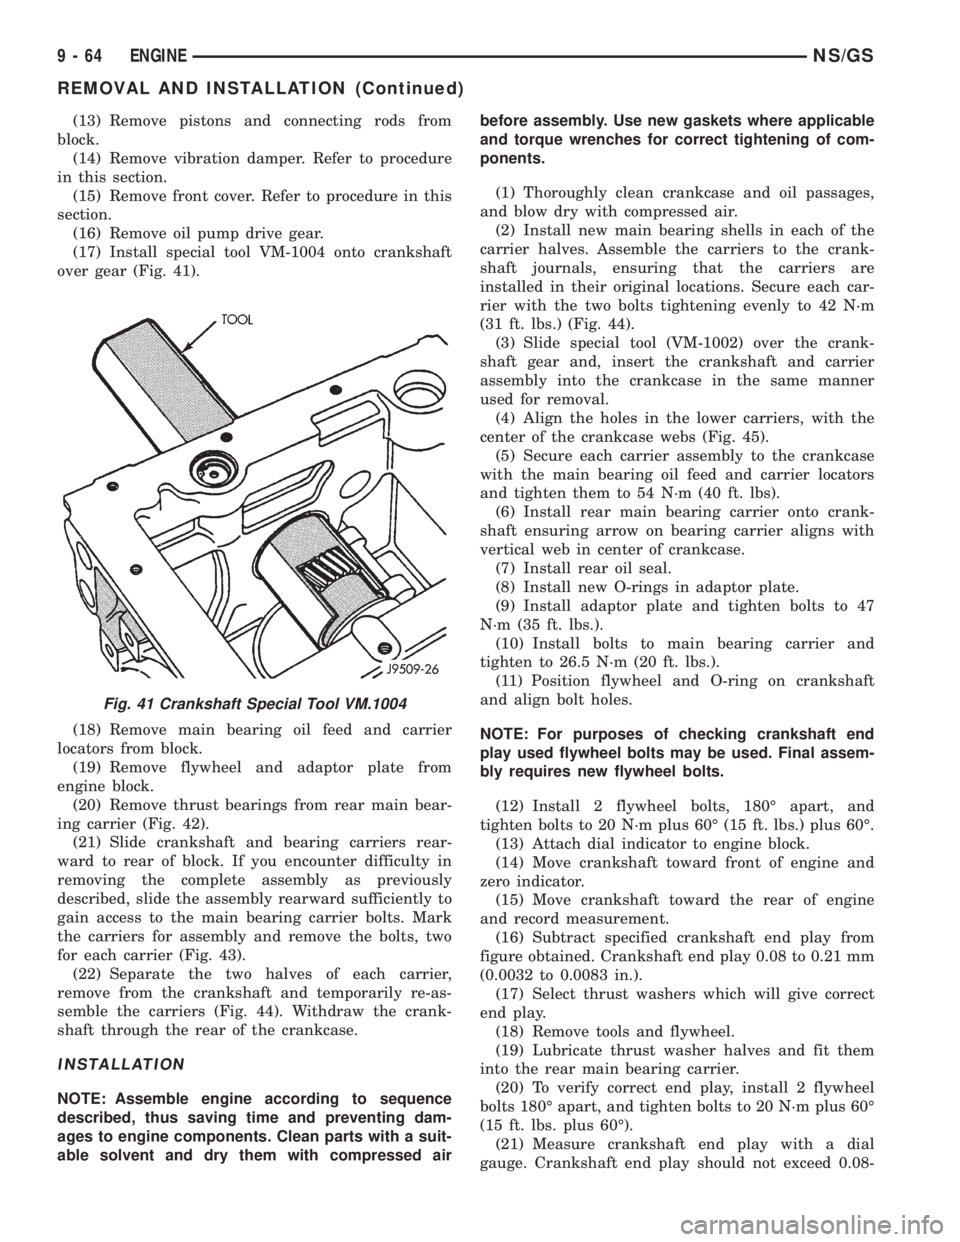
(17) Install special tool VM-1004 onto crankshaft
over gear (Fig. 41).
(18) Remove main bearing oil feed and carrier
locators from block.
(19) Remove flywheel and adaptor plate from
engine block.
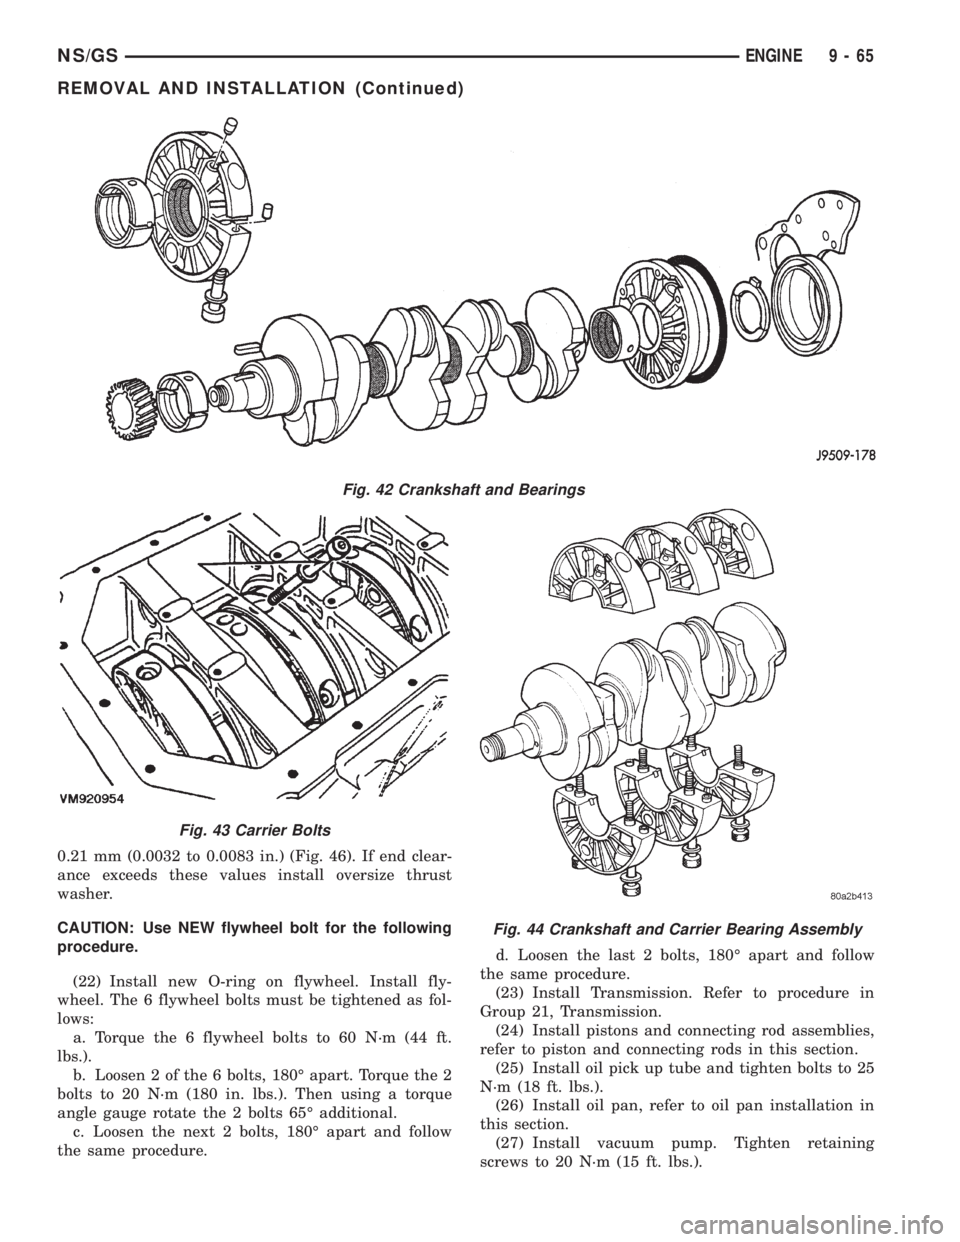
(20) Remove thrust bearings from rear main bear-
ing carrier (Fig. 42).
(21) Slide crankshaft and bearing carriers rear-
ward to rear of block. If you encounter difficulty in
removing the complete assembly as previously
described, slide the assembly rearward sufficiently to
gain access to the main bearing carrier bolts. Mark
the carriers for assembly and remove the bolts, two
for each carrier (Fig. 43).
(22) Separate the two halves of each carrier,
remove from the crankshaft and temporarily re-as-
semble the carriers (Fig. 44). Withdraw the crank-
shaft through the rear of the crankcase.
INSTALLATION
NOTE: Assemble engine according to sequence
described, thus saving time and preventing dam-
ages to engine components. Clean parts with a suit-
able solvent and dry them with compressed airbefore assembly. Use new gaskets where applicable
and torque wrenches for correct tightening of com-
ponents.
(1) Thoroughly clean crankcase and oil passages,
and blow dry with compressed air.
(2) Install new main bearing shells in each of the
carrier halves. Assemble the carriers to the crank-
shaft journals, ensuring that the carriers are
installed in their original locations. Secure each car-
rier with the two bolts tightening evenly to 42 N´m
(31 ft. lbs.) (Fig. 44).
(3) Slide special tool (VM-1002) over the crank-
shaft gear and, insert the crankshaft and carrier
assembly into the crankcase in the same manner
used for removal.
(4) Align the holes in the lower carriers, with the
center of the crankcase webs (Fig. 45).
(5) Secure each carrier assembly to the crankcase
with the main bearing oil feed and carrier locators
and tighten them to 54 N´m (40 ft. lbs).
(6) Install rear main bearing carrier onto crank-
shaft ensuring arrow on bearing carrier aligns with
vertical web in center of crankcase.
(7) Install rear oil seal.
(8) Install new O-rings in adaptor plate.
(9) Install adaptor plate and tighten bolts to 47
N´m (35 ft. lbs.).
(10) Install bolts to main bearing carrier and
tighten to 26.5 N´m (20 ft. lbs.).
(11) Position flywheel and O-ring on crankshaft
and align bolt holes.
NOTE: For purposes of checking crankshaft end
play used flywheel bolts may be used. Final assem-
bly requires new flywheel bolts.
(12) Install 2 flywheel bolts, 180É apart, and
tighten bolts to 20 N´m plus 60É (15 ft. lbs.) plus 60É.
(13) Attach dial indicator to engine block.
(14) Move crankshaft toward front of engine and
zero indicator.
(15) Move crankshaft toward the rear of engine
and record measurement.
(16) Subtract specified crankshaft end play from
figure obtained. Crankshaft end play 0.08 to 0.21 mm
(0.0032 to 0.0083 in.).
(17) Select thrust washers which will give correct
end play.
(18) Remove tools and flywheel.
(19) Lubricate thrust washer halves and fit them
into the rear main bearing carrier.
(20) To verify correct end play, install 2 flywheel
bolts 180É apart, and tighten bolts to 20 N´m plus 60É
(15 ft. lbs. plus 60É).
(21) Measure crankshaft end play with a dial
gauge. Crankshaft end play should not exceed 0.08-
Fig. 41 Crankshaft Special Tool VM.1004
9 - 64 ENGINENS/GS
REMOVAL AND INSTALLATION (Continued)
Page 1243 of 1938
0.21 mm (0.0032 to 0.0083 in.) (Fig. 46). If end clear-
ance exceeds these values install oversize thrust
washer.
CAUTION: Use NEW flywheel bolt for the following
procedure.
(22) Install new O-ring on flywheel. Install fly-
wheel. The 6 flywheel bolts must be tightened as fol-
lows:
a. Torque the 6 flywheel bolts to 60 N´m (44 ft.
lbs.).
b. Loosen 2 of the 6 bolts, 180É apart. Torque the 2
bolts to 20 N´m (180 in. lbs.). Then using a torque
angle gauge rotate the 2 bolts 65É additional.
c. Loosen the next 2 bolts, 180É apart and follow
the same procedure.d. Loosen the last 2 bolts, 180É apart and follow
the same procedure.
(23) Install Transmission. Refer to procedure in
Group 21, Transmission.
(24) Install pistons and connecting rod assemblies,
refer to piston and connecting rods in this section.
(25) Install oil pick up tube and tighten bolts to 25
N´m (18 ft. lbs.).
(26) Install oil pan, refer to oil pan installation in
this section.
(27) Install vacuum pump. Tighten retaining
screws to 20 N´m (15 ft. lbs.).
Fig. 42 Crankshaft and Bearings
Fig. 43 Carrier Bolts
Fig. 44 Crankshaft and Carrier Bearing Assembly
NS/GSENGINE 9 - 65
REMOVAL AND INSTALLATION (Continued)
Page 1245 of 1938
(3) Drain oil.
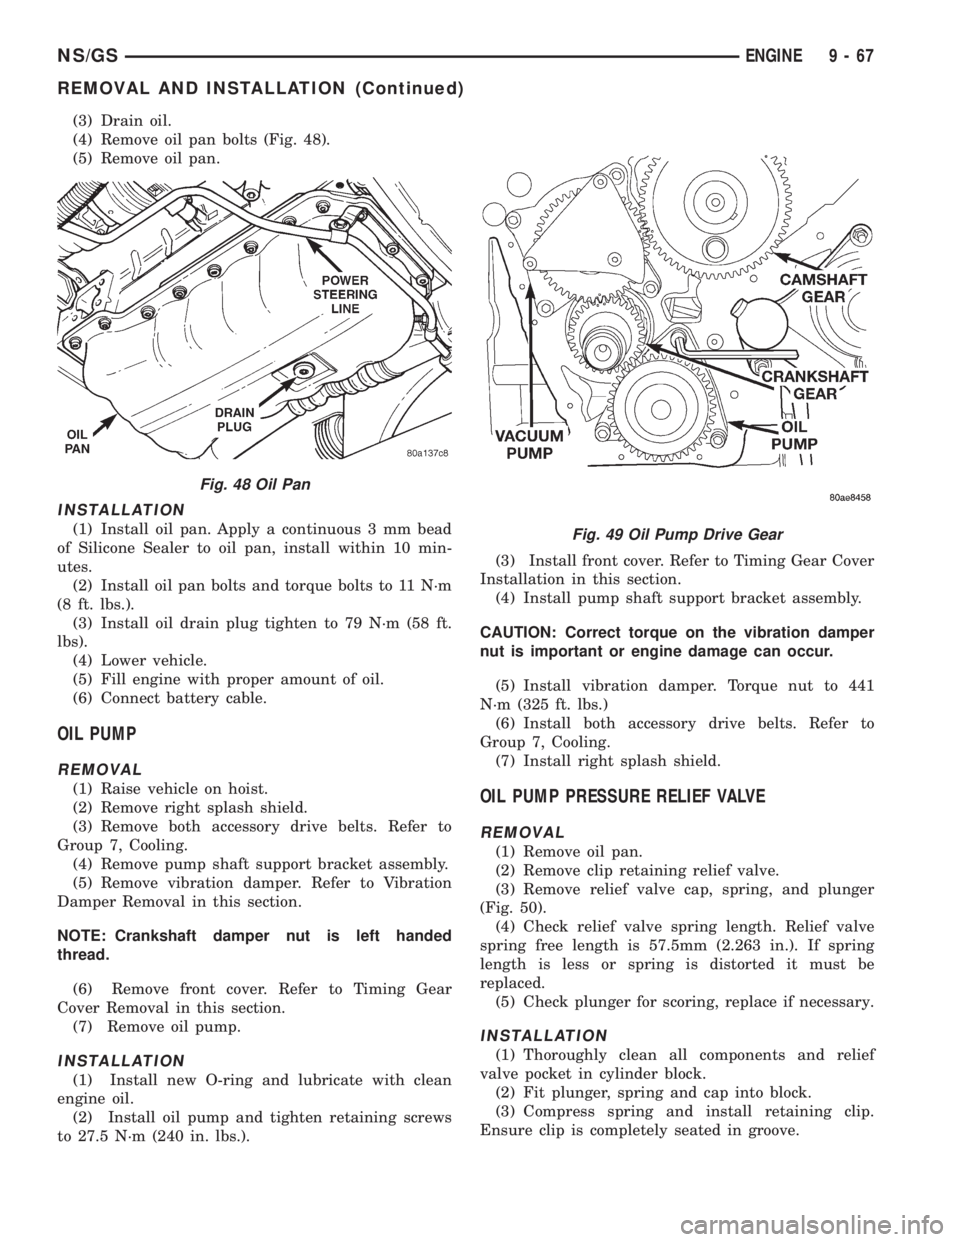
(4) Remove oil pan bolts (Fig. 48).
(5) Remove oil pan.
INSTALLATION
(1) Install oil pan. Apply a continuous 3 mm bead
of Silicone Sealer to oil pan, install within 10 min-
utes.
(2) Install oil pan bolts and torque bolts to 11 N´m
(8 ft. lbs.).
(3) Install oil drain plug tighten to 79 N´m (58 ft.
lbs).
(4) Lower vehicle.
(5) Fill engine with proper amount of oil.
(6) Connect battery cable.
OIL PUMP
REMOVAL
(1) Raise vehicle on hoist.
(2) Remove right splash shield.
(3) Remove both accessory drive belts. Refer to
Group 7, Cooling.
(4) Remove pump shaft support bracket assembly.
(5) Remove vibration damper. Refer to Vibration
Damper Removal in this section.
NOTE: Crankshaft damper nut is left handed
thread.
(6) Remove front cover. Refer to Timing Gear
Cover Removal in this section.
(7) Remove oil pump.
INSTALLATION
(1) Install new O-ring and lubricate with clean
engine oil.
(2) Install oil pump and tighten retaining screws
to 27.5 N´m (240 in. lbs.).(3) Install front cover. Refer to Timing Gear Cover
Installation in this section.
(4) Install pump shaft support bracket assembly.
CAUTION: Correct torque on the vibration damper
nut is important or engine damage can occur.
(5) Install vibration damper. Torque nut to 441
N´m (325 ft. lbs.)
(6) Install both accessory drive belts. Refer to
Group 7, Cooling.
(7) Install right splash shield.
OIL PUMP PRESSURE RELIEF VALVE
REMOVAL
(1) Remove oil pan.
(2) Remove clip retaining relief valve.
(3) Remove relief valve cap, spring, and plunger
(Fig. 50).
(4) Check relief valve spring length. Relief valve
spring free length is 57.5mm (2.263 in.). If spring
length is less or spring is distorted it must be
replaced.
(5) Check plunger for scoring, replace if necessary.
INSTALLATION
(1) Thoroughly clean all components and relief
valve pocket in cylinder block.
(2) Fit plunger, spring and cap into block.
(3) Compress spring and install retaining clip.
Ensure clip is completely seated in groove.
Fig. 48 Oil Pan
Fig. 49 Oil Pump Drive Gear
NS/GSENGINE 9 - 67
REMOVAL AND INSTALLATION (Continued)