CHRYSLER VOYAGER 2001 Service Manual
Manufacturer: CHRYSLER, Model Year: 2001, Model line: VOYAGER, Model: CHRYSLER VOYAGER 2001Pages: 4284, PDF Size: 83.53 MB
Page 4021 of 4284
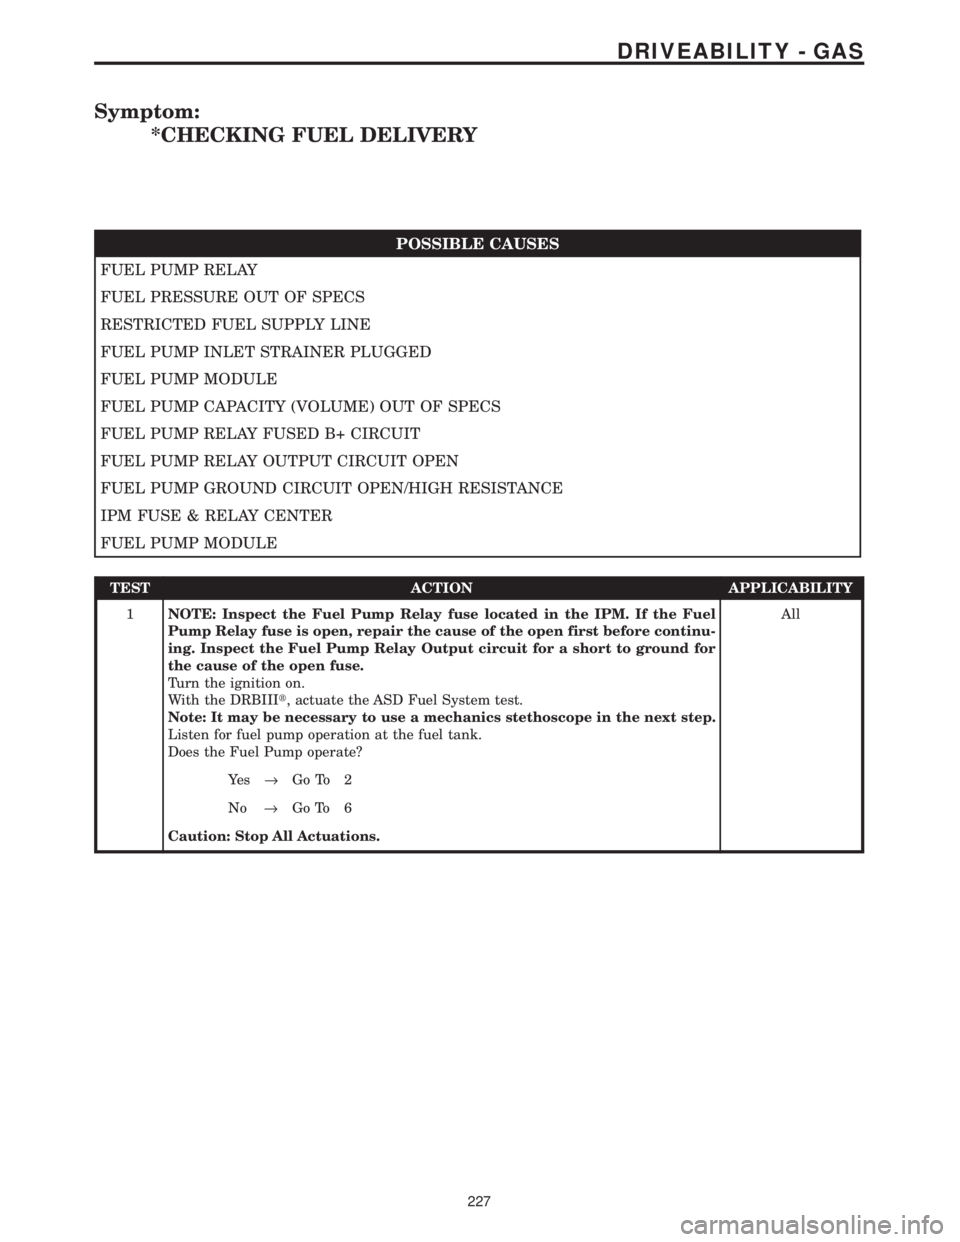
Symptom:
*CHECKING FUEL DELIVERY
POSSIBLE CAUSES
FUEL PUMP RELAY
FUEL PRESSURE OUT OF SPECS
RESTRICTED FUEL SUPPLY LINE
FUEL PUMP INLET STRAINER PLUGGED
FUEL PUMP MODULE
FUEL PUMP CAPACITY (VOLUME) OUT OF SPECS
FUEL PUMP RELAY FUSED B+ CIRCUIT
FUEL PUMP RELAY OUTPUT CIRCUIT OPEN
FUEL PUMP GROUND CIRCUIT OPEN/HIGH RESISTANCE
IPM FUSE & RELAY CENTER
FUEL PUMP MODULE
TEST ACTION APPLICABILITY
1NOTE: Inspect the Fuel Pump Relay fuse located in the IPM. If the Fuel
Pump Relay fuse is open, repair the cause of the open first before continu-
ing. Inspect the Fuel Pump Relay Output circuit for a short to ground for
the cause of the open fuse.
Turn the ignition on.
With the DRBIIIt, actuate the ASD Fuel System test.
Note: It may be necessary to use a mechanics stethoscope in the next step.
Listen for fuel pump operation at the fuel tank.
Does the Fuel Pump operate?All
Ye s®Go To 2
No®Go To 6
Caution: Stop All Actuations.
227
DRIVEABILITY - GAS
Page 4022 of 4284

TEST ACTION APPLICABILITY
2 Turn the ignition off.
WARNING: The fuel system is under a constant pressure even with the
engine off. Before testing or servicing any fuel system hose, fitting or line,
the fuel system pressure must be released.
Install a fuel pressure gauge to the fuel rail test port.
Turn the ignition on.
With the DRBIIIt, actuate the ASD Fuel System test and observe the fuel pressure
gauge.
NOTE: Fuel pressure specification is 400 KPa +/- 34 KPa (58 psi +/- 5 psi).
Choose a conclusion that best matches your fuel pressure reading.All
Below Specification
Go To 3
Within Specification
Go To 5
Above Specification
Replace the fuel filter/fuel pressure regulator.
Perform POWERTRAIN VERIFICATION TEST VER-1.
Caution: Stop All Actuations.
3 Turn the ignition off.
WARNING: The fuel system is under a constant pressure even with the
engine off. Before testing or servicing any fuel system hose, fitting or line,
the fuel system pressure must be released.
Raise vehicle on hoist, and disconnect the fuel pressure line at the fuel pump module.
Install special 5/169fuel line adapter tool #6539 between disconnected fuel line and
the fuel pump module.
Attach a fuel pressure test gauge to the9T9fitting on tool #6539.
Turn the ignition on.
With the DRBIIIt, actuate the ASD Fuel System test and observe the fuel pressure
gauge.
NOTE: Fuel pressure specification is 400 KPa +/- 34 KPa (58 psi +/- 5 psi).
Is the fuel pressure within specification now?All
Ye s®Repair/replace fuel supply line as necessary.
Perform POWERTRAIN VERIFICATION TEST VER-1.
No®Go To 4
Caution: Stop All Actuations.
4 Turn the ignition off.
WARNING: The fuel system is under a constant pressure even with the
engine off. Before testing or servicing any fuel system hose,fitting or line,
the fuel system pressure must be released.
Remove the Fuel Pump Module and inspect the Fuel Inlet Strainer.
Is the Fuel Inlet Strainer plugged?All
Ye s®Replace the Fuel Pump Inlet Strainer.
Perform POWERTRAIN VERIFICATION TEST VER-1.
No®Replace the Fuel Pump Module.
Perform POWERTRAIN VERIFICATION TEST VER-1.
228
DRIVEABILITY - GAS
*CHECKING FUEL DELIVERY ÐContinued
Page 4023 of 4284
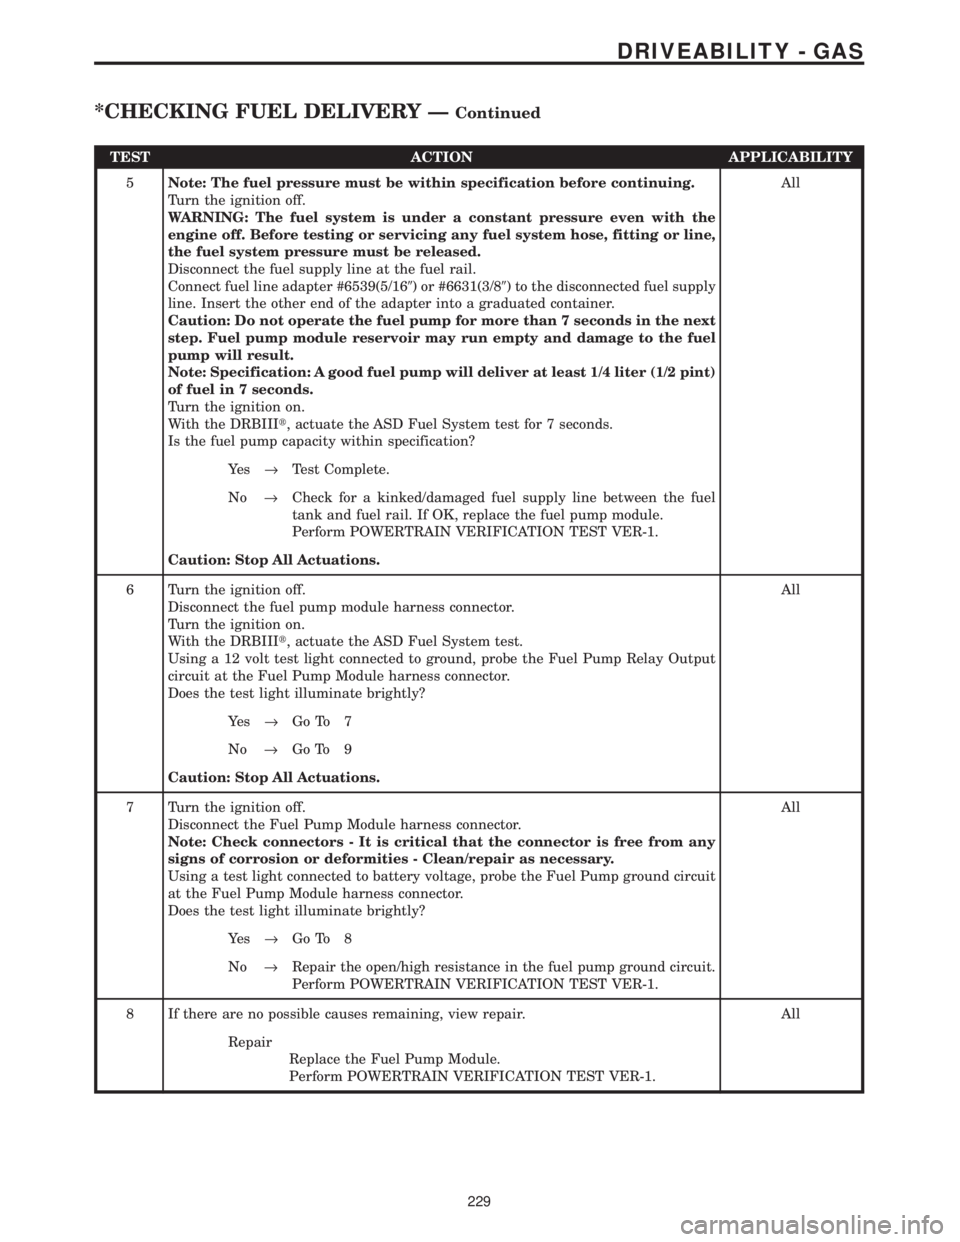
TEST ACTION APPLICABILITY
5Note: The fuel pressure must be within specification before continuing.
Turn the ignition off.
WARNING: The fuel system is under a constant pressure even with the
engine off. Before testing or servicing any fuel system hose, fitting or line,
the fuel system pressure must be released.
Disconnect the fuel supply line at the fuel rail.
Connect fuel line adapter #6539(5/169) or #6631(3/89) to the disconnected fuel supply
line. Insert the other end of the adapter into a graduated container.
Caution: Do not operate the fuel pump for more than 7 seconds in the next
step. Fuel pump module reservoir may run empty and damage to the fuel
pump will result.
Note: Specification: A good fuel pump will deliver at least 1/4 liter (1/2 pint)
of fuel in 7 seconds.
Turn the ignition on.
With the DRBIIIt, actuate the ASD Fuel System test for 7 seconds.
Is the fuel pump capacity within specification?All
Ye s®Test Complete.
No®Check for a kinked/damaged fuel supply line between the fuel
tank and fuel rail. If OK, replace the fuel pump module.
Perform POWERTRAIN VERIFICATION TEST VER-1.
Caution: Stop All Actuations.
6 Turn the ignition off.
Disconnect the fuel pump module harness connector.
Turn the ignition on.
With the DRBIIIt, actuate the ASD Fuel System test.
Using a 12 volt test light connected to ground, probe the Fuel Pump Relay Output
circuit at the Fuel Pump Module harness connector.
Does the test light illuminate brightly?All
Ye s®Go To 7
No®Go To 9
Caution: Stop All Actuations.
7 Turn the ignition off.
Disconnect the Fuel Pump Module harness connector.
Note: Check connectors - It is critical that the connector is free from any
signs of corrosion or deformities - Clean/repair as necessary.
Using a test light connected to battery voltage, probe the Fuel Pump ground circuit
at the Fuel Pump Module harness connector.
Does the test light illuminate brightly?All
Ye s®Go To 8
No®Repair the open/high resistance in the fuel pump ground circuit.
Perform POWERTRAIN VERIFICATION TEST VER-1.
8 If there are no possible causes remaining, view repair. All
Repair
Replace the Fuel Pump Module.
Perform POWERTRAIN VERIFICATION TEST VER-1.
229
DRIVEABILITY - GAS
*CHECKING FUEL DELIVERY ÐContinued
Page 4024 of 4284
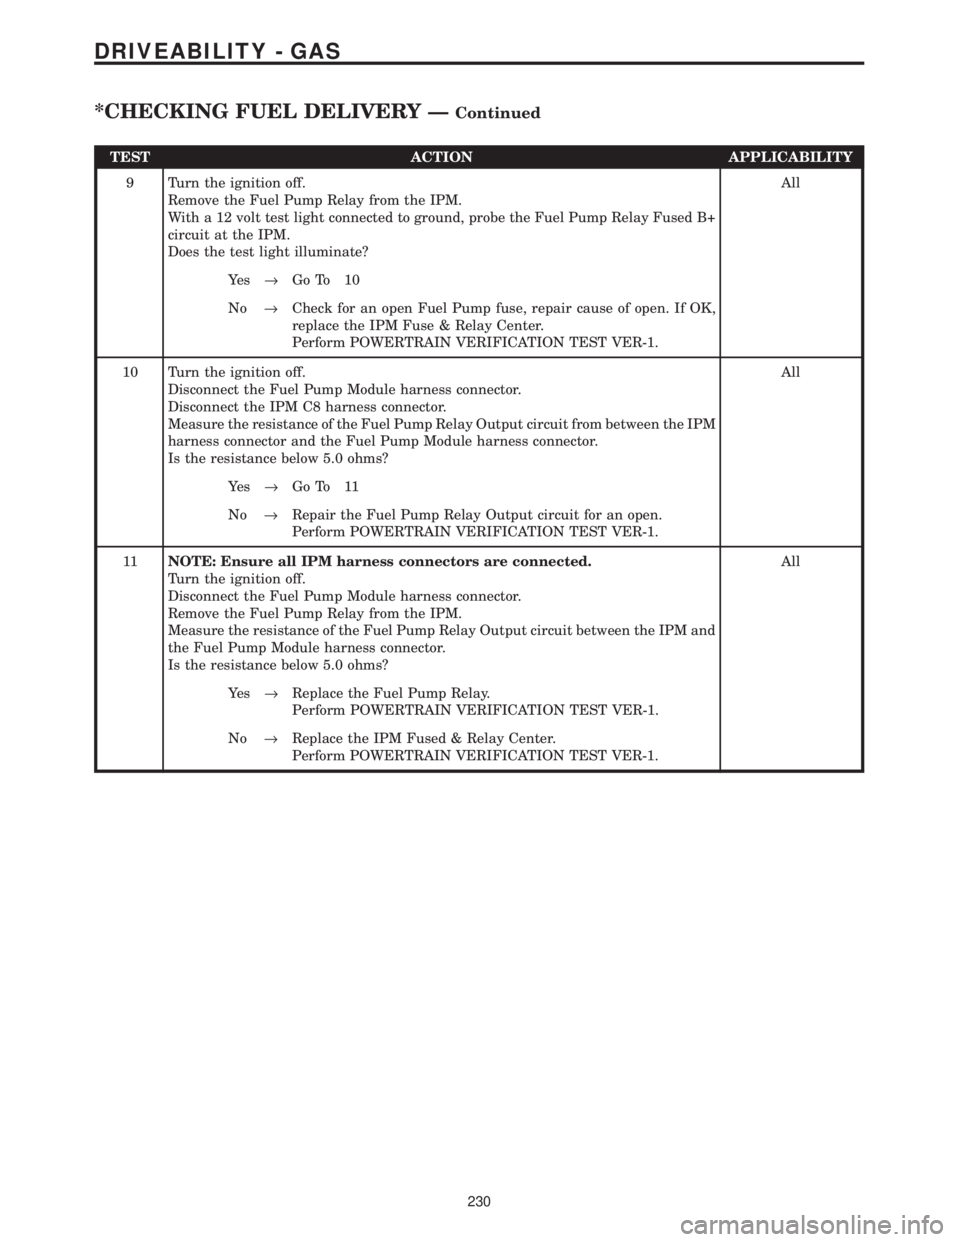
TEST ACTION APPLICABILITY
9 Turn the ignition off.
Remove the Fuel Pump Relay from the IPM.
With a 12 volt test light connected to ground, probe the Fuel Pump Relay Fused B+
circuit at the IPM.
Does the test light illuminate?All
Ye s®Go To 10
No®Check for an open Fuel Pump fuse, repair cause of open. If OK,
replace the IPM Fuse & Relay Center.
Perform POWERTRAIN VERIFICATION TEST VER-1.
10 Turn the ignition off.
Disconnect the Fuel Pump Module harness connector.
Disconnect the IPM C8 harness connector.
Measure the resistance of the Fuel Pump Relay Output circuit from between the IPM
harness connector and the Fuel Pump Module harness connector.
Is the resistance below 5.0 ohms?All
Ye s®Go To 11
No®Repair the Fuel Pump Relay Output circuit for an open.
Perform POWERTRAIN VERIFICATION TEST VER-1.
11NOTE: Ensure all IPM harness connectors are connected.
Turn the ignition off.
Disconnect the Fuel Pump Module harness connector.
Remove the Fuel Pump Relay from the IPM.
Measure the resistance of the Fuel Pump Relay Output circuit between the IPM and
the Fuel Pump Module harness connector.
Is the resistance below 5.0 ohms?All
Ye s®Replace the Fuel Pump Relay.
Perform POWERTRAIN VERIFICATION TEST VER-1.
No®Replace the IPM Fused & Relay Center.
Perform POWERTRAIN VERIFICATION TEST VER-1.
230
DRIVEABILITY - GAS
*CHECKING FUEL DELIVERY ÐContinued
Page 4025 of 4284

Symptom:
*CHECKING IAC MOTOR (2.4L)
POSSIBLE CAUSES
IAC MOTOR OPERATION
IAC DRIVER CIRCUITS OPEN
IAC MOTOR
TEST ACTION APPLICABILITY
1 Turn the ignition on.
With the DRBIIIt, monitor engine RPM.
With the DRBIIIt, set the engine speed to 1400 RPM.
Does the engine speed reach 1400 rpm?All
Ye s®The IAC Motor is operation normally
Perform POWERTRAIN VERIFICATION TEST VER - 2.
No®Go To 2
2 Turn the ignition off.
Disconnect IAC Motor harness connector.
Disconnect the PCM harness connector.
Repeat each measurement for each IAC Driver circuit.
Measure the resistance of each IAC Driver circuit between the IAC Motor harness
connector and the PCM harness connector.
Is the resistance below 5.0 ohms at all IAC Driver circuits?All
Ye s®Replace the Idle Air Control Motor.
Perform POWERTRAIN VERIFICATION TEST VER - 2.
No®Repair the IAC Driver circuit(s) for an open.
Perform POWERTRAIN VERIFICATION TEST VER - 2.
231
DRIVEABILITY - GAS
Page 4026 of 4284
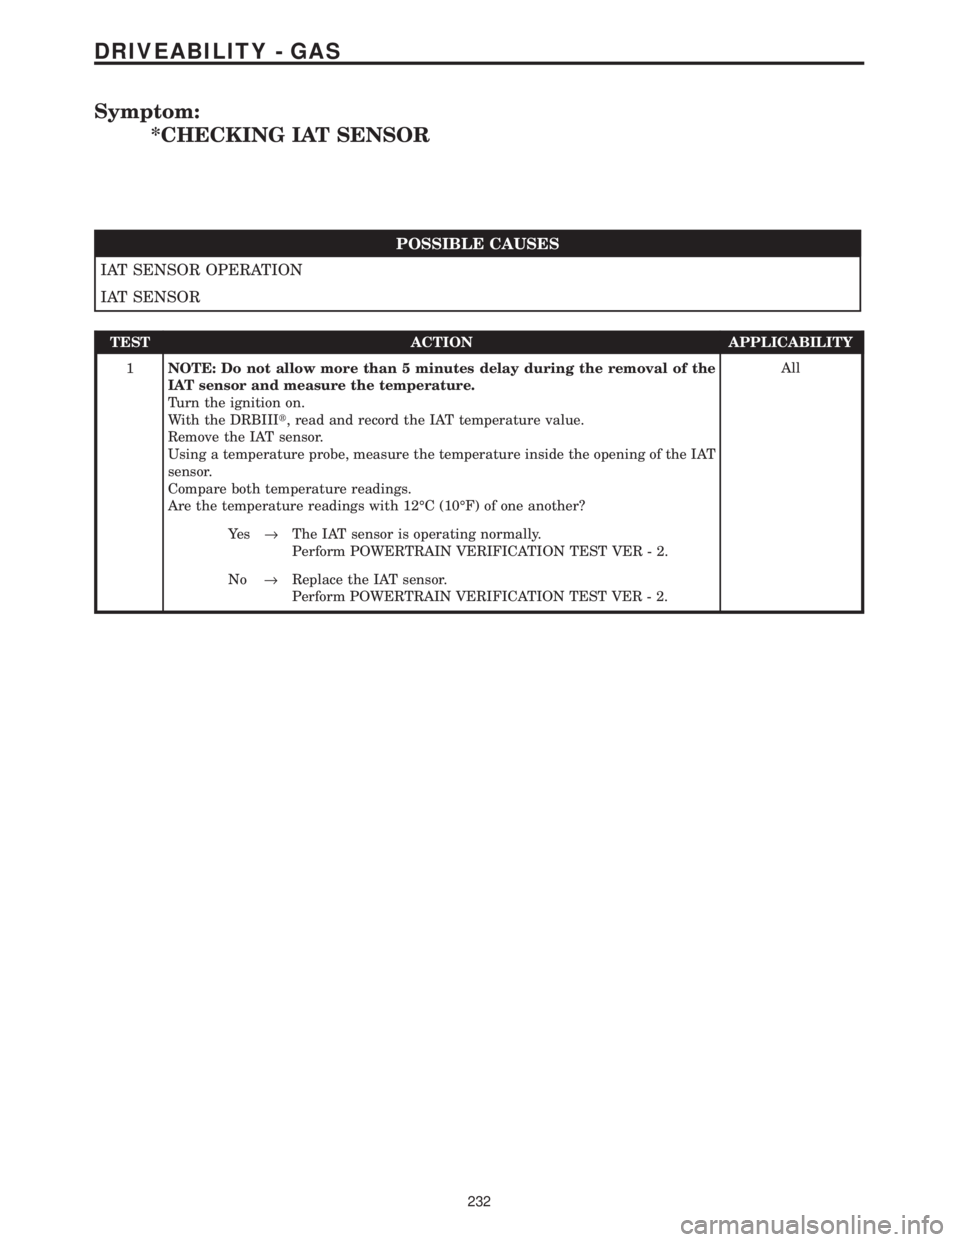
Symptom:
*CHECKING IAT SENSOR
POSSIBLE CAUSES
IAT SENSOR OPERATION
IAT SENSOR
TEST ACTION APPLICABILITY
1NOTE: Do not allow more than 5 minutes delay during the removal of the
IAT sensor and measure the temperature.
Turn the ignition on.
With the DRBIIIt, read and record the IAT temperature value.
Remove the IAT sensor.
Using a temperature probe, measure the temperature inside the opening of the IAT
sensor.
Compare both temperature readings.
Are the temperature readings with 12ÉC (10ÉF) of one another?All
Ye s®The IAT sensor is operating normally.
Perform POWERTRAIN VERIFICATION TEST VER - 2.
No®Replace the IAT sensor.
Perform POWERTRAIN VERIFICATION TEST VER - 2.
232
DRIVEABILITY - GAS
Page 4027 of 4284

Symptom:
*CHECKING MAP SENSOR
POSSIBLE CAUSES
MAP SENSOR OPERATION
MAP SENSOR
TEST ACTION APPLICABILITY
1 Turn the ignition off.
Attach a vacuum gauge to a manifold vacuum source.
NOTE: If the engine will not idle, maintain a constant engine speed above
idle.
Allow the engine to idle.
With the DRBIIIt, monitor the MAP sensor vacuum.
Compare the MAP vacuum value on the DRBIIItand the vacuum reading on the
vacuum gauge.
Are the vacuum readings within 1 inch of vacuum of each other?All
Ye s®The MAP sensor is operating normally.
Perform POWERTRAIN VERIFICATION TEST VER - 2.
No®Replace the MAP sensor.
Perform POWERTRAIN VERIFICATION TEST VER - 2.
233
DRIVEABILITY - GAS
Page 4028 of 4284
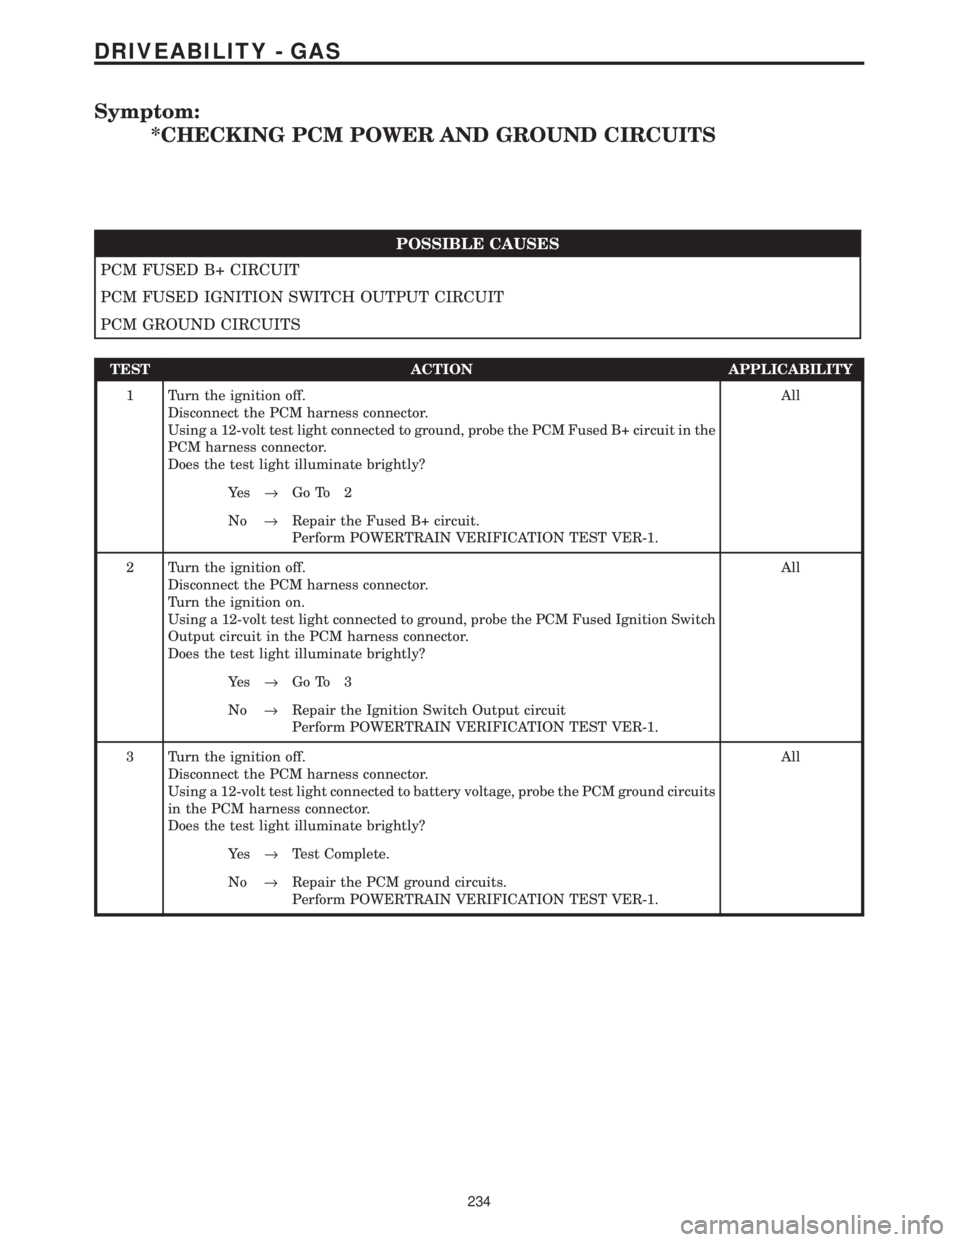
Symptom:
*CHECKING PCM POWER AND GROUND CIRCUITS
POSSIBLE CAUSES
PCM FUSED B+ CIRCUIT
PCM FUSED IGNITION SWITCH OUTPUT CIRCUIT
PCM GROUND CIRCUITS
TEST ACTION APPLICABILITY
1 Turn the ignition off.
Disconnect the PCM harness connector.
Using a 12-volt test light connected to ground, probe the PCM Fused B+ circuit in the
PCM harness connector.
Does the test light illuminate brightly?All
Ye s®Go To 2
No®Repair the Fused B+ circuit.
Perform POWERTRAIN VERIFICATION TEST VER-1.
2 Turn the ignition off.
Disconnect the PCM harness connector.
Turn the ignition on.
Using a 12-volt test light connected to ground, probe the PCM Fused Ignition Switch
Output circuit in the PCM harness connector.
Does the test light illuminate brightly?All
Ye s®Go To 3
No®Repair the Ignition Switch Output circuit
Perform POWERTRAIN VERIFICATION TEST VER-1.
3 Turn the ignition off.
Disconnect the PCM harness connector.
Using a 12-volt test light connected to battery voltage, probe the PCM ground circuits
in the PCM harness connector.
Does the test light illuminate brightly?All
Ye s®Test Complete.
No®Repair the PCM ground circuits.
Perform POWERTRAIN VERIFICATION TEST VER-1.
234
DRIVEABILITY - GAS
Page 4029 of 4284
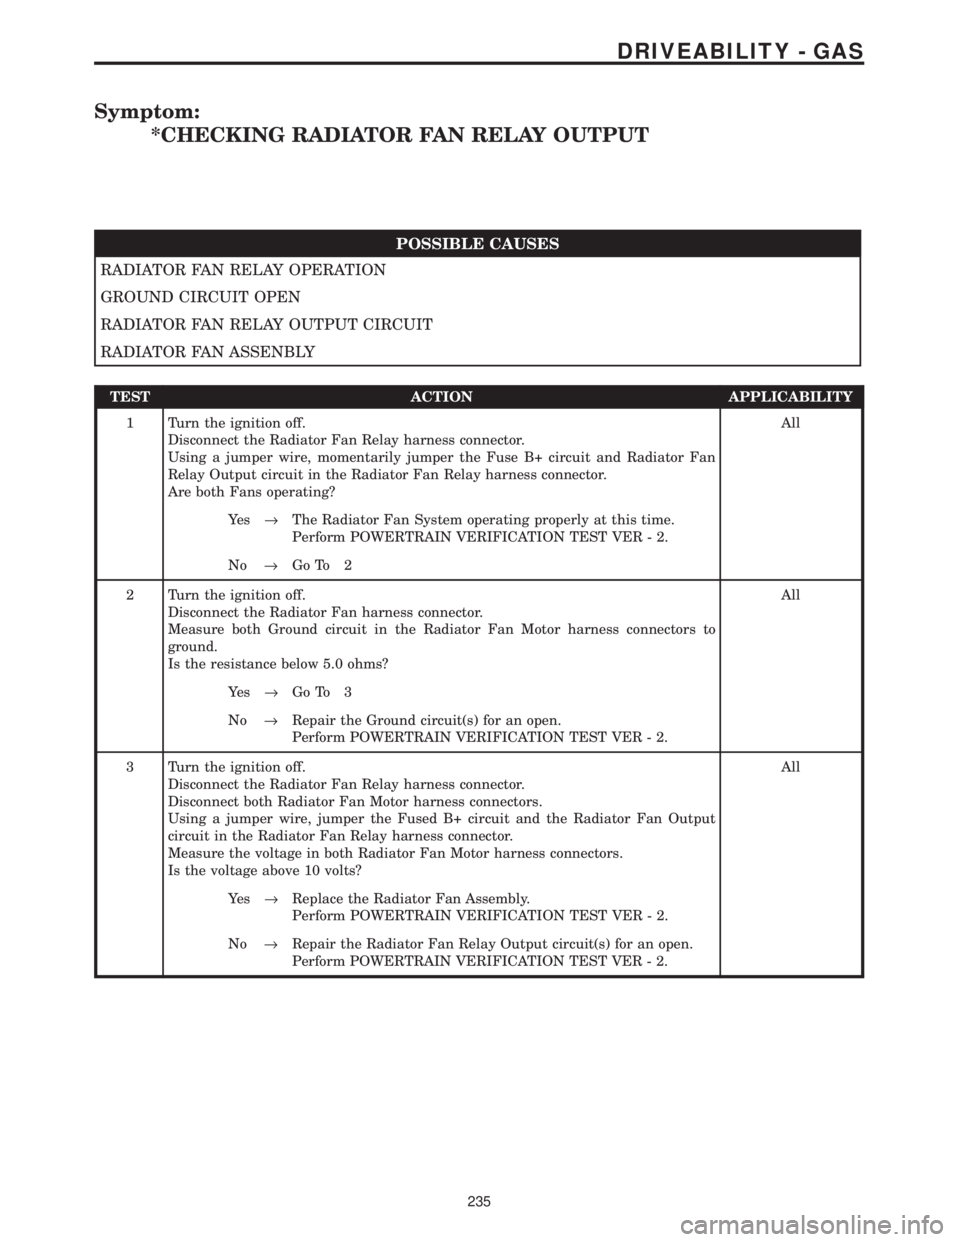
Symptom:
*CHECKING RADIATOR FAN RELAY OUTPUT
POSSIBLE CAUSES
RADIATOR FAN RELAY OPERATION
GROUND CIRCUIT OPEN
RADIATOR FAN RELAY OUTPUT CIRCUIT
RADIATOR FAN ASSENBLY
TEST ACTION APPLICABILITY
1 Turn the ignition off.
Disconnect the Radiator Fan Relay harness connector.
Using a jumper wire, momentarily jumper the Fuse B+ circuit and Radiator Fan
Relay Output circuit in the Radiator Fan Relay harness connector.
Are both Fans operating?All
Ye s®The Radiator Fan System operating properly at this time.
Perform POWERTRAIN VERIFICATION TEST VER - 2.
No®Go To 2
2 Turn the ignition off.
Disconnect the Radiator Fan harness connector.
Measure both Ground circuit in the Radiator Fan Motor harness connectors to
ground.
Is the resistance below 5.0 ohms?All
Ye s®Go To 3
No®Repair the Ground circuit(s) for an open.
Perform POWERTRAIN VERIFICATION TEST VER - 2.
3 Turn the ignition off.
Disconnect the Radiator Fan Relay harness connector.
Disconnect both Radiator Fan Motor harness connectors.
Using a jumper wire, jumper the Fused B+ circuit and the Radiator Fan Output
circuit in the Radiator Fan Relay harness connector.
Measure the voltage in both Radiator Fan Motor harness connectors.
Is the voltage above 10 volts?All
Ye s®Replace the Radiator Fan Assembly.
Perform POWERTRAIN VERIFICATION TEST VER - 2.
No®Repair the Radiator Fan Relay Output circuit(s) for an open.
Perform POWERTRAIN VERIFICATION TEST VER - 2.
235
DRIVEABILITY - GAS
Page 4030 of 4284
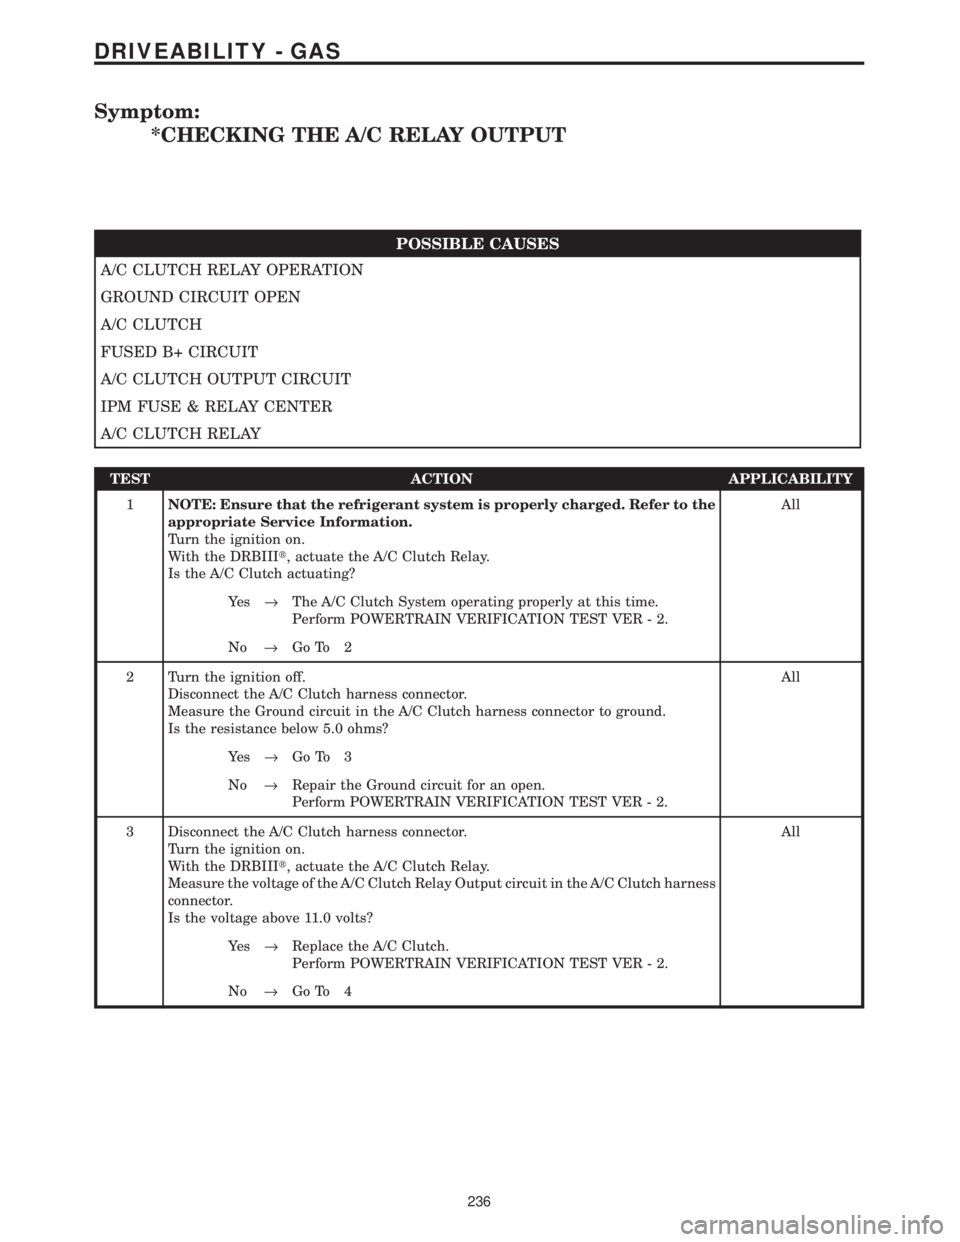
Symptom:
*CHECKING THE A/C RELAY OUTPUT
POSSIBLE CAUSES
A/C CLUTCH RELAY OPERATION
GROUND CIRCUIT OPEN
A/C CLUTCH
FUSED B+ CIRCUIT
A/C CLUTCH OUTPUT CIRCUIT
IPM FUSE & RELAY CENTER
A/C CLUTCH RELAY
TEST ACTION APPLICABILITY
1NOTE: Ensure that the refrigerant system is properly charged. Refer to the
appropriate Service Information.
Turn the ignition on.
With the DRBIIIt, actuate the A/C Clutch Relay.
Is the A/C Clutch actuating?All
Ye s®The A/C Clutch System operating properly at this time.
Perform POWERTRAIN VERIFICATION TEST VER - 2.
No®Go To 2
2 Turn the ignition off.
Disconnect the A/C Clutch harness connector.
Measure the Ground circuit in the A/C Clutch harness connector to ground.
Is the resistance below 5.0 ohms?All
Ye s®Go To 3
No®Repair the Ground circuit for an open.
Perform POWERTRAIN VERIFICATION TEST VER - 2.
3 Disconnect the A/C Clutch harness connector.
Turn the ignition on.
With the DRBIIIt, actuate the A/C Clutch Relay.
Measure the voltage of the A/C Clutch Relay Output circuit in the A/C Clutch harness
connector.
Is the voltage above 11.0 volts?All
Ye s®Replace the A/C Clutch.
Perform POWERTRAIN VERIFICATION TEST VER - 2.
No®Go To 4
236
DRIVEABILITY - GAS