Citroen C4 RHD 2015 2.G Owner's Manual
Manufacturer: CITROEN, Model Year: 2015, Model line: C4 RHD, Model: Citroen C4 RHD 2015 2.GPages: 328, PDF Size: 12.72 MB
Page 211 of 328
1111
209
LOAD REDUCTION MODE
System which manages the use of cer -
tain functions according to the level of
charge
remaining in the battery.
When the vehicle is being driven, the load
reduction function temporarily de -
activates certain functions, such as the
air
conditioning,
the
heated
rear
screen...
The deactivated functions are reactivat -
ed automatically as soon as conditions
permit.
ENERGY ECONOMY MODE
System which manages the period of use of certain functions to conserve a
sufficient
level of charge in the battery.
After
the
engine
has
stopped,
you
can
still
use
functions
such
as
the
audio
equipment,
windscreen
wipers,
dipped
beam
headlamps,
courtesy
lamps,
e
tc.
for
a
maximum
combined
period
of
thirty minutes.
Switching to economy mode
Once this period has elapsed, a message appears
in the screen indicating that the vehicle
has
switched
to
economy
mode and
the
active
functions
are
put
on
standby
.
If the telephone is being used at the
same time on the navigation
system,
it
will
be
interrupted
after 10
minutes.
A
flat
battery
prevents
the
en
-
gine
from
starting
(refer
to
the
corresponding
paragraph).
Exiting economy mode
These functions are reactivated auto -
matically the next time the vehicle is
driven.
F
In
order
to
resume
the
use
of
these functions
immediately
,
start
the
engine and
let it run for a few minutes.
The
time
available
to
you
will
then
be double
the
period
for
which
the
engine is
left
running.
However
,
this
period
will
always
be
between
five
and
thirty
minutes.
This
period
may
be
greatly
re
-
duced
if
the
battery
is
not
fully
charged.
CHANGING A WIPER BLADE
Before removing a front wiper
blade
F Within one minute after switching of
f the ignition, operate the wiper
stalk
to
position
the
wiper
blades
vertically
on the windscreen.
Removing
F Raise the corresponding wiper arm.
F
Unclip
the wiper blade and remove it.
Fitting
F Put the corresponding new wiper blade
in place and clip it.
F
Fold
down the wiper arm carefully.
After fitting a front wiper blade
F Switch on the ignition.
F
Operate
the
wiper
stalk
again
to
park
the wiper blades.
PRACTICAL INFORMATION
Page 212 of 328
1111
210
VERY COLD CLIMATE SCREEN *
* According to country.
Fitting
F Offer up the very cold climate screen to the front of the lower sec
-
tion
of the front bumper.
F
Press
around
its
edge
to
engage
its
fixing
clips one by one.
Removal
F Use a screwdriver as a lever to re -
lease each fixing clip in turn.
Do
not
forget
to
remove
the
very
cold
climate screen when:
-
the
ambient
temperature
ex
-
ceeds
10 °C,
-
towing,
-
driving at speeds above 75 mph
(120
km/h).
Removable
protective
screen
which
prevents
the
accumulation
of
snow
at
the
radiator
cooling
fan.
FITTING ROOF BARS
For safety
reasons and to avoid dam -
aging the roof, it is essential to use the
transverse
bars
approved
for
your
ve
-
hicle.
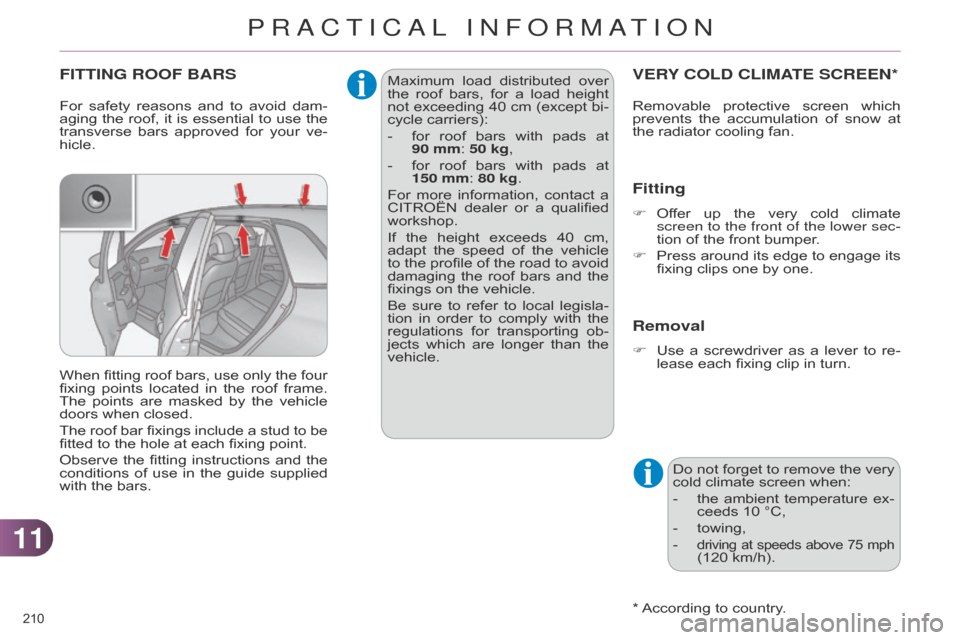
When
fitting
roof
bars,
use
only
the
four
fixing
points
located
in
the
roof
frame.
The
points
are
masked
by
the
vehicle
doors
when closed.
The
roof
bar
fixings
include
a
stud
to
be
fitted
to the hole at each fixing point.
Observe
the
fitting
instructions
and
the
conditions
of
use
in
the
guide
supplied
with
the bars. Maximum
load
distributed
over
the
roof bars, for a load height not
exceeding 40 cm (except bi -
cycle
carriers):
-
for
roof
bars
with
pads
at
90
mm: 50 kg,
-
for
roof
bars
with
pads
at
150
mm: 80 kg.
For
more
information,
contact
a
CITROËN
dealer
or
a
qualified
workshop.
If
the
height
exceeds
40
cm,
adapt
the
speed
of
the
vehicle
to
the
profile
of
the
road
to
avoid
damaging
the
roof
bars
and
the
fixings
on the vehicle.
Be
sure
to
refer
to
local
legisla
-
tion
in
order
to
comply
with
the
regulations
for
transporting
ob
-
jects
which
are
longer
than
the
vehicle.
PRACTICAL INFORMATION
Page 213 of 328
1111
211
TOWING THE VEHICLE
Procedure for having your vehicle towed
or for towing another vehicle us -
ing
a removable towing eye.
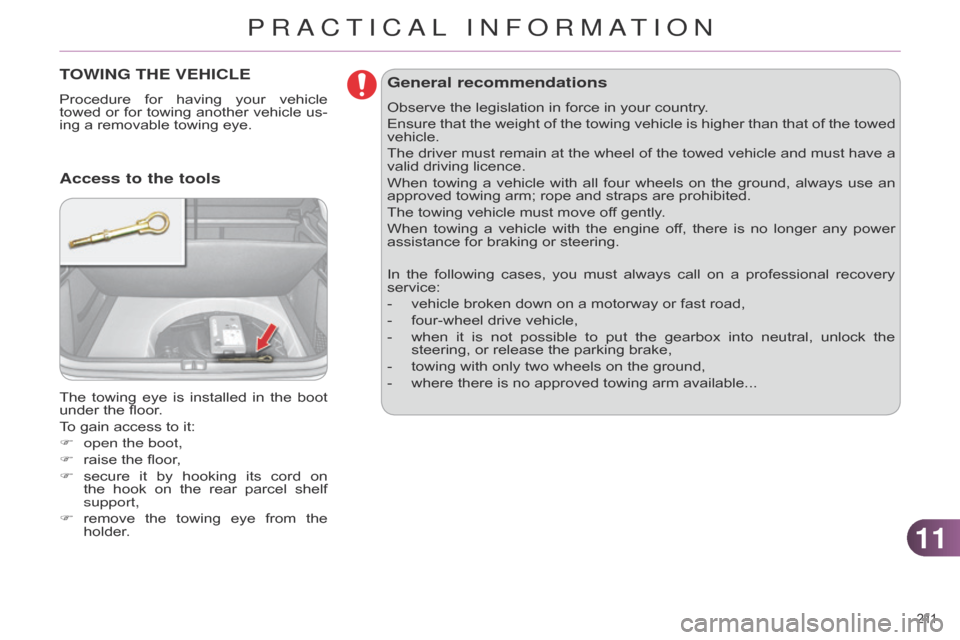
The
towing
eye
is
installed
in
the
boot
under
the floor.
To
gain access to it:
F
open the boot,
F
raise
the floor,
F
secure
it
by
hooking
its
cord
on
the
hook
on
the
rear
parcel
shelf
support,
F
remove
the
towing
eye
from
the
holder
.
Access to the tools General recommendations
Observe the legislation in force in your country.
Ensure
that
the
weight
of
the
towing
vehicle
is
higher
than
that
of
the
towed
vehicle.
The
driver
must
remain
at
the
wheel
of
the
towed
vehicle
and
must
have
a
valid
driving licence.
When
towing
a
vehicle
with
all
four
wheels
on
the
ground,
always
use
an
approved
towing arm; rope and straps are prohibited.
The
towing vehicle must move off gently.
When
towing
a
vehicle
with
the
engine
of
f,
there
is
no
longer
any
power
assistance
for braking or steering.
In
the
following
cases,
you
must
always
call
on
a
professional
recovery
service:
-
vehicle
broken down on a motorway or fast road,
-
four-wheel
drive vehicle,
-
when
it
is
not
possible
to
put
the
gearbox
into
neutral,
unlock
the
steering,
or release the parking brake,
-
towing
with only two wheels on the ground,
-
where
there is no approved towing arm available...
PRACTICAL INFORMATION
Page 214 of 328
1111
212
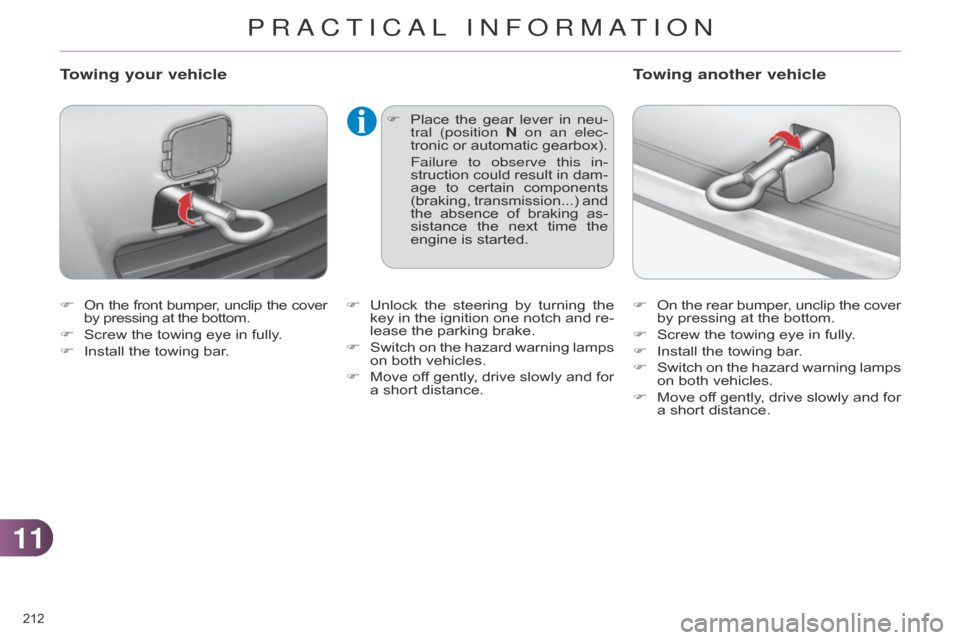
F On the front bumper , unclip the cover by
pressing at the bottom.
F
Screw
the towing eye in fully.
F
Install
the towing bar.
Towing your vehicle
F Place the gear lever in neu -
tral (position N on an elec-
tronic
or automatic gearbox).
Failure to observe this in
-
struction
could
result
in
dam
-
age
to
certain
components
(braking,
transmission...)
and
the
absence
of
braking
as
-
sistance
the
next
time
the
engine
is started. F
On
the
rear
bumper
,
unclip
the
cover by
pressing at the bottom.
F
Screw
the towing eye in fully.
F
Install
the towing bar.
F
Switch
on
the
hazard
warning
lamps
on
both vehicles.
F
Move
of
f
gently
,
drive
slowly
and
for
a
short distance.
Towing another vehicle
F Unlock the steering by turning the key
in the ignition one notch and re -
lease
the parking brake.
F
Switch
on
the
hazard
warning
lamps
on
both vehicles.
F
Move
of
f
gently
,
drive
slowly
and
for
a
short distance.
PRACTICAL INFORMATION
Page 215 of 328

1111
213
TOWING A TRAILER
We recommend the use of genu -
ine CITROËN towbars and their
harnesses
that
have
been
tested
and
approved
from
the
design
stage
of
your
vehicle,
and
that
the
fitting
of
the
towbar
is
en
-
trusted
to
a
CITROËN
dealer
or
a
qualified workshop.
If
the
towbar
is
not
fitted
by
a
CITROËN
dealer
,
it
must
still
be
fitted
in
accordance
with
the
vehicle
manufacturer's
instruc
-
tions.
Your
vehicle
is
primarily
designed
for
transporting
people
and
luggage,
but
it
may
also be used for towing a trailer.
Driving
with
a
trailer
places
greater
de
-
mands
on
the
towing
vehicle
and
the
driver
must take particular care.
Driving advice
Distribution of loads
F
Distribute
the
load
in
the
trailer
so
that
the
heaviest
items
are
as
close
as
possible
to
the
axle
and
the
nose
weight
approaches
the
maximum
permitted
without exceeding it.
Air
density
decreases
with
altitude,
thus
reducing
engine
performance.
Above
1
000
metres,
the
maximum
towed
load
must
be
reduced
by
10
%
for
every
1 000
metres of altitude.
Side wind
F
T
ake
into
account
the
increased
sensitivity
to side wind.
Cooling
Towing
a
trailer
on
a
slope
increases
the
temperature of the coolant.
As
the
fan
is
electrically
controlled,
its
cooling
capacity
is
not
dependent
on
the
engine speed.
F
T
o
lower
the
engine
speed,
reduce
your
speed. The
maximum
towed
load
on
a
long
in
-
cline depends on the gradient and the ambient
temperature.
In all cases, keep a check on the
coolant
temperature.
F
If
the
warning
lamp
and
the
ST
OP
warning
lamp
come
on,
stop
the
vehicle
and
switch
of
f
the
engine
as
soon
as possible.
Braking
Towing
a
trailer
increases
the
braking
distance.
T
o
avoid
overheating
of
the
brakes
on
a
long
mountain
type
of
descent,
the
use
of
engine braking is recommended.
Tyres
F
Check
the
tyre
pressures
of
the
towing
vehicle
and
of
the
trailer
,
observing
the
recommended
pres
-
sures.
Lighting
F
Check
the
electrical
lighting
and
sig
-
nalling
on the trailer.
Refer
to
the
"T
echnical
data"
section
for
details
of
the
weights
and
towed
loads
which
apply to your vehicle.
The
rear
parking
sensors
will
be
deactivated
automatically
if
a
genuine
CITROËN
towbar
is
used.
PRACTICAL INFORMATION
Page 216 of 328
1111
214
AUDIO PRE-EqUIPMENT
Your vehicle is equipped with certain factory-fitted
audio equipment:
-
a
dual-function
aerial
at
the
rear
of
the roof,
-
a
coaxial aerial cable,
-
basic
interference suppression,
-
cabling
for
speakers
in
the
front
doors and
tweeters in the dashboard,
-
cabling
for
speakers
in
the
rear
doors,
-
two
8-way connectors.
Before
installin
g
a
radio
unit
or
speakers
in
your
vehicle,
contact
a
CITROËN
dealer
or
a
qualified
workshop
to
obtain
a
suitable
wiring
harness.
n
ever use a separate wire to
connect
the
(+)
of
your
audio
equipment
(risk
of
discharging
of
the
battery).
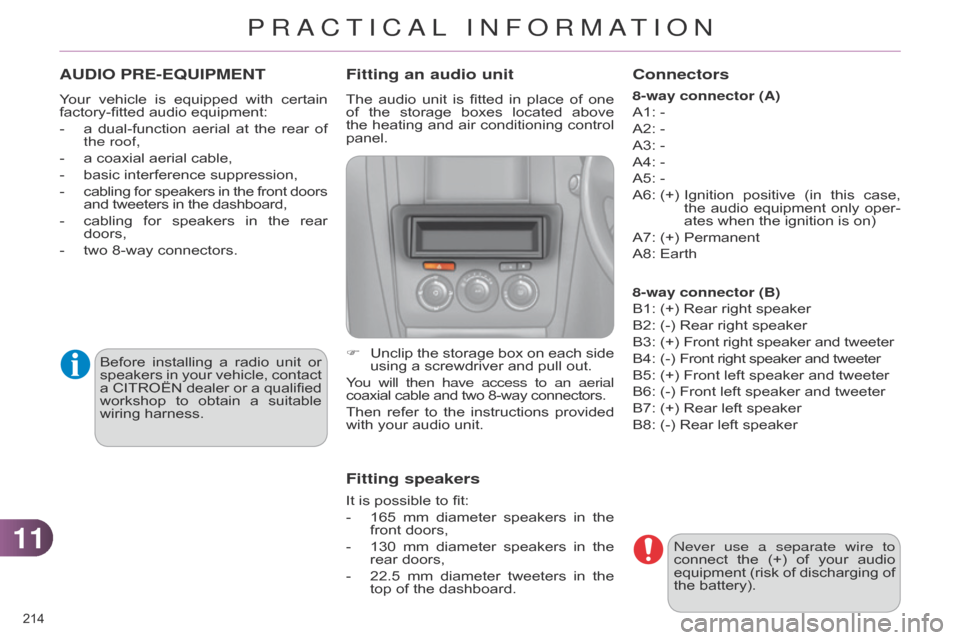
Fitting an audio unit
The audio unit is fitted in place of one of
the storage boxes located above
the
heating
and
air
conditioning
control
panel.
F
Unclip
the
storage
box
on
each
side
using
a screwdriver and pull out.
You will then have access to an aerial
coaxial
cable and two 8-way connectors.
Then
refer
to
the
instructions
provided
with
your audio unit.
Fitting speakers
It is possible to fit:
-
165
mm
diameter
speakers
in
the
front
doors,
-
130
mm
diameter
speakers
in
the
rear
doors,
-
22.5
mm
diameter
tweeters
in
the
top
of the dashboard.
Connectors
8-way connector (A)
A1: -
A2:
-
A3:
-
A4:
-
A5:
-
A6:
(+)
Ignition
positive
(in
this
case,
the
audio
equipment
only
oper
-
ates
when the ignition is on)
A7:
(+)
Permanent
A8:
Earth
8-way connector (B)
B1:
(+) Rear right speaker
B2:
(-) Rear right speaker
B3:
(
+)
Front
right speaker and tweeter
B4:
(
-)
Front
right speaker and tweeter
B5:
(+) Front left speaker and tweeter
B6:
(-) Front left speaker and tweeter
B7:
(+) Rear left speaker
B8:
(-) Rear left speaker
PRACTICAL INFORMATION
Page 217 of 328

1111
215
ACCESSORIES
A wide range of accessories and genu -
ine parts is available from the CITROËN
dealer
network.
These
accessories
and
parts
are
all
suitable
for
your
vehicle
and
benefit
from
CITROËN's
recommendation
and
warranty
.
Conversion kits
You
can
obtain
an
"Enterprise"
kit
to
convert
a
trade
vehicle
to
a
private
car
and
vice-versa.
"Comfort":
door
deflectors,
side
window
blinds,
rear
screen
blind,
insulated
module,
coat
hanger
fixed
to
head
restraint,
reading
lamp,
mirror
for
caravan,
cruise
control,
scented
air
freshener
and
car
-
tridges,
parking sensors... "Transport systems":
boot carpet, boot liner, boot net, boot
spacers, transverse roof bars, bicycle
carrier,
ski
carrier
,
roof
boxes,
towbars,
towbar
wiring harnesses...
"Styling":
gear
lever
knobs,
aluminium
foot
rest,
alloy
wheels,
wheel
embellishers,
chrome
mirror
shells,
chrome
door
aperture
finishers,
door
sill
finishers,
tailgate
lower chrome finisher...*
T
o
avoid
any
risk
of
jamming
the
pedals:-
ensure
that
mats
are
correctly
positioned
and secured,
-
never
fit
one
mat
on
top
of
another
.
"Security and safety":
anti-intrusion
alarm, microwave sensor , anti-tilt
sensor , stolen vehicle tracking
system,
child
seats
and
booster
cush
-
ions,
breathalyser
,
first
aid
kit,
fire
extin
-
guisher,
warning
triangle,
high
visibility
vest,
dog
guard,
pet
seat
belt,
wheel
security
bolts,
snow
chains,
non-slip
covers,
front foglamp kit...
"Protection":
mats*,
seat
covers
compatible
with
lateral
airbags,
door
sill
protectors,
mud
flaps,
door
protective
rubbing
strips,
bumper
protection
strips,
protective
covers
for pets, vehicle cover...
If
a
towbar
and
wiring
harness
are
fitted
outside
the
CITROËN
dealer
network,
the
installation
must
be
done
using
the
vehicle's
electrical
pre-equipment
and
in
line
with
the
manufacturer's
rec
-
ommendations.
PRACTICAL INFORMATION
Page 218 of 328
1111
216
Installation of radio
communication transmitters
Before
installing
any
after-market radio
communication
transmitter
,
you
can
contact
a
CITROËN
deal
-
er
for
the
specification
of
transmit
-
ters
which
can
be
fitted
(frequency
,
maximum
power
,
aerial
posi
-
tion,
specific
installation
require
-
ments),
in
line
with
the
V
ehicle
Electromagnetic
Compatibility
Directive (2004/104/EC). Depending
on the legislation in force
in the country, certain safe-
ty
equipment
may
be
compul
-
sory:
high
visibility
safety
vests,
warning
triangles,
breathalyzers,
spare
bulbs,
spare
fuses,
fire
ex
-
tinguisher,
first
aid
kit,
mud
flaps
at
the rear of the vehicle.
The
fitting
of
electrical
equip
-
ment
or
accessories
which
are
not
recommended
by
CITROËN
may
result
in
a
failure
of
your
ve
-
hicle's
electronic
system
and
ex
-
cessive
electrical consumption.
Contact
a
CITROËN
dealer
for
information
on
the
range
of
recommended
equipment
and
accessories.
"Multimedia":
audio
systems,
steering
mounted
au
-
dio
controls,
speakers,
Hi-Fi
module,
Bluetooth
hands-free
system,
port
-
able
satellite
navigation
system,
semi-
integral
support
bracket
for
portable
navigation
system,
mapping
update
CD,
driving
assistant,
portable
video
screen,
portable
video
support
bracket,
230
V/50
Hz
socket,
230
V/50
Hz
adap
-
tor, iPhone
® compatible mobile phone charger
,
mobile phone/smartphone
bracket,
Wi-Fi on board... By
going
to
a
CITROËN
dealer,
you
can
also
obtain
cleaning
and
maintenance
products
(interior
and
exterior)
- in-
cluding
ecological
products
in
the
"TECHNA
TURE"
range
-,
products
for
topping
up
(screenwash...),
touch-up
pens
and
paint
aerosols
for
the
exact
colour
of
your
vehicle,
recharges
(car
-
tridge
for
the
temporary
puncture
repair
kit...),
...
PRACTICAL INFORMATION
Page 219 of 328

217
* The maximum power corresponds to the value type-approved on a test bed, under conditions defined in European legislation (Directive
1999/99/EC).
PETROL ENGINES AND GEARBOXES
.../1: model fitted with low rolling resistance tyres.
.../2: model fitted with very low rolling resistance tyres.
Petrol engine
VTi 95THP 110 VTi 120
Gearbox Manual
(5-speed) Manual
(5-speed) Manual
(5-speed) Automatic
(4-speed)
Model code:
NC... 8FR0HNZ6
HNZ6/1
HNZ6/2 5FS0
5FS9
5FS9/D
Cubic capacity (cc) 1 397
1 199
1 598
Bore x stroke (mm)
77 x 72.5 75 x 90.5
77 x 85.8
Max power*: EU standard (kW)
7081 88
Max power engine speed (rpm)
6 000
5 500
6 000
Max torque: EU standard (Nm)
135205 160
Max torque engine speed (rpm)
4 000
1 500
4 250
Fuel Unleaded Unleaded Unleaded
Catalytic converter Ye sYe s Ye s
Engine oil capacity (in litres) 4.25- 4.25
12
TECHNICAL DATA
Page 220 of 328

218
* The maximum power corresponds to the value type-approved on a test bed, under conditions defined in European legislation (Directive
1999/99/EC).
.../S:
model fitted with Stop & Start.
.../1: model
fitted with low rolling resistance tyres.
Petrol engine
e-THP 130THP 155
Gearbox Manual
(6-speed) Electronic
(6-speed)
Model code:
NC... HNYM/S
HNYM/1S 5FV8/P
Cubic capacity (cc) 1 199
1 598
Bore x stroke (mm)
70 x 90.5
77 x 85.8
Max power*: EU standard (kW)
96 11 5
Max power engine speed (rpm)
5 500
6 000
Max torque: EU standard (Nm)
230 240
Max torque engine speed (rpm)
1 750
1 400
Fuel UnleadedUnleaded
Catalytic converter Ye sYe s
Engine oil capacity (in litres) -4.25
12
TECHNICAL DATA