CITROEN DS3 2018 Handbook (in English)
Manufacturer: CITROEN, Model Year: 2018, Model line: DS3, Model: CITROEN DS3 2018Pages: 248, PDF Size: 8.79 MB
Page 141 of 248

139
2.Value decrease button.
3. Value increase button.
4. Cruise control off/resume button.
Displays in the instrument
panel
The programmed information is grouped
together in the instrument panel screen.
5Cruise control off/resume indication.
6 Cruise control selection indication.
7 Programmed speed value.
Programming
F Turn thumb wheel 1 to the "CRUISE"
position: the cruise control mode is selected
but is not switched on (PAUSE).
F
Se
t the programmed speed by accelerating
to the required speed, then press button
2
or 3 (e.g. 70 mph (110 km/h)).
You can change the programmed speed further
using buttons 2
and 3:
-
B
y + or - 1 km/h = short press.
-
B
y + or - 5 km/h = long press.
-
I
n steps of + or - 5 km/h = maintained press.
Pause
F Switch off the cruise control by pressing button 4: a confirmation message appears
on the screen (PAUSE). F
S
witch the cruise control back on by
pressing button 4 again.
Exceeding programmed
speed
Intentional or unintentional exceeding of the
programmed speed results in flashing of this
speed on the display.
Returning to the programmed speed, by means
of intentional or unintentional deceleration of
the vehicle, automatically cancels the flashing
of the programmed speed.
Leaving cruise control mode
F Turn thumb wheel 1
to the 0 position: the
cruise control mode is deselected. The
display returns to the total mileage recorder.
06
Driving
Page 142 of 248

140
Malfunction
In the event of a cruise control fault, the speed
i s cleared resulting in flashing of the dashes.
Have it checked by an authorised dealer or by
a
qualified workshop. When cruise control is active, be careful
when holding one of the speed setting
buttons: this may result in a
very rapid
change in the speed of your vehicle.
Do not use the cruise control on slippery
roads or in heavy traffic.
When descending a
steep hill, the cruise
control system cannot prevent the vehicle
from exceeding the programmed speed.
To avoid any risk of jamming the pedals:
-
E
nsure that mats are secured correctly.
-
D
o not fit one mat on top of another.
Active City Brake
Active City Brake is a driving assistance
s ystem that aims to avoid a frontal collision
or reduce the speed of an impact if the driver
does not react sufficiently (inadequate brake
application).
This system has been designed to
improve driving safety.
The driver must always check the traffic
and assess the distances and relative
speeds of other vehicles.
Active City Brake cannot in any
circumstances replace the need for
vigilance on the part of the driver.
Never look at the laser sensor through
an optical instrument (magnifying glass,
microscope, etc.) at a
distance of less
than 10
centimetres: risk of eye injury!
Principle
Using a laser sensor located at the top of the
w indscreen, this system detects a vehicle
running in the same direction or stationary
ahead of your vehicle.
When necessary, the vehicle's braking system
is operated automatically to avoid a
collision
with the vehicle ahead.
Automatic braking occurs later than if
done by the driver, so as to inter vene only
when there is a
high risk of collision.
Conditions of activation
Active City Brake functions if the following
conditions are met:
-
ig
nition on,
-
t
he vehicle is moving for ward,
-
t
he speed is between about 3 and 19 mph
(5
and 30 km/h),
06
Driving
Page 143 of 248
141
Operation
- the braking assistance systems (ABS, EBFD, EBA) are not faulty.
-
t
he trajectory control systems (ASR, DSC)
are not deactivated or faulty,
-
t
he vehicle is not making a sharp turn,
-
t
he system has not triggered in the last ten
seconds.
When your vehicle is too close to or
approaches the vehicle ahead too quickly, the
system automatically applies the brakes to
avoid a
collision.
You are then warned by the display of
a
message.
The brake lamps of your vehicle are lit to warn
other users.
The collision can be avoided if the speed
difference between your vehicle and the one
ahead is not more than 9
mph (15 km/h).
Above this threshold, the system will do
what is possible to avoid or reduce the
accident by lowering the speed of impact.
The automatic braking can lead to the complete
stop of the vehicle if the situation requires it. In this case, the vehicle is held stationary
temporarily (for about 1.5
seconds) to allow
the driver to take back control by pressing the
brake pedal.
Unless the driver depresses the clutch
pedal quickly enough during automatic
braking, triggering of the system may
cause the engine to stall.
During automatic braking, the driver can
always obtain a
higher rate of deceleration
than that controlled by the system, by
pressing firmly on the brake pedal.
After an impact, the system is
automatically put out of ser vice: it no
longer operates.
You must go to a
member of the dealer
network or a
qualified workshop to have
the system made operational again.Deactivation
The system is deactivated in the vehicle
configuration menu, accessible with the ignition on.
Its state is memorised when the ignition is switched
of f.
When the system is deactivated, a
message is displayed every time the
ignition is switched on, to warn you.
With monochrome screen C
F Press the MENU button for access to the
main menu.
F
Sel
ect "Personalisation-configuration ",
F
Sel
ect "Define the vehicle parameters ".
F
Sel
ect "Driving assistance ".
F
Sel
ect "Automatic emergency braking :
OFF " or " Automatic emergency braking :
ON ".
F
P
ress the " 7" or " 8" buttons to check or
uncheck the box and respectively activate
or deactivate the system.
F
P
ress the " 5" or " 6" button, then the OK
button to select the OK box and confirm or
the Back button to cancel.
06
Driving
Page 144 of 248
142
With the touch screen tablet
F Press the "MENU" button.
F Sel ect the " Driving" menu.
F
I
n the secondary page, select " Vehicle
settings ".
F
Sel
ect the " Driving assistance " tab.
F
C
heck or uncheck the " Auto emergency
braking " box to activate or deactivate the
system.
F
Confirm.
Operating limits
The system only detects vehicles that are
stationary or moving in the same direction as
your vehicle. It does not detect small vehicles (bicycles,
motorcycles), pedestrians or animals, nor
non-reflective stationary objects.
This system will not trigger or inter vene if the
driver:
-
a
ccelerates strongly
-
o
r suddenly turns the steering wheel
(avoidance manoeuvre). When weather conditions are difficult
(extremely heavy rain, snow, fog, hail,
etc.), braking distances increase, which
may reduce the system's ability to avoid
a
collision.
The driver must therefore remain
particularly cautious.
Never let snow build up on the bonnet
or any object above the bonnet nor at
the front of the roof: this could enter the
field of vision of the sensor and obstruct
detection.
Operating faults
Sensor fault
The operation of the laser sensor may suffer
inter ference from accumulations of dirt or
misting of the windscreen. In this case you are
warned by the display of a
message.
Use windscreen demisting and regularly clean
the area of the windscreen in front of the
sensor.
Do not stick or other wise attach any object
on the windscreen in front of the sensor.
System fault
In the event of a malfunction of the system, you
a re warned by an audible signal and the display
of the message " Automatic braking system
fault ".
Have the system checked by your dealer or by
a
qualified workshop. In the event of an impact to the
windscreen near the sensor, deactivate
the system and contact your dealer
or a
qualified workshop to have your
windscreen replaced.
Do not attempt to remove, adjust or test
the sensor.
Only your dealer or a
qualified workshop
may work on the system.
When towing a
trailer or when the vehicle
is being towed, the system must be
deactivated.
06
Driving
Page 145 of 248
143
Parking assistance
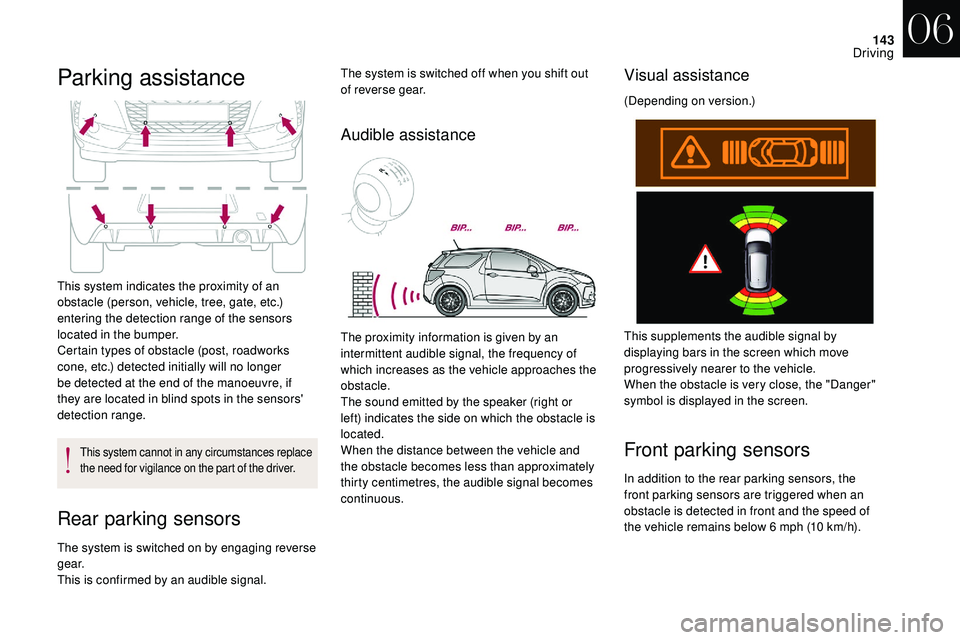
This system indicates the proximity of an
obstacle (person, vehicle, tree, gate, etc.)
entering the detection range of the sensors
located in the bumper.
Certain types of obstacle (post, roadworks
cone, etc.) detected initially will no longer
be detected at the end of the manoeuvre, if
they are located in blind spots in the sensors'
detection range.
This system cannot in any circumstances replace
the need for vigilance on the part of the driver.
Rear parking sensors
The system is switched on by engaging reverse
g e a r.
This is confirmed by an audible signal.
Audible assistanceVisual assistance
(Depending on version.)
Front parking sensors
The proximity information is given by an
intermittent audible signal, the frequency of
which increases as the vehicle approaches the
obstacle.
The sound emitted by the speaker (right or
left) indicates the side on which the obstacle is
located.
When the distance between the vehicle and
the obstacle becomes less than approximately
thirty centimetres, the audible signal becomes
continuous. This supplements the audible signal by
displaying bars in the screen which move
progressively nearer to the vehicle.
When the obstacle is very close, the "Danger"
symbol is displayed in the screen.
In addition to the rear parking sensors, the
front parking sensors are triggered when an
obstacle is detected in front and the speed of
the vehicle remains below 6
mph (10 km/h).
The system is switched off when you shift out
of reverse gear.
06
Driving
Page 146 of 248
144
Deactivation/activation of the
front and rear parking sensors
You can activate or deactivate the function via
the vehicle configuration or settings menu.
The system's status is saved when the ignition
is switched off.The function will be deactivated
automatically if a
trailer is being towed or
a
bicycle carrier is fitted (vehicle fitted with
a
towbar or an approved bicycle carrier).
Malfunction
In the event of a system fault when
enga ging reverse gear, this warning
lamp is displayed in the instrument
panel and/or a
message appears
in the screen, accompanied by an
audible signal (short beep).
Contact the dealer network or
a
qualified workshop to have the
system checked.
In bad or wintry weather, ensure that the
sensors are not covered with mud, ice or
snow. When reverse gear is engaged, an
audible signal (long beep) indicates that
the sensors may be dirty.
Certain sound sources (motorcycle,
lorry, pneumatic drill, etc.) may trigger
the audible signals of the parking sensor
system.
The front parking sensors are interrupted if
the vehicle stops for more than three seconds
in for ward gear, if no further obstacles are
detected or when the speed of the vehicle
exceeds 6
mph (10
km/h).
The sound from the loudspeaker (front
or rear) helps to indicate whether the
obstacle is in front or behind.
Reversing camera
The reversing camera is only an aid and
the driver must remain cautious at all times.
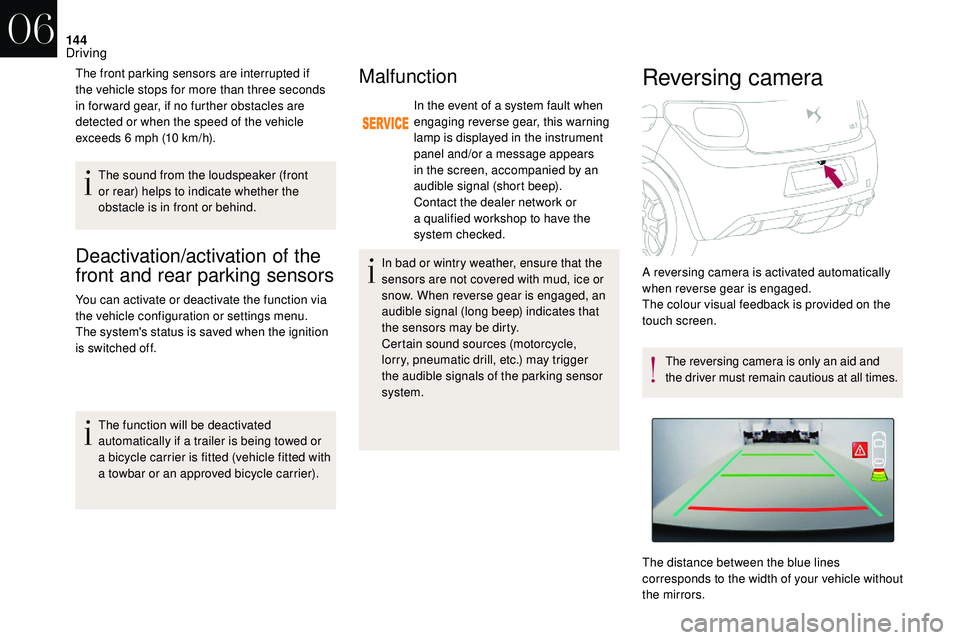
The distance between the blue lines
corresponds to the width of your vehicle without
the mirrors. A reversing camera is activated automatically
when reverse gear is engaged.
The colour visual feedback is provided on the
touch screen.
06
Driving
Page 147 of 248

145
The blue lines represent the general direction
of the vehicle.
The red line represents a distance of about
30
cm beyond the edge of your vehicle's
rear bumper. The audible signal becomes
continuous after this limit.
The green lines represent distances of about
1
and 2 metres beyond the edge of your
vehicle's rear bumper.
They are represented by lines marked "on
the ground" and do not allow to determine
the position of tall obstacles (e.g. other
vehicles) relative to the vehicle.
Some deformation of the image is normal.
It is normal to see part of the number plate
displayed at the bottom of the screen.
Clean the reversing camera regularly
using a
soft, dry cloth.
High pressure jet washing
When washing your vehicle, do not direct
the nozzle within 30
cm of the camera
lens.
06
Driving
Page 148 of 248

PR ACTICAL INFORMATION
07
Page 149 of 248

147
A DYNAMIC PARTNERSHIP,
DIRECTED TOWARDS THE
FUTURE.
For more than 45 years, TOTAL and DS have
shar ed common values: excellence, creativity and
technological innovation.
It is in this same spirit that TOTAL has developed
a
range of TOTAL QUARTZ lubricants adapted to
DS
engines, making them even more fuel efficient and
environmentally friendly.
Choose TOTAL QUARTZ lubricants
for ser vicing your vehicle; this
is your assurance of optimum
durability and per formance from
your engine.
07
Practical information
Page 150 of 248
148
Fuel tank
Capacity of the tank:
- Pe trol: approximately 30 or 50 litres
(depending on version).
-
D
iesel: approximately 30 or 46 litres
(depending on version).
Low fuel level
When the low fuel level is reached
in the fuel tank, this warning lamp
comes on in the instrument panel.
When it is first lit, approximately
5
litres of fuel remain in the tank.
Refuel as soon as possible to avoid
running out.
If you have put the wrong fuel in your
vehicle, you must have the fuel tank
drained and filled with the correct fuel
before star ting the engine.
Refilling
A self-adhesive label on the inner face of the
filler flap reminds you of the type of fuel to use,
depending on your engine.
Additions of fuel must be of at least 7 litres, in
order to be registered by the fuel gauge. With Stop & Start, never refuel with the
system in STOP mode; you must switch
off the ignition with the key.
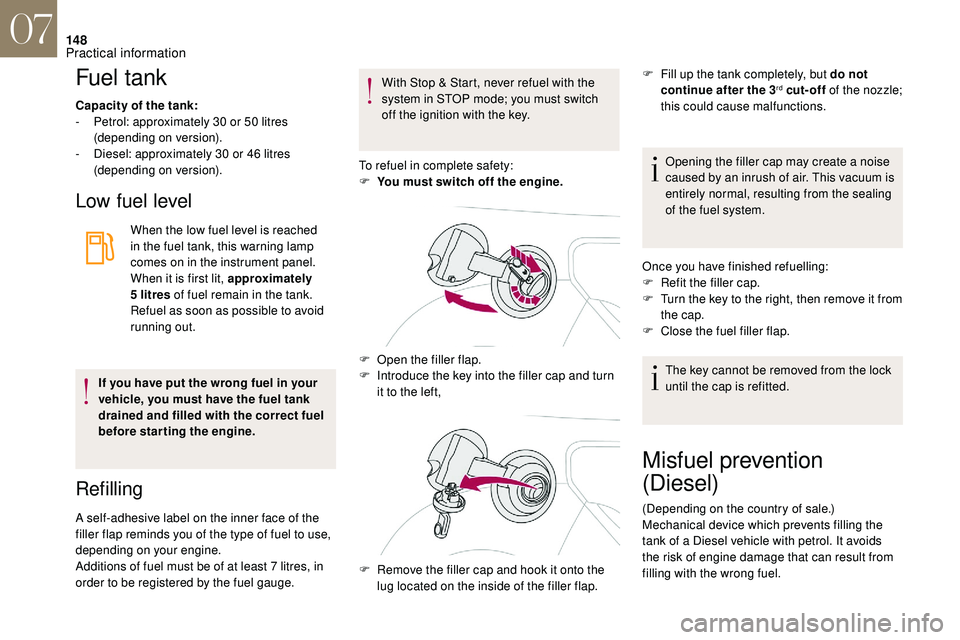
To refuel in complete safety:
F
Y
ou must switch off the engine.
F
O
pen the filler flap.
F
I
ntroduce the key into the filler cap and turn
it to the left, Opening the filler cap may create a noise
caused by an inrush of air. This vacuum is
entirely normal, resulting from the sealing
of the fuel system.
Once you have finished refuelling:
F
R
efit the filler cap.
F
T
urn the key to the right, then remove it from
the cap.
F
C
lose the fuel filler flap.
The key cannot be removed from the lock
until the cap is refitted.
F
R
emove the filler cap and hook it onto the
lug located on the inside of the filler flap. F
F
ill up the tank completely, but do not
continue after the 3
rd cut-off of the nozzle;
this could cause malfunctions.
Misfuel prevention
(Diesel)
(Depending on the country of sale.)
Mechanical device which prevents filling the
tank of a Diesel vehicle with petrol. It avoids
the risk of engine damage that can result from
filling with the wrong fuel.
07
Practical information