engine oil DATSUN 210 1979 Manual Online
[x] Cancel search | Manufacturer: DATSUN, Model Year: 1979, Model line: 210, Model: DATSUN 210 1979Pages: 548, PDF Size: 28.66 MB
Page 196 of 548

2
Engine
rotates
but
does
not
run
smoothly
This
may
be
caused
by
the
ignition
Condition
Location
Engine
misses
Distributor
Ignition
coil
High
tension
cable
Spark
plugs
IC
ignition
unit
Engine
causes
knocking
very
often
Distributor
Spark
plugs
Engine
does
not
deliver
enough
power
Distributor
Spark
plugs
Engine
Electrical
System
system
or
other
engine
conditions
not
related
to
ignition
system
Therefore
first
complete
inspection
of
ignition
system
should
be
carried
out
Probable
cause
Foreign
matter
onpicl
up
coil
Improper
air
gap
Leak
of
electricity
at
cap
and
rotor
head
Breakage
of
pick
up
coil
lead
wire
Worn
or
shaky
breaker
plate
Worn
or
shaky
distributor
driVing
shaft
Layer
short
circuit
or
inferior
quality
coil
Deterioration
of
insulation
with
cense
quenlleak
of
electricity
Fouled
Leak
of
electricity
at
upper
porcelain
insulator
Spark
plug
gap
too
narrow
Faulty
IC
ignition
unit
Breakage
of
circuit
Detached
connection
Improper
ignition
timing
too
advanced
Coming
off
or
breakage
of
governor
spring
Worn
pin
or
hole
of
governor
Burnt
too
much
Improper
ignition
timing
too
retarded
Improper
functioning
governor
Foreign
particles
stuck
in
air
gap
Fouled
EE
38
Corrective
action
Clean
Correct
Repair
or
replace
Replace
Replace
assembly
Replace
aSsembly
Replace
with
good
one
Replace
Clean
Repair
or
replace
Correct
or
replace
Replace
Replace
Repair
Correct
Correct
or
replace
Replace
Replace
Correct
Replace
assembly
Clean
Clean
Page 199 of 548

REMOVAL
It
is
much
easier
to
remove
engine
and
transmission
as
a
single
unit
than
to
remove
alone
After
removal
engine
can
be
separated
from
the
transmission
assembly
WARNING
a
Place
wheel
chocks
in
fronl
of
front
wheels
and
in
rear
of
rear
wheels
b
Be
sure
to
hoist
engine
in
a
safe
manner
c
You
should
not
remove
engine
until
exhaust
system
has
com
pletely
cooled
off
Otherwise
you
may
burn
your
self
and
or
fire
may
break
out
in
fuel
line
Note
Fender
coven
should
be
used
to
protect
car
body
1
Disconnect
battery
ground
cable
from
battery
terminal
and
fusible
link
at
wire
connector
2
Remove
hood
as
follows
CAUTION
Have
an
assistant
help
you
so
as
to
prevent
damage
to
body
I
Mark
hood
hinge
locations
on
hood
to
facilitate
reinstallation
2
Support
hood
by
ltand
and
re
move
bolts
securing
it
to
hood
hinge
being
careful
not
to
let
hood
slip
when
bolts
are
removed
See
Fig
ER
2
3
Remove
hood
from
hood
hinge
f
Il
I
BF133A
Fig
ER
2
Removing
Hood
Remove
under
cover
Drain
radiator
coolant
and
engine
3
4
oil
5
Disconnect
upper
and
lower
hoses
from
radiator
and
disconnect
oil
cooler
hoses
automatic
transmission
only
6
Remove
four
bolts
securing
radia
Engine
Removal
Installation
tor
to
body
and
detach
radiator
after
removing
radiator
shroud
7
Remove
air
cleaner
assembly
from
carburetor
as
follows
1
Remove
fresh
air
duct
from
air
cleaner
2
Remove
hot
air
duct
from
air
cleaner
3
Loosen
air
cleaner
band
bolt
4
Disconnect
air
cleaner
to
air
pump
hose
at
air
cleaner
5
Disconnect
air
cleaner
ta
rocker
cover
hose
at
rocker
cover
6
Disconnect
air
cleaner
to
A
B
valve
hose
at
air
cleaner
7
Disconnect
air
cleaner
to
related
vacuum
hoses
at
air
cleaner
8
Disconnect
accelerator
control
wire
from
carburetor
9
Disconnect
the
following
cables
wires
and
hoses
Wire
to
auto
choke
heater
Wire
to
throttle
opener
cut
solenoid
or
throttle
switch
Wire
to
fuel
cut
solenoid
Wire
to
vacuum
switching
valve
High
tension
cable
between
igni
tion
coil
and
distributor
Battery
cable
to
starter
motor
Wire
to
distributor
Wire
to
thermal
transmitter
Wire
to
alternator
Engine
ground
cable
oil
pressure
switch
and
engine
harness
No
2
See
Fig
ER
3
o
1
Ground
cable
2
Engine
harness
No
2
3
Oil
pressure
switch
Fig
ER
3
EA368
Disconnecting
Cable
and
Wire
Fuel
hose
at
fuel
pump
and
fuel
return
hose
at
connection
Air
pump
air
cleaner
hose
Carbon
canister
hoses
Heater
inlet
and
outlet
hoses
if
so
equipped
ER
3
Vacuum
hose
of
brake
booster
at
intake
manifold
Air
conditioner
equipped
model
10
Remove
compressor
belt
To
remove
loosen
idler
pulley
nut
and
adjusting
bolt
1
Remove
air
pump
2
Remove
compressor
retaining
bolts
and
move
compressor
toward
fender
to
facilitate
removal
of
engine
Nole
Never
discharge
gas
from
com
pressor
while
work
is
being
per
formed
II
Compressor
EA478
Fig
ER
4
Location
of
Air
Compressor
3
Disconnect
vacuum
hose
of
air
conditioner
from
connector
of
intake
manifold
4
Remove
F
i
C
D
actuator
from
bracket
II
Remove
clutch
operating
cylin
der
from
clutch
housing
manual
trans
mission
only
dJ
Tightening
torque
Clutch
operating
cylinder
E
A3
to
clutch
housing
3
1
to
4
1
kg
22
to
30
ft
lbl
Fig
ER
5
Removing
Clutch
Operating
Cylinder
Page 200 of 548
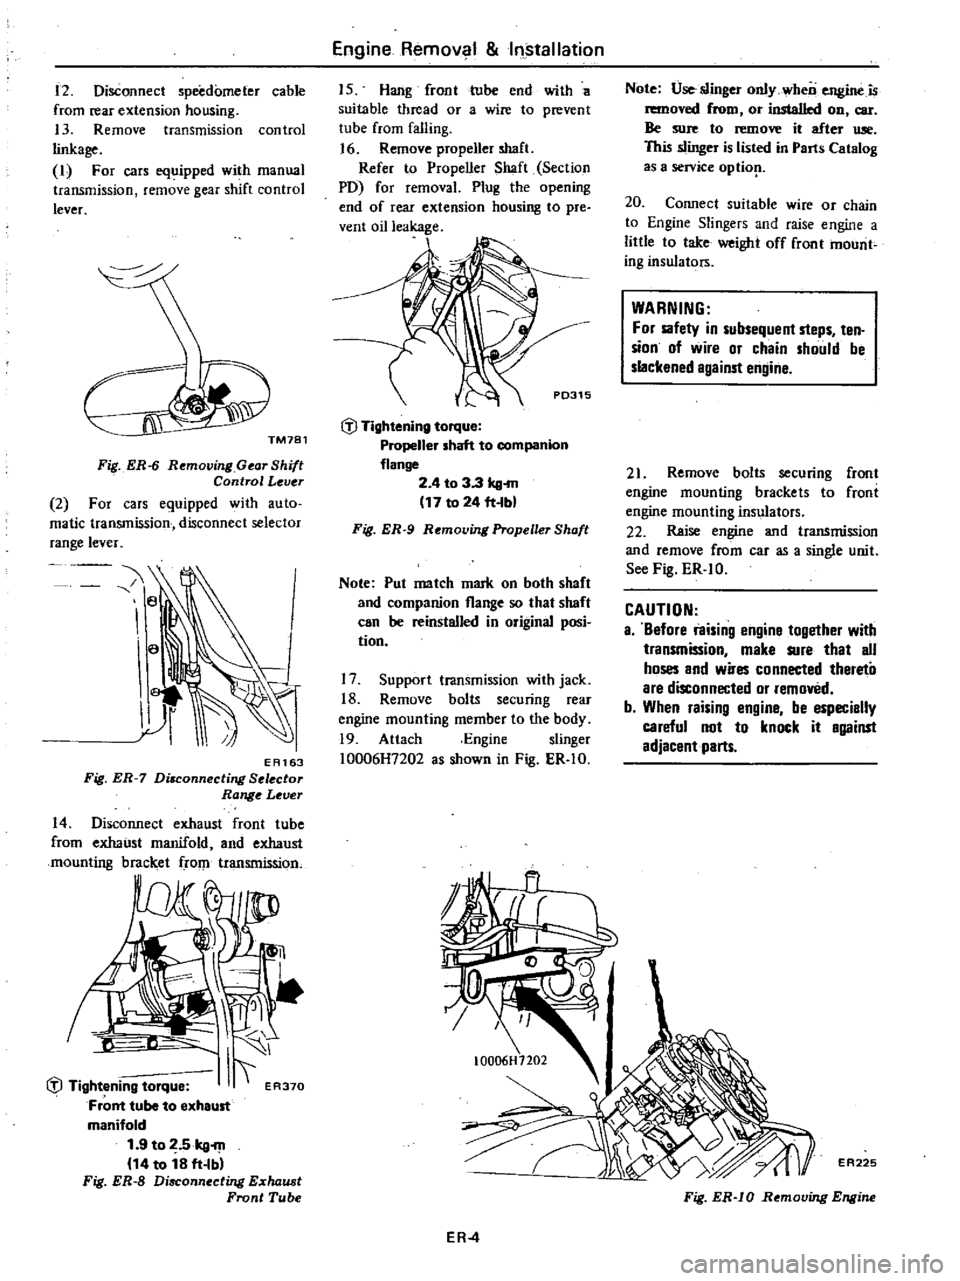
12
Disconnect
speedometer
cable
from
rear
extension
housing
13
Remove
transmission
control
linkage
I
For
cars
equipped
with
manual
transmission
remove
gear
shift
control
lever
Fig
ER
6
Removing
Gear
Shift
Control
Lever
2
For
cars
equipped
with
auto
matic
transmission
disconnect
selector
range
lever
e
a
EA163
Fig
ER
7
Di8connecting
Selector
Range
Lever
14
Disconnect
exhaust
front
tube
from
exhaust
manifold
and
exhaust
mounting
bracket
rom
transmission
I
liJ
Tightening
torque
I
ER370
Front
tube
to
exheust
manifold
1
9
to
2
5kg
m
14
to
18
ft
Ibl
Fig
ER
S
Disconnecting
E
chaust
Front
Tube
Engine
Remov
1
Installation
15
Hang
front
tube
end
with
a
suitable
thread
or
a
wire
to
prevent
tube
from
falling
J
6
Remove
propeller
shaft
Refer
to
Propeller
Shaft
Section
PO
for
removal
Plug
the
opening
end
of
rear
extension
housing
to
pre
vent
oil
leakage
P0315
liJ
Tightening
torque
Propeller
shaft
to
companion
flange
2
4
to
3
3
kg
m
17
to
24
ft
bl
Fig
ER
9
Removing
Propeller
Shaft
Note
Pul
me
tch
mark
on
both
shaft
and
companion
flange
so
that
shoft
can
be
reinstalled
in
original
posi
tion
17
Support
transmission
with
jack
18
Remove
bolts
securing
rear
engine
mounting
member
to
the
body
19
Attach
Engine
slinger
10006H7202
as
shown
in
Fig
ER
IO
Note
Use
slinger
only
wheo
engine
is
removed
from
or
installed
on
car
Be
sure
to
remove
it
efter
Ulle
This
slinger
is
listed
in
Parts
Cet
log
as
a
service
optiop
20
Connect
suitable
wire
or
chain
to
Engine
Slingers
and
raise
engine
a
little
to
take
weight
off
front
mount
ing
insulators
WARNING
For
sofety
in
subsequent
steps
ten
sion
of
wire
or
chain
should
be
slackened
against
engine
21
Remove
bolts
securing
front
engine
mounting
brackets
to
froni
engine
mounting
insulators
22
Reise
engine
and
transmission
and
remove
from
car
as
a
single
unit
See
Fig
ER
IO
CAUTION
a
Before
raising
engine
10gether
with
transmission
make
sure
that
all
hoses
and
wires
connected
thereto
are
disconnected
or
removed
b
When
raising
engine
be
especially
careful
not
to
knock
it
against
adjacent
parts
ER
4
EA225
Fig
ER
IO
Removing
Engine
Page 209 of 548
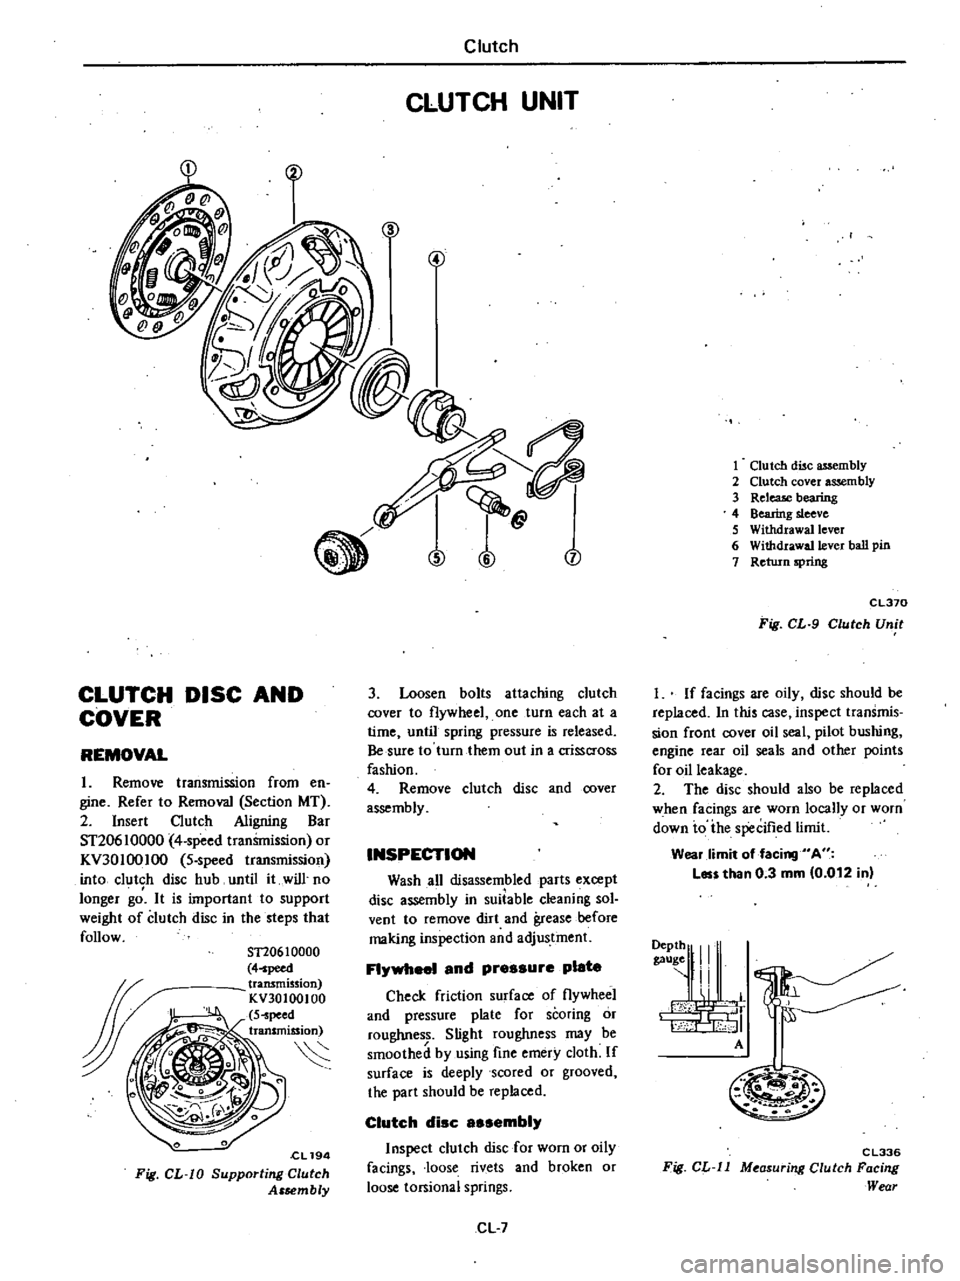
CLUTCH
DISC
AND
COVER
REMOVAL
1
Remove
transmission
from
en
gine
Refer
to
Removal
Section
MT
2
Insert
Clutch
Aligning
Bar
ST20610000
4
speed
tranSmission
or
KV30100IOO
5
speed
transmission
into
clutch
disc
hub
until
it
will
no
longer
gd
It
is
important
to
support
weight
of
clutch
disc
in
the
steps
that
follow
ST20610000
4
peed
transmission
KV30100100
S
peed
transmission
S
cL194
Fig
CL
W
Supporting
Clutch
Assembly
Clutch
CLUTCH
UNIT
n
j
3
Loosen
bolts
attaching
clutch
cover
to
flywheel
one
turn
each
at
a
time
until
spring
pressure
is
released
Be
sure
to
turn
them
out
in
a
crisscross
fashion
4
Remove
clutch
disc
and
cover
assembly
INSPECTION
Wash
all
disassembled
parts
except
disc
assembly
in
suiiable
cleaning
sol
vent
to
remove
dirt
and
grease
before
making
inspection
and
adjustment
FI
1
and
pressure
plate
Check
friction
surface
of
flywheel
and
pressure
plate
for
scoring
or
roughness
Slight
roughness
may
be
smoothed
by
using
fine
emery
cloth
If
surface
is
deeply
scored
or
grooved
the
part
should
be
replaced
Clutch
disc
sembi
Inspect
clutch
disc
for
worn
or
oily
facings
loose
rivets
and
broken
or
loose
torsional
springs
CL
7
1
Clutch
disc
assembly
2
Clutch
cover
assembly
3
ReleaJe
bearing
4
Bearing
sleeve
S
Withdrawal
lever
6
Withdrawa11ever
ball
pin
7
Return
spring
CL370
Fig
CL
9
Clutch
Unit
I
If
facings
are
oily
disc
should
be
replaced
In
this
case
inspect
transmis
sion
front
cover
oil
seal
pilot
bushing
engine
rear
oil
seals
and
other
points
for
oil
leakage
2
The
disc
should
also
be
replaced
when
facings
are
worn
locally
or
worn
down
io
ihe
specified
limit
Wear
limit
of
facing
A
Les
than
0
3
mm
0
012
in
9111
I
A
M
m
C
L336
Fig
CL
ll
M
asur
ng
Clutch
Facing
Wear
Page 214 of 548

Condition
Clutch
slips
Clutch
drags
Clutch
TROUBLE
DIAGNOSES
AND
CORRECTIONS
Probable
cause
and
testing
Corrective
action
Slipping
of
clutch
may
be
noticeable
when
any
of
the
following
symptoms
is
encountered
during
operation
I
Car
will
not
respond
to
erigine
speed
during
acceleration
2
Insufficient
car
speed
3
Lack
of
power
during
uphill
driving
Some
of
the
above
conditions
may
also
be
attributable
to
engine
problem
First
determine
whether
engine
or
clutch
is
causing
the
problem
If
slipping
clutch
is
left
unheeded
wear
and
or
overheating
will
occur
on
clutch
facing
to
such
an
extent
that
it
is
no
longer
serviceable
TO
TEST
FOR
SLIPPING
CLurCH
proceed
as
follows
During
upgrade
havelling
run
engine
at
about
40
to
50
km
h
25
to
31
MPH
with
gear
shift
lever
in
3rd
speed
position
shift
into
highest
gear
and
t
the
same
time
rev
up
engine
If
clutch
is
slipping
car
willnot
readily
respond
to
depression
of
accelerator
pedal
Clutch
facing
warn
excessively
Oil
or
grease
on
clutch
facing
Warped
clutch
cover
or
pressure
plate
Replace
Replace
Repair
or
replace
Dragging
clu
tch
is
particularly
noticeable
when
shifting
gears
especially
into
low
gear
TO
TEST
FOR
DRAGGING
CLurCH
proceed
as
follows
I
Start
engine
Disengage
clutch
Shift
into
reverse
gear
and
then
into
Neutral
Gradually
increase
engine
speed
and
again
shift
into
reverse
gear
If
clutch
is
dragging
gear
grating
is
heard
when
shifting
gears
from
Neutral
into
Reverse
2
Stop
engine
and
shift
gears
Conduct
this
test
at
each
gear
position
3
In
step
2
gears
are
shifted
smoothly
except
1st
speed
position
at
idling
a
If
dragging
is
encountered
at
the
end
of
shifting
check
condition
of
synchro
mechanism
in
transmission
b
If
dragging
is
encountered
at
the
beginning
of
shifting
proceed
to
step
4
below
4
Push
change
lever
toward
Reverse
ide
depress
pedal
to
check
for
free
travel
of
pedal
a
If
pedal
can
be
depressed
further
check
clutch
for
condition
b
If
pedal
cannot
be
depressed
further
proceed
to
step
5
below
5
Check
clutch
control
pedal
height
pedal
free
play
free
travel
withdrawal
lever
play
etc
If
any
abnormal
condition
does
not
exist
and
if
pedal
cannot
be
depressed
further
check
clutch
for
condition
Clutch
disc
runout
or
warped
Wear
or
rust
on
hub
splines
in
clutch
disc
Diaphragm
spring
toe
height
out
of
adjustment
or
toe
tip
worn
Worn
or
improperly
installed
parts
Replace
Clean
and
lubricate
with
grease
or
replace
Adjust
or
replace
Repair
or
replace
CL12
Page 215 of 548

Condition
Clutch
chatters
Noisy
clutch
Clutch
grabs
Clutch
Probable
cause
and
testing
Corr
ctive
action
Clutch
chattering
is
usually
noticeable
when
car
is
just
rolled
off
with
clutch
parlially
engaged
Weak
or
broken
clutch
disc
torsion
spring
Oil
or
grease
on
clutch
facing
Clutch
facing
out
of
proper
contact
or
clutch
disc
runout
Loose
rivets
Warped
pressure
plate
or
clutch
cover
surface
Unevenness
of
diaphragm
spring
toe
height
Loose
engine
mounting
or
deteriorated
rubber
A
noise
is
heard
after
clutch
is
disengaged
Damaged
release
bearing
A
noise
is
heard
when
clutch
is
disengaged
Insufficient
grease
on
the
sliding
surface
of
bearing
sleeve
Clutch
cover
and
bearing
are
not
in
stalled
correctly
Replace
Replace
Replace
Replace
Repair
or
replace
Adjust
or
replace
Retighten
or
replace
I
Replace
Apply
grease
Adjust
A
noise
is
heard
when
car
is
suddenly
rolled
off
with
clutch
partially
engaged
Damaged
pilot
bushing
I
Replace
When
grabbing
of
clutch
occurs
car
will
not
roll
off
smoothly
from
a
standing
start
or
clutch
will
be
engaged
before
clutch
pedal
is
fully
depressed
Oil
or
grease
on
clutch
facing
Clutch
facing
worn
or
loose
rivets
Wear
or
rust
on
splines
in
drive
shaft
and
clutch
disc
Warped
flywheel
or
pressure
plate
Loose
mountings
for
engine
or
power
train
units
CL13
Replace
Replace
Clean
or
replace
Repair
or
replace
Retighten
Page 219 of 548

I
ht
2nd
fork
r
2
3rd
top
fork
rod
3
Reverse
fork
rod
4
Retaining
pin
5
I
t
2nd
shift
fork
6
3rd
top
shift
fork
7
Checking
ball
plug
8
Check
ban
spring
9
Check
ball
10
Interlock
plunger
11
S
topper
ring
12
Shift
rod
A
bracket
13
Reverse
shift
fork
14
Lock
pin
15
Striking
lever
Manual
Transmission
16
Striking
rod
17
Return
spring
plug
18
Reverse
check
spring
19
Return
pring
20
Plunger
21
D
ring
22
Stopper
pin
bolt
23
Striking
guide
assembly
24
Striking
guide
oil
seal
REMOVAL
To
dismount
transmission
from
the
car
proceed
as
follows
Disconnect
battery
ground
cable
2
Remove
console
box
and
detach
rubber
boots
if
so
equipped
3
Place
transmission
control
lever
in
neutral
position
and
remove
it
m
TM781
Fig
MT
4
Removing
Control
Lever
@
@
25
Control
lever
bushing
26
Expansion
plug
27
Control
pin
bushing
28
Control
arm
pin
29
Control
lever
o
Tightening
torque
kg
m
ft
lb
@
0
5
to
0
8
3
6
tn
5
8
@
1
3
to
1
7
9
to
12
Fig
MT
3
F4W60L
Tra11lmiBSion
Shift
Control
Components
TM094A
4
Jack
up
the
car
and
support
its
weight
on
safety
stands
Use
a
hy
draulic
hoist
or
open
pit
if
available
Make
sure
that
safety
is
insured
5
Disconnect
front
exhaust
tube
and
remove
bolt
securing
exhaust
mounting
bracket
from
exhaust
front
tube
side
6
Disconnect
wires
from
reverse
back
up
lamp
switch
7
Disconnect
speedometer
cable
from
rear
extension
At
the
same
time
removey
top
detecting
switch
if
so
equipped
8
Remove
propeller
shaft
Refer
to
Removal
Section
PO
Note
Plug
up
the
opening
in
the
rear
extension
to
prevent
oil
from
flow
ing
out
MT
3
9
Remove
clutch
operating
cylinder
from
transmission
case
10
Support
engine
by
placing
a
jack
under
oil
pan
with
a
wooden
block
used
between
oil
pan
and
jack
CAUTION
00
not
place
the
jack
under
the
oil
pan
drain
plug
11
Support
transmission
with
a
transmission
jack
12
Loosen
rear
engine
mount
se
curing
bolts
CD
temporarily
and
re
move
crossmember
mounting
bolts
V
Page 220 of 548
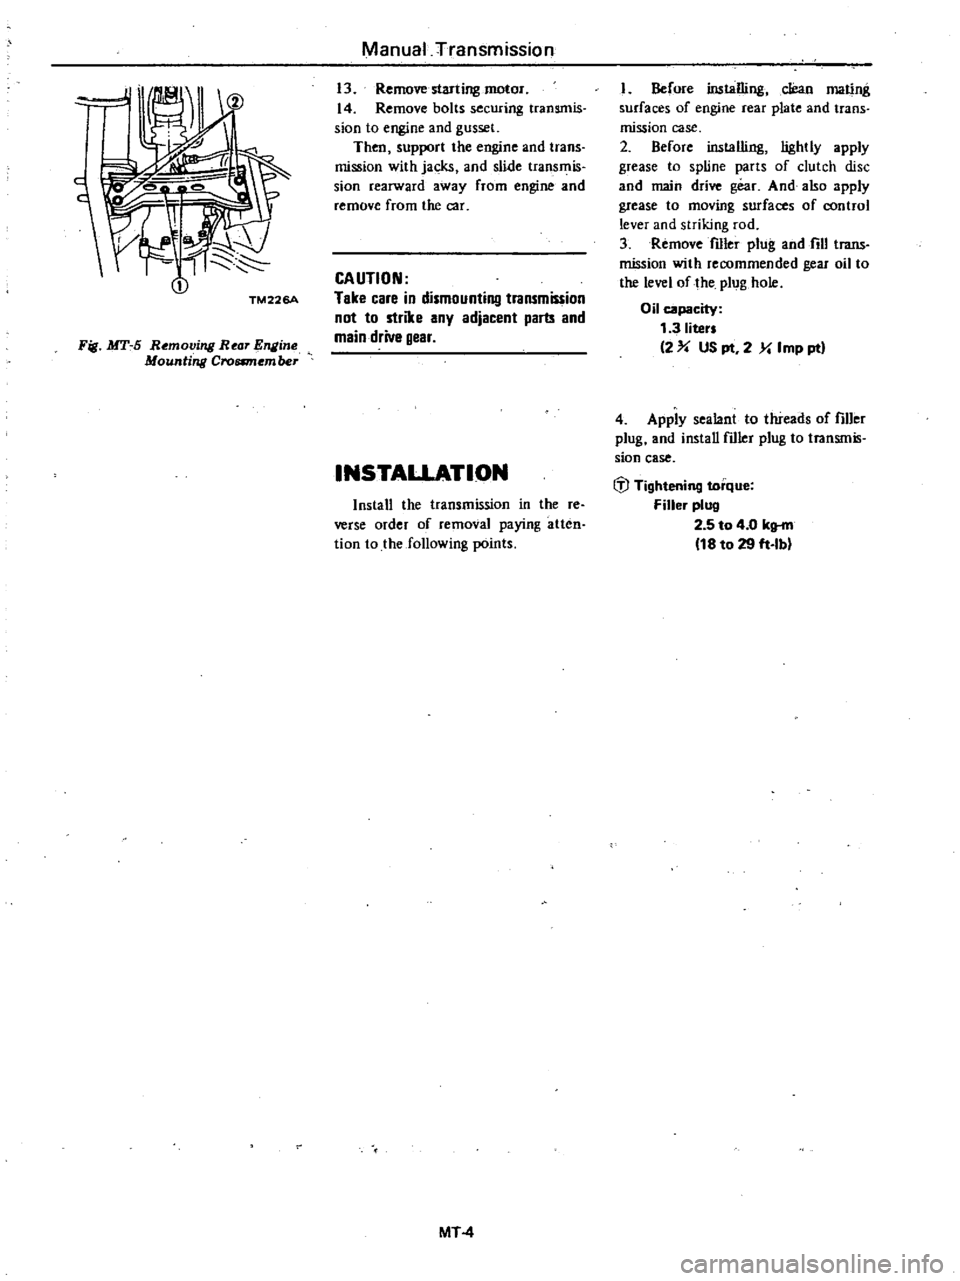
Fig
MT
5
Removing
Rear
1IIline
Mounting
Croamember
Manual
Transmission
13
Remove
starling
motor
14
Remove
bolts
securing
transmis
sion
to
engine
and
gusset
Then
support
the
engine
and
trans
mission
with
jacks
and
slide
trans
is
sion
rearward
away
from
engine
and
remove
from
the
car
CAUTION
Take
care
in
dismounting
trammission
not
to
strike
any
adjacent
parts
and
main
drive
gear
INSTAUATION
Install
the
transmission
in
the
re
verse
order
of
removal
paying
atten
tion
to
the
following
points
MT
4
I
Before
installing
cJean
mating
surfaces
of
engine
rear
plate
and
trans
mission
case
2
Before
installing
lightly
apply
grease
to
spline
parts
of
clutch
disc
and
main
drive
gear
And
also
apply
grease
to
moving
surfaces
of
control
lever
and
striking
rod
3
Remove
filler
plug
and
fill
trans
mission
with
recommended
gear
oil
to
the
level
of
the
plug
hole
Oil
capacity
1
3
liter
2
US
pt
2
Y
Imp
ptl
4
Apply
sealant
to
threads
of
filler
plug
and
install
fdler
plug
to
transmis
sion
case
IiJ
Tightening
torque
Filler
plug
2
5
to
4
0
klt
fll
18
to
29
ft
Ib
Page 225 of 548
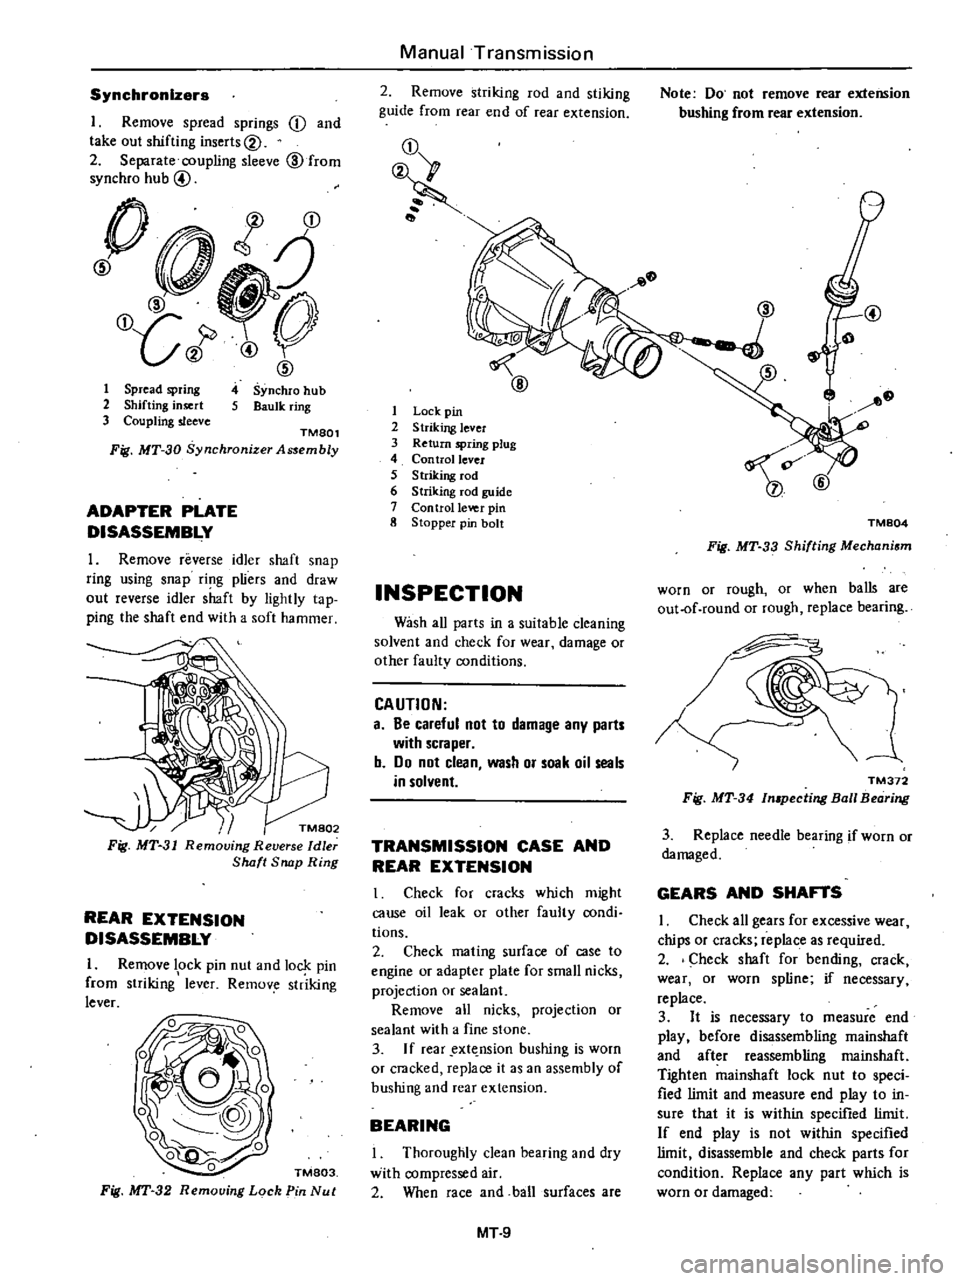
Synchronizers
I
Remove
spread
springs
j
and
take
out
shifting
inserts@
2
Separate
coupling
sleeve
@
from
synchro
hub
@
0
t
j
@
O
LJ
J
1
ID
4
Synchro
hub
S
Baulk
ring
1
Spread
spring
2
Shifting
insert
3
Coupling
sleeve
TMSOl
Fig
MT
30
Synchronjzer
Assembly
ADAPTER
PLATE
DISASSEMBLY
1
Remove
reverse
idler
shaft
snap
ring
using
snap
ri
1g
pliers
and
draw
out
reverse
idler
shaft
by
lightly
tap
ping
the
shaft
end
with
a
soft
hammer
k
Fig
MT
31
Removing
Reverse
Idler
Shaft
Snap
Ring
REAR
EXTENSION
DISASSEMBLY
I
Remove
lock
pin
nut
and
lock
pin
from
striking
1
lever
Remov
str
iking
lever
TM803
Fig
MT
32
Removing
Lock
Pin
Nut
Manual
Transmission
2
Remove
striking
rod
and
stiking
guide
from
rear
end
of
rear
extension
j
1
Lock
pin
2
Striking
lever
3
Return
spring
plug
4
Con
trollevcr
5
Striking
rod
6
Striking
fod
guide
7
Control
Ie
o
eI
pin
8
Stopper
pin
bolt
INSPECTION
Wash
all
parts
in
a
suitable
cleaning
solvent
and
check
for
wear
damage
or
other
faulty
conditions
CAUTION
a
Be
careful
not
to
damage
any
parts
with
scraper
b
Do
not
clean
wash
or
soak
oil
seals
in
solvent
TRANSMISSION
CASE
AND
REAR
EXTENSION
I
Check
for
cracks
which
might
cause
oil
leak
or
other
faulty
condi
tions
2
Check
mating
surface
of
case
to
engine
or
adapter
plate
for
small
nicks
projection
or
sealant
Remove
all
nicks
projection
or
sealant
with
a
fine
stone
3
If
rear
ext
nsion
bushing
is
worn
or
cracked
replace
it
as
an
assembly
of
bushing
and
rear
extension
BEARING
Thoroughly
clean
bearing
and
dry
with
compressed
air
2
When
race
and
ball
surfaces
are
MT
9
Note
Do
not
remove
rear
extension
bushing
from
rear
extension
@
TM804
Fig
MT
33
Shifting
Mechanism
worn
or
rough
or
when
balls
are
out
of
round
or
rough
replace
bearing
TM372
Fig
MT
34
In
pecting
Ball
Bearing
3
Replace
needle
bearing
if
worn
or
damaged
GEARS
AND
SHAFTS
I
Check
all
gears
for
excessive
wear
chips
or
cracks
replace
as
required
2
Check
shaft
for
bending
crack
wear
or
worn
spline
if
necessary
replace
3
It
is
necessary
to
measure
end
play
before
disassembling
mainshaft
and
after
reassembling
rnainshaft
Tighten
mainshaft
lock
nut
to
speci
fied
limit
and
measure
end
play
to
in
sure
that
it
is
within
specified
limit
If
end
play
is
not
within
specified
limit
disassemble
and
check
parts
for
condition
Replace
any
part
which
is
worn
or
damaged
Page 226 of 548
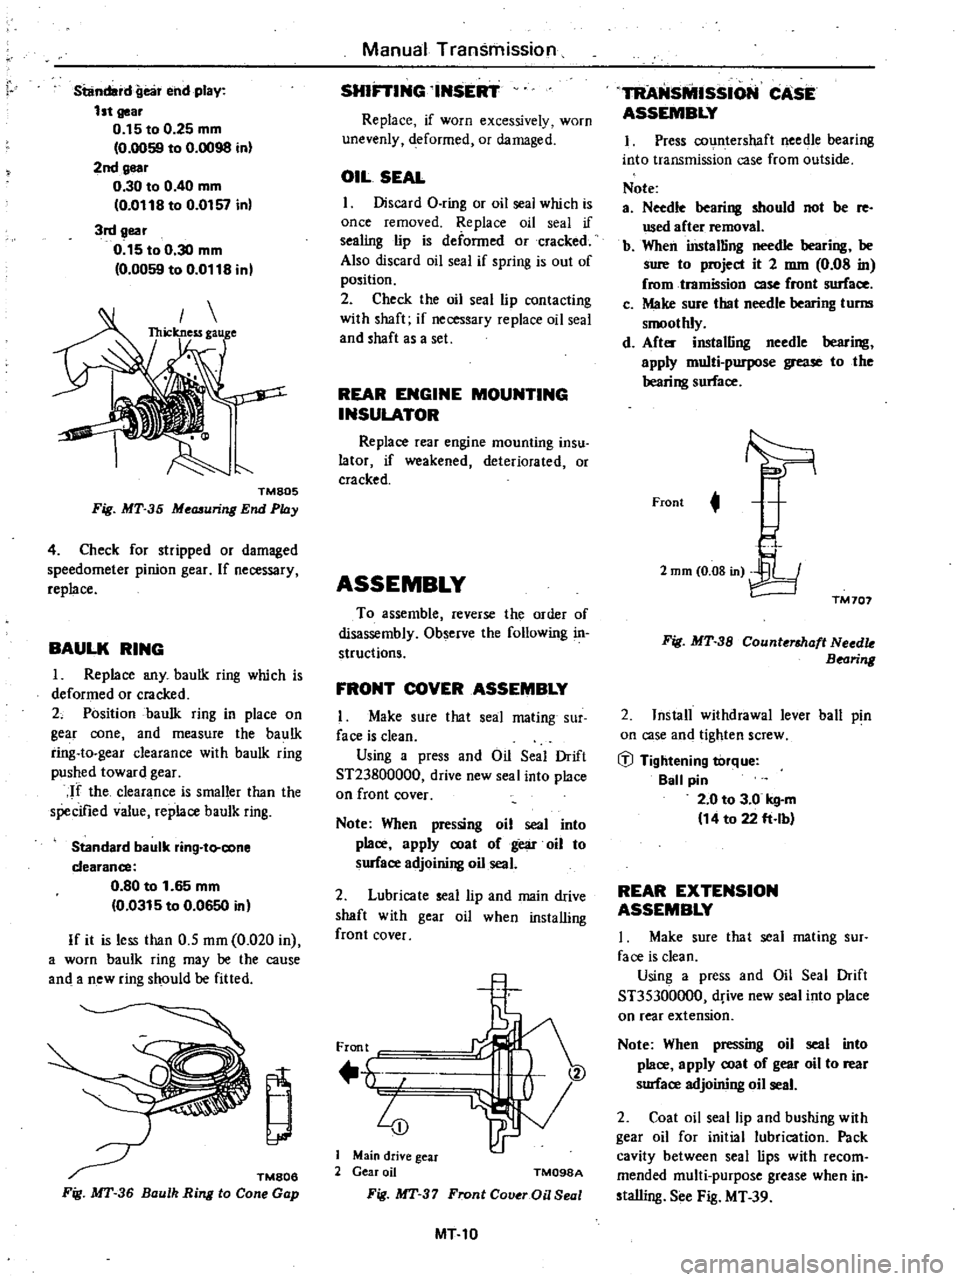
standard
gea
end
play
1st
gear
0
15
to
0
25
mm
0
0059
to
0
0098
inl
2nd
gear
0
30
to
0
40
mm
0
0118
to
0
0157
in
3rd
gear
0
15
to
0
30
mm
0
0059
to
0
0118
in
TMB05
Fig
MT
35
Me
uring
End
Phly
4
Check
for
stripped
or
damaged
speedometer
pinion
gear
If
necessary
replace
BAULK
RING
1
Replace
any
baulk
ring
which
is
deformed
or
cracked
2
Position
baulk
ring
in
place
on
gear
cone
and
measure
the
baulk
ring
to
gear
clearance
with
baulk
ring
pushed
toward
gear
If
the
clearance
is
smaller
than
the
specified
value
replace
baulk
ring
Standard
baulk
ring
to
cone
clearance
0
80
to
1
65
mm
0
0315
to
0
0650
inl
If
it
is
less
than
0
5
mm
0
020
in
a
worn
baulk
ring
may
be
the
cause
and
a
new
ring
should
be
fitted
TM806
Fig
MT
36
Baulh
Ring
10
Cone
Gap
Manual
Transmission
SHlFTING
INSERT
Replace
if
worn
excessively
worn
unevenly
deformed
or
damaged
OIL
SEAL
I
Discard
a
ring
or
oil
seal
which
is
once
removed
Replace
oil
seal
if
sealing
lip
is
deformed
Or
cracked
Also
discard
oil
seal
if
spring
is
out
of
position
2
Check
the
oil
seal
lip
contacting
with
shaft
if
necessary
replace
oil
seal
and
shaft
as
a
set
REAR
ENGINE
MOUNTING
INSULATOR
Replace
rear
engine
mounting
insu
lator
if
weakened
deteriorated
or
cracked
ASSEMBLY
To
assemble
reverse
the
order
of
disassembly
Observe
the
following
in
structions
FRONT
COVER
ASSEMBLY
I
Make
sure
that
seal
mating
sur
face
is
clean
Using
a
press
and
Oil
Seal
Drift
ST23800000
drive
new
seal
into
place
on
front
cover
Note
When
pressing
oil
seal
into
place
apply
coat
of
gear
oil
to
surface
adjoining
oil
seal
2
Lubricate
seal
lip
and
main
drive
shaft
with
gear
oil
when
installing
front
cover
Front
4
Main
drive
gear
2
Gear
oil
TM098A
Fig
MT
37
Fronl
Cover
Oil
Seal
MT10
TRANsMISSION
CASE
ASSEMBLY
1
Press
countershaft
needle
bearing
into
transmission
case
from
outside
Note
a
Needle
bearing
should
not
be
fe
used
after
removal
b
When
iDstalling
needle
bearing
be
sure
to
project
it
2
mm
0
08
in
fromtramission
so
front
surface
c
Make
sure
that
needle
bearing
turm
smoothly
d
After
installing
needle
bearing
apply
multi
purpose
grease
to
the
bearing
surface
Front
t
2
mm
0
08
in
TM
707
Fig
MT
38
Counterlhaft
Needk
Bearing
2
Install
withdrawal
lever
ball
pin
on
case
and
tighten
screw
iJ
Tightening
torque
Ball
pin
2
0
to
3
0
kg
m
14
to
22
ft
lb
REAR
EXTENSION
ASSEMBLY
I
Make
sure
that
seal
mating
sur
face
is
clean
Using
a
press
and
Oil
Seal
Drift
ST35300000
drive
new
seal
into
place
on
rear
extension
Note
When
pressing
oil
seal
into
place
apply
coat
of
gear
oil
to
rear
smace
adjoining
oil
seal
2
Coat
oil
seal
lip
and
bushing
with
gear
oil
for
initial
lubri
tion
Pack
cavity
between
seal
lips
with
recom
mended
multi
purpose
grease
when
in
sta1ling
See
Fig
MT
39