ECU DATSUN PICK-UP 1977 User Guide
[x] Cancel search | Manufacturer: DATSUN, Model Year: 1977, Model line: PICK-UP, Model: DATSUN PICK-UP 1977Pages: 537, PDF Size: 35.48 MB
Page 92 of 537
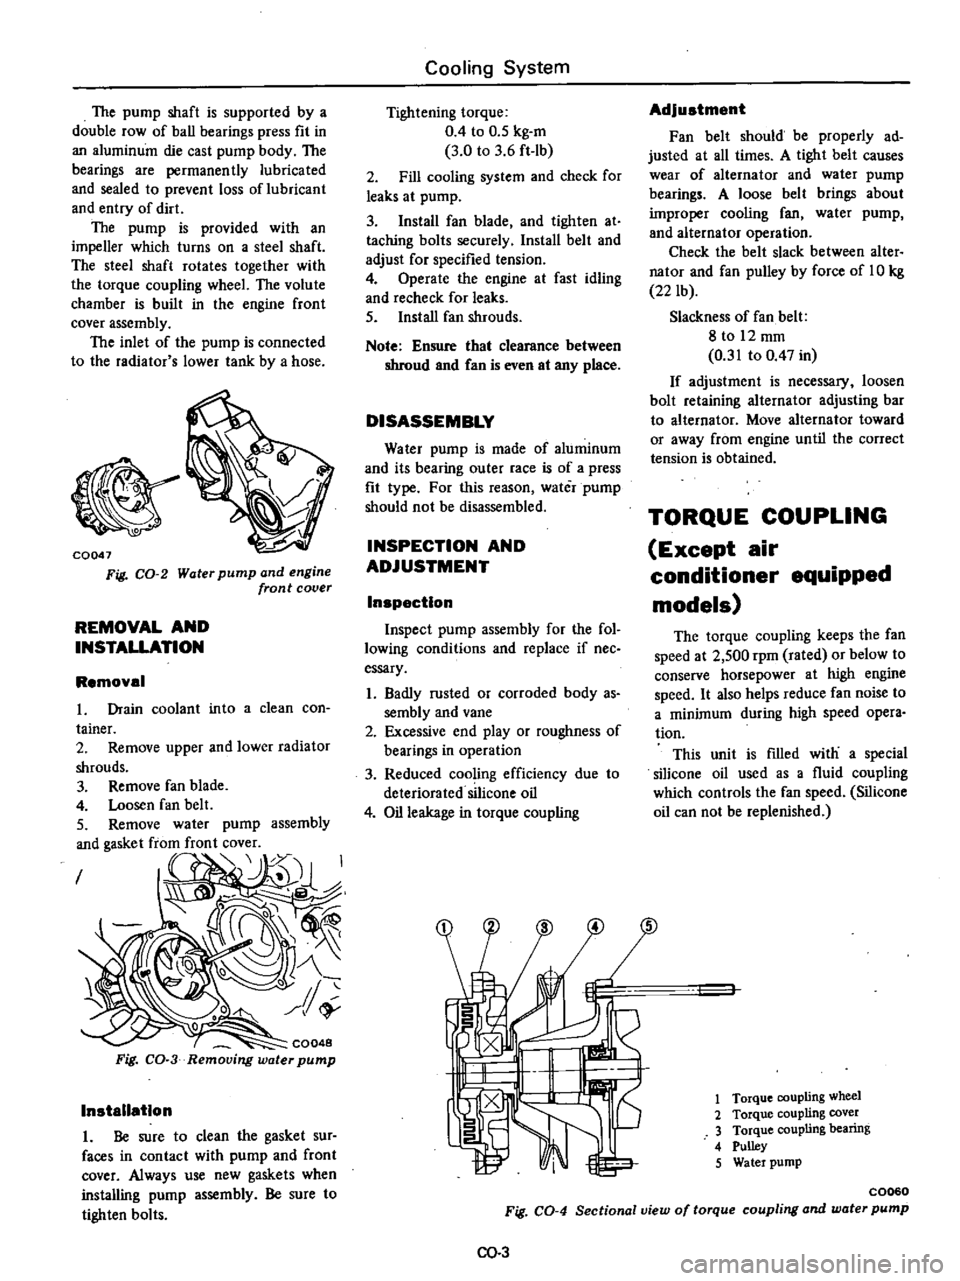
The
pump
shaft
is
supported
by
a
double
row
of
ball
bearings
press
fit
in
an
aluminum
die
cast
pump
body
The
bearings
are
permanently
lubricated
and
sealed
to
prevent
loss
of
lubricant
and
entry
of
dirt
The
pump
is
provided
with
an
impeller
which
turns
on
a
steel
shaft
The
steel
shaft
rotates
together
with
the
torque
coupling
wheeL
The
volute
chamber
is
built
in
the
engine
front
cover
assembly
The
inlet
of
the
pump
is
connected
to
the
radiator
s
lower
tank
by
a
hose
i
o
CQ047
Fig
CO
2
Water
pump
and
engine
front
cover
REMOVAL
AND
INSTALLATION
Removal
in
to
a
clean
con
assembly
I
CQ048
Fig
CO
3
Removing
water
pump
Installation
1
Be
sure
to
clean
the
gasket
sur
faces
in
contact
with
pump
and
front
cover
Always
use
new
gaskets
when
installing
pump
assembly
Be
sure
to
tighten
bolts
Cooling
System
Tightening
torque
0
4
to
0
5
kg
m
3
0
to
3
6
ft
lb
2
Fill
cooling
system
and
check
for
leaks
at
pump
3
Install
fan
blade
and
tighten
at
taching
bolts
securely
Install
belt
and
adjust
for
specified
tension
4
Operate
the
engine
at
fast
idling
and
recheck
for
leaks
5
Install
fan
shrouds
Note
Ensure
that
clearance
between
shroud
and
Can
is
even
at
any
place
DISASSEMBLY
Water
pump
is
made
of
aluminum
and
its
bearing
outer
race
is
of
a
press
fit
type
For
this
reason
water
pump
should
not
be
disassembled
INSPECTION
AND
ADJUSTMENT
Inspection
Inspect
pump
assembly
for
the
fol
lowing
conditions
and
replace
if
nee
essary
1
Badly
rusted
or
corroded
body
as
sembly
and
vane
2
Excessive
end
play
or
roughness
of
bearings
in
operation
3
Reduced
cooling
efficiency
due
to
deteriorated
silicone
oil
4
Oil
leakage
in
torque
coupling
Adjustment
Fan
belt
should
be
properly
ad
justed
at
all
times
A
tight
belt
causes
wear
of
alternator
and
water
pump
bearings
A
loose
belt
brings
about
improper
cooling
fan
water
pump
and
alternator
operation
Check
the
belt
slack
between
alter
nator
and
fan
pulley
by
force
of
10
kg
22
lb
Slackness
of
fan
belt
8
to
12
mm
0
31
to
0
47
in
If
adjustment
is
necessary
loosen
bolt
retaining
alternator
adjusting
bar
to
alternator
Move
alternator
toward
or
away
from
engine
until
the
correct
tension
is
obtained
TORQUE
COUPLING
Except
air
conditioner
equipped
models
The
torque
coupling
keeps
the
fan
speed
at
2
500
rpm
rated
or
below
to
conserve
horsepower
at
high
engine
speed
It
also
helps
reduce
fan
noise
to
a
minimum
during
high
speed
opera
tion
This
unit
is
filled
with
a
special
silicone
oil
used
as
a
fluid
coupling
which
controls
the
fan
speed
Silicone
oil
can
not
be
replenished
1
Torque
coupling
wheel
2
Torque
coupling
cover
3
Torque
coupling
bearing
4
Pulley
5
Water
pump
C0060
Fig
CO
4
Sectional
view
of
torque
coupling
and
water
pump
00
3
Page 101 of 537

TEMPERATURE
SENSOR
The
temperature
sensor
is
attached
to
the
inside
of
the
air
cleaner
The
bimetal
built
in
the
sensor
detects
the
under
hood
air
temperature
and
opens
or
closes
the
vacuum
passage
in
the
sensor
The
construction
of
the
tempera
ture
sensor
is
shown
in
the
following
CD
V
00
@
I
I
@
j
I
I
1
Protector
cover
Screw
Adjusting
frame
Air
temperature
bi
metal
Rivet
Valve
seat
frame
Lower
frame
Air
bleed
valve
Gasket
Fig
EF
6
Temperature
senior
EF206
VACUUM
MOTOR
AND
AIR
CONTROL
VALVE
The
vacuum
pressure
which
varies
with
opening
of
the
carburetor
throt
tle
acts
upon
the
vacuum
motor
dia
phragm
The
valve
shaft
attached
to
the
diaphragm
is
then
moved
up
or
down
in
response
to
the
vacuum
on
the
diaphragm
This
movement
of
the
valve
shaft
actuates
the
air
control
valve
to
control
the
temperature
of
the
air
to
be
introduced
into
the
air
cleaner
pr
to
I
1
Valve
spring
00
2
Diaphragm
@
3
Retainer
E
F
207
4
Valve
shaft
Fig
EF
7
Vacuum
motor
REMOVAL
AND
INSTALLATION
TEMPERATURE
SENSOR
Removal
Using
pliers
flatten
clip
con
Engine
Fuel
neeting
vacuum
hose
to
sensor
vacuum
tube
I
Pipe
2
Calch
3
Fixed
with
adhesive
4
Hose
5
Tab
6
Clip
7
Gasket
EC019
Fig
EF
B
Removal
of
semor
2
Disconnect
hose
from
sensor
3
Take
off
clip
from
sensor
vacuum
tube
and
dismount
sensor
body
from
air
cleaner
Note
The
gasket
between
sensor
and
air
cleaner
is
bonded
to
the
air
cleaner
side
and
should
not
be
removed
Inatallatlon
Mount
sensor
on
the
specified
position
For
mounting
position
of
sensor
see
the
following
EF717
Fig
EF
9
lalling
se
or
2
Insert
clip
into
vacuum
tube
of
sensor
After
installing
each
vacuum
hose
secure
hose
with
the
clip
Note
Be
sure
to
install
vacuum
hose
correctly
Correct
position
is
R
H
side
to
Nissan
mark
at
the
top
face
of
sensor
for
intake
manifold
L
H
side
for
vacuum
motor
VACUUM
MOTOR
1
Remove
screws
securing
vacuum
motor
to
air
cleaner
2
Disconnect
valve
shaft
attached
to
vacuum
motor
diapluagm
from
air
control
valve
and
remove
cacuum
motor
assembly
from
air
cleaner
3
To
install
reverse
the
removal
procedure
FRESH
AIR
DUCT
I
Disconnect
fresh
air
duct
at
air
cleaner
2
Fresh
air
duct
is
provided
with
projections
on
its
air
inlet
side
end
Hold
fresh
air
duct
with
a
hand
and
carefully
pull
out
from
radiator
core
support
while
turning
it
in
either
direction
3
To
install
reverse
the
removal
procedure
Be
sure
to
insert
projec
lions
of
fresh
air
duct
securely
into
mounting
hole
in
radiator
core
sup
port
EF518
EF
5
Fresh
air
duct
Air
cleaner
Duct
mounting
hole
Radiator
Radiator
core
support
Fig
EF
I0
Removal
of
fresh
air
duct
Page 102 of 537
r
AIR
CLEANER
1
Loosen
bolts
securing
air
cleaner
to
air
cleaner
bracket
2
Loosen
air
cleaner
lock
bolt
and
remove
air
cleaner
from
carburetor
Disconnect
the
following
hoses
when
dismounting
air
cleaner
Under
hood
air
inlet
hose
Hot
air
inlet
hose
Vacuum
hose
Sensor
to
intake
manifold
Vacuum
hose
Sensor
to
vacuum
motor
Vacuum
hose
Idle
compensator
to
intake
manifold
Hose
Air
pump
to
air
cleaner
Hose
AB
valve
to
air
cleaner
Hose
Carburetor
to
air
cleaner
Blow
by
hose
Air
cleaner
to
rocker
cover
Hose
Air
control
vaive
to
air
cleaner
California
models
only
3
To
install
reverse
the
removal
procedure
INSPECTION
1
AIR
CLEANER
ELEMENT
Viscous
paper
type
air
cleaner
ele
ment
does
not
require
any
cleaning
operation
until
it
is
replaced
periodi
cally
Brushing
or
blasting
operation
will
cause
clogging
and
result
in
enrich
ment
of
carburetor
mixture
and
should
never
be
conducted
For
reo
placement
interval
of
air
cleaner
ele
ment
refer
to
Maintenance
Sched
ule
2
HOT
AIR
CONTROL
SYSTEM
In
warm
weather
it
is
difficult
to
find
out
malfunction
of
hot
air
control
system
In
cold
wea
thee
however
malfunction
of
air
control
valve
due
to
disconnection
or
deterioration
of
vacu
um
hose
between
intake
manifold
and
vacuum
motor
and
insufficient
dura
bility
of
air
control
valve
will
cause
insufficient
automatic
control
opera
tion
for
intake
air
and
result
in
engine
disorder
including
I
Stall
or
hesitation
of
engine
oper
ation
2
Increase
in
fuel
consumption
3
uck
of
power
Engine
Fuel
These
phenomena
reveal
malfunc
tion
of
hot
air
control
system
If
these
phenomena
should
occur
check
hot
air
control
system
as
described
in
the
following
before
carrying
out
inspec
tion
of
carburetor
2
1
Vacuum
hose
Intake
manifold
to
3
way
connec
tor
3
way
connector
to
temperature
sensor
3
way
connector
to
idle
com
pensator
temperature
sensor
to
vacu
um
motor
I
Check
that
vacuum
hoses
are
se
curely
connected
in
correct
postion
2
Check
each
hose
for
cracks
or
distortion
hose
clip
for
condition
Note
Vacuum
hose
position
R
H
side
of
Nissan
mark
on
the
top
of
sensor
is
for
intake
manifold
L
U
side
of
the
mark
is
for
vacuum
motor
2
2
Vacuum
motor
I
With
engine
stopped
disconnect
fresh
air
duct
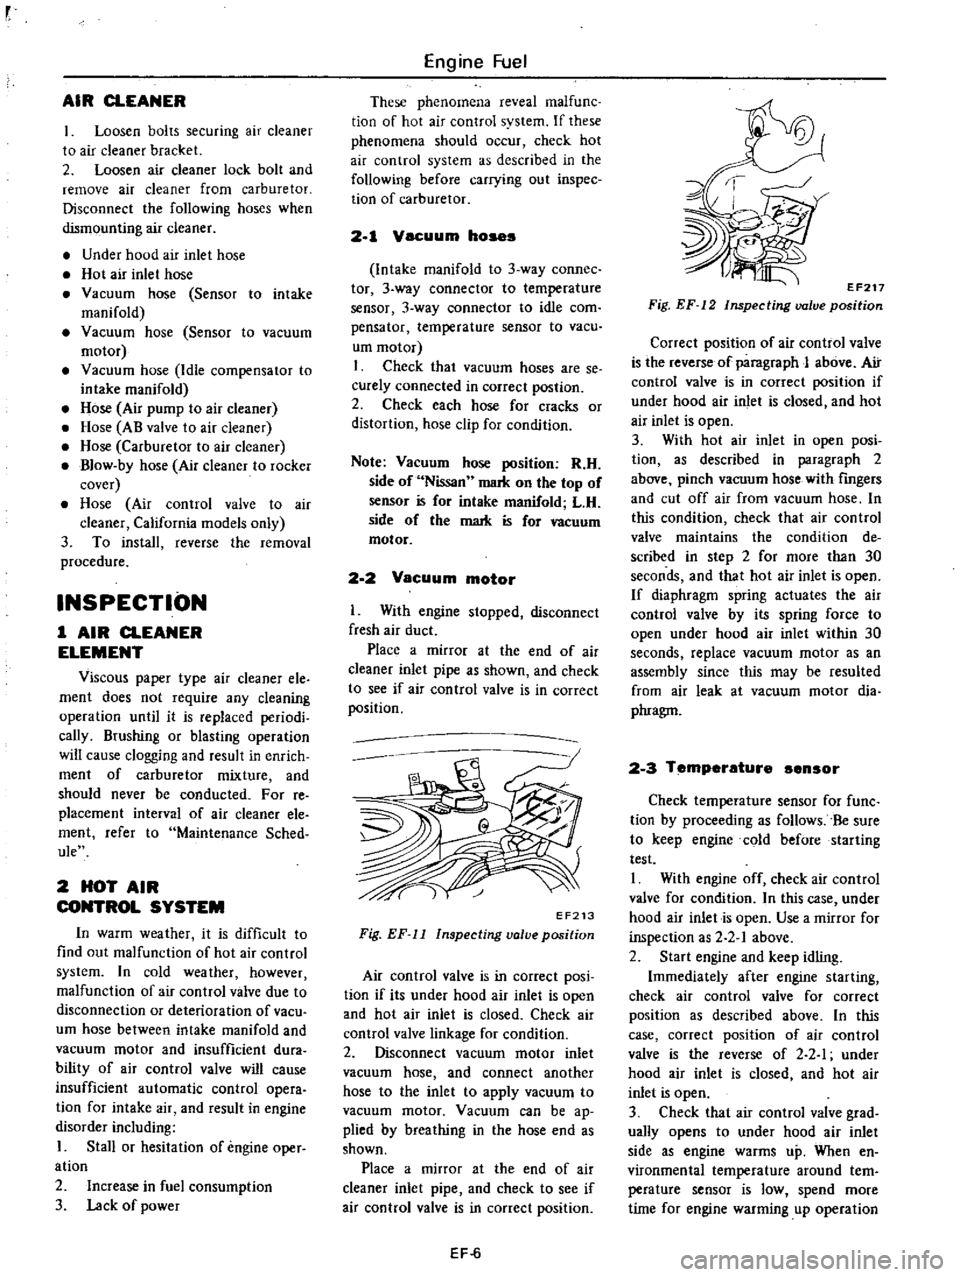
Place
a
mirror
at
the
end
of
air
cleaner
inlet
pipe
as
shown
and
check
to
see
if
air
con
trol
valve
is
in
correct
position
EF213
Fig
EF
11
Inspecting
valve
position
Air
control
valve
is
in
correct
posi
tion
if
its
under
hood
air
inlet
is
open
and
hot
air
inlet
is
closed
Check
air
control
valve
linkage
for
condition
2
Disconnect
vacuum
motor
inlet
vacuum
hose
and
connect
another
hose
to
the
inlet
to
apply
vacuum
to
vacuum
motor
Vacuum
can
be
ap
plied
by
breathing
in
the
hose
end
as
shown
Place
a
mirror
at
the
end
of
air
cleaner
inlet
pipe
and
check
to
see
if
air
control
valve
is
in
correct
position
EF
6
EF217
Fig
EF
12
Inspecting
valve
position
Correct
position
of
air
control
valve
is
the
reverse
of
paragraph
J
above
Air
control
valve
is
in
correct
position
if
under
hood
air
inlet
is
closed
and
hot
air
inlet
is
open
3
With
hot
air
inlet
in
open
posi
tion
as
described
in
paragraph
2
above
pinch
vacuum
hose
with
fingers
and
cut
off
air
from
vacuum
hose
In
this
condition
check
that
air
control
valve
maintains
the
condition
de
scribed
in
step
2
for
more
than
30
seconds
and
that
hot
air
inlet
is
open
If
diaphragm
spring
actuates
the
air
control
valve
by
its
spring
force
to
open
under
hood
air
inlet
within
30
seconds
replace
vacuum
motor
as
an
assembly
since
this
may
be
resulted
from
air
leak
at
vacuum
motor
dia
phragm
2
3
Temperature
ensor
Check
temperature
sensor
for
func
tion
by
proceeding
as
follows
Be
sure
to
keep
engine
cold
before
starting
test
I
With
engine
off
check
air
control
valve
for
condition
In
this
case
under
hood
air
inlet
is
open
Use
a
mirror
for
inspection
as
2
2
1
above
2
Start
engine
and
keep
idling
Immediately
after
engine
starting
check
air
control
valve
for
correct
position
as
described
above
In
this
case
correct
position
of
air
control
valve
is
the
reverse
of
2
2
I
under
hood
air
inlet
is
closed
and
hot
air
inlet
is
open
3
Check
that
air
control
valve
grad
ually
opens
to
under
hood
air
inlet
side
as
engine
warms
up
When
en
vironmental
temperature
around
tern
perature
sensor
is
low
spend
more
time
for
engine
warming
up
operation
Page 104 of 537
Engine
Fuel
REMOVAL
AND
INSTALLATION
Remove
air
cleaner
cover
2
Remove
hose
connecting
idle
compensator
and
3
way
connector
3
Loosen
screws
securing
idle
com
pensator
to
air
cleaner
then
remove
idle
compensator
Notes
a
When
removing
idle
compensator
remove
gasket
and
plate
b
When
removing
screw
securing
idle
compensator
to
air
cleaner
be
care
ful
not
to
miss
the
saew
4
To
install
reverse
the
removal
procedure
INSPECTION
I
Check
tha
t
valve
IS
m
closed
position
when
bi
metal
temperature
is
lower
than
operating
temperature
To
check
breathe
air
into
tube
or
suck
DESCRIPTION
The
fuel
fJlter
is
a
cartridge
type
It
uses
a
paper
element
which
can
be
checked
for
condition
from
the
out
side
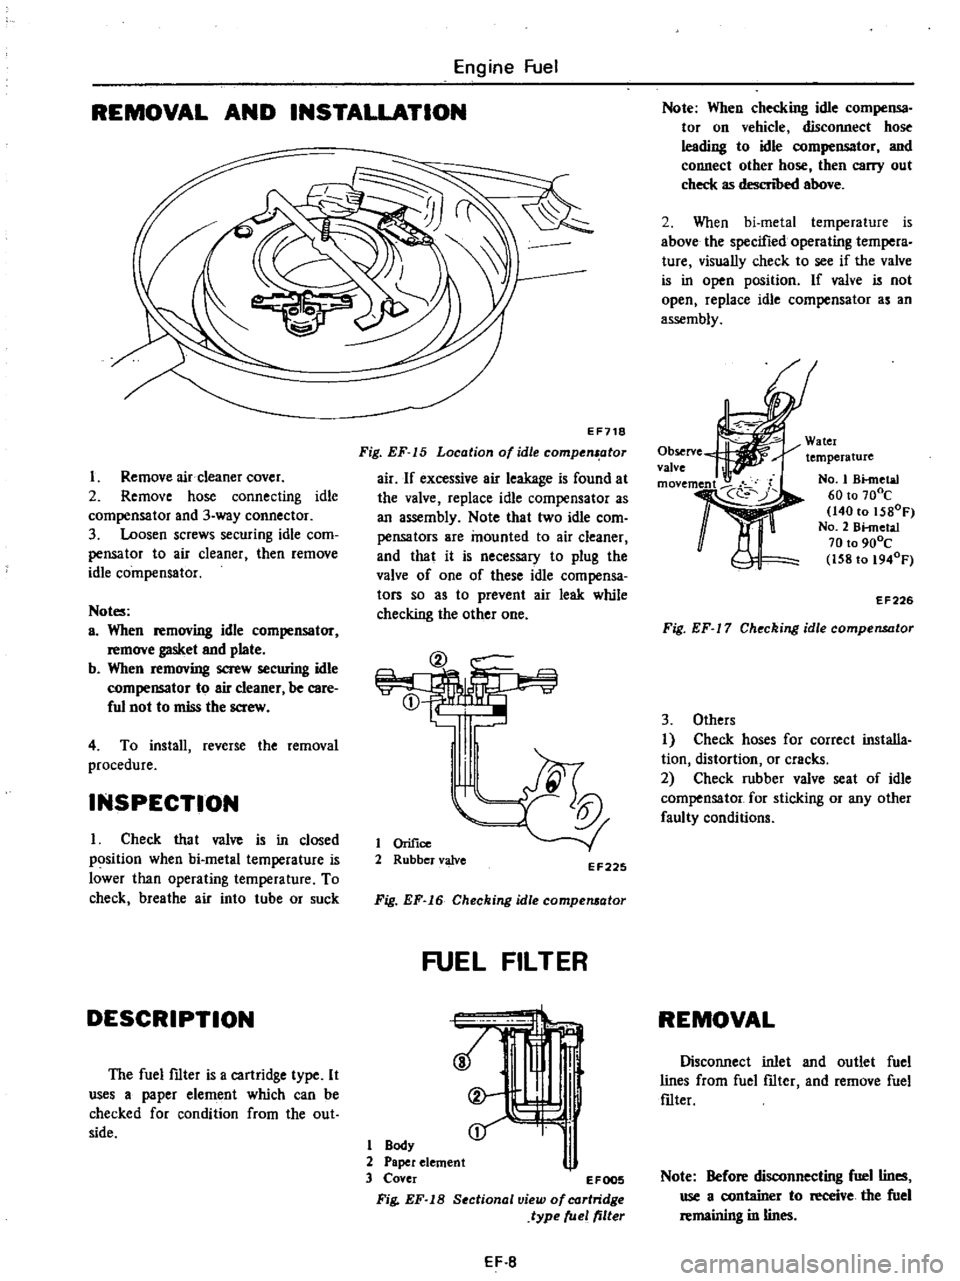
EF718
Fig
EF
15
Location
of
idle
compenl
otor
air
If
excessive
air
leakage
is
found
at
the
valve
replace
idle
compensator
as
an
assembly
Note
that
two
idle
com
pensators
are
mounted
to
air
cleaner
and
that
it
is
necessary
to
plug
the
valve
of
one
of
these
idle
compensa
tors
so
as
to
prevent
air
leak
while
checking
the
other
one
@
CD
I
tl
1
Orifice
2
Rubber
valve
EF225
Fig
EF
16
Checking
idle
compelll
lor
FUEL
FILTER
1
Body
2
Paper
element
3
Cover
1
EFOO5
Fig
EF
18
Sectional
view
of
cartridge
type
fuel
filter
EF
8
Note
When
checking
idle
compensa
tor
on
vehicle
disconnect
hose
leading
to
idle
compensator
and
connect
other
hose
then
carry
out
check
as
descn
bed
above
2
When
bi
metal
temperature
is
above
the
specified
operating
tempera
ture
visually
check
to
see
if
the
valve
is
in
open
position
If
valve
is
not
open
replace
idle
compensator
as
an
assembly
Watcr
temperature
Observe
valve
11t
No
1
Bknctal
60
to
70De
140
to
1580F
NO
2
Bi
metal
70
to
900C
158to
1940F
EF226
Fig
EF
17
Checking
idle
compensator
3
Others
I
Check
hoses
for
correct
installa
tion
distortion
or
cracks
2
Check
rubber
valve
seat
of
idle
compensator
for
sticking
or
any
other
faulty
conditions
REMOVAL
Disconnect
inlet
and
outlet
fuel
lines
from
fuel
fJlter
and
remove
fuel
fJlter
Note
Before
disconnecting
fuel
lines
use
a
container
to
receive
the
fuel
remaining
in
lines
Page 105 of 537
DESCRIPTION
FUEL
PUMP
TESTING
STATIC
PRESSURE
TEST
CAPACITY
TEST
DESCRIPTION
The
fuel
pump
transfers
fuel
from
the
tank
to
the
carburetor
in
sufficient
quantity
to
meet
the
engine
require
ments
at
any
speed
or
load
The
fuel
pump
is
a
pulsating
type
designed
for
easy
maintenance
It
con
sists
of
a
body
a
rocker
arm
assembly
a
fuel
diaphragm
a
fuel
diaphragm
spring
seal
inlet
and
outlet
valves
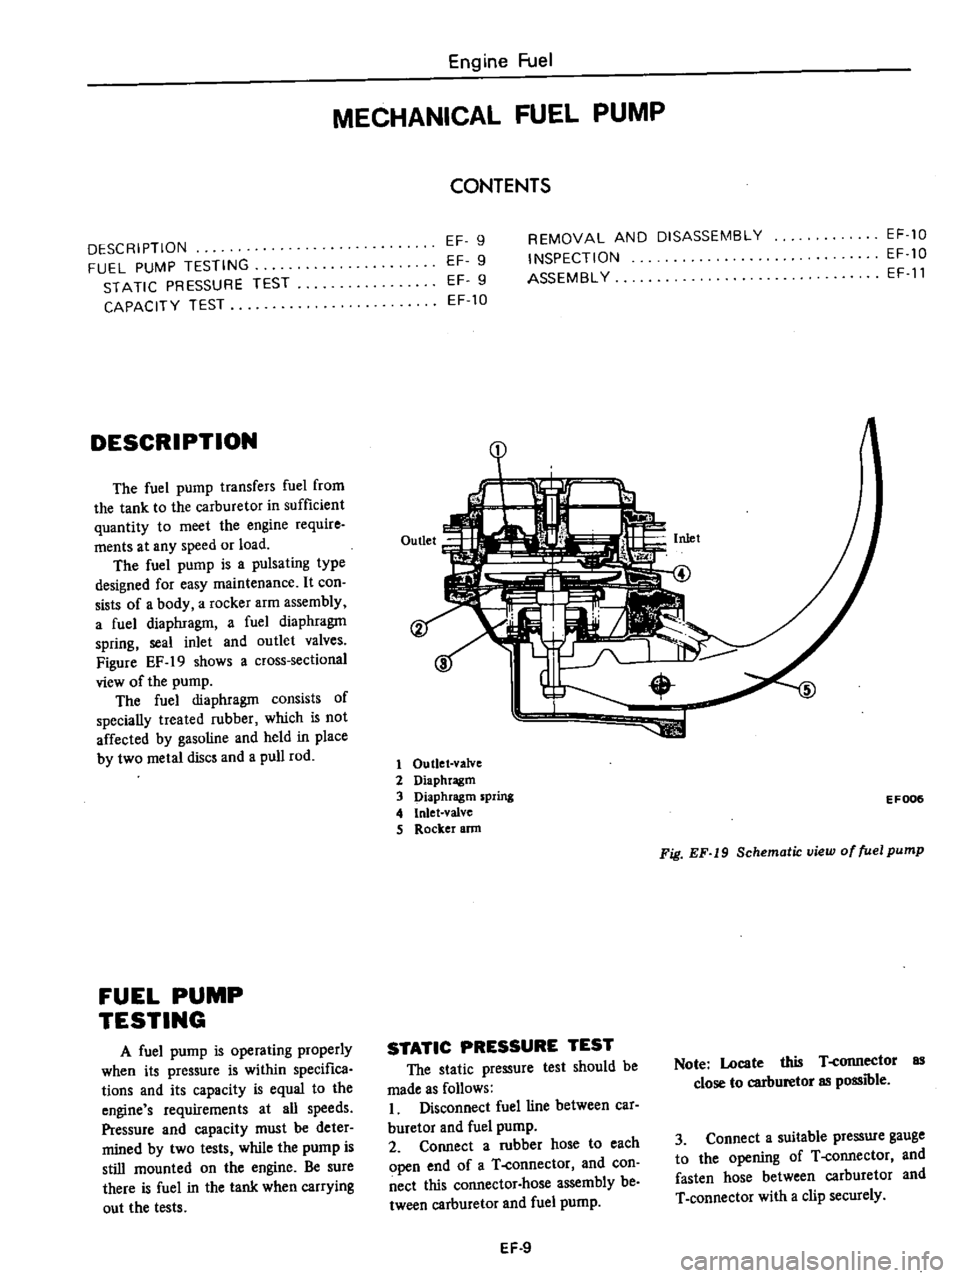
Figure
EF
19
shows
a
cross
sectional
view
of
the
pump
The
fuel
diaphragm
consists
of
specially
treated
rubber
which
is
not
affected
by
gasoline
and
held
in
place
by
two
metal
discs
and
a
pull
rod
FUEL
PUMP
TESTING
A
fuel
pump
is
operating
properly
when
its
pressure
is
within
specifica
tions
and
its
capacity
is
equal
to
the
engine
s
requirements
at
all
speeds
Pressure
and
capacity
must
be
deter
mined
by
two
tests
while
the
pump
is
still
mounted
on
the
engine
Be
sure
there
is
fuel
in
the
tank
when
carrying
out
the
tests
Engine
Fuel
MECHANICAL
FUEL
PUMP
CONTENTS
EF
9
EF
9
EF
9
EF
10
REMOVAL
AND
DISASSEMBLY
INSPECTION
ASSEMBL
Y
EF
10
EF
10
EF
11
1
1
Outlet
valve
2
Diaphragm
3
Diaphragm
spring
4
Inlet
valve
S
Rocker
ann
EF006
Fig
EF
19
Schematic
view
of
fuel
pump
STATIC
PRESSURE
TEST
The
static
pressure
test
should
be
made
as
follows
I
Disconnect
fuel
line
between
car
buretor
and
fuel
pump
2
Connect
a
rubber
hose
to
each
open
end
of
a
T
connector
and
con
nect
this
connector
hose
assembly
be
tween
carburetor
and
fuel
pump
Note
Locate
this
T
connector
as
close
to
carburetor
as
possible
3
Connect
a
suitable
pressure
gauge
to
the
opening
of
T
connector
and
fasten
hose
between
carburetor
and
T
connector
with
a
clip
securely
EF
9
Page 106 of 537

4
Run
the
engine
at
varying
speeds
5
The
pressure
gauge
indicates
static
fuel
pressure
in
the
line
The
gauge
reading
should
be
within
the
following
range
0
21
to
0
27
kg
em2
3
0
to
3
8
psi
Note
If
the
fuel
in
carburetor
float
chamber
has
run
out
and
engine
has
stopped
clip
and
pour
fuel
into
carburetor
Fasten
clip
secure
ly
and
repe
1
static
pressure
test
Pressure
below
the
lower
limit
indi
cates
extreme
wear
on
one
part
or
a
small
amount
of
wear
on
each
working
part
It
also
indicates
ruptured
dia
phragm
worn
warped
dirty
or
gum
ming
valves
and
seats
or
a
weak
diaphragm
return
spring
Pressure
above
the
upper
limit
indicates
an
excessively
strong
tension
of
dia
phragm
return
spring
or
a
diaphragm
that
is
too
tight
Both
of
these
condi
tions
require
the
removal
of
pump
assembly
for
replacement
or
repair
CAPACITY
TEST
The
capacity
test
is
made
only
when
static
pressure
is
within
the
specifications
To
make
this
test
pro
ceed
as
follows
1
Disconnect
pressure
gauge
from
T
connector
and
in
its
vacant
place
install
a
suitable
container
as
a
fuel
sump
2
Run
engine
at
1
000
rpm
3
The
pump
should
deliver
1
000
cc
2
11
US
pt
of
fuel
in
one
minute
or
less
If
little
or
no
fuel
flows
from
the
open
end
of
pipe
it
is
an
indication
that
fuel
line
is
clogged
or
pump
is
malfunctioning
REMOVAL
AND
DISASSEMBLY
Remove
fuel
pump
assembly
by
unscrewing
two
mounting
nuts
and
disassemble
in
the
following
order
1
Separate
upper
body
and
lower
body
by
unscrewing
body
set
screws
Engine
Fuel
2
Take
off
cap
and
cap
gasket
by
removing
cap
screws
3
Unscrew
elbow
and
connector
4
Take
off
valve
retainer
by
un
screwing
two
retainer
screws
and
re
move
two
valves
5
To
remove
diaphragm
press
down
its
center
against
spring
force
With
diaphragm
pressed
down
tilt
it
until
the
end
of
pull
rod
touches
the
inne
wall
of
body
Then
release
diaphragm
to
unhook
push
rod
Be
careful
during
this
operation
not
to
damage
diaphragm
or
oil
se
L
i
J
EFOO7
Fig
EF
20
Remouing
pull
rod
6
Drive
rocker
arm
pin
out
with
a
press
or
hammer
8
o
6
7
8
@
INSPECTION
I
Check
upper
body
and
lower
body
for
cracks
EF
10
I
fuel
pump
cap
2
Cap
gasket
3
Valve
packing
4
fuel
pump
val
e
assembly
S
Valve
retainer
6
Diaphragm
assembly
7
Diaphragm
spring
8
PuRro
9
Lower
body
seal
washer
10
Lower
body
seal
11
Inkl
connector
12
Outlet
connector
13
Rocker
arm
spring
14
Rocker
arm
I
S
Rocker
artyl
side
pin
16
Fuel
pump
packing
17
Spacer
fuel
pump
fo
cylinder
block
EF510
Fig
EF
21
Slruc
ure
of
fuel
pump
2
Check
valve
assembly
for
wear
on
valve
and
valve
spring
Blow
valve
assembly
with
brea
th
to
examine
its
function
Page 108 of 537

854
co
in
in
one
minute
or
less
If
no
gasoline
or
only
a
little
flows
from
open
end
of
pipe
with
pump
operated
or
if
pump
does
not
work
perform
the
following
diagnosis
Notes
3
Do
not
connect
battery
in
reverse
polarity
which
if
left
for
a
long
time
would
damage
transitor
circuit
and
disable
pump
Engine
Fuel
b
Do
not
let
fall
pump
as
it
may
damage
electronic
components
c
Do
not
apply
overvoitage
max
l
8Y
Overvoltage
starting
by
quick
charge
or
tage
running
would
deteriorate
or
damage
elec
tronic
components
Fuel
pressure
maximum
0
32
kg
cm
4
6
psi
REMOVAL
AND
INSTALLATION
Flom
fuel
tank
Electric
fuel
pump
is
installed
on
bracket
with
two
bolts
This
bracket
is
located
on
R
H
side
member
adjacent
to
fuel
tank
I
Remove
inlet
hose
from
fuel
pump
Also
remove
outlet
hose
run
ning
to
engine
Receive
fuel
remaining
in
fuel
hose
in
a
suitable
container
2
Disconnect
harness
at
connector
3
Remove
bolts
securing
fuel
pump
to
bracket
and
detach
fuel
pump
4
Installation
is
the
reverse
order
of
removal
9
@
1
Cover
2
Magnet
3
Cover
gasket
4
Filter
5
Gasket
6
Spring
retainer
7
Washer
8
O
ring
9
Inlet
valve
10
Retutn
PIing
11
Plunger
12
Plunger
cylinder
13
Body
To
carburetor
1
Elecuic
fuel
pump
2
Mounting
bracket
3
Fuel
mter
EF72D
Fig
EF
23
Electric
fuel
pump
DISASSEMBLY
Do
not
disassemble
unless
pump
is
faulty
I
Remove
cover
with
wrench
and
take
out
cover
gasket
magnet
and
filter
from
pump
body
2
When
removing
plunger
take
out
spring
retainer
from
plunger
tube
3
Then
take
out
washer
O
ring
inlet
valve
return
spring
and
plunger
from
tube
Note
Do
not
disassemble
electronic
components
If
n
replace
with
new
ones
6
EF721
Fig
EF
24
Exploded
view
of
electric
fuel
pump
EF
12
ASSEMBLY
I
Before
assembly
clean
all
parts
with
gasoline
and
compressed
air
com
pletely
Notes
a
If
gask
t
an
d
fdterare
faulty
r
place
b
Clean
magnet
and
cover
for
fault
c
Take
care
not
to
defonn
thin
tube
d
Assemble
plunger
return
spring
inlet
valve
O
ring
washer
and
set
spring
retainer
in
that
order
e
Assemble
filter
gasket
and
cover
with
f
Tighten
cover
with
wrench
to
the
stopper
If
component
parts
are
dirty
after
disassembly
clean
as
follows
Wash
fIlter
and
strainer
with
clean
gasoline
and
blow
with
compressed
air
When
cleaning
parts
check
fllter
for
fault
If
faulty
replace
Wash
plunger
plunger
cylinder
and
inlet
valve
with
clean
gasoline
and
blow
dust
off
with
compressed
air
2
Check
c
v
m
lI
parts
for
wear
or
damage
If
they
are
found
faulty
replace
them
3
Insert
plunger
assembly
into
plunger
cylinder
of
body
and
apply
electric
current
to
it
Move
the
assembly
up
and
down
If
the
assembly
does
not
move
it
shows
that
the
electric
uuit
is
faulty
and
it
must
be
replaced
Page 147 of 537

9
From
air
pump
l
h
1
Not
actuated
REMOVAL
AND
INSTALLATION
Air
p
mp
sir
cleaner
Remove
air
hose
then
detach
air
cleaner
from
hoodledge
Air
cleaner
element
and
Ii
r
deancr
lower
body
are
built
into
a
unit
construction
Replace
air
cleaner
clcl
nen
and
lower
body
as
an
assembly
J
J
tt
c
t
o
J
EC
323
Fig
EC
26
Replacing
oir
cleaner
element
Air
pum
Remove
air
hoses
from
air
pump
2
Loosen
air
pump
adjusting
bar
mounting
bolts
and
air
pump
mount
ing
bolts
then
remove
air
pump
drive
bell
3
Remove
air
pump
pulley
4
Remove
air
pump
from
bracket
Air
control
valve
California
models
l
Disconnect
air
hoses
and
a
vacu
um
hose
from
air
control
valve
2
Remove
air
con
trol
valve
from
bracket
E
A
R
valve
California
modela
Remove
vacuum
pipe
and
air
hose
and
dismount
E
A
R
valve
Emission
Control
System
o
jJ
To
Intake
mamfold
rF
vacuum
r
To
air
cleaner
From
air
pump
EC781
Fig
EC
27
Locotion
of
E
A
R
wive
Antl
backflravalve
Disconnect
air
hose
and
vacuum
hose
from
anti
backfire
valve
Check
valve
Disconnect
hose
and
remove
check
valve
from
air
gallery
pipe
Air
ganery
pIpe
andinJactlon
nozzles
It
is
very
difficult
to
remove
the
air
gallery
from
the
exhaust
manifold
without
bending
the
pipe
which
could
result
in
fractures
or
leakage
There
fore
removal
of
the
air
gallery
pipe
and
injection
nozzles
should
be
under
taken
only
when
they
are
damaged
I
Lubricate
around
the
connecting
portion
of
air
injection
nozzle
and
air
gallery
with
engine
oil
2
Hold
air
injection
nozzle
hexagon
head
with
a
wrench
and
unfasten
flare
screw
connecting
ait
gallery
to
injec
tion
nozzle
Remove
air
gallery
EC
14
To
intake
manifold
vaCUl
lm
r
Y
4
9
Gf
T
I
To
air
cleaner
I
Actuated
EC299
Fig
EC
25
Operation
of
air
control
value
Notes
a
Apply
engine
011
to
rews
several
times
during
above
work
b
Be
atreful
not
to
damage
other
parts
3
Unfasten
air
injection
nozzle
from
cylinder
head
applying
engine
oil
to
screwed
portion
several
times
4
Check
air
gallery
and
nozzle
for
fractures
or
leakage
Clean
air
injection
nozzle
with
a
wire
brush
5
At
time
of
installation
hold
air
injection
nozzle
hexagon
head
with
a
wrench
and
tighten
air
gallery
flange
screw
to
a
torque
of
5
0
to
5
9
kg
m
36
to
43
ft
lb
6
Check
cylinder
head
air
injection
nozzle
and
air
gallery
for
leaks
with
engine
running
Air
pump
relief
vslve
Loosen
carburetor
air
cleaner
mounting
sc
ews
and
remove
air
pump
relief
valve
InstallatIon
Install
in
the
reverse
order
of
reo
moval
DISASSEMBLY
AND
ASSEMBLY
Disassembly
of
air
pump
1
Remove
four
pulley
drive
bolts
and
remove
pulley
from
hub
2
Secure
air
pump
drive
hub
in
a
vise
as
shewn
in
Figure
EC
28
and
remove
four
end
cover
bolts
Page 148 of 537
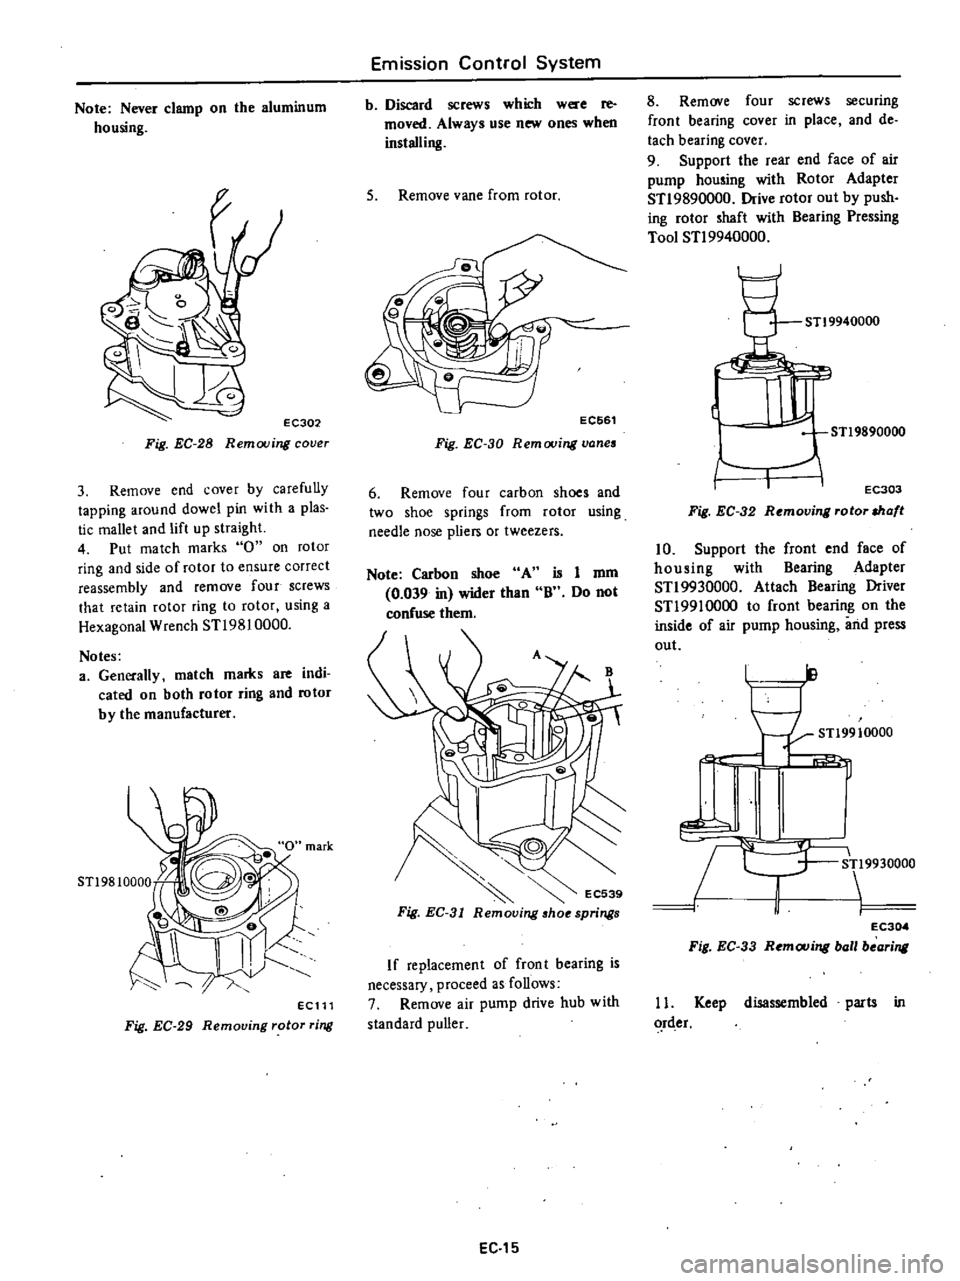
Note
Never
clamp
on
the
aluminum
housing
EC302
Fig
EC
28
Removing
cover
3
Remove
end
cover
by
carefully
tapping
around
dowel
pin
with
a
plas
tic
mallet
and
lift
up
straight
4
Put
match
marks
0
on
rotor
ring
and
side
of
rotor
to
ensure
correct
reassembly
and
remove
four
screws
that
retain
rotor
ring
to
rotor
using
a
Hexagonal
Wrench
STl9810000
Notes
a
Generally
match
marks
are
indi
cated
on
both
rotor
ring
and
rotor
by
the
manufacturer
ECll1
Fig
EC
29
Removing
rotor
ring
Emission
Control
System
b
Discard
screws
which
were
re
moved
Always
use
new
ones
when
installing
5
Remove
vane
from
rotor
EC661
Fig
EC
30
Remooing
vanes
6
Remove
four
carbon
shoes
and
two
shoe
springs
from
rotor
using
needle
nose
pliers
or
tweezers
Note
Carbon
shoe
A
0
039
in
wider
than
confuse
them
is
I
mm
B
Do
not
If
replacement
of
front
bearing
is
necessary
proceed
as
follows
7
Remove
air
pump
drive
hub
with
standard
puller
EC
15
8
Remove
four
screws
securing
front
bearing
cover
in
place
and
de
tach
bearing
cover
9
Support
the
rear
end
face
of
air
pump
housing
with
Rotor
Adapter
STl9890000
Drive
rotor
out
by
push
ing
rotor
shaft
with
Bearing
Pressing
Tool
STl9940000
STl9940000
1Ul
STl9890000
I
I
EC303
Fig
EC
32
Removing
rotor
shaft
10
Support
the
front
end
face
of
housing
with
Bearing
Adapter
STl9930000
Attach
Bearing
Driver
STl9910000
to
front
bearing
on
the
inside
of
air
pump
housing
iuid
press
out
ll
I
I
STl9910000
i
L
9930000
J
1
EC304
Fig
EC
33
Remouing
ball
bearing
11
Keep
disassembled
parts
in
rder
Page 149 of 537

Emission
Control
System
Assembl
of
air
pump
I
Front
bearing
Support
the
rear
end
face
of
air
pump
housing
with
RotOL
Adapter
STl9890000
Press
front
bearing
into
place
with
a
press
arid
Bearing
Ptessing
Tool
STl9940000
I
I
STl9940000
X8
03
Fig
EC
35
Pressing
ball
bearing
L
2
Bearing
cover
Torque
four
bearing
cover
securing
bolts
to
0
1
to
0
2
kg
m
0
7
to
1
4
ft
lb
3
Rotor
shaft
Support
the
inward
bottom
of
rotor
with
Rotor
Stand
STl9920000
Press
rotor
into
place
with
a
press
and
Bearing
Drive
STl9910000
until
the
stepped
portion
of
rotor
shaft
touches
front
bearing
inner
race
C
1
ST
19910000
ST19920000
I
EC3Q7
Fig
EC
36
Pressing
rotor
shaft
Notes
a
Be
sure
to
drive
front
bearing
inner
race
in
b
After
rotor
is
installed
in
place
ensure
that
the
rotor
end
is
pos
tioned
below
the
end
face
of
air
pump
housing
Position
of
rotor
end
below
air
pump
housing
0
050
to
0
150
mm
0
0020
to
0
0059
in
4
Air
pump
drive
hub
Support
the
inward
bottom
of
rotor
with
Rotor
Stand
STl9920000
EC
16
EC562
Fig
EC
34
Componenbr
of
two
vane
type
Press
drive
hub
into
place
with
a
pre
and
Bearing
Driver
STI
991
0000
until
the
end
face
of
drive
hub
touches
froE
c
ing
in
n
c
j
STt9910000
STl9920000
e
r
EC308
Fig
EC
37
Pressing
air
pump
drive
hub
5
Carbon
shoe
1
Place
air
pump
drive
hub
in
a
vise
2
Clean
carbon
dust
etc
from
shoe
grooves
3
Align
rotor
with
housing
proper
ly
Refer
to
Figure
EC
38
Then
insert
carbon
shoes
into
place
noting
their
directions