ECU DATSUN PICK-UP 1977 Workshop Manual
[x] Cancel search | Manufacturer: DATSUN, Model Year: 1977, Model line: PICK-UP, Model: DATSUN PICK-UP 1977Pages: 537, PDF Size: 35.48 MB
Page 308 of 537
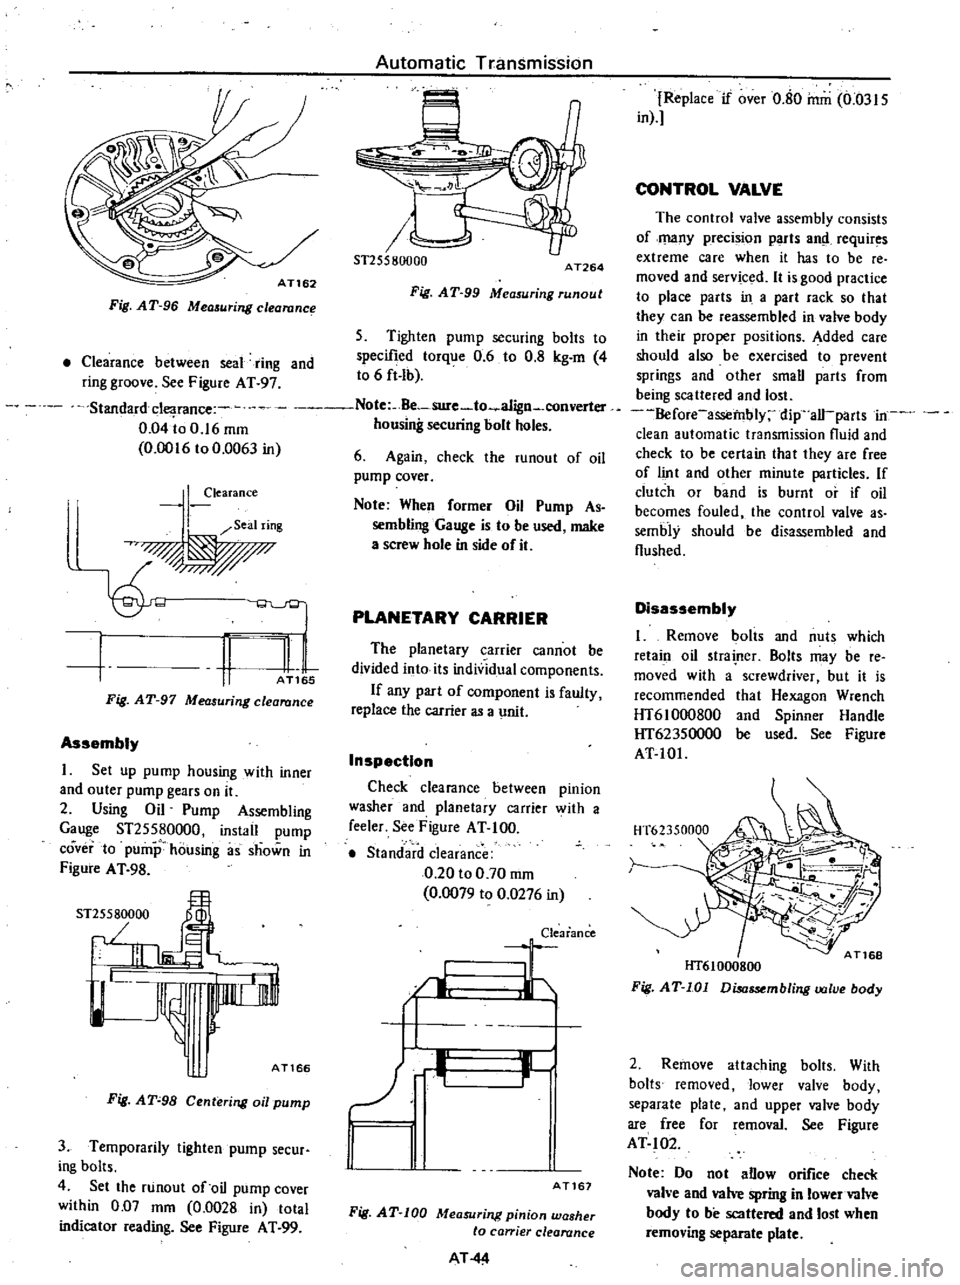
Fig
AT
96
Measuring
clearanc
Automatic
Transmission
6
u
ST255801JOO
AT264
Fig
AT
99
Measuring
runout
5
Tighten
pump
securing
bolts
to
specified
torque
0
6
to
0
8
kg
m
4
to
6
ft
Ib
Clearance
between
seal
ring
and
ring
groove
See
Figure
AT
97
Standarddearance
Note
Be
sure
to
a1ign
converter
0
04
io
0
16
mm
housing
securing
bolt
holes
0
0016
to
0
0063
in
6
Again
check
the
runout
of
oil
pump
cover
I
learance
Seal
ring
q
I
n
l
1
AT
5
Fig
AT
97
Measuring
clearance
Assembly
I
Set
up
pump
housing
with
inner
and
outer
pump
gears
on
it
2
Using
Oil
Pump
Assembling
Gauge
ST25580000
instail
pump
coverta
pump
housing
as
shown
in
Figure
A
T
98
ST
5
000
J
I
I
JL
AT166
Fig
AT
98
Centering
oil
pump
3
Temporarily
lighten
pump
secur
ing
bolts
4
Set
the
runout
of
oil
pump
cover
within
0
D7
mm
0
0028
in
total
indicator
reading
See
Figure
AT
99
Note
When
former
Oil
Pump
As
sembling
Gauge
is
to
be
used
make
a
screw
hole
in
side
of
it
PLANETARY
CARRIER
The
planetary
carrier
cannot
be
divided
into
its
individual
components
If
any
part
of
component
is
faulty
replace
the
carrier
as
a
unit
Inspection
Check
clearance
between
pinion
washer
and
planetary
carrier
with
a
feeler
See
Figure
AT
100
Standard
clearance
0
20
to
0
70
mm
0
0079
to
0
0276
in
Clearance
I
Jr
I
1
11
r
AT167
Fig
AT
100
Measuring
pinion
washer
to
ca
ier
clearance
AT
44
Replace
if
over
0
80
mm
0
0315
in
CONTROL
VALVE
The
control
valve
assembly
consists
of
many
preci
ion
parts
and
requir
s
extreme
care
when
it
has
to
be
reo
moved
and
serviced
It
is
good
practice
to
place
parts
in
a
part
rack
so
that
they
can
be
reassembled
in
valve
body
in
their
proper
positions
Added
care
should
also
be
exercised
to
prevent
springs
and
other
small
parts
from
being
scattered
and
lo
t
Before
assembly
dip
all
parts
in
clean
automatic
transmission
fluid
and
check
to
be
certain
that
they
are
free
of
lint
and
other
minute
particles
If
clutch
or
band
is
burnt
or
if
oil
becomes
fouled
the
control
valve
as
sembly
should
be
di
ssembled
and
flushed
Disassembly
I
Remove
bolts
and
nuts
which
retain
oil
trainer
Bolts
may
be
re
moved
with
a
screwdriver
but
it
is
recommended
that
Hexagon
Wrench
HT610oo800
and
Spinner
Handle
HT62350000
be
used
See
Figure
AT
101
HT61000800
Fig
AT
101
Disassembling
valve
body
2
Remove
attaching
bolts
With
bolts
removed
lower
valve
body
separate
plate
and
upper
valve
body
are
free
for
removal
See
Figure
AT
102
Note
Do
not
allow
orifice
check
vah
e
and
valve
spring
in
lower
valve
body
to
be
scattered
and
lost
when
removing
separate
plate
Page 314 of 537
Using
the
tester
check
the
two
black
yellow
BY
wires
from
the
in
hibitor
switch
in
the
ranges
N
and
I
and
the
tw
re
d
black
RBj
wir
s
in
the
range
R
for
continuity
Turn
range
select
lever
in
both
directions
from
each
lever
set
position
and
check
each
continuity
range
It
is
normal
if
the
electricity
is
on
while
the
lever
is
within
an
angle
of
about
30
on
both
sides
from
each
lever
set
line
How
ever
if
its
continl
ity
range
is
obvious
ly
unequal
on
both
sides
adjustment
is
required
If
any
malfunction
is
found
un
screw
the
fastening
nut
of
the
range
selector
lever
and
two
fastening
bolts
of
the
switch
body
and
then
remove
the
machine
screw
under
the
switch
body
Adjust
the
manual
shaft
correct
ly
to
the
position
N
by
means
of
the
selector
lever
When
the
slot
of
the
shaft
becomes
vertical
the
detent
works
to
position
the
shaft
correctly
with
a
clicking
sound
MSlVe
the
switch
slightly
asj
Je
so
that
the
screw
hole
will
be
aligned
with
the
pin
hole
of
the
internal
rotor
combined
with
the
manual
shaft
and
check
their
alignment
by
inserting
a
1
5
mm
0
059
in
diameter
pin
into
the
holes
If
the
alignment
is
correct
fasten
the
switch
body
with
the
bolts
pull
out
the
pin
tighten
up
the
screw
in
the
hole
and
fasten
the
selector
lever
as
before
Check
the
continuity
again
with
the
tester
If
the
malfunc
tion
still
remains
replace
the
inhibitor
switch
Chcck
whether
the
reverse
lamp
and
the
starter
motor
operate
normal
ly
in
these
ranges
If
Ihere
is
any
lrouble
first
check
the
linkage
If
no
fault
is
found
in
the
linkage
check
the
inhibitor
switch
Separate
the
manual
lever
from
Ihe
remote
control
selector
rod
and
turn
the
range
selcct
lever
to
N
Note
In
the
position
N
the
slot
of
the
manual
shaft
is
vertical
STALL
TEST
The
purpose
of
this
test
is
to
check
the
transmission
and
engine
for
trou
ble
by
measuring
the
maximum
num
bers
of
revolutions
of
the
engine
while
Automatic
Transmission
vehicle
is
held
in
a
stalled
condition
The
carburctor
is
in
full
throttle
opera
tion
with
the
selector
lever
in
ranges
f
2
and
I
respectively
Com
pare
the
measured
results
with
the
slandard
values
Components
to
be
tested
and
test
items
I
Clutches
brake
and
band
in
trans
mission
for
slipping
2
Torque
converter
for
proper
fune
tioning
3
Engine
for
overall
properly
STALL
TEST
PROCEDURES
Before
Icsting
c
heck
the
engine
oil
and
torque
converter
oil
warm
up
the
engine
cooling
water
to
suitable
tem
perature
by
running
at
1
200
rpm
with
the
selector
lever
in
the
range
P
for
several
minutes
Warm
up
the
torque
converter
oil
to
suitable
temperature
6010
1000C
140
to
2l20F
I
Mount
the
engine
tachometer
at
a
location
that
allows
good
visibility
fro
the
dri
er
s
seat
and
put
a
mark
on
specified
revolutions
on
the
meter
2
Secure
the
front
and
rear
wheels
with
chocks
and
apply
the
hand
brake
Be
sure
to
depress
the
brake
pedal
fumly
with
the
left
foot
before
de
pressing
the
accelerator
pedal
3
Throw
the
selector
lever
into
the
range
1
4
Slowly
depress
the
accelerator
pedal
until
the
throttle
valvc
is
fully
opened
Quickly
read
and
record
the
engine
revolution
when
the
engine
begins
to
rotate
steadily
and
then
release
the
accelerator
pedal
5
Shift
the
selector
lever
to
N
and
operate
the
engine
at
approxi
mately
1
200
rpm
for
more
than
one
minute
to
cool
down
the
torque
con
ver
ter
oil
and
coolant
6
Make
similar
stall
tests
in
ranges
2
I
and
RIO
Note
The
stall
test
operation
as
speci
f
d
in
item
4
should
be
I
l3de
wiihin
five
seconds
If
it
takes
too
long
the
oil
deteriorates
an
the
clutches
brake
and
band
are
ad
versely
affected
Sufficient
cooling
time
should
be
given
between
each
AT
5O
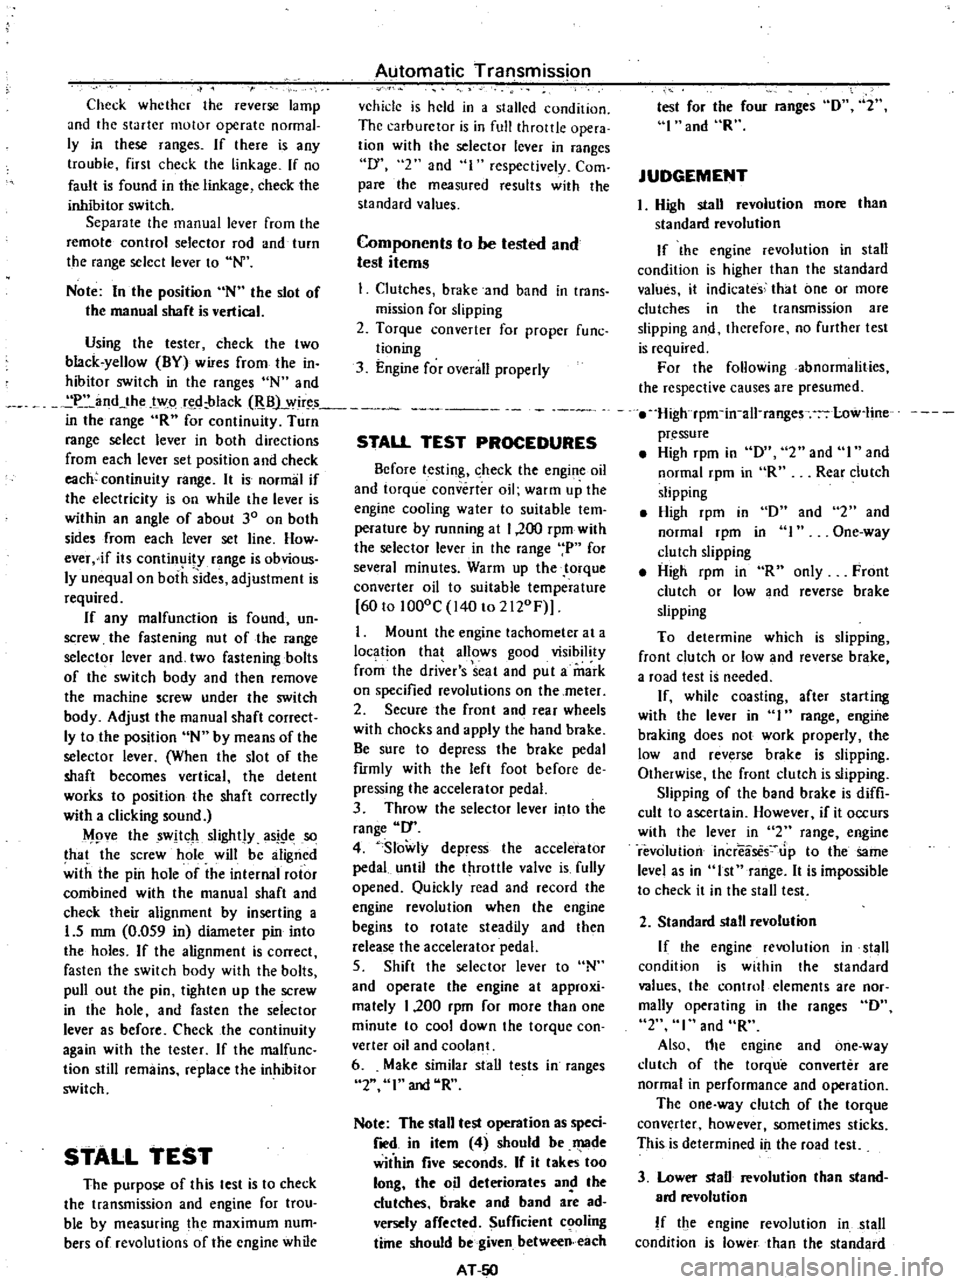
test
for
the
four
ranges
0
2
I
and
R
JUDGEMENT
High
stall
revolution
more
than
standard
revolution
If
the
engine
revolution
in
stall
condition
is
higher
than
the
standard
values
it
indicates
that
one
or
more
clutches
in
the
transmission
are
slipping
and
therefore
no
further
test
is
required
For
the
following
abnormalities
the
respective
causes
are
presumed
High
rpm
in
all
ranges
low
Iine
pressure
High
rpm
in
D
2
and
I
and
normal
rpm
in
R
Rear
clutch
slipping
High
rpm
in
0
and
normal
rpm
in
I
clutch
slipping
High
rpm
in
R
only
Front
clutch
or
low
and
reverse
brake
slipping
To
determine
which
is
slipping
front
clutch
or
low
and
reverse
brake
a
road
test
is
nceded
If
whilc
coasting
after
starting
with
the
lever
in
1
range
engine
braking
does
not
work
properly
the
low
and
reverse
brake
is
slipping
Otherwise
the
front
clutch
is
slipping
Slipping
of
the
band
brake
is
diffi
cult
to
ascertain
However
if
it
occurs
with
the
lever
in
2
range
engine
revolution
increases
Jp
to
thesarne
level
as
in
I
strange
It
is
impossible
to
check
it
in
the
stall
test
2
and
One
way
2
Standard
stall
revolution
If
the
engine
revolution
in
stall
condition
is
within
the
standard
values
the
control
elements
are
nor
mally
operating
in
the
ranges
0
2
I
and
R
Also
tIle
engine
and
one
way
clutch
of
the
torque
converter
are
normal
in
performance
and
operation
The
one
way
clutch
of
the
torque
converter
however
sometimes
sticks
This
is
determined
in
the
road
test
3
Lower
stall
revolution
than
stand
ard
revolution
If
the
engine
revolution
in
stall
condition
is
lower
than
the
standard
Page 335 of 537
PROPELLER
SHAFT
DIFFERENTIAL
CARRIER
REMOVAL
I
Jack
up
rear
of
vehicle
and
sup
port
it
by
placing
a
safety
stand
under
rear
axle
case
Drain
gear
oil
2
Remove
propeller
shaft
and
rear
axle
shafts
These
works
can
be
done
by
referring
to
Rear
Axle
and
Rear
Suspension
3
Loosen
off
bolts
securing
differ
ential
carrier
to
rear
axle
cas
and
take
out
differential
carrier
assembly
PRE
DISASSEMBLY
INSPECTION
Differential
carrier
should
be
in
spected
before
any
parts
are
removed
from
it
These
inspections
are
helpful
to
fmd
the
cause
of
a
problem
and
to
determine
the
corrections
needed
I
Mount
differential
carrier
on
Dif
ferential
Attachment
ST063
I
0000
ST063
10000
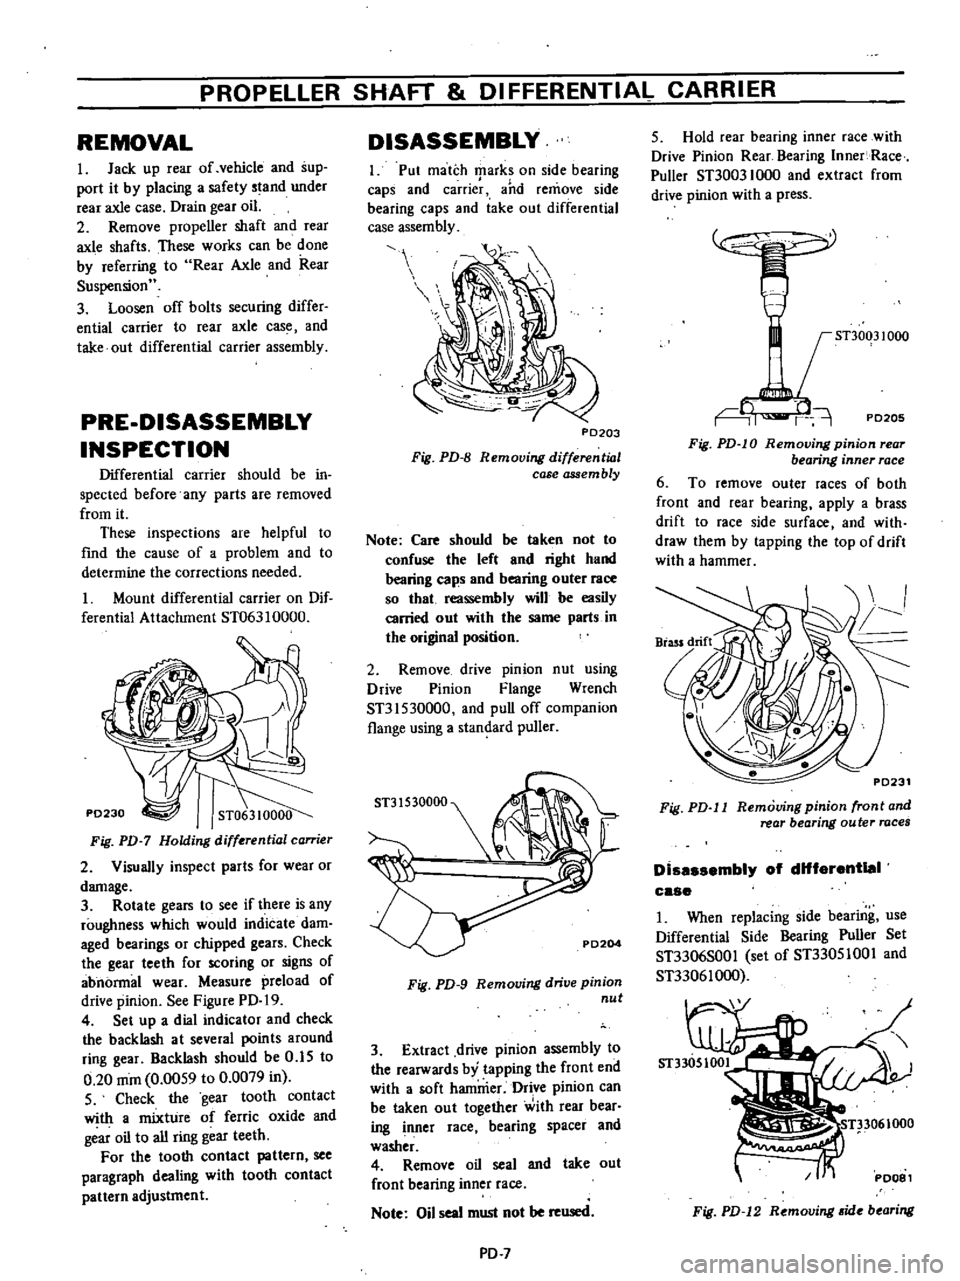
Fig
PD
7
Holding
differential
can
ier
2
Visually
inspect
parts
for
wear
or
damage
3
Rotate
gears
to
see
if
there
is
any
roughness
which
would
indicate
dam
aged
bearings
or
chipped
gears
Check
the
gear
teeth
for
scoring
or
signs
of
abnormal
wear
Measure
preload
of
drive
pinion
See
Figure
PD
19
4
Set
up
a
dial
indicator
and
check
the
backlash
at
several
points
around
ring
gear
Backlash
should
be
0
15
to
0
20
mOl
0
00S9
to
0
0079
in
S
Check
the
gear
tooth
contact
with
a
mixture
of
ferric
oxide
and
g
ar
oil
to
all
ring
gear
teeth
For
the
tooth
contact
pattern
see
paragraph
dealing
with
tooth
contact
pattern
adjustment
DISASSEMBLY
I
Put
match
tpark
on
side
bearing
caps
and
carrier
and
remove
side
bearing
caps
and
take
out
differential
case
assembly
P0203
Fig
PD
B
Removing
differenlwl
case
assem
bly
Note
Care
should
be
taken
not
to
confuse
the
left
and
right
hand
bearing
caps
and
bearing
outer
race
so
that
reassembly
will
be
easily
carried
out
with
the
same
parts
in
the
original
position
2
Remove
drive
pinion
nut
using
Drive
Pinion
Flange
Wrench
ST31530000
and
pull
off
companion
flange
using
a
standard
puller
Fig
PD
9
Removing
drive
pinion
nul
3
Extract
drive
pinion
assembly
to
the
rearwards
by
tapping
the
front
end
with
a
soft
hammer
Drive
pinion
can
be
taken
out
together
with
rear
bear
ing
nner
race
bearing
spacer
and
washer
4
Remove
oil
seal
and
take
out
front
bearing
inner
race
Note
Oil
seal
must
not
be
used
PD
7
5
Hold
rear
bearing
inner
race
with
Drive
Pinion
Rear
Bearing
Inner
Race
Puller
ST30031000
and
extract
from
drive
pinion
with
a
press
STJ0031000
PD205
Fig
PD
10
Removing
pinion
rear
bearing
inner
race
6
To
remove
outer
races
of
both
front
and
rear
bearing
apply
a
brass
drift
to
race
side
surface
and
with
draw
them
by
tapping
the
top
of
drift
with
a
hammer
Fig
PD
l1
Removing
pinion
front
and
rear
bearing
outer
races
Dissssembly
of
dHferentIeI
case
1
When
replacing
side
bearing
use
Differential
Side
Bearing
Puller
Set
ST3306S00
I
set
of
ST330S100
I
and
ST33061000
Fig
PD
12
Removing
ide
bearing
Page 336 of 537
PROPElli
ER
SHAfT
DIFFERENTIAL
G
ARRIERf
Notes
a
PUller
should
be
handled
with
care
in
catchins
the
edge
of
bearing
inner
race
b
Be
careful
not
to
confuse
left
and
right
hand
parts
2
Remove
ring
gear
by
spreading
out
lock
strap
and
loosening
ring
gear
bolts
in
diagonally
3
Punch
off
pinion
mate
shaft
lock
pin
from
ring
gear
side
using
Solid
Punch
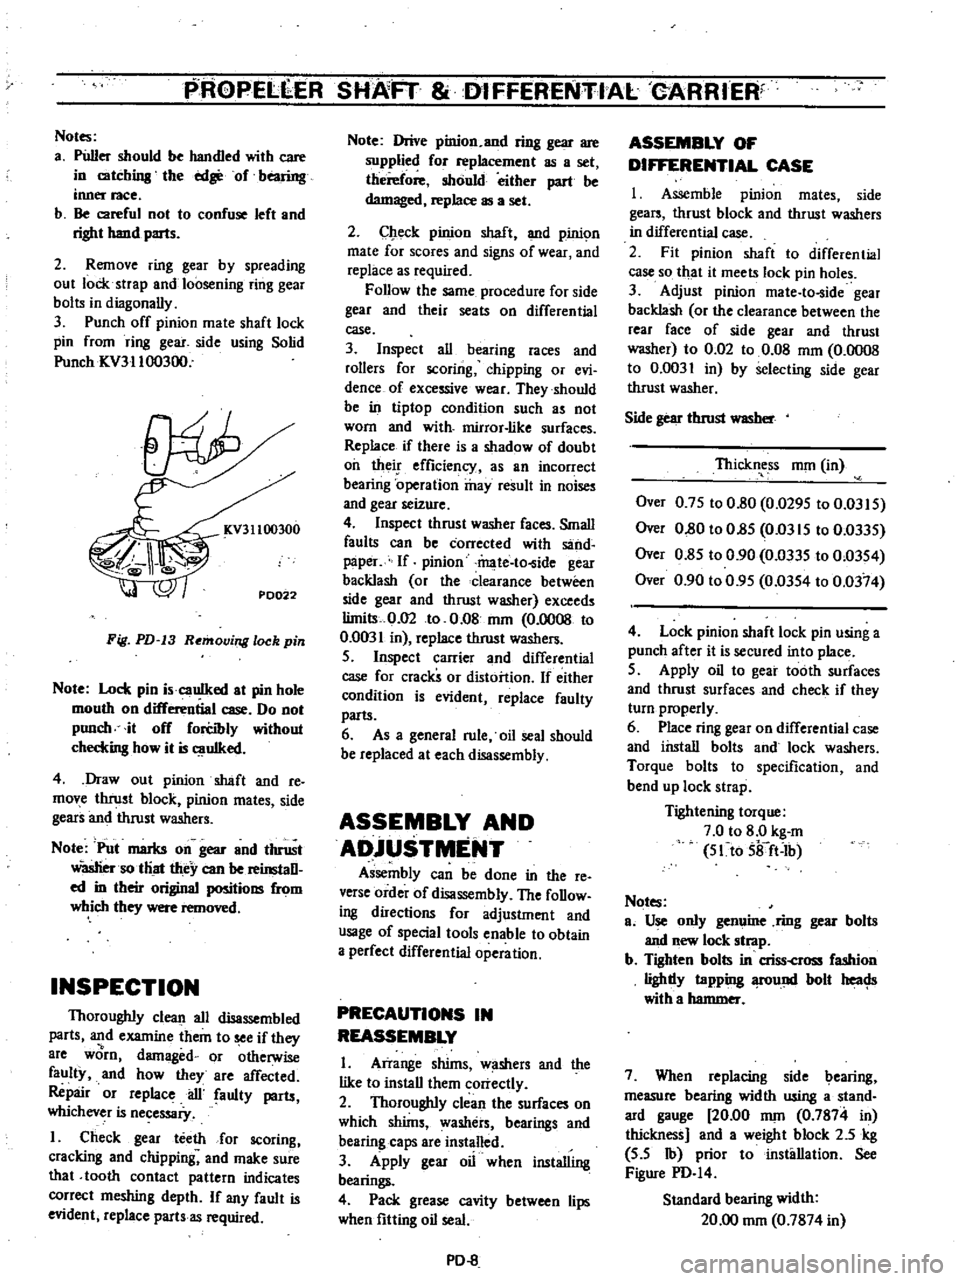
ICV31100300
KV31100300
PD022
Fig
PD
13
Removing
lock
pin
Note
Lock
pin
i
cauIked
at
pin
hole
mouth
on
differential
case
Do
not
punch
it
off
forCibly
without
checkins
how
it
is
uIked
4
Draw
out
pinion
shaft
and
re
move
thrust
block
pinion
mates
side
gears
and
thrust
washers
Note
Put
marks
on
gear
and
thrust
Wasliersotliat
they
can
be
reinstaD
ed
in
their
original
positions
from
which
they
were
removed
INSPECTION
Thoroughly
clean
all
disassembled
parts
and
examine
them
to
see
if
they
8re
worn
damaged
or
otherwise
faulty
and
how
they
are
affected
Repair
or
replace
ail
faulty
parts
whichever
is
necessaiy
I
Check
gear
teeth
for
scoring
cracking
and
chipping
and
make
sure
that
tooth
contact
pattern
indicates
correct
meshing
depth
If
any
fault
is
evident
replace
parts
as
required
Note
Drive
pinion
and
ring
gear
are
supplied
for
replacement
as
a
set
therefore
should
either
part
be
damaged
replace
as
a
set
2
Check
pinion
shaft
and
pinic
m
mate
for
scores
and
signs
of
wear
and
replace
as
required
Follow
the
same
procedure
for
side
gear
and
their
seats
on
differential
case
3
Inspect
all
bearing
races
and
rollers
for
scoring
chipping
or
evi
dence
of
excessive
wear
They
should
be
in
tiptop
condition
such
as
not
worn
and
with
mirror
like
surfaces
Replace
if
there
is
a
shadow
of
doubt
oil
their
efficiency
as
an
incorrect
bearing
operation
may
result
in
noises
and
gear
seizure
4
Inspect
thrust
washer
faces
Small
faults
can
be
corrected
with
sand
paper
If
pinion
mate
to
ide
gear
backlash
or
the
clearance
between
side
gear
and
thrust
washer
exceeds
limits
0
02
to
0
08
nun
0
0008
to
0
0031
in
replace
thrust
washers
S
Inspect
carrier
and
differential
case
for
cracks
or
distortion
If
either
condition
is
evident
replace
faulty
parts
6
As
a
general
rule
oil
seal
should
be
replaced
at
each
disassembly
ASSEMBLY
AND
ADjUSTMENT
Assembly
can
be
done
in
the
reo
verse
order
of
disassembly
The
foDow
ing
directions
for
adjustment
and
usage
of
special
tools
enable
to
obtain
a
perfect
differential
operation
PRECAUTIONS
IN
REASSEMBLY
I
Arrange
shims
w
shers
and
the
like
to
install
them
correctly
2
Thoroughly
clean
the
surfaces
on
which
shims
washers
bearings
and
bearing
caps
are
installed
3
Apply
gear
oil
when
installing
bearings
4
Pack
grease
cavity
between
lips
when
fitting
oil
seal
PD
8
ASSEMBLY
OF
DIFFERENTIAL
CASE
I
Assemble
pinion
mates
side
gears
thrust
block
and
thrust
washers
in
differential
case
2
Fit
pinion
shaft
to
differential
case
so
that
it
meets
lock
pin
holes
3
Adjust
pinion
mate
to
ide
gear
backlash
or
the
clearance
between
the
rear
face
of
side
gear
and
thrust
washer
to
0
02
to
0
08
mOl
0
0008
to
0
0031
in
by
selecting
side
gear
thrust
washer
Side
gear
thrust
WlISber
Thickness
nun
in
Over
0
7S
to
0
80
0
029S
to
0
03IS
Over
0
80
to
O
8S
Om
IS
to
0
033S
Over
0
8S
to
0
90
0
033S
to
0
03S4
Over
0
90
to
0
9S
0
03S4
to
0
0374
4
Lock
pinion
shaft
lock
pin
using
a
punch
after
it
is
secured
into
place
S
Apply
oil
to
gear
tooth
surfaces
and
thrust
surfaces
and
check
if
they
turn
properly
6
Place
ring
gear
on
differential
case
and
install
bolts
and
lock
washers
Torque
bolts
to
specification
and
bend
up
lock
strap
Tightening
torque
7
0
to
8
0
kg
m
S1to
Sifft
Ib
Notes
ao
Use
only
genuine
ring
gear
bolts
and
new
lock
strap
b
Tighten
bolts
in
criss
cross
fashion
lighdy
tapping
fOund
bolt
heac
Js
with
a
hammer
7
When
replacing
side
bearing
measure
bearing
width
using
a
stand
ard
gauge
20
00
nun
0
7874
in
thickness
and
a
weight
block
2
5
kg
S
S
Ib
prior
to
installation
See
Figure
PD
I4
Standard
bearing
width
20
00
nun
0
7874
in
Page 341 of 537
P
ROPELLER
SHAFT
DIFFERENTIAL
CARRIER
c
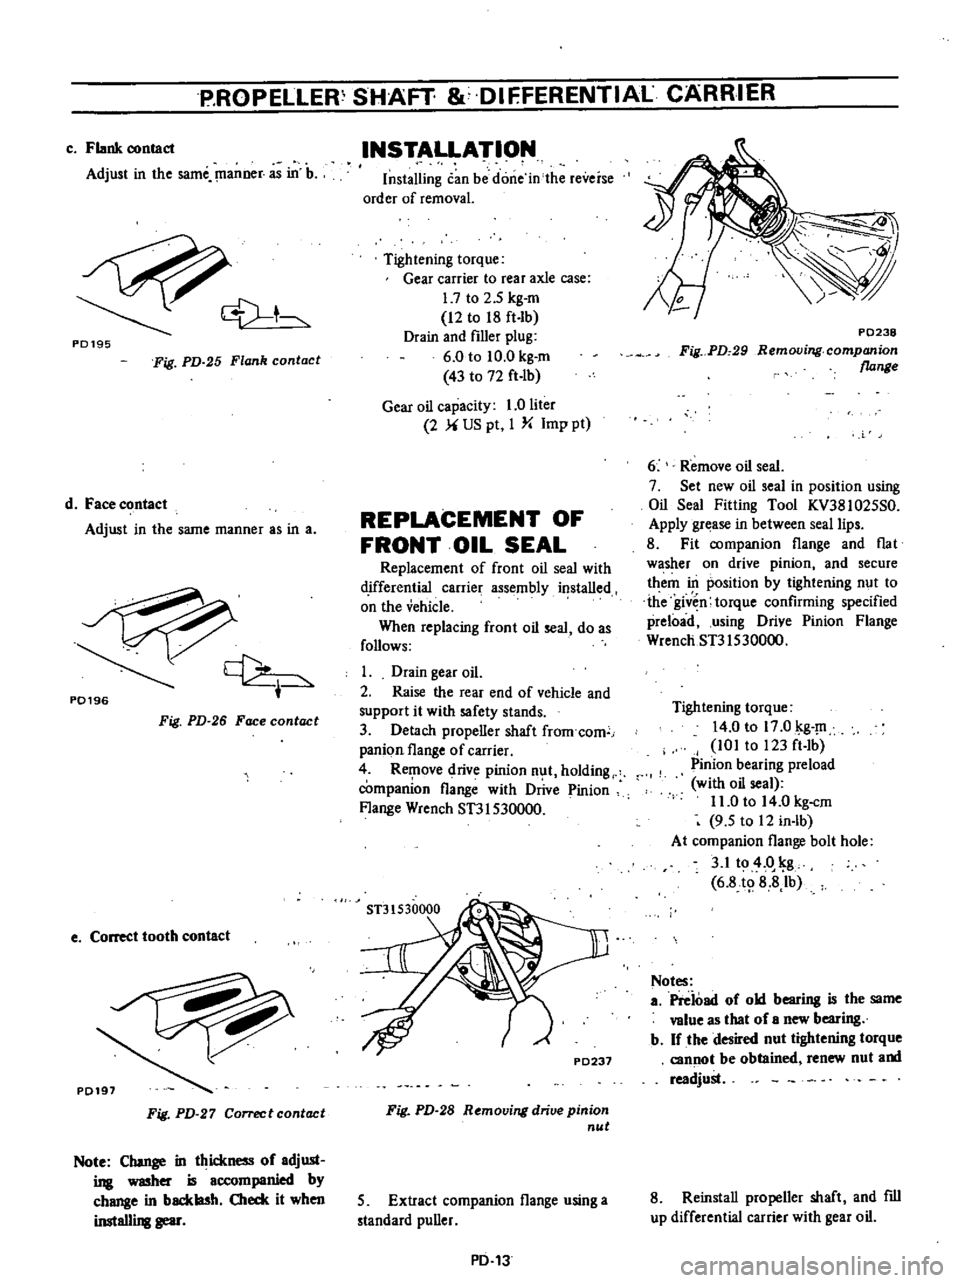
Flank
oontact
Adjust
in
the
same
manner
as
in
b
cV
t
PD195
Fig
PD
25
Flank
contact
d
Face
contact
Adjust
in
the
same
manner
as
in
a
P0196
t
Fig
PD
26
Face
contact
e
Correct
tooth
contact
Fig
PD
27
Correct
contact
Note
Change
in
thickness
of
adjWll
ing
washer
is
accompanied
by
change
in
backlash
Oled
it
when
instaIIi
gear
INSTALLATION
Installing
can
be
done
in
the
reverse
order
of
removal
Tightening
torque
Gear
carrier
to
rear
axle
case
1
7
to
2
5
kg
m
12
to
18
ft
lb
Drain
and
filler
plug
6
0
to
10
0
kg
m
43
to
72
ft
lb
Gear
oil
capacity
1
0
liter
2
US
pt
I
Y
Imp
pt
REPLACEMENT
OF
FRONT
OIL
SEAL
Replacement
of
front
oil
seal
with
d
ifferential
carrier
assembly
installed
on
the
vehicle
When
replacing
front
oil
seal
do
as
follows
1
Drain
gear
oil
2
Raise
the
rear
end
of
vehicle
and
support
it
with
safety
stands
3
Detach
propeller
shaft
from
com
panion
flange
of
carrier
4
R
1
ove
drive
pinion
n
t
holding
companion
flange
with
Drive
Pinion
Flange
Wrench
ST31S30000
P0238
Fig
PD
29
Removing
companion
flange
6
Remove
oil
seal
7
Set
new
oil
seal
in
position
using
Oil
Seal
Fitting
Tool
KV38102SS0
Apply
grease
in
between
seal
lips
8
Fit
companion
flange
and
flat
w
sher
on
drive
pinion
and
secure
them
in
position
by
tightening
nut
to
the
given
torque
confirming
specified
preload
using
Drive
Pinion
Flange
WrencliST31530000
Tightening
torque
14
0
to
17
0
kg
101
to
123
ft
Ib
Pinion
bearing
preload
with
oil
seal
11
0
to
14
0
kg
cm
9
5
to
12
in
lb
At
companion
flange
bolt
hole
3
1
to
4
o
g
6
8
8
8Ib
Notes
a
Preioad
of
old
bearing
is
the
same
value
as
that
of
a
new
bearing
b
If
the
desired
nut
tightening
torque
P0237
can
ot
be
obtained
renew
nut
and
readjust
Fig
PD
28
R
moving
drive
pinion
nut
S
Extract
companion
flange
using
a
standard
puller
PD
13
8
Reinstall
propeller
shaft
and
fill
up
differential
carrier
with
gear
oil
Page 352 of 537
The
design
of
the
front
suspension
adopts
the
independent
double
wishbone
type
suspension
used
the
torsion
bar
spring
Both
the
upper
and
lower
links
are
installed
on
the
bracket
which
is
welded
on
the
frame
A
1d
the
above
links
swing
to
allow
the
knuckle
spindle
to
move
freely
in
a
vertical
dimension
The
top
and
bottom
of
the
knuckle
spindle
support
are
connected
to
the
upper
link
through
rubber
bushing
and
to
the
lower
lick
through
screw
bushing
The
tension
rod
held
by
the
brack
ets
on
the
chassis
frame
and
lower
lick
wiih
rubber
bushings
bears
the
force
of
fore
and
aft
direction
The
front
end
of
the
torsion
bar
spring
is
installed
to
the
torque
arm
which
attaches
to
the
lower
link
The
opposite
end
is
installed
to
the
spring
anchor
that
secures
to
chassis
frame
firmly
The
both
ends
of
the
torsion
bar
spring
are
serrated
The
shock
absorber
is
double
action
telescopic
hydraulic
type
The
upper
stem
is
attached
to
the
bracket
of
the
chassis
frame
The
lower
insulated
bracket
is
bolted
to
the
lower
lick
The
bumper
rubber
secured
to
the
bracket
Of
the
frame
limits
the
verti
cal
motion
of
the
suspension
lick
The
knuckle
spindle
is
connecied
to
the
k
ufkle
spindle
arm
by
the
king
pin
The
king
pin
bushings
are
fitted
to
the
upper
and
lower
arm
portIOns
of
the
knuckle
spindle
and
seals
are
provided
at
the
portions
mentioned
to
keep
water
and
dirt
from
enteri
g
The
knuckle
arm
is
connected
to
the
lower
end
of
the
knuckle
spindle
to
transmit
ttLe
movement
of
the
steering
wheel
to
the
knuckle
spindle
The
wheel
hub
is
supported
by
two
taper
roller
bearings
on
the
knuckle
spindle
Tlie
brake
drum
and
wheel
are
secured
to
ihe
hub
by
the
hub
bolts
Front
Axle
Front
Suspension
FRONT
AXLE
REMOVAL
AND
INSTALLATION
Removal
I
Jack
up
and
support
vehicle
on
the
stands
at
the
frame
in
a
safe
manner
2
Remove
front
wheel
3
Re
ove
brake
hose
together
with
connector
from
wheel
cylinder
4
Remove
brake
drum
S
Remove
hub
cap
and
then
remove
cotter
pin
adjusting
cap
and
spindle
nut
from
knuckle
spindle
6
Remove
wheel
hub
outer
and
inner
wheel
bearings
bearing
washer
and
grease
seal
from
knuckle
spindle
7
Remove
brake
disc
assembly
from
the
flange
of
knuckle
spindle
8
Remove
knuckle
arm
from
knuckle
spindle
9
Remove
king
pin
lock
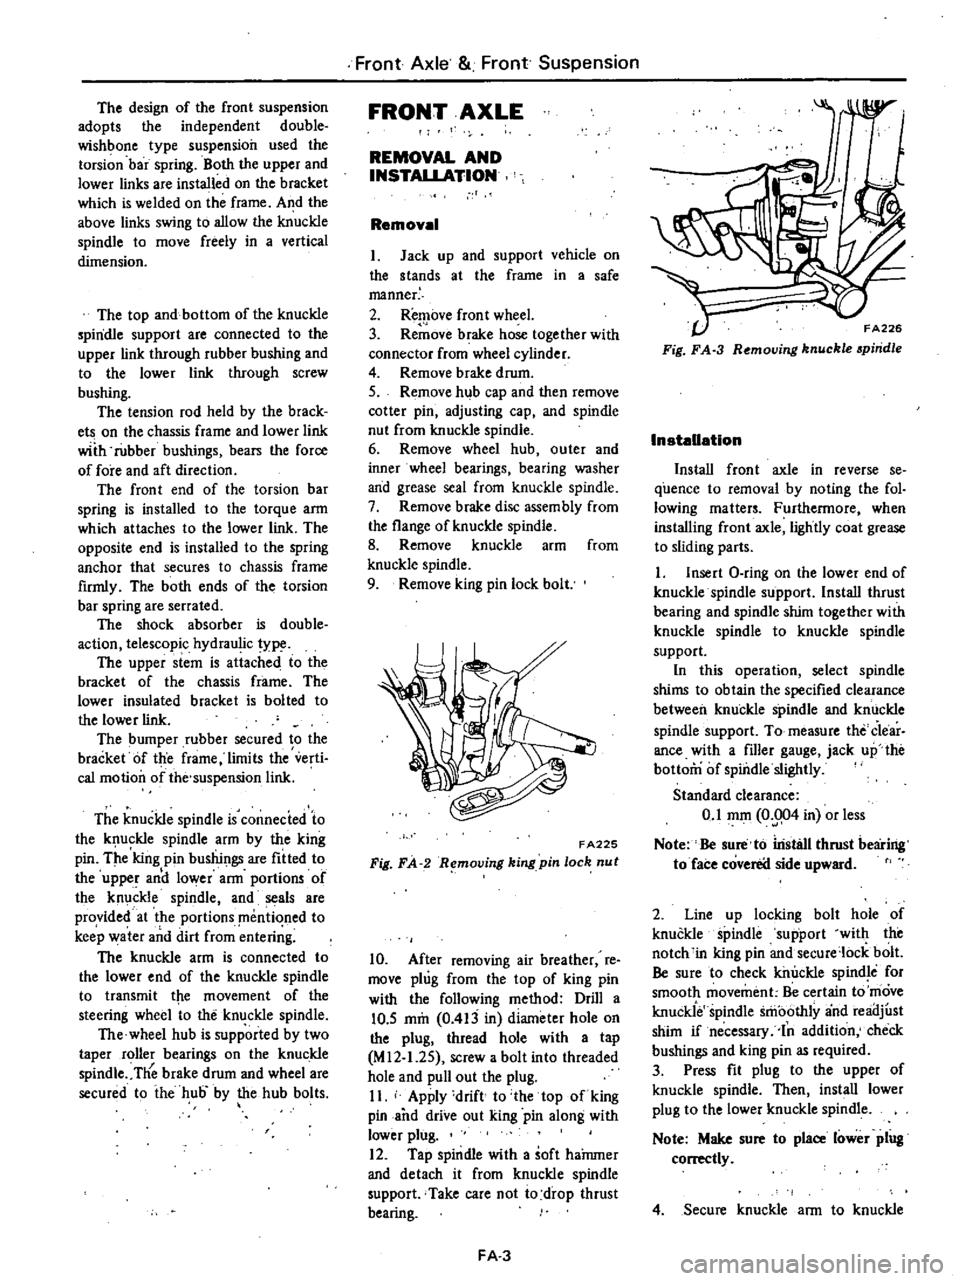
bolt
FA225
Fig
FA
R
mol1ing
king
pin
loch
nut
10
After
removing
air
breather
re
move
plug
from
the
top
of
king
pin
with
the
following
method
Drill
a
10
5
mm
0
413
in
diameter
hole
on
the
plug
thread
hole
with
a
tap
M
12
1
2S
screw
a
bolt
into
threaded
hole
and
pull
out
the
plug
II
Apply
drift
to
the
top
of
king
pin
and
drive
out
king
pin
along
with
lower
plug
12
Tap
spindle
with
a
soft
haJnmer
and
detach
it
from
knuckle
spindle
support
Take
care
not
io
drop
thrust
bearing
FA
3
FA226
Fig
FA
3
R
moving
knuckle
piridle
Installation
Install
front
axle
in
reverse
se
quence
to
removal
by
noting
the
fol
lowing
matters
Furthermore
when
installing
front
axle
lightly
coat
grease
to
sliding
parts
I
Insert
O
ring
on
the
lower
end
of
knuckle
spindle
support
Install
thrust
bearing
and
spindle
shim
together
with
knuckle
spindle
to
knuckle
spindle
support
In
this
operation
select
spindle
shims
to
obtain
the
specified
clearance
between
knuckle
spindle
and
knuckle
spindle
support
To
measure
the
Clear
ance
with
a
filler
gauge
jack
up
the
bottom
of
spindle
slightly
Standard
clearance
0
1
mOl
0
004
in
or
less
Note
Be
sure
to
iristsll
thrust
bearing
to
face
coverea
side
upward
2
Line
up
locking
bolt
hole
of
knuckle
spindle
support
with
the
notch
in
king
pin
and
secure
lock
bolt
Be
sure
to
check
killJckle
spindle
for
smooth
movement
Be
certain
to
move
knuckie
spindle
smoothly
and
reailjust
shim
if
necessary
In
addition
check
bushings
and
king
pin
as
required
3
Press
fit
plug
to
the
upper
of
knuckle
spindle
Then
install
lower
plug
to
the
lower
knuckle
spindle
Note
Make
sure
to
place
lower
plug
conectly
4
Secure
knuckle
arm
to
knuckle
Page 353 of 537

spindle
and
torque
bolt
to
10
3
to
12
1
kg
m
75
to
88
ft
lb
Bend
lock
plate
to
engaged
flats
on
boll
head
Note
When
disassembled
discard
used
lock
plate
5
Pack
grea
to
the
upP
r
and
lower
bushings
on
knuckle
spindle
until
grease
c
omes
out
from
gr
ease
seal
6
Fill
wheel
hub
and
cap
with
grease
up
to
the
described
level
See
Figure
F
A
4
FA141
Fig
FA
4
Gre
ing
wheel
hub
7
Pack
roller
and
cone
assembly
and
the
cavity
of
grease
seal
lip
with
grease
8
Coat
grease
to
the
thread
of
knuckle
spindle
bearing
washer
and
bearing
lock
nul
9
Secure
wheel
hub
bearings
bear
ing
washer
and
spindle
nut
on
knuckle
spindle
and
adju
t
bearing
preload
referring
to
the
paragraph
Wheel
bearing
adjustment
Note
Be
sure
to
obtain
correct
pre
load
on
wheel
bearings
for
the
pu
rpose
of
ving
their
long
life
taking
care
to
keep
wheel
be8rlngs
grease
seal
bearing
washer
and
spin
dle
nut
clean
when
installing
them
WHEEL
BEARING
D
TM
NT
Wrong
adjustment
of
wheel
bear
ing
causes
abnonnal
wear
and
score
on
the
bearings
and
knuckle
spindle
Front
Axle
Front
Suspension
To
attain
proper
preload
on
wheel
bearings
proceed
the
following
opera
tions
I
Torque
spindle
nut
to
3
0
to
3
S
kg
m
22
to
25
ft
lb
using
torque
wrench
FA227
Fig
FA
5
Tightening
apindle
nut
2
Rotate
wheel
hub
a
few
turns
clockwise
and
counterclockwise
to
seat
bearings
Then
retighten
spindle
nut
to
the
same
tightening
torque
Be
certain
to
rotate
hub
smoothly
3
Back
off
spindle
nut
in
range
from
40
to
70
degrees
Locate
adjust
ing
cap
on
spindle
nut
so
as
to
align
the
castellation
on
the
cap
with
the
cotter
pin
hole
in
the
spindle
4
Check
the
hub
rotation
If
hub
rotates
properly
measure
bearing
rota
tion
starting
torque
If
measured
torque
is
deviated
from
the
specified
value
r
place
beari
gs
r
re
dju
st
The
starting
torque
can
be
mea
sured
by
a
spring
balance
as
shown
in
Figure
F
A
6
Spring
balance
indication
at
hub
bolt
New
bearing
2
1
kg
4
Ib
o
ess
Used
bearing
1
0
kg
2
2
lb
or
less
Notes
a
When
measuring
the
starting
force
pull
the
spring
balance
toward
tan
gential
direction
against
normal
line
connected
between
hub
boll
and
spindle
center
b
Axial
play
is
permissible
to
exist
in
0
1
mm
0
004
in
or
less
FA
4
fA22S
Fig
FA
6
Mea
uring
bearing
rotation
atarting
torque
S
Install
a
new
cotter
pin
Bend
the
ends
of
coller
pin
around
the
castel
lated
flange
of
adjusting
cap
Then
install
hub
cap
DISASSEMBLY
AND
ASSEMBLY
Knuckle
spindle
I
Drive
spindle
bushing
and
grease
seal
out
of
knuckle
spindle
with
KiTlg
Pin
Bush
Drift
ST3S380000
Discard
bushing
and
grease
seal
when
disas
sembled
2
After
cleaning
king
pin
bores
thoroughly
install
bushing
carefully
by
using
the
above
special
tpol
Posi
tion
bushing
in
accordance
With
the
instructions
fIlled
in
Figure
F
A
7
and
FA
8
34
mm
1
34
in
Upper
side
in
lower
boss
I
I
1
II
I
Pla
ce
this
position
in
line
with
grease
nipple
hole
Upper
side
in
upper
boss
FA229
Fig
FA
7
King
pin
bu
hing
Page 357 of 537

SHOCK
ABSORBER
REMOVAL
AND
INSTAUATION
1
Raise
vehicle
on
a
hoist
or
stands
2
Remove
wheel
3
Hold
the
upper
stem
of
shock
absorber
and
remove
outs
washer
and
rubber
bushing
4
Remove
bolt
from
the
lower
end
of
shock
absorber
FA232
Fig
FA
13
Shock
absorber
S
Retain
lower
rubber
bushing
in
position
install
the
lower
end
of
shock
absorber
to
the
bracket
of
lower
link
and
torque
the
bolt
to
3
1
to
4
1
kg
m
23
to
30
ft
lb
Note
Insert
the
bolt
from
the
front
side
of
vehicle
6
Install
the
upper
end
of
shock
absorber
to
body
bracket
and
tighten
lock
n
Jt
to
the
specifjcations
Tightening
torque
1
6
to
2
2
kg
m
121016
ft
lb
INSPECTION
I
Check
shock
absorber
for
visible
defects
and
oil
leaks
Place
shock
absorber
vertically
in
a
vise
and
hand
stroke
shock
absorber
as
outlined
be
low
Extend
and
compress
shock
ab
sorber
as
faI
as
possible
travelling
as
long
as
possible
If
smooth
hydraulic
resistance
is
not
present
in
bqth
Iirection
replace
absorber
2
Replace
rubber
bushing
if
crack
or
deterioration
is
detected
Front
Axle
Front
Suspension
Specifications
for
shock
absorber
Model
Item
Piston
stroke
mm
in
Damping
force
kg
lb
0
3
m
sec
0
98
ft
sec
j
Rebound
Compression
STABILIZER
REMOVAL
AND
INSTAUATION
I
Raise
vehicle
on
a
hoist
or
stands
2
Remove
wheel
3
Loosen
secUring
nut
at
the
lower
link
side
of
stabilizer
4
Remove
bolt
securing
stabilizer
mounting
bracket
to
chassis
frame
Install
stabilizer
in
the
reverse
se
quence
to
removal
noting
the
follow
ing
instructions
S
Attach
stabilizer
mounting
brack
et
to
chassis
frame
tightening
bolt
to
1
6
to
2
2
kg
m
12
to
16
ft
lb
torque
6
Install
stabilizer
lower
link
side
to
connecting
rod
and
tighten
nut
to
the
specifications
as
shown
in
Figure
FA
14
Then
torque
lock
nut
toJ
6
to
2
2
kg
m
12
to
16
ft
lb
F
A233
Fig
FA
14
Stabilizer
detail
INSPECTION
Check
stabilizer
for
deformation
FA
S
All
models
110
4
3
76
168
38
84
and
rubber
bushings
for
crack
wear
and
deterioration
Replace
if
ne
cessary
TENSION
POD
REMOVAL
AND
INSTALLATION
I
Raise
vehicle
on
a
hoist
or
stands
2
Remove
wheel
3
Remove
nuts
CD
from
both
ends
of
tension
rod
4
Remove
bracket
bolt
@
from
the
front
end
of
tension
rod
and
remove
tension
rod
with
bracket
CD
@
f
A234
Fig
FA
15
Ten
ion
rod
Install
tension
rod
in
reverse
00
qunce
to
removal
noting
the
following
instructions
Page 359 of 537
UPPER
AND
LOWER
LINKS
REMOVAL
AND
INSTALLATION
Removal
I
Raise
vehicle
on
a
hoist
or
stands
2
Remove
wheel
and
brake
drum
as
an
assembly
3
Remove
wheel
hub
Refer
to
see
tion
Front
Axle
4
Loosen
bolts
retaining
brake
disc
to
knuckle
spindle
and
remove
brake
disc
5
Remove
knuckle
arm
torsion
bar
spimgJ
stabilizer
shock
absorber
and
tension
rod
in
t
ili
order
referring
the
related
sections
6
Remove
upper
fulcrum
bolt
se
curing
knuckle
spindle
support
to
upper
link
assembly
and
disassemble
them
7
Remove
upper
link
bushings
from
knuckle
spindle
support
8
Remove
screw
bushings
from
both
ends
of
lower
link
fulcrum
pin
9
Loosen
nut
at
lower
portion
of
knuckle
spindle
support
from
inside
and
pull
out
cotter
pin
retaining
ful
crum
pin
10
Pull
out
fulcrum
pin
with
drift
and
remove
knuckle
spindle
support
with
knuckle
spindle
from
lower
link
Then
detach
dust
cover
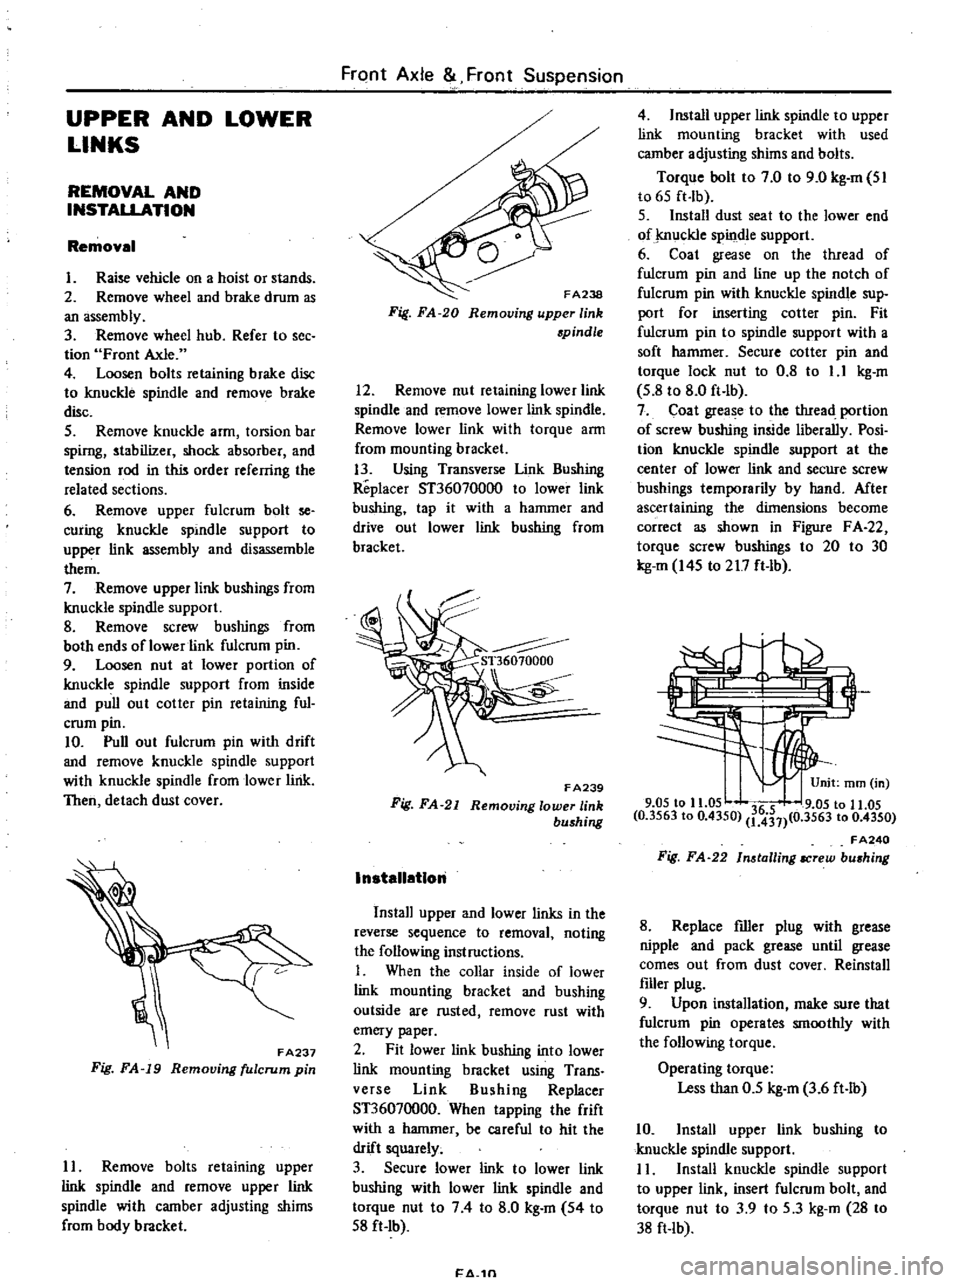
FA237
Fig
FA
19
Removing
fulcrum
pin
II
Remove
bolts
retaining
upper
link
spindle
and
remove
upper
link
spindle
with
camber
adjusting
shims
from
body
bracket
FrClnt
Axle
Front
Suspension
FA238
Fig
FA
20
Removing
upper
link
spindle
12
Remove
nut
retaining
lower
link
spindle
and
remove
lower
link
spindle
Remove
lower
link
with
torque
arm
from
mounting
bracket
13
Using
Transverse
Unk
Bushing
Replacer
ST36070000
to
lower
link
bushing
tap
it
with
a
hammer
and
drive
out
lower
link
bushing
from
bracket
F
A239
Fig
FA
21
Removing
lower
link
bushing
InstallatIon
Install
upper
and
lower
links
in
the
reverse
sequence
to
removal
noting
the
following
instructions
I
When
the
collar
inside
of
lower
link
mounting
bracket
and
bushing
outside
are
rusted
remove
rust
with
emery
paper
2
Fit
lower
link
bushing
into
lower
link
mounting
bracket
using
Trans
verse
Link
Bushing
Replacer
ST36070000
When
tapping
the
frift
with
a
hammer
be
careful
to
hit
the
drift
squarely
3
Secure
lower
link
to
lower
link
bushing
with
lower
link
spindle
and
torque
nut
to
74
to
8
0
kg
m
54
to
S8
ft
Ib
1
4
1n
4
Install
upper
link
spindle
to
upper
link
mounting
bracket
with
used
camber
adjusting
shims
and
bolts
Torque
bolt
to
7
0
to
9
0
kg
m
SI
to
6S
ft
lb
S
Install
dust
seat
to
the
lower
end
of
j
nuckle
spindle
support
6
Coat
grease
on
the
thread
of
fulcrum
pin
and
line
up
the
notch
of
fulcrum
pin
with
knuckle
spindle
sup
port
for
inserting
cotter
pin
Fit
fulcrum
pin
to
spindle
support
with
a
soft
hammer
Secure
cotter
pin
and
torque
lock
nut
to
0
8
to
1
1
kg
m
S
8
to
8
0
ft
lb
7
Coat
grease
to
the
tIuead
portion
of
screw
bushing
inside
liberally
Posi
tion
knuckle
spindle
support
at
the
center
of
lower
link
and
secure
screw
bushings
temporarily
by
hand
Mter
ascertaining
the
dimensions
become
correct
as
shown
in
Figure
F
A
22
torque
screw
bushings
to
20
to
30
kg
m
I4S
to
217
ft
lb
3
9
05
to
11
05
36
5
9
05
to
11
05
0
3563
to
0
4350
1
431
0
3563
to
0
4350
FA240
Fig
FA
22
In
tailing
IICrew
bu
hing
8
Replace
filler
plug
with
grease
nipple
and
pack
grease
until
grease
comes
out
from
dust
cover
Reinstall
filler
plug
9
Upon
installation
make
sure
that
fulcrum
pin
operates
smoothly
with
the
following
torque
Operating
torque
Less
than
0
5
kg
m
3
6
ft
lb
10
Install
upper
link
bushing
to
knuckle
spindle
support
I
I
Install
knuckle
spindle
support
to
upper
link
insert
fulcrum
bolt
and
torque
nut
to
3
9
to
S
3
kg
m
28
to
38
ft
lb
Page 360 of 537
Note
When
installing
fulcrum
pin
insert
it
from
rearward
of
vehicle
12
Install
tension
rod
shock
ab
sorber
I
stabilizer
torsion
bar
spring
and
knuckle
arm
referring
to
the
related
paragraphs
13
Install
brake
disc
to
knuckle
spindle
and
torque
securing
bolt
to
4
2
to
5
0
kg
m
30
to
36
ft
Ib
14
Install
wheel
and
brake
drum
as
an
assembly
and
torque
knuckle
spin
dle
nut
to
8
0
to
9
0
kg
m
58
to
65
ft
Ib
DISASSEMBLY
AND
ASSEMBLY
Upper
link
I
Detach
upper
link
spindle
from
upper
links
and
remove
clamp
dust
cover
and
dust
seal
Secure
upper
link
in
a
vise
and
loosen
screw
bushing
Assemble
link
spindle
in
reverse
sequence
to
disassembling
noting
the
following
instructions
2
Torque
screw
bushing
on
upper
link
to
3S
to
55
kg
m
253
to
398
ft
Ib
Install
new
dust
seal
and
dust
cover
and
secure
them
with
clamp
3
Coat
grease
to
screw
bushing
in
side
and
the
thread
portion
of
upper
link
spindle
liberally
Screw
front
and
rear
links
to
upper
link
spindle
in
the
same
length
so
as
to
obtain
the
speci
fied
figures
as
shown
in
Figure
FA
23
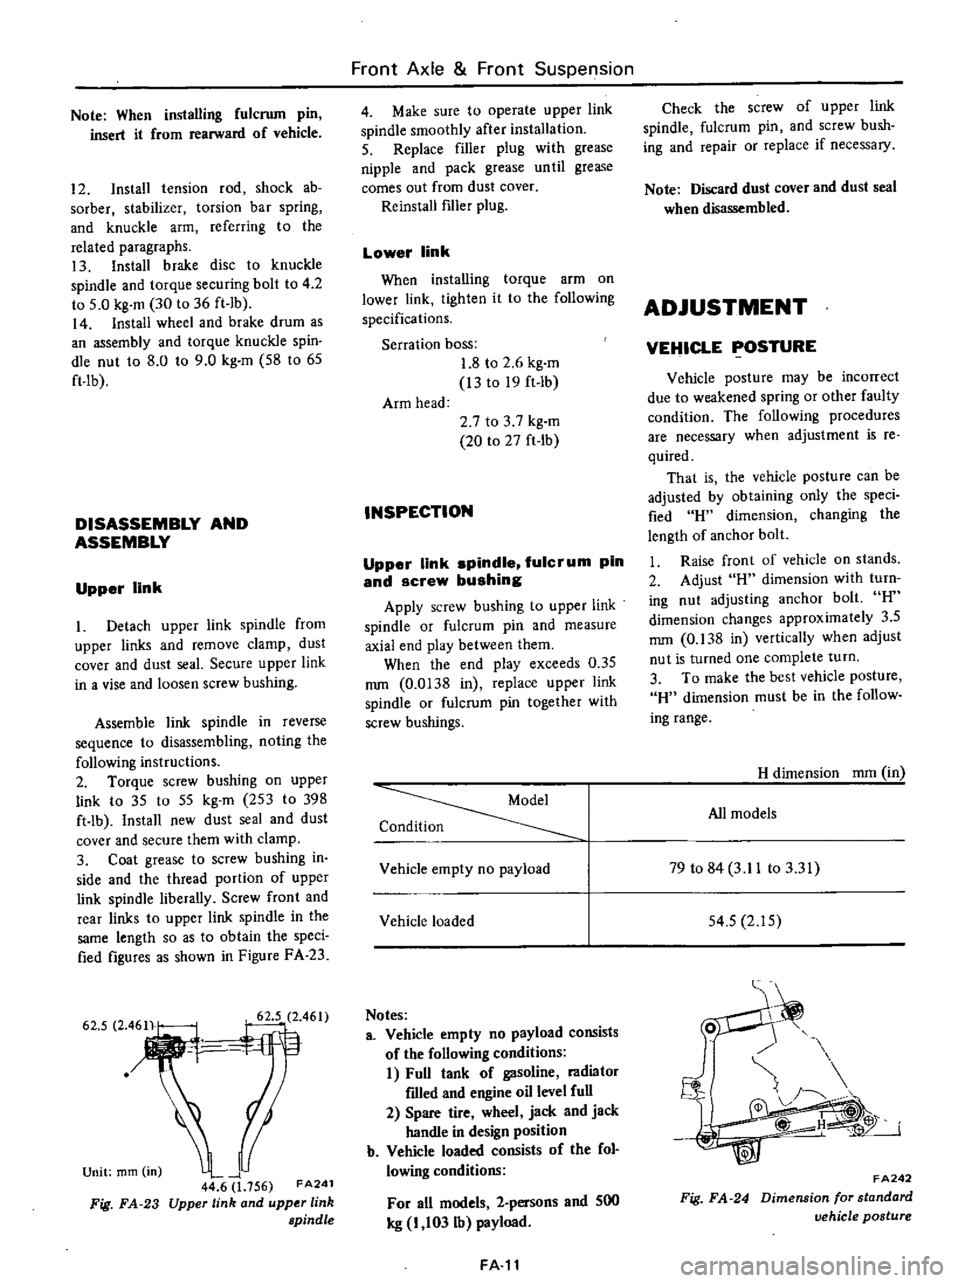
Unit
mm
in
I
44
6
1
156
FA2
Upper
link
and
upper
link
spindle
Fig
FA
23
Front
Axle
Front
Suspension
4
Make
sure
to
operate
upper
link
spindle
smoothly
after
installation
5
Replace
filler
plug
with
grease
nipple
and
pack
grease
until
grease
comes
out
from
dust
cover
Reinstall
f1ller
plug
Lower
link
When
installing
torque
arm
on
lower
link
tighten
it
to
the
following
specifications
Serration
boss
1
8
to
2
6
kg
m
13
to
19
ft
Ib
Arm
head
2
7
to
3
7
kg
m
20
to
27
ft
tb
INSPECTION
Upper
link
spindle
fulcrum
pin
and
screw
bushing
Apply
screw
bushing
to
upper
link
spindle
or
fulcrum
pin
and
measure
axial
end
play
between
them
When
the
end
play
exceeds
0
35
mm
0
0138
in
replace
upper
link
spindle
or
fulcrum
pin
together
with
screw
bushings
Condition
Vehicle
empty
no
payload
Vehicle
loaded
Notes
a
Vehicle
empty
no
payload
consists
of
the
following
conditions
I
Full
tank
of
gasoline
radiator
f1lled
and
engine
oil
level
full
2
Spare
tire
wheel
jack
and
jack
handle
in
design
position
b
Vehicle
loaded
consists
of
the
fol
lowing
conditions
For
all
models
2
persons
and
SIlO
leg
I
103lb
payload
FA
Check
the
screw
of
upper
link
spindle
fulcrum
pin
and
screw
bush
ing
and
repair
or
replace
if
necessary
Note
Discard
dust
cover
and
dust
seal
when
disassembled
ADJUSTMENT
VEHICLE
POSTURE
Vehicle
posture
may
be
incorrect
due
to
weakened
spring
or
other
faulty
condition
The
following
procedures
are
necessary
when
adjustment
is
Ie
quired
That
is
the
vehicle
posture
can
be
adjusted
by
obtaining
only
the
speci
fied
H
dimension
changing
the
length
of
anchor
bolt
I
Raise
front
of
vehicle
on
stands
2
Adjust
H
dimension
with
turn
ing
nut
adjusting
anchor
bolt
H
dimension
changes
approximately
3
5
mm
0
J38
in
vertically
when
adjust
nut
is
turned
one
complete
turn
3
To
make
the
best
vehicle
posture
H
dimension
must
be
in
the
follow
ing
range
H
dimension
mOl
in
All
models
79
to
84
3
11
to
3
31
54
5
2
15
o
i
Fig
FA
24
FA242
Dimension
for
standard
vehicle
postl4re