lock DATSUN PICK-UP 1977 User Guide
[x] Cancel search | Manufacturer: DATSUN, Model Year: 1977, Model line: PICK-UP, Model: DATSUN PICK-UP 1977Pages: 537, PDF Size: 35.48 MB
Page 45 of 537

Condition
POOR
FUEL
ECONOMY
Se
the
xplanation
of
the
pow
r
dec
Oth
n
PROBLEM
IN
OTHER
FUNCTIONS
D
cr
d
oil
p
ssure
Excessive
wear
on
the
sliding
parts
Scuffing
of
sliding
parts
Floor
temperature
too
high
California
only
Engine
Tune
up
Probable
cause
Exceeding
idling
revolution
Inoperative
acceleration
recovery
Fuel
leakage
Malfunction
of
B
C
D
D
Malfunction
of
A
r
C
air
cleaner
Inadequate
oil
quality
Overheat
Worn
oil
pump
regulator
valve
Functional
deterioration
of
oil
pump
Blocked
oil
f1lter
Increased
clearance
in
various
sliding
parts
Blocked
oil
strainer
Inoperative
oil
gauge
pressure
switch
Oil
pressure
decreases
Improper
quality
or
contamination
of
oil
Damaged
air
cleaner
Overheat
or
overcoal
Improper
fuel
mixture
Decrease
of
oil
pressure
Insufficient
clearances
Overhea
t
Improper
fuel
mixture
Problem
in
fuel
system
Refer
to
Inspec
tion
of
Fuel
System
Problem
in
ignition
system
Refer
to
In
spection
of
Ignition
System
ET33
Corrective
action
Adjust
it
to
the
designated
rpm
Adjust
it
Repair
or
tighten
the
connection
of
fuel
pipes
Adjust
Check
and
replace
Use
the
designated
oil
Previously
mentioned
Disassemble
oil
pump
and
repair
or
renew
it
Repair
or
replace
it
with
a
new
one
Renew
it
Disassemble
and
replace
the
worn
parts
with
new
ones
Oeanit
Replace
it
with
a
new
one
Previousiy
mentioned
Exchange
the
oil
with
proper
one
and
change
element
Change
elemen
t
Previously
mentioned
Check
the
fuel
system
Previously
mentioned
Readjust
to
the
designated
clearances
Previously
mentioned
Check
the
fuel
system
Check
and
repair
Check
and
repair
Page 47 of 537
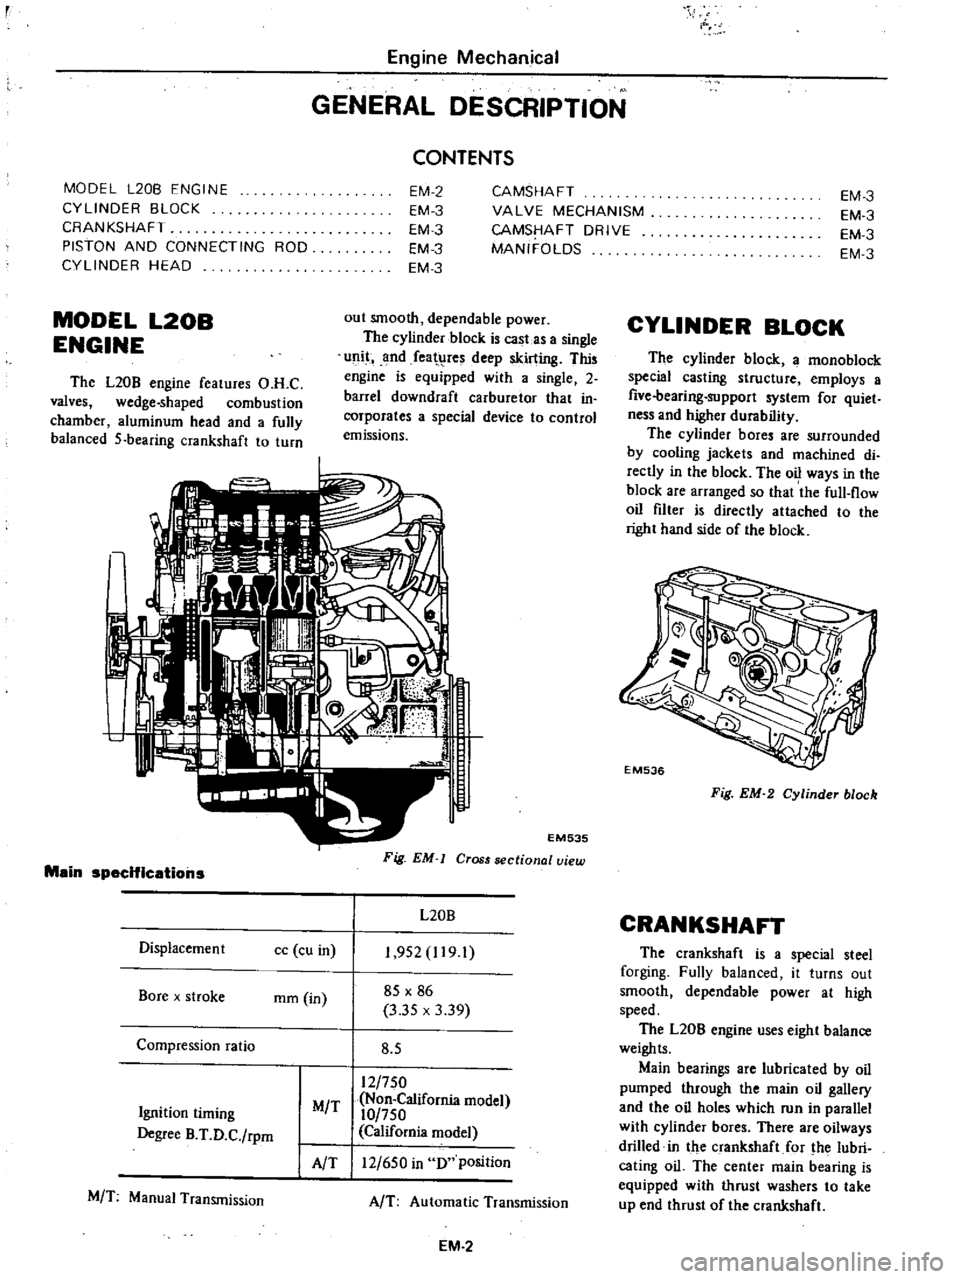
Engine
Mechanical
GENERAL
DESCRIPTION
MODEL
L20B
ENGINE
CYLINDER
BLOCK
CRANKSHAFT
PISTON
AND
CONNECTING
ROD
CYLINDER
HEAD
CONTENTS
EM
2
EM
3
EM
3
EM
3
EM
3
CAMSHAFT
VALVE
MECHANISM
CAMSHAFT
DRIVE
MANIFOLDS
out
smooth
dependable
power
The
cylinder
block
is
cast
as
a
single
unit
and
featllres
deep
skirting
This
engine
is
equipped
with
a
single
2
barrel
downdraft
carburetor
that
in
corporates
a
special
device
to
control
emissions
MODEL
L20B
ENGINE
The
L20B
engine
features
O
H
C
valves
wedge
shaped
combustion
chamber
aluminum
head
and
a
fully
balanced
5
bearing
crankshaft
to
turn
Main
specifications
Oisplacemen
t
cc
cu
in
Bore
x
stroke
mm
in
Compression
ratio
Ignition
timing
Degree
B
T
O
C
rpm
MIT
AlT
MIT
Manual
Transmission
EM535
Fig
EM
Cross
sectional
view
L20B
1
952
1191
85
X
86
3
35
x
3
39
8
5
12
750
Non
California
model
10
750
California
model
12
650
in
0
position
AIT
Automatic
Transmission
EM
2
EM
3
EM
3
EM
3
EM
3
CYLINDER
BLOCK
The
cylinder
block
a
mono
block
special
casting
structure
employs
a
five
bearing
support
system
for
quiet
ness
and
higher
durability
The
cylinder
bores
are
surrounded
by
cooling
jackets
and
machined
di
rectly
in
the
block
The
oil
ways
in
the
block
are
arranged
so
that
the
full
flow
oil
filter
is
directly
attached
to
the
right
hand
side
of
the
block
EM536
Fig
EM
2
Cylinder
block
CRANKSHAFT
The
crankshaft
is
a
special
steel
forging
Fully
balanced
it
turns
out
smooth
dependable
power
at
high
speed
The
L20B
engine
uses
eight
balance
weights
Main
bearings
are
lubricated
by
oil
pumped
through
the
main
oil
gallery
and
the
oil
holes
which
run
in
parallel
with
cylinder
bores
There
are
oilways
drilled
in
the
crankshaft
for
the
lubri
cating
oil
The
center
main
bearing
is
equipped
with
thrust
washers
to
take
up
end
thrust
of
the
crankshaft
Page 49 of 537
r
I
I
PRELIMINARY
CLEANING
AND
INSPECTION
DISASSEMBL
Y
PRELIMINARY
CLEANING
AND
INSt
ECTION
Before
disassembling
engine
note
the
following
I
Fuel
oil
or
water
may
leak
past
cylinder
head
and
block
Prior
to
disassembling
check
cylinder
head
1
1ltermal
vacuum
valve
2
Check
valve
3
Altitude
compensator
in
air
cleaner
4
Air
gallery
pipe
S
Auto
choke
6
Automatic
temperature
control
air
cleaner
7
Anti
8ackfire
valve
A
B
valve
8
Boost
Controlled
Deceleration
Device
Bee
D
D
9
P
c
v
valve
to
Air
relief
valve
11
E
G
R
control
valve
12
B
C
D
D
control
valve
and
solenoid
valve
13
Emergency
air
relief
valve
14
Air
pump
air
cleaner
IS
Carbon
canister
16
Air
control
valve
11
Air
pump
Engine
Mechanical
ENGINE
DISASSEMBLY
CONTENTS
EM
4
EM
4
PISTONS
AND
CONNECTING
RODS
CYLINDER
HE
AD
EM
7
EM
7
front
chain
cover
oil
pan
and
oil
filter
gaskets
lInd
crankshaft
and
water
pump
seals
for
signs
of
leakage
past
their
gasketed
surfaces
2
Check
carburetor
and
fuel
pump
for
condition
fuel
hoses
for
deteriora
tion
cracks
or
leakage
of
fuel
past
their
jointed
or
connected
surfaces
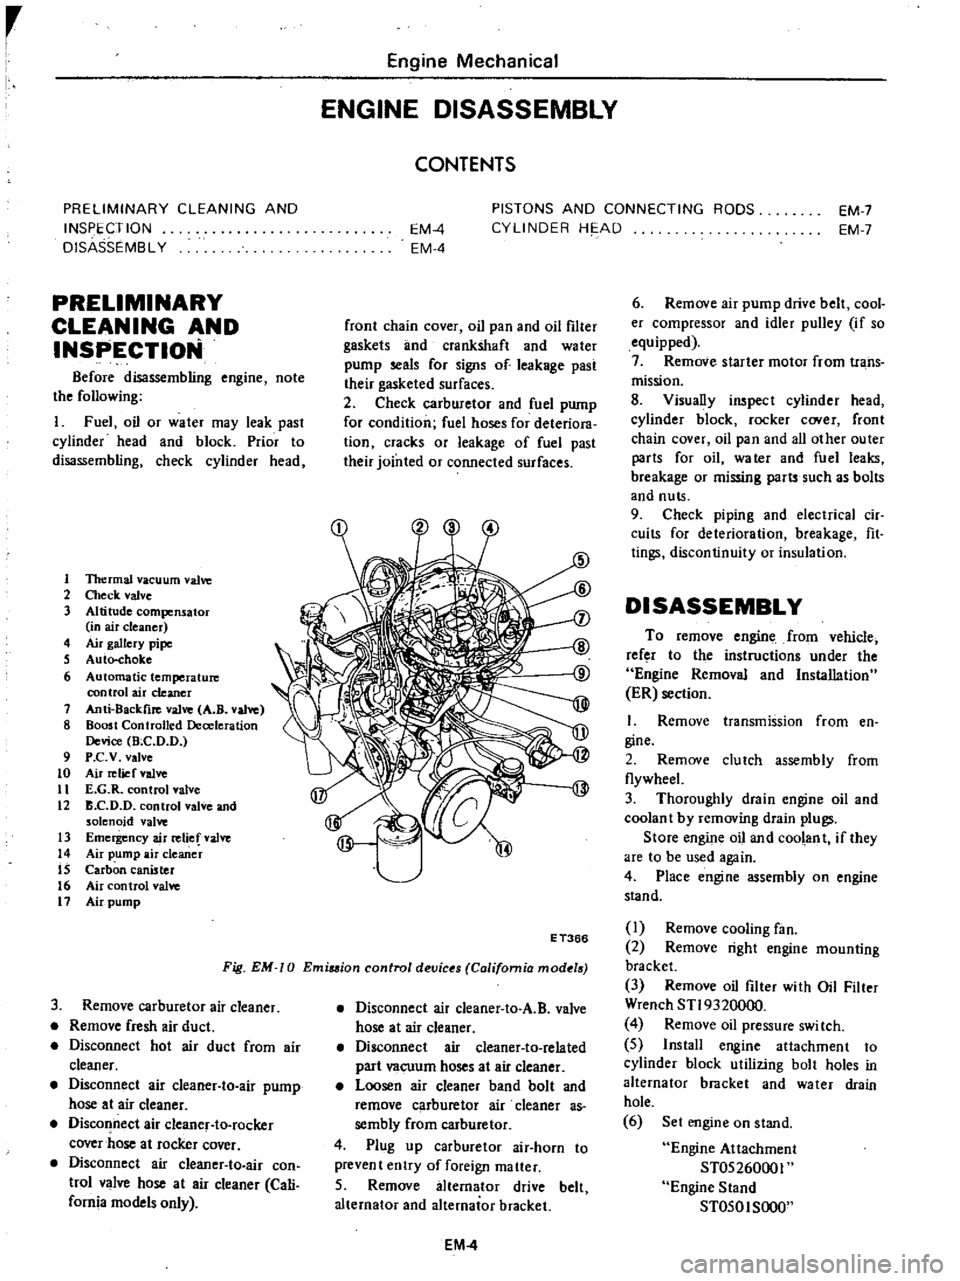
Fig
EM
0
Emiuion
control
devic
s
California
mod
18
E
T366
3
Remove
carburetor
air
cleaner
Remove
fresh
air
duct
Disconnect
hot
air
duct
from
air
cleaner
Disconnect
air
cleaner
to
air
pump
hose
at
air
cleaner
Disconnect
air
cleanef
to
rocker
cover
hose
at
rocker
cover
Disconnect
air
cIeaner
to
air
con
trol
valve
hose
at
air
cleaner
Cali
fornia
models
only
Disconnect
air
cleaner
to
A
B
valve
hose
at
air
cleaner
Disconnect
air
cleaner
to
related
part
vacuum
hoses
at
air
cleaner
Loosen
air
cleaner
band
bolt
and
remove
carburetor
air
cleaner
as
sembly
from
carburetor
4
Plug
up
carburetor
air
horn
to
prevent
entry
of
foreign
matter
5
Remove
alternator
drive
belt
alternator
and
alternator
bracket
EM
4
6
Remove
air
pump
drive
belt
cool
er
compressor
and
idler
pulley
if
so
equipped
7
Remove
starter
motor
from
trans
mission
8
Visually
inspect
cylinder
head
cylinder
block
rocker
C
Ner
front
chain
cover
oil
pan
and
all
other
outer
parts
for
oil
water
and
fuel
leaks
breakage
or
missing
parts
such
as
bolts
and
nuts
9
Check
piping
and
electrical
cir
cuits
for
deterioration
breakage
fit
tings
discontinuity
or
insulation
DISASSEMBLY
To
remove
engine
from
vehicle
refer
to
the
instructions
under
the
Engine
Removal
and
Installation
ER
section
I
Remove
transmission
from
en
gine
2
Remove
clutch
assembly
from
flywheeL
3
Thoroughly
drain
engine
oil
and
coolan
t
by
removing
drain
plugs
Store
engine
oil
and
coolant
if
they
are
to
be
used
again
4
Place
engine
assembly
on
engine
stand
I
Remove
cooling
fan
2
Remove
right
engine
mounting
bracket
3
Remove
oil
filter
with
Oil
Filter
Wrench
STI9320000
4
Remove
oil
pressure
swi
tch
5
Install
engine
attachment
to
cylinder
block
utilizing
bolt
holes
in
alternator
bracket
and
water
drain
hole
6
Set
engine
on
stand
Engine
Attachment
ST05260001
Engine
Stand
ST050I
SOOO
Page 50 of 537

EM410
Fig
EM
II
Engine
on
engine
land
Remove
oil
level
gauge
6
Remove
carburetor
from
intake
manifold
1
Disconnect
cylinder
block
to
P
C
V
valve
hose
at
P
C
V
valve
2
Disconnect
A
B
valve
to
E
G
R
passage
hose
at
E
G
R
passage
3
Disconnect
vacuum
tube
to
carburetor
hoses
white
and
yellow
at
vacuum
tube
4
Disconnect
fuel
hose
from
carburetor
5
Remove
dash
pot
bracket
from
intake
manifold
6
Remov
carburetor
attaching
bolts
and
remove
carburetor
assembly
and
gasket
7
Disconnect
distributor
high
ten
sion
cables
from
sparkplugs
8
Disconnect
vacuum
hose
from
distributor
and
remove
distributor
as
sembly
9
Disconnect
fuel
hose
from
fuel
pump
and
remove
fuel
and
vacuum
hoses
combined
from
cylinder
head
10
Remove
fuel
pump
assembly
from
cylinder
head
EM412
Fig
EM
12
Removing
fuel
pump
IJ
Remove
in
take
and
exhaust
manifold
assembly
from
cylinder
head
1
Disconnect
vacuum
hose
from
air
control
valve
and
remove
air
con
trol
valve
for
California
and
a
r
hoses
as
an
assembly
Engine
Mechanical
1
Air
control
valve
2
Distributor
EM531
Fig
EM
13
Removing
air
control
valve
Californio
model
2
Remove
carburetor
air
cleaner
bracket
3
Disconnect
vacuum
hose
from
E
G
R
valve
4
Remove
check
valve
from
air
gallery
pipe
5
Disconnect
E
G
R
tube
from
E
G
R
passage
and
exhaust
manifold
6
Remove
E
G
R
passage
and
E
G
R
valve
from
intake
manifold
I
E
G
R
passage
2
E
G
R
tube
Fig
EM
14
EM532
Removing
E
G
R
tube
and
passage
7
Remove
F
l
C
D
bracket
from
cylinder
head
if
so
equipped
8
Disconnect
vacuum
hoses
from
thermal
vacuum
valve
and
remove
thermostat
housing
and
gasket
from
cylinder
head
EM089
Fig
EM
15
Removing
thermostat
housing
EM
5
9
Remove
cylinder
block
to
P
C
V
valve
hose
blow
by
gas
hose
from
cylinder
block
10
Remove
manifold
attaching
bolts
and
remove
intake
and
exhaust
manifold
assembly
and
gasket
from
cylinder
head
Fig
EM
16
Removing
intake
and
exhaust
manifold
assembly
11
Remove
intake
and
exhaust
manifold
attaching
bolts
and
separate
intake
manifold
from
exhaust
mani
fold
12
Remove
air
gallery
pipes
from
exhaust
manifold
12
Remove
left
engi
e
mounting
bra
et
from
cylinder
blopk
13
Remove
air
pump
and
cooler
compressor
bracket
14
Remove
crankshaft
pulley
in
stalling
bolt
and
washer
and
then
remove
pulley
with
a
two
jaw
puller
15
Remove
water
pump
assembly
16
Remove
rocker
cover
17
R
emove
spark
plugs
18
Remove
fuel
pump
drive
earn
19
Remove
camshaft
sprocket
Refer
to
the
following
note
during
operation
when
removing
camshaft
sprocket
from
engine
installed
on
car
EM091
Fig
EM
17
Removing
cammaf
sprocket
Page 52 of 537

EM103
EM411
Fig
EM
29
Remouingpi
tonpin
Fig
EM
26
Remouing
rear
oil
eal
41
Remove
crankshaft
42
Remove
baffie
plate
and
cyl
inder
block
net
Fig
EM
27
Removing
baffle
plate
and
nel
PISTONS
AND
CONNECTING
RODS
Remove
piston
rings
with
a
ring
remover
O
EM102
Fig
EM
28
Removing
pilton
rings
2
Press
piston
pin
out
with
Piston
Pin
Press
Stand
STl3030001
Engine
Mechanical
3
Keep
disassembled
parts
in
order
CYLINDER
HEAD
I
Remove
valve
rocker
springs
Loosen
valve
rocker
pivot
lock
nut
and
remove
rocker
arm
by
pressing
valve
spring
down
Fig
EM
3D
Removing
rockerarrm
2
Remove
locate
plate
and
remove
camshaft
EM105
Fig
EM
31
Remouing
cammaft
EM
7
Note
Be
careful
not
to
damage
eam
shaft
bearings
and
earn
lobes
3
Remove
valves
using
Valve
Lifter
STl2070000
STl2070000
Fig
EM
32
Removing
ualves
Notes
a
Take
care
not
to
lose
valve
spring
seat
oil
seal
valve
collet
and
valve
rocker
guide
b
Be
sure
to
keep
camshaft
bearings
intact
or
the
bearing
center
is
liable
to
come
out
of
alignment
61
8
Exhaust
Intake
EM101
Fig
EM
33
Value
components
Page 53 of 537
r
Engine
Mechanical
INSPECTION
AND
REPAIR
PREPARATION
FOR
INSPECTION
CYLINDER
HEAD
AND
VALVE
CHECKING
CYLINDER
HEAD
MATING
FACE
VALVE
ASSEMBLY
VALVE
SPRING
ROCKER
ARM
AND
VALVE
ROCKER
PIVOT
VALVE
GUIDE
VALVE
SEAT
INSERTS
CAMSHAFT
AND
CAMSHAFT
BEARING
CAMSHAFT
BEARING
CLEARANCE
VALVE
TIMING
CAMSHAFT
ALIGNMENT
CYLINDER
BLOCK
HOW
TO
MEASURE
CYLINDER
BORE
CYLINDER
BORING
PREPARATION
FOR
INSPECTI
N
I
Before
cleaning
check
for
signs
of
water
and
oil
leaks
in
cylinder
block
and
head
2
Clean
oil
carbon
deposits
and
sealant
from
an
parts
Remove
gasket
3
Clean
all
oil
holes
with
solvent
and
dry
with
compressed
air
Make
sure
that
they
are
not
restricted
CYLINDER
HEAD
AND
VALVE
CHECKING
CYLINDER
HEAD
MATING
FACE
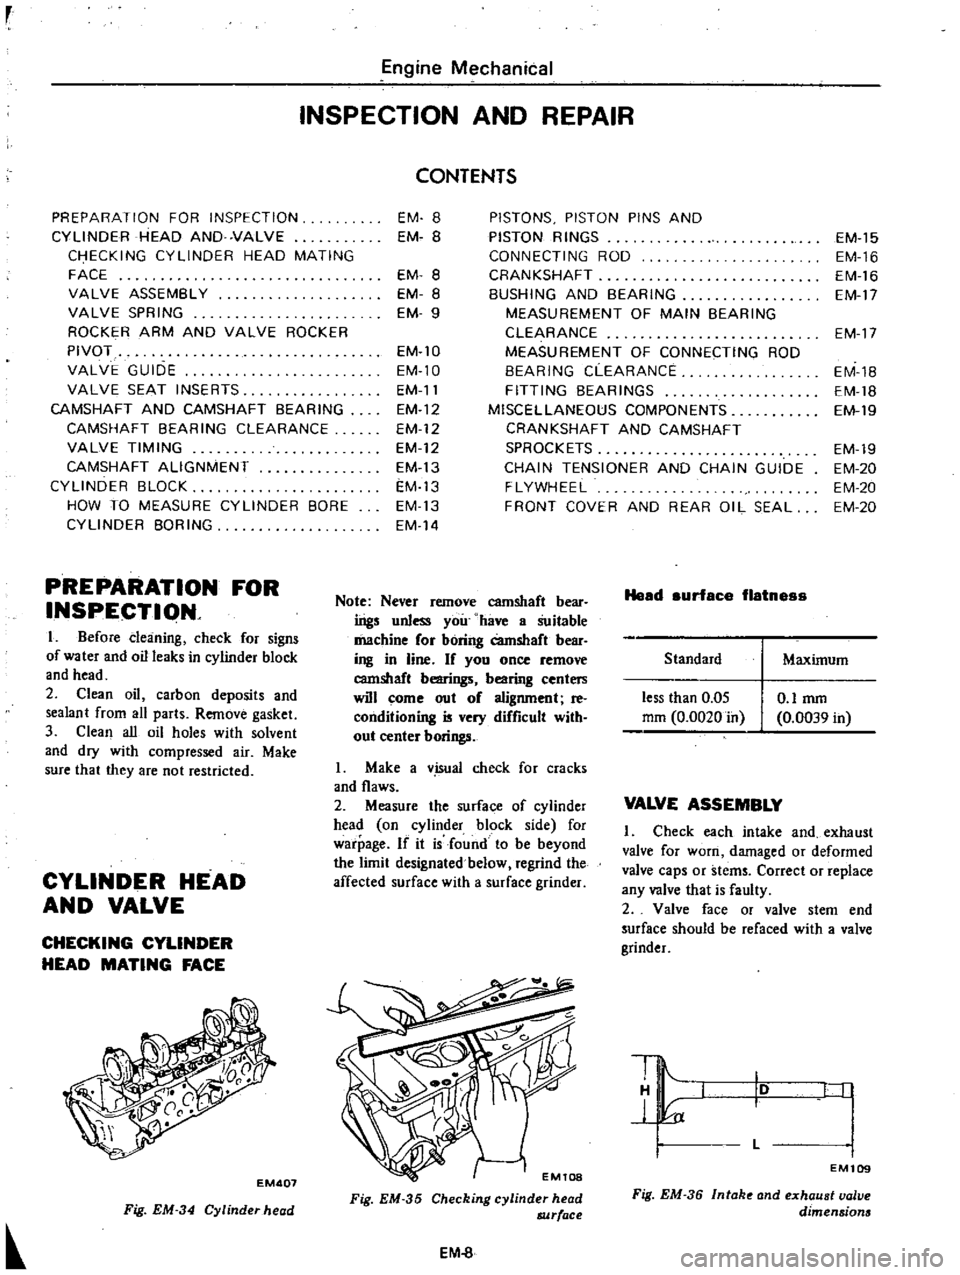
EM407
Fig
EM
34
Cylinder
head
CONTENTS
EM
8
EM
B
EM
8
EM
8
EM
9
EM
lO
EM
l0
EM
11
EM
12
EM
12
EM
12
EM
13
EM
13
EM
13
EM
14
PISTONS
PISTON
PINS
AND
PISTON
RINGS
CONNECTING
ROD
CRANKSHAFT
BUSHING
AND
BEARING
MEASUREMENT
OF
MAIN
BEARING
CLEARANCE
MEASUREMENT
OF
CONNECTING
ROD
BEARING
CLEARANCE
FITTING
BEARINGS
MISCELLANEOUS
COMPONENTS
CRANKSHAFT
AND
CAMSHAFT
SPROCKETS
CHAIN
TENSIONER
AND
CHAIN
GUIDE
FLYWHEEL
FRONT
COVER
AND
REAR
OIL
SEAL
Note
Never
remove
camshaft
bear
ings
unless
you
have
a
Suitable
machine
or
boring
Camshaft
bear
ing
in
line
If
you
once
remove
camshaft
bearings
bearing
centers
will
come
out
o
alignment
reo
conditioning
is
very
difficult
with
out
center
borings
L
Make
a
v
isual
check
for
cracks
and
flaws
2
Measure
the
surface
of
cylinder
head
on
cylinder
block
side
for
warpage
If
it
is
found
to
be
beyond
the
limit
designated
below
regrind
the
affected
surface
with
a
surface
grinder
Fig
EM
35
Checking
cylinder
head
8JJrface
EM
8
Head
surface
flatnes
Standard
less
than
0
05
mm
0
0020
in
O
lmm
0
0039
in
EM
15
EM
16
EM
16
EM
17
EM
17
EM
1B
EM
18
EM
19
EM
19
EM
20
EM
20
EM
20
Maximum
VALVE
ASSEMBLY
Check
each
intake
and
exhaust
valve
for
worn
damaged
or
deformed
valve
caps
or
stems
Correct
or
replace
any
valve
that
is
faulty
2
Valve
face
or
valve
stem
end
surface
should
be
refaced
with
a
valve
grinder
10
L
I
I
I
EM109
Fig
EM
36
Intak
and
exhaust
valve
dimensions
Page 58 of 537
Standard
Camshaft
bend
mm
in
0
02
0
0008
CAMSHAFT
ALIGNMENT
I
Check
camshaft
camshaft
journal
and
earn
surface
for
bend
wear
or
damage
If
damage
is
beyond
limits
replace
affected
parts
2
A
bend
value
is
one
half
of
the
reading
obtained
when
camshaft
is
turned
one
full
revolution
with
a
dial
gauge
applied
to
2nd
and
3rd
journals
Standard
height
of
tam
mm
in
I
Intake
1
Exhaust
Wear
limit
of
earn
height
mm
in
Allo
able
difference
in
diam
ter
betweim
max
worn
and
min
mm
in
worn
parts
of
c
mshaft
journal
Engine
Mechanical
Bend
limit
0
05
0
0020
I
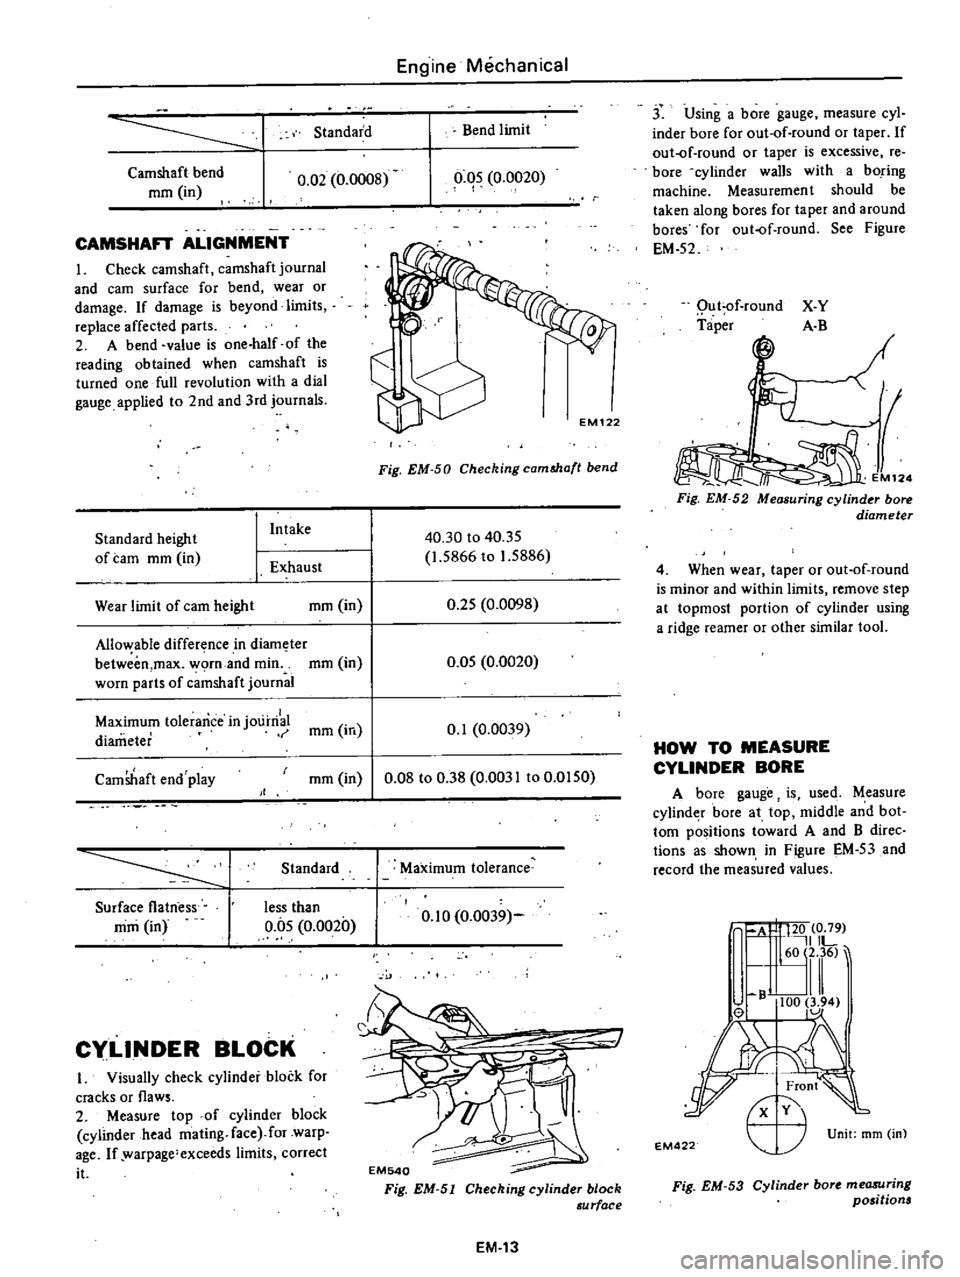
Fig
EM
50
Checking
camMa
t
bend
40
30
to
40
35
1
5866
to
1
5886
0
25
0
0098
0
05
0
0020
Maximum
tolerance
in
j01
irri
mm
in
0
1
0
0039
diameter
CamShaft
end
play
mm
in
0
08
to
0
38
0
0031
to
0
0150
Standard
Surface
flatness
mm
in
less
than
0
05
0
0020
Cy
LlNDER
BLOCK
I
Visually
check
cylinder
block
for
cracks
or
flaws
2
Measure
top
of
cylinder
block
cylinder
head
mating
face
for
warp
age
If
warpage
exceeds
limits
correct
it
Maximum
tolerance
0
10
0
0039
EM540
Fig
EM
51
Cheching
cylinder
block
au
rface
EM
13
j
Using
a
bore
gauge
measure
cyl
inder
bore
for
out
of
round
or
taper
If
out
of
round
or
taper
is
excessive
re
bore
cylinder
walls
with
a
boring
machine
Measuremen
t
should
be
taken
along
bores
for
taper
and
around
bores
for
out
of
round
See
Figure
EM
52
Qu
t
of
round
Taper
X
Y
A
B
M12
Fig
EM
52
Measuring
cylinder
bore
diameter
4
When
wear
taper
or
out
of
round
is
minor
and
within
limits
remove
step
at
topmost
portion
of
cylinder
using
a
ridge
reamer
or
other
similar
tool
HOW
TO
MEASURE
CYLINDER
BORE
A
bore
gauge
is
used
Measure
cylind
r
bore
at
top
middle
and
bot
tom
positions
toward
A
and
B
direc
tions
as
shown
in
Figure
EM
53
and
record
the
measured
values
A
I
120
0
79
IlL
60
2
36
lll
B
100
3
94
el
1
Unit
mm
m
EM
22
r
Fig
EM
53
Cylinder
bort
me08Uring
positions
Page 62 of 537
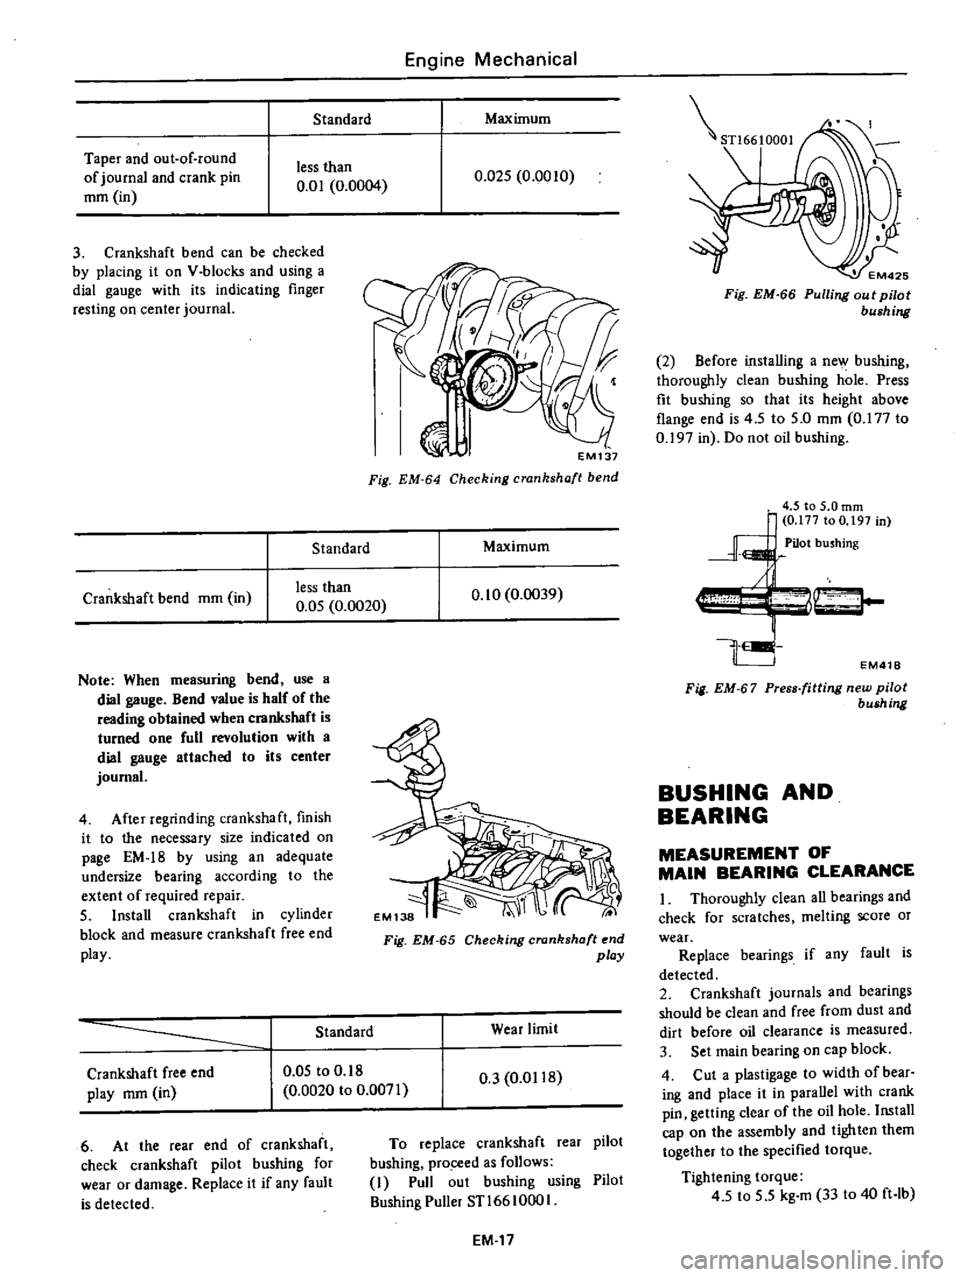
Standard
Taper
and
out
of
round
of
journal
and
crank
pin
mm
in
less
than
0
01
0
0004
3
Crankshaft
bend
can
be
checked
by
placing
it
on
V
blocks
and
using
a
dial
gauge
with
its
indicating
finger
resting
on
center
journal
Standard
Crankshaft
bend
mm
in
less
than
0
05
0
0020
Note
When
measuring
bend
use
a
dial
gauge
Bend
value
is
half
of
the
reading
obtained
when
crankshaft
is
turned
one
full
revolution
with
a
dial
gauge
attached
to
its
center
journal
4
After
regrinding
crankshaft
finish
it
to
the
necessary
size
indicated
on
page
EM
18
by
using
an
adequate
undersize
bearing
according
to
the
extent
of
required
repair
5
Install
crankshaft
in
cylinder
block
and
measure
crankshaft
free
end
play
Engine
Mechanical
Maximum
0
Q25
0
0010
EM137
Fig
EM
64
Checking
crankshaft
bend
Maximum
0
10
0
0039
Fig
EM
65
Checking
crankshaft
end
play
Standard
Wear
limit
Crankshaft
free
end
play
mm
in
0
05
to
0
18
0
0020
to
0
0071
0
3
0
0118
6
At
the
rear
end
of
crankshaft
check
crankshaft
pilot
bushing
for
wear
or
damage
Replace
it
if
any
fault
is
detected
To
replace
crankshaft
rear
pilot
bushing
pro
ceed
as
follows
I
Pull
out
bushing
using
Pilot
Bushing
Puller
STl66
1000
I
EM
17
STl6610001
EM425
Fig
EM
66
Pulling
out
pilot
bushing
2
Before
installing
a
new
bushing
thoroughly
clean
bushing
hole
Press
fit
bushing
so
that
its
height
above
flange
end
is
4
5
to
5
0
mm
0
177
to
0
197
in
Do
not
oil
bushing
EM418
Fig
EM
67
Press
fitting
new
pilot
bush
ng
BUSHING
AND
BEARING
MEASUREMENT
OF
MAIN
BEARING
CLEARANCE
I
Thoroughly
clean
all
bearings
and
check
for
scratches
melting
score
or
wear
Replace
bearings
if
any
fault
is
detected
2
Crankshaft
journals
and
bearings
should
be
clean
and
free
from
dust
and
dirt
before
oil
clearance
is
measured
3
Set
main
bearing
on
cap
block
4
Cut
a
plastigage
to
width
of
bear
ing
and
place
it
in
parallel
with
crank
pin
getting
clear
of
the
oil
hole
Install
cap
on
the
assembly
and
tighten
them
together
to
the
specified
torque
Tightening
torque
4
5
to
5
5
kg
m
33
to
40
ft
lb
Page 63 of 537
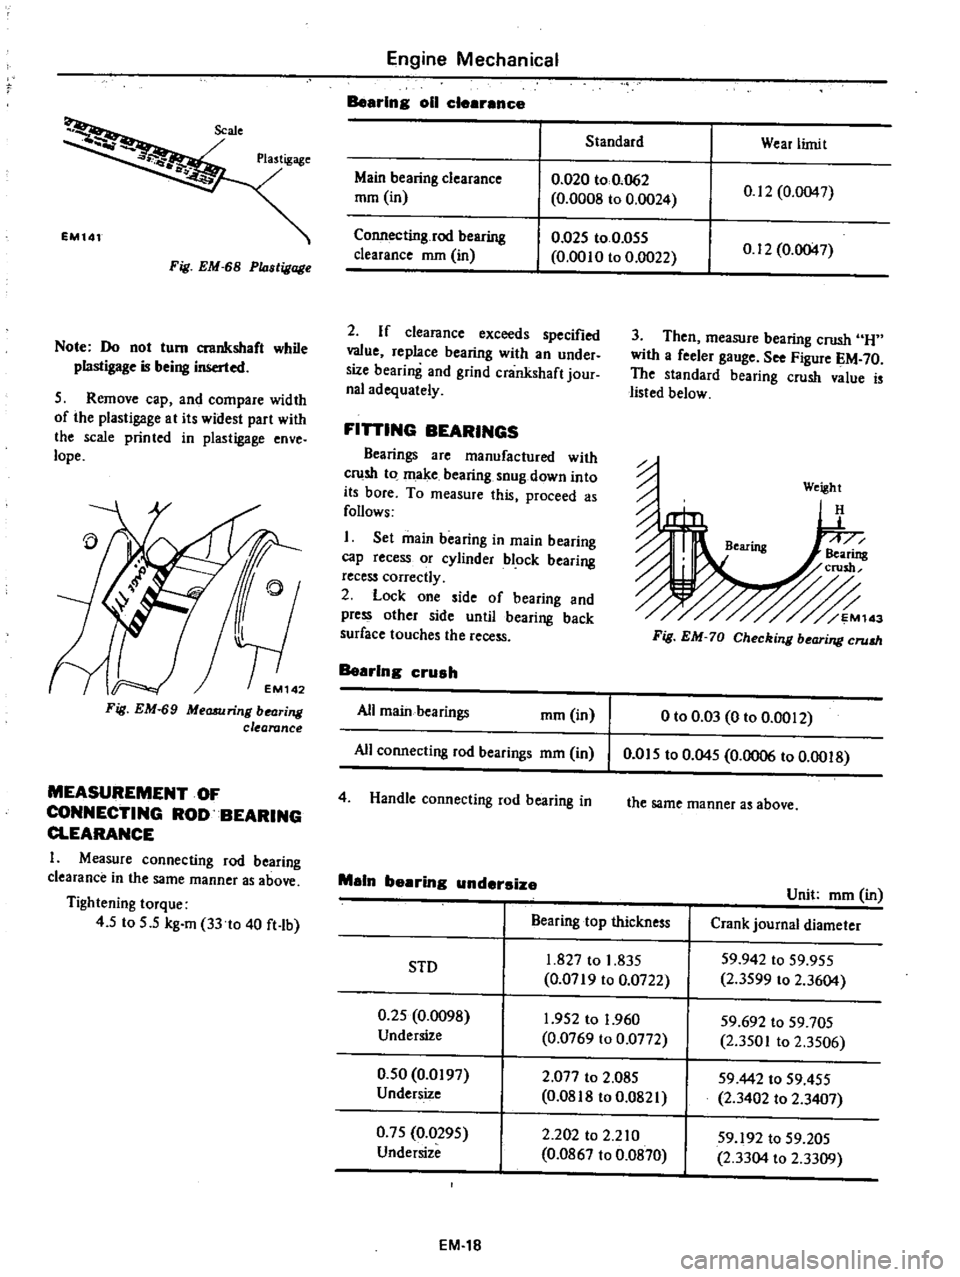
Fig
EM
68
P14stigage
Note
Do
not
tum
crankshaft
while
plastigage
is
being
inserted
5
Remove
cap
and
compare
width
of
the
plastigage
at
its
widest
part
with
the
scale
printed
in
plastigage
enve
lope
Fig
EM
69
Measuring
bearing
clearance
MEASUREMENT
OF
CONNECTING
ROD
BEARING
CLEARANCE
I
Measure
connecting
rod
bearing
clearance
in
the
same
manner
as
above
Tightening
torque
4
5
to
5
5
kg
m
33
to
40
ft
lb
Engine
Mechanical
Bearing
011
clearance
Standard
Wear
limit
Main
bearing
clearance
mm
in
0
020
to
0
062
0
0008
to
0
0024
0
12
0
0047
Connecting
rod
bearing
clearance
mm
in
0
025
to
0
055
0
0010
to
0
0022
0
12
0
0047
2
If
clearance
exceeds
specified
value
replace
bearing
with
an
under
size
bearing
and
grind
crankshaft
jour
nal
adequately
FiniNG
BEARINGS
Bearings
are
manufactured
with
crush
to
make
bearing
snug
down
into
its
bore
To
measure
this
proceed
as
follows
I
Set
main
bearing
in
main
bearing
cap
recess
or
cylinder
block
bearing
recess
correctly
2
Lock
one
side
of
bearing
and
press
other
side
until
bearing
back
surface
touches
the
recess
Bearing
crush
All
main
bearings
mm
in
All
connecting
rod
bearings
mm
in
4
Handle
connecting
rod
bearing
in
3
Then
measure
bearing
crush
H
with
a
feeler
gauge
See
Figure
EM
70
The
standard
bearing
crush
value
is
listed
below
Weight
H
Fig
EM
70
Checking
bearing
crum
o
to
0
03
0
to
0
0012
0
015
to
0
045
0
0006
to
0
0018
the
same
manner
as
above
Main
bearing
undersize
Unit
mm
in
Bearing
top
thickness
Crank
journal
diameter
1
827
to
1
835
59
942
to
59
955
SID
0
0719
to
0
0722
2
3599
to
2
3604
0
25
0
0098
1
952
to
1
960
59
692
to
59
705
Undersize
0
0769
to
0
0772
2
3501
to
2
3506
0
50
0
0197
2
077
to
2
085
59442
to
59
455
Undersize
0
0818
to
0
0821
2
3402
to
2
3407
0
75
0
0295
2
202
to
2
210
59
192
to
59
205
Undersize
0
0867
to
0
0870
2
3304
to
2
3309
EM
18
Page 66 of 537
PRECAUTIONS
CYLINDER
HEAD
PRECAUTIONS
I
Use
thoroughly
cleaned
parts
Especially
make
sure
that
oil
holes
are
clear
of
foreign
matter
2
When
installing
sliding
parts
such
as
bearings
be
s
uIe
to
apply
engine
oil
to
them
3
Use
new
packing
and
oil
seals
4
Do
not
reuse
lock
washers
5
Keep
tools
and
work
benches
clean
6
Keep
necessary
parts
and
tools
near
at
hand
7
Be
sure
to
follow
specified
tight
ening
torque
and
order
8
Applying
sealant
Use
sealant
to
eliminate
water
and
oil
leaks
Parts
requiring
sealant
are
I
Front
cover
and
corners
of
cyl
inder
block
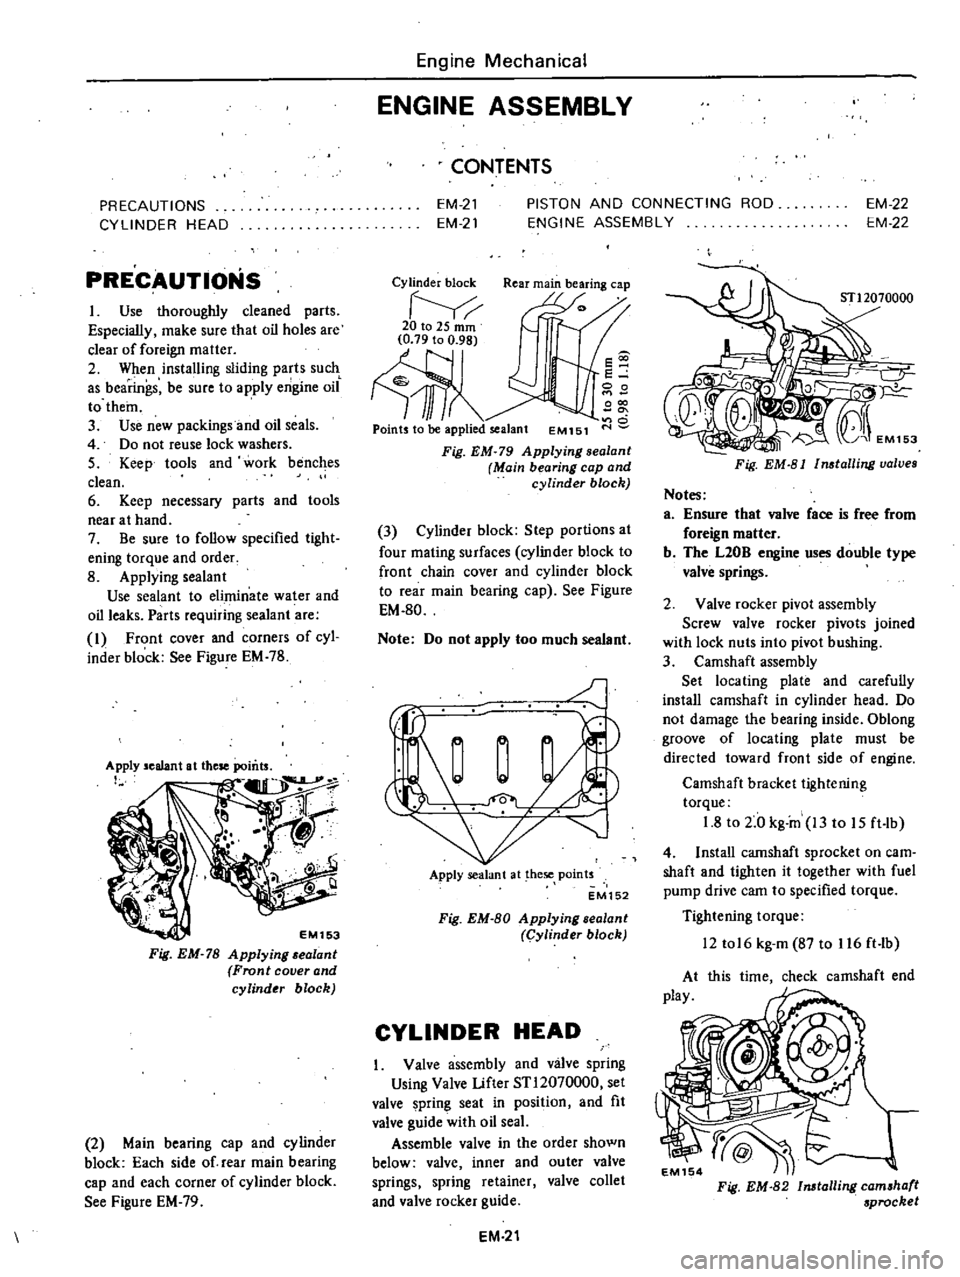
See
Figure
EM
78
EM153
Fig
EM
78
Applying
alant
Front
cover
and
cylinder
block
2
Main
bearing
cap
and
cylinder
block
Each
side
of
rear
main
bearing
cap
and
each
corner
of
cylinder
block
See
Figure
EM
79
Engine
Mechanical
ENGINE
ASSEMBLY
CONTENTS
EM
21
EM
21
PISTON
AND
CONNECTING
ROD
ENGINE
ASSEMBLY
EM
22
EM
22
Cylinder
block
Rear
main
bearing
cap
20to2Smm
Ill
Points
to
be
applied
sealant
EM151
s
e
00
000
o
Fig
EM
79
Applying
sealanl
Main
bearing
cap
and
cylinder
block
3
Cylinder
block
Step
portions
at
four
mating
surfaces
cylinder
block
to
front
chain
cover
and
cylinder
block
to
rear
main
bearing
cap
See
Figure
EM
80
Note
Do
not
apply
too
much
sealant
J
Apply
sealant
at
hese
points
EM152
Fig
EM
80
Applying
sealant
Cylinder
block
CYLINDER
HEAD
Valve
assembly
and
valve
spring
Using
Valve
Lifter
STl2070000
set
valve
pring
seat
in
position
and
fit
valve
guide
with
oil
seaL
Assemble
valve
in
the
order
shown
below
valve
inner
and
outer
valve
springs
spring
retainer
valve
collet
and
valve
rocker
guide
EM
21
Fig
EM
81
Installing
valves
Notes
a
Ensure
that
valve
face
is
free
from
foreign
matter
b
The
L20B
engine
uses
double
type
valve
springs
2
Valve
rocker
pivot
assembly
Screw
valve
rocker
pivots
joined
with
lock
nuts
into
pivot
hushing
3
Camshaft
assembly
Set
locating
plate
and
carefully
install
camshaft
in
cylinder
head
Do
not
damage
the
bearing
inside
Oblong
groove
of
locating
plate
must
be
directed
toward
front
side
of
engine
Camshaft
bracket
tightening
torque
1
8
to
2
0
kg
in
13
to
15
ft
lb
4
Install
camshaft
sprocket
on
earn
shaft
and
tighten
it
together
with
fuel
pump
drive
cam
to
specified
torque
Tightening
torque
12
tol6
kg
m
87
to
116
ft
lb
this
time
check
camshaft
end
Fig
EM
82
Installing
camshaft
sprocket