lock DATSUN PICK-UP 1977 Owner's Guide
[x] Cancel search | Manufacturer: DATSUN, Model Year: 1977, Model line: PICK-UP, Model: DATSUN PICK-UP 1977Pages: 537, PDF Size: 35.48 MB
Page 102 of 537
r
AIR
CLEANER
1
Loosen
bolts
securing
air
cleaner
to
air
cleaner
bracket
2
Loosen
air
cleaner
lock
bolt
and
remove
air
cleaner
from
carburetor
Disconnect
the
following
hoses
when
dismounting
air
cleaner
Under
hood
air
inlet
hose
Hot
air
inlet
hose
Vacuum
hose
Sensor
to
intake
manifold
Vacuum
hose
Sensor
to
vacuum
motor
Vacuum
hose
Idle
compensator
to
intake
manifold
Hose
Air
pump
to
air
cleaner
Hose
AB
valve
to
air
cleaner
Hose
Carburetor
to
air
cleaner
Blow
by
hose
Air
cleaner
to
rocker
cover
Hose
Air
control
vaive
to
air
cleaner
California
models
only
3
To
install
reverse
the
removal
procedure
INSPECTION
1
AIR
CLEANER
ELEMENT
Viscous
paper
type
air
cleaner
ele
ment
does
not
require
any
cleaning
operation
until
it
is
replaced
periodi
cally
Brushing
or
blasting
operation
will
cause
clogging
and
result
in
enrich
ment
of
carburetor
mixture
and
should
never
be
conducted
For
reo
placement
interval
of
air
cleaner
ele
ment
refer
to
Maintenance
Sched
ule
2
HOT
AIR
CONTROL
SYSTEM
In
warm
weather
it
is
difficult
to
find
out
malfunction
of
hot
air
control
system
In
cold
wea
thee
however
malfunction
of
air
control
valve
due
to
disconnection
or
deterioration
of
vacu
um
hose
between
intake
manifold
and
vacuum
motor
and
insufficient
dura
bility
of
air
control
valve
will
cause
insufficient
automatic
control
opera
tion
for
intake
air
and
result
in
engine
disorder
including
I
Stall
or
hesitation
of
engine
oper
ation
2
Increase
in
fuel
consumption
3
uck
of
power
Engine
Fuel
These
phenomena
reveal
malfunc
tion
of
hot
air
control
system
If
these
phenomena
should
occur
check
hot
air
control
system
as
described
in
the
following
before
carrying
out
inspec
tion
of
carburetor
2
1
Vacuum
hose
Intake
manifold
to
3
way
connec
tor
3
way
connector
to
temperature
sensor
3
way
connector
to
idle
com
pensator
temperature
sensor
to
vacu
um
motor
I
Check
that
vacuum
hoses
are
se
curely
connected
in
correct
postion
2
Check
each
hose
for
cracks
or
distortion
hose
clip
for
condition
Note
Vacuum
hose
position
R
H
side
of
Nissan
mark
on
the
top
of
sensor
is
for
intake
manifold
L
U
side
of
the
mark
is
for
vacuum
motor
2
2
Vacuum
motor
I
With
engine
stopped
disconnect
fresh
air
duct
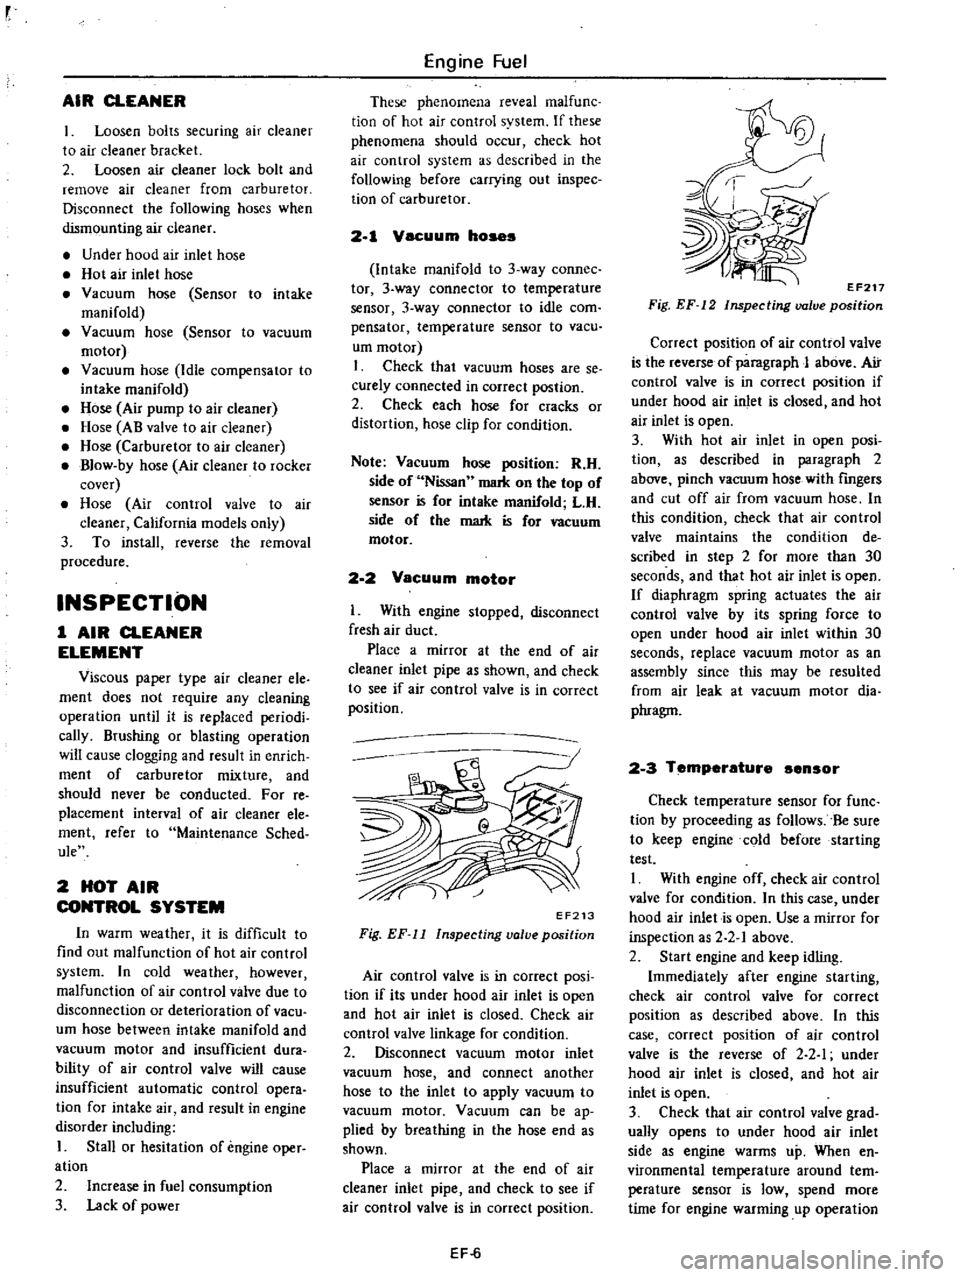
Place
a
mirror
at
the
end
of
air
cleaner
inlet
pipe
as
shown
and
check
to
see
if
air
con
trol
valve
is
in
correct
position
EF213
Fig
EF
11
Inspecting
valve
position
Air
control
valve
is
in
correct
posi
tion
if
its
under
hood
air
inlet
is
open
and
hot
air
inlet
is
closed
Check
air
control
valve
linkage
for
condition
2
Disconnect
vacuum
motor
inlet
vacuum
hose
and
connect
another
hose
to
the
inlet
to
apply
vacuum
to
vacuum
motor
Vacuum
can
be
ap
plied
by
breathing
in
the
hose
end
as
shown
Place
a
mirror
at
the
end
of
air
cleaner
inlet
pipe
and
check
to
see
if
air
control
valve
is
in
correct
position
EF
6
EF217
Fig
EF
12
Inspecting
valve
position
Correct
position
of
air
control
valve
is
the
reverse
of
paragraph
J
above
Air
control
valve
is
in
correct
position
if
under
hood
air
inlet
is
closed
and
hot
air
inlet
is
open
3
With
hot
air
inlet
in
open
posi
tion
as
described
in
paragraph
2
above
pinch
vacuum
hose
with
fingers
and
cut
off
air
from
vacuum
hose
In
this
condition
check
that
air
control
valve
maintains
the
condition
de
scribed
in
step
2
for
more
than
30
seconds
and
that
hot
air
inlet
is
open
If
diaphragm
spring
actuates
the
air
control
valve
by
its
spring
force
to
open
under
hood
air
inlet
within
30
seconds
replace
vacuum
motor
as
an
assembly
since
this
may
be
resulted
from
air
leak
at
vacuum
motor
dia
phragm
2
3
Temperature
ensor
Check
temperature
sensor
for
func
tion
by
proceeding
as
follows
Be
sure
to
keep
engine
cold
before
starting
test
I
With
engine
off
check
air
control
valve
for
condition
In
this
case
under
hood
air
inlet
is
open
Use
a
mirror
for
inspection
as
2
2
1
above
2
Start
engine
and
keep
idling
Immediately
after
engine
starting
check
air
control
valve
for
correct
position
as
described
above
In
this
case
correct
position
of
air
control
valve
is
the
reverse
of
2
2
I
under
hood
air
inlet
is
closed
and
hot
air
inlet
is
open
3
Check
that
air
control
valve
grad
ually
opens
to
under
hood
air
inlet
side
as
engine
warms
up
When
en
vironmental
temperature
around
tern
perature
sensor
is
low
spend
more
time
for
engine
warming
up
operation
Page 106 of 537

4
Run
the
engine
at
varying
speeds
5
The
pressure
gauge
indicates
static
fuel
pressure
in
the
line
The
gauge
reading
should
be
within
the
following
range
0
21
to
0
27
kg
em2
3
0
to
3
8
psi
Note
If
the
fuel
in
carburetor
float
chamber
has
run
out
and
engine
has
stopped
clip
and
pour
fuel
into
carburetor
Fasten
clip
secure
ly
and
repe
1
static
pressure
test
Pressure
below
the
lower
limit
indi
cates
extreme
wear
on
one
part
or
a
small
amount
of
wear
on
each
working
part
It
also
indicates
ruptured
dia
phragm
worn
warped
dirty
or
gum
ming
valves
and
seats
or
a
weak
diaphragm
return
spring
Pressure
above
the
upper
limit
indicates
an
excessively
strong
tension
of
dia
phragm
return
spring
or
a
diaphragm
that
is
too
tight
Both
of
these
condi
tions
require
the
removal
of
pump
assembly
for
replacement
or
repair
CAPACITY
TEST
The
capacity
test
is
made
only
when
static
pressure
is
within
the
specifications
To
make
this
test
pro
ceed
as
follows
1
Disconnect
pressure
gauge
from
T
connector
and
in
its
vacant
place
install
a
suitable
container
as
a
fuel
sump
2
Run
engine
at
1
000
rpm
3
The
pump
should
deliver
1
000
cc
2
11
US
pt
of
fuel
in
one
minute
or
less
If
little
or
no
fuel
flows
from
the
open
end
of
pipe
it
is
an
indication
that
fuel
line
is
clogged
or
pump
is
malfunctioning
REMOVAL
AND
DISASSEMBLY
Remove
fuel
pump
assembly
by
unscrewing
two
mounting
nuts
and
disassemble
in
the
following
order
1
Separate
upper
body
and
lower
body
by
unscrewing
body
set
screws
Engine
Fuel
2
Take
off
cap
and
cap
gasket
by
removing
cap
screws
3
Unscrew
elbow
and
connector
4
Take
off
valve
retainer
by
un
screwing
two
retainer
screws
and
re
move
two
valves
5
To
remove
diaphragm
press
down
its
center
against
spring
force
With
diaphragm
pressed
down
tilt
it
until
the
end
of
pull
rod
touches
the
inne
wall
of
body
Then
release
diaphragm
to
unhook
push
rod
Be
careful
during
this
operation
not
to
damage
diaphragm
or
oil
se
L
i
J
EFOO7
Fig
EF
20
Remouing
pull
rod
6
Drive
rocker
arm
pin
out
with
a
press
or
hammer
8
o
6
7
8
@
INSPECTION
I
Check
upper
body
and
lower
body
for
cracks
EF
10
I
fuel
pump
cap
2
Cap
gasket
3
Valve
packing
4
fuel
pump
val
e
assembly
S
Valve
retainer
6
Diaphragm
assembly
7
Diaphragm
spring
8
PuRro
9
Lower
body
seal
washer
10
Lower
body
seal
11
Inkl
connector
12
Outlet
connector
13
Rocker
arm
spring
14
Rocker
arm
I
S
Rocker
artyl
side
pin
16
Fuel
pump
packing
17
Spacer
fuel
pump
fo
cylinder
block
EF510
Fig
EF
21
Slruc
ure
of
fuel
pump
2
Check
valve
assembly
for
wear
on
valve
and
valve
spring
Blow
valve
assembly
with
brea
th
to
examine
its
function
Page 110 of 537
Engine
Fuel
CARBURETOR
CONTENTS
DESCRIPTION
EF
14
CHOKE
UNLOADER
EF
23
STRUCTURE
AND
OPERATION
EF
14
ELECTRIC
AUTOMATIC
CHOKE
EF
24
PRIMARY
SYSTEM
EF
15
INTERLOCK
OPENING
OF
PRIMARY
AND
SECONDARY
SYSTEM
EF
16
SECONDARY
THROTTLE
VALVE
EF
24
ANTI
DIESELING
SYSTEM
EF
17
DASH
POT
EF
25
FLOAT
SYSTEM
EF
18
ACCELERATING
PUMP
EF
25
BOOST
CONTROLLED
DECELERATION
ANTI
DIESELING
SOLENOID
VALVE
EF
25
DEVICE
B
C
D
D
EF
1B
B
C
D
D
CIRCUIT
WITH
FUNCTION
ELECTRIC
AUTOMATIC
CHOKE
EF
20
TEST
CONNECTOR
EF
25
DASH
POT
SYSTEM
EF
20
ALTITUDE
COMPENSATOR
ALTITUDE
COMPENSATOR
California
modelsl
EF
29
California
models
EF
20
MAJOR
SERVICE
OPERATION
EF
29
ADJUSTMENT
AND
INSPECTION
EF
21
REMOVAL
EF
29
CARBURETOR
IDLE
RPM
AND
DISASSEMBLY
AND
ASSEMBLY
EF
30
MIXTURE
RATIO
EF
21
CLEANING
AND
INSPECTION
EF
34
FUEL
LEVEL
EF
22
SERVICE
DATA
AND
SPECIFICATIONS
EF
35
FAST
IDLE
EF
22
TROU8LE
DIAGNOSES
AND
VACUUM
BREAK
EF
23
CORRECTIONS
EF
36
DESCRIPTION
The
carburetors
are
of
down
draft
two
barrel
types
which
produce
the
optimum
air
fuel
mixture
under
all
operating
conditions
They
present
several
distinct
features
of
importance
to
the
vehicle
owners
A
summary
of
the
features
is
as
follows
1
A
slow
economizer
to
make
a
smooth
connection
with
acceleration
or
deceleration
during
light
load
run
ning
It
also
assures
stable
low
speed
performance
2
An
idle
limiter
to
reduce
harmful
exhaust
emissions
to
a
minimum
3
A
B
C
D
D
device
for
reducing
hydrocarbon
H
C
emissions
4
An
electric
automatic
choke
to
facilitate
cold
starting
and
to
reduce
exhaust
emissions
5
An
anti
dieseling
solenoid
to
eliminate
dieseling
run
on
6
A
power
valve
or
vacuum
actu
ated
booster
to
ensure
smooth
high
speed
operation
7
The
carburetor
comes
equipped
with
dash
pot
which
ensures
smooth
deceleration
without
engine
stall
under
all
operating
conditions
8
The
hand
operated
altitude
com
pensator
is
installed
in
the
California
models
EF
14
STRUCTURE
AND
OPERATION
These
carburetors
consist
of
a
primary
system
for
normal
running
and
a
secondary
system
for
full
load
running
A
float
system
common
to
both
primary
and
secondary
systems
a
se
condary
switch
over
mechanism
an
accelerating
mechanism
etc
are
also
attached
An
anti
dieseling
solenoid
valve
and
a
power
valve
mechanism
are
also
installed
The
hand
operated
altitude
com
pensator
corrects
air
fuel
mixture
to
an
optimum
ratio
Page 113 of 537
Step
system
The
construction
of
this
system
may
correspond
to
the
idling
and
slow
system
of
the
primary
system
Tlris
system
aims
at
the
proper
filling
up
of
the
gap
when
fuel
supply
is
transferred
from
the
primary
system
to
the
secondary
one
The
step
port
is
located
near
the
secondary
throttle
valve
edge
in
its
fully
closed
state
Secondary
switchover
mechanism
The
secondary
throttle
valve
is
linked
to
the
diaphragm
which
is
actuated
by
the
vacuum
created
in
the
venturi
A
vacuum
jet
is
provided
at
each
of
the
primary
and
secondary
venturies
and
the
composite
vacuum
of
these
jets
actuates
the
diaphragm
As
the
linkage
causes
the
secondary
throttle
valve
to
close
until
the
prima
ry
throttle
valve
opening
reaches
ap
proximately
500
fuel
consumption
during
normal
operation
is
not
exces
sive
During
high
speed
running
as
shown
in
Figure
EF
28
as
the
vacuum
at
the
venturi
is
increased
the
dia
phragm
is
pulled
against
the
diaphragm
spring
force
and
then
secondary
throt
tie
valve
is
opened
The
other
side
during
low
speed
running
as
the
primary
throttle
valve
opening
does
not
reach
500
the
secondary
throttle
valve
is
locked
to
close
completely
by
the
locking
arm
which
is
interlocked
with
primary
throttle
arm
by
linkage
When
the
primary
throttle
valve
opening
reaches
wider
position
than
500
the
secondary
throttle
valve
is
ready
to
open
because
the
locking
arm
revolves
and
leaves
from
the
se
condary
throttle
arm
Engine
Fuel
HI
h
speed
circuit
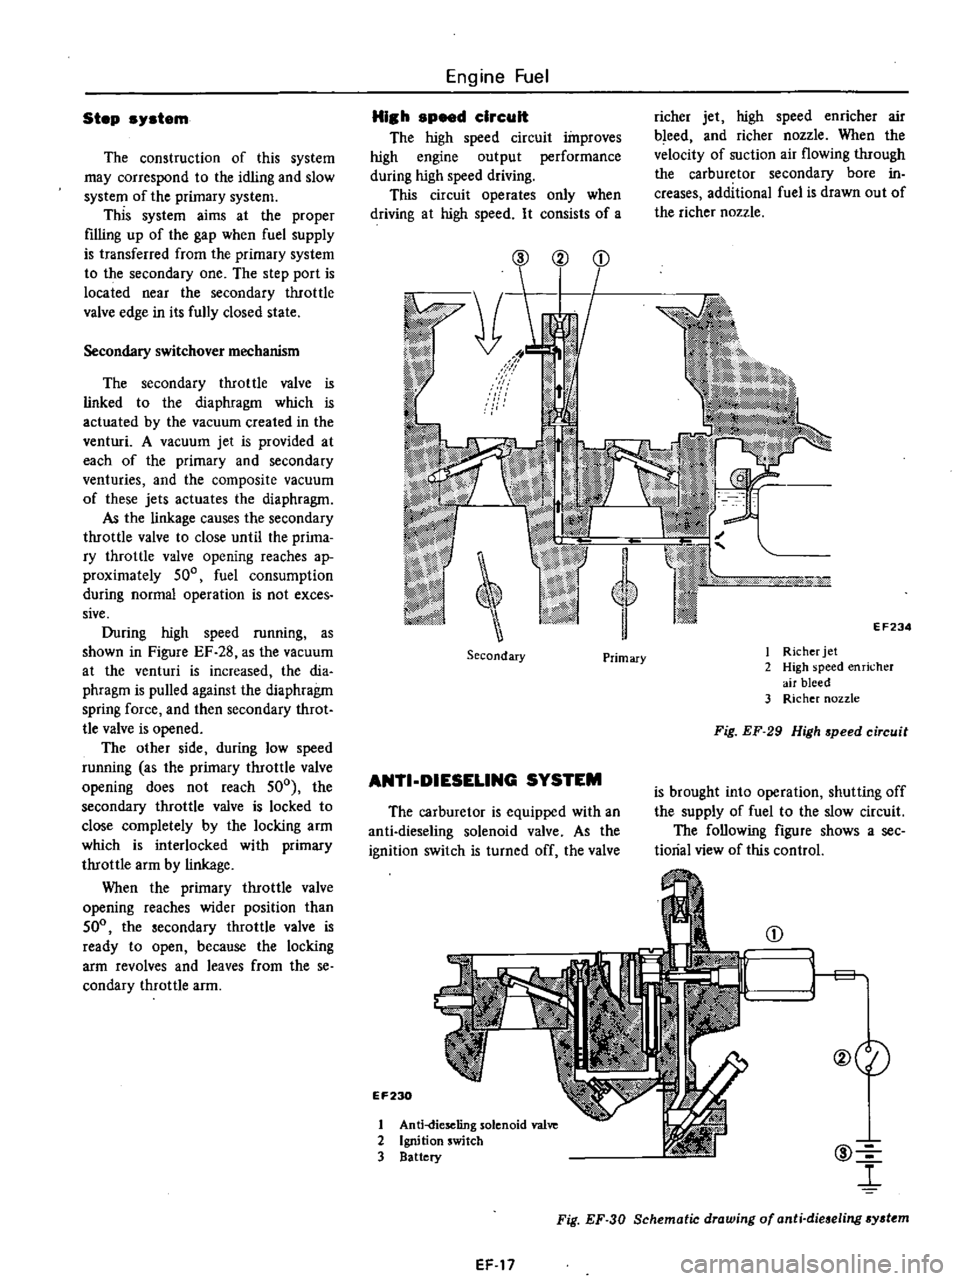
The
high
speed
circuit
improves
high
engine
output
performance
during
high
speed
driving
This
circuit
operates
only
when
driving
at
high
speed
It
consists
of
a
richer
jet
high
speed
enricher
air
bleed
and
richer
nozzle
When
the
velocity
of
suction
air
flowing
through
the
carburetor
secondary
bore
in
creases
additional
fuel
is
drawn
out
of
the
richer
nozzle
@
2
EF234
Secondary
I
Richer
jet
2
High
speed
enricher
air
bleed
3
Richer
nozzle
Primary
Fig
EF
29
High
speed
circuit
ANTI
DIESELlNG
SYSTEM
is
brought
into
operation
shutting
off
the
supply
of
fuel
to
the
slow
circuit
The
following
figure
shows
a
see
tiorial
view
of
this
control
The
carburetor
is
equipped
with
an
anti
dieseling
solenoid
valve
As
the
ignition
switch
is
turned
off
the
valve
EF230
@
l
CD
1
1
g
@eI
1
Anti
dieseling
solenoid
va1
2
Ignition
switch
3
Battery
Fig
EF
30
Schematic
drawing
of
anti
dieseling
sydtm
EF
17
Page 117 of 537
Notes
a
The
idle
rpm
and
CO
vary
accord
ing
to
the
altitude
Therefore
they
should
be
properly
adjusted
when
the
position
of
the
H
L
lever
is
changed
EF729
ADJUSTMENT
AND
INSPECTION
CARBURETOR
IDLE
R
P
M
AND
MIXTURE
RATIO
Cautions
3
On
automatic
transmission
equi
ped
models
check
should
be
per
formed
in
the
0
position
Be
sure
to
engage
parking
brake
and
to
lock
both
front
and
rear
wheels
with
wheel
chocks
b
Keep
your
foot
down
on
the
brake
pedal
while
depressing
the
accelera
tor
pedal
Otherwise
vehicle
surges
forward
dangerously
Notes
a
00
not
attempt
to
screw
the
idle
adjusting
screw
down
completely
Ooing
so
could
cause
damage
to
tip
which
in
turn
will
tend
to
cause
malfunctio11ll
b
If
idle
limiter
cap
obstructs
proper
adjustment
remove
it
To
install
idle
limiter
cap
refer
to
Idle
Limiter
Cap
c
After
idle
adjustment
has
been
made
shift
the
lever
to
the
N
or
P
position
for
automatic
trans
mission
d
When
measuring
CO
percentage
in
Engine
Fuel
b
Counties
1
219
m
4
000
ft
or
more
above
sea
level
have
been
designated
by
law
as
High
Altitude
Counties
For
further
details
refer
to
1977
OATSUN
PICK
UP
Service
Bulletin
Pub
No
257
0
I
Air
cleaner
rID
mOl
If
Low
altitude
Ll
n
n
L
n
Fig
EF
34
sert
probe
into
tail
pipe
more
than
40
em
15
7
in
CO
Idle
adjustment
with
CO
meter
Idle
mixture
adjustment
requires
the
use
of
a
CO
meter
especially
for
California
models
When
preparing
to
adjust
idle
mixture
it
is
essential
to
have
the
meter
thoroughly
warmed
up
and
calibrated
I
Check
carburetor
pipes
for
proper
connection
2
Warm
up
engine
until
water
tem
perature
indicator
points
to
the
middle
of
gauge
The
procedure
to
warm
up
engine
is
not
specifically
recom
mended
Either
driving
vehicle
or
oper
ating
engine
at
no
load
will
be
good
3
Make
sure
that
water
tempera
ture
indicator
points
to
the
middle
Further
keep
engine
running
at
about
2
000
rpm
for
about
5
minutes
with
out
applying
load
to
engine
in
order
to
stabilize
engine
condition
Engine
hood
should
be
open
4
Run
engine
for
about
10
minutes
at
idling
speed
Ouring
this
10
minutes
proceed
as
described
in
steps
5
to
9
below
5
Remove
air
hose
between
3
way
connector
5
way
connector
for
Cali
fornia
models
and
air
check
valve
as
EF
21
shown
in
Figure
EF
35
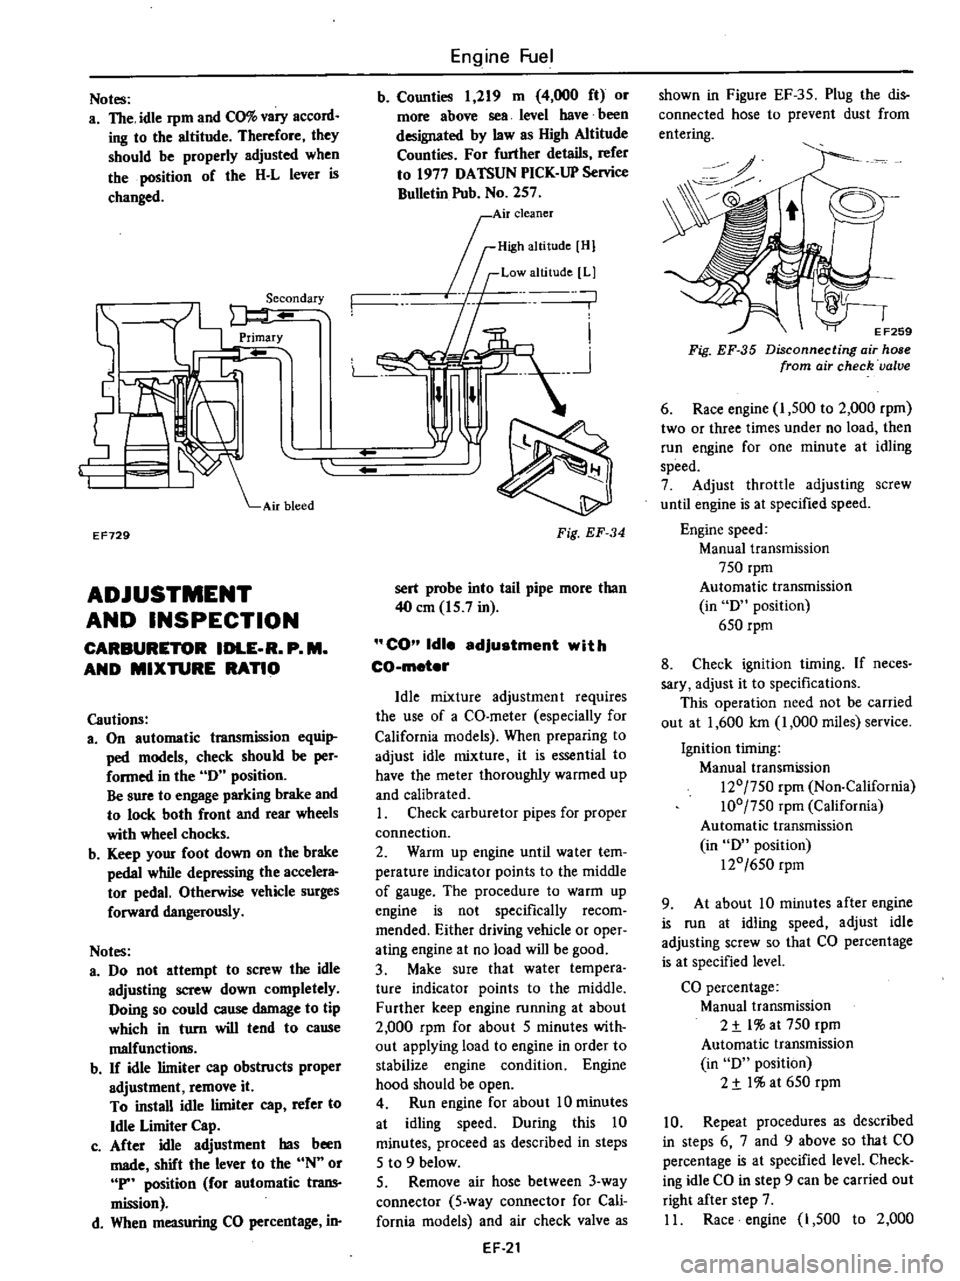
Plug
the
dis
connected
hose
to
prevent
dust
from
entering
0
o
EF259
Fig
EF
35
Disconnecting
air
hose
from
air
check
valve
6
Race
engine
I
500
to
2
000
rpm
two
or
three
times
under
no
load
then
run
engine
for
one
minute
at
idling
speed
7
Adjust
throttle
adjusting
screw
until
engine
is
at
specified
speed
Engine
speed
Manual
transmission
750
rpm
Automatic
transmission
in
0
position
650
rpm
8
Check
ignition
timing
If
neces
sary
adjust
it
to
specifications
This
operation
need
not
be
carried
out
at
1
600
Ian
1
000
miles
service
Ignition
timing
Manual
transmission
120
750
rpm
Non
California
100
750
rpm
California
Automatic
transmission
in
0
position
120
650
rpm
9
At
about
10
minutes
after
engine
is
run
at
idling
speed
adjust
idle
adjusting
screw
so
that
CO
percentage
is
at
specified
level
CO
percentage
Manual
transmission
2
t
l
at
750
rpm
Automatic
transmission
in
0
position
2
t
I
at
650
rpm
10
Repeat
procedures
as
described
in
steps
6
7
and
9
above
so
that
CO
percentage
is
at
specified
level
Check
ing
idle
CO
in
step
9
can
be
carried
out
right
after
step
7
II
Race
engine
1
500
to
2
000
Page 118 of 537
rpm
two
or
three
iimes
under
no
load
and
make
sure
that
specified
CO
per
centage
is
obtained
12
Connect
air
hose
to
air
check
valve
If
engine
speed
increases
readjust
it
to
the
specified
speed
with
throttle
adjustingsqew
CO
idle
edJustment
without
CO
meter
If
CO
meter
is
not
available
the
following
procedures
may
be
used
L
Check
carburetor
pipes
for
proper
connection
2
Warm
up
engine
until
water
tem
perature
indicator
points
to
the
middle
of
gauge
The
procedure
to
warm
up
engine
is
not
specifically
recom
mended
Either
driving
vehicle
or
oper
ating
engine
at
no
load
will
be
good
3
Make
sure
that
water
temperature
indicator
points
to
the
middle
Further
keep
engine
running
at
about
2
000
rpm
for
about
5
minutes
without
applying
load
to
engine
in
order
to
stabilize
engine
condition
Engine
hood
should
be
open
4
Run
engine
for
about
10
minutes
at
idling
speed
During
this
10
minutes
proceed
as
described
in
steps
5
to
9
below
5
Remove
air
hose
between
3
way
connector
5
way
connector
for
Cali
fornia
models
and
air
check
valve
shown
in
Figure
EF
35
Plug
the
dis
connected
hose
19
prevent
dust
from
entering
6
Race
engine
1
500
to
2
000
rpm
two
or
three
times
under
no
load
then
run
engine
for
one
minute
at
idling
speed
7
Adjust
throttle
adjusting
screw
so
that
engine
speeds
are
as
indicated
below
Engine
speed
Manual
transmission
815
rpm
Automatic
transmission
in
D
position
670
rpm
8
Check
ignition
timing
if
neces
sary
adjust
it
to
the
value
required
by
specifications
This
operation
need
not
be
carried
out
at
1
600
km
1
000
miles
service
9
At
about
10
minutes
after
engine
Engine
Fuel
is
run
at
idling
speed
adjust
idle
adjusting
screw
until
maximum
rpm
is
obtained
10
Repeat
procedures
as
described
in
steps
6
7
and
9
above
until
engine
speed
at
best
idle
mixture
is
815
rpm
for
manual
transmission
models
and
670
rpm
for
automatic
transmission
models
in
D
position
Adjustment
in
step
9
can
be
carried
out
right
after
step
7
11
Turn
the
idle
adjusting
screw
clockwise
until
engine
speed
drops
off
below
specified
rpm
Engine
speed
drops
off
Manual
transmission
60
to
70
rpm
Automatic
transmission
in
D
position
15
to
25
rpm
12
Connect
air
hose
to
air
check
valve
If
engine
speed
increases
readjust
it
to
the
specified
speed
with
throttle
adjusting
screw
Idle
limiter
cep
Do
not
remove
this
idle
limiter
cap
unless
necessary
If
this
unit
is
re
moved
it
must
be
readjusted
at
lime
of
installation
To
adjust
proceed
as
follows
I
After
adjusting
throttle
or
idle
speed
adjusting
screw
check
to
be
sure
that
the
amount
of
CO
contained
in
exhaust
gases
meets
the
established
standard
2
Install
idle
limiter
cap
in
position
making
sure
that
the
adjusting
screw
can
rotate
another
1
8
turn
in
the
CO
RICH
direction
Carbo
to
per
CO
rich
450
lIS
rotation
t
CO
lean
J
SQ
dl
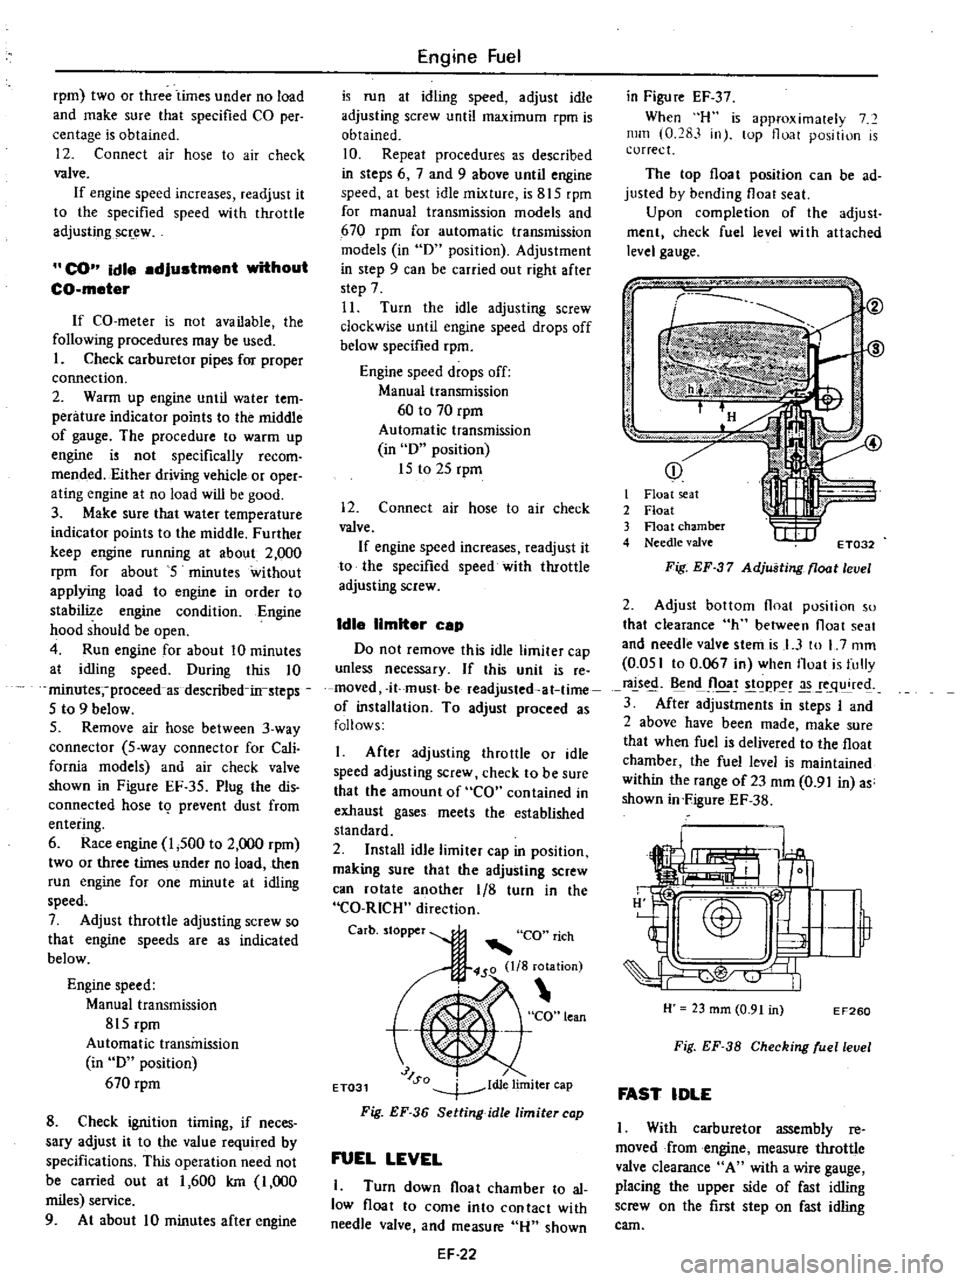
lim
ET031
1
e
Iter
cap
Fig
EF
36
Setting
idle
limiter
cap
FUEL
LEVEL
1
Turn
down
float
chamber
to
al
low
float
to
come
into
contact
with
needle
valve
and
measure
Hu
shown
EF
22
in
Figu
re
EF
37
When
H
is
approximalely
7
mill
0
283
in
lOp
float
position
is
correct
The
top
float
position
can
be
ad
justed
by
bending
float
seat
Upon
completion
of
the
adjust
ment
check
fuel
level
wi
th
attached
level
gauge
p
j
i
I
it
I
Float
seat
2
Float
3
Float
chamber
4
Needle
valve
t
I
IIf
ET032
Fig
EF
37
Adjusting
float
level
2
Adjust
bottom
float
position
so
that
clearance
h
between
float
seat
and
needle
valve
stemis
I
3
to
L
7
mm
0
051
to
0
067
in
when
Iloat
is
fully
rals
n
Jloa
t
goppe
q
re
3
After
adjustments
in
steps
I
and
2
above
have
been
made
make
sure
that
when
fuel
is
delivered
to
the
float
chamber
the
fuel
level
is
maintained
within
the
range
of23
mm
0
91
in
as
shown
in
FigureEF
38
H
23
mm
0
91
in
EF260
Fig
EF
38
Checking
ruellevel
FAST
IDLE
I
With
carburetor
assembly
reo
moved
from
engine
measure
throttle
valve
clearance
A
with
a
wire
gauge
placing
the
upper
side
of
fast
idling
screw
on
the
first
step
on
fast
idling
cam
Page 120 of 537

ELECTRIC
AUTOMATIC
CHOKE
Checklna
automatic
choke
heater
circuit
with
function
test
connector
Caution
Do
not
altach
test
leads
of
a
circuit
tester
to
those
other
than
designated
Refer
to
figure
Ef
43
I
With
engine
not
running
check
for
continuity
between
A
and
B
as
shown
in
figure
Ef
43
If
continuity
exists
heater
is
func
tioning
properly
If
continuity
d
s
not
exist
check
for
disconnected
connector
or
open
P
T
e
heater
circuit
2
With
engine
running
at
idle
check
for
presence
of
voltage
across
A
and
B
as
shown
in
figure
EF
43
If
voltmeter
reading
is
12
volts
d
c
heater
circuit
is
functioning
properly
If
vohmeter
reading
is
zero
check
for
disconnected
connector
open
circuit
or
faulty
automatic
choke
relay
3
Replace
faulty
parts
J
j
N
j
EF710
1
ignition
key
2
Automatic
choke
relay
Engine
stop
OFF
Engine
start
ON
3
Automatic
choke
heateI
4
Function
test
connector
5
Altema
tor
Fig
EF
43
Checking
oulomalic
choke
heater
circuit
with
fu
nc
non
led
connector
Engine
Fuel
Automatic
choke
I
Before
starting
engine
fully
de
press
al
celerator
pedaJ
to
ensure
that
choke
valve
doses
properly
Push
choke
valve
with
a
finger
and
heck
for
binding
3
Check
0
be
sure
that
bi
rnetal
cover
index
mark
is
set
at
the
cen
leT
of
choke
housing
index
mark
a
s
shown
in
Figure
EF
44
Note
Do
not
set
b
metal
cover
index
mark
at
any
position
except
the
center
of
choke
housing
index
marl
tE
jL
J
Thermostat
cover
Bi
metal
chamber
2
Thermostat
housing
3
Groove
ET034
Fig
EF
44
Bi
metol
tting
4
Check
automatic
choke
heater
source
wiring
for
proper
connection
then
start
engine
5
After
warming
up
the
engine
see
that
choke
valve
is
fully
open
6
If
automatic
choke
heater
source
wiring
is
normal
and
choke
valve
does
not
operate
after
warm
up
replace
hi
metal
co
t
er
Automatic
choke
relay
I
Remove
automatic
choke
relay
Auto
choke
heater
relay
EF278
Fig
EF
45
Location
of
automatic
choke
relay
EF
24
2
Make
an
operational
check
of
automatic
choke
relay
as
shown
in
Figure
EF
46
Apply
2
volts
d
c
across
termi
nals
I
and
3
to
ensure
that
i
ontinuity
exists
between
terminals
2
and
4
Check
t
lal
continuity
does
not
exist
between
terminals
2
and
4
when
no
voltage
is
applied
across
them
If
results
satisfies
the
above
automatic
choke
relay
is
functioning
properly
if
not
replace
choke
relay
1
2
3
y
4
EF723
Fig
EF
46
Checking
automatic
choke
relay
Automatic
choke
heater
I
Measure
resistance
of
choke
heater
as
shown
in
figure
EF
47
spe
ified
re
s
an
ce
is
3
7
to
8
9
ohms
F
EF261
Fig
EF
47
Automatic
choke
heater
check
2
If
measured
value
is
not
within
the
specification
replace
bi
metal
cover
INTERLOCK
OPENING
OF
PRIMARY
AND
SECONDARY
THROTnE
VALVE
Figure
EF
48
shows
primary
throt
tie
valve
opened
SO
When
primary
throtlle
valve
is
opened
50
the
adjust
plate
integrated
with
throttle
valve
is
in
contact
with
return
plate
at
A
Page 121 of 537
When
throttle
valve
is
opened
fur
ther
locking
arm
is
detached
from
secondary
throttle
arm
permitting
see
ondary
system
to
start
operation
Linkage
between
primary
and
see
ondary
throttles
will
function
properly
if
distance
between
throttle
valve
and
inner
wall
of
throttle
chamber
is
74
mm
0
291
in
Adjustment
is
made
by
bending
connecting
link
I
L
l
1
4
CAl
Secondary
prm
ary
I
Jl
I
7
t
@
1
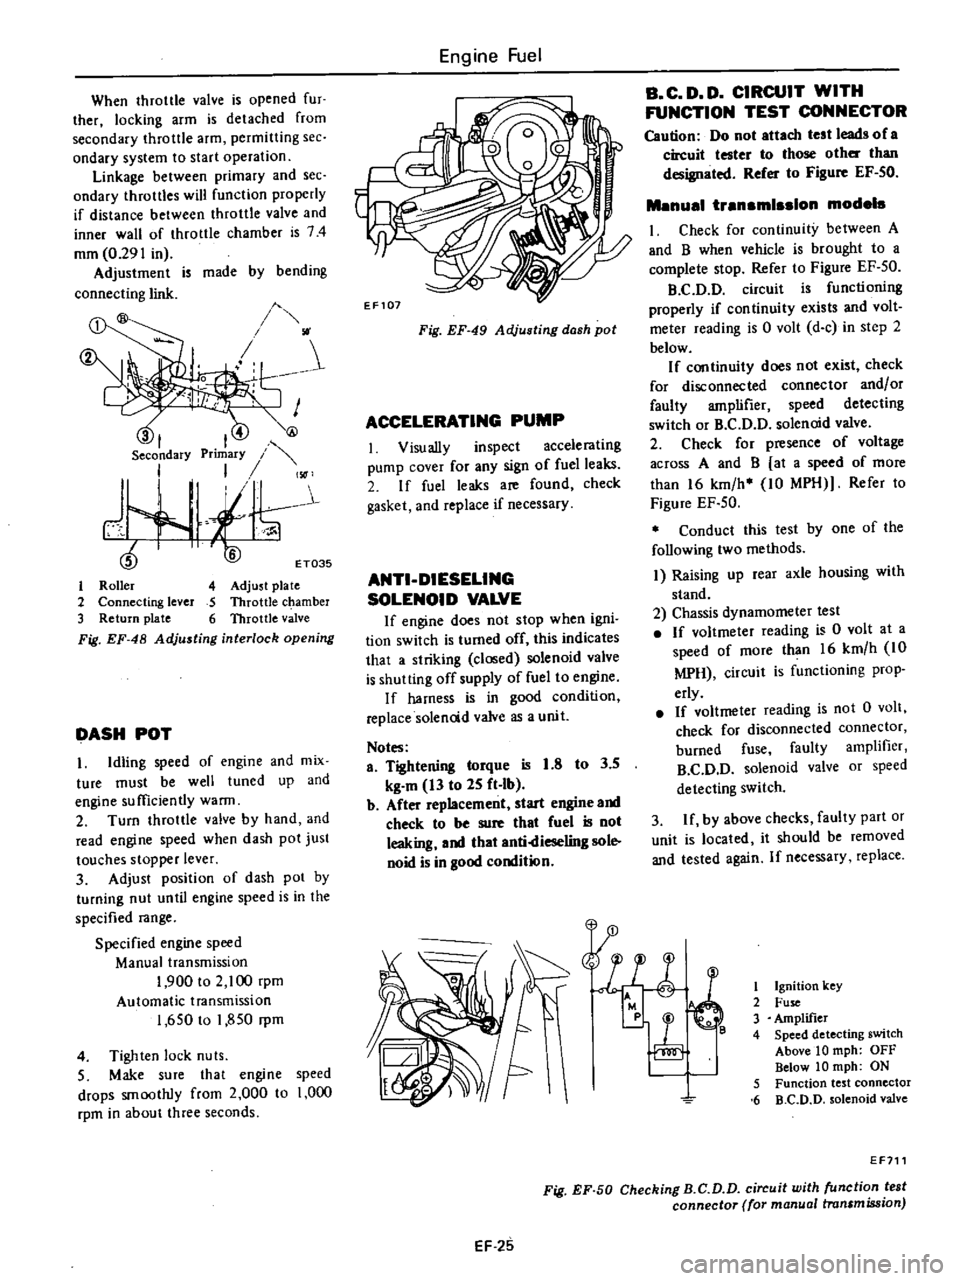
Roller
4
Adjust
plate
2
Connecting
lever
5
Throttle
c
amber
3
Return
plate
6
Throttle
valve
Fig
EF
48
Adjusting
interlock
opening
DASH
POT
1
Idling
speed
of
engine
and
mix
ture
must
be
well
tuned
up
and
engine
sufficiently
warm
2
Turn
throttle
valve
by
hand
and
read
engine
speed
when
dash
pot
just
touches
stopper
lever
3
Adjust
position
of
dash
pot
by
turning
nut
until
engine
speed
is
in
the
specified
range
Specified
engine
speed
Manual
transmission
1
900
to
2
100
rpm
Automatic
transmission
1
650
to
1
850
rpm
4
Tighten
lock
nuts
5
Make
sure
that
engine
speed
drops
smoothly
from
2
000
to
1
000
rpm
in
about
three
seconds
Engine
Fuel
Fig
EF
49
Adjusting
dash
pot
ACCELERATING
PUMP
I
Visually
inspect
accelerating
pump
cover
for
any
sign
of
fuel
leaks
2
If
fuel
leaks
are
found
check
gasket
and
replace
if
necessary
ANTI
DIESELING
SOLENOID
VALVE
If
engine
does
not
stop
when
igni
tion
switch
is
turned
off
this
indicates
that
a
striking
closed
solenoid
valve
is
shutting
off
supply
of
fuel
to
engine
If
harness
is
in
good
condition
replace
solencid
valve
as
a
unit
Notes
a
Tightening
torque
is
1
8
to
3
5
kg
m
13
to
25
ft
Ib
b
After
replacement
star
engine
and
check
to
be
sure
that
fuel
is
not
leaking
and
that
anti
dieseling
sol
noid
is
in
good
condition
B
C
D
D
CIRCUIT
WITH
FUNCTION
TEST
CONNECTOR
Caution
Do
not
attach
test
leads
of
a
circuit
tester
to
those
other
than
designated
Refer
to
Figure
EF
50
Menuel
trensmlsslon
models
I
Check
for
continuity
between
A
and
B
when
vehicle
is
brought
to
a
complete
stop
Refer
to
Figure
EF
50
B
C
D
D
circuit
is
functioning
properly
if
continuity
exists
and
volt
meter
reading
is
0
volt
d
c
in
step
2
below
If
continuity
does
not
exist
check
for
disconnected
connector
and
or
faulty
amplifier
speed
detecting
switch
or
B
C
D
D
solenoid
valve
2
Check
for
presence
of
voltage
across
A
and
B
at
a
speed
of
more
than
16
km
h
10
MPH
Refer
to
Figure
EF
50
Conduct
this
test
by
one
of
the
following
two
methods
I
Raising
up
rear
axle
housing
with
stand
2
Chassis
dynamometer
test
If
voltmeter
reading
is
0
volt
at
a
speed
of
more
than
16
km
h
10
MPH
circuit
is
functioning
prop
erly
If
voltmeter
reading
is
not
0
volt
check
for
disconnected
connector
burned
fuse
faulty
amplifier
B
C
D
D
solenoid
valve
or
speed
detecting
switch
3
If
by
above
checks
faulty
part
or
unit
is
located
it
should
be
removed
and
tested
again
If
necessary
replace
1
P4
11
0
8
l
1
Ignition
Icey
2
Fuse
3
Amplifier
4
Speed
detecting
switch
Above
10
mph
OFF
Below
10
mph
ON
5
Function
test
connector
6
B
C
D
D
solenoid
valve
EF711
Fig
EF
50
Checking
B
C
D
D
circuit
with
function
test
connector
for
manual
transmission
EF
25
Page 123 of 537
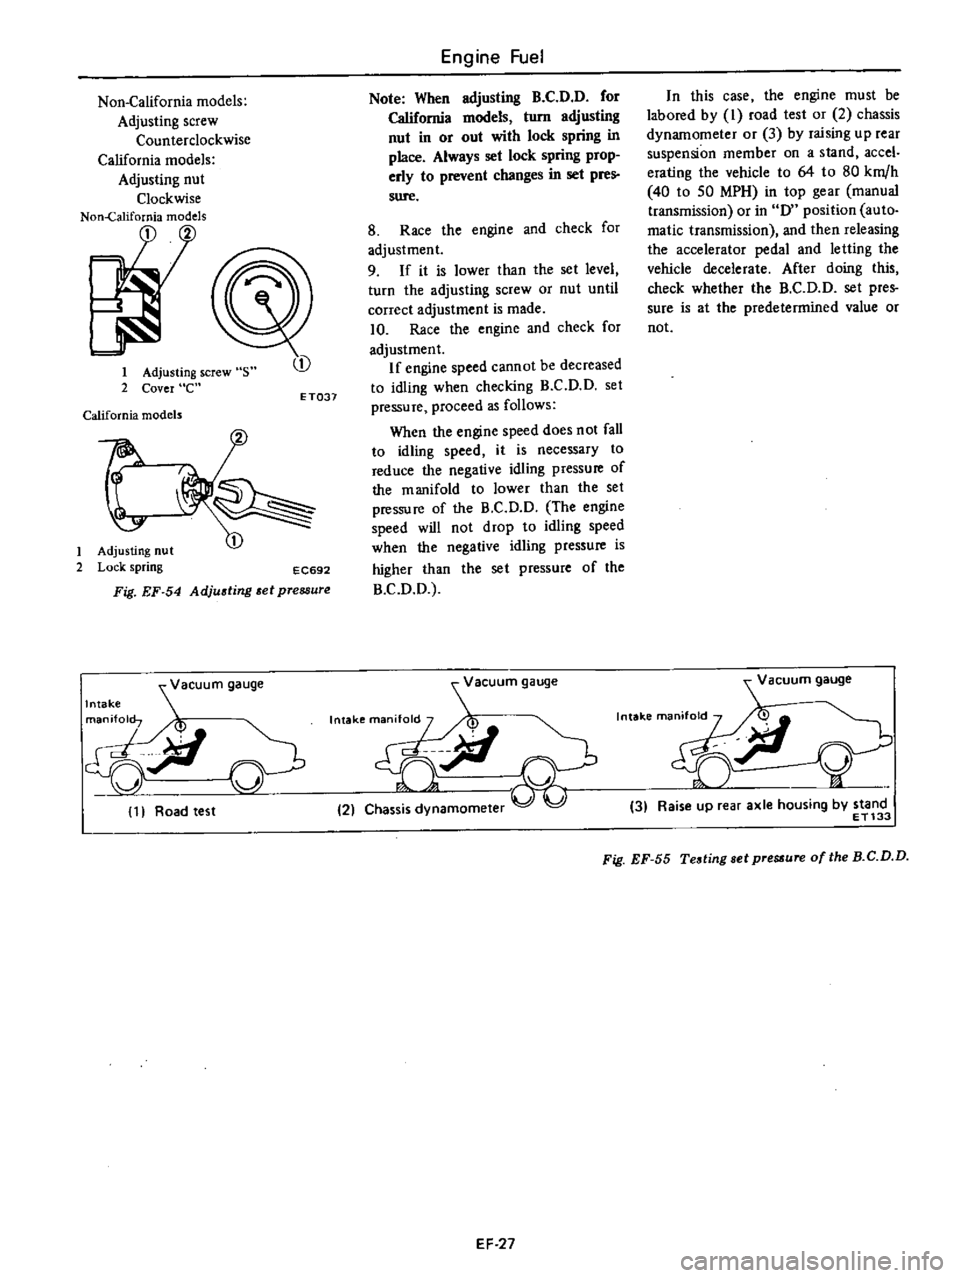
Non
California
models
Adjusting
screw
Counterclockwise
California
models
Adjusting
nut
Clockwise
Non
California
models
1
2
1
Adjusting
screw
s
2
Cover
e
California
models
t
1
Adjusting
nut
2
Lock
spring
EC692
Fig
EF
54
Adjusting
et
pressure
vacuum
gauge
Intake
gjl
11
Road
test
CD
ET037
Engine
Fuel
Note
When
adjusting
B
C
D
D
for
California
models
turn
adjusting
nut
in
or
out
with
lock
spring
in
place
Always
set
lock
spring
prop
erly
to
prevent
changes
in
set
pres
sure
8
Race
the
engine
and
check
for
adjustment
9
If
it
is
lower
than
the
set
level
turn
the
adjusting
screw
or
nut
until
correct
adjustment
is
made
10
Race
the
engine
and
check
for
adjustment
If
engine
speed
cannot
be
decreased
to
idling
when
checking
B
C
D
D
set
pressure
proceed
as
follows
When
the
engine
speed
does
not
fall
to
idling
speed
it
is
necessary
to
reduce
the
negative
idling
pressure
of
the
manifold
to
lower
than
the
set
pressure
of
the
B
C
D
O
The
engine
speed
will
not
drop
to
idling
speed
when
the
negative
idling
pressure
is
higher
Ihan
the
sel
pressure
of
the
B
C
O
O
acuum
gauge
Intakema
M
V
9iI
21
Chas
amomeler
In
this
case
the
engine
must
be
labored
by
I
road
test
or
2
chassis
dynamometer
or
3
by
raising
up
rear
suspension
member
on
a
stand
accel
erating
the
vehicle
to
64
to
80
km
h
40
10
50
MPH
in
top
gear
manual
transmission
or
in
0
position
auto
matic
transmission
and
then
releasing
the
accelerator
pedal
and
letting
the
vehicle
decelerate
After
doing
this
check
whether
the
B
C
O
D
set
pres
sure
is
at
the
predetermined
value
or
not
Vacuum
gauge
n
i
Y
3
Raise
up
rear
axle
housing
by
stand
ET133
Fig
EF
55
Testing
sel
pre
ure
of
the
B
C
D
D
EF
27
Page 126 of 537
Engine
Fuel
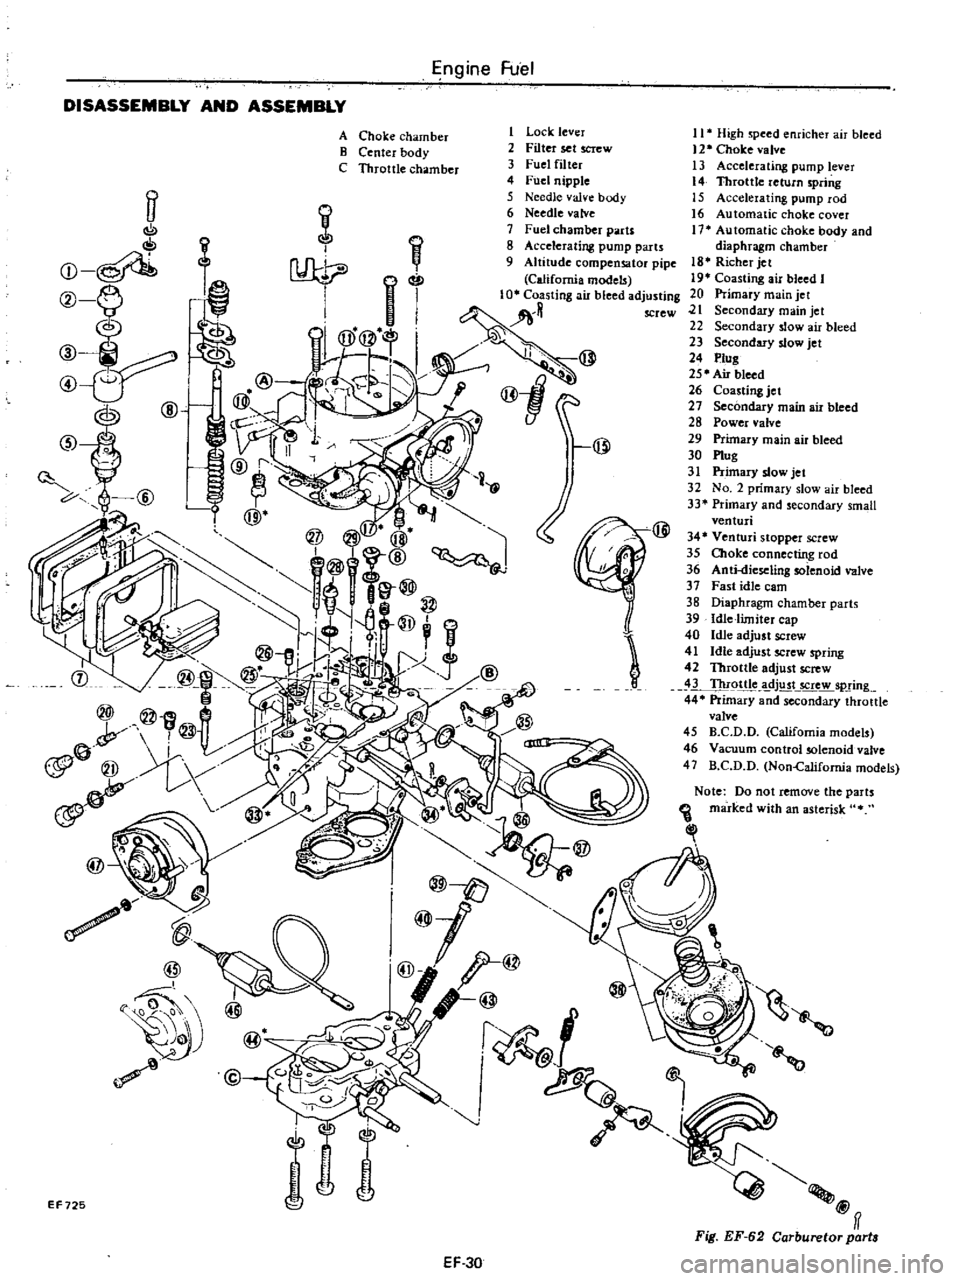
DISASSEMBLY
AND
ASSEMBLY
ff
C
oI
Q
f
@
ID
J
@
tJ
@
1
Lock
lever
2
Filter
set
screw
3
Fuel
filter
4
Fuel
nipple
5
Needle
valve
body
6
Needle
valve
7
Fuel
chamber
parts
8
Accelerating
pump
parts
9
Altitude
compensator
pipe
California
models
tng
ail
bleed
adJ
@
@1
@
A
Choke
chamber
B
Center
body
C
Throttle
chamber
I
J
@
EF725
EF30
11
High
speed
enricher
air
bleed
12
Choke
valve
13
Accelerating
pump
lever
14
Throttle
return
spring
15
Accelerating
pump
rod
16
Automatic
choke
cover
17
Automatic
choke
body
and
diaphragm
chamber
18
Richer
jet
19
Coasting
air
bleed
I
20
Primary
main
jet
21
Secondary
main
jet
22
Secondary
slow
air
bleed
23
Secondary
slow
jet
24
Plug
25
Air
bleed
26
Coasting
jet
27
Secondary
main
air
bleed
28
Power
valve
29
Primary
main
air
bleed
30
Plug
31
Primary
slow
jet
32
No
2
primary
slow
air
bleed
33
Primary
and
secondary
small
venturi
34
Venturi
stopper
screw
35
Choke
connecting
rod
36
Anti
dieseling
solenoid
valve
37
Fast
idle
cam
38
Diaphragm
chamber
parts
39
Idle
limiter
cap
40
Idle
adjust
screw
41
Idle
adjust
screw
spring
42
Throttle
adjust
screw
3
Thr9ttle
dj
t
5Crew
spring
44
Primary
and
secondary
throttle
valve
45
B
C
D
D
California
models
46
Vacuum
control
solenoid
valve
47
B
C
D
D
Non
Califomia
models
Note
Do
not
remove
the
parts
marked
with
an
asterisk
Ill
@ff
Fig
EF
62
Carburetor
part