DATSUN PICK-UP 1977 Repair Manual
Manufacturer: DATSUN, Model Year: 1977, Model line: PICK-UP, Model: DATSUN PICK-UP 1977Pages: 537, PDF Size: 35.48 MB
Page 61 of 537
r
Piston
pin
outside
diameter
Piston
pin
hole
diameter
Piston
pin
to
piston
clearance
I
Interference
fit
of
piston
pin
to
connecting
rod
CONNECTING
ROD
I
If
a
connecting
rod
has
any
flaw
on
either
side
of
the
thrust
face
or
the
large
end
correct
or
replace
it
EM133
Fig
EM
61
Ch
cking
rod
alignment
Connecting
rod
bend
or
torsion
per
100
mm
or
3
94
in
length
mm
in
3
When
replacing
connecting
rod
select
rod
so
that
weight
difference
between
new
and
old
ones
is
within
7
gr
0
25
oz
Do
not
use
a
combination
of
new
and
former
connecting
rod
big
end
nuts
and
connecting
rod
bolts
which
affect
specified
weight
variations
4
Install
connecting
rods
with
bear
ings
on
to
corresponding
crank
pins
and
measure
thrust
clearance
Ifmeas
ured
value
exceeds
limit
replace
Engine
Mechanical
Unit
mm
in
20
993
to
20
998
0
8265
to
0
8267
21
001
to
21
008
0
8268
to
0
8271
0
003
to
0
015
0
0001
to
0
006
0
015
to
0
035
0
0006
to
0
0014
2
Check
connecting
rod
for
bend
or
torsion
using
a
connecting
rod
aligner
If
bend
or
torsion
exceeds
the
limit
q
rrect
or
replace
Standard
Maximum
0
03
0
0012
0
05
0
0020
Fig
EM
62
Checking
big
end
play
Standard
Maximum
Big
end
play
mm
in
0
2
to
0
3
0
0079
to
0
01
18
0
6
0
0236
EM
16
CRANKSHAFT
1
Whenever
crankshaft
is
removed
from
engine
it
should
be
cleaned
thoroughly
in
a
suitable
solvent
After
cleaning
check
crankshaft
journal
and
crank
pin
Jor
score
bias
wear
or
cracks
Rep
air
or
replace
as
required
If
damage
is
minor
dress
with
fine
crocus
cloth
2
Check
journals
and
crank
pins
for
taper
and
out
of
round
with
a
micro
meter
Measurement
should
be
taken
along
journals
for
taper
and
around
journals
for
out
of
round
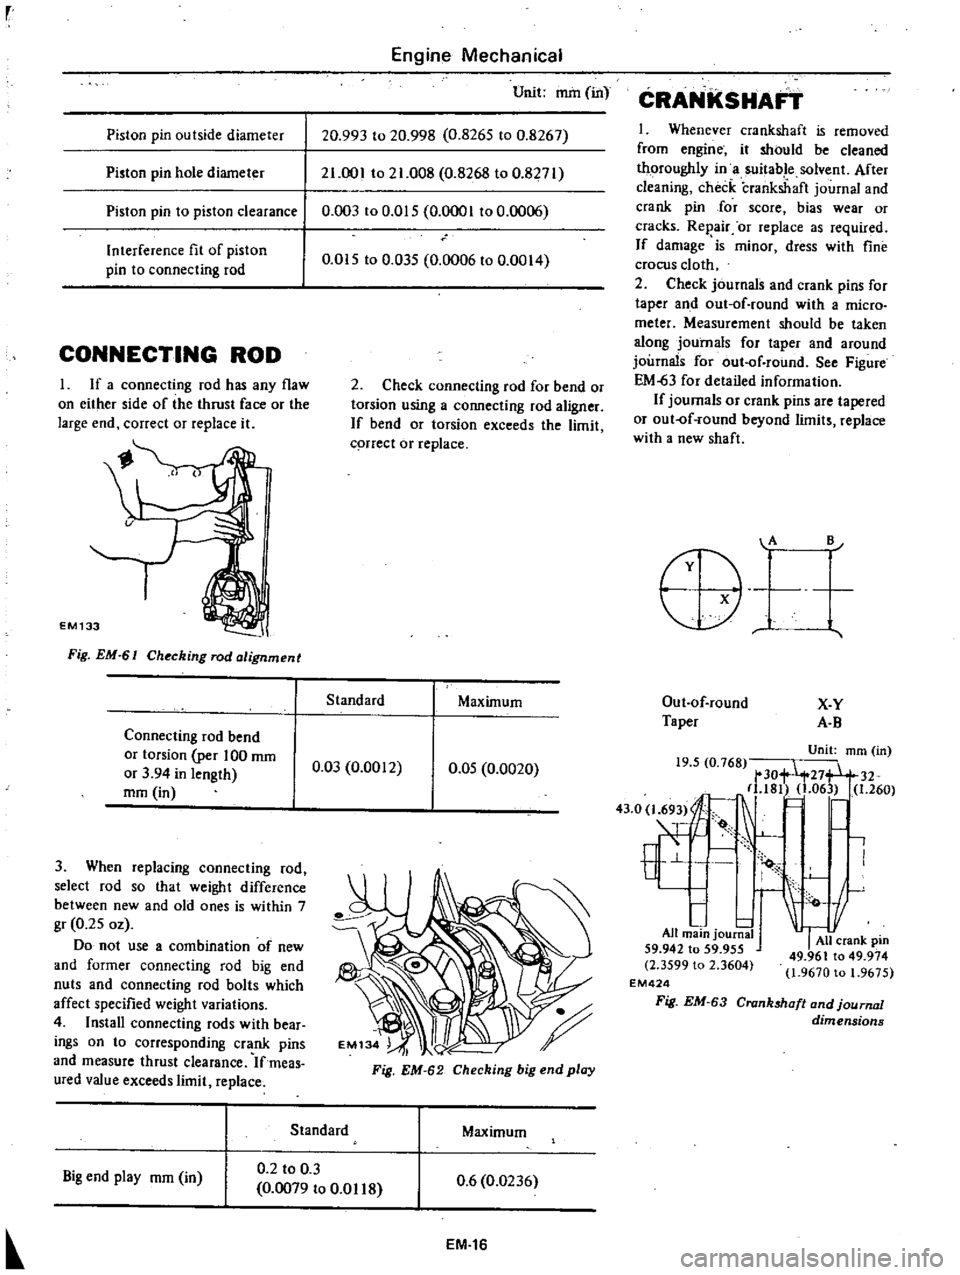
See
Figure
EM
63
for
detailed
information
If
journals
or
crank
pins
are
tapered
or
out
of
round
beyond
limits
replace
with
a
new
shaft
A
B
Out
of
round
X
Y
Taper
A
B
Unit
mm
in
19
5
0
768
tt
30
27
32
181
1
06
1
260
43
O
l
69
I
E
1
All
main
journa
59
942
to
59
955
All
crank
pm
2
3599
l
2
3604
49
961
to
49
974
o
1
9670
to
1
9675
EM424
Fig
EM
63
Crankshaft
and
journal
dimensions
Page 62 of 537
Standard
Taper
and
out
of
round
of
journal
and
crank
pin
mm
in
less
than
0
01
0
0004
3
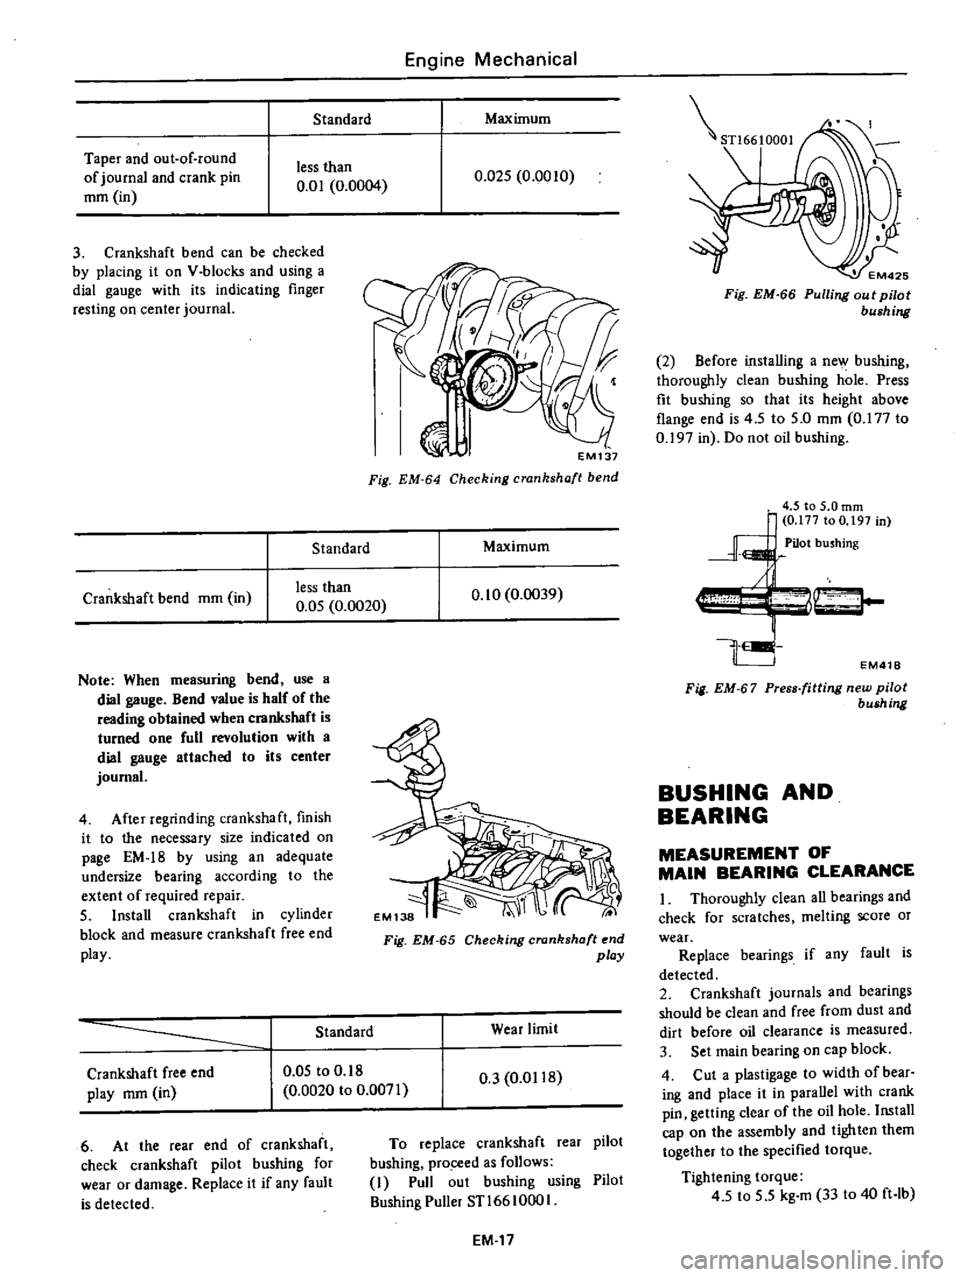
Crankshaft
bend
can
be
checked
by
placing
it
on
V
blocks
and
using
a
dial
gauge
with
its
indicating
finger
resting
on
center
journal
Standard
Crankshaft
bend
mm
in
less
than
0
05
0
0020
Note
When
measuring
bend
use
a
dial
gauge
Bend
value
is
half
of
the
reading
obtained
when
crankshaft
is
turned
one
full
revolution
with
a
dial
gauge
attached
to
its
center
journal
4
After
regrinding
crankshaft
finish
it
to
the
necessary
size
indicated
on
page
EM
18
by
using
an
adequate
undersize
bearing
according
to
the
extent
of
required
repair
5
Install
crankshaft
in
cylinder
block
and
measure
crankshaft
free
end
play
Engine
Mechanical
Maximum
0
Q25
0
0010
EM137
Fig
EM
64
Checking
crankshaft
bend
Maximum
0
10
0
0039
Fig
EM
65
Checking
crankshaft
end
play
Standard
Wear
limit
Crankshaft
free
end
play
mm
in
0
05
to
0
18
0
0020
to
0
0071
0
3
0
0118
6
At
the
rear
end
of
crankshaft
check
crankshaft
pilot
bushing
for
wear
or
damage
Replace
it
if
any
fault
is
detected
To
replace
crankshaft
rear
pilot
bushing
pro
ceed
as
follows
I
Pull
out
bushing
using
Pilot
Bushing
Puller
STl66
1000
I
EM
17
STl6610001
EM425
Fig
EM
66
Pulling
out
pilot
bushing
2
Before
installing
a
new
bushing
thoroughly
clean
bushing
hole
Press
fit
bushing
so
that
its
height
above
flange
end
is
4
5
to
5
0
mm
0
177
to
0
197
in
Do
not
oil
bushing
EM418
Fig
EM
67
Press
fitting
new
pilot
bush
ng
BUSHING
AND
BEARING
MEASUREMENT
OF
MAIN
BEARING
CLEARANCE
I
Thoroughly
clean
all
bearings
and
check
for
scratches
melting
score
or
wear
Replace
bearings
if
any
fault
is
detected
2
Crankshaft
journals
and
bearings
should
be
clean
and
free
from
dust
and
dirt
before
oil
clearance
is
measured
3
Set
main
bearing
on
cap
block
4
Cut
a
plastigage
to
width
of
bear
ing
and
place
it
in
parallel
with
crank
pin
getting
clear
of
the
oil
hole
Install
cap
on
the
assembly
and
tighten
them
together
to
the
specified
torque
Tightening
torque
4
5
to
5
5
kg
m
33
to
40
ft
lb
Page 63 of 537
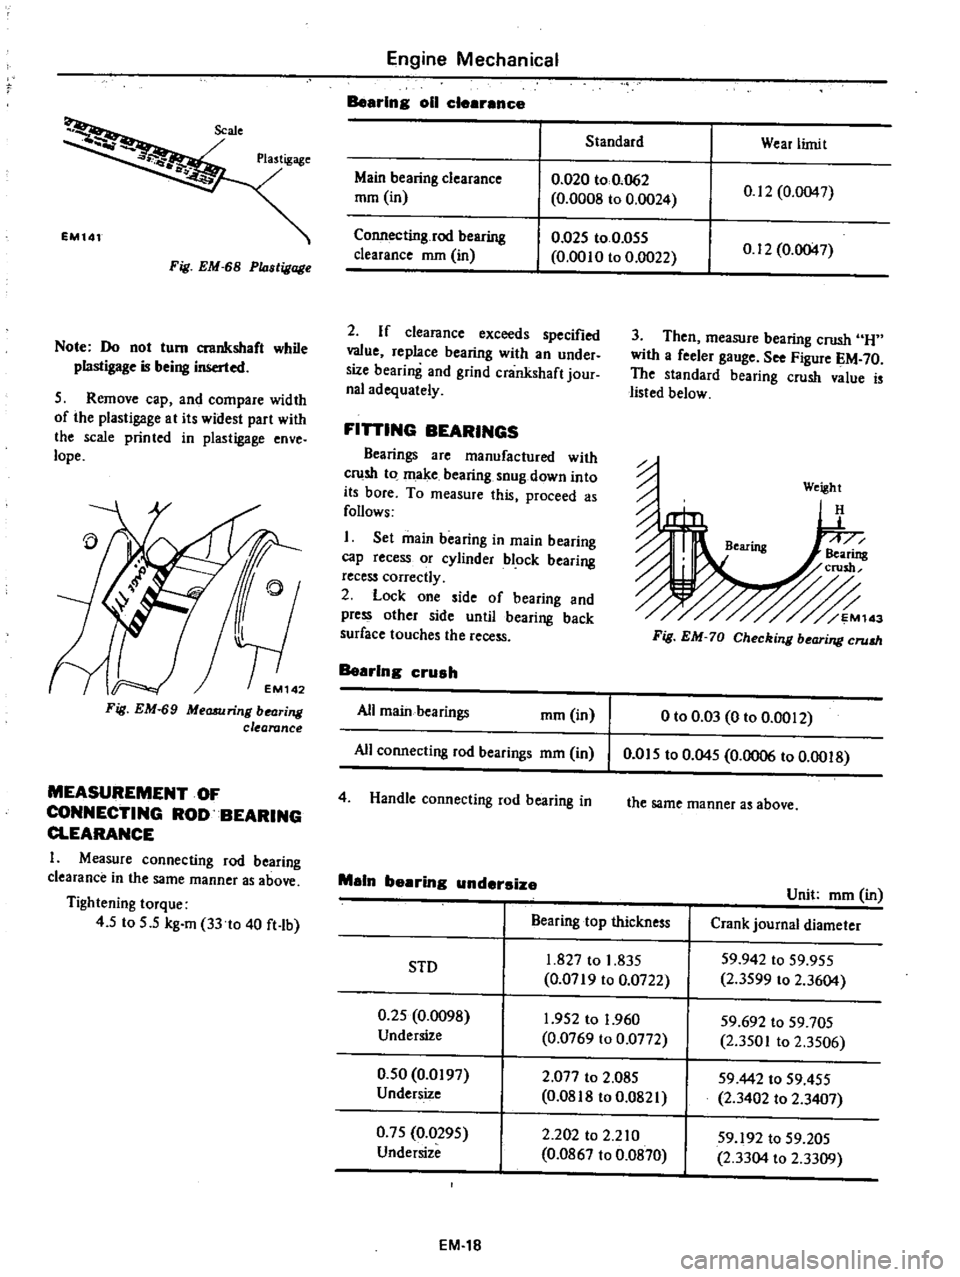
Fig
EM
68
P14stigage
Note
Do
not
tum
crankshaft
while
plastigage
is
being
inserted
5
Remove
cap
and
compare
width
of
the
plastigage
at
its
widest
part
with
the
scale
printed
in
plastigage
enve
lope
Fig
EM
69
Measuring
bearing
clearance
MEASUREMENT
OF
CONNECTING
ROD
BEARING
CLEARANCE
I
Measure
connecting
rod
bearing
clearance
in
the
same
manner
as
above
Tightening
torque
4
5
to
5
5
kg
m
33
to
40
ft
lb
Engine
Mechanical
Bearing
011
clearance
Standard
Wear
limit
Main
bearing
clearance
mm
in
0
020
to
0
062
0
0008
to
0
0024
0
12
0
0047
Connecting
rod
bearing
clearance
mm
in
0
025
to
0
055
0
0010
to
0
0022
0
12
0
0047
2
If
clearance
exceeds
specified
value
replace
bearing
with
an
under
size
bearing
and
grind
crankshaft
jour
nal
adequately
FiniNG
BEARINGS
Bearings
are
manufactured
with
crush
to
make
bearing
snug
down
into
its
bore
To
measure
this
proceed
as
follows
I
Set
main
bearing
in
main
bearing
cap
recess
or
cylinder
block
bearing
recess
correctly
2
Lock
one
side
of
bearing
and
press
other
side
until
bearing
back
surface
touches
the
recess
Bearing
crush
All
main
bearings
mm
in
All
connecting
rod
bearings
mm
in
4
Handle
connecting
rod
bearing
in
3
Then
measure
bearing
crush
H
with
a
feeler
gauge
See
Figure
EM
70
The
standard
bearing
crush
value
is
listed
below
Weight
H
Fig
EM
70
Checking
bearing
crum
o
to
0
03
0
to
0
0012
0
015
to
0
045
0
0006
to
0
0018
the
same
manner
as
above
Main
bearing
undersize
Unit
mm
in
Bearing
top
thickness
Crank
journal
diameter
1
827
to
1
835
59
942
to
59
955
SID
0
0719
to
0
0722
2
3599
to
2
3604
0
25
0
0098
1
952
to
1
960
59
692
to
59
705
Undersize
0
0769
to
0
0772
2
3501
to
2
3506
0
50
0
0197
2
077
to
2
085
59442
to
59
455
Undersize
0
0818
to
0
0821
2
3402
to
2
3407
0
75
0
0295
2
202
to
2
210
59
192
to
59
205
Undersize
0
0867
to
0
0870
2
3304
to
2
3309
EM
18
Page 64 of 537
Engine
Mechanical
Connectlns
rod
be
rlns
undersize
SID
0
25
0
0098
Undersize
0
50
0
0197
Undersize
0
75
0
0295
Undersize
MISCELLANEOUS
COMPONENTS
CRANKSHA
AND
CAMSHA
SPROCKETS
I
Check
tooth
surface
for
flaws
or
wear
Replace
sprocket
if
fault
is
found
2
Install
camshaft
sprocket
in
posi
tion
and
check
for
rounout
If
it
exceeds
0
1
mm
0
0039
in
total
indicator
reading
repl
ce
camshaft
sprocket
Also
check
for
end
play
Camshaft
end
play
0
08
to
0
38
mm
0
0032
to
0
0150
in
EMl48
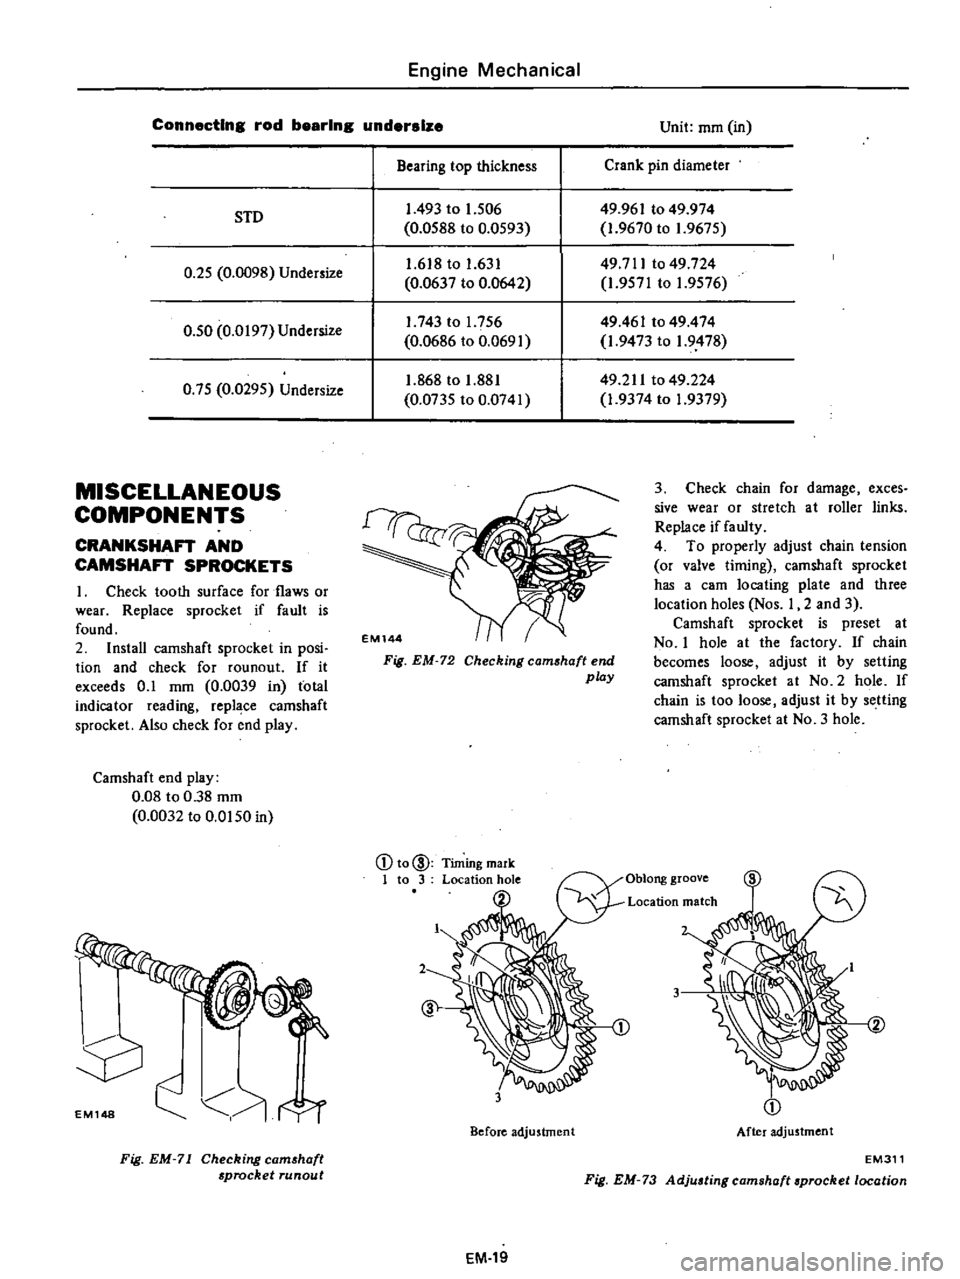
Fig
EM
71
Checking
eam
haft
sprocket
Tunaut
Unit
mm
in
Bearing
top
thickness
Crank
pin
diameter
1
493
to
1
506
0
0588
to
0
0593
49
961
to
49
974
1
9670
to
1
9675
49711
to
49
724
1
9571
to
1
9576
1
618
to
1
631
0
0637
to
0
0642
1
743
to
1
756
0
0686
to
0
0691
49461
to
49
474
1
9473
to
1
9478
1
868
to
1
881
0
0735
to
0
0741
49
211
to
49
224
1
9374
to
1
9379
Fig
EM
72
Checking
camshaft
end
play
3
Check
chain
for
damage
exces
sive
wear
or
stretch
at
roller
links
Replace
if
faulty
4
To
properly
adjust
chain
tension
or
valve
timing
camshaft
sprocket
has
a
earn
locating
plate
and
three
location
holes
Nos
I
2
and
3
Camshaft
sprocket
is
preset
at
No
I
hole
at
the
factory
If
chain
becomes
loose
adjust
it
by
setting
camshaft
sprocket
at
NO
2
hole
If
chain
is
too
loose
adjust
it
by
setting
camshaft
sprocket
at
No
3
hole
2
3
Before
adjustment
Location
match
3
After
adju5tmen
t
EM311
Fig
EM
73
Adjuating
camshaft
aprocket
location
EM
19
Page 65 of 537
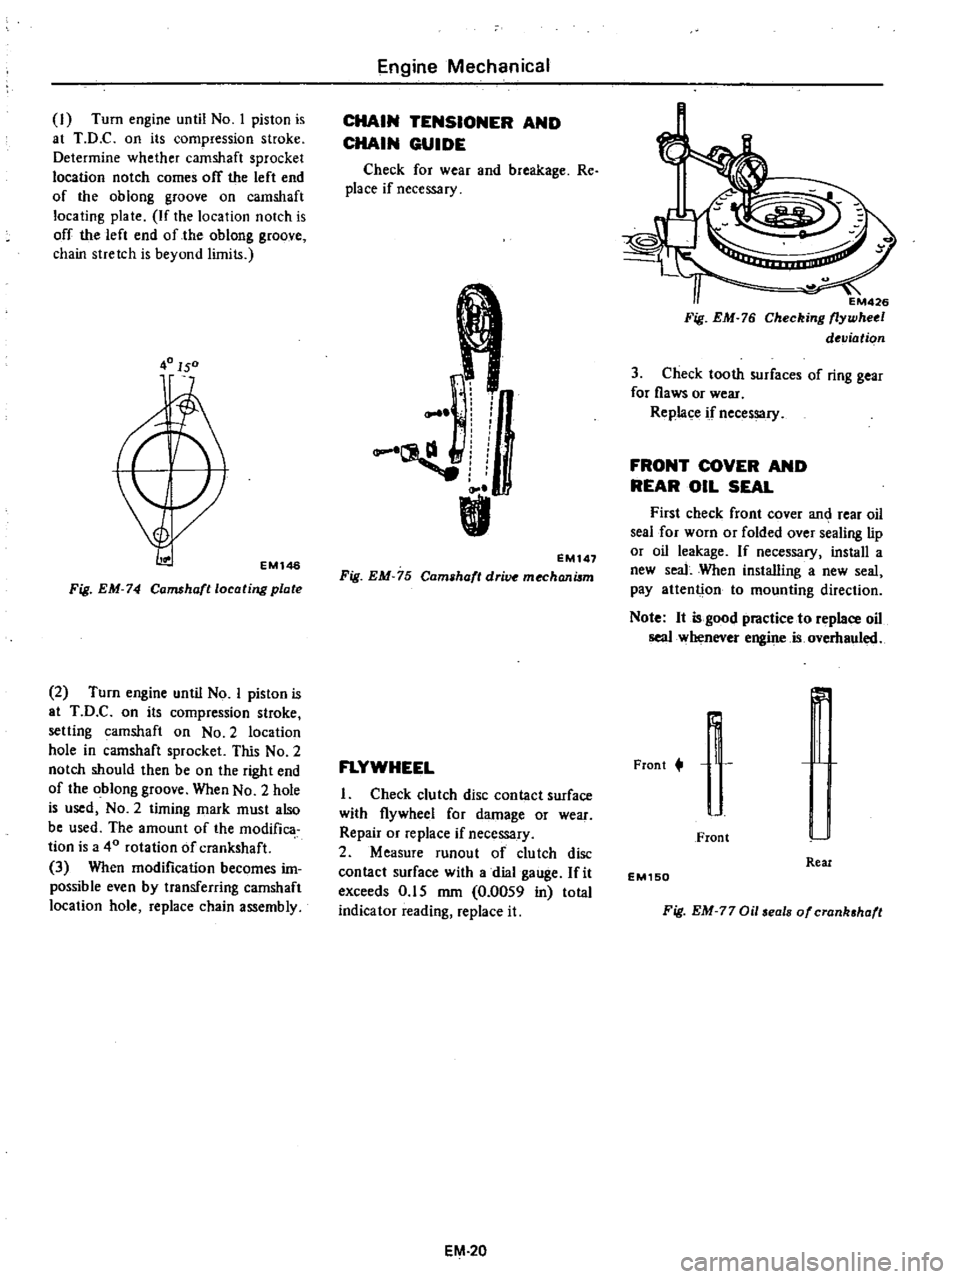
I
Turn
engine
until
No
I
piston
is
at
T
D
C
on
its
compression
stroke
Determine
whether
camshaft
sprocket
location
notch
comes
off
the
left
end
of
the
oblong
groove
on
camshaft
locating
plate
If
the
location
notch
is
off
the
left
end
of
the
oblong
groove
chain
stretch
is
beyond
limits
40150
EMl46
Fig
EM
74
Camshafllocating
plate
2
Turn
engine
until
No
I
piston
is
at
T
D
C
on
its
compression
stroke
setting
camshaft
on
No
2
location
hole
in
camshaft
sprocket
This
No
2
notch
should
then
be
on
the
right
end
of
the
oblong
groove
When
No
2
hole
is
used
NO
2
timing
mark
must
also
be
used
The
amount
of
the
modifica
tion
is
a
40
rotation
of
crankshaft
3
When
modification
becomes
im
possible
even
by
transferring
camshaft
location
hole
replace
chain
assembly
Engine
Mechanical
CHAIN
TENSIONER
AND
CHAIN
GUIDE
Check
for
wear
and
breakage
Re
place
if
necessary
r
I
L
EM147
Fig
EM
75
Cam
haft
dri
mechanilm
FLYWHEEL
I
Check
clutch
disc
contact
surface
with
flywheel
for
damage
or
wear
Repair
or
replace
if
necessary
2
Measure
runout
of
clutch
disc
contact
surface
with
a
dial
gauge
fit
exceeds
0
15
mm
0
0059
in
total
indicator
reading
replace
it
EM
20
EM426
Fig
EM
76
Checking
flywheel
deviation
3
Check
tooth
surfaces
of
ring
gear
for
flaws
or
wear
Replace
if
necessary
FRONT
COVER
AND
REAR
OIL
SEAL
First
check
front
cover
an
rear
oil
seal
for
worn
or
folded
over
sealing
lip
or
oil
leakage
If
necessary
install
a
new
seal
When
installing
a
new
seal
pay
attenti
on
to
mounting
direction
Note
It
is
good
practice
to
replace
oil
seal
whenever
engine
is
overhauled
Frant
t
r
r
J
I
Front
Real
EM150
Fig
EM
77
Oil
eals
of
crank
haft
Page 66 of 537
PRECAUTIONS
CYLINDER
HEAD
PRECAUTIONS
I
Use
thoroughly
cleaned
parts
Especially
make
sure
that
oil
holes
are
clear
of
foreign
matter
2
When
installing
sliding
parts
such
as
bearings
be
s
uIe
to
apply
engine
oil
to
them
3
Use
new
packing
and
oil
seals
4
Do
not
reuse
lock
washers
5
Keep
tools
and
work
benches
clean
6
Keep
necessary
parts
and
tools
near
at
hand
7
Be
sure
to
follow
specified
tight
ening
torque
and
order
8
Applying
sealant
Use
sealant
to
eliminate
water
and
oil
leaks
Parts
requiring
sealant
are
I
Front
cover
and
corners
of
cyl
inder
block
See
Figure
EM
78
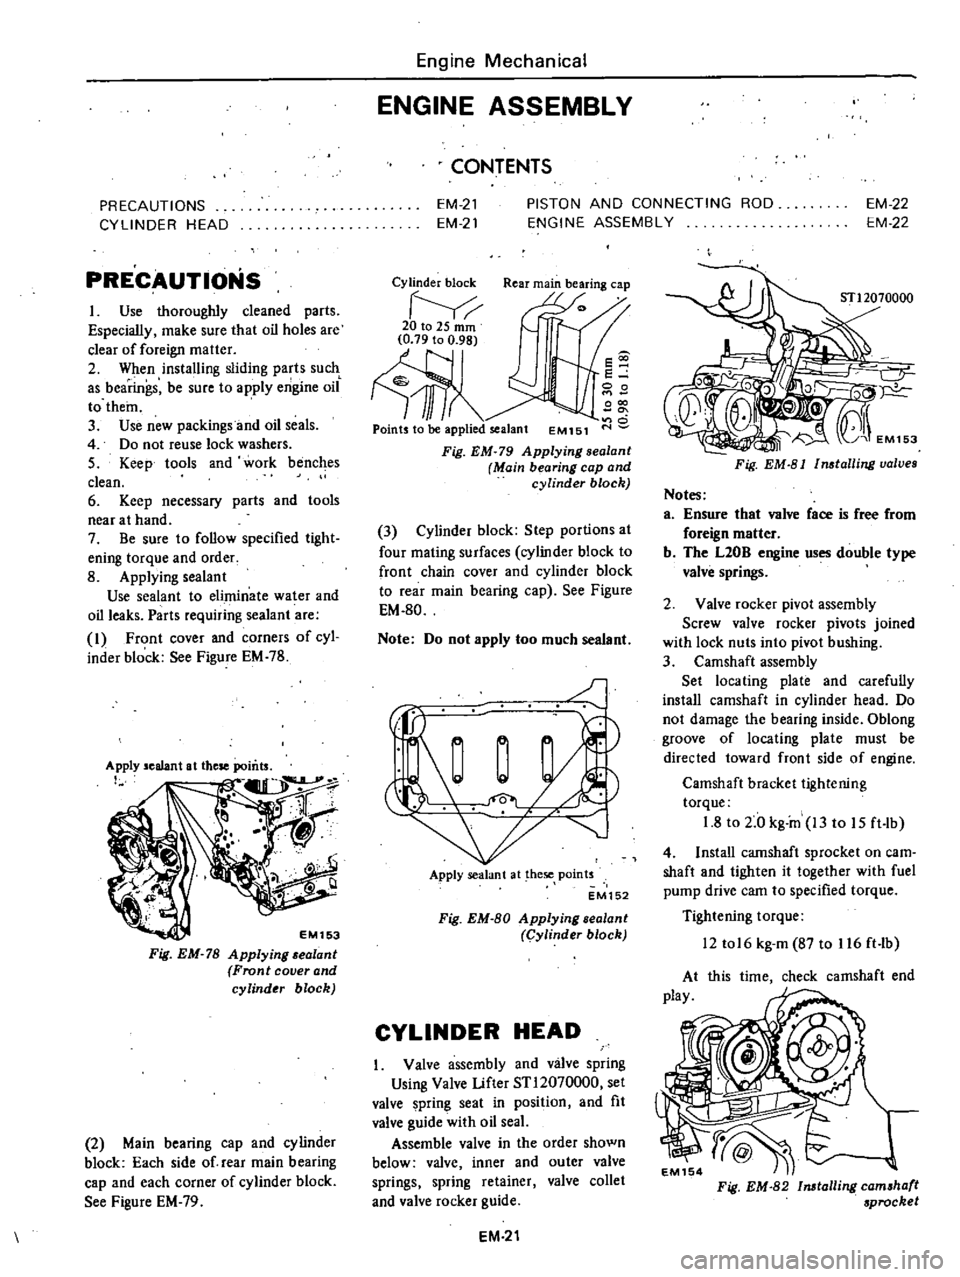
EM153
Fig
EM
78
Applying
alant
Front
cover
and
cylinder
block
2
Main
bearing
cap
and
cylinder
block
Each
side
of
rear
main
bearing
cap
and
each
corner
of
cylinder
block
See
Figure
EM
79
Engine
Mechanical
ENGINE
ASSEMBLY
CONTENTS
EM
21
EM
21
PISTON
AND
CONNECTING
ROD
ENGINE
ASSEMBLY
EM
22
EM
22
Cylinder
block
Rear
main
bearing
cap
20to2Smm
Ill
Points
to
be
applied
sealant
EM151
s
e
00
000
o
Fig
EM
79
Applying
sealanl
Main
bearing
cap
and
cylinder
block
3
Cylinder
block
Step
portions
at
four
mating
surfaces
cylinder
block
to
front
chain
cover
and
cylinder
block
to
rear
main
bearing
cap
See
Figure
EM
80
Note
Do
not
apply
too
much
sealant
J
Apply
sealant
at
hese
points
EM152
Fig
EM
80
Applying
sealant
Cylinder
block
CYLINDER
HEAD
Valve
assembly
and
valve
spring
Using
Valve
Lifter
STl2070000
set
valve
pring
seat
in
position
and
fit
valve
guide
with
oil
seaL
Assemble
valve
in
the
order
shown
below
valve
inner
and
outer
valve
springs
spring
retainer
valve
collet
and
valve
rocker
guide
EM
21
Fig
EM
81
Installing
valves
Notes
a
Ensure
that
valve
face
is
free
from
foreign
matter
b
The
L20B
engine
uses
double
type
valve
springs
2
Valve
rocker
pivot
assembly
Screw
valve
rocker
pivots
joined
with
lock
nuts
into
pivot
hushing
3
Camshaft
assembly
Set
locating
plate
and
carefully
install
camshaft
in
cylinder
head
Do
not
damage
the
bearing
inside
Oblong
groove
of
locating
plate
must
be
directed
toward
front
side
of
engine
Camshaft
bracket
tightening
torque
1
8
to
2
0
kg
in
13
to
15
ft
lb
4
Install
camshaft
sprocket
on
earn
shaft
and
tighten
it
together
with
fuel
pump
drive
cam
to
specified
torque
Tightening
torque
12
tol6
kg
m
87
to
116
ft
lb
this
time
check
camshaft
end
Fig
EM
82
Installing
camshaft
sprocket
Page 67 of 537
5
Install
rocker
arms
by
pressing
valve
springs
down
with
a
screwdriver
6
Install
valve
rocker
springs
7
After
assembling
cylinder
head
turn
camshaft
until
No
I
piston
is
at
T
D
C
on
its
compression
stroke
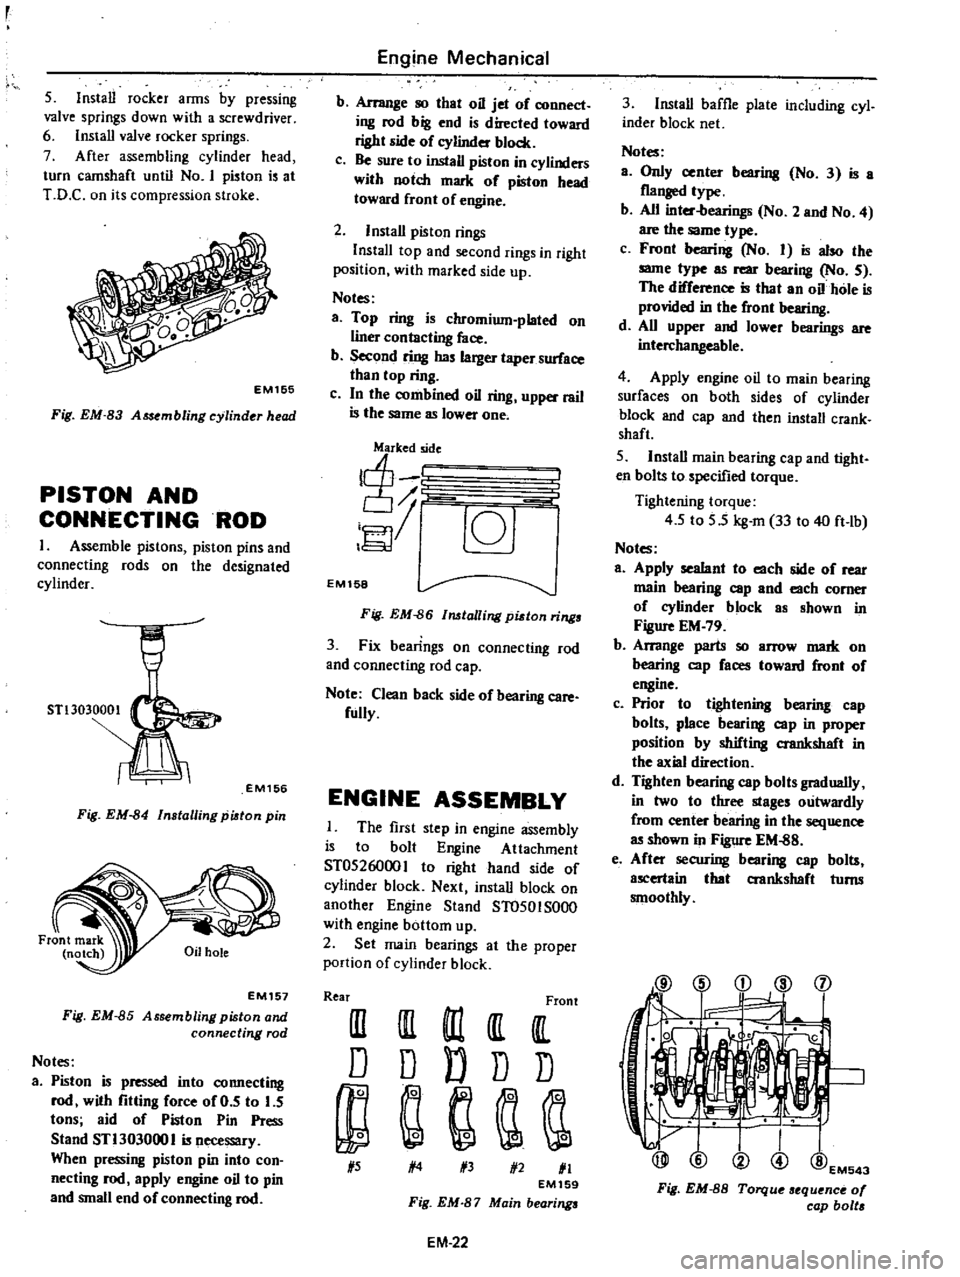
EM1S5
Fig
EM
83
A
embling
cylinder
head
PISTON
AND
CONNECTINGROD
1
Assemble
pistons
piston
pins
and
connecting
rods
on
the
de
ignated
cylinder
STl3030001
EM156
Fig
EM
84
Installing
piston
pin
EM157
Fig
EM
85
Assembling
piston
and
connecting
rod
Notes
a
Piston
is
pressed
into
connecting
rod
with
fitting
force
of
0
5
to
5
tons
aid
of
Piston
Pin
Press
Stand
STl303000
I
is
necessary
When
pressing
piston
pin
into
con
necting
rod
apply
engine
oil
to
pin
and
small
end
of
connecting
rod
Engine
Mechanical
b
Arrange
so
that
oil
jet
of
connect
ing
rod
big
end
is
directed
toward
right
side
of
eylinder
block
c
Be
sure
to
install
piston
in
cylinders
with
notch
mark
of
piston
head
toward
front
of
engine
2
Install
piston
rings
InstalI
top
and
second
rings
in
right
position
with
marked
side
up
Notes
a
Top
ring
is
chromium
plated
on
liner
contacting
face
b
Second
ring
has
larger
taper
surface
than
top
ring
c
In
the
combined
oil
ring
upper
rail
is
the
same
as
lower
one
j
c6J
EM158
Fig
EM
86
lalling
pidon
rings
3
Fix
bearings
on
connecting
rod
and
connecting
rod
cap
Note
Clean
back
side
of
bearing
care
fully
ENGINE
ASSEMBLY
The
first
step
in
engine
assembly
is
to
bolt
Engine
Attachment
ST0526000
I
to
right
hand
ide
of
cylinder
block
Next
install
block
on
another
Engine
Stand
ST0501S000
with
engine
bottom
up
2
Set
main
bearings
at
the
proper
portion
of
cylinder
block
Rear
Front
III
III
m
It
IlL
D
D
D
D
D
1
5
1
4
1
3
1
2
1
1
EM159
Fig
EM
87
Main
bearings
EM
22
3
Install
baffle
plate
including
cyl
inder
block
net
Notes
a
Only
center
bearing
No
3
is
a
flanged
type
b
All
inter
bearings
No
2
and
No
4
are
the
same
type
c
Front
bearing
No
I
is
also
the
same
type
as
rear
bearing
No
5
The
difference
is
that
an
oil
hole
is
provided
in
the
front
bearing
d
All
upper
and
lower
bearings
are
interchangeable
4
Apply
engine
oil
to
main
bearing
surfaces
on
both
sides
of
cylinder
block
and
cap
and
then
install
crank
shaft
5
Install
main
bearing
cap
and
tight
en
bolts
to
specified
torque
Tightening
torque
4
5
to
5
5
kg
m
33
to
40
ft
lb
Notes
a
Apply
sealant
to
each
side
of
rear
main
bearing
cap
and
each
comer
of
eylinder
block
as
shown
in
Figure
EM
79
b
Arrange
parts
so
arrow
mark
on
bearing
cap
faces
toward
front
of
engine
c
Prior
to
tightening
bearing
cap
bolts
place
bearing
cap
in
proper
position
by
shifting
crankshaft
in
the
axial
direction
d
Tighten
bearing
cap
bolts
gradually
in
two
to
three
stages
outwardly
from
center
bearing
in
the
sequence
as
shown
in
Figure
EM
88
e
After
securing
bearing
cap
bolts
ascertain
that
aankshaft
turns
smoothly
@
i
d
l
j
1
@EM543
Fig
EM
8S
Torque
sequence
0
cap
bolt
Page 68 of 537
6
Make
sure
that
crankshaft
has
proper
end
play
Crankshaft
end
play
0
05
to
0
18
mm
0
0020
to
0
0071
in
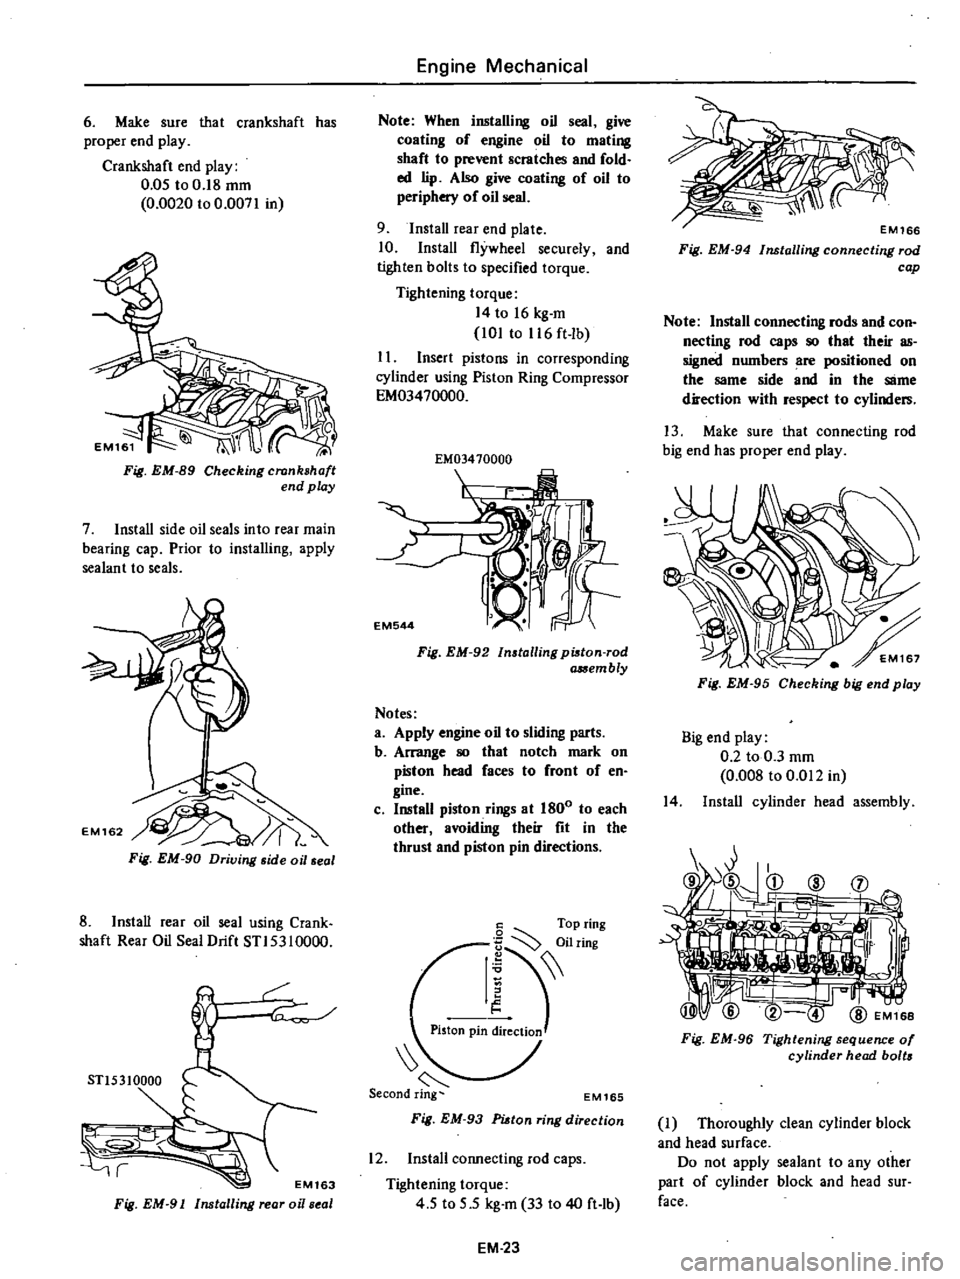
Fig
EM
89
Checking
crankshaft
end
play
7
Install
side
oil
seals
into
rear
main
bearing
cap
Prior
to
installing
apply
sealant
to
seals
Fig
EM
90
Driving
side
oil
seal
8
Install
rear
oil
seal
using
Crank
shaft
Rear
Oil
Seal
Drift
STI5310000
r
STl5310000
r
EM163
Fig
EM
91
Installing
rear
oi
seal
Engine
Mechanical
Note
When
installing
oil
seal
give
coating
of
engine
oil
to
mating
shaft
to
prevent
scratches
and
fold
ed
lip
Also
give
coating
of
oil
to
periphery
of
oil
seal
9
Install
rear
end
plate
10
Install
flywheel
securely
and
tighten
bolts
to
specified
torque
Tightening
torque
14
to
16
kg
m
101
to
116
ft
lb
I
I
Insert
pistons
in
corresponding
cylinder
using
Piston
Ring
Compressor
EM03470000
EM03410000
I
EM544
Fig
EM
92
Installing
pi8ton
rod
a
Sembly
Notes
a
Apply
engine
oil
to
sliding
parts
b
Arrange
80
that
notch
mark
on
piston
head
faces
to
front
of
en
gine
c
Install
piston
rings
at
1800
to
each
other
avoiding
their
fit
in
the
thrust
and
piston
pin
directions
6
Top
ring
I
iilring
Piston
pin
ireClioJ
EM165
Fig
EM
93
PUtan
ring
direction
12
Install
connecting
rod
caps
Tightening
torque
4
5
to
5
5
kg
m
33
to
40
ft
lb
EM
23
Fig
EM
94
Installing
connecting
rod
cap
Note
Install
connecting
rods
and
con
necting
rod
caps
80
that
their
as
signed
numbers
are
positioned
on
the
same
side
and
in
the
SlIme
direction
with
respect
to
cylinders
13
Make
sure
that
connecting
rod
big
end
has
proper
end
play
Fig
EM
95
Checking
big
end
play
Big
end
play
0
2
to
0
3
mm
0
008
to
0
Ql2
in
14
Install
cylinder
head
assembly
Fig
EM
96
Tightening
sequence
01
cylinder
head
bolts
J
Thoroughly
clean
cylinder
block
and
head
surface
Do
not
apply
sealant
to
any
other
part
of
cylinder
block
and
head
sur
face
Page 69 of 537
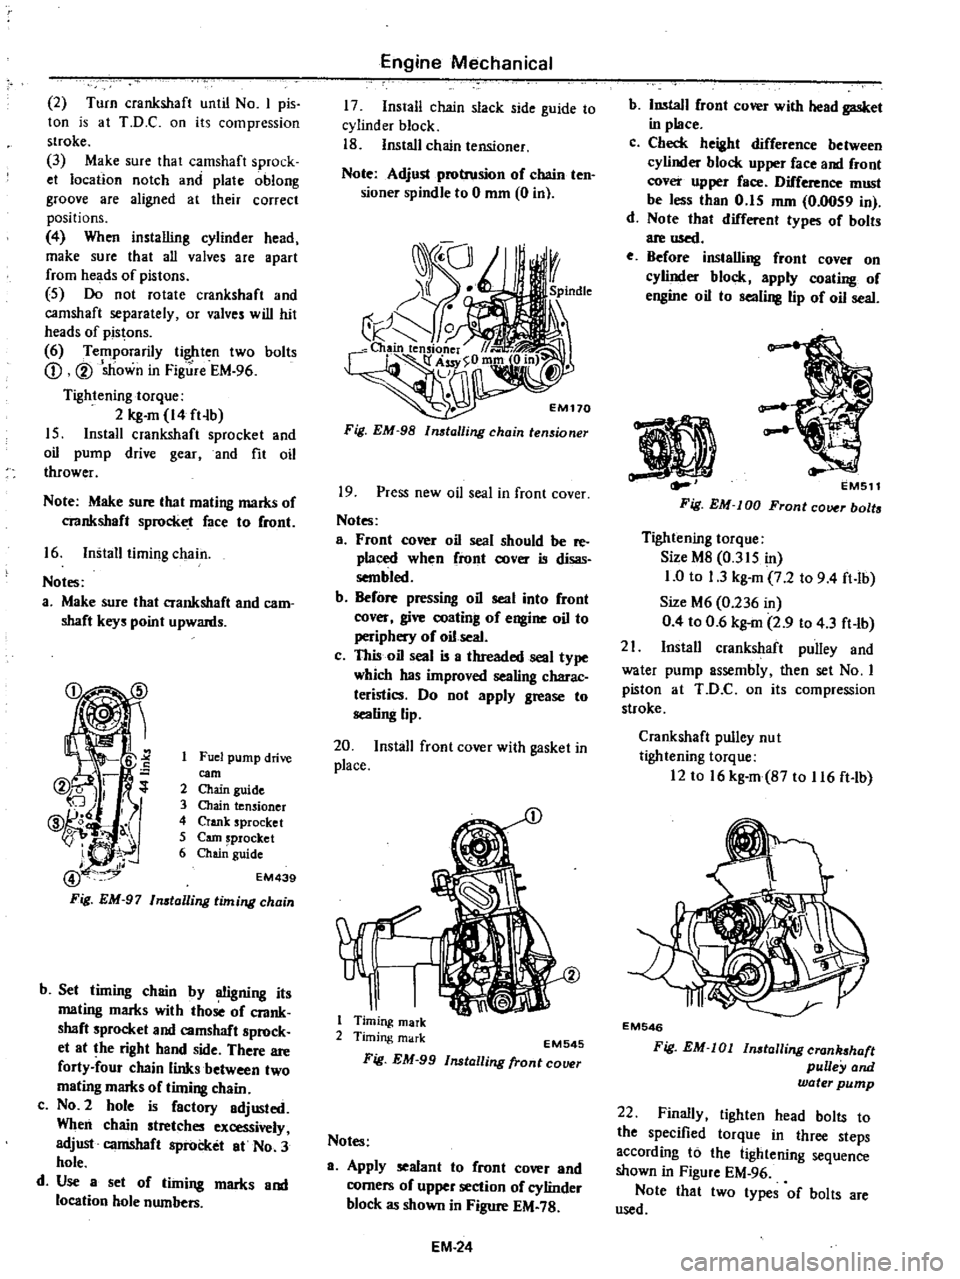
2
Turn
crankshaft
until
No
I
pis
ton
is
at
T
D
C
on
its
compression
stroke
3
Make
sure
thai
camshaft
sprock
et
location
notch
and
plate
oblong
groove
are
aligned
at
their
correct
positions
4
When
installing
cylinder
head
make
sure
that
all
valves
are
apart
from
heads
of
pistons
5
Do
not
rotate
crankshaft
and
camshaft
separately
or
valves
will
hit
heads
of
pistons
6
Temporarily
tighten
two
bolts
CD
V
sJiown
in
Fig
re
EM
96
Tightening
torque
2
kg
m
14
ft
b
15
Install
crankshaft
sprocket
and
oil
pump
drive
gear
and
fit
oil
thrower
Note
Make
sure
lhat
maling
marks
of
crankshaft
sprocket
face
10
Cront
16
Install
timing
chain
Noles
a
Make
sure
that
crankshaft
and
cam
shaft
keys
point
upwards
Fuel
pump
drive
earn
2
Chain
guide
3
Chain
tensioner
4
Crank
sprocket
5
earn
sprocket
6
Chai
guide
EM439
b
Set
timing
chain
by
OOgning
its
mating
marks
with
those
oC
crank
shaft
sprocket
and
camshaft
sprock
et
at
the
right
hand
side
There
are
forty
four
chain
links
between
two
mating
marks
of
timing
chain
c
NO
2
hole
is
Cactory
adjusted
When
chain
stretches
excessively
adjust
camshaft
sprocket
at
No
3
hole
d
Use
a
set
of
timing
marks
and
location
hole
numbers
Engine
Mechanical
17
Install
chain
slack
side
guide
to
cylinder
block
18
Install
chain
tensioner
Note
Adjust
protrusion
oC
chain
ten
sioner
spindle
to
0
mm
0
in
Fig
EM
98
lmtalling
chain
tensioner
19
Press
new
oil
seal
in
front
cover
Notes
a
Front
cover
oil
seal
should
be
reo
placed
when
Cront
cover
is
disas
sembled
b
BeCore
pressing
oil
seal
into
Cront
cover
give
coating
of
engine
oil
to
periphery
of
oil
seal
c
This
oil
seal
is
a
threaded
seal
type
which
has
improved
sealing
charac
teristics
Do
not
apply
grease
to
sealing
lip
20
Install
front
cover
with
gasket
in
place
1
Timing
mark
2
Timing
mark
EM545
Fig
EM
99
Installing
fronl
COlHlr
Notes
a
Apply
sealant
to
Cront
cover
and
corners
oC
upper
section
of
cylinder
block
as
shown
in
Figure
EM
78
EM
24
b
Install
Cront
cover
with
head
gasket
in
place
c
Check
height
diCCerence
between
cylinder
block
upper
Cace
and
Cront
cover
upper
Cace
DifCerence
must
be
less
than
0
15
mm
0
0059
in
d
Note
that
difCerent
types
oC
bolts
are
used
e
Before
installing
front
cover
on
cylinder
block
apply
coating
oC
engine
oil
10
sealing
lip
of
oil
seal
EMS11
Fig
EM
lOD
Front
cover
bolts
Tightening
torque
Size
M8
0
315
in
1
0
to
1
3
kg
m
7
2
to
9
4
ft
lb
Size
M6
0
236
in
0
4
to
0
6
kg
m
2
9
to
4
3
ft
lb
21
Install
crankshaft
pulley
and
water
pump
assembly
then
set
No
I
piston
at
ToO
C
on
its
compression
stloke
Crankshaft
pulley
nu
I
tightening
torque
12
to
16
kg
m
B7
to
116
ft
lb
EM546
Fig
EM
Ol
lnstallingcran
haft
pulley
and
water
pump
22
Finally
tighten
head
bolts
to
the
specified
torque
in
three
steps
according
to
the
lightening
sequence
shown
in
Figure
EM
96
Note
thai
Iwo
types
of
bolts
are
used
Page 70 of 537
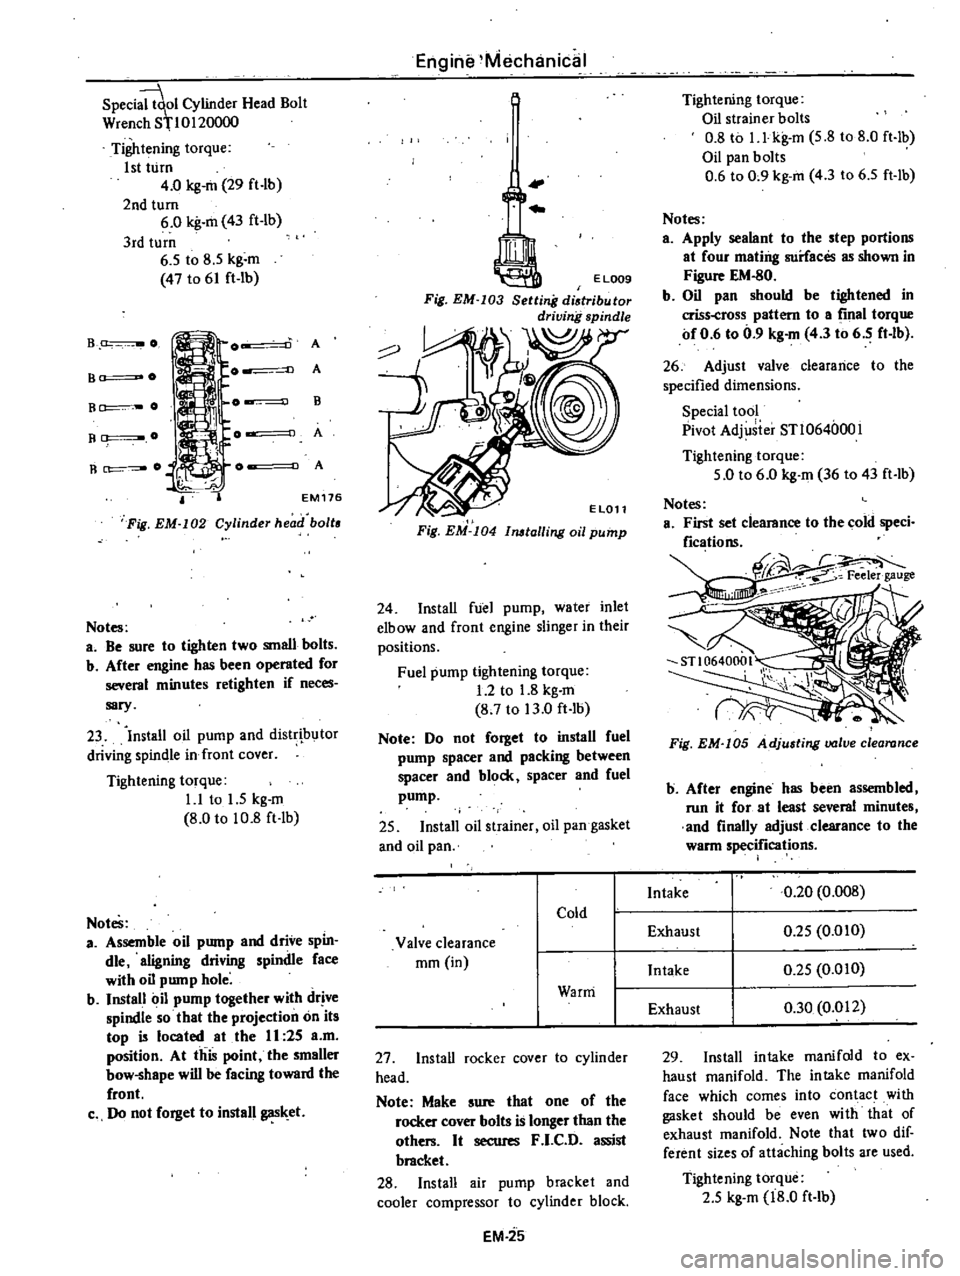
Speci
ol
Cylinder
Head
Bolt
Wren
h
8110120000
Tightening
torque
1st
turn
4
0
kg
m
29
ft
lb
2nd
turn
6
0
kg
m
43
ft
lb
3rd
turn
6
5
to
8
5
kg
m
47
to
61
ft
lb
B
O
A
A
B
A
A
B
O
B
O
R
O
EM
176
Fig
EM
I02
Cylinder
head
boll
Notes
a
Be
sure
to
tighten
two
small
bolts
b
After
engine
has
been
operated
for
several
minutes
retighten
if
neces
sary
23
Install
oil
pump
and
distr
butor
driving
spindle
in
front
cover
Tightening
torque
1
1
to
1
5
kg
m
8
0
to
10
8
ft
lb
Notes
a
Assemble
oil
pump
and
drive
spin
die
aligning
driving
spindle
face
with
oil
pump
hole
b
Install
oil
pump
together
with
drive
spindle
so
that
the
projection
on
its
top
is
located
at
the
II
25
a
m
position
At
this
point
the
smaller
bow
shape
will
be
facing
toward
the
front
c
Do
not
forget
to
install
gas
et
Engine
Mechanical
I
Fig
EM
I04
11l6lalling
oil
pump
24
Install
fuel
pump
water
inlet
elbow
and
front
engine
slinger
in
their
positions
Fuel
pump
tightening
torque
1
2
to
1
8
kg
m
8
7
to
13
0
ft
lb
Note
Do
not
forget
to
install
fuel
pump
spacer
and
packing
between
spacer
and
block
spacer
and
fuel
pump
25
Install
oil
strainer
oil
pan
gasket
and
oil
pan
27
Install
rocker
cover
to
cylinder
head
Note
Make
sure
that
one
of
the
rocker
cover
bolts
is
longer
than
the
others
It
secures
F
I
C
D
assist
bracket
28
Install
air
pump
bracket
and
cooler
compressor
to
cylinder
block
EM
25
Tightening
torque
Oil
strainer
bolts
0
8
to
I
l
kg
m
5
8
to
8
0
ft
lb
Oil
pan
bolts
0
6
to
0
9
kg
m
4
3
to
6
5
ft
lb
Notes
a
Apply
sealant
to
the
step
portions
at
four
mating
surfaces
as
shown
in
Figure
EM
80
b
Oil
pan
should
be
tigh
tened
in
criss
cross
pattern
to
a
final
torque
of
0
6
to
0
9
kg
m
4
3
to
6
5
ft
lb
26
Adjust
valve
clearance
to
the
specified
dimensions
Special
tool
Pivot
Adj
iier
STl064000l
Tightening
torque
5
0
to
6
0
kg
m
36
to
43
ft
lb
Fig
EM
I05
Adjusting
valve
clearance
b
After
engine
has
been
assembled
run
it
for
at
least
several
minutes
and
finally
adjust
clearance
to
the
warm
specifications
29
Install
intake
manifold
to
ex
haust
manifold
The
intake
manifold
face
which
comes
into
contact
with
gasket
should
be
even
with
that
of
exhaust
manifold
Note
that
two
dif
ferent
sizes
of
attaching
bolts
are
used
Tightening
torque
2
5
kg
m
18
0
ft
lb