DATSUN PICK-UP 1977 Workshop Manual
Manufacturer: DATSUN, Model Year: 1977, Model line: PICK-UP, Model: DATSUN PICK-UP 1977Pages: 537, PDF Size: 35.48 MB
Page 51 of 537
r
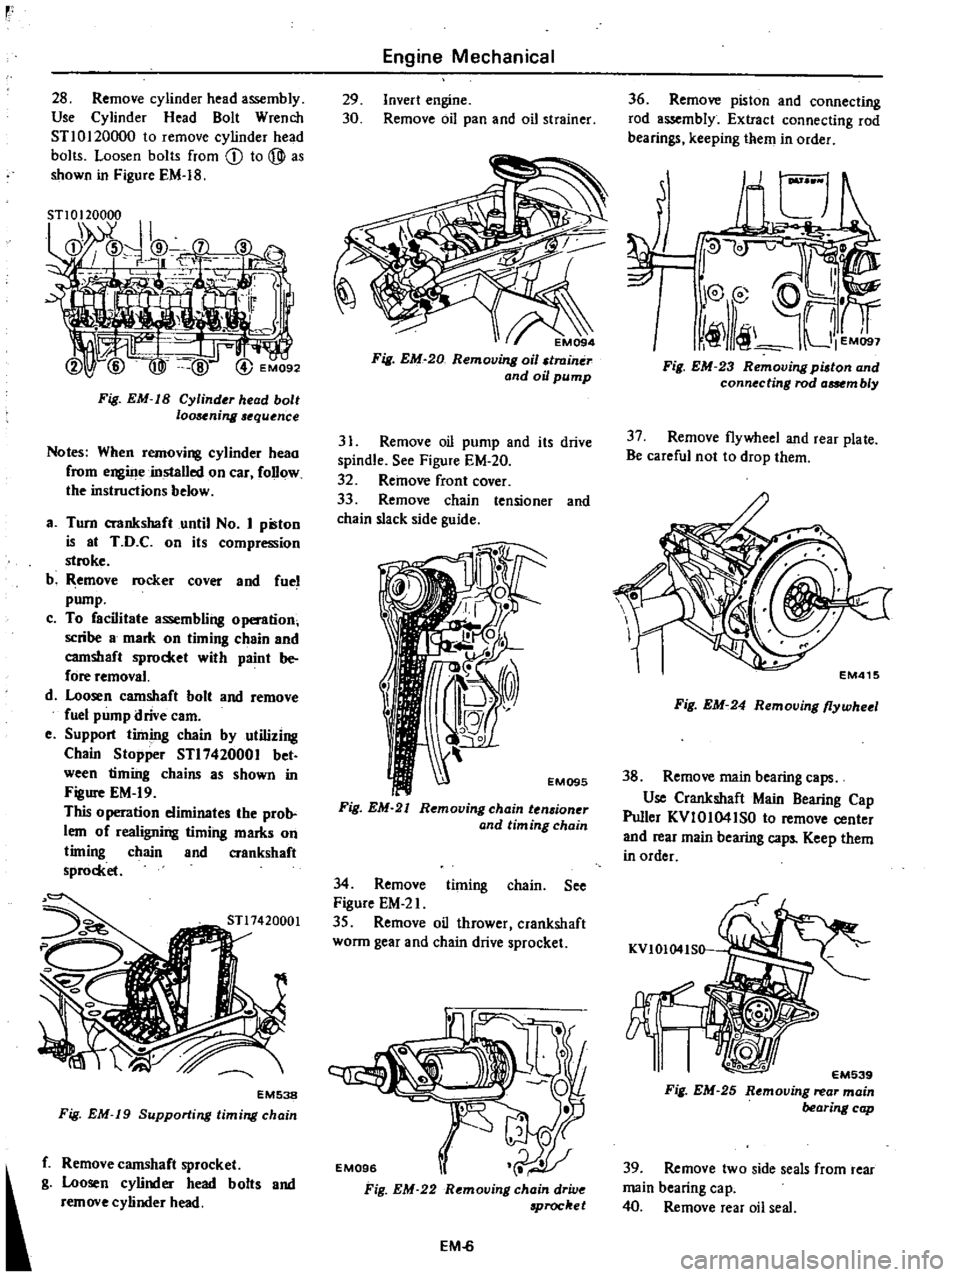
28
Remove
cylinder
head
assembly
Use
Cylinder
Head
Bolt
Wrench
STl0120000
to
remove
cylinder
head
bolts
Loosen
bolts
from
CD
to
@
as
shown
in
Figure
EM
18
Fig
EM
IS
Cylinder
head
bolt
loosening
equence
Notes
When
removing
cylinder
heao
from
engiJJe
installed
on
car
follow
the
instructions
below
a
Turn
crankshaft
until
No
I
pilton
is
at
T
D
C
on
its
compression
stroke
b
Remove
rocker
Cover
and
fuel
pump
c
To
facilitate
assembling
o
tion
scribe
8
mark
on
timing
c
8in
and
camshaft
sprocket
with
paint
be
fore
removal
d
Loosen
camshaft
bolt
and
remove
fuel
pump
drive
earn
e
Support
timing
chain
by
utilizing
Chain
Stopper
STl7420001
bet
ween
timiilg
chains
as
shown
in
Figure
EM
19
This
0
peration
eliminates
the
prob
lem
of
realigning
timing
marks
on
timing
chain
and
crankshaft
sprocket
EM538
Fig
EM
19
Supporting
timing
chain
f
Remove
camshaft
sprocket
g
Loosen
cylinder
head
bolts
and
remove
cylinder
head
Engine
Mechanical
29
Invert
engine
30
Remove
oil
pan
and
oil
strainer
EM094
Fig
EM
20
Removing
oil
traintir
and
oil
pump
31
Remove
oil
pump
and
its
drive
spindle
See
Figure
EM
20
32
Remove
front
cover
33
Remove
chain
tensioner
and
chain
slack
side
guide
EM095
Fig
EM
21
Removing
chain
ten
ioner
and
tim
ing
chain
34
Remove
timing
chain
See
Figure
EM
2l
35
Remove
oil
thrower
crankshaft
wonn
gear
and
chain
drive
sprocket
Fig
EM
22
Removing
chain
drive
Proc
et
EM
6
36
Remove
piston
and
connecting
rod
a
mbly
Extract
connecting
rod
bearings
keeping
them
in
order
I
Fig
EM
23
Removing
pilton
and
connecting
rod
aat
m
b
y
37
Remove
flywheel
and
rear
plate
Be
careful
not
to
drop
them
EM415
Fig
EM
24
Removing
flywheel
38
Remove
main
bearing
caps
Use
Crankshaft
Main
Bearing
Cap
Puller
KVIOI04ISO
to
remove
center
and
rear
main
bearing
caps
Keep
them
in
order
KVIOI04IS0
EM539
Fig
EM
25
Removing
rear
main
bearing
cap
39
Remove
two
side
seals
from
rear
main
bearing
ca
p
40
Remove
rear
oil
seal
Page 52 of 537

EM103
EM411
Fig
EM
29
Remouingpi
tonpin
Fig
EM
26
Remouing
rear
oil
eal
41
Remove
crankshaft
42
Remove
baffie
plate
and
cyl
inder
block
net
Fig
EM
27
Removing
baffle
plate
and
nel
PISTONS
AND
CONNECTING
RODS
Remove
piston
rings
with
a
ring
remover
O
EM102
Fig
EM
28
Removing
pilton
rings
2
Press
piston
pin
out
with
Piston
Pin
Press
Stand
STl3030001
Engine
Mechanical
3
Keep
disassembled
parts
in
order
CYLINDER
HEAD
I
Remove
valve
rocker
springs
Loosen
valve
rocker
pivot
lock
nut
and
remove
rocker
arm
by
pressing
valve
spring
down
Fig
EM
3D
Removing
rockerarrm
2
Remove
locate
plate
and
remove
camshaft
EM105
Fig
EM
31
Remouing
cammaft
EM
7
Note
Be
careful
not
to
damage
eam
shaft
bearings
and
earn
lobes
3
Remove
valves
using
Valve
Lifter
STl2070000
STl2070000
Fig
EM
32
Removing
ualves
Notes
a
Take
care
not
to
lose
valve
spring
seat
oil
seal
valve
collet
and
valve
rocker
guide
b
Be
sure
to
keep
camshaft
bearings
intact
or
the
bearing
center
is
liable
to
come
out
of
alignment
61
8
Exhaust
Intake
EM101
Fig
EM
33
Value
components
Page 53 of 537
r
Engine
Mechanical
INSPECTION
AND
REPAIR
PREPARATION
FOR
INSPECTION
CYLINDER
HEAD
AND
VALVE
CHECKING
CYLINDER
HEAD
MATING
FACE
VALVE
ASSEMBLY
VALVE
SPRING
ROCKER
ARM
AND
VALVE
ROCKER
PIVOT
VALVE
GUIDE
VALVE
SEAT
INSERTS
CAMSHAFT
AND
CAMSHAFT
BEARING
CAMSHAFT
BEARING
CLEARANCE
VALVE
TIMING
CAMSHAFT
ALIGNMENT
CYLINDER
BLOCK
HOW
TO
MEASURE
CYLINDER
BORE
CYLINDER
BORING
PREPARATION
FOR
INSPECTI
N
I
Before
cleaning
check
for
signs
of
water
and
oil
leaks
in
cylinder
block
and
head
2
Clean
oil
carbon
deposits
and
sealant
from
an
parts
Remove
gasket
3
Clean
all
oil
holes
with
solvent
and
dry
with
compressed
air
Make
sure
that
they
are
not
restricted
CYLINDER
HEAD
AND
VALVE
CHECKING
CYLINDER
HEAD
MATING
FACE
EM407
Fig
EM
34
Cylinder
head
CONTENTS
EM
8
EM
B
EM
8
EM
8
EM
9
EM
lO
EM
l0
EM
11
EM
12
EM
12
EM
12
EM
13
EM
13
EM
13
EM
14
PISTONS
PISTON
PINS
AND
PISTON
RINGS
CONNECTING
ROD
CRANKSHAFT
BUSHING
AND
BEARING
MEASUREMENT
OF
MAIN
BEARING
CLEARANCE
MEASUREMENT
OF
CONNECTING
ROD
BEARING
CLEARANCE
FITTING
BEARINGS
MISCELLANEOUS
COMPONENTS
CRANKSHAFT
AND
CAMSHAFT
SPROCKETS
CHAIN
TENSIONER
AND
CHAIN
GUIDE
FLYWHEEL
FRONT
COVER
AND
REAR
OIL
SEAL
Note
Never
remove
camshaft
bear
ings
unless
you
have
a
Suitable
machine
or
boring
Camshaft
bear
ing
in
line
If
you
once
remove
camshaft
bearings
bearing
centers
will
come
out
o
alignment
reo
conditioning
is
very
difficult
with
out
center
borings
L
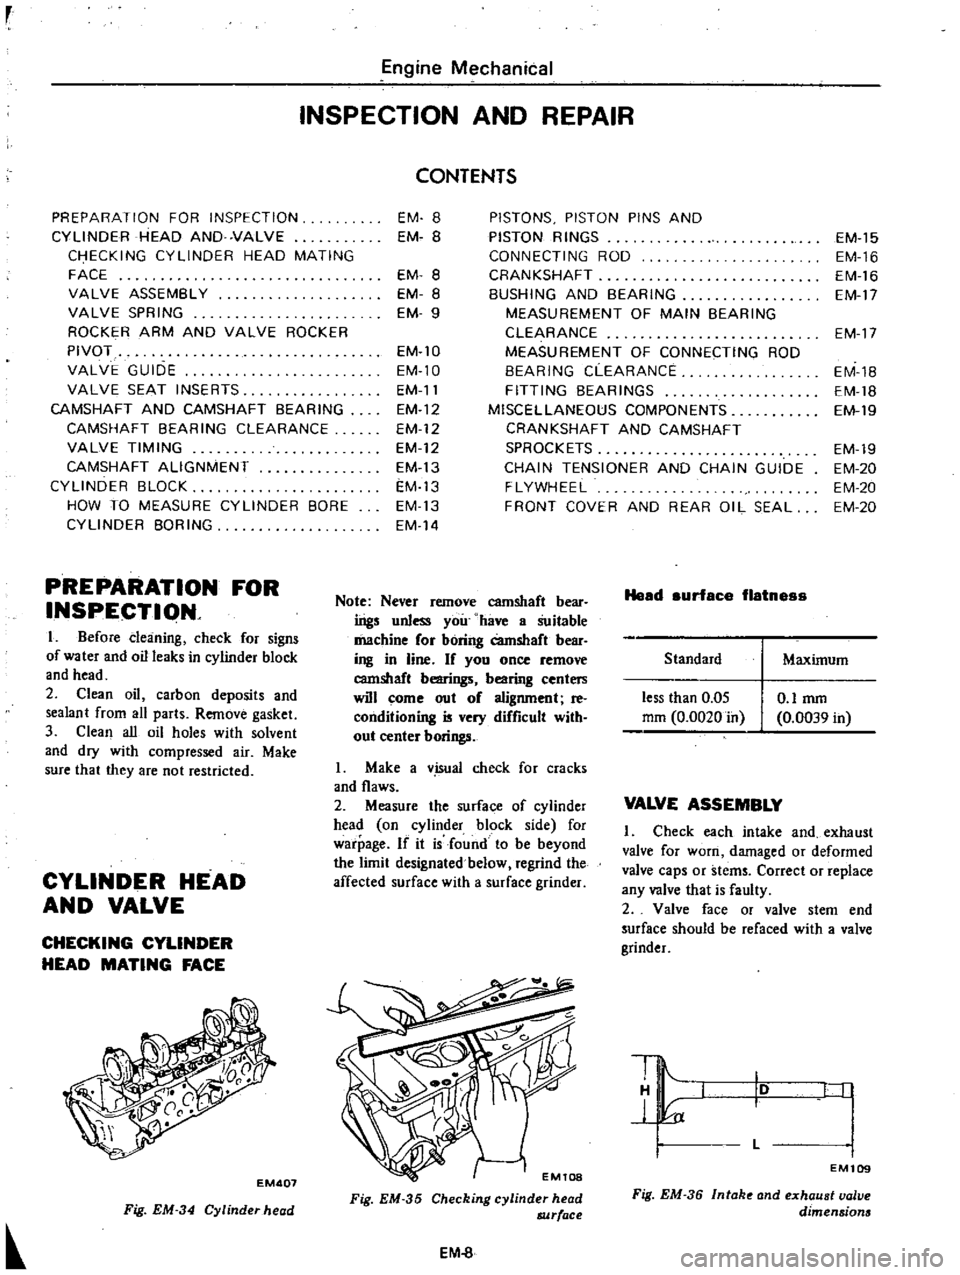
Make
a
v
isual
check
for
cracks
and
flaws
2
Measure
the
surface
of
cylinder
head
on
cylinder
block
side
for
warpage
If
it
is
found
to
be
beyond
the
limit
designated
below
regrind
the
affected
surface
with
a
surface
grinder
Fig
EM
35
Checking
cylinder
head
8JJrface
EM
8
Head
surface
flatnes
Standard
less
than
0
05
mm
0
0020
in
O
lmm
0
0039
in
EM
15
EM
16
EM
16
EM
17
EM
17
EM
1B
EM
18
EM
19
EM
19
EM
20
EM
20
EM
20
Maximum
VALVE
ASSEMBLY
Check
each
intake
and
exhaust
valve
for
worn
damaged
or
deformed
valve
caps
or
stems
Correct
or
replace
any
valve
that
is
faulty
2
Valve
face
or
valve
stem
end
surface
should
be
refaced
with
a
valve
grinder
10
L
I
I
I
EM109
Fig
EM
36
Intak
and
exhaust
valve
dimensions
Page 54 of 537
Engine
Mechanical
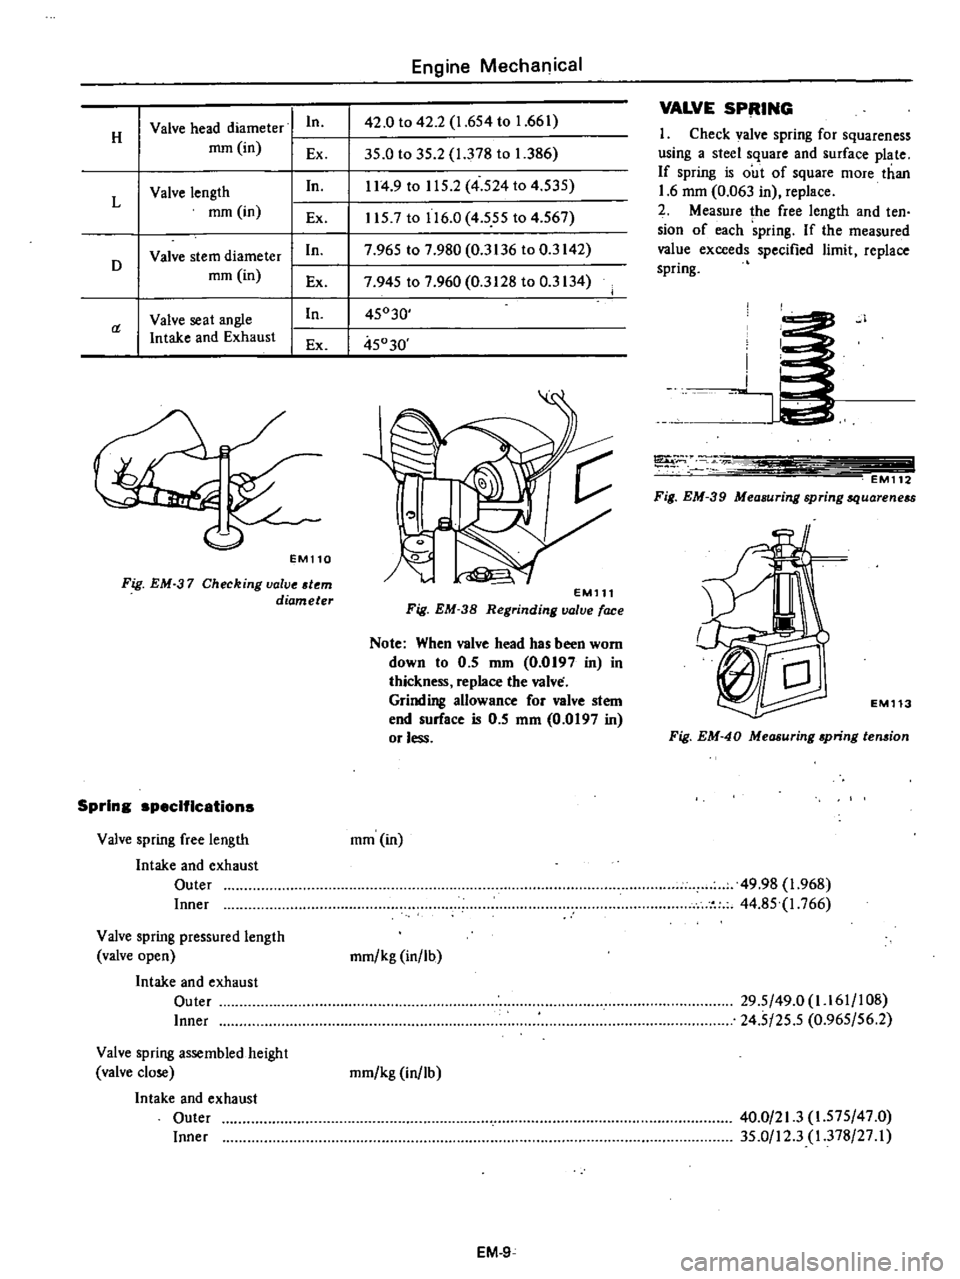
Valve
head
diameter
I
In
42
0
to
42
2
1
654
to
1
661
VALVE
SPRING
H
1
Check
valve
spring
for
squareness
mm
in
Ex
35
0
to
35
2
1
378
to
1
386
using
a
steel
square
and
surface
plate
In
114
9
to
115
2
4
524
to
4
535
If
spring
is
out
of
square
more
than
Valve
length
1
6
mm
0
063
in
replace
L
mm
in
2
Measure
lhe
free
length
and
ten
Ex
1157
to
116
0
4
555
to
4
567
sion
of
each
spring
If
the
measured
Valve
stem
diameter
In
7
965
to
7
980
0
3136
to
0
3142
value
exceeds
specified
limit
replace
D
mm
in
spring
Ex
7
945
to
7
960
0
3128
to
0
3134
Valve
seat
angle
In
45030
a
Intake
and
Exhaust
Ex
45030
EM110
Fig
EM
37
Checking
valve
tern
diameter
Spring
specifications
Valve
spring
free
length
Intake
and
exhaust
Outer
Inner
Valve
spring
pressured
length
valve
open
Intake
and
exhaust
Outer
Inner
Valve
spring
assembled
height
valve
close
Intake
and
exhaust
Outer
Inner
EMll1
Fig
EM
38
Regrinding
valve
face
Note
When
valve
head
has
been
worn
down
to
0
5
nun
0
0197
in
in
thickness
replace
the
valve
Grinding
allowance
for
valve
stem
end
surface
is
0
5
mm
0
0197
in
or
less
mm
in
mmlkg
in
lb
mmlkg
in
lb
EM
9
I
i
J
T
EM112
Fig
EM
39
Measuring
spring
quareneu
1
EM113
Fig
EM
40
Measuring
apring
ten
ion
49
98
1
968
44
85
1
766
29
5
49
0
1
161
108
24
5
25
5
0
965156
2
40
0
21
3
1
575
47
0
35
0
12
3
1
378
27
I
Page 55 of 537
rr
ROCKER
ARM
AND
VALVE
ROCKER
PIVOT
Check
pivot
head
and
cam
contact
and
pivot
contact
surfaces
of
rocker
arm
for
damage
or
wear
If
damage
is
found
replace
them
A
faulty
pivot
must
be
replaced
together
with
its
corresponding
rocker
arm
VALVE
GUIDE
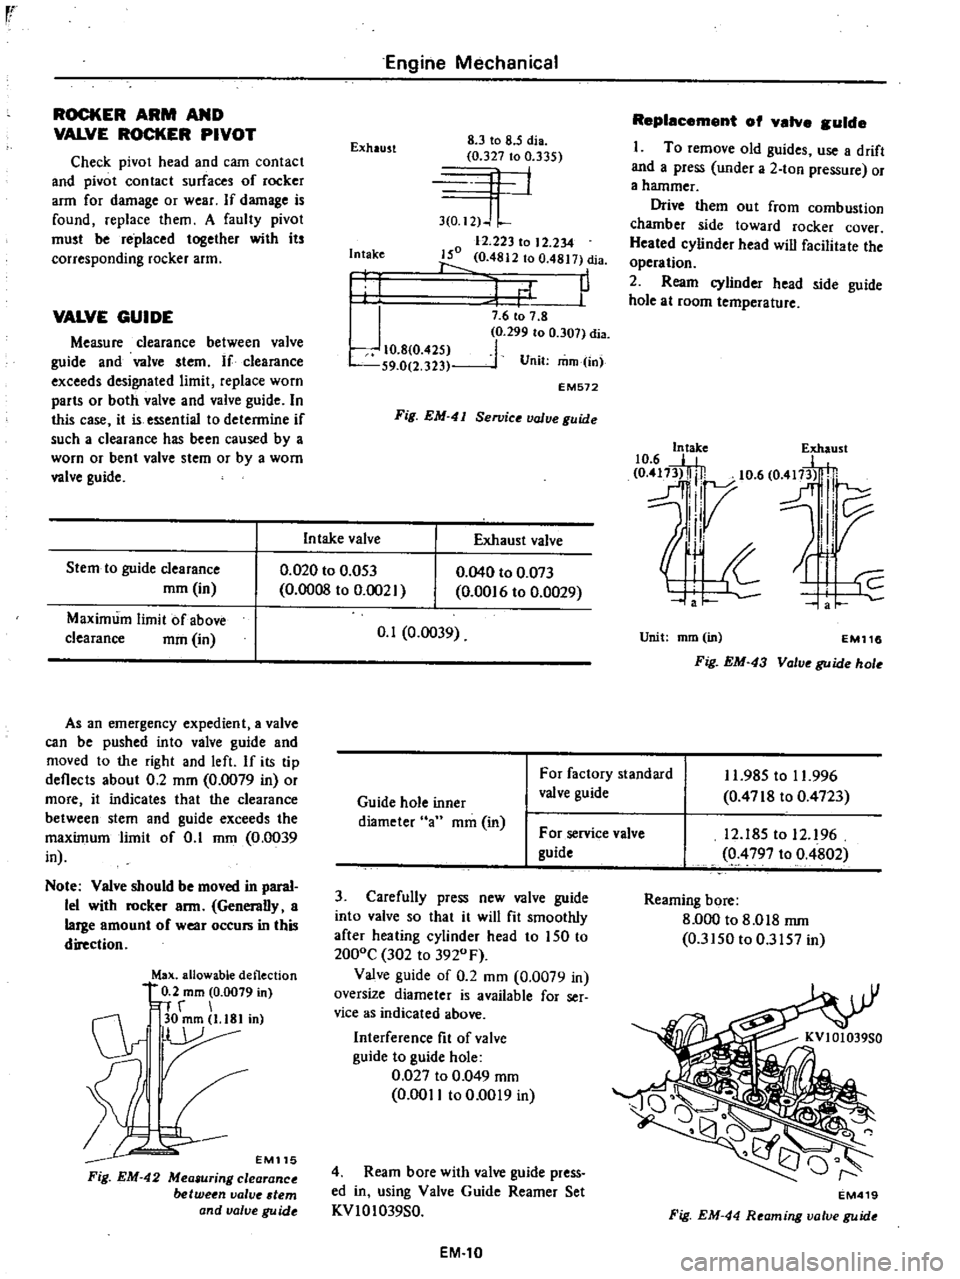
Measure
clearance
between
valve
guide
and
valve
stem
If
clearance
exceeds
designated
limit
replace
worn
parts
or
both
valve
and
valve
guide
In
this
case
it
is
essential
to
determine
if
such
a
clearance
has
been
caused
by
a
worn
or
bent
valve
stem
or
by
a
worn
valve
guide
Stem
to
guide
clearance
mm
in
Maximum
limit
of
above
clearance
mm
in
Engine
Mechanical
Exhaust
8
3
to
8
5
dia
0
327
to
0
335
4
1
3
0
I2
J
L
12
223
to
12
234
150
0
4812
to
0
4817
dia
1
P
Intake
I
I
J
10
8
0
425
S9
0
2
323
7
6
to
7
8
0
299
to
0
307
dia
1
Unit
mm
in
EM572
Fig
EM
41
Se11Jice
value
guide
In
take
valve
Exhaust
valve
0
020
to
0
053
0
0008
to
0
002
As
an
emergency
expedient
a
valve
can
be
pushed
into
valve
guide
and
moved
to
the
right
and
left
If
its
tip
deflects
about
0
2
mm
0
0079
in
or
more
it
indicates
that
the
clearance
between
stem
and
guide
exceeds
the
maximum
limit
of
0
1
mm
0
0039
in
Note
Valve
should
be
moved
in
paral
lel
with
rocker
arm
Generally
a
large
amount
of
wear
occurs
in
this
direction
Max
allowable
deflection
0
2
mm
0
0079
in
n
r
C1r
30mm
l
18Iin
r
EM115
Fig
EM
42
Mea
uring
clearance
between
valve
tern
and
valve
gu
ide
0
040
to
0
073
0
00
6
to
0
0029
0
1
0
0039
Replacement
of
valve
guide
I
To
remove
old
guides
use
a
drift
and
a
press
under
a
2
ton
pressure
or
a
hammer
Drive
them
out
from
combustion
chamber
side
toward
rocker
cover
Heated
cylinder
head
will
facilitate
the
operation
2
Ream
cylinder
head
side
guide
hole
at
room
temperature
10
6
E
e
417
5t
0
m3l
lj
10
6
O
fl
H
dl7
l
IV
II
Unit
mm
in
EM116
Fig
EM
43
Valve
guide
hole
Guide
hole
inner
diameter
an
mm
in
For
factory
standard
valve
guide
11
985
to
11
996
0
4718
to
0
4723
For
service
valve
guide
3
Carefully
press
new
valve
guide
into
valve
so
that
it
will
fit
smoothly
after
heating
cylinder
head
to
150
to
2000C
302
to
3920
F
Valve
guide
of
0
2
mm
0
0079
in
oversize
diameter
is
available
for
ser
vice
as
indicated
above
Interference
fit
of
valve
guide
to
guide
hole
0
027
to
0
049
mm
0
0011
to
0
0019
in
4
Ream
bore
with
valve
guide
press
ed
in
using
Valve
Guide
Reamer
Set
KVIOI039S0
EM
10
12
185
to
12
96
0
4797
to
0
4802
Reaming
bore
8
000
to
8
018
rnm
0
3150
to
0
3157
in
EM419
Fig
EM
44
Reaming
valve
guide
Page 56 of 537
q
1
I
k
k
lO
i
I
37
9
to
38
1
eel
1
492
to
1
500
dis
co
q
0
45
597
to
45
613
1
795
to
1
796
dia
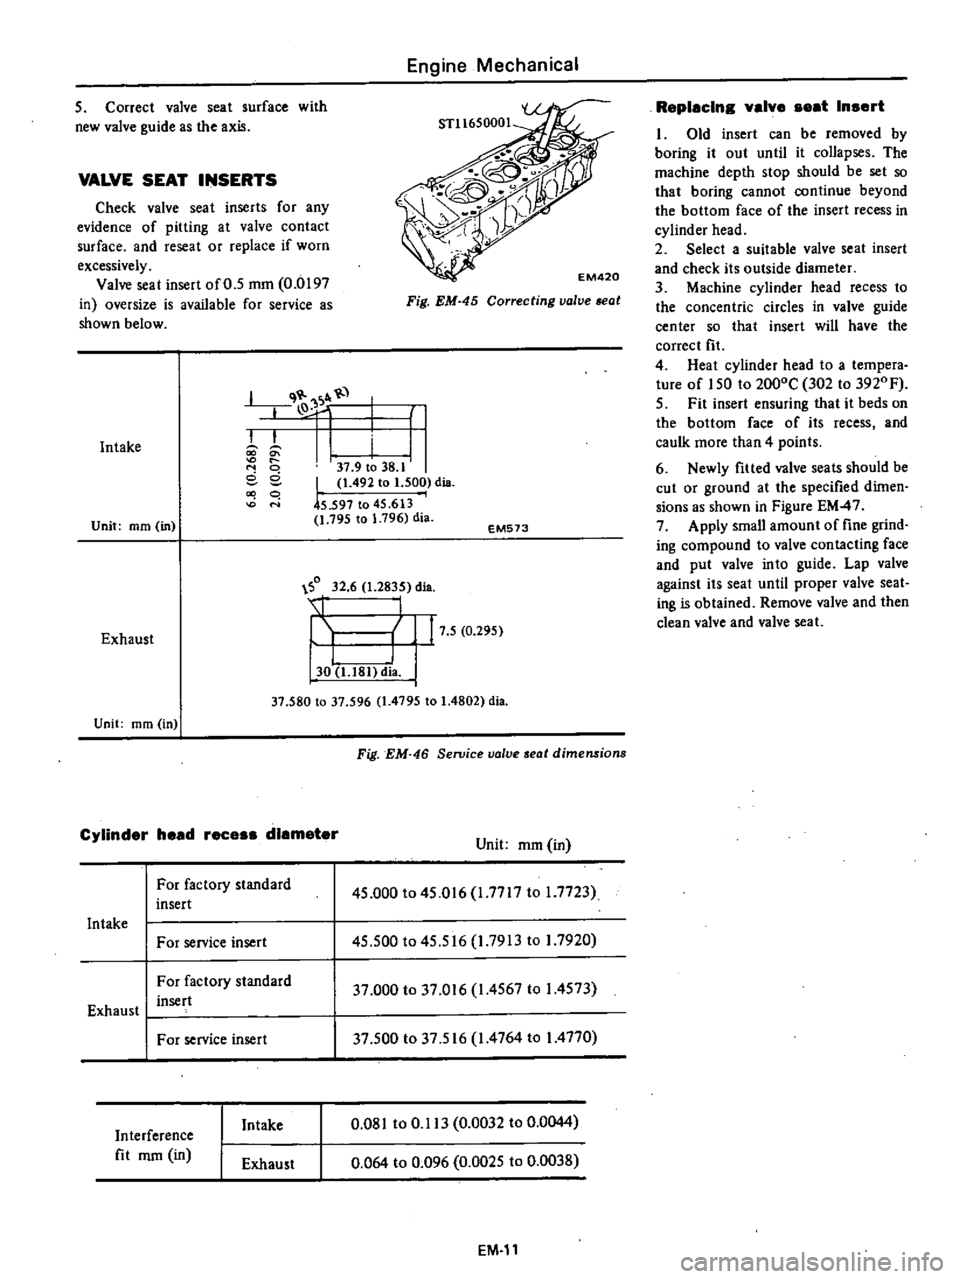
5
Correct
valve
seat
surface
with
new
valve
guide
as
the
axis
VALVE
SEAT
INSERTS
Check
valve
seat
inserts
for
any
evidence
of
pitting
at
valve
contact
surface
and
reseat
or
replace
if
worn
excessively
Valve
seat
insert
of
0
5
mm
0
0197
in
oversize
is
available
for
service
as
shown
below
Intake
Unit
mm
in
Engine
Mechanical
Fig
EM
45
Correcting
valve
seat
EM573
0
32
6
1
2835
dia
Exhaust
I
I
30
U81
dia
17
5
0
295
Unit
mm
in
37
580
to
37
596
1
4795
to
1
4802
dia
Cylinder
head
rece
diameter
For
factory
standard
insert
Intake
For
service
insert
For
factory
standard
insert
Exhaust
I
For
service
insert
Interference
fit
mm
in
Intake
Exhaust
Fig
EM
46
Seroice
valve
seat
dimensions
Unit
mm
in
45
000
to
45
016
1
7717
to
1
7723
45
500
to
45
516
1
7913
to
I
7920
37
000
to
37
016
1
4567
to
I
4573
37
500
to
37
516
1
4764
to
I
4770
0
081
to
0
113
0
0032
to
0
0044
0
064
to
0
096
0
0025
to
0
0038
EM
11
Replacln
valve
eat
In
ert
1
Old
insert
can
be
removed
by
boring
it
out
until
it
collapses
The
machine
depth
stop
should
be
set
so
that
boring
cannot
continue
beyond
the
bottom
face
of
the
insert
recess
in
cylinder
head
2
Select
a
suitable
valve
seat
insert
and
check
its
outside
diameter
3
Machine
cylinder
head
recess
to
the
concentric
circles
in
valve
guide
center
so
that
insert
will
have
the
correct
fit
4
Heat
cylinder
head
to
a
tempera
ture
of
150
to
2000C
302
to
3920
F
5
Fit
insert
ensuring
that
it
beds
on
the
bottom
face
of
its
recess
and
caulk
more
than
4
points
6
Newly
fitted
valve
seats
should
be
cut
or
ground
at
the
specified
dimen
sions
as
shown
in
Figure
EM
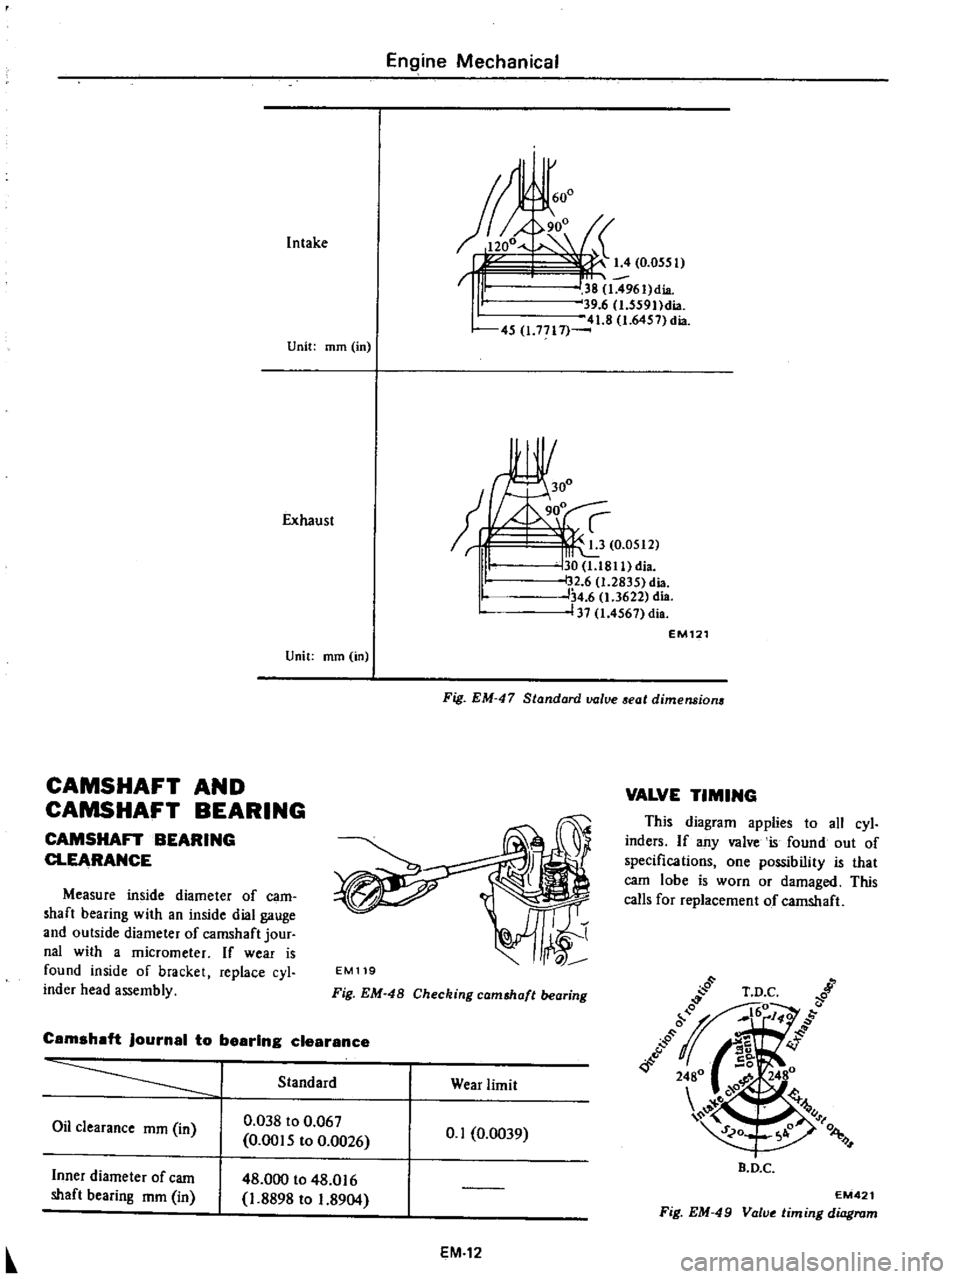
47
7
Apply
small
amount
of
fine
grind
ing
compound
to
valve
contacting
face
and
put
valve
into
guide
Lap
valve
against
its
seat
until
proper
valve
seat
ing
is
obtained
Remove
valve
and
then
clean
valve
and
valve
sea
1
Page 57 of 537
Intake
Engine
Mechanical
I
600
38
1
496I
dia
W
39
6
I
559Ildia
1
8
1
6457
dia
45
1
71l1
Unit
mm
in
Exhaust
30
30
1
l811
di
I
32
6
2835
dia
34
6
1
3622
dia
137
1
4567
dia
Unit
mm
m
CAMSHAFT
AND
CAMSHAFT
BEARING
CAMSHAnBEARING
CLEARANCE
Measure
inside
diameter
of
earn
haft
beating
with
an
inside
dial
gauge
and
outside
diameter
of
camshaft
jour
nal
with
a
micrometer
If
wear
is
found
inside
of
bracket
replace
cyl
inder
head
assembly
EM121
Fig
EM
47
Standard
value
aeat
dimensions
EM119
Fig
EM
48
Checking
cam
haft
bearing
Camshaft
journal
to
bearing
clearance
Standard
Wear
limit
Oil
clearance
mm
in
0
038
to
0
067
0
0015
to
0
0026
0
1
0
0039
Inner
diameter
of
earn
shaft
bearing
mm
in
48
000
to
48
016
1
8898
to
1
8904
EM
12
VALVE
TIMING
This
diagram
applies
to
all
cyl
inders
If
any
valve
is
found
out
of
specifications
one
possibility
that
carn
lobe
is
worn
or
damaged
This
calls
for
replacement
of
camshaft
B
D
C
EM421
Fig
EM
49
Value
timing
diagram
Page 58 of 537
Standard
Camshaft
bend
mm
in
0
02
0
0008
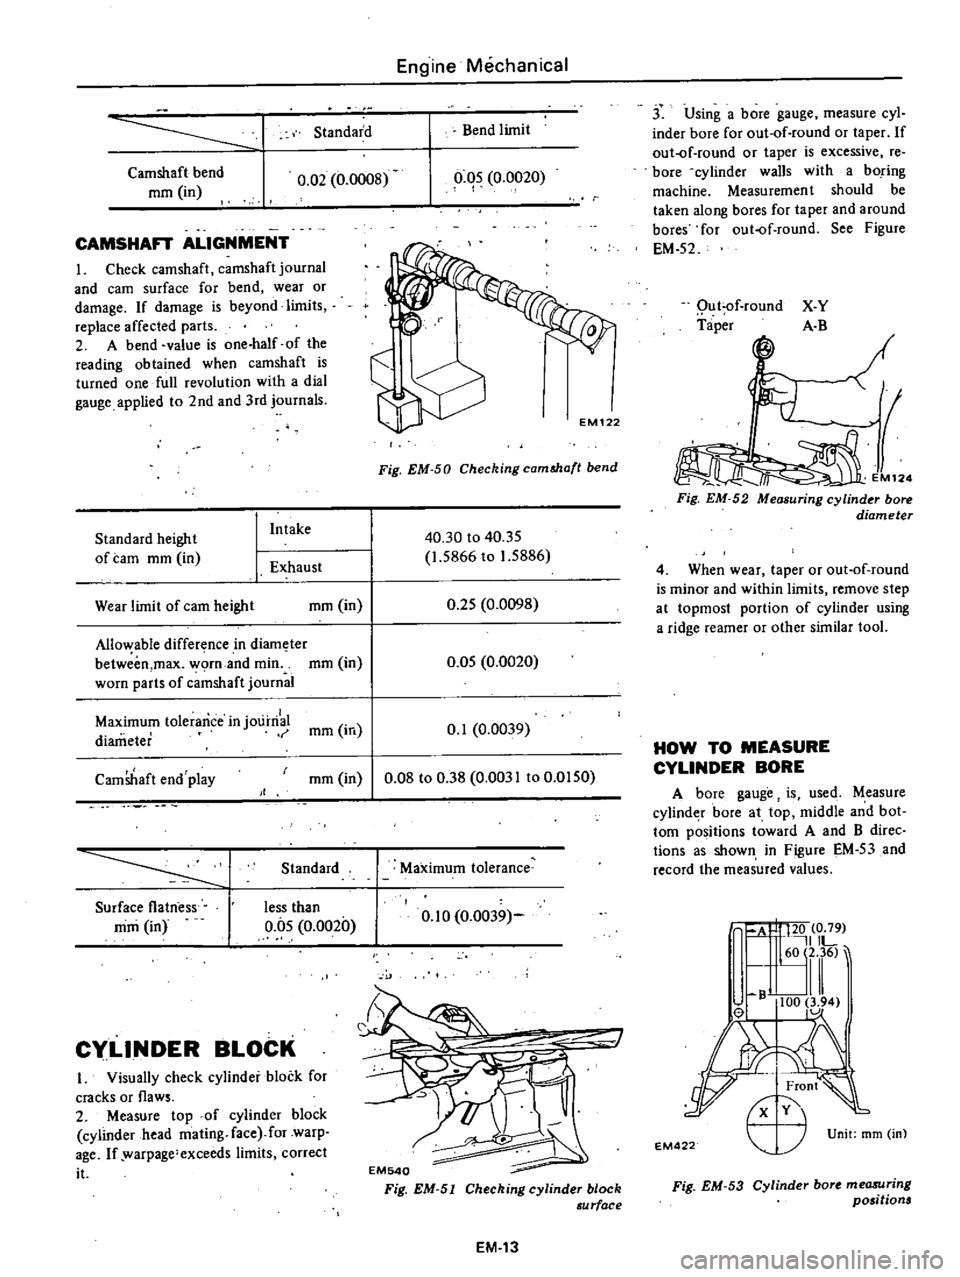
CAMSHAFT
ALIGNMENT
I
Check
camshaft
camshaft
journal
and
earn
surface
for
bend
wear
or
damage
If
damage
is
beyond
limits
replace
affected
parts
2
A
bend
value
is
one
half
of
the
reading
obtained
when
camshaft
is
turned
one
full
revolution
with
a
dial
gauge
applied
to
2nd
and
3rd
journals
Standard
height
of
tam
mm
in
I
Intake
1
Exhaust
Wear
limit
of
earn
height
mm
in
Allo
able
difference
in
diam
ter
betweim
max
worn
and
min
mm
in
worn
parts
of
c
mshaft
journal
Engine
Mechanical
Bend
limit
0
05
0
0020
I
Fig
EM
50
Checking
camMa
t
bend
40
30
to
40
35
1
5866
to
1
5886
0
25
0
0098
0
05
0
0020
Maximum
tolerance
in
j01
irri
mm
in
0
1
0
0039
diameter
CamShaft
end
play
mm
in
0
08
to
0
38
0
0031
to
0
0150
Standard
Surface
flatness
mm
in
less
than
0
05
0
0020
Cy
LlNDER
BLOCK
I
Visually
check
cylinder
block
for
cracks
or
flaws
2
Measure
top
of
cylinder
block
cylinder
head
mating
face
for
warp
age
If
warpage
exceeds
limits
correct
it
Maximum
tolerance
0
10
0
0039
EM540
Fig
EM
51
Cheching
cylinder
block
au
rface
EM
13
j
Using
a
bore
gauge
measure
cyl
inder
bore
for
out
of
round
or
taper
If
out
of
round
or
taper
is
excessive
re
bore
cylinder
walls
with
a
boring
machine
Measuremen
t
should
be
taken
along
bores
for
taper
and
around
bores
for
out
of
round
See
Figure
EM
52
Qu
t
of
round
Taper
X
Y
A
B
M12
Fig
EM
52
Measuring
cylinder
bore
diameter
4
When
wear
taper
or
out
of
round
is
minor
and
within
limits
remove
step
at
topmost
portion
of
cylinder
using
a
ridge
reamer
or
other
similar
tool
HOW
TO
MEASURE
CYLINDER
BORE
A
bore
gauge
is
used
Measure
cylind
r
bore
at
top
middle
and
bot
tom
positions
toward
A
and
B
direc
tions
as
shown
in
Figure
EM
53
and
record
the
measured
values
A
I
120
0
79
IlL
60
2
36
lll
B
100
3
94
el
1
Unit
mm
m
EM
22
r
Fig
EM
53
Cylinder
bort
me08Uring
positions
Page 59 of 537
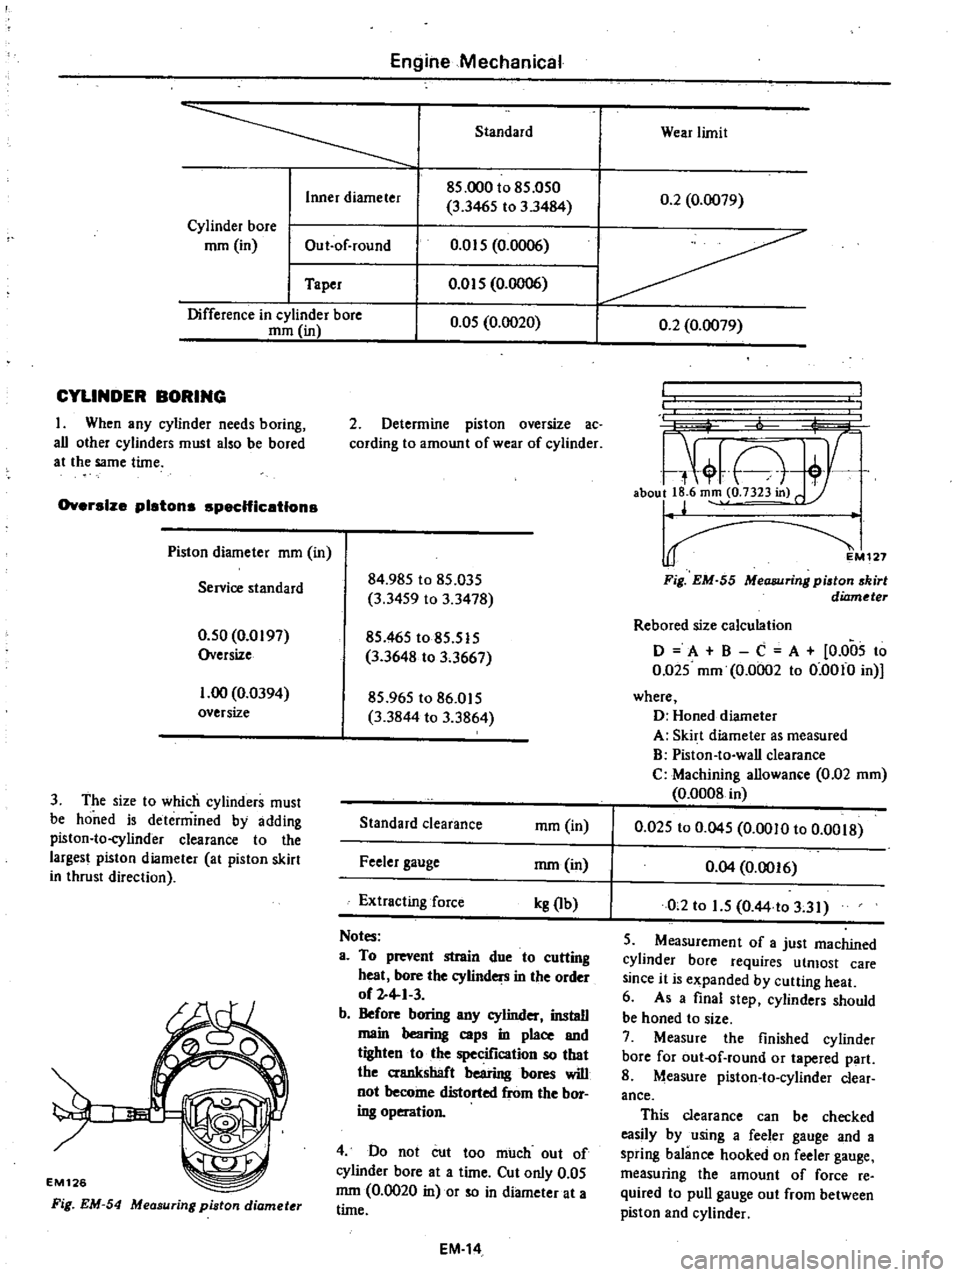
Engine
Mechanical
Standard
Wear
limit
Inner
diameter
85
000
to
85
050
0
2
0
0079
3
3465
to
3
3484
Cylinder
bore
mm
in
Out
of
round
O
ot5
0
0006
Taper
0
015
0
0006
Difference
in
cylinder
bore
0
05
0
0020
0
2
0
0079
mm
in
CYLINDER
BORING
I
When
any
cylinder
needs
boring
all
other
cylinders
must
also
be
bored
at
the
same
time
Oversize
pistons
spec
Hic
etlons
Piston
diameter
mm
in
Servioe
standard
0
50
0
0197
Oversize
1
00
0
0394
oversize
3
The
size
to
which
cylinders
must
be
honed
is
determined
by
adding
piston
to
cylinder
clearance
to
the
largest
piston
diameter
at
piston
skirt
in
thrust
direction
EM126
Fig
EM
54
Measuring
piston
diamet
r
2
Determine
piston
oversize
ac
cording
to
amount
of
wear
of
cylinder
84
985
to
85
035
3
3459
to
3
3478
85
465
to
85
515
3
3648
to
3
3667
85
965
to
86
015
3
3844
to
3
3864
Standard
clearance
ffim
in
Feeler
gauge
mm
in
Extracting
force
kg
Ib
Notes
a
To
prevent
strain
due
to
cutting
heat
bore
the
cylinders
in
the
order
of
2
4
1
3
b
Before
boring
any
cylinder
install
main
bearing
caps
in
place
and
tighten
to
the
specification
so
that
the
crankshaft
bearing
bores
will
not
become
distorted
from
the
bor
ing
operation
4
Do
not
cut
too
much
out
of
cylinder
bore
at
a
time
Cut
only
0
05
mm
0
0020
in
or
so
in
diameter
at
a
time
EM
14
L
7
A
aboull
6
m
o
7323in
r
127
Fig
EM
55
MeCUJlJring
piston
skirt
diameter
Rebored
size
calculation
o
A
B
C
A
0
005
to
0
Q25
mm
0
0002
to
0
0010
in
where
D
Honed
diameter
A
Skirt
diameter
as
measured
B
Piston
to
wall
clearance
C
Machining
allowance
0
02
mm
0
0008
in
0
025
to
0
045
0
0010
to
0
0018
0
04
0
0016
0
2
to
1
5
O
44
to
3
31
5
Measurement
of
a
just
machined
cylinder
bore
requires
utmost
care
since
it
is
expanded
by
cutting
heat
6
As
a
final
step
cylinders
should
be
honed
to
size
7
Measure
the
finished
cylinder
bore
for
out
of
round
or
tapered
part
8
Measure
piston
to
cylinder
clear
ance
This
clearance
can
be
checked
easily
by
using
a
feeler
gauge
and
a
spring
balance
hooked
on
feeler
gauge
measuring
the
amount
of
force
re
quired
to
pull
gauge
out
from
between
piston
and
cylinder
Page 60 of 537

Engine
Mechanical
Notes
a
When
measuring
clearance
slowly
pull
feeier
gaUge
siraight
upward
b
It
Is
reConUnended
that
piston
and
cylinder
be
hel
ted
to
200C
680F
PISTONS
PISTON
PINS
AND
PISTON
RINGS
I
Remove
carbon
from
piston
and
ring
grooves
with
a
ca
bon
scraper
and
a
curved
steel
wire
Clean
out
oil
slots
in
bottom
land
of
oil
ring
groove
2
Check
for
damage
scratches
and
wear
Replace
if
necessary
3
Meas1
1re
side
clearance
of
rings
in
ring
grooves
as
each
ring
is
installed
Side
clearance
should
be
as
follows
00
I
EM542
Fig
EM
58
Measuring
ring
gap
Notes
a
When
piston
ring
only
is
to
be
replaced
without
cylinder
bore
being
corrected
measure
gap
at
bottom
of
cylinder
where
wear
is
minor
b
Oversize
piston
rings
are
available
for
serv
ce
Oversize
0
5
mm
0
0197
in
and
1
0
mm
0
0394
in
5
Measure
piston
pin
hole
in
rela
tion
to
outer
diameter
of
pin
If
wear
exceeds
limit
replace
each
piston
pin
together
with
the
piston
on
which
it
is
installed
6
Determine
the
fitting
of
piston
pin
into
piston
pin
hole
to
such
an
extent
that
it
can
be
finger
pressed
at
room
temperature
This
piston
pin
must
be
a
tight
pre
s
fit
into
connect
ing
rod
t
J
f
rr
11
1
I
EM541
Fig
EM
56
Measuring
piaton
fit
in
cylinder
Fig
EM
57
Measuring
piston
ring
side
clearance
Side
clearance
Unit
mm
in
I
Second
ring
I
I
Wear
limit
Standard
0
040
to
0
073
0
0016
to
0
0029
0
030
to
0
070
I
0
0012
to
0
0028
I
Top
ring
0
1
0
0039
Oil
ring
f
feeler
gauge
Ring
should
be
placed
to
diameter
at
upper
or
lower
limit
of
ring
travel
4
Push
ring
into
cylinder
with
pis
ton
so
as
to
place
it
squarely
in
cylinder
measure
ring
gap
with
a
EM131
Ring
gap
Fig
EM
59
Piston
pin
fitting
Unit
rom
in
Standard
Wear
limit
0
25
to
0
40
0
0098
to
0
0157
0
30
to
0
50
0
0
II
8
to
0
0197
Top
ring
Second
ring
1
0
0
0394
EM132
0
30
to
0
90
0
0118
to
0
0354
Oil
ring
Fig
EM
60
Measuring
pi
ton
pin
diamet
EM
15