DODGE RAM 2001 Service Repair Manual
Manufacturer: DODGE, Model Year: 2001, Model line: RAM, Model: DODGE RAM 2001Pages: 2889, PDF Size: 68.07 MB
Page 141 of 2889
DIFFERENTIAL
REMOVAL
(1) Raise and support vehicle.
(2) Remove lubricant fill hole plug from the differ-
ential housing cover.
(3) Remove differential housing cover and drain
the lubricant from the housing.
(4) Clean the housing cavity with a flushing oil,
light engine oil or lint free cloth.Do not use water,
steam, kerosene or gasoline for cleaning.
(5) Remove hub bearings and axle shafts.
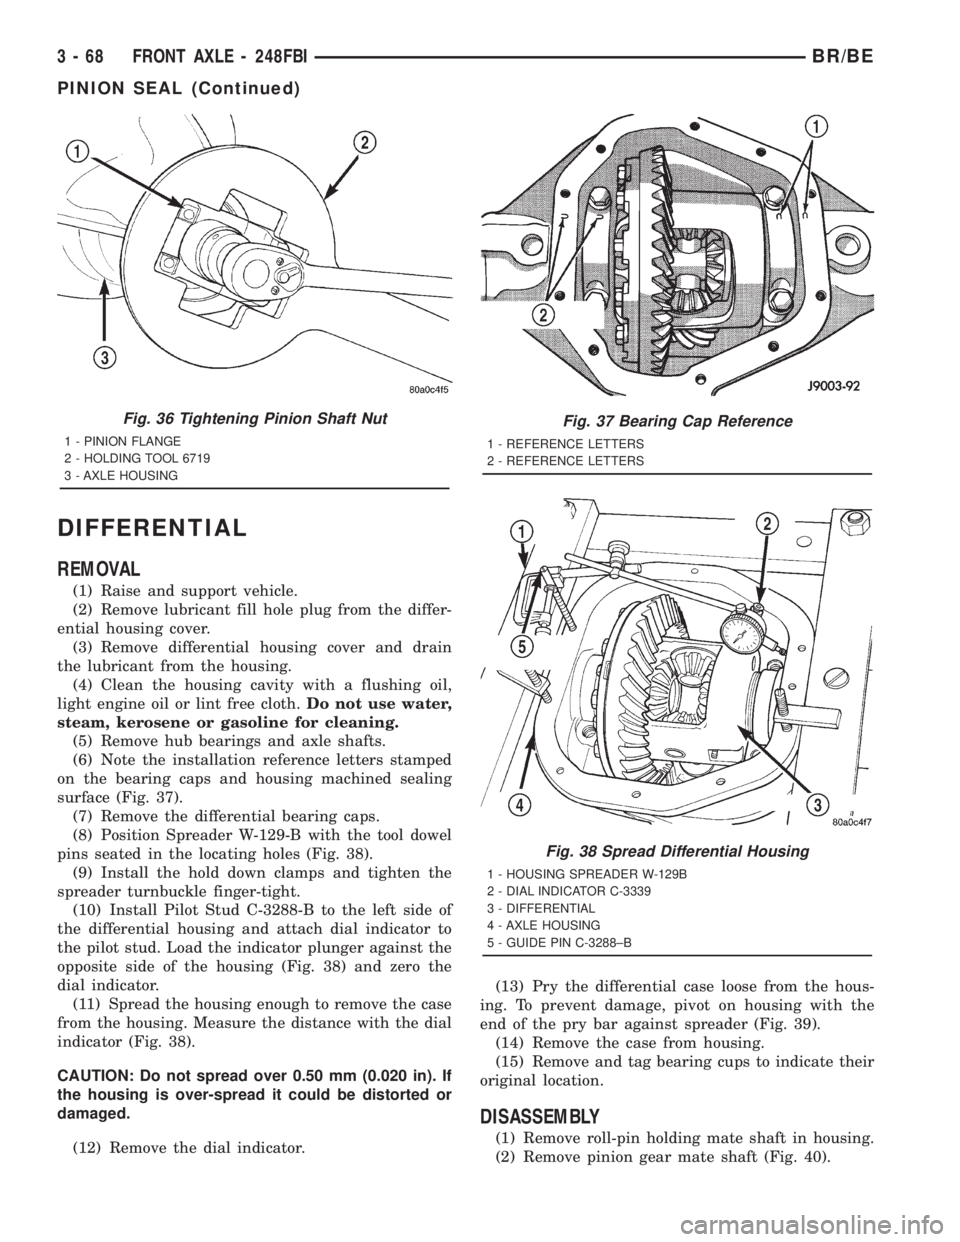
(6) Note the installation reference letters stamped
on the bearing caps and housing machined sealing
surface (Fig. 37).
(7) Remove the differential bearing caps.
(8) Position Spreader W-129-B with the tool dowel
pins seated in the locating holes (Fig. 38).
(9) Install the hold down clamps and tighten the
spreader turnbuckle finger-tight.
(10) Install Pilot Stud C-3288-B to the left side of
the differential housing and attach dial indicator to
the pilot stud. Load the indicator plunger against the
opposite side of the housing (Fig. 38) and zero the
dial indicator.
(11) Spread the housing enough to remove the case
from the housing. Measure the distance with the dial
indicator (Fig. 38).
CAUTION: Do not spread over 0.50 mm (0.020 in). If
the housing is over-spread it could be distorted or
damaged.
(12) Remove the dial indicator.(13) Pry the differential case loose from the hous-
ing. To prevent damage, pivot on housing with the
end of the pry bar against spreader (Fig. 39).
(14) Remove the case from housing.
(15) Remove and tag bearing cups to indicate their
original location.
DISASSEMBLY
(1) Remove roll-pin holding mate shaft in housing.
(2) Remove pinion gear mate shaft (Fig. 40).
Fig. 36 Tightening Pinion Shaft Nut
1 - PINION FLANGE
2 - HOLDING TOOL 6719
3 - AXLE HOUSING
Fig. 37 Bearing Cap Reference
1 - REFERENCE LETTERS
2 - REFERENCE LETTERS
Fig. 38 Spread Differential Housing
1 - HOUSING SPREADER W-129B
2 - DIAL INDICATOR C-3339
3 - DIFFERENTIAL
4 - AXLE HOUSING
5 - GUIDE PIN C-3288±B
3 - 68 FRONT AXLE - 248FBIBR/BE
PINION SEAL (Continued)
Page 142 of 2889
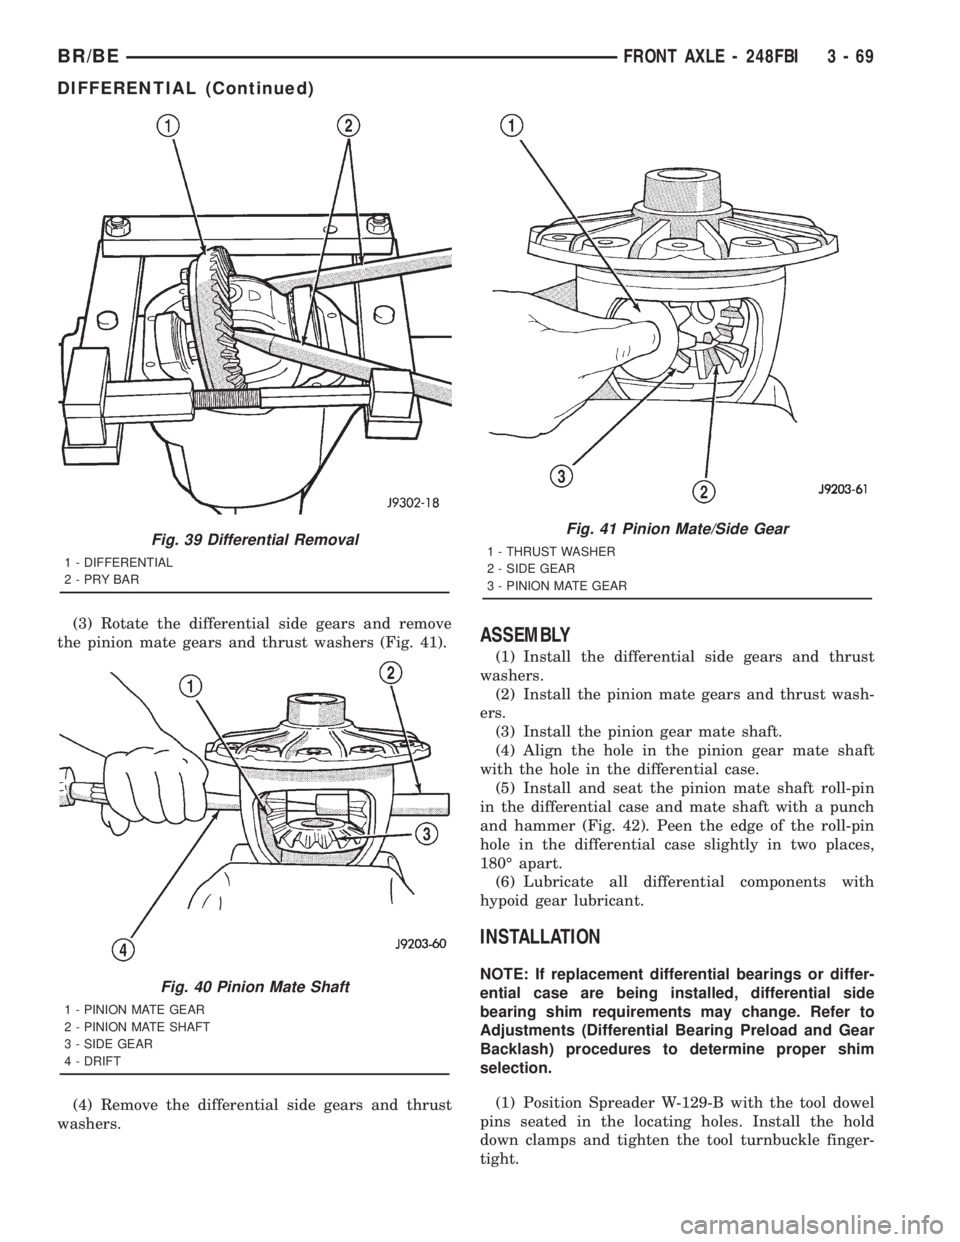
(3) Rotate the differential side gears and remove
the pinion mate gears and thrust washers (Fig. 41).
(4) Remove the differential side gears and thrust
washers.ASSEMBLY
(1) Install the differential side gears and thrust
washers.
(2) Install the pinion mate gears and thrust wash-
ers.
(3) Install the pinion gear mate shaft.
(4) Align the hole in the pinion gear mate shaft
with the hole in the differential case.
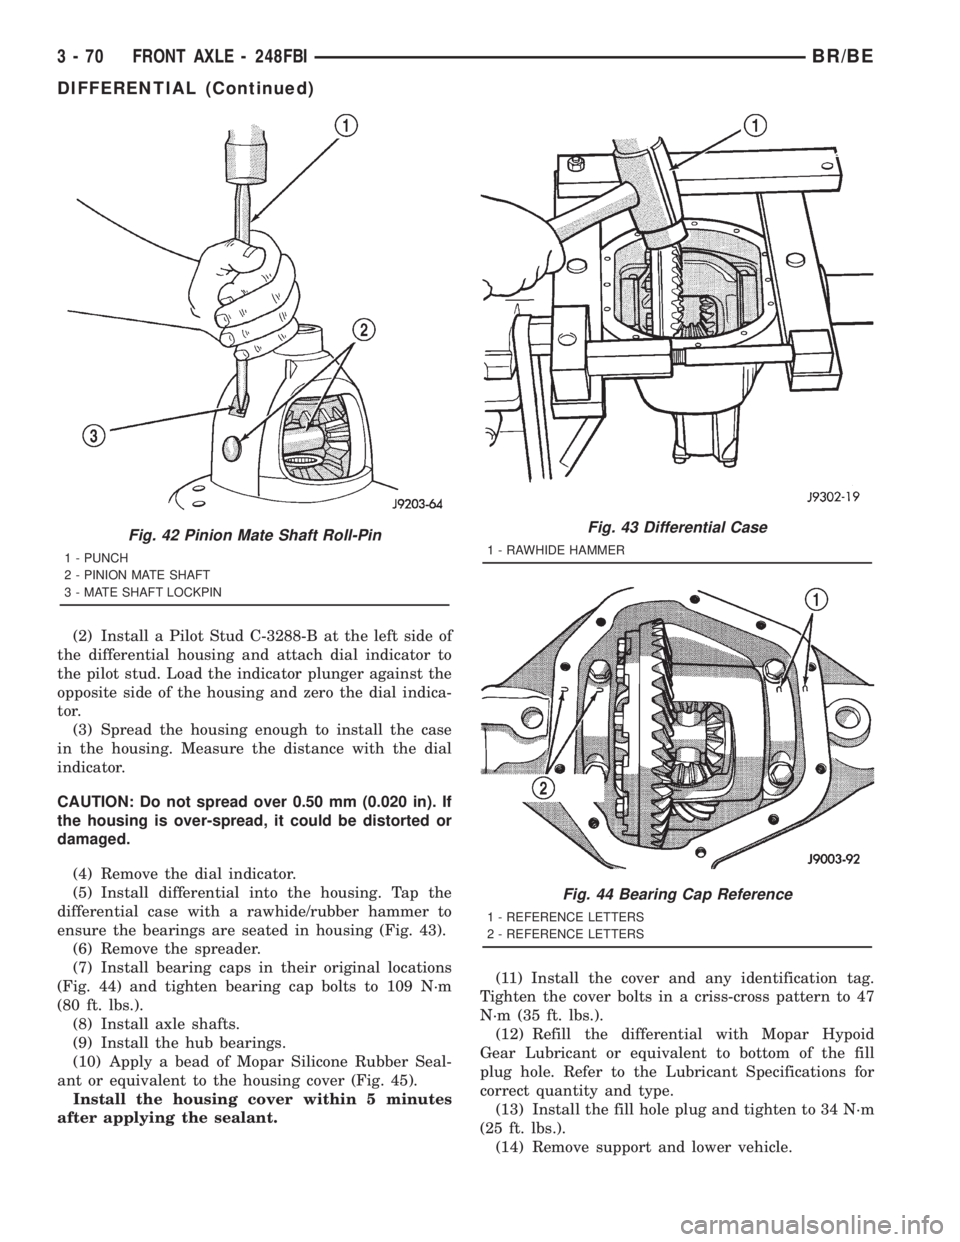
(5) Install and seat the pinion mate shaft roll-pin
in the differential case and mate shaft with a punch
and hammer (Fig. 42). Peen the edge of the roll-pin
hole in the differential case slightly in two places,
180É apart.
(6) Lubricate all differential components with
hypoid gear lubricant.
INSTALLATION
NOTE: If replacement differential bearings or differ-
ential case are being installed, differential side
bearing shim requirements may change. Refer to
Adjustments (Differential Bearing Preload and Gear
Backlash) procedures to determine proper shim
selection.
(1) Position Spreader W-129-B with the tool dowel
pins seated in the locating holes. Install the hold
down clamps and tighten the tool turnbuckle finger-
tight.
Fig. 39 Differential Removal
1 - DIFFERENTIAL
2-PRYBAR
Fig. 40 Pinion Mate Shaft
1 - PINION MATE GEAR
2 - PINION MATE SHAFT
3 - SIDE GEAR
4 - DRIFT
Fig. 41 Pinion Mate/Side Gear
1 - THRUST WASHER
2 - SIDE GEAR
3 - PINION MATE GEAR
BR/BEFRONT AXLE - 248FBI 3 - 69
DIFFERENTIAL (Continued)
Page 143 of 2889
(2) Install a Pilot Stud C-3288-B at the left side of
the differential housing and attach dial indicator to
the pilot stud. Load the indicator plunger against the
opposite side of the housing and zero the dial indica-
tor.
(3) Spread the housing enough to install the case
in the housing. Measure the distance with the dial
indicator.
CAUTION: Do not spread over 0.50 mm (0.020 in). If
the housing is over-spread, it could be distorted or
damaged.
(4) Remove the dial indicator.
(5) Install differential into the housing. Tap the
differential case with a rawhide/rubber hammer to
ensure the bearings are seated in housing (Fig. 43).
(6) Remove the spreader.
(7) Install bearing caps in their original locations
(Fig. 44) and tighten bearing cap bolts to 109 N´m
(80 ft. lbs.).
(8) Install axle shafts.
(9) Install the hub bearings.
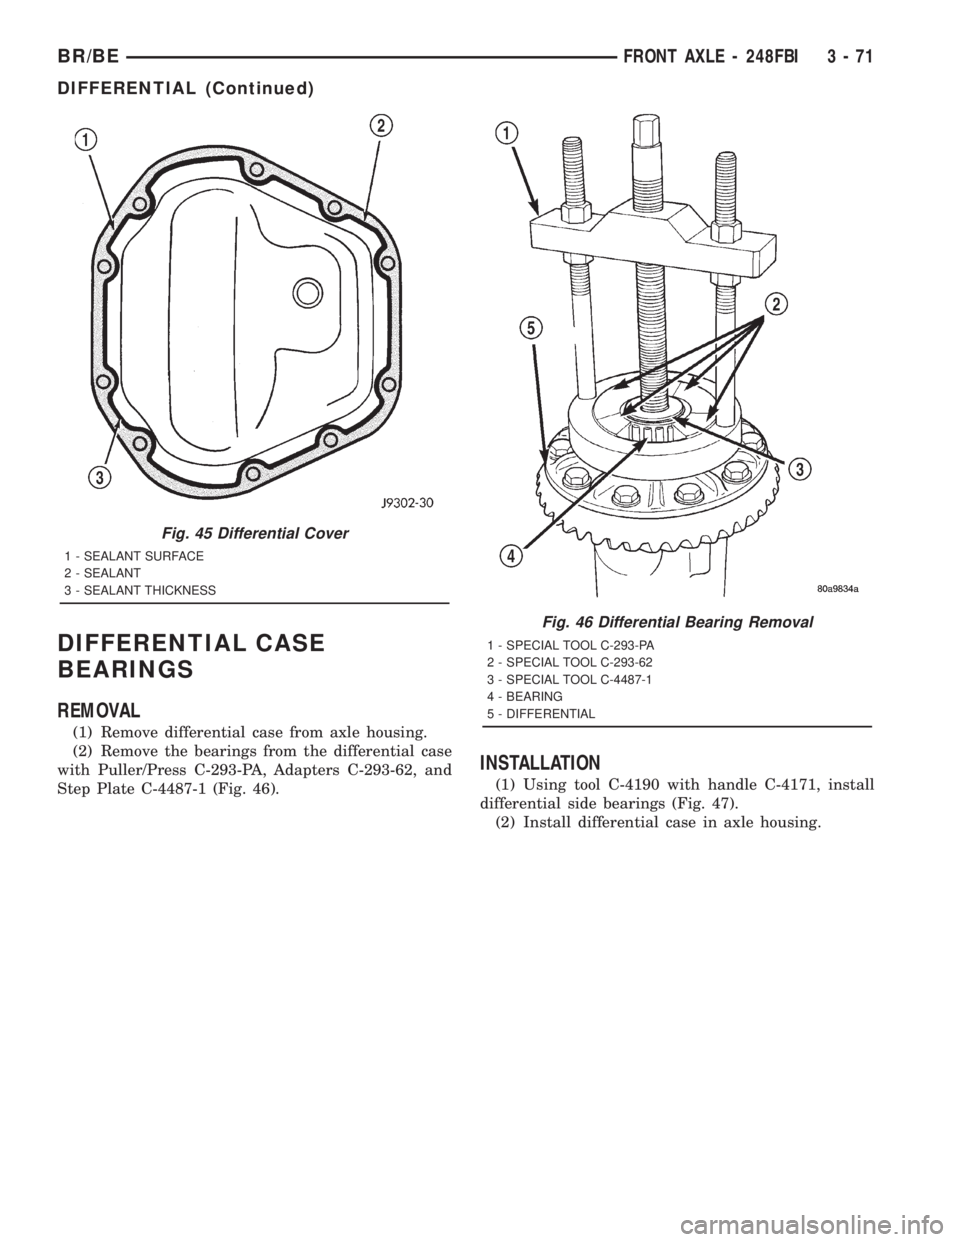
(10) Apply a bead of Mopar Silicone Rubber Seal-
ant or equivalent to the housing cover (Fig. 45).
Install the housing cover within 5 minutes
after applying the sealant.(11) Install the cover and any identification tag.
Tighten the cover bolts in a criss-cross pattern to 47
N´m (35 ft. lbs.).
(12) Refill the differential with Mopar Hypoid
Gear Lubricant or equivalent to bottom of the fill
plug hole. Refer to the Lubricant Specifications for
correct quantity and type.
(13) Install the fill hole plug and tighten to 34 N´m
(25 ft. lbs.).
(14) Remove support and lower vehicle.
Fig. 42 Pinion Mate Shaft Roll-Pin
1 - PUNCH
2 - PINION MATE SHAFT
3 - MATE SHAFT LOCKPIN
Fig. 43 Differential Case
1 - RAWHIDE HAMMER
Fig. 44 Bearing Cap Reference
1 - REFERENCE LETTERS
2 - REFERENCE LETTERS
3 - 70 FRONT AXLE - 248FBIBR/BE
DIFFERENTIAL (Continued)
Page 144 of 2889
DIFFERENTIAL CASE
BEARINGS
REMOVAL
(1) Remove differential case from axle housing.
(2) Remove the bearings from the differential case
with Puller/Press C-293-PA, Adapters C-293-62, and
Step Plate C-4487-1 (Fig. 46).
INSTALLATION
(1) Using tool C-4190 with handle C-4171, install
differential side bearings (Fig. 47).
(2) Install differential case in axle housing.
Fig. 45 Differential Cover
1 - SEALANT SURFACE
2 - SEALANT
3 - SEALANT THICKNESS
Fig. 46 Differential Bearing Removal
1 - SPECIAL TOOL C-293-PA
2 - SPECIAL TOOL C-293-62
3 - SPECIAL TOOL C-4487-1
4 - BEARING
5 - DIFFERENTIAL
BR/BEFRONT AXLE - 248FBI 3 - 71
DIFFERENTIAL (Continued)
Page 145 of 2889
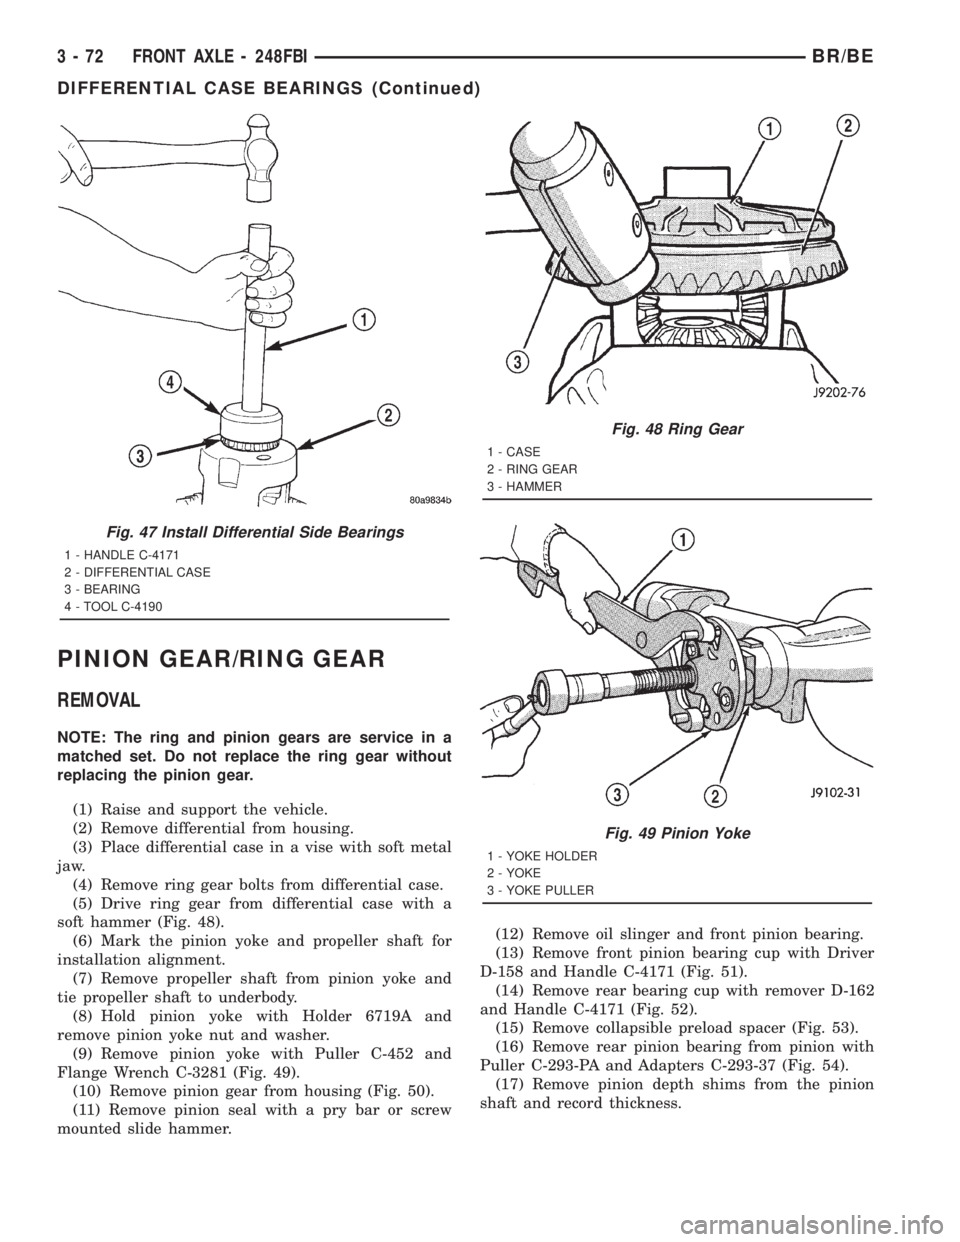
PINION GEAR/RING GEAR
REMOVAL
NOTE: The ring and pinion gears are service in a
matched set. Do not replace the ring gear without
replacing the pinion gear.
(1) Raise and support the vehicle.
(2) Remove differential from housing.
(3) Place differential case in a vise with soft metal
jaw.
(4) Remove ring gear bolts from differential case.
(5) Drive ring gear from differential case with a
soft hammer (Fig. 48).
(6) Mark the pinion yoke and propeller shaft for
installation alignment.
(7) Remove propeller shaft from pinion yoke and
tie propeller shaft to underbody.
(8) Hold pinion yoke with Holder 6719A and
remove pinion yoke nut and washer.
(9) Remove pinion yoke with Puller C-452 and
Flange Wrench C-3281 (Fig. 49).
(10) Remove pinion gear from housing (Fig. 50).
(11) Remove pinion seal with a pry bar or screw
mounted slide hammer.(12) Remove oil slinger and front pinion bearing.
(13) Remove front pinion bearing cup with Driver
D-158 and Handle C-4171 (Fig. 51).
(14) Remove rear bearing cup with remover D-162
and Handle C-4171 (Fig. 52).
(15) Remove collapsible preload spacer (Fig. 53).
(16) Remove rear pinion bearing from pinion with
Puller C-293-PA and Adapters C-293-37 (Fig. 54).
(17) Remove pinion depth shims from the pinion
shaft and record thickness.
Fig. 47 Install Differential Side Bearings
1 - HANDLE C-4171
2 - DIFFERENTIAL CASE
3 - BEARING
4 - TOOL C-4190
Fig. 48 Ring Gear
1 - CASE
2 - RING GEAR
3 - HAMMER
Fig. 49 Pinion Yoke
1 - YOKE HOLDER
2 - YOKE
3 - YOKE PULLER
3 - 72 FRONT AXLE - 248FBIBR/BE
DIFFERENTIAL CASE BEARINGS (Continued)
Page 146 of 2889
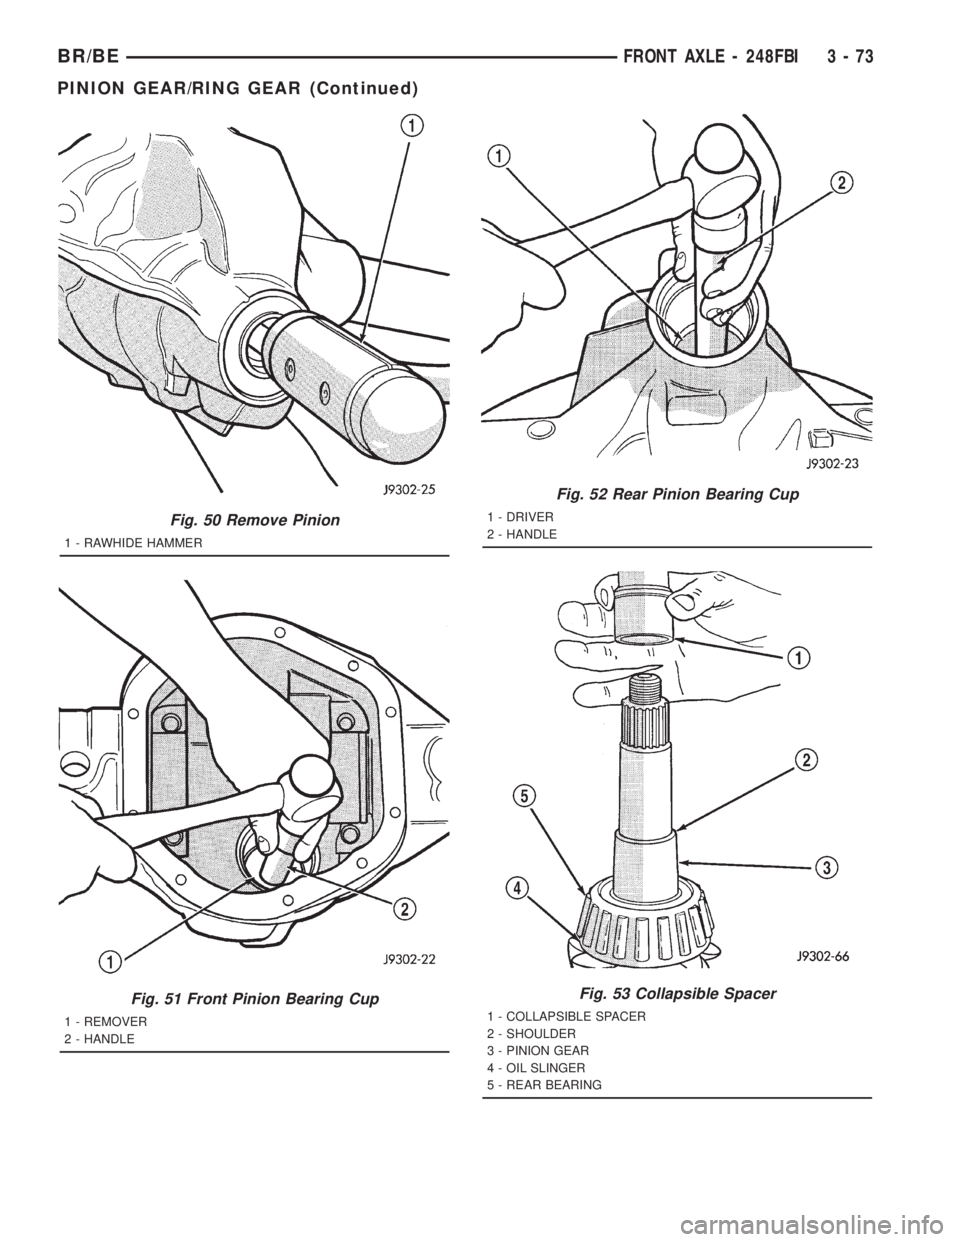
Fig. 50 Remove Pinion
1 - RAWHIDE HAMMER
Fig. 51 Front Pinion Bearing Cup
1 - REMOVER
2 - HANDLE
Fig. 52 Rear Pinion Bearing Cup
1 - DRIVER
2 - HANDLE
Fig. 53 Collapsible Spacer
1 - COLLAPSIBLE SPACER
2 - SHOULDER
3 - PINION GEAR
4 - OIL SLINGER
5 - REAR BEARING
BR/BEFRONT AXLE - 248FBI 3 - 73
PINION GEAR/RING GEAR (Continued)
Page 147 of 2889
INSTALLATION
NOTE: Pinion depth shims are placed between the
rear pinion bearing cone and pinion gear to achieve
proper ring and pinion gear mesh. If ring and pinion
gears are reused, the original pinion depth shim
can be used. Refer to Adjustments (Pinion Gear
Depth) to select the proper shim thickness if ring
and pinion gears are replaced.
(1) Apply Mopar Door Ease stick lubricant to out-
side surface of bearing cups.
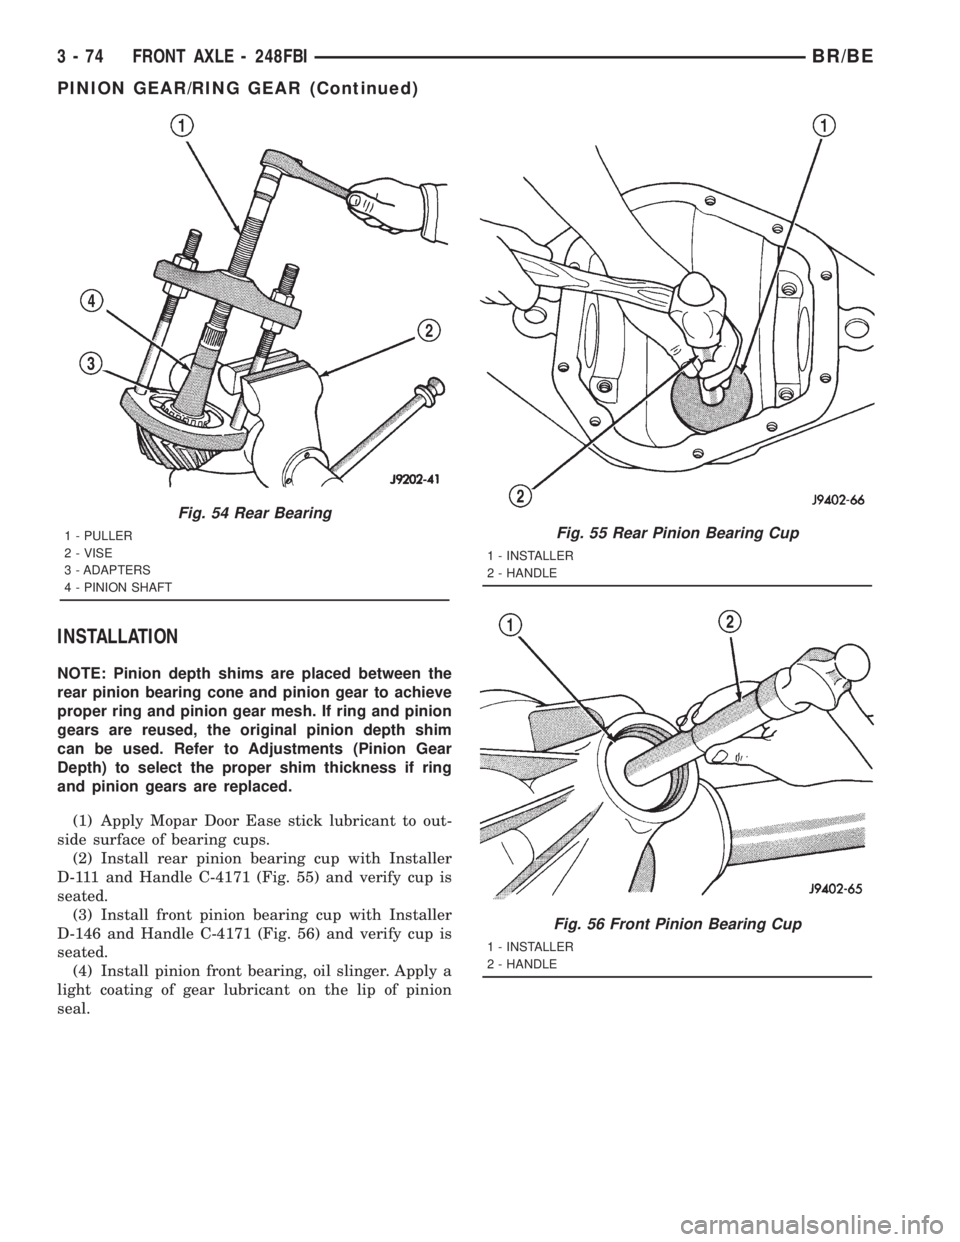
(2) Install rear pinion bearing cup with Installer
D-111 and Handle C-4171 (Fig. 55) and verify cup is
seated.
(3) Install front pinion bearing cup with Installer
D-146 and Handle C-4171 (Fig. 56) and verify cup is
seated.
(4) Install pinion front bearing, oil slinger. Apply a
light coating of gear lubricant on the lip of pinion
seal.
Fig. 54 Rear Bearing
1 - PULLER
2 - VISE
3 - ADAPTERS
4 - PINION SHAFTFig. 55 Rear Pinion Bearing Cup
1 - INSTALLER
2 - HANDLE
Fig. 56 Front Pinion Bearing Cup
1 - INSTALLER
2 - HANDLE
3 - 74 FRONT AXLE - 248FBIBR/BE
PINION GEAR/RING GEAR (Continued)
Page 148 of 2889
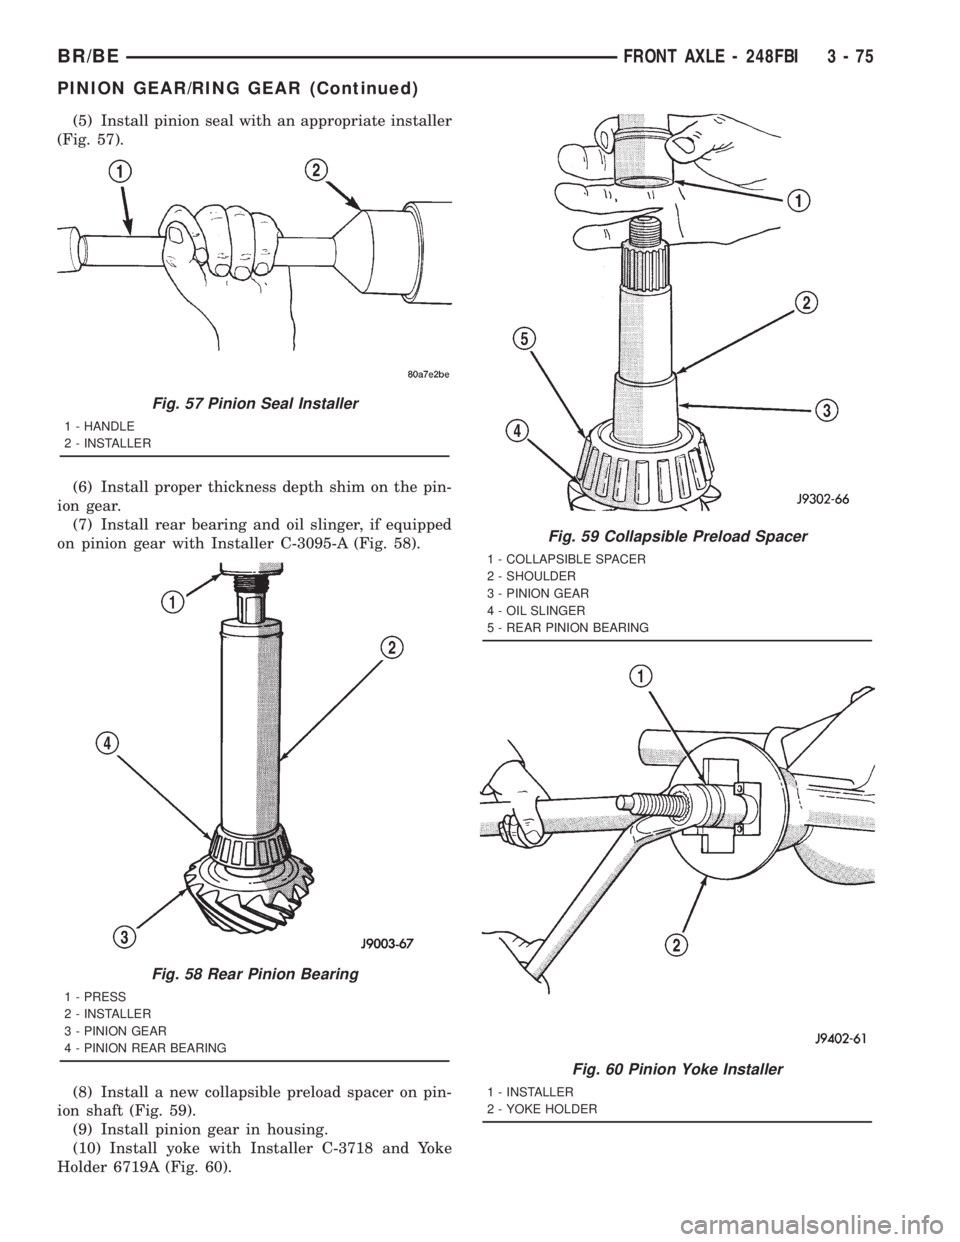
(5) Install pinion seal with an appropriate installer
(Fig. 57).
(6) Install proper thickness depth shim on the pin-
ion gear.
(7) Install rear bearing and oil slinger, if equipped
on pinion gear with Installer C-3095-A (Fig. 58).
(8) Install a new collapsible preload spacer on pin-
ion shaft (Fig. 59).
(9) Install pinion gear in housing.
(10) Install yoke with Installer C-3718 and Yoke
Holder 6719A (Fig. 60).
Fig. 57 Pinion Seal Installer
1 - HANDLE
2 - INSTALLER
Fig. 58 Rear Pinion Bearing
1 - PRESS
2 - INSTALLER
3 - PINION GEAR
4 - PINION REAR BEARING
Fig. 59 Collapsible Preload Spacer
1 - COLLAPSIBLE SPACER
2 - SHOULDER
3 - PINION GEAR
4 - OIL SLINGER
5 - REAR PINION BEARING
Fig. 60 Pinion Yoke Installer
1 - INSTALLER
2 - YOKE HOLDER
BR/BEFRONT AXLE - 248FBI 3 - 75
PINION GEAR/RING GEAR (Continued)
Page 149 of 2889
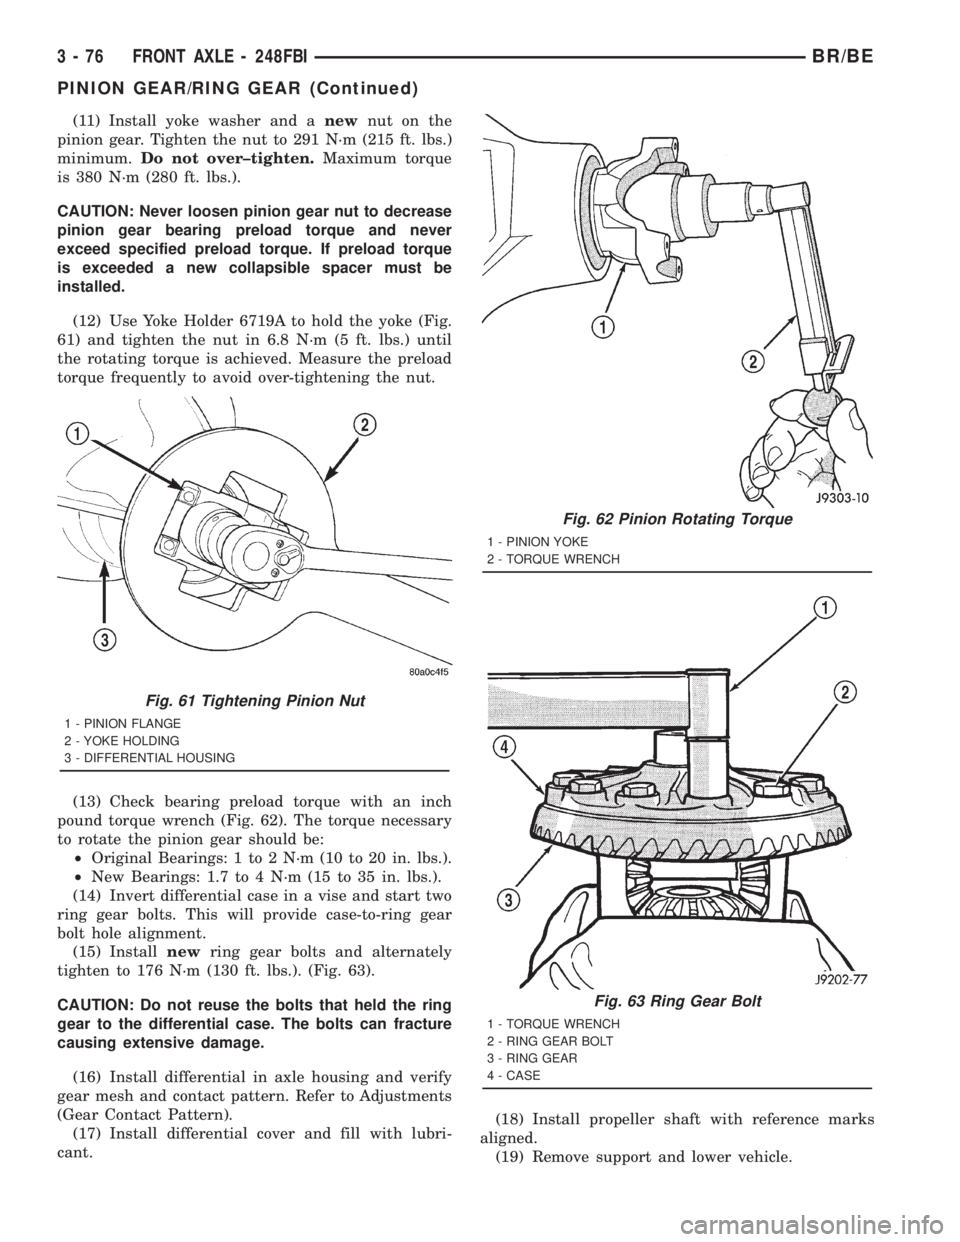
(11) Install yoke washer and anewnut on the
pinion gear. Tighten the nut to 291 N´m (215 ft. lbs.)
minimum.Do not over±tighten.Maximum torque
is 380 N´m (280 ft. lbs.).
CAUTION: Never loosen pinion gear nut to decrease
pinion gear bearing preload torque and never
exceed specified preload torque. If preload torque
is exceeded a new collapsible spacer must be
installed.
(12) Use Yoke Holder 6719A to hold the yoke (Fig.
61) and tighten the nut in 6.8 N´m (5 ft. lbs.) until
the rotating torque is achieved. Measure the preload
torque frequently to avoid over-tightening the nut.
(13) Check bearing preload torque with an inch
pound torque wrench (Fig. 62). The torque necessary
to rotate the pinion gear should be:
²Original Bearings: 1 to 2 N´m (10 to 20 in. lbs.).
²New Bearings: 1.7 to 4 N´m (15 to 35 in. lbs.).
(14) Invert differential case in a vise and start two
ring gear bolts. This will provide case-to-ring gear
bolt hole alignment.
(15) Installnewring gear bolts and alternately
tighten to 176 N´m (130 ft. lbs.). (Fig. 63).
CAUTION: Do not reuse the bolts that held the ring
gear to the differential case. The bolts can fracture
causing extensive damage.
(16) Install differential in axle housing and verify
gear mesh and contact pattern. Refer to Adjustments
(Gear Contact Pattern).
(17) Install differential cover and fill with lubri-
cant.(18) Install propeller shaft with reference marks
aligned.
(19) Remove support and lower vehicle.
Fig. 61 Tightening Pinion Nut
1 - PINION FLANGE
2 - YOKE HOLDING
3 - DIFFERENTIAL HOUSING
Fig. 62 Pinion Rotating Torque
1 - PINION YOKE
2 - TORQUE WRENCH
Fig. 63 Ring Gear Bolt
1 - TORQUE WRENCH
2 - RING GEAR BOLT
3 - RING GEAR
4 - CASE
3 - 76 FRONT AXLE - 248FBIBR/BE
PINION GEAR/RING GEAR (Continued)
Page 150 of 2889
REAR AXLE-91/4
TABLE OF CONTENTS
page page
REAR AXLE-91/4
DESCRIPTION...........................77
OPERATION.............................77
DIAGNOSIS AND TESTING.................80
AXLE................................80
REMOVAL..............................83
INSTALLATION...........................84
ADJUSTMENTS..........................84
SPECIFICATIONS........................90
SPECIAL TOOLS.........................90
AXLE SHAFTS
REMOVAL..............................93
INSTALLATION...........................93
AXLE SHAFT SEALS
REMOVAL..............................94
INSTALLATION...........................94
AXLE BEARINGS
REMOVAL..............................94
INSTALLATION...........................95PINION SEAL
REMOVAL..............................95
INSTALLATION...........................95
DIFFERENTIAL
REMOVAL..............................96
DISASSEMBLY...........................97
ASSEMBLY.............................98
INSTALLATION...........................98
DIFFERENTIAL - TRAC-LOK
DIAGNOSIS AND TESTING.................98
TRAC-LOK............................98
DISASSEMBLY...........................99
ASSEMBLY............................101
DIFFERENTIAL CASE BEARINGS
REMOVAL.............................103
INSTALLATION..........................103
PINION GEAR/RING GEAR/TONE RING
REMOVAL.............................103
INSTALLATION..........................105
REAR AXLE-91/4
DESCRIPTION
The 9 1/4 Inch axle housings consist of a cast iron
center section with axle tubes extending from either
side. The tubes are pressed into and welded to the
differential housing to form a one-piece axle housing
(Fig. 1).
The axles have a vent hose to relieve internal pres-
sure caused by lubricant vaporization and internal
expansion.
The axles are equipped with semi-floating axle
shafts, meaning vehicle loads are supported by the
axle shaft and bearings. The axle shafts are retained
by C-locks in the differential side gears.
The removable, stamped steel cover provides a
means for inspection and service without removing
the complete axle from the vehicle.
The axle has a date tag and a gear ratio tag. The
tags are attached to the differential housing by a
cover bolt.
The rear wheel anti-lock (RWAL) brake speed sen-
sor is attached to the top, forward exterior of the dif-
ferential housing. A seal is located between the
sensor and the wire harness connector. The seal must
be in place when the wire connector is connected to
the sensor. The RWAL brake exciter ring is press-fit-ted onto the differential case against the ring gear
flange.
The differential case is a one-piece design. The dif-
ferential pinion shaft is retained with a screw. Differ-
ential bearing preload and ring gear backlash are set
and maintained by threaded adjusters at the outside
of the differential housing. Pinion bearing preload is
set and maintained by the use of a collapsible spacer.
Axles equipped with a Trac-Lokydifferential are
optional. A differential has a one-piece differential
case, and the same internal components as a stan-
dard differential, plus two clutch disc packs.
AXLE IDENTIFICATION
The axle differential cover can be used for identifi-
cation of the axle (Fig. 2). A ratio tag is attached to
the top of the differential cover.
OPERATION
The axle receives power from the transmission/
transfer case through the rear propeller shaft. The
rear propeller shaft is connected to the drive pinion
which rotates the differential through the gear mesh
with the ring gear bolted to the differential case. The
engine power is transmitted to the axle shafts
through the differential pinions and side gears. The
side gears are splined to the axle shafts.
BR/BEREAR AXLE - 9 1/4 3 - 77