DODGE TRUCK 1993 Service Repair Manual
Manufacturer: DODGE, Model Year: 1993, Model line: TRUCK, Model: DODGE TRUCK 1993Pages: 1502, PDF Size: 80.97 MB
Page 331 of 1502
8A
- 10
ELECTRICAL
•
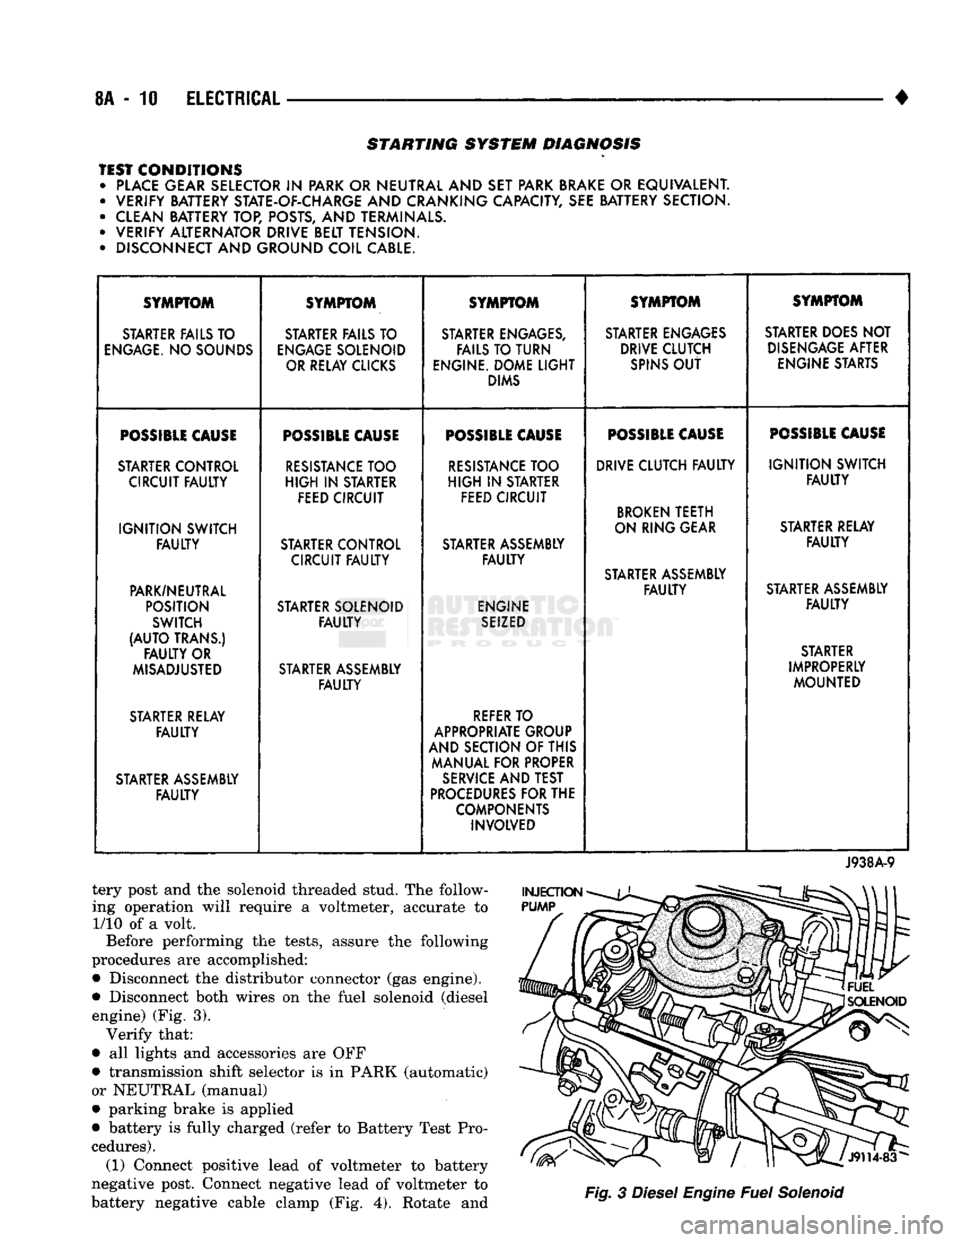
STARTING SYSTEM DIAGNOSIS
TEST CONDITIONS • PLACE GEAR SELECTOR
IN
PARK OR NEUTRAL AND SET PARK BRAKE
OR
EQUIVALENT. • VERIFY BATTERY STATE-OF-CHARGE AND CRANKING CAPACITY, SEE BATTERY SECTION.
• CLEAN BATTERY TOP, POSTS, AND TERMINALS.
• VERIFY ALTERNATOR DRIVE BELT TENSION.
• DISCONNECT AND GROUND COIL CABLE. SYMPTOM
SYMPTOM SYMPTOM SYMPTOM SYMPTOM
STARTER FAILS TO STARTER FAILS TO STARTER ENGAGES, STARTER ENGAGES STARTER DOES NOT
ENGAGE.
NO SOUNDS
ENGAGE
SOLENOID FAILS TO TURN DRIVE CLUTCH
DISENGAGE
AFTER
OR RELAY CLICKS ENGINE. DOME
LIGHT
SPINS
OUT
ENGINE STARTS
DIMS
POSSIBLE
CAUSE
POSSIBLE
CAUSE
POSSIBLE
CAUSE
POSSIBLE
CAUSE
POSSIBLE
CAUSE
STARTER CONTROL
RESISTANCE
TOO
RESISTANCE
TOO DRIVE CLUTCH
FAULTY
IGNITION
SWITCH
CIRCUIT
FAULTY
HIGH
IN
STARTER
HIGH
IN
STARTER
FAULTY
FEED CIRCUIT FEED CIRCUIT
BROKEN
TEETH
IGNITION
SWITCH ON RING GEAR
STARTER RELAY
FAULTY
STARTER CONTROL STARTER ASSEMBLY
FAULTY
CIRCUIT
FAULTY FAULTY
STARTER ASSEMBLY
PARK/NEUTRAL
FAULTY
STARTER ASSEMBLY
POSITION STARTER SOLENOID ENGINE
FAULTY
SWITCH
FAULTY
SEIZED
(AUTO
TRANS.) STARTER
FAULTY
OR STARTER
MISADJUSTED STARTER ASSEMBLY IMPROPERLY
FAULTY
MOUNTED
STARTER RELAY
REFER
TO
FAULTY
APPROPRIATE GROUP
AND SECTION OF THIS
MANUAL FOR PROPER
STARTER ASSEMBLY
SERVICE
AND TEST
FAULTY
PROCEDURES
FOR THE
COMPONENTS INVOLVED
J938A-9
tery post and the solenoid threaded stud. The follow
ing operation will require a voltmeter, accurate to 1/10 of a volt.
Before performing the tests, assure the following
procedures are accomplished:
•
Disconnect the distributor connector (gas engine).
•
Disconnect both wires on the fuel solenoid (diesel engine) (Fig. 3). Verify that:
•
all lights and accessories are OFF
•
transmission shift selector is in PARK (automatic)
or NEUTRAL (manual)
•
parking brake is applied
•
battery is fully charged (refer to Battery Test Pro
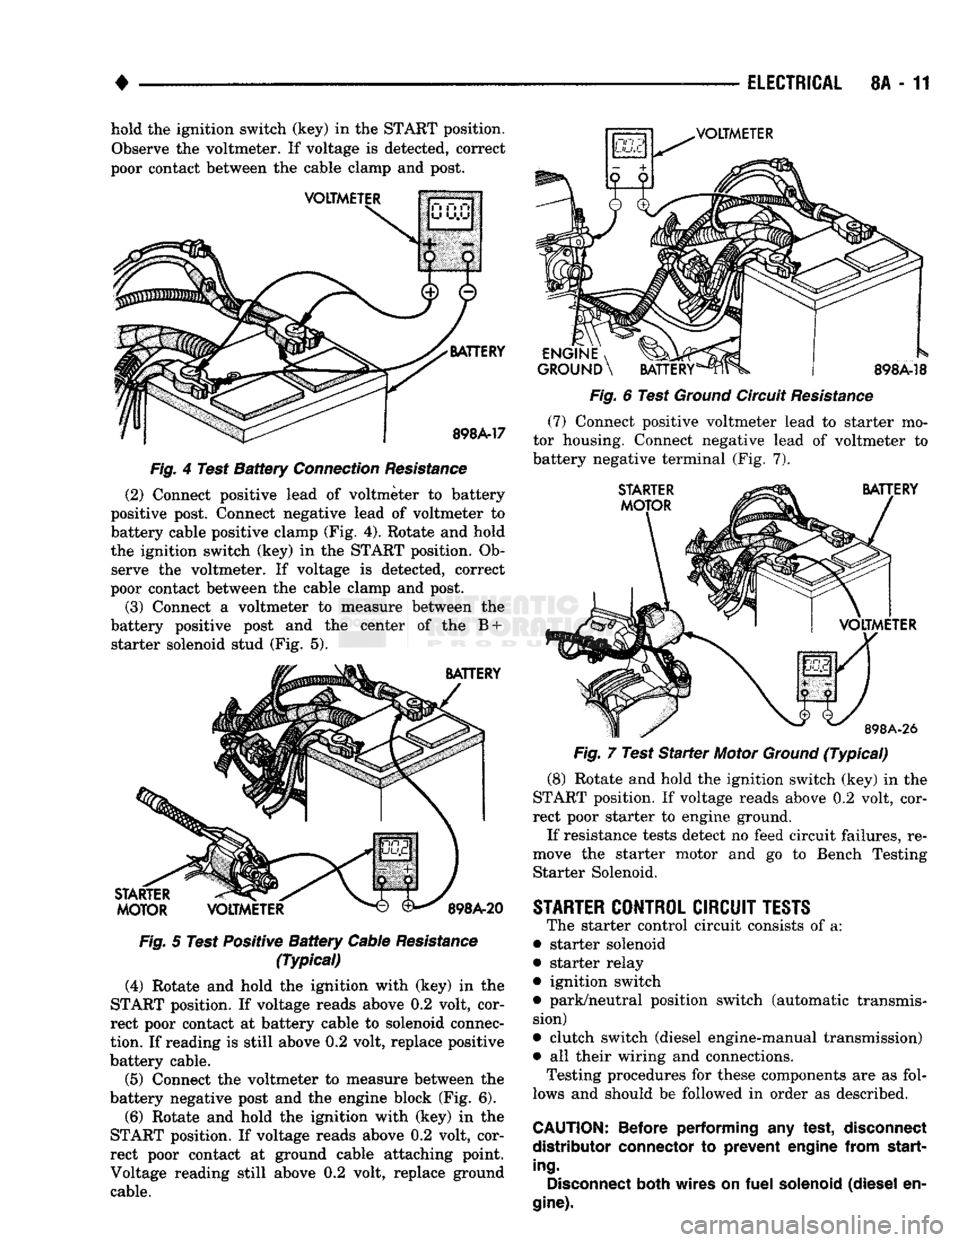
cedures). (1) Connect positive lead of voltmeter to battery
negative post. Connect negative lead of voltmeter to
battery negative cable clamp (Fig. 4). Rotate and
Fig.
3
Diesel
Engine
Fuel
Solenoid
Page 332 of 1502
•
ELECTRICAL
8A - 11 hold the ignition switch (key) in the START position.
Observe the voltmeter. If voltage is detected, correct
poor contact between the cable clamp and post.
VOLTMETER
VOLTMETER
BATTERY
898A-17
Fig.
4 Test
Battery
Connection
Resistance
(2) Connect positive lead of voltmeter to battery
positive post. Connect negative lead of voltmeter to
battery cable positive clamp (Fig. 4). Rotate and hold
the ignition switch (key) in the START position. Ob serve the voltmeter. If voltage is detected, correct
poor contact between the cable clamp and post.
(3) Connect a voltmeter to measure between the
battery positive post and the center of the B + starter solenoid stud (Fig. 5).
BATTERY
STARTER
MOTOR
VOLTMETER
898A-20
Fig.
5 Test Positive
Battery
Cable
Resistance
(Typical)
(4) Rotate and hold the ighition with (key) in the
START position. If voltage reads above 0.2 volt, cor
rect poor contact at battery cable to solenoid connec
tion.
If reading is still above 0.2 volt, replace positive
battery cable.
(5) Connect the voltmeter to measure between the
battery negative post and the engine block (Fig. 6).
(6) Rotate and hold the ignition with (key) in the
START position. If voltage reads above 0.2 volt, cor
rect poor contact at ground cable attaching point.
Voltage reading still above 0.2 volt, replace ground cable.
ENGINE
, ^J^P
GROUND
\
BATTERY
898A-18
Fig.
6 Test
Ground
Circuit
Resistance
(7)
Connect positive voltmeter lead to starter mo
tor housing. Connect negative lead of voltmeter to
battery negative terminal (Fig. 7).
STARTER
MOTOR
BATTERY
VOLTMETER
898A-26
Fig.
7 Test
Starter
Motor
Ground
(Typical)
(8) Rotate and hold the ignition switch (key) in the
START position. If voltage reads above 0.2 volt, cor
rect poor starter to engine ground.
If resistance tests detect no feed circuit failures, re
move the starter motor and go to Bench Testing Starter Solenoid.
STARTER
CONTROL
CIRCUIT
TESTS
The starter control circuit consists of a:
• starter solenoid
• starter relay
• ignition switch
• park/neutral position switch (automatic transmis sion)
• clutch switch (diesel engine-manual transmission)
• all their wiring and connections.
Testing procedures for these components are as fol
lows and should be followed in order as described.
CAUTION:
Before
performing
any
test,
disconnect
distributor
connector
to
prevent
engine
from
start
ing.
Disconnect
both
wires
on
fuel
solenoid
(diesel
en
gine).
Page 333 of 1502
8A
- 12
ELECTRICAL
•
ENGINE
STARTER
RELAY
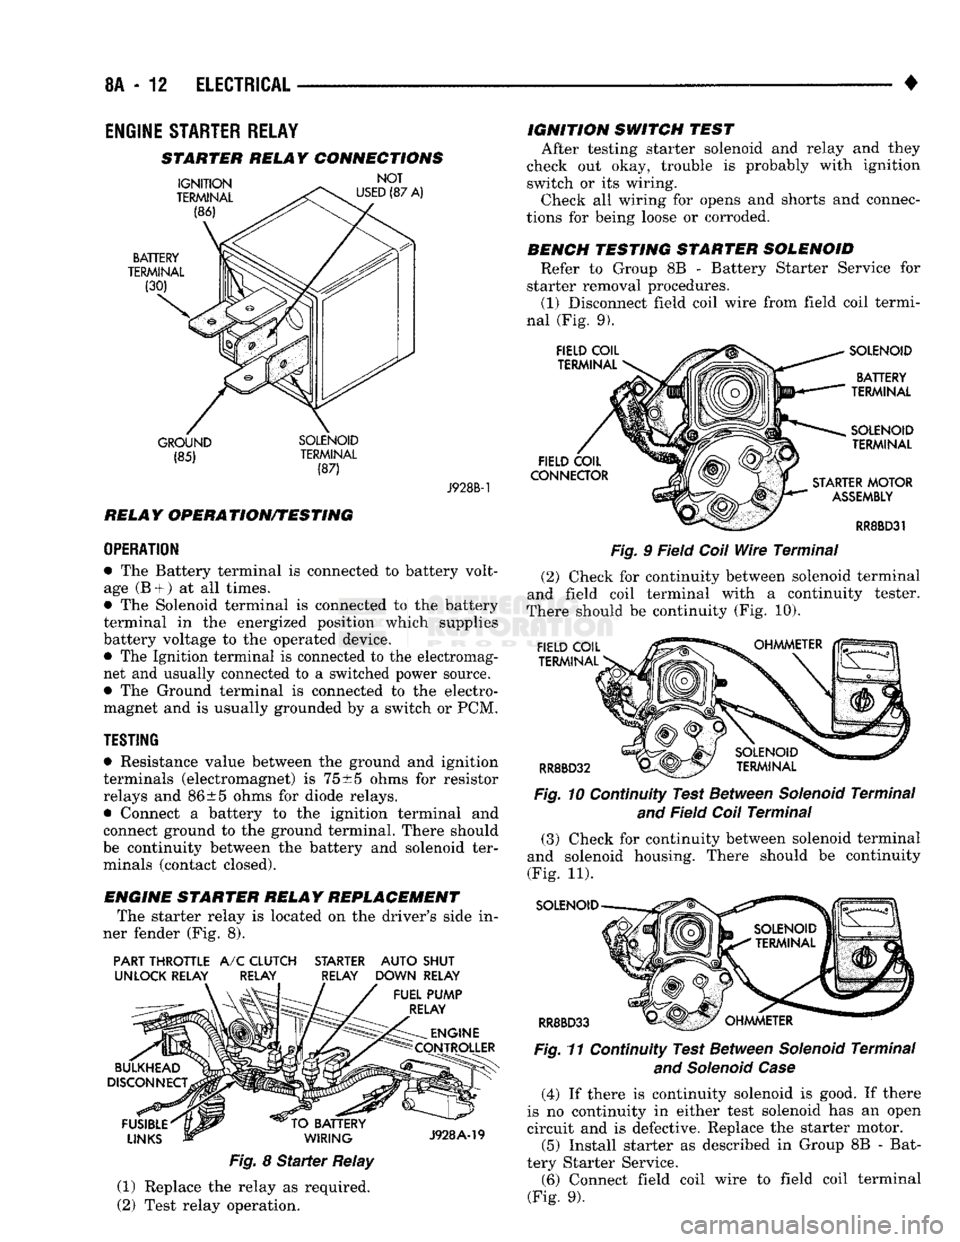
STARTER RELAY CONNECTIONS
GROUND SOLENOID (85) TERMINAL
(87) J928B-1
RELAY OPERATION/TESTING
OPERATION
• The Battery terminal is connected to battery volt
age (B +
)
at all times.
• The Solenoid terminal is connected to the battery
terminal in the energized position which supplies
battery voltage to the operated device. • The Ignition terminal is connected to the electromag
net and usually connected to a switched power source.
• The Ground terminal is connected to the electro
magnet and is usually grounded by a switch or PCM.
TESTING
• Resistance value between the ground and ignition
terminals (electromagnet) is
75
±5 ohms for resistor
relays and 86±5 ohms for diode relays.
• Connect a battery to the ignition terminal and
connect ground to the ground terminal. There should
be continuity between the battery and solenoid ter minals (contact closed).
ENGINE STARTER RELAY REPLACEMENT The starter relay is located on the driver's side in
ner fender (Fig. 8).
PART THROTTLE
A/C
CLUTCH STARTER AUTO SHUT
UNLOCK RELAY RELAY RELAY DOWN RELAY
Fig.
8
Starter
Relay
(1) Replace the relay as required.
(2) Test relay operation. IGNITION SWITCH TEST
After testing starter solenoid and relay and they
check out okay, trouble is probably with ignition
switch or its wiring. Check all wiring for opens and shorts and connec
tions for being loose or corroded.
BENCH TESTING STARTER SOLENOID Refer to Group 8B - Battery Starter Service for
starter removal procedures. (1) Disconnect field coil wire from field coil termi
nal (Fig. 9).
Fig.
9 Field
Coil
Wire
Terminal
(2) Check for continuity between solenoid terminal
and field coil terminal with a continuity tester.
There should be continuity (Fig. 10).
Fig.
10 Continuity Test Between
Solenoid
Terminal
and
Field
Coil
Terminal
(3) Check for continuity between solenoid terminal
and solenoid housing. There should be continuity
(Fig. 11).
SOLENOID
RR8BD33 Fig.
11 Continuity Test Between
Solenoid
Terminal
and Solenoid Case
(4) If there is continuity solenoid is good. If there
is no continuity in either test solenoid has an open
circuit and is defective. Replace the starter motor. (5) Install starter as described in Group 8B - Bat
tery Starter Service. (6) Connect field coil wire to field coil terminal
(Fig. 9).
Page 334 of 1502
•
ELECTRICAL
8A - 13 GENERATOR TEST PROCEDURES ON
VEHICLE
INDEX
page
Current
Output
Test
......................
14
Diagnostic Procedures
13
General
Information
13
Generator
Output
Wire Resistance Test
.......
13
page
How
to
Use
Malfunction
Indicator
(Check Engine) Lamp
for
Fault
Codes
17
Operational Check
with
Voltmeter
............
13
Using
On-Board Diagnostic System
15
GENERAL
INFORMATION
The generator
is
belt-driven
by the
engine.
All en
gines
use
serpentine drive. The amount
of DC
current produced
by the
gener
ator
is
controlled
by the
Powertrain Control Module (PCM).
All vehicles
are
equipped with
On
Board Diagnos
tics (OBD).
All OBD
sensing systems
are
monitored
by
the PCM. The PCM
will store
in
electronic mem ory
any
detectable failure within
the
monitored cir
cuits.
Refer
to
USING ON-BOARD DIAGNOSTIC SYSTEM
in
this group
for
more information.
OPERATIONAL CHECK
WITH
VOLTMETER
When
the
ignition switch
is
turned
to the RUN po
sition, battery potential will register
on the
voltme
ter. During engine cranking
a
lower voltage will appear
on the
meter. With
the
engine running,
a
voltage reading higher than
the
first reading (igni
tion
in RUN)
should register.
DIAGNOSTIC PROCEDURES
If
the
indicator does
not
operate properly,
or if an
undercharged
or
overcharged battery condition
oc
curs,
the
following procedures
may be
used
to
diag
nose
the
charging system. Remember that
an
undercharged battery
is
often
caused
by:
• accessories being left
on
overnight
•
or by a
defective switch which allows
a
bulb, such
as a
trunk
or
glove
box
light,
to
stay
on
(refer
to
Ignition
Off
Draw).
WISUAL
INSPECTION
• Inspect condition
of
battery cable terminals, bat
tery posts, connections
at
engine block, starter motor solenoid
and
relay. They should
be
clean
and
tight.
Repair
as
required.
• Inspect
all
fuses
in the
fuse block
for
tightness
in
receptacles. They should
be
properly installed
and
tight. Repair
or
replace
as
required.
• Inspect generator mounting bolts
for
tightness.
Re
place
or
torque bolt
as
required (refer
to
Torque Specifications).
• Inspect generator drive belt condition
and
tension.
Tension
or
replace belt
as
required. Refer
to
Belt
Tension Specifications. • Inspect connection
at
generator
B+
output.
It
should
be
clean
and
tight. Repair
as
required.
GENERATOR
OUTPUT
WIRE RESISTANCE TEST
(FIG.
1)
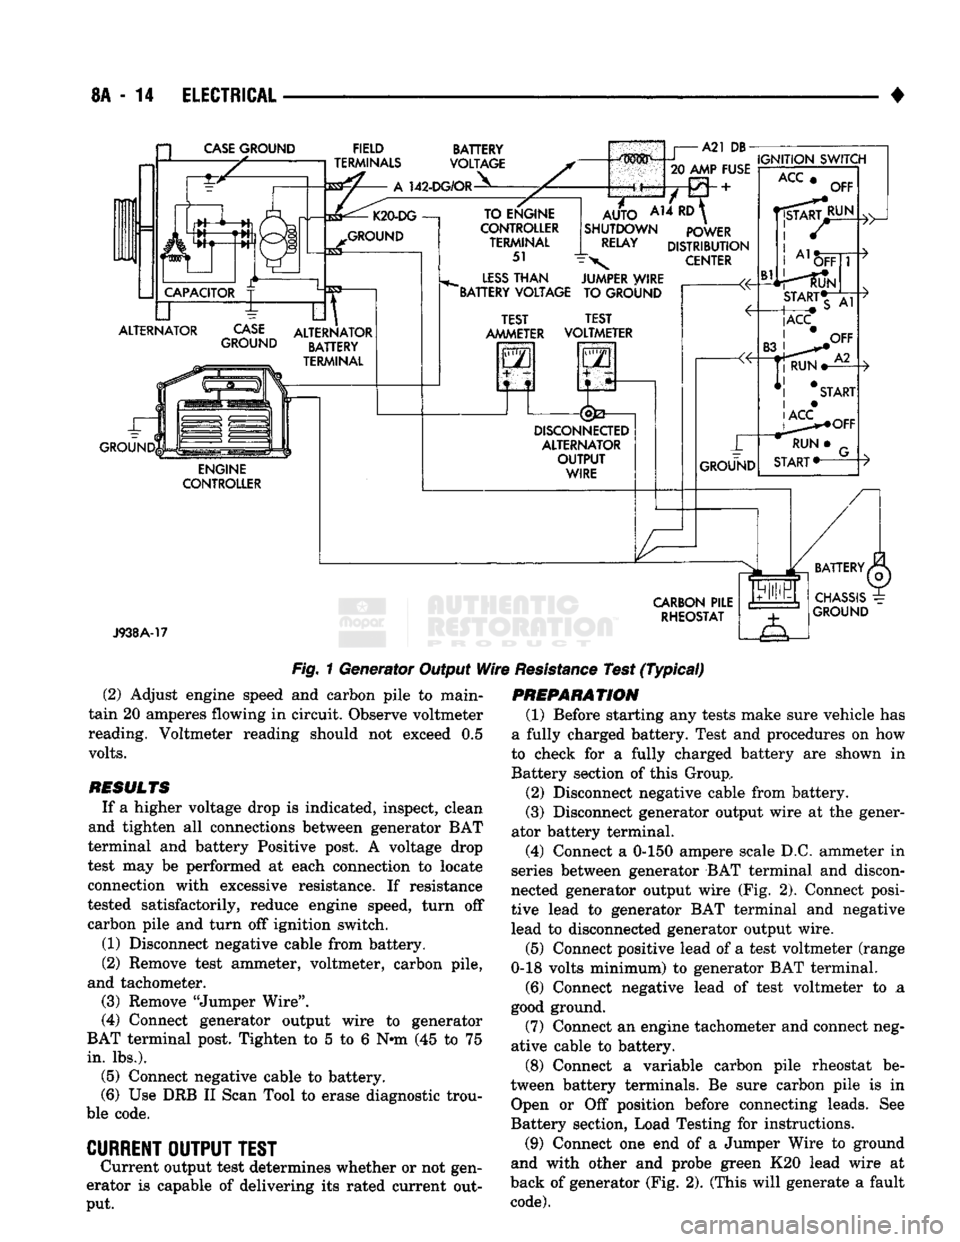
Generator output wire resistance test will show
amount
of
voltage drop across generator output wire
between generator
BAT
terminal
and
battery posi tive post.
PREPARATION
(1) Before starting test make sure vehicle
has a
fully charged battery. Test
and
procedures
on how to
check
for a
fully charged battery
are
shown
in
Bat
tery section
of
this Group.
(2) Turn
OFF
ignition switch.
(3)
Disconnect negative cable from battery.
(4)
Disconnect generator output wire from genera
tor output Battery terminal. (5) Connect
a 0-150
ampere scale
D.C.
ammeter
in
series between generator
BAT
terminal
and
discon
nected generator output wire. Connect Positive lead
to generator
BAT
terminal
and
Negative lead
to
dis connected generator output wire. (6) Connect Positive lead
of a
test voltmeter
(Range
0-18
volts minimum)
to
disconnected genera
tor output wire. Connect negative lead
of
test voltme
ter
to
battery positive cable
at
positive post. (7) Connect
one end of a
Jumper Wire
to
ground
and with other
end
probe green
K20
lead wire
at
back
of
generator
(Fig. 1).
(This will generate
a
fault
code).
CAUTION:
Do not
connect blue
A142
lead
of
wiring
to ground. Refer
to
Group
8W
-
Wiring Diagrams
for
more information.
(8) Connect
an
engine tachometer
and
connect neg
ative cable
to
battery.
(9) Connect
a
variable carbon pile rheostat
be
tween battery terminals.
Be
sure carbon pile
is in
"Open"
or "Off
position before connecting leads.
See
Battery Section, Load Testing
for
instructions.
TEST
(1) Start engine. Immediately after starting,
re
duce engine speed
to
idle.
Page 335 of 1502
8A
- 14
ELECTRICAL
CASE
GROUND
FIELD
TERMINALS
142-DG/OR
BATTERY
VOLTAGE
ALTERNATOR
CASE
GROUND
GROUND ALTERNATOR
BATTERY
TERMINAL
ENGINE
CONTROLLER TO ENGINE
CONTROLLER TERMINAL
51
LESS
THAN
"BATTERY VOLTAGE
m^mm i
A21 DB-
20
AMP FUSE
A14
RD
AUTO
SHUTDOWN
RELAY
IGNITION
SWITCH
POWER
DISTRIBUTION
CENTER
JUMPER WIRE TO GROUND TEST
AMMETER TEST
VOLTMETER
2
i
DISCONNEaED
ALTERNATOR
OUTPUT
WIRE
ACC
OFF
J938A-17
CARBON
PILE
RHEOSTAT
Fig.
1 Generator Output
Wire
Resistance
Test
(Typical)
(2) Adjust engine speed and carbon pile to main
tain 20 amperes flowing in circuit. Observe voltmeter
reading. Voltmeter reading should not exceed 0.5
volts.
RESULTS
If a higher voltage drop is indicated, inspect, clean
and tighten all connections between generator BAT
terminal and battery Positive post. A voltage drop
test may be performed at each connection to locate
connection with excessive resistance. If resistance
tested satisfactorily, reduce engine speed, turn off carbon pile and turn off ignition switch.
(1) Disconnect negative cable from battery.
(2) Remove test ammeter, voltmeter, carbon pile,
and tachometer. (3) Remove "Jumper Wire".
(4) Connect generator output wire to generator
BAT terminal post. Tighten to 5 to 6 Nnn (45 to 75
in.
lbs.). (5) Connect negative cable to battery.
(6) Use DRB II Scan Tool to erase diagnostic trou
ble code.
CURRENT
OUTPUT
TEST
Current output test determines whether or not gen
erator is capable of delivering its rated current out
put.
PREPARATION
(1) Before starting any tests make sure vehicle has
a fully charged battery. Test and procedures on how
to check for a fully charged battery are shown in
Battery section of this Group,
(2) Disconnect negative cable from battery.
(3) Disconnect generator output wire at the gener
ator battery terminal.
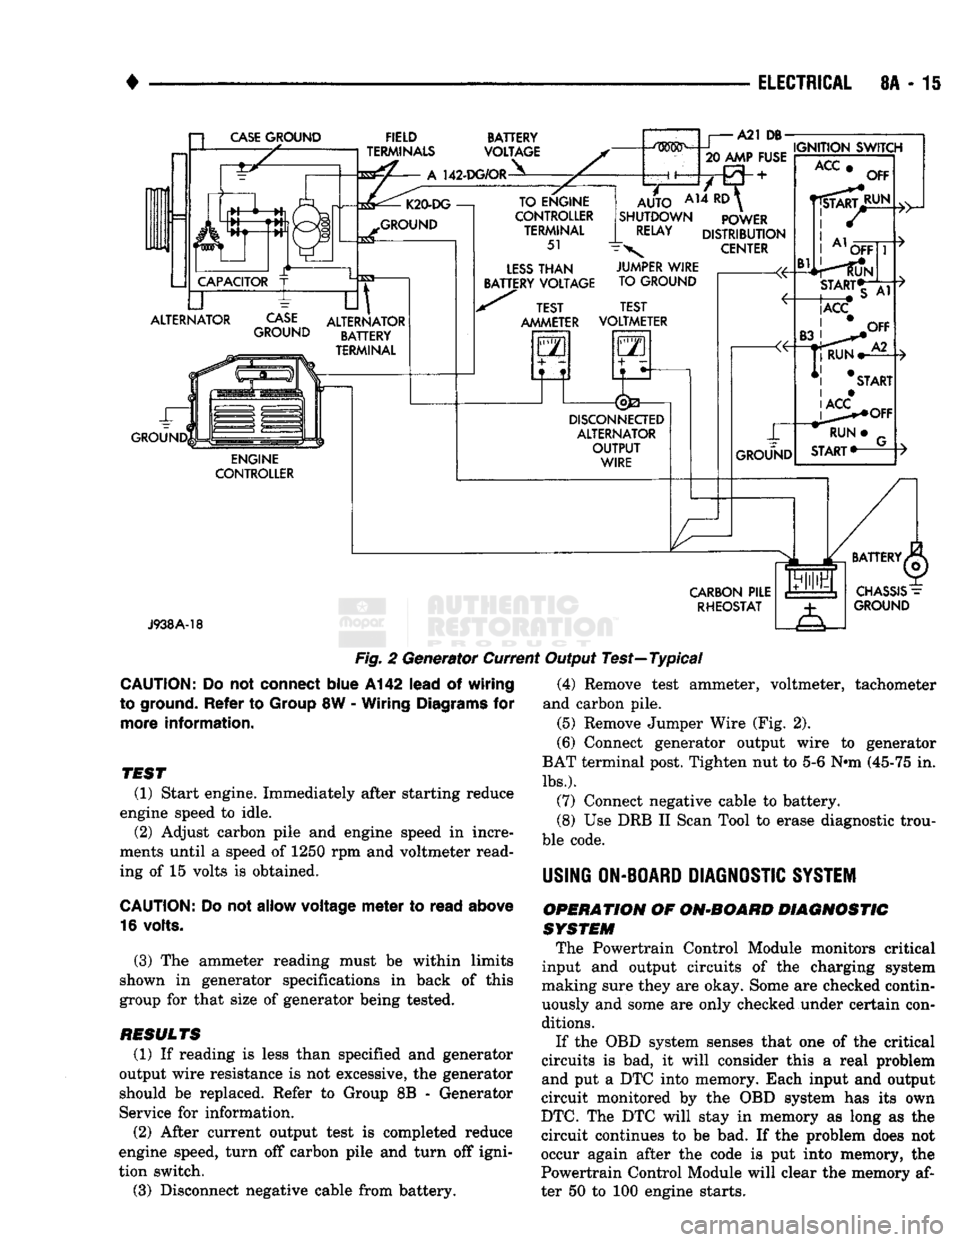
(4) Connect a 0-150 ampere scale D.C. ammeter in
series between generator BAT terminal and discon
nected generator output wire (Fig. 2). Connect posi
tive lead to generator BAT terminal and negative
lead to disconnected generator output wire.
(5) Connect positive lead of a test voltmeter (range
0-18 volts minimum) to generator BAT terminal.
(6) Connect negative lead of test voltmeter to a
good ground.
(7) Connect an engine tachometer and connect neg
ative cable to battery.
(8) Connect a variable carbon pile rheostat be
tween battery terminals. Be sure carbon pile is in Open or Off position before connecting leads. See
Battery section, Load Testing for instructions.
(9) Connect one end of a Jumper Wire to ground
and with other and probe green K20 lead wire at
back of generator (Fig. 2). (This will generate a fault
code).
Page 336 of 1502
•
ELECTRICAL
8A - 15 a
CASE
GROUND
CAPACITOR
ALTERNATOR ~L FIELD
TERMINALS
A
142-DG/OR BATTERY
VOLTAGE K20-DG
—!
GROUND
CASE
GROUND
til
ALTERNATOR BATTERY
TERMINAL ENGINE
CONTROLLER TO ENGINE
CONTROLLER TERMINAL
51
LESS
THAN
BATTERY VOLTAGE A21
DB-
.....
IGNITION SWITCH
20 AMP FUSE
AUTO
AH ^
SHUTDOWN POWER
RELAY
DISTRIBUTION
\
CENTER TEST
AMMETER JUMPER WIRE
TO GROUND
TEST
VOLTMETER
GO
5—n
DISCONNECTED
ALTERNATOR OUTPUT WIRE GROUND
ACC
Bl
OFF
RUN OFF
START*T
|ACC
CARBON
PILE RHEOSTAT
J938A-18
Fig.
2 Generator Current Output Test—Typical
CAUTION:
Do not
connect
blue
A142
lead
of
wiring
to ground.
Refer
to
Group
8W -
Wiring
Diagrams
for
more
information.
TEST
(1) Start engine. Immediately after starting reduce
engine speed to idle. (2) Adjust carbon pile and engine speed in incre
ments until a speed of 1250 rpm and voltmeter read
ing of 15 volts is obtained.
CAUTION:
Do not
allow
voltage
meter
to
read
above
16 volts.
(3) The ammeter reading must be within limits
shown in generator specifications in back of this
group for that size of generator being tested.
RESULTS
(1) If reading is less than specified and generator
output wire resistance is not excessive, the generator
should be replaced. Refer to Group 8B - Generator
Service for information.
(2) After current output test is completed reduce
engine speed, turn off carbon pile and turn off igni
tion switch.
(3) Disconnect negative cable from battery. (4) Remove test ammeter, voltmeter, tachometer
and carbon pile. (5) Remove Jumper Wire (Fig. 2).
(6) Connect generator output wire to generator
BAT terminal post. Tighten nut to 5-6 Nnn (45-75 in.
lbs.).
(7) Connect negative cable to battery.
(8) Use DRB II Scan Tool to erase diagnostic trou
ble code.
USING
ON-BOARD
DIAGNOSTIC
SYSTEM
OPERATION
OF
ON-BOARD
DIAGNOSTIC
SYSTEM
The Powertrain Control Module monitors critical
input and output circuits of the charging system
making sure they are okay. Some are checked contin
uously and some are only checked under certain con
ditions.
If the OBD system senses that one of the critical
circuits is bad, it will consider this a real problem
and put a DTC into memory. Each input and output
circuit monitored by the OBD system has its own
DTC.
The DTC will stay in memory as long as the
circuit continues to be bad. If the problem does not
occur again after the code is put into memory, the
Powertrain Control Module will clear the memory af
ter 50 to 100 engine starts.
Page 337 of 1502
8A
- 16
ELECTRICAL
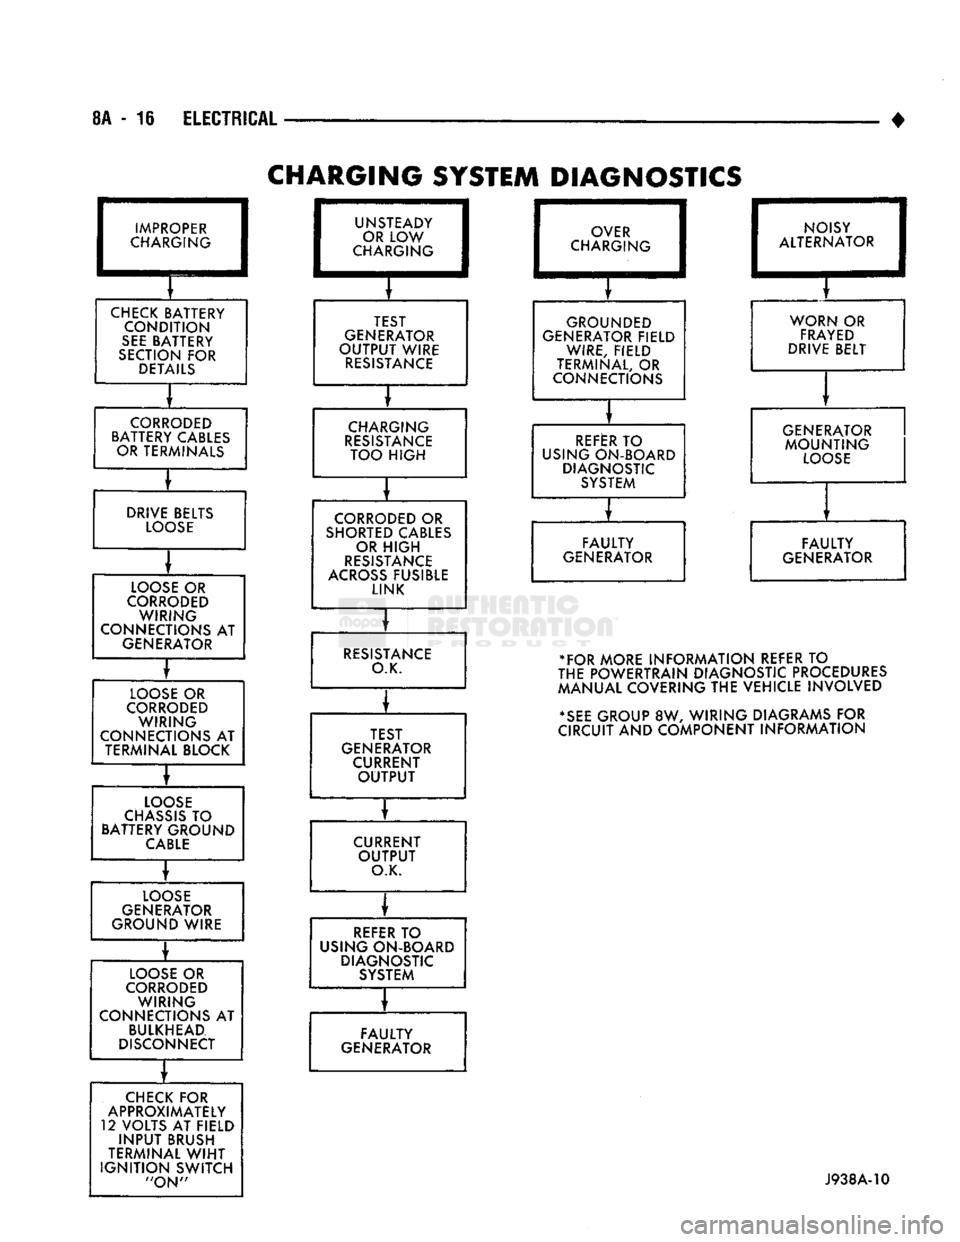
CHARGING
SYSTEM DIAGNOSTICS
IMPROPER
CHARGING
CHECK
BATTERY CONDITION
SEE
BATTERY
SECTION
FOR
DETAILS
CORRODED
BATTERY CABLES OR TERMINALS
DRIVE BELTS
LOOSE
LOOSE
OR
CORRODED
WIRING
CONNECTIONS
AT
GENERATOR
LOOSE
OR
CORRODED
WIRING
CONNECTIONS
AT
TERMINAL BLOCK
LOOSE
CHASSIS
TO
BATTERY GROUND
CABLE
LOOSE
GENERATOR
GROUND WIRE
LOOSE
OR
CORRODED
WIRING
CONNECTIONS
AT
BULKHEAD
DISCONNECT
CHECK
FOR
APPROXIMATELY
12 VOLTS
AT
FIELD
INPUT
BRUSH
TERMINAL
WIHT
IGNITION
SWITCH
"ON"
UNS'
OR
CHAF rEADY
LOW
K3ING
TEST
GENERATOR
OUTPUT
WIRE
RESISTANCE
CHARGING
RESISTANCE
TOO
HIGH
CORRODED
OR
SHORTED CABLES OR
HIGH
RESISTANCE
ACROSS
FUSIBLE LINK
RESISTANCE
O.K.
TEST
GENERATOR CURRENT
OUTPUT
CURRENT
OUTPUT
O.K.
REFER
TO
USING ON-BOARD DIAGNOSTIC SYSTEM
o
CHAR
/ER
.GING
GROUNDED
GENERATOR FIELD WIRE, FIELD
TERMINAL,
OR
CONNECTIONS
1 NO
1
ALTERf
ISY
MATOR
WORN
OR
FRAYED
DRIVE BELT
REFER
TO
USING ON-BOARD DIAGNOSTIC SYSTEM GENERATOR
MOUNTING
LOOSE
FAULTY
GENERATOR
FAULTY
GENERATOR •FOR MORE INFORMATION REFER
TO
THE POWERTRAIN DIAGNOSTIC PROCEDURES
MANUAL COVERING
THE
VEHICLE INVOLVED
*SEE
GROUP
8W,
WIRING DIAGRAMS
FOR
CIRCUIT
AND
COMPONENT INFORMATION
FAULTY
GENERATOR
J938A-V0
Page 338 of 1502
•
ELECTRICAL
8A - 17
DIAGNOSTIC
TROUBLE
CODES
Diagnostic trouble codes are 2 digit numbers
flashed on Malfunction Indicator lamp (Check En
gine) that identify which circuit is bad. In most cases
they do not identify which component in a circuit is
bad. A DTC description can be read using the DRB II scan tool. Refer to Group 14 - Fuel Systems for more
information. Therefore, a DTC is only a result, not
necessarily the reason for the problem. However, in
some cases, as a result of the design of the driveabil- ity test procedure, a DTC can be the reason for the
problem. It is important that the test procedure be followed in order to understand what the DTC of the
on-board diagnostic system are trying to tell.
HOW
TO
USE
MALFUNCTION
INDICATOR
(CHECK
ENGINE)
LAMP
FOR
FAULT
CODES
To activate this function cycle the ignition switch
on-off-on-off-on within 5 seconds and any DTC stored
in the Powertrain Control Module will be displayed.
The Check Engine lamp will display a DTC by flash ing on and off. There is a short pause between
flashes and a longer pause between digits. All codes
displayed are two digit numbers with a four second
pause between codes. An example of a code is as follows:
(1) Lamp on for 2 seconds, then turns off.
(2) Lamp flashes 4 times pauses and then flashes
1.
(3) Lamp pauses for 4 seconds, flashes 4 times,
pauses and then flashes 7 times.
The two codes are 41 and 47. Any number of codes
can be displayed (maximum of 8 faults can be stored) as long as they are in memory. The lamp will flash
until all of them (including 55) are displayed (55 =
End of test).
CHARGING
SYSTEM
FAULT
CODES
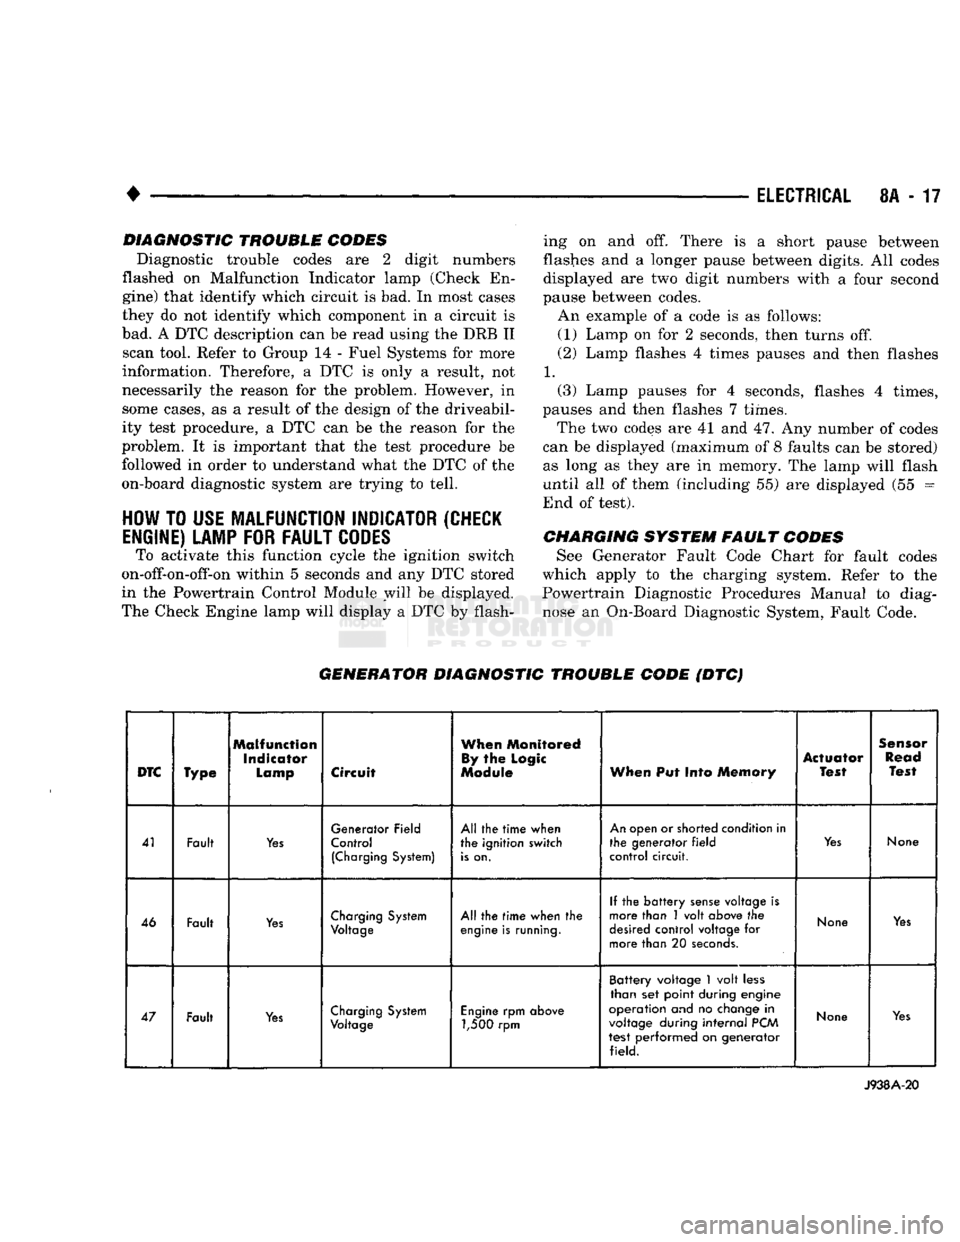
See Generator Fault Code Chart for fault codes
which apply to the charging system. Refer to the
Powertrain Diagnostic Procedures Manual to diag
nose an On-Board Diagnostic System, Fault Code.
GENERATOR
DIAGNOSTIC
TROUBLE
CODE
(DTC)
DTC
Type
Malfunction
Indicator
Lamp
Circuit
When
Monitored
By
the
Logic
Module
When
Put Into
Memory
Actuator
Test
Sensor
Read
Test
41 Fault
Yes
Generator Field
Control
(Charging
System)
All the
time
when
the ignition switch
is
on.
An
open or shorted condition in
the generator
field
control circuit.
Yes
None
46 Fault
Yes
Charging
System
Voltage
All the
time
when the
engine
is
running.
If the
battery
sense
voltage is
more than 1 volt
above
the
desired
control voltage for
more than 20
seconds.
None
Yes
47 Fault
Yes
Charging
System
Voltage
Engine
rpm
above
1,500 rpm Battery voltage
1
volt
less
than set point during engine
operation and no
change
in
voltage
during
internal
PCM
test performed on generator field.
None
Yes
J938A-20
Page 339 of 1502
8A
- 18
ELECTRICAL
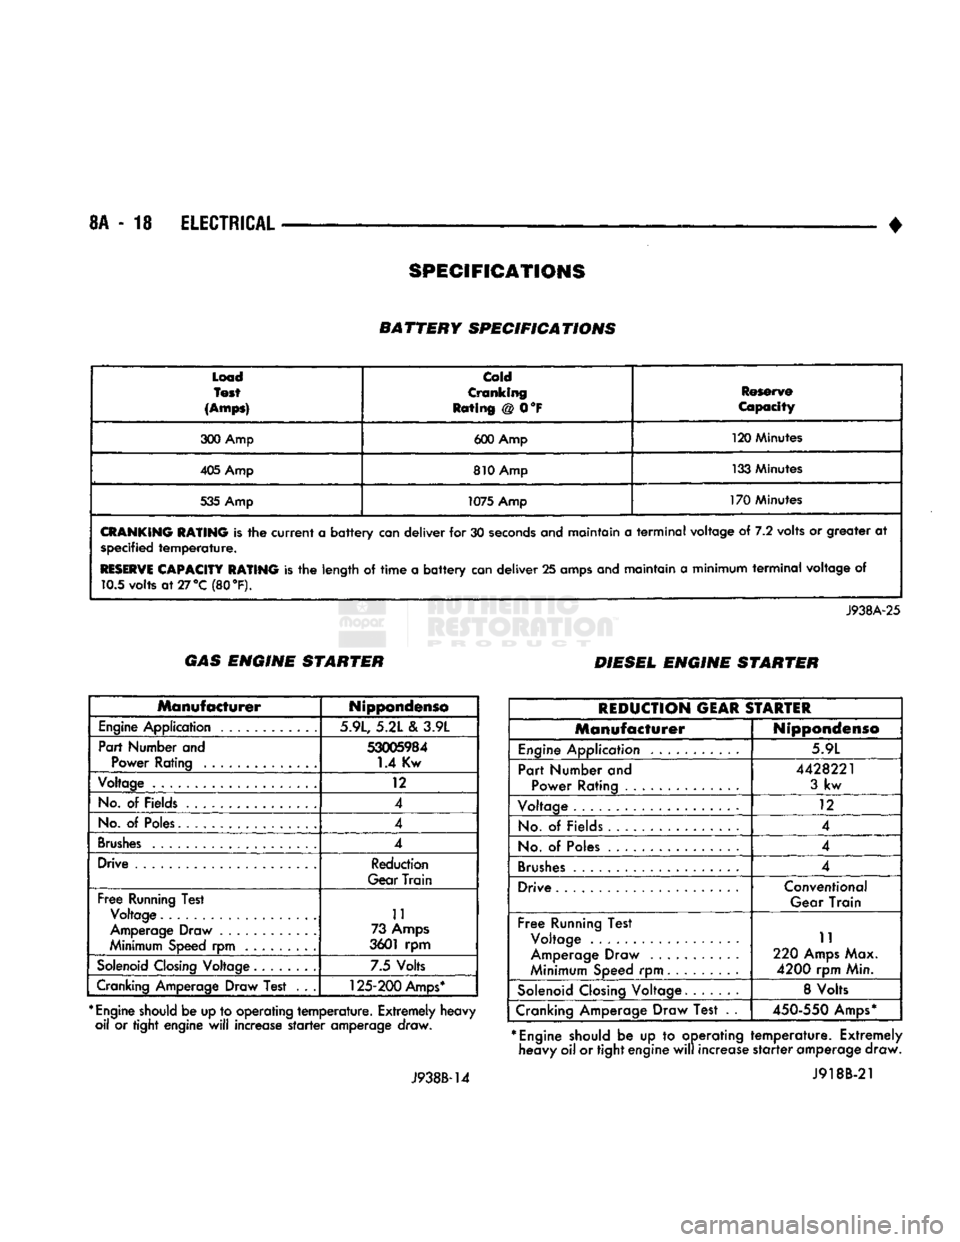
• BATTERY SPECIFICATIONS
Load
Test
(Amps)
Cold
Cranking
Rating @ 0°F Reserve
Capacity
300 Amp 600 Amp 120 Minutes
405 Amp 810 Amp 133 Minutes
535 Amp 1075 Amp 170 Minutes
CRANKING
RATING
is the
current
a
battery
can deliver for 30
seconds
and maintain a
terminal
voltage of 7.2 volts or greater at specified
temperature.
RESERVE
CAPACITY RATING
is the length of
time
a
battery
can deliver 25 amps and maintain a minimum
terminal
voltage of 10.5 volts
at27°C
(80 °F).
J938A-25 GAS ENGINE STARTER
DIESEL ENGINE STARTER
Manufacturer
Nippondenso
Engine
Application 5.9L, 5.21 e\ 3.9L
Part Number and
53005984
Power Rating 1.4 Kw
Voltage 12
No.
of Fields 4
No.
of
Poles.
4
Brushes
4
Drive Reduction
Gear Train
Free
Running Test Voltage 11
Amperage Draw ............ 73
Amps
Minimum Speed rpm 3601 rpm
Solenoid
Closing
Voltage 7.5 Volts
Cranking Amperage Draw Test . . .
125-200
Amps*
*
Engine
should
be up to operating
temperature.
Extremely heavy oil or tight engine
will
increase
starter
amperage draw.
J938B-14
REDUCTION
GEAR
STARTER
Manufacturer
Nippondenso
Engine
Application 5.9L
Part Number and Power Rating ..............
4428221
3
kw
Voltage 12
No.
of Fields 4
No.
of
Poles
4
Brushes
.................... 4
Drive Conventional
Gear Train
Free
Running Test Voltage .
Amperage Draw
Minimum Speed rpm 11
220
Amps
Max.
4200
rpm Min.
Solenoid
Closing
Voltage. 8 Volts
Cranking Amperage Draw Test . .
450-550
Amps*
*
Engine
should be up to operating heavy oil or tight engine
will
increase
temperature.
Extremely
starter
amperage draw. J918B-21
SPECIFICATIONS
Page 340 of 1502
•
ELECTRICAL
8A - 19
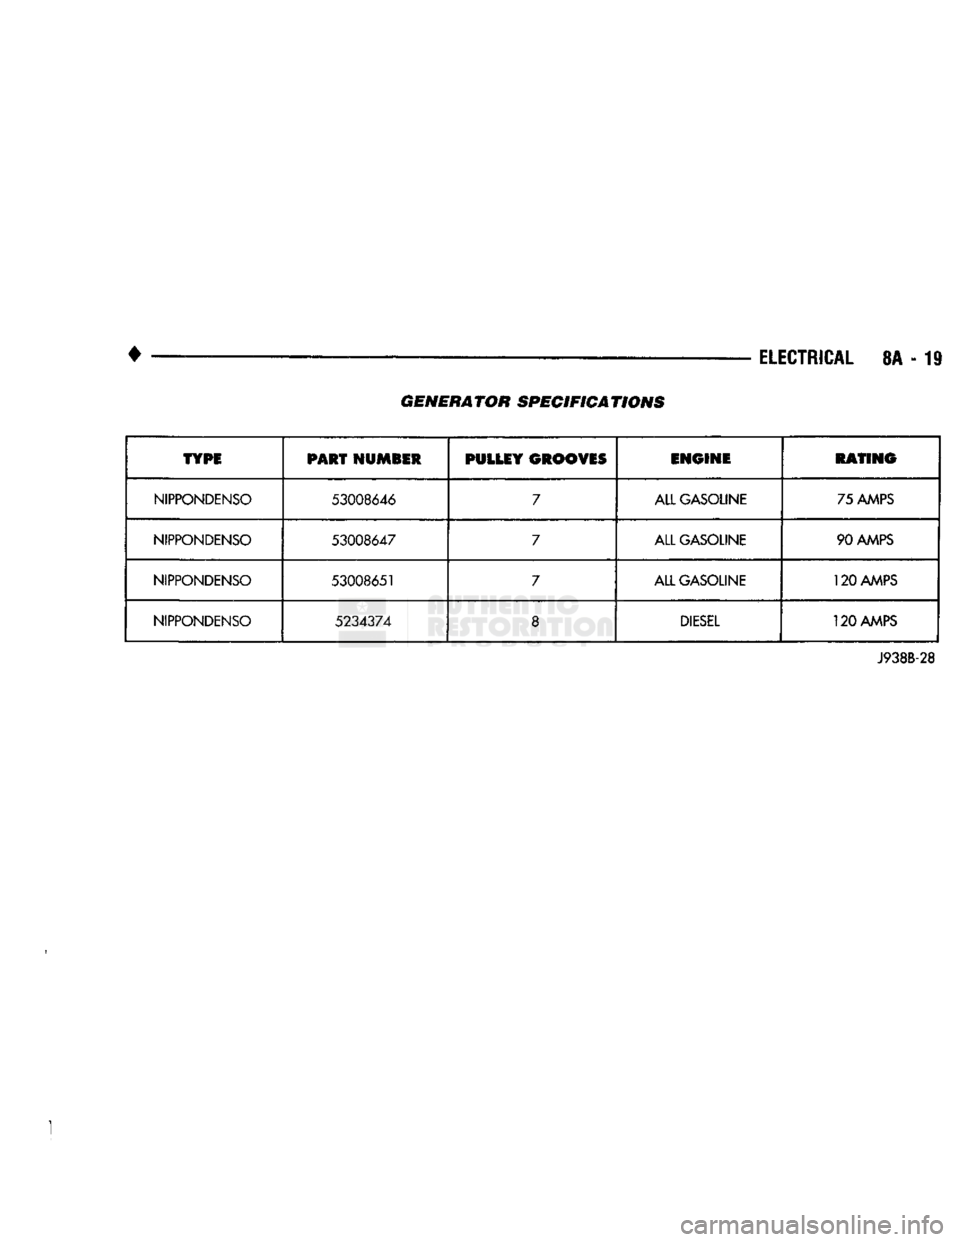
GENERATOR SPECIFICATIONS
TYPE
PART
NUMBER
PULLEY
GROOVES ENGINE
RATING
NIPPONDENSO
53008646 7
ALL GASOLINE
75
AMPS
NIPPONDENSO
53008647
7
ALL GASOLINE
90
AMPS
NIPPONDENSO
53008651 7
ALL GASOLINE
120
AMPS
NIPPONDENSO
5234374
8
DIESEL
120
AMPS
J938B-28