DODGE TRUCK 1993 Service Repair Manual
Manufacturer: DODGE, Model Year: 1993, Model line: TRUCK, Model: DODGE TRUCK 1993Pages: 1502, PDF Size: 80.97 MB
Page 781 of 1502
11
- 22
EXHAUST
SYSTEM
AND
INTAKE MANIFOLD
•
DIFFUSER
TURBINE
HOUSING
O-RING BEARING
HOUSING
LOCKPLATE
J9111-9
Fig.
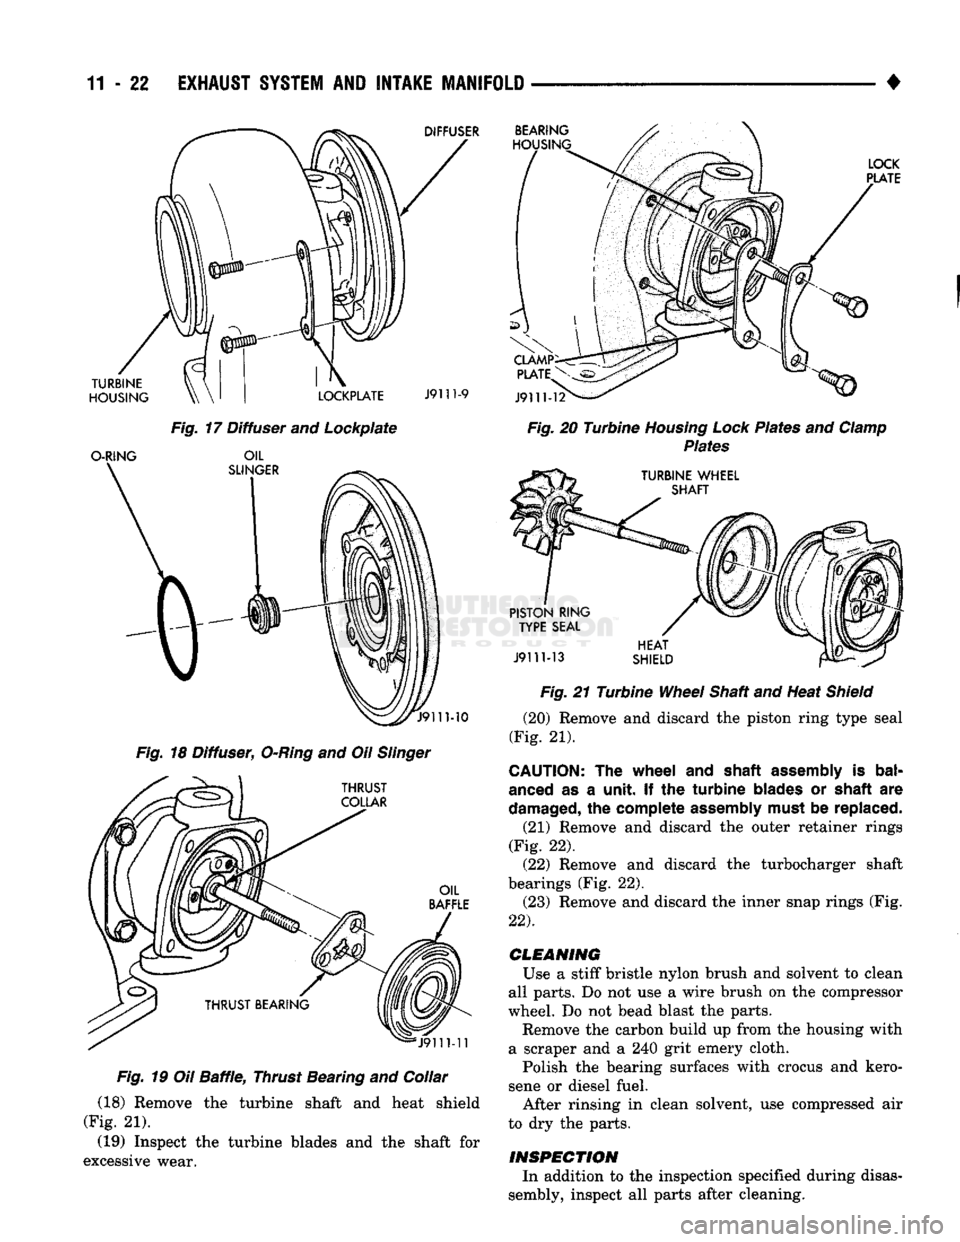
17 Diffuser and Lockplate
OIL
SLINGER
MO
Fig.
18 Diffuser,
O-Ring
and Oil
Slinger
THRUST
COLLAR
OIL
BAFFLE
J9111-11
Fig.
19 Oil
Baffle,
Thrust Bearing and Collar
(18) Remove the turbine shaft and heat shield
(Fig. 21).
(19) Inspect the turbine blades and the shaft for
excessive wear.
LOCK
PLATE
J9111-12
Fig.
20 Turbine
Housing Lock
Plates and
Clamp
Plates
TURBINE WHEEL SHAFT
PISTON RING TYPE SEAL
J9111-13
HEAT
SHIELD Fig.
21 Turbine
Wheel
Shaft and Heat
Shield
(20) Remove and discard the piston ring type seal
(Fig. 21).
CAUTION:
The
wheel
and
shaft assembly
is
bal
anced
as a
unit.
If the
turbine blades
or
shaft
are
damaged,
the
complete assembly must
be
replaced.
(21) Remove and discard the outer retainer rings
(Fig. 22). (22) Remove and discard the turbocharger shaft
bearings (Fig. 22). (23) Remove and discard the inner snap rings (Fig.
22).
CLEANING
Use a stiff bristle nylon brush and solvent to clean
all parts. Do not use a wire brush on the compressor
wheel. Do not bead blast the parts. Remove the carbon build up from the housing with
a scraper and a 240 grit emery cloth.
Polish the bearing surfaces with crocus and kero
sene or diesel fuel. After rinsing in clean solvent, use compressed air
to dry the parts.
INSPECTION
In addition to the inspection specified during disas
sembly, inspect all parts after cleaning.
Page 782 of 1502
•
EXHAUST
SYSTEM
AND
INTAKE MANIFOLD
11 - 23
HEAT
SHIELD
OUTER RETAINER
RINGS
BREAKING,
HOUSING
J9111-18
Fig.
24 Turbine Shaft/Heat
Shield
to Bearing
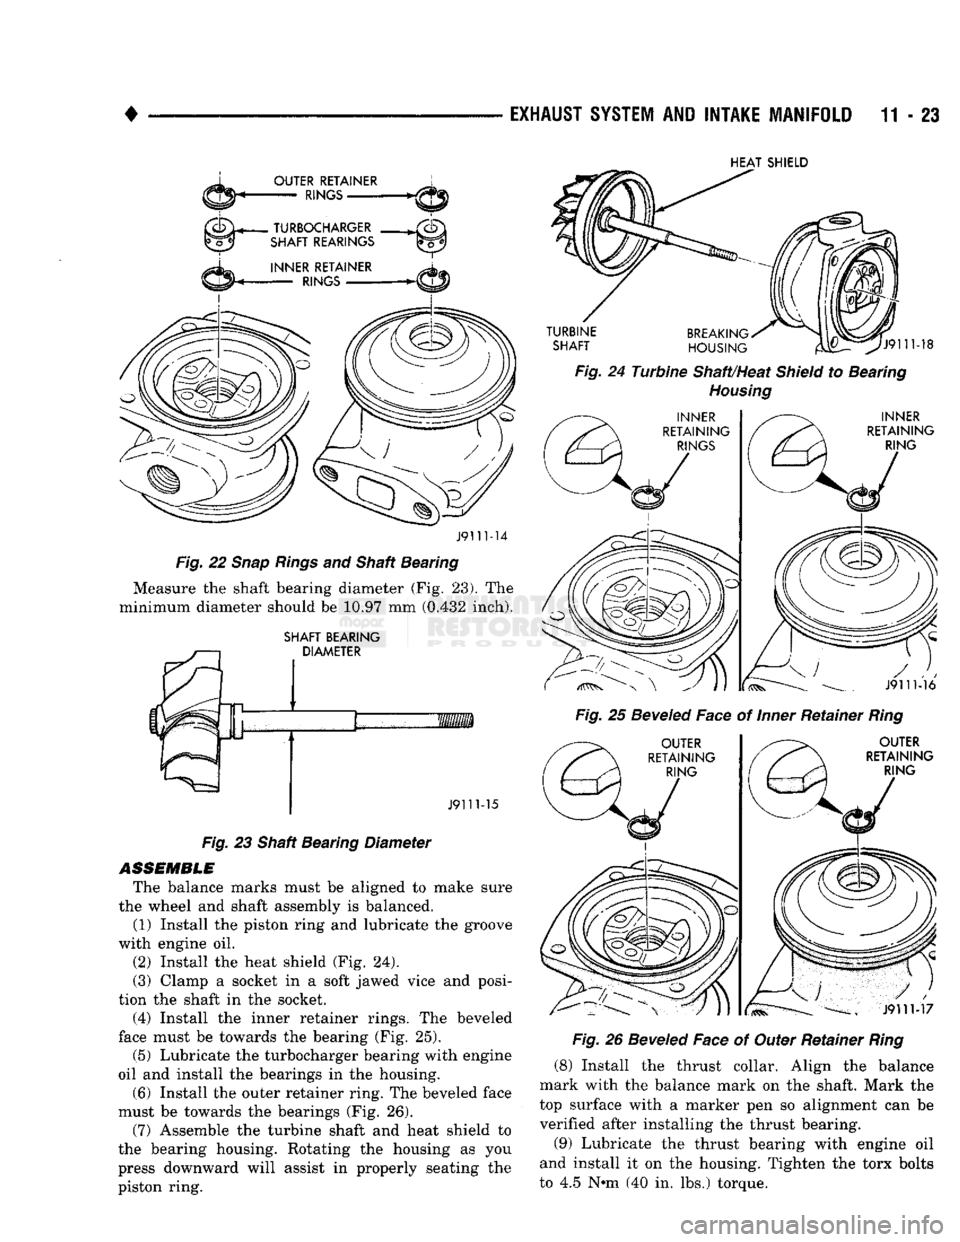
Housing
INNER
RETAINING
RINGS
INNER
RETAINING RING
J9111-14
Fig.
22
Snap Rings
and Shaft Bearing Measure the shaft bearing diameter (Fig. 23). The
minimum diameter should be 10.97 mm (0.432 inch).
SHAFT BEARING DIAMETER Fig.
25
Beveled
Face of
Inner
Retainer
Ring
J911M6
OUTER
RETAINING RING
J9111-15
Fig.
23 Shaft Bearing Diameter
ASSEMBLE
The balance marks must be aligned to make sure
the wheel and shaft assembly is balanced. (1) Install the piston ring and lubricate the groove
with engine oil.
(2) Install the heat shield (Fig. 24).
(3) Clamp a socket in a soft jawed vice and posi
tion the shaft in the socket. (4) Install the inner retainer rings. The beveled
face must be towards the bearing (Fig. 25).
(5) Lubricate the turbocharger bearing with engine
oil and install the bearings in the housing.
(6) Install the outer retainer ring. The beveled face
must be towards the bearings (Fig. 26).
(7) Assemble the turbine shaft and heat shield to
the bearing housing. Rotating the housing as you
press downward will assist in properly seating the
piston ring.
OUTER
RETAINING RING
J9111-17
Fig.
26
Beveled
Face of Outer Retainer
Ring
(8) Install the thrust collar. Align the balance
mark with the balance mark on the shaft. Mark the
top surface with a marker pen so alignment can be verified after installing the thrust bearing.
(9) Lubricate the thrust bearing with engine oil
and install it on the housing. Tighten the torx bolts
to 4.5 N»m (40 in. lbs.) torque.
Page 783 of 1502
11
- 24
EXHAUST
SYSTEM
AND
INTAKE
MANIFOLD
(10) Install the oil baffle. Check the balance mark
alignment. (11) Install the piston ring type seal on the oil
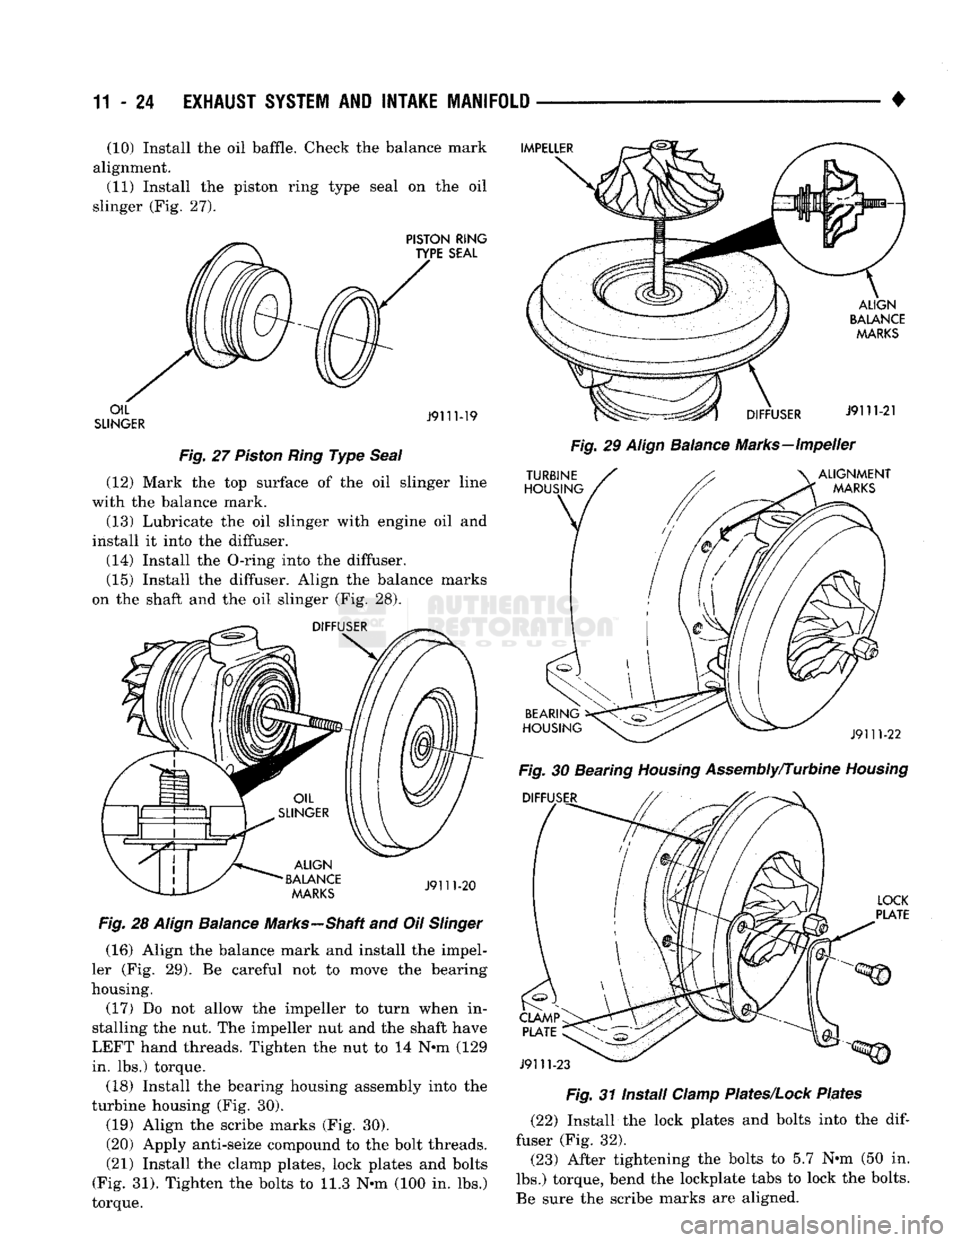
slinger (Fig. 27).
Fig.
27
Piston
Ring
Type
Seal
(12) Mark the top surface of the oil slinger line
with the balance mark.
(13) Lubricate the oil slinger with engine oil and
install it into the diffuser.
(14) Install the O-ring into the diffuser. (15) Install the diffuser. Align the balance marks
on the shaft and the oil slinger (Fig. 28).
Fig.
28
Align
Balance
Marks—Shaft and Oil
Slinger
(16) Align the balance mark and install the impel
ler (Fig. 29). Be careful not to move the bearing
housing. (17) Do not allow the impeller to turn when in
stalling the nut. The impeller nut and the shaft have
LEFT hand threads. Tighten the nut to 14 N-m (129
in. lbs.) torque.
(18) Install the bearing housing assembly into the
turbine housing (Fig. 30). (19) Align the scribe marks (Fig. 30).
(20) Apply anti-seize compound to the bolt threads. (21) Install the clamp plates, lock plates and bolts
(Fig. 31). Tighten the bolts to 11.3 N-m (100 in. lbs.)
torque.
Fig.
29
Align
Balance
Marks—Impeller
Fig.
30 Bearing
Housing
Assembly/Turbine
Housing
Fig.
31 Install
Clamp
Plates/Lock
Plates
(22) Install the lock plates and bolts into the
dif
fuser (Fig. 32).
(23) After tightening the bolts to 5.7 N-m (50 in.
lbs.) torque, bend the lockplate tabs to lock the bolts.
Be sure the scribe marks are aligned.
Page 784 of 1502
•
EXHAUST
SYSTEM
AND
INTAKE MANIFOLD
11 - 25
Fig.
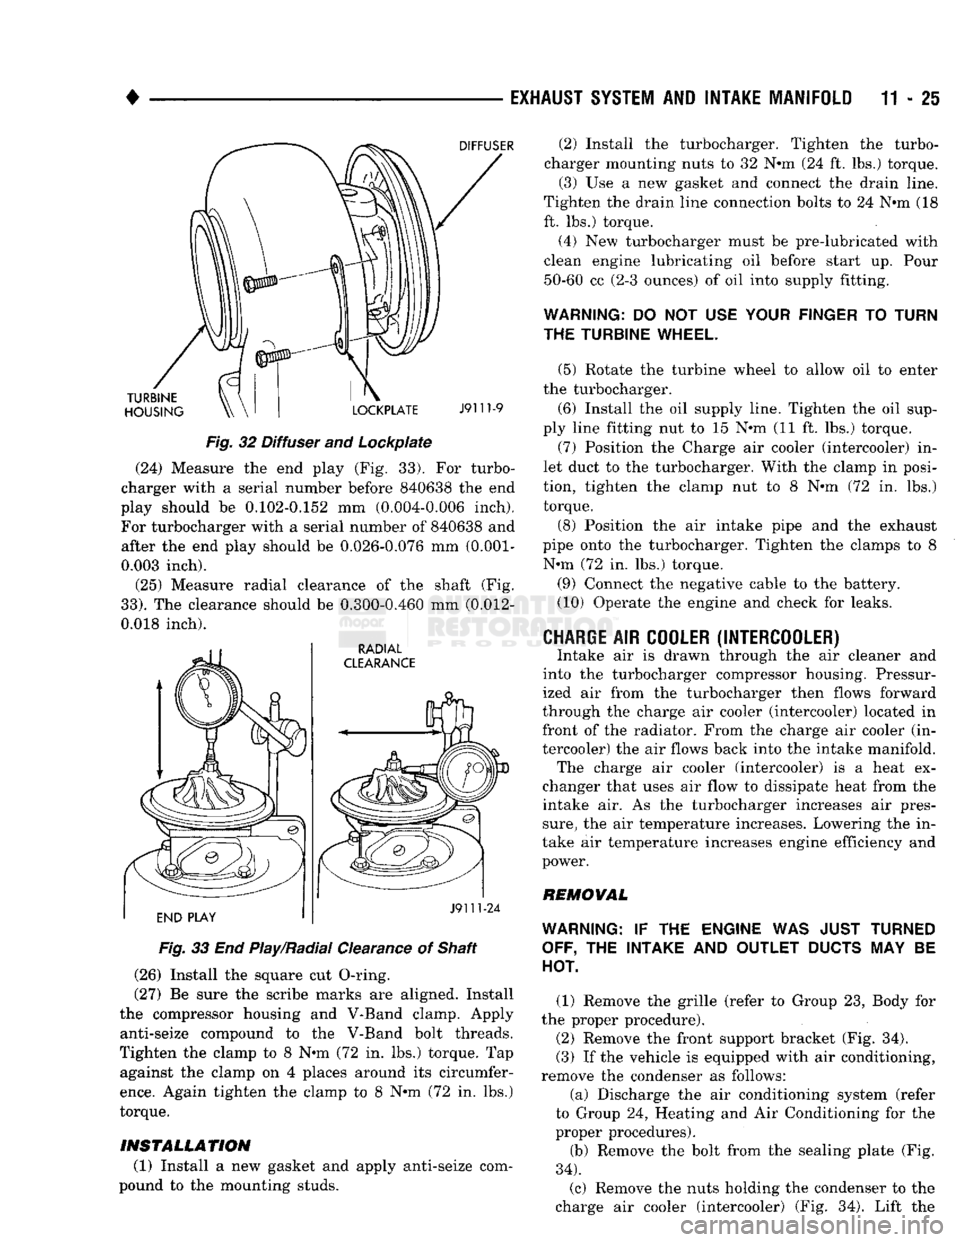
32 Diffuser and Lockpiate (24) Measure the end play (Fig. 33). For turbo
charger with a serial number before 840638 the end
play should be 0.102-0.152 mm (0.004-0.006 inch).
For turbocharger with a serial number of 840638 and after the end play should be 0.026-0.076 mm
(0.001-
0.003 inch).
(25) Measure radial clearance of the shaft (Fig.
33).
The clearance should be 0.300-0.460 mm (0.012-
0.018 inch).
Fig.
33 End Play/Radial Clearance of Shaft
(26) Install the square cut O-ring.
(27) Be sure the scribe marks are aligned. Install
the compressor housing and V-Band clamp. Apply anti-seize compound to the V-Band bolt threads.
Tighten the clamp to 8 N-m (72 in. lbs.) torque. Tap against the clamp on 4 places around its circumfer
ence.
Again tighten the clamp to 8 N-m (72 in. lbs.)
torque.
INSTALLATION
(1) Install a new gasket and apply anti-seize com
pound to the mounting studs. (2) Install the turbocharger. Tighten the turbo
charger mounting nuts to 32 N-m (24 ft. lbs.) torque. (3) Use a new gasket and connect the drain line.
Tighten the drain line connection bolts to 24 N-m (18
ft. lbs.) torque.
(4) New turbocharger must be pre-lubricated with
clean engine lubricating oil before start up. Pour 50-60 cc (2-3 ounces) of oil into supply fitting.
WARNING:
DO NOT USE
YOUR FINGER
TO
TURN
THE TURBINE WHEEL.
(5) Rotate the turbine wheel to allow oil to enter
the turbocharger.
(6) Install the oil supply line. Tighten the oil sup
ply line fitting nut to 15 N-m (11 ft. lbs.) torque. (7) Position the Charge air cooler (intercooler) in
let duct to the turbocharger. With the clamp in posi
tion, tighten the clamp nut to 8 N-m (72 in. lbs.) torque.
(8) Position the air intake pipe and the exhaust
pipe onto the turbocharger. Tighten the clamps to 8 N-m (72 in. lbs.) torque.
(9) Connect the negative cable to the battery.
(10) Operate the engine and check for leaks.
CHARGE
AIR
COOLER (INTERCOOLER)
Intake air is drawn through the air cleaner and
into the turbocharger compressor housing. Pressur
ized air from the turbocharger then flows forward
through the charge air cooler (intercooler) located in front of the radiator. From the charge air cooler (in
tercooler) the air flows back into the intake manifold. The charge air cooler (intercooler) is a heat ex
changer that uses air flow to dissipate heat from the
intake air. As the turbocharger increases air pres
sure,
the air temperature increases. Lowering the in
take air temperature increases engine efficiency and
power.
REMOVAL
WARNING:
IF THE
ENGINE
WAS
JUST TURNED OFF,
THE
INTAKE
AND
OUTLET
DUCTS
MAY BE
HOT.
(1) Remove the grille (refer to Group 23, Body for
the proper procedure).
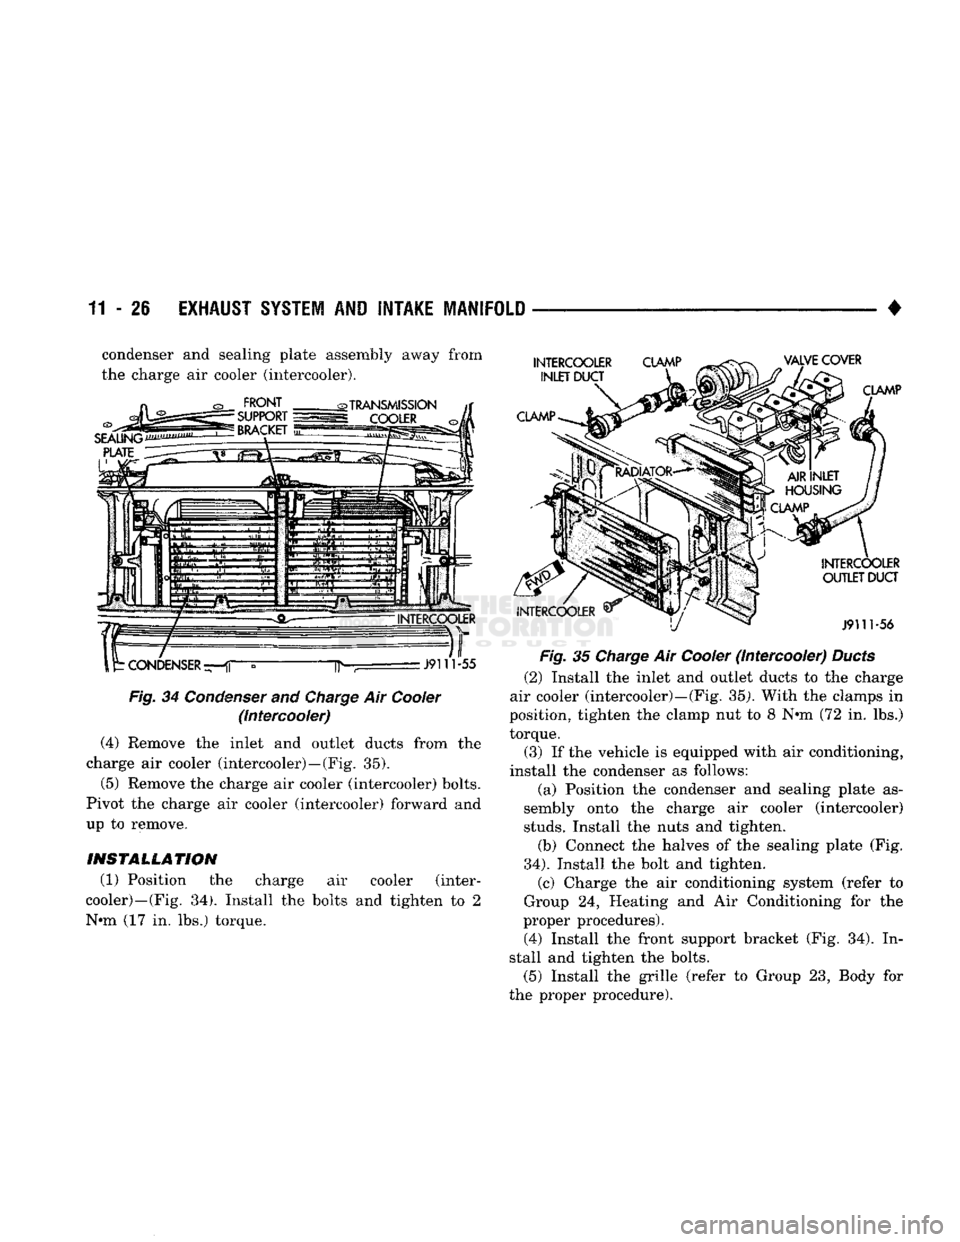
(2) Remove the front support bracket (Fig. 34).
(3) If the vehicle is equipped with air conditioning,
remove the condenser as follows:
(a) Discharge the air conditioning system (refer
to Group 24, Heating and Air Conditioning for the
proper procedures).
(b) Remove the bolt from the sealing plate (Fig.
34).
(c) Remove the nuts holding the condenser to the
charge air cooler (intercooler) (Fig. 34). Lift the
Page 785 of 1502
11 - 26
EXHAUST SYSTEM
AND
INTAKE MANIFOLD
• condenser and sealing plate assembly away from
the charge air cooler (intercooler).
Fig.
34 Condenser and
Charge
Air Cooler (Intercooler)
(4) Remove the inlet and outlet ducts from the
charge air cooler (intercooler)—(Fig. 35).
(5) Remove the charge air cooler (intercooler) bolts.
Pivot the charge air cooler (intercooler) forward and
up to remove.
INSTALLATION
(1) Position the charge air cooler (inter
cooler)—(Fig. 34). Install the bolts and tighten to 2
N-m (17 in. lbs.) torque.
Fig.
35 Charge Air Cooler (Intercooler) Ducts
(2) Install the inlet and outlet ducts to the charge
air cooler (intercooler)—(Fig. 35). With the clamps in
position, tighten the clamp nut to 8 N-m (72 in. lbs.)
torque.
(3) If the vehicle is equipped with air conditioning,
install the condenser as follows: (a) Position the condenser and sealing plate as
sembly onto the charge air cooler (intercooler)
studs.
Install the nuts and tighten.
(b) Connect the halves of the sealing plate (Fig.
34).
Install the bolt and tighten. (c) Charge the air conditioning system (refer to
Group 24, Heating and Air Conditioning for the
proper procedures).
(4) Install the front support bracket (Fig. 34). In
stall and tighten the bolts. (5) Install the grille (refer to Group 23, Body for
the proper procedure).
Page 786 of 1502
•
EXHAUST SYSTEM
AND
INTAKE MANIFOLD
11-27
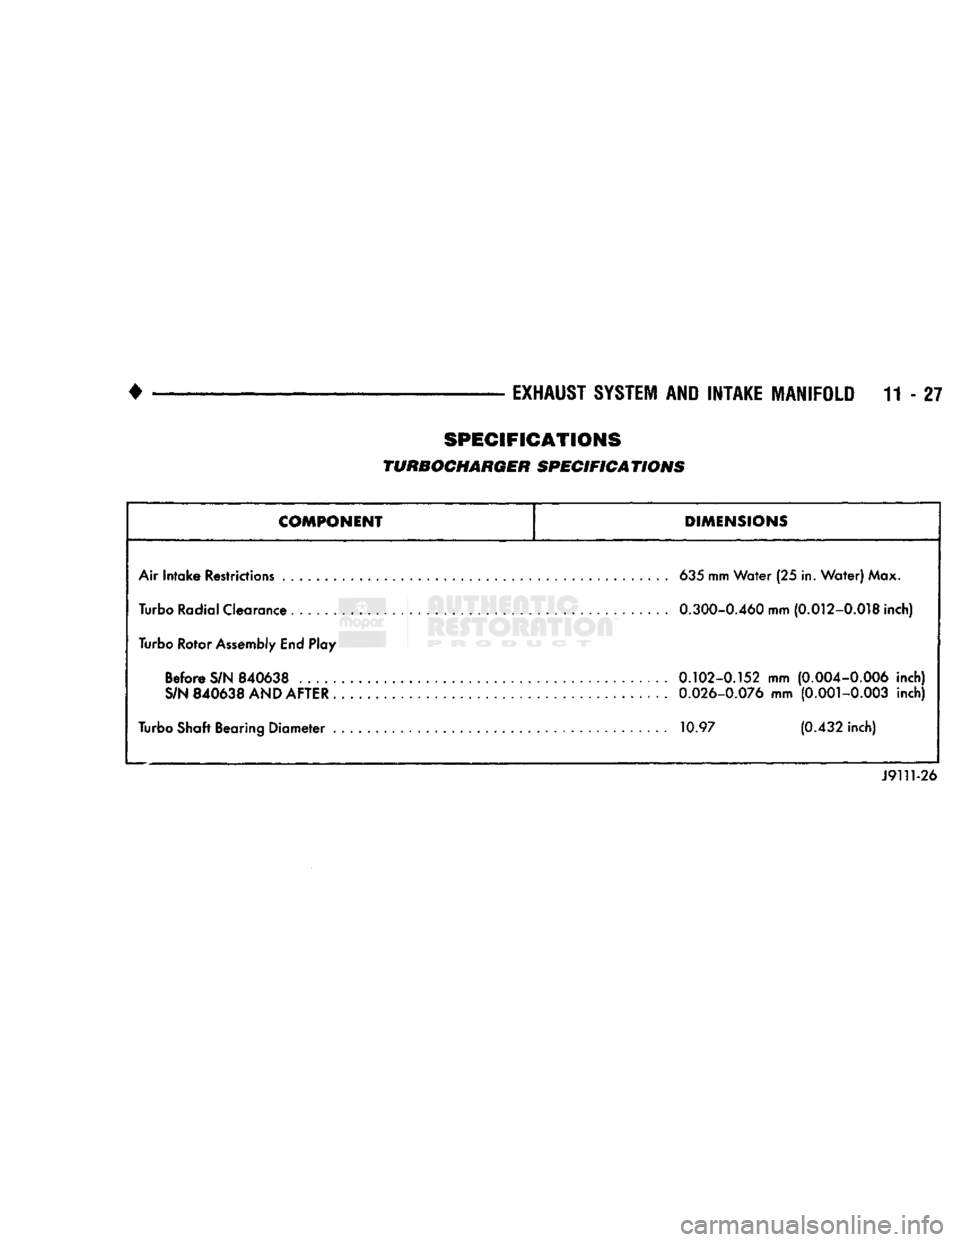
SPECIFICATIONS
TURBOCHARGER SPECIFICATIONS
COMPONENT
DIMENSIONS
Air Intake Restrictions
635
mm Water (25 in. Water) Max.
Turbo Radial Clearance
0.300-0.460
mm
(0.012-0.018
inch)
Turbo Rotor Assembly End Play Before S/N 840638 0.102-0.152 mm (0.004-0.006 inch)
S/N
840638
AND AFTER .
0.026-0.076
mm
(0.001-0.003
inch)
Turbo Shaft Bearing Diameter
10.97 (0.432
inch)
J9111-26
Page 787 of 1502
11
- 28
EXHAUST
SYSTEM
AND
INTAKE MANIFOLD
•
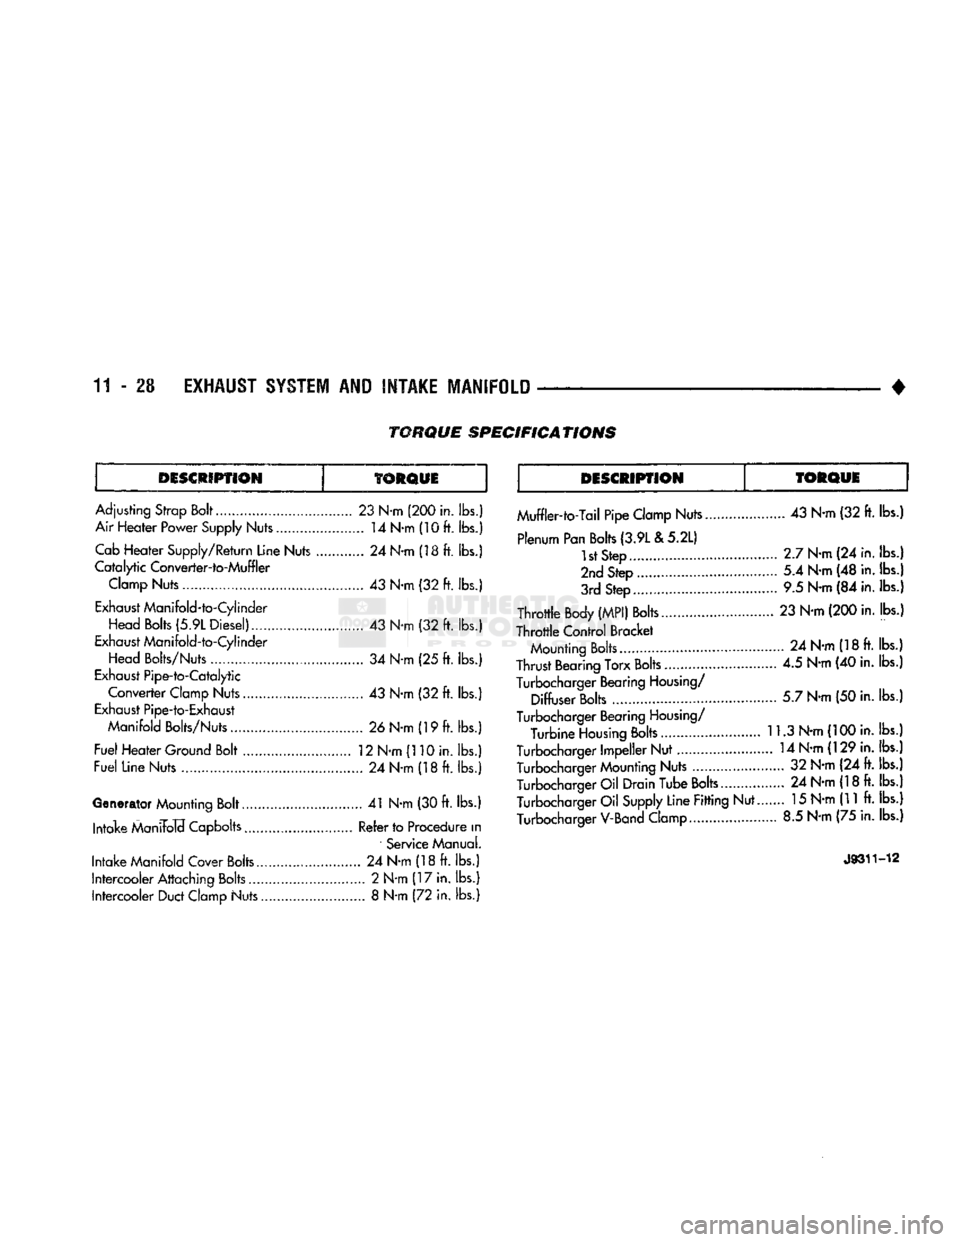
DESCRIPTION
TORQUE
DESCRIPTION
TORQUE
Adjusting
Strop
Bolt
23
N-m
(200 in.
lbs.)
Air Heater Power Supply Nuts 14 N-m (10
ft.
lbs.) Cab
Heater Supply/Return Line Nuts 24
N-m
(18
ft.
lbs.)
Catalytic
Converter-to-Muffler Clamp Nuts 43 N-m (32 ft. lbs.)
Exhaust Manifold-to-Cylinder
Head
Bolts
(5.9L Diesel) 43 N-m (32
ft.
lbs.)
Exhaust Manifold-to-Cylinder
Head Bolts/Nuts 34
N-m (25
ft. lbs.)
Exhaust Pipe-to-Catalytic
Converter Clamp Nuts 43 N-m (32 ft. lbs.)
Exhaust Pipe-to-Exhaust
Manifold
Bolts/Nuts 26 N-m (19 ft. lbs.)
Fuel Heater Ground Bolt . 12 N-m (110 in. lbs.)
Fuel Line Nuts 24 N-m (18ft. lbs.)
Generator Mounting Bolt 41 N-m (30 ft. lbs.) Intake ManiFolcf Capbolts Refer to Procedure
in
Service Manual.
Intake Manifold Cover Bolts 24 N-m (18 ft. lbs.)
Intercooler Attaching Bolts............................. 2 N-m (17 in. lbs.) Intercooler Duct Clamp Nuts 8 N-m (72 in. lbs.) Muffler-to-Tail Pipe Clamp Nuts 43 N-m (32 ft. lbs.)
Plenum Pan Bolts (3.9L
& 5.2L)
1st Step 2.7 N-m (24 in. lbs.)
2nd Step 5.4 N-m (48 in. lbs.)
3rd Step 9.5 N-m (84 in. lbs.)
Throttle Body
(MPI)
Bolts 23 N-m (200 in. lbs.)
Throttle Control Bracket Mounting Bolts 24 N-m (18 ft. lbs.)
Thrust Bearing Torx Bolts............................ 4.5 N-m (40 in. lbs.)
Turbocharger Bearing Housing/ Diffuser Bolts 5.7 N-m (50 in. lbs.)
Turbocharger Bearing Housing/ Turbine Housing Bolts 11.3 N-m (100 in. lbs.)
Turbocharger Impeller Nut 14 N-m (129 in. lbs.) Turbocharger Mounting Nuts 32 N-m (24 ft. lbs.)
Turbocharger Oil Drain Tube Bolts... 24 N-m (18 ft. lbs.) Turbocharger Oil Supply Line Fitting Nut.. 15 N-m (11 ft. lbs.)
Turbocharger V-Band Clamp 8.5 N-m (75 in. lbs.)
J9311-12
TORQUE
SPECIFICATIONS
Page 788 of 1502
• •
•
FRAME AND BUMPERS 13 - 1
CONTENTS
page page
ATTACHED COMPONENTS . B B. B. B . 30 FRAME 20 BUMPERS 1 SNOW PLOW 3
BUMPERS
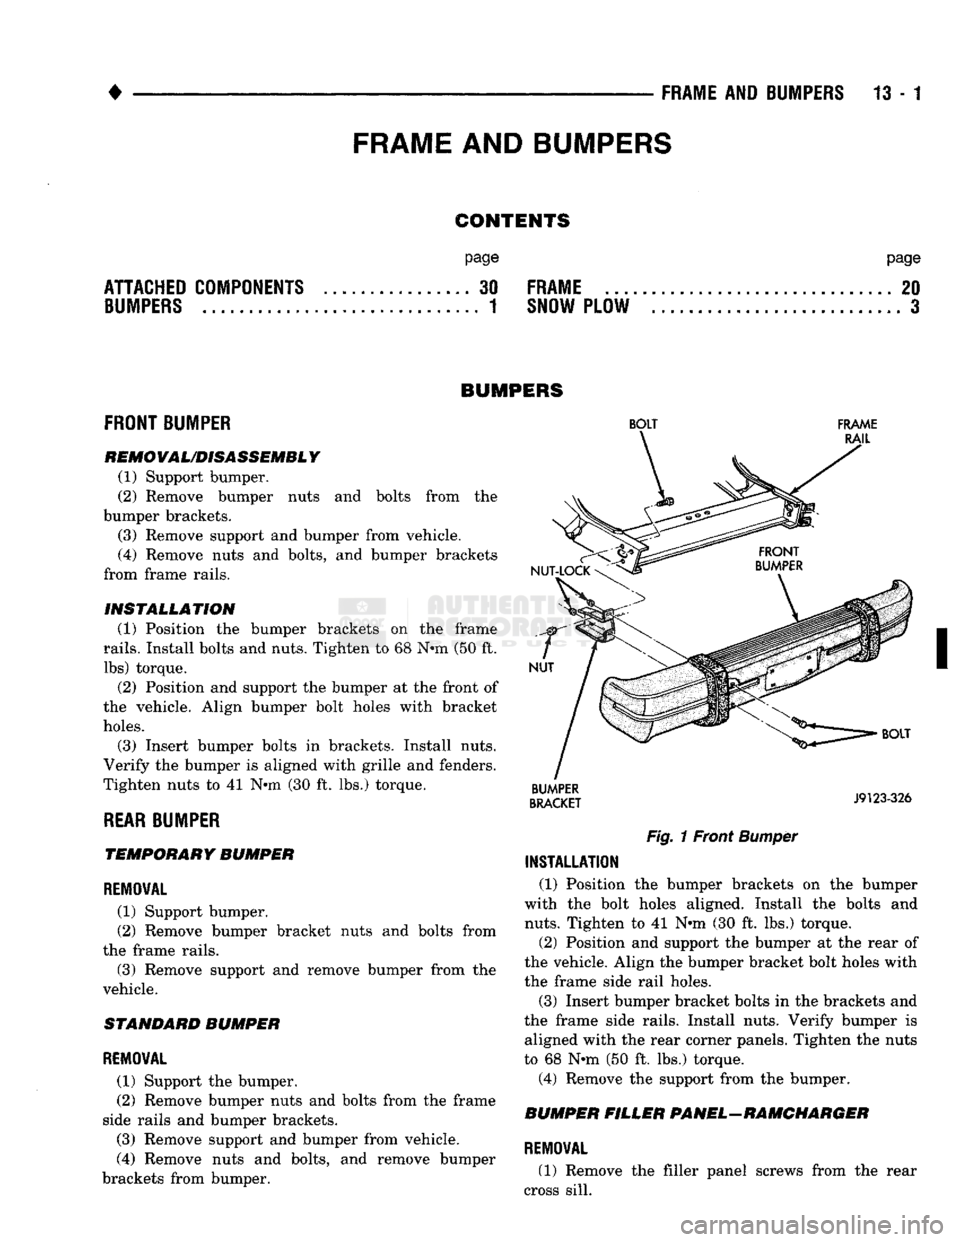
FRONT BUMPER
REMOVAL/DISASSEMBLY
(1) Support bumper.
(2) Remove bumper nuts and bolts from the
bumper brackets.
(3) Remove support and bumper from vehicle. (4) Remove nuts and bolts, and bumper brackets
from frame rails.
INSTALLATION (1) Position the bumper brackets on the frame
rails.
Install bolts and nuts. Tighten to 68 Nnn (50 ft. lbs) torque.
(2) Position and support the bumper at the front of
the vehicle. Align bumper bolt holes with bracket
holes.
(3) Insert bumper bolts in brackets. Install nuts.
Verify the bumper is aligned with grille and fenders.
Tighten nuts to 41 N*m (30 ft. lbs.) torque.
REAR BUMPER TEMPORARY BUMPER
REMOVAL
(1) Support bumper.
(2) Remove bumper bracket nuts and bolts from
the frame rails.
(3) Remove support and remove bumper from the
vehicle.
STANDARD BUMPER
REMOVAL
(1) Support the bumper,
(2) Remove bumper nuts and bolts from the frame
side rails and bumper brackets.
(3) Remove support and bumper from vehicle.
(4) Remove nuts and bolts, and remove bumper
brackets from bumper.
BOLT
FRAME
RAIL
NUT-LOCK
NUT
BUMPER
BRACKET
J9123-326
Fig.
1 Front
Bumper
INSTALLATION
(1) Position the bumper brackets on the bumper
with the bolt holes aligned. Install the bolts and
nuts.
Tighten to 41 N«m (30 ft. lbs.) torque.
(2) Position and support the bumper at the rear of
the vehicle. Align the bumper bracket bolt holes with
the frame side rail holes.
(3) Insert bumper bracket bolts in the brackets and
the frame side rails. Install nuts. Verify bumper is aligned with the rear corner panels. Tighten the nuts
to 68 N-m (50 ft. lbs.) torque.
(4) Remove the support from the bumper.
BUMPER FILLER PANEL-RAMCHARGER
REMOVAL
(1) Remove the filler panel screws from the rear
cross sill.
FRAME
AND
BUMPERS
Page 789 of 1502
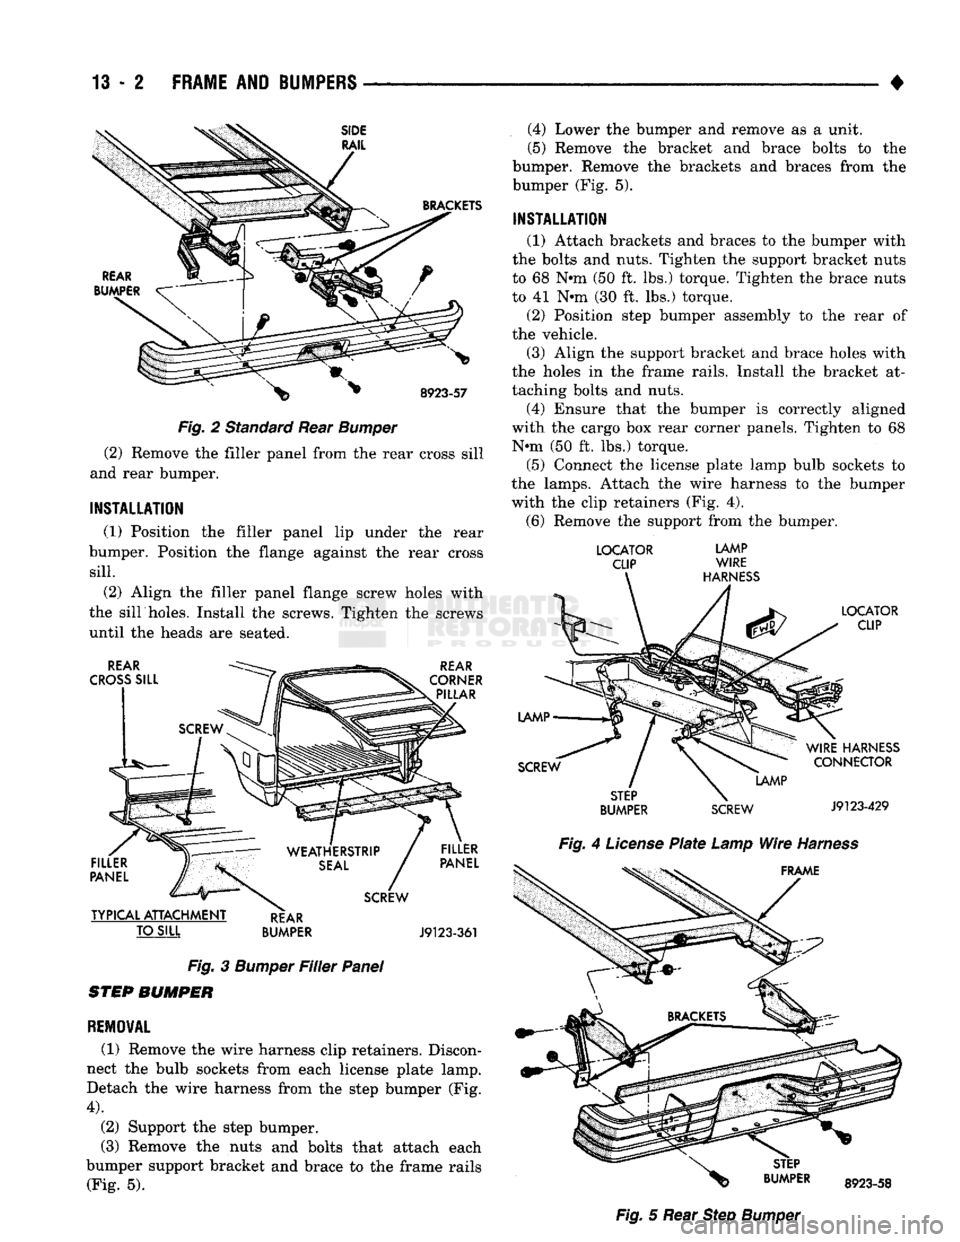
13 - 2
FRAME
AND
BUMPERS
•
Fig. 2 Standard Rear Bumper
(2) Remove the filler panel from the rear cross sill
and rear bumper.
INSTALLATION
(1) Position the filler panel lip under the rear
bumper. Position the flange against the rear cross
sill.
(2) Align the filler panel flange screw holes with
the sill holes. Install the screws. Tighten the screws
until the heads are seated.
TO SILL
BUMPER J9123-361
Fig. 3 Bumper Filler Panel
STEP BUMPER
REMOVAL
(1) Remove the wire harness clip retainers. Discon
nect the bulb sockets from each license plate lamp.
Detach the wire harness from the step bumper (Fig.
4).
(2) Support the step bumper.
(3) Remove the nuts and bolts that attach each
bumper support bracket and brace to the frame rails (Fig. 5). (4) Lower the bumper and remove as a unit.
(5) Remove the bracket and brace bolts to the
bumper. Remove the brackets and braces from the
bumper (Fig. 5).
INSTALLATION
(1) Attach brackets and braces to the bumper with
the bolts and nuts. Tighten the support bracket nuts
to 68 N*m (50 ft. lbs.) torque. Tighten the brace nuts
to 41 N»m (30 ft. lbs.) torque.
(2) Position step bumper assembly to the rear of
the vehicle.
(3) Align the support bracket and brace holes with
the holes in the frame rails. Install the bracket at
taching bolts and nuts. (4) Ensure that the bumper is correctly aligned
with the cargo box rear corner panels. Tighten to 68 N«m (50 ft. lbs.) torque.
(5) Connect the license plate lamp bulb sockets to
the lamps. Attach the wire harness to the bumper
with the clip retainers (Fig. 4). (6) Remove the support from the bumper.
LOCATOR
LAMP
CLIP WIRE
BUMPER SCREW J9123429
Fig. 4 License Plate Lamp Wire Harness Fig. 5 Rear Step Bumper
Page 790 of 1502
•
FRAME
AND
BUMPERS
13 - 3
SNOW
PLOW
NDEX
page
Power
Angling Cylinder Service
16
Power
Unit
. . 13
Service
Information
3
Snow
Plow Control Module
17
Snow
Plow Frame
16
SERVICE
INFORMATION
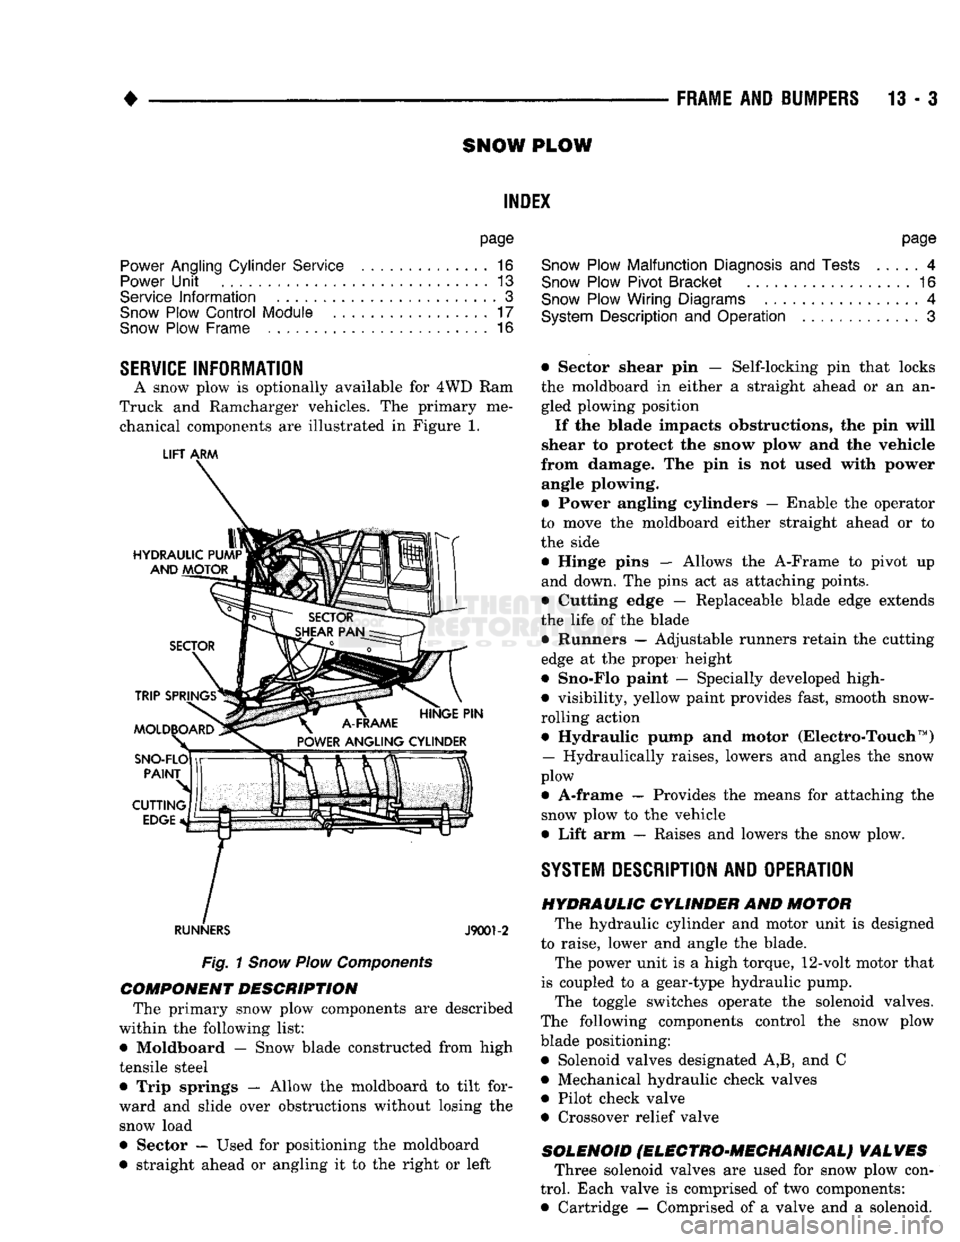
A snow plow is optionally available for 4WD Ram
Truck and Ramcharger vehicles. The primary me chanical components are illustrated in Figure 1.
LIFT
ARM
RUNNERS
J9001-2
Fig.
1
Snow
Plow
Components
COMPONENT DESCRIPTION
The primary snow plow components are described
within the following list:
• Moldboard — Snow blade constructed from high
tensile steel
• Trip springs — Allow the moldboard to tilt for
ward and slide over obstructions without losing the snow load
• Sector — Used for positioning the moldboard
• straight ahead or angling it to the right or left
page
Snow
Plow Malfunction
Diagnosis
and
Tests
4
Snow
Plow Pivot Bracket
16
Snow
Plow Wiring Diagrams
4
System
Description
and
Operation
3
• Sector shear pin — Self-locking pin that locks the moldboard in either a straight ahead or an an
gled plowing position
If the blade impacts obstructions, the pin will
shear to protect the snow plow and the vehicle
from damage. The pin is not used with power angle plowing.
• Power angling cylinders — Enable the operator
to move the moldboard either straight ahead or to
the side
• Hinge pins — Allows the A-Frame to pivot up
and down. The pins act as attaching points.
• Cutting edge — Replaceable blade edge extends
the life of the blade • Runners — Adjustable runners retain the cutting
edge at the proper height
• Sno-Flo paint — Specially developed high-
• visibility, yellow paint provides fast, smooth snow-
rolling action • Hydraulic pump and motor (Electro-Touch ™)
— Hydraulically raises, lowers and angles the snow
plow
• A-frame — Provides the means for attaching the snow plow to the vehicle
• Lift arm — Raises and lowers the snow plow.
SYSTEM
DESCRIPTION
AND OPERATION HYDRAULIC CYLINDER
AND
MOTOR
The hydraulic cylinder and motor unit is designed
to raise, lower and angle the blade. The power unit is a high torque, 12-volt motor that
is coupled to a gear-type hydraulic pump. The toggle switches operate the solenoid valves.
The following components control the snow plow blade positioning: • Solenoid valves designated A,B, and C
• Mechanical hydraulic check valves
• Pilot check valve
• Crossover relief valve
SOLENOID
fELEGTRO'MEGHANIGALj VALVES
Three solenoid valves are used for snow plow con
trol. Each valve is comprised of two components:
• Cartridge — Comprised of a valve and a solenoid.