FIAT BARCHETTA 2003 1.G Service Manual
Manufacturer: FIAT, Model Year: 2003, Model line: BARCHETTA, Model: FIAT BARCHETTA 2003 1.GPages: 170, PDF Size: 3.55 MB
Page 41 of 170
40
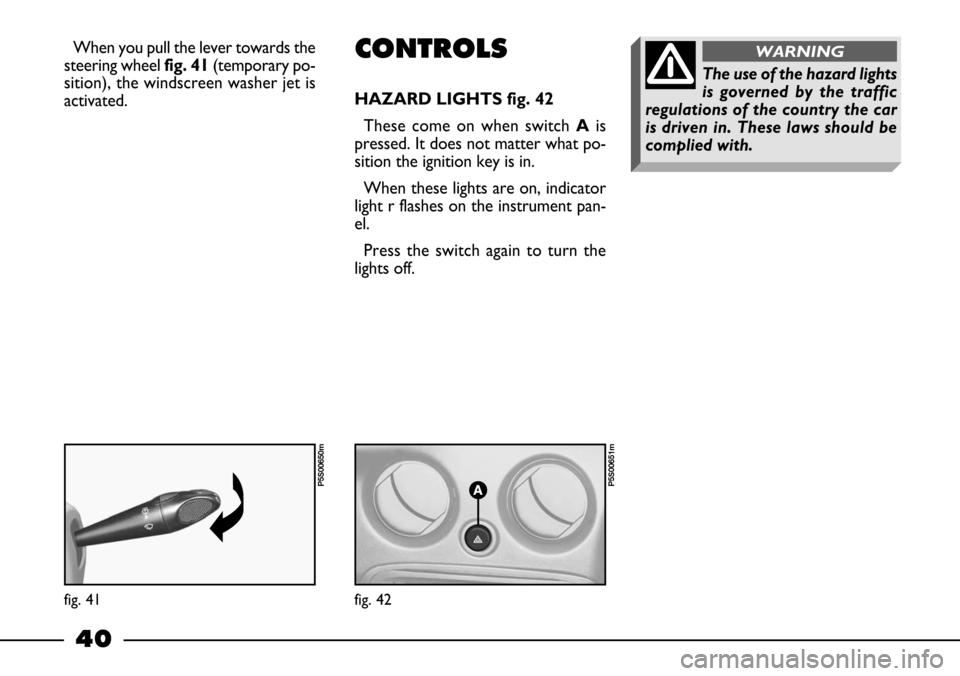
When you pull the lever towards the
steering wheel fig. 41(temporary po-
sition), the windscreen washer jet is
activated. CONTROLS
HAZARD LIGHTS fig. 42
These come on when switch Ais
pressed. It does not matter what po-
sition the ignition key is in.
When these lights are on, indicator
light r flashes on the instrument pan-
el.
Press the switch again to turn the
lights off.
fig. 41
P5S00650m
fig. 42
P5S00651m
The use of the hazard lights
is governed by the traffic
regulations of the country the car
is driven in. These laws should be
complied with.
WARNING
Page 42 of 170
41
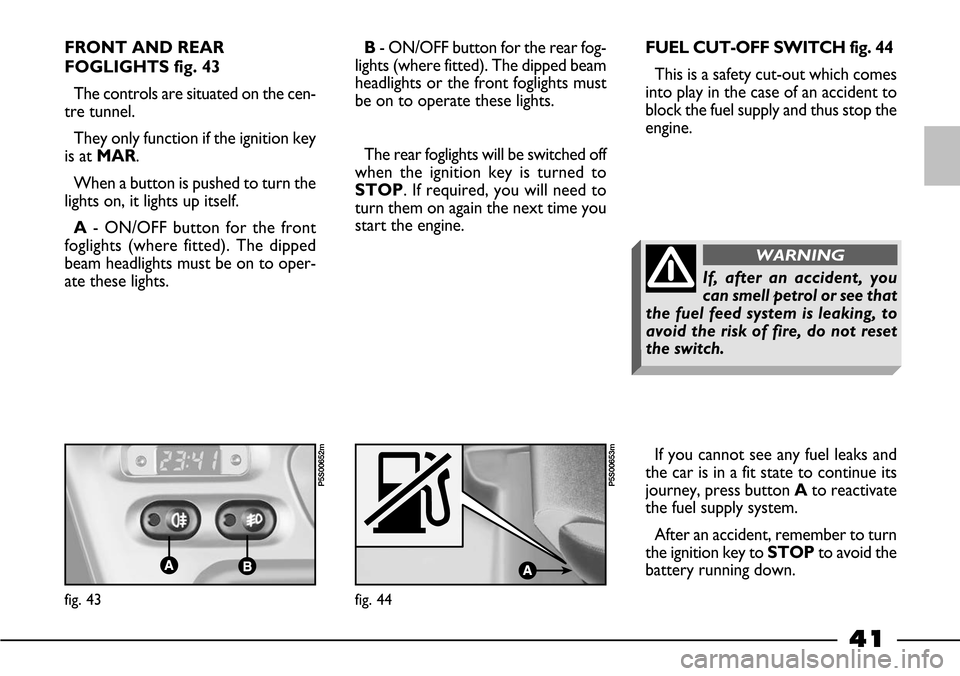
FRONT AND REAR
FOGLIGHTS fig. 43
The controls are situated on the cen-
tre tunnel.
They only function if the ignition key
is at MAR.
When a button is pushed to turn the
lights on, it lights up itself.
A- ON/OFF button for the front
foglights (where fitted). The dipped
beam headlights must be on to oper-
ate these lights.B- ON/OFF button for the rear fog-
lights (where fitted). The dipped beam
headlights or the front foglights must
be on to operate these lights.
The rear foglights will be switched off
when the ignition key is turned to
STOP. If required, you will need to
turn them on again the next time you
start the engine.FUEL CUT-OFF SWITCH fig. 44
This is a safety cut-out which comes
into play in the case of an accident to
block the fuel supply and thus stop the
engine.
If you cannot see any fuel leaks and
the car is in a fit state to continue its
journey, press button Ato reactivate
the fuel supply system.
After an accident, remember to turn
the ignition key toSTOPto avoid the
battery running down.
fig. 44
P5S00653m
fig. 43
P5S00652m
If, after an accident, you
can smell petrol or see that
the fuel feed system is leaking, to
avoid the risk of fire, do not reset
the switch.
WARNING
Page 43 of 170
42
INTERIOR
EQUIPMENT
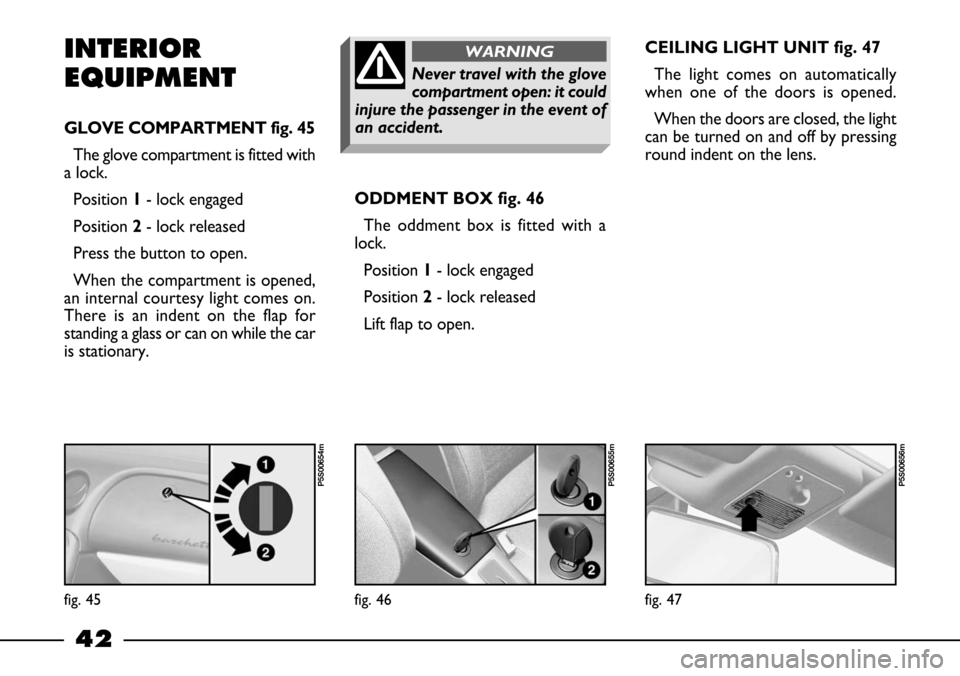
GLOVE COMPARTMENT fig. 45
The glove compartment is fitted with
a lock.
Position1- lock engaged
Position2- lock released
Press the button to open.
When the compartment is opened,
an internal courtesy light comes on.
There is an indent on the flap for
standing a glass or can on while the car
is stationary.ODDMENT BOX fig. 46
The oddment box is fitted with a
lock.
Position 1- lock engaged
Position 2- lock released
Lift flap to open. CEILING LIGHT UNIT fig. 47
The light comes on automatically
when one of the doors is opened.
When the doors are closed, the light
can be turned on and off by pressing
round indent on the lens.
fig. 45
P5S00654m
fig. 46
P5S00655m
fig. 47
P5S00656m
Never travel with the glove
compartment open: it could
injure the passenger in the event of
an accident.
WARNING
Page 44 of 170
43
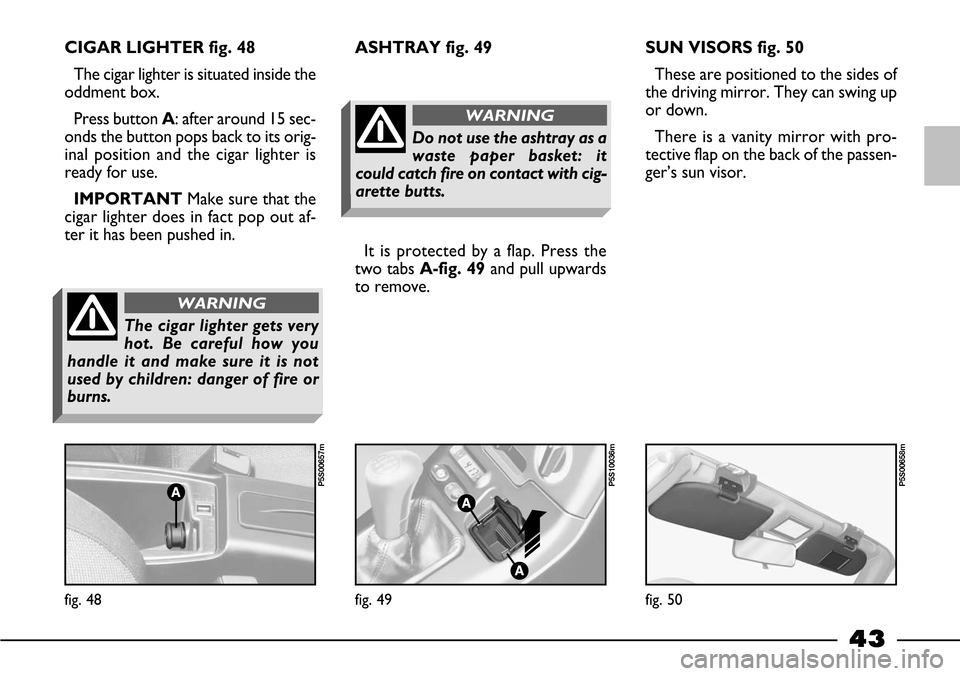
CIGAR LIGHTER fig. 48
The cigar lighter is situated inside the
oddment box.
Press button A: after around 15 sec-
onds the button pops back to its orig-
inal position and the cigar lighter is
ready for use.
IMPORTANTMake sure that the
cigar lighter does in fact pop out af-
ter it has been pushed in.ASHTRAY fig. 49
It is protected by a flap. Press the
two tabs A-fig. 49 and pull upwards
to remove. SUN VISORS fig. 50
These are positioned to the sides of
the driving mirror. They can swing up
or down.
There is a vanity mirror with pro-
tective flap on the back of the passen-
ger’s sun visor.
The cigar lighter gets very
hot. Be careful how you
handle it and make sure it is not
used by children: danger of fire or
burns.
WARNING
Do not use the ashtray as a
waste paper basket: it
could catch fire on contact with cig-
arette butts.
WARNING
fig. 48
P5S00657m
fig. 49
P5S10036m
fig. 50
P5S00658m
Page 45 of 170
44
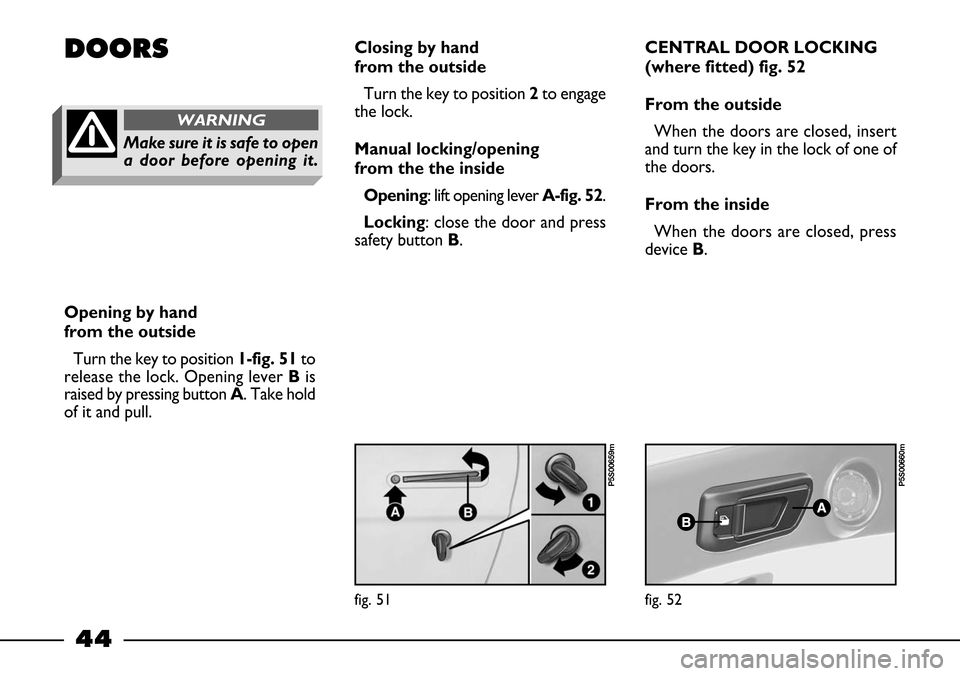
DOORSClosing by hand
from the outside
Turn the key to position 2to engage
the lock.
Manual locking/opening
from the the inside
Opening: lift opening lever A-fig. 52.
Locking: close the door and press
safety button B.CENTRAL DOOR LOCKING
(where fitted) fig. 52
From the outside
When the doors are closed, insert
and turn the key in the lock of one of
the doors.
From the inside
When the doors are closed, press
device B.
Opening by hand
from the outside
Turn the key to position 1-fig. 51to
release the lock. Opening lever Bis
raised by pressing button A. Take hold
of it and pull.
fig. 51
P5S00659m
fig. 52
P5S00660m
Make sure it is safe to open
a door before opening it.
WARNING
Page 46 of 170
45
IMPORTANT If one of the doors
is not shut properly or there is a fail-
ure in the system, the central locking
feature will not work and, after some
attempts, the device stops working for
around two minutes. In these two
minutes the doors can be locked or
unlocked manually without the elec-
trical system coming into play. After
the two minutes the control unit is
ready to receive commands once
more.
If the reason for the malfunction has
been removed, the device will start to
work properly again. If not it will cut
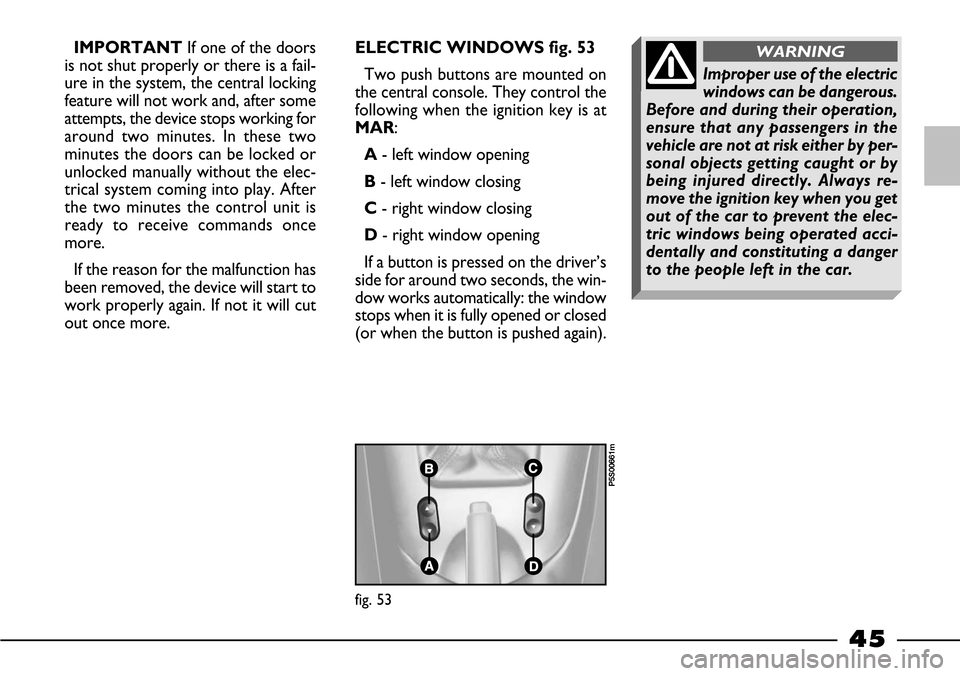
out once more.ELECTRIC WINDOWS fig. 53
Two push buttons are mounted on
the central console. They control the
following when the ignition key is at
MAR:
A- left window opening
B- left window closing
C- right window closing
D- right window opening
If a button is pressed on the driver’s
side for around two seconds, the win-
dow works automatically: the window
stops when it is fully opened or closed
(or when the button is pushed again).
fig. 53
P5S00661m
Improper use of the electric
windows can be dangerous.
Before and during their operation,
ensure that any passengers in the
vehicle are not at risk either by per-
sonal objects getting caught or by
being injured directly. Always re-
move the ignition key when you get
out of the car to prevent the elec-
tric windows being operated acci-
dentally and constituting a danger
to the people left in the car.
WARNING
Page 47 of 170
46
HOOD
USEFUL TIPS
Before opening the hood, make sure
its housing is not obstructed by any-
thing.
To prevent damage to the window
seals, open and close the hood either
with the windows right down or with
the doors open.
Do not fold the hood when it is wet:
it may get damaged if it is left in its
housing for a long period.
Do not rest weights on the open or
closed hood: the canvas and the frame
could get damaged.
Do not open or close the hood
when the outside temperature is very
low.
Snow or ice must be removed with
objects that do not leave scratches.
Take the car to a Fiat Dealership
for any repairs or maintenance.OPENING
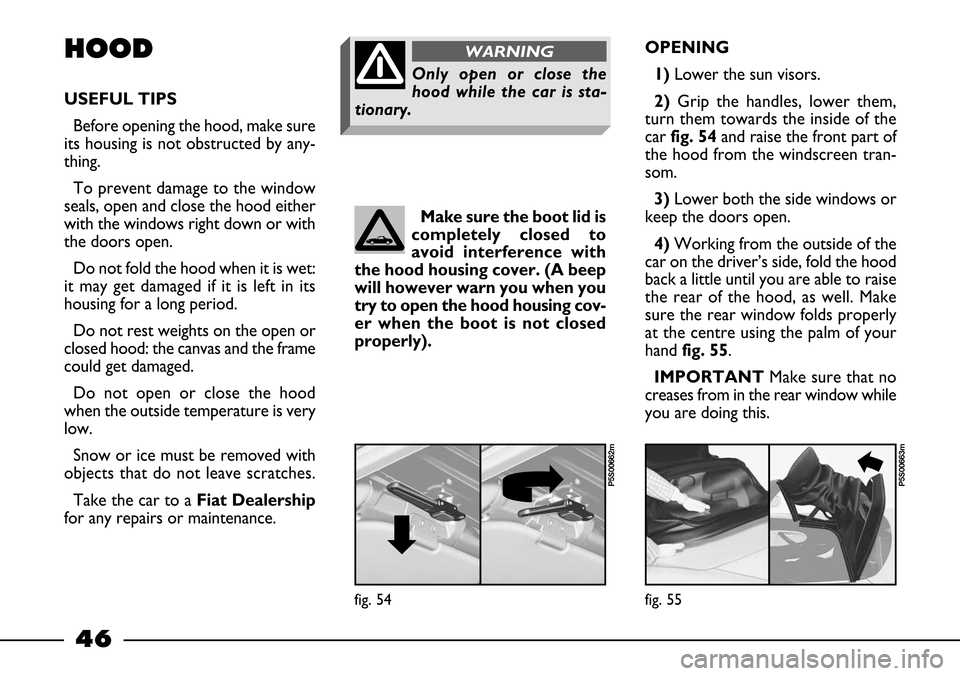
1) Lower the sun visors.
2) Grip the handles, lower them,
turn them towards the inside of the
car fig. 54and raise the front part of
the hood from the windscreen tran-
som.
3)Lower both the side windows or
keep the doors open.
4) Working from the outside of the
car on the driver’s side, fold the hood
back a little until you are able to raise
the rear of the hood, as well. Make
sure the rear window folds properly
at the centre using the palm of your
hand fig. 55.
IMPORTANTMake sure that no
creases from in the rear window while
you are doing this. Make sure the boot lid is
completely closed to
avoid interference with
the hood housing cover. (A beep
will however warn you when you
try to open the hood housing cov-
er when the boot is not closed
properly).
Only open or close the
hood while the car is sta-
tionary.
WARNING
fig. 55
P5S00663m
fig. 54
P5S00662m
Page 48 of 170
47
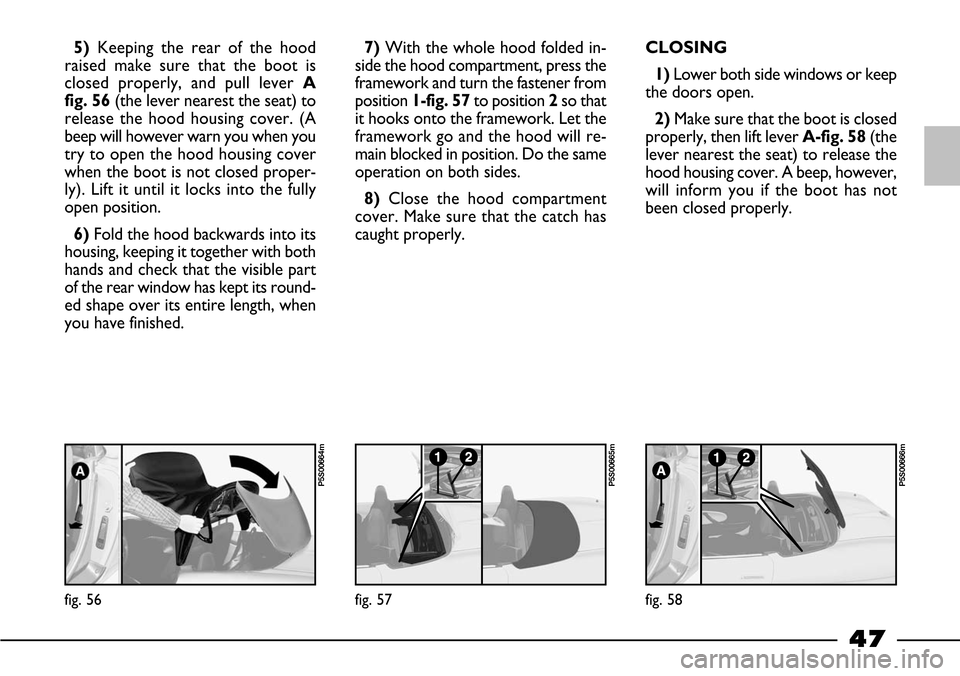
5)Keeping the rear of the hood
raised make sure that the boot is
closed properly, and pull lever A
fig. 56(the lever nearest the seat) to
release the hood housing cover. (A
beep will however warn you when you
try to open the hood housing cover
when the boot is not closed proper-
ly). Lift it until it locks into the fully
open position.
6) Fold the hood backwards into its
housing, keeping it together with both
hands and check that the visible part
of the rear window has kept its round-
ed shape over its entire length, when
you have finished.7) With the whole hood folded in-
side the hood compartment, press the
framework and turn the fastener from
position 1-fig. 57to position 2so that
it hooks onto the framework. Let the
framework go and the hood will re-
main blocked in position. Do the same
operation on both sides.
8)Close the hood compartment
cover. Make sure that the catch has
caught properly.CLOSING
1) Lower both side windows or keep
the doors open.
2)Make sure that the boot is closed
properly, then lift lever A-fig. 58(the
lever nearest the seat) to release the
hood housing cover. A beep, however,
will inform you if the boot has not
been closed properly.
fig. 56
P5S00664m
fig. 57
P5S00665m
fig. 58
P5S00666m
Page 49 of 170

48
3) Lift the hood housing cover until
it locks into the completely open po-
sition.
4)Turn the hood fastener from po-
sition2-fig. 58to position 1so that it
rests in the appropriate recess. Do the
same operation on both sides. Work-
ing from outside the car, lift hood with
one hand until you can grip the rear
part of the hood with the other hand.
Keep the hood folded, and pull it right
to the front of the car so you can close
the hood compartment cover, fig. 59.
Make sure the catch on the cover has
caught properly.5) Rest the rear of the hood on the
hood compartment cover fig. 60.
6)Rest the front part of the hood on
the windscreen transom.7) From the inside of the car, swing
the sun visors down, keep the hood
lowered with one hand using the re-
cess for the purpose fig. 61and, with
the other hand, lock it onto the wind-
screen transom by turning the handles.
8)Lift the sun visors.
fig. 60
P5S00667m
fig. 59
P5S00729m
fig. 61
P5S00668m
Page 50 of 170
49
HARD TOP
(where fitted)
The hard top is fitted with a heated
rear window and should be used in-
stead of the hood during the winter.
USEFUL TIPS
Before fitting the hard top, fold the
hood into its housing properly and an-
chor the hood housing cover to its
safety devices.
Remove the seat belts from the slots
in the seat backs and tip the seat backs
forward.
Position and remove the hard top
with the side windows fully lowered
or the doors open. Get another per-
son to help you to support the hard
top on the right and left.
If repairs or maintenance are neces-
sary, take the car to a Fiat Dealer-
ship.FITTING
1)Make sure the hard top’s fitting
handles on the windscreen transom
are turned inwards.
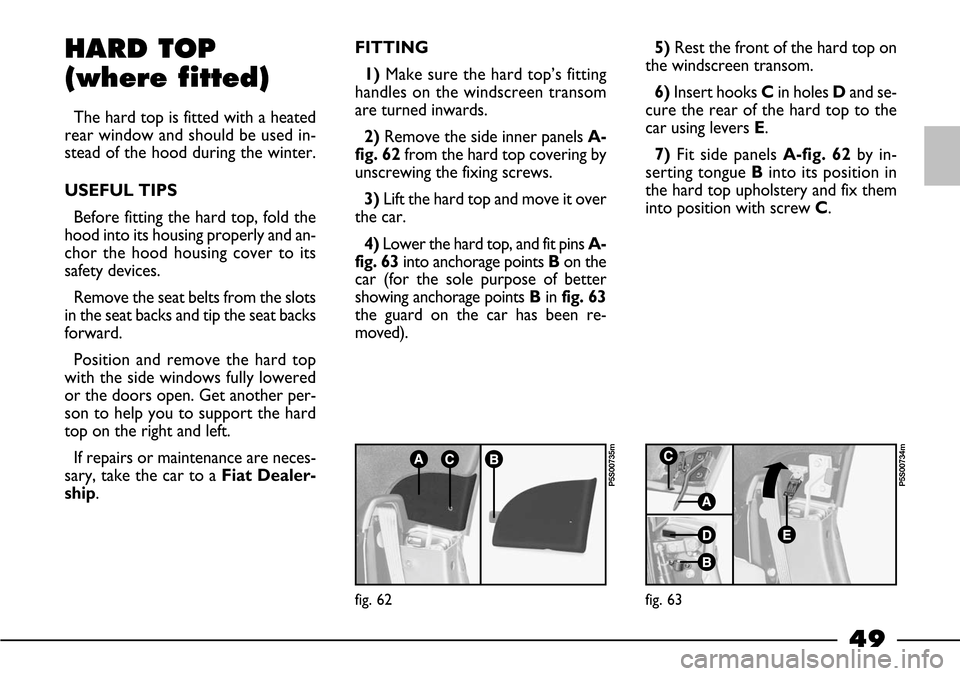
2)Remove the side inner panels A-
fig. 62from the hard top covering by
unscrewing the fixing screws.
3) Lift the hard top and move it over
the car.
4) Lower the hard top, and fit pins A-
fig. 63into anchorage points Bon the
car (for the sole purpose of better
showing anchorage points Bin fig. 63
the guard on the car has been re-
moved).5)Rest the front of the hard top on
the windscreen transom.
6)Insert hooks Cin holes Dand se-
cure the rear of the hard top to the
car using levers E.
7)Fit side panels A-fig. 62by in-
serting tongue Binto its position in
the hard top upholstery and fix them
into position with screw C.
fig. 63
P5S00734m
fig. 62
P5S00735m