FIAT BARCHETTA 2003 1.G Workshop Manual
Manufacturer: FIAT, Model Year: 2003, Model line: BARCHETTA, Model: FIAT BARCHETTA 2003 1.GPages: 170, PDF Size: 3.55 MB
Page 51 of 170
50
8) Connect the heated rear window’s
electrical connector to the connector
located under the left side panel.
9) Working from inside the car,
swing the sun visors down and lock
the hard top in position on the wind-
screen transom by turning the handles
fig. 64.
REMOVAL
1)Working from inside the car, low-
er the sun visors and release the hard
top from the windscreen transom by
pulling down and turning the handles
fig. 65towards the inside of the car.2)Remove the side panels A-fig. 66
from the hard top’s upholstery by un-
doing fixing screws B.
3) Disconnect the heated rear win-
dow’s electrical connector from the
connector located under the left side
panel.
4) Push red safety buttons A-fig. 67
upwards and release levers B.
5)Release hooks Cfrom holes D
(for the sole purpose of better show-
ing anchorage points Din fig. 67, the
guard on the car has been removed).6) Working from outside the car,
and with someone else to lend a hand,
raise the hard top and move it back-
wards.
7) Refit side panels A-fig. 66over
the hard top upholstery and fix them
with screws B.
fig. 64
P5S00736m
fig. 65
P5S00737m
fig. 67
P5S00738m
fig. 66
P5S00739m
Page 52 of 170
51
STORAGE
1)Place the hard top on a suitable
rack if possible.
2) Clean and protect the painted
parts by applying protective wax.
3)Sprinkle talcum powder on the
rubber weather-stripping.
4) Clean the interior upholstery, re-
moving dust with a soft brush or vac-
uum cleaner.
5)Cover the hard top with a fabric
or perforated plastic cover. Do not
use imperforated plastic as it will not
allow any moisture on the hard top to
evaporate.HEATED REAR WINDOW
The device only works when the ig-
nition key is at MAR. Press the but-
ton A-fig. 68 on the hard top panel
between the closing handles in central
position to switch the device on and
off. WIND STOP
The wind stop is located behind the
seatsfig. 70. It increases driving com-
fort at all speeds by limiting the air tur-
bulence created in the passenger com-
partment when travelling with the
hood open.
fig. 69
P5S10023m
fig. 68
P5S10048m
fig. 70
P5S10024m
Page 53 of 170
52
It allows to prolong the “open hood”
season.
FITTING THE WIND STOP
(1
stfitting)
1)Fit the side brackets Aand B
fig. 69in the holes on the internal
sides of the car, on the right and on
the left.
2)Fasten the side brackets Aand B
to the body with the nuts and screws
provided. Insert the screws and the
washers from the outside of the body
side and fasten the brackets from the
inside with the nuts, fig. 69.3)Fit the ends of the wind spot C
and D fig. 70inside the previously fit-
ted brackets. Make sure that the wind
stop cover is facing the rear part of the
car.
4)Position the coverE-fig. 71on
the brackets Aand Bas shown in the
figure. Then fasten knobs F on the sup-
porting bracket screw.
5)Fasten the knobs Fso to lock the
wind stop in position.
The wind stop will not prevent open-
ing and closing the hood once it is fit-
ted.REMOVING THE WIND STOP
Simply loosen the fastening knobs F
by turning them anticlockwise. Re-
move the wind stop by pulling it up-
wards. After removing the wind stop,
refasten the knobs Fon the support-
ing brackets.
For refitting the wind stop, simply
loosen the fastening knobs F, insert
the wind stop and fasten it. Leave sup-
porting brackets Aand Bfitted.
For safety reasons, do not
store the removed wind
stop in the passenger compart-
ment.
WARNING
fig. 71
P5S10025m
Fit and remove the wind
stop with the hood folded
away in the specific compartment
and the hood compartment open.
WARNING
Page 54 of 170
53
BONNET
To open the bonnet:
1) Pull lever A-fig. 72in the direc-
tion of the arrow.Before lifting the bonnet,
check the windscreen wiper
arms are not lifted from the wind-
screen.
WARNING
2)Press leverA-fig. 73.
3)Lift the bonnet gripping it in the
centre of itsfront edge and, at the
same time, release support rod A-
fig. 74from its clip.
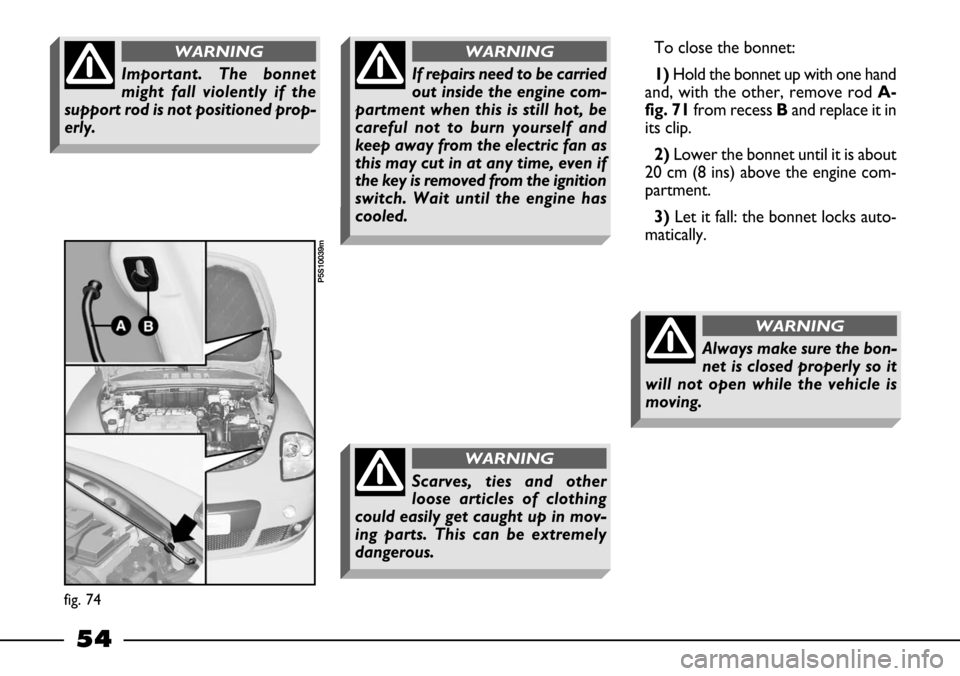
4) Place the tip of the support rod in
recess Bof the bonnet.
fig. 73
P5S00617m
fig. 72
P5S00670m
Check the fasteners after
the first 500 km. Repeat the
check regularly.
WARNING
We recommend removing
the wind stop if you plan on
using the car with the hood closed
for a long time. Store the removed
wind stop in the boot.
WARNING
Perform the operation on-
ly when the vehicle is sta-
tionary.
WARNING
Page 55 of 170
54
Important. The bonnet
might fall violently if the
support rod is not positioned prop-
erly.
WARNINGTo close the bonnet:
1) Hold the bonnet up with one hand
and, with the other, remove rod A-
fig. 71from recess Band replace it in
its clip.
2)Lower the bonnet until it is about
20 cm (8 ins) above the engine com-
partment.
3)Let it fall: the bonnet locks auto-
matically.
Always make sure the bon-
net is closed properly so it
will not open while the vehicle is
moving.
WARNING
fig. 74
P5S10039m
If repairs need to be carried
out inside the engine com-
partment when this is still hot, be
careful not to burn yourself and
keep away from the electric fan as
this may cut in at any time, even if
the key is removed from the ignition
switch. Wait until the engine has
cooled.
WARNING
Scarves, ties and other
loose articles of clothing
could easily get caught up in mov-
ing parts. This can be extremely
dangerous.
WARNING
Page 56 of 170
55
BOOT
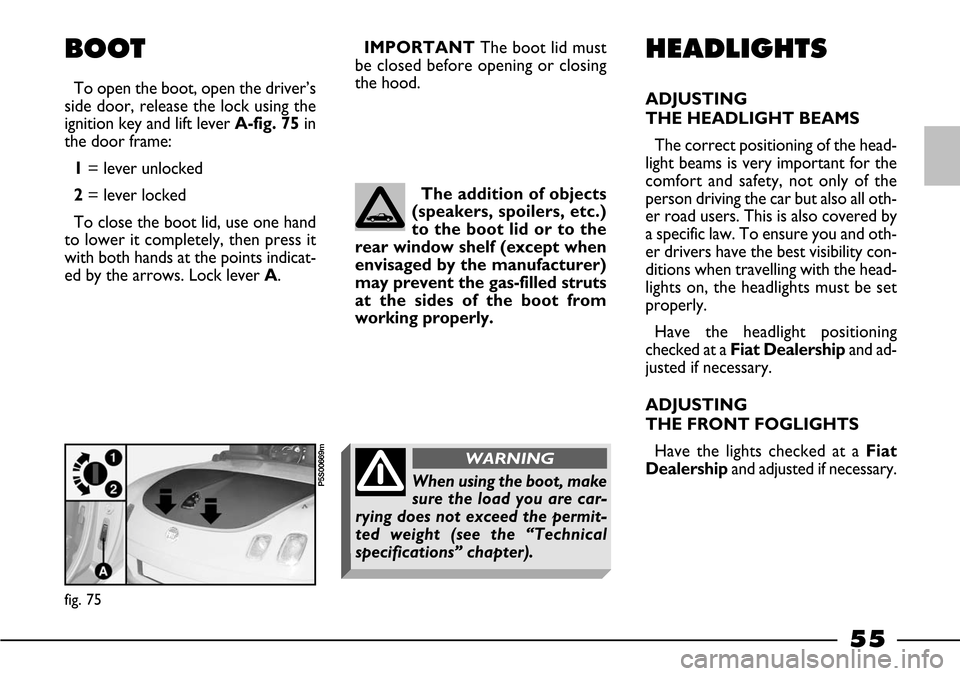
To open the boot, open the driver’s
side door, release the lock using the
ignition key and lift lever A-fig. 75in
the door frame:
1= lever unlocked
2= lever locked
To close the boot lid, use one hand
to lower it completely, then press it
with both hands at the points indicat-
ed by the arrows. Lock lever A.IMPORTANTThe boot lid must
be closed before opening or closing
the hood.
HEADLIGHTS
ADJUSTING
THE HEADLIGHT BEAMS
The correct positioning of the head-
light beams is very important for the
comfort and safety, not only of the
person driving the car but also all oth-
er road users. This is also covered by
a specific law. To ensure you and oth-
er drivers have the best visibility con-
ditions when travelling with the head-
lights on, the headlights must be set
properly.
Have the headlight positioning
checked at a Fiat Dealershipand ad-
justed if necessary.
ADJUSTING
THE FRONT FOGLIGHTS
Have the lights checked at a Fiat
Dealershipand adjusted if necessary. The addition of objects
(speakers, spoilers, etc.)
to the boot lid or to the
rear window shelf (except when
envisaged by the manufacturer)
may prevent the gas-filled struts
at the sides of the boot from
working properly.
fig. 75
P5S00669mWhen using the boot, make
sure the load you are car-
rying does not exceed the permit-
ted weight (see the “Technical
specifications” chapter).
WARNING
Page 57 of 170
56
ABS
(where fitted)
The vehicle is fitted with an ABS
braking system, which prevents the
wheels from locking when braking,
makes the most of road grip and gives
the best control when emergency
braking under difficult road conditions.
The driver can tell the ABS system
has come into play when he feels the
brake pedal pulsating slightly and the
system gets noisier.
This should not be interpreted as a
fault in the brakes; on the contrary it
is a sign that the ABS system is work-
ing: it tells the driver that the vehicle
is travelling at the limit of its road grip
and that he should alter his speed to
fit the type of road surface.
The ABS system is an addition to the
basic braking system. If there is a mal-
function, the system turns off auto-
matically and only the ordinary brakes
continue to work.If a failure occurs, and consequently
the anti-lock function is not effective,
the braking system will continue to
work as usual.
If you have never driven a vehicle
with ABS before, you should practice
using the system on slippery terrain,
obviously with the necessary safety
precautions and keeping to the High-
way Code of the country you are in.
It is also a good idea to read the fol-
lowing information carefully.
The advantage in using the ABS sys-
tem is that it continues to give you
maximum manoeuvrability even when
braking hard in conditions of poor grip
by preventing the wheels locking.
You should, however, not expect the
braking distance to always decrease:
for example surfaces with gravel or
fresh snow on a slippery road will in
fact increase the braking distance.To exploit the ABS system to the full
in the event of necessity, you should
take heed of the following advice:
The ABS exploits the tyre-
road grip available to the
full, but it cannot improve it; you
should therefore take every care
when driving on slippery surfaces,
and not take unnecessary risks.
WARNING
If the ABS system cuts in it
is a sign that the grip be-
tween the tyre and the road surface
has reached the limit: you must
slow down to match the speed to
the road grip available.
WARNING
Page 58 of 170
57
Braking while cornering always re-
quires extreme care even when using
ABS.
The most important advice to follow
is the following:If you follow these tips you will be
able to brake better in any situation.
IMPORTANTVehicles fitted with
ABS may only be fitted with wheel
rims, tyres and brake pads of the make
and model approved by the vehicle
manufacturer.
An Electronic Brake Distributor
EBD integrates the ABSsystem and
uses the control unit and sensors of
theABSsystem to increase perfor-
mance of the brake system.
If there is a fault, the warn-
ing light >will light up on
the dashboard. At this point, reduce
speed and go to a Fiat Dealership
to have your vehicle checked and
put right immediately.
WARNING
When the ABS cuts in, and
you feel the brake pedal
pulsating, do not remove your foot,
but keep it pressed. In doing so you
will stop in the shortest amount of
space possible under the current
road conditions.
WARNING
The car is fitted with an
electronic braking device
(EBD). If the >and xwarning
light turn on at the same time, this
means that there is an EBD system
fault. In this case violent braking
may be accompanied by early rear
wheel locking with the possibility of
skidding. Drive the car extremely
carefully to the nearest Fiat Deal-
ership to have the system checked.
WARNING
The lighting of warning
light >when the engine is
running normally indicates a fault
in the ABS system only. In this case,
the braking system will still be ef-
fective without the anti-lock device.
In these conditions EBD system op-
eration can be reduced. Also in this
case we recommend immediately
taking the car to a Fiat Dealership
avoiding sudden braking to have
the system checked.
WARNING
If the xbrake fluid low
warning light comes on,
stop the vehicle immediately and
contact the nearest Fiat Dealership.
Fluid leaks from the hydraulic sys-
tem, in fact, can compromise brake
system operation, both traditional
systems and systems with ABS.
WARNING
Page 59 of 170
58
AIR BAG
Description and operation
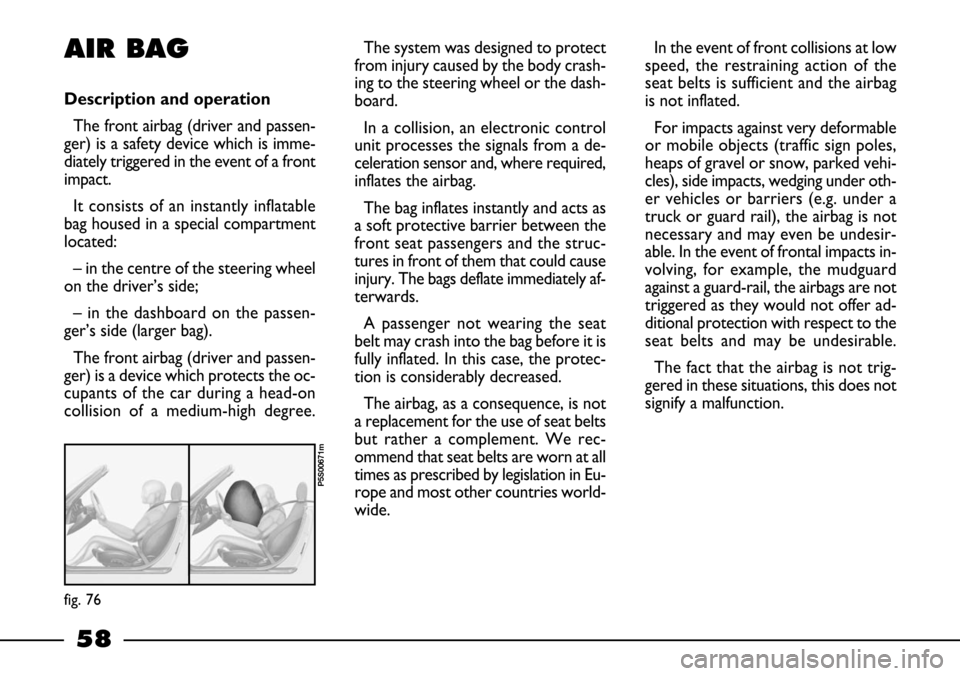
The front airbag (driver and passen-
ger) is a safety device which is imme-
diately triggered in the event of a front
impact.
It consists of an instantly inflatable
bag housed in a special compartment
located:
– in the centre of the steering wheel
on the driver’s side;
– in the dashboard on the passen-
ger’s side (larger bag).
The front airbag (driver and passen-
ger) is a device which protects the oc-
cupants of the car during a head-on
collision of a medium-high degree. The system was designed to protect
from injury caused by the body crash-
ing to the steering wheel or the dash-
board.
In a collision, an electronic control
unit processes the signals from a de-
celeration sensor and, where required,
inflates the airbag.
The bag inflates instantly and acts as
a soft protective barrier between the
front seat passengers and the struc-
tures in front of them that could cause
injury. The bags deflate immediately af-
terwards.
A passenger not wearing the seat
belt may crash into the bag before it is
fully inflated. In this case, the protec-
tion is considerably decreased.
The airbag, as a consequence, is not
a replacement for the use of seat belts
but rather a complement. We rec-
ommend that seat belts are worn at all
times as prescribed by legislation in Eu-
rope and most other countries world-
wide. In the event of front collisions at low
speed, the restraining action of the
seat belts is sufficient and the airbag
is not inflated.
For impacts against very deformable
or mobile objects (traffic sign poles,
heaps of gravel or snow, parked vehi-
cles), side impacts, wedging under oth-
er vehicles or barriers (e.g. under a
truck or guard rail), the airbag is not
necessary and may even be undesir-
able. In the event of frontal impacts in-
volving, for example, the mudguard
against a guard-rail, the airbags are not
triggered as they would not offer ad-
ditional protection with respect to the
seat belts and may be undesirable.
The fact that the airbag is not trig-
gered in these situations, this does not
signify a malfunction.
fig. 76
P5S00671m
Page 60 of 170
59
AIRBAG PASSENGER SIDE
(where fitted)
The passenger side airbag was de-
signed and calibrated to protect a per-
son wearing seat belts.
When fully inflated, the bag will fill
most of the space between the dash-
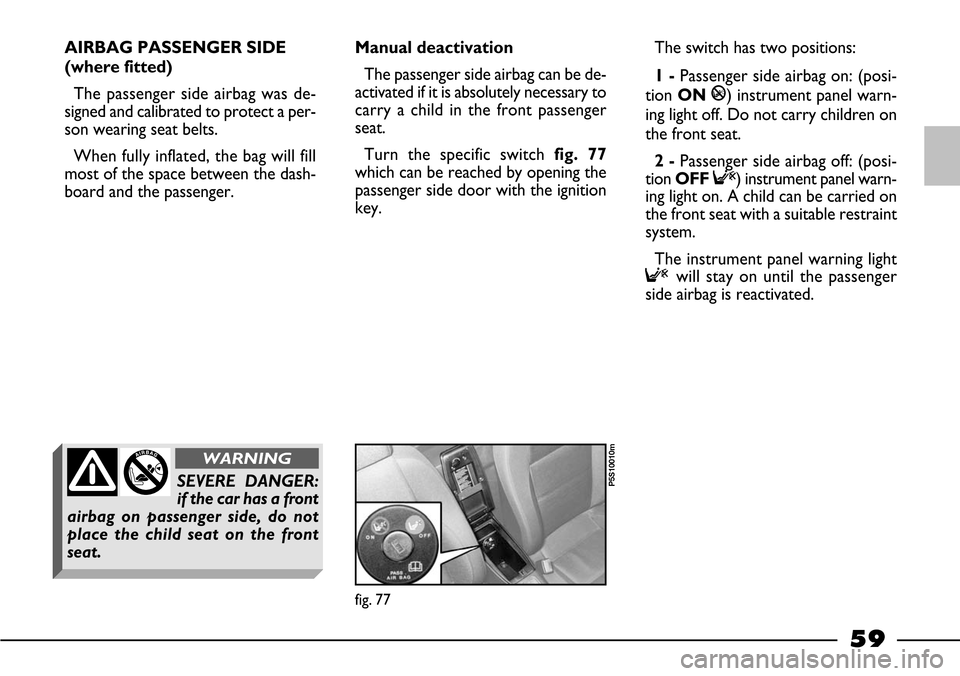
board and the passenger. Manual deactivation
The passenger side airbag can be de-
activated if it is absolutely necessary to
carry a child in the front passenger
seat.
Turn the specific switch fig. 77
which can be reached by opening the
passenger side door with the ignition
key. The switch has two positions:
1 - Passenger side airbag on: (posi-
tion ON
P) instrument panel warn-
ing light off. Do not carry children on
the front seat.
2 -Passenger side airbag off: (posi-
tion OFFF) instrument panel warn-
ing light on. A child can be carried on
the front seat with a suitable restraint
system.
The instrument panel warning light
Fwill stay on until the passenger
side airbag is reactivated.
SEVERE DANGER:
if the car has a front
airbag on passenger side, do not
place the child seat on the front
seat.
WARNING
fig. 77
P5S10010m