FIAT MULTIPLA 2004 1.G Connect NavPlus Manual
Manufacturer: FIAT, Model Year: 2004, Model line: MULTIPLA, Model: FIAT MULTIPLA 2004 1.GPages: 202, PDF Size: 2.22 MB
Page 171 of 202
170
CONNECT NAV
NAVIGATOR
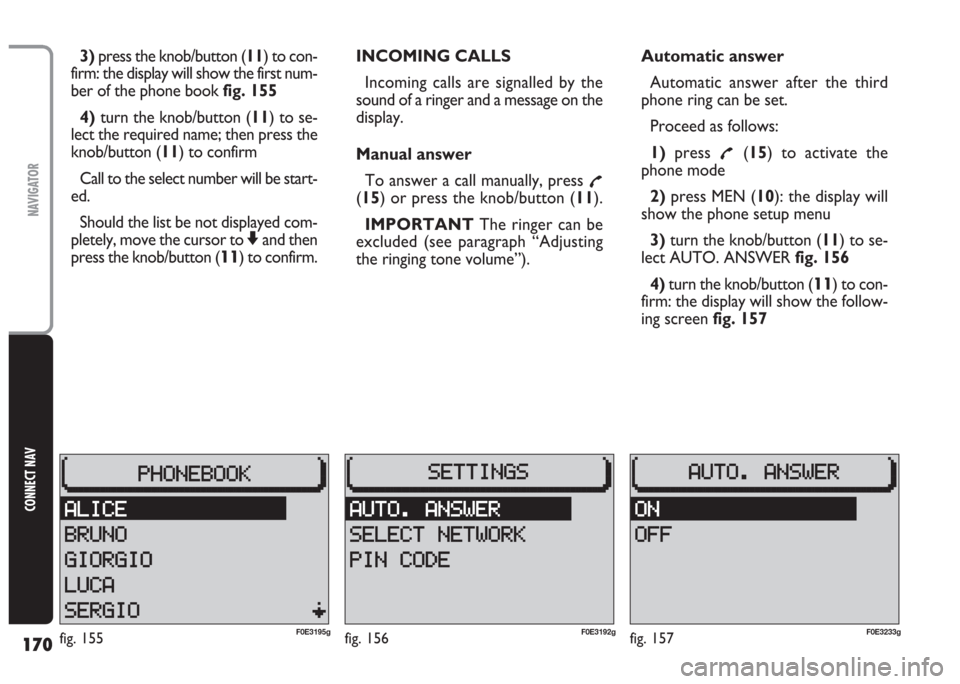
3)press the knob/button (11) to con-
firm: the display will show the first num-
ber of the phone book fig. 155
4) turn the knob/button (11) to se-
lect the required name; then press the
knob/button (11) to confirm
Call to the select number will be start-
ed.
Should the list be not displayed com-
pletely, move the cursor to
Zand then
press the knob/button (
11) to confirm.INCOMING CALLS
Incoming calls are signalled by the
sound of a ringer and a message on the
display.
Manual answer
To answer a call manually, press
£(15) or press the knob/button (11).
IMPORTANT The ringer can be
excluded (see paragraph “Adjusting
the ringing tone volume”).Automatic answer
Automatic answer after the third
phone ring can be set.
Proceed as follows:
1)press
£(15) to activate the
phone mode
2)press MEN (10): the display will
show the phone setup menu
3)turn the knob/button (11) to se-
lect AUTO. ANSWER fig. 156
4)turn the knob/button (
11) to con-
firm: the display will show the follow-
ing screen fig. 157
fig. 156F0E3192gfig. 155F0E3195gfig. 157F0E3233g
Page 172 of 202
171
CONNECT NAV
NAVIGATOR
5) turn the knob/button (11) to se-
lect the required setting (ON or OFF)
6)press the knob/button (11) to
confirm: the display will show the
phone setup menu.
Refusing a call
To refuse a call, press ESC (9).
The caller will hear the busy line sig-
nal.
Ending a call
To end a call, press
£(15).
Redialling
Using the list of last called number
it is possible to redial a number (see
“Selecting a number from the list of
last called numbers” in this section).TELEPHONE CALLS TO
FOREIGN COUNTRIES
The GSM international standard en-
ables to call foreign countries.
The prerequisite is the existence of
a roaming agreement between
providers.
Check that your network provider
allows to use the SIM card in roam-
ing conditions.
The network provider can provide
you with the list of countries having lo-
cal network providers and the differ-
ent tariffs.
IMPORTANT To call abroad con-
tact immediately your network
provider and remember that your SIM
card shall be enabled for calls in roam-
ing conditions.Proceed as follows:
1) dial the international dialling code
of the required country
2) dial the area code without di-
allingthe first “0” and then dial the
phone number
IMPORTANT the first two figures
of the international dialling code can
be replaced by symbol “
+”
Example
International code of
the required country: 0039
Italy
Area dialling code: 011 Torino
Phone number: 12…. Office
Dialled number: +391112706..
Page 173 of 202
172
CONNECT NAV
NAVIGATOR
When you are abroad
Who calls you from your country of
origin can dial the number without in-
ternational code.
Who calls you from a country dif-
ferent from that of origin must dial the
international code of your country.
When calling a fix phone number, di-
al first the area dialling code and then
the phone number, the international
code is not required.SELECTING THE NETWORK
This function shall be used for se-
lecting another network (not the GSM
one), provided that there is a roaming
agreement between your provider and
other providers. A list with preferred
radio stations can also be selected.
This is particularly useful when you
have to stay abroad for long periods
since the tariffs of the various network
providers can be very different.Selecting the network manually
Use this function for selecting man-
ually the required network.
Proceed as follows:
1)press
£(15) to activate the
phone mode
2)press MEN (10): the display will
show the phone setup menu
3)turn the knob/button (11) to
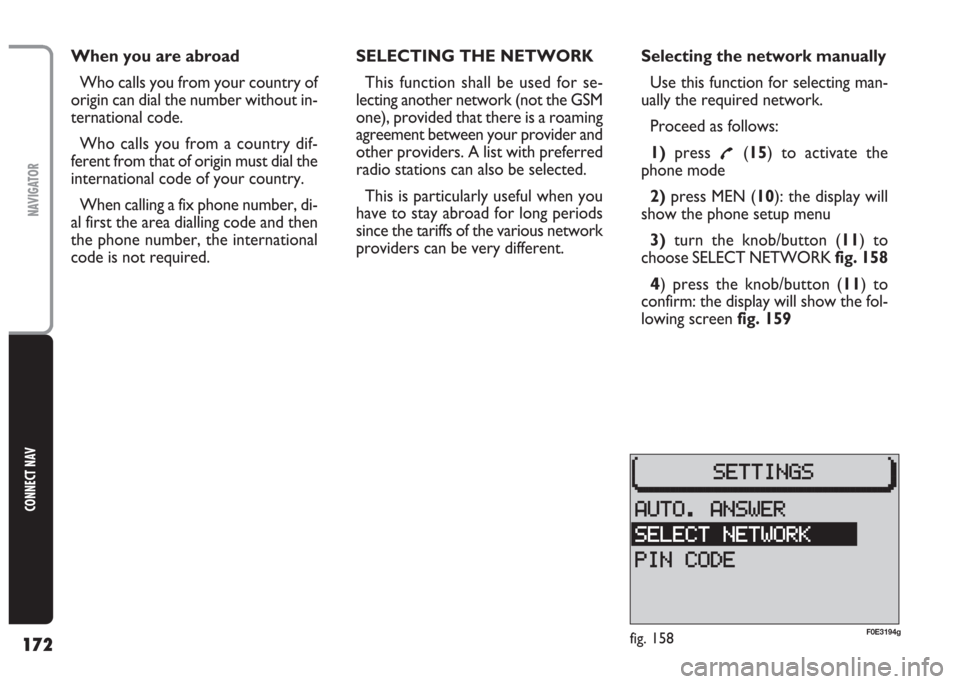
choose SELECT NETWORK fig. 158
4) press the knob/button (11) to
confirm: the display will show the fol-
lowing screen fig. 159
fig. 158F0E3194g
Page 174 of 202
173
CONNECT NAV
NAVIGATOR
5)turn the knob/button (11) to
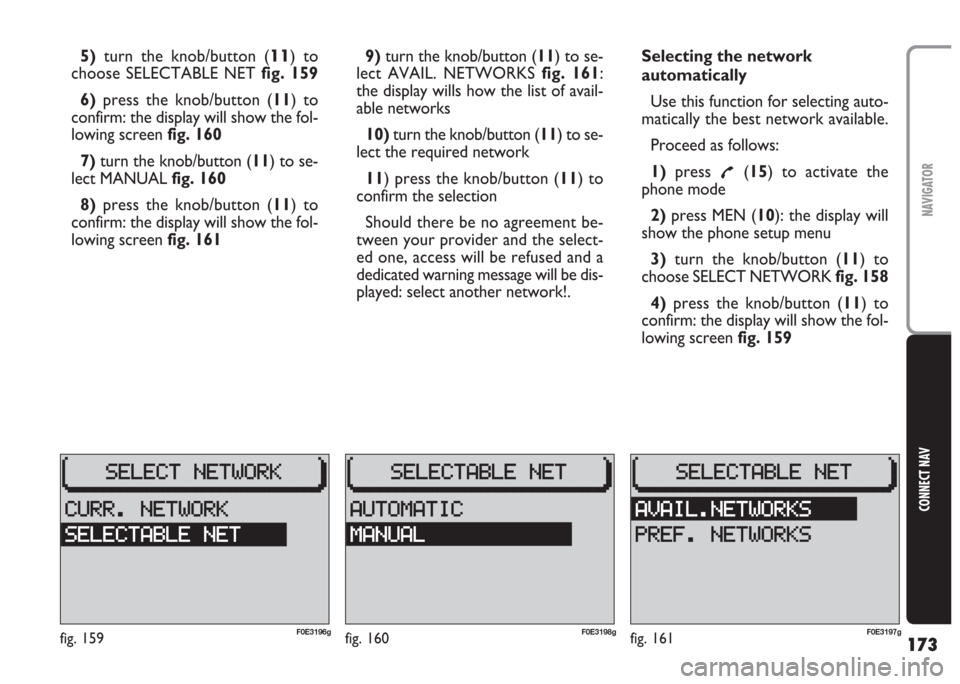
choose SELECTABLE NET fig. 159
6) press the knob/button (11) to
confirm: the display will show the fol-
lowing screen fig. 160
7)turn the knob/button (11) to se-
lect MANUAL fig. 160
8)press the knob/button (11) to
confirm: the display will show the fol-
lowing screen fig. 1619)turn the knob/button (11) to se-
lect AVAIL. NETWORKS fig. 161:
the display wills how the list of avail-
able networks
10)turn the knob/button (11) to se-
lect the required network
11) press the knob/button (11) to
confirm the selection
Should there be no agreement be-
tween your provider and the select-
ed one, access will be refused and a
dedicated warning message will be dis-
played: select another network!.Selecting the network
automatically
Use this function for selecting auto-
matically the best network available.
Proceed as follows:
1)press
£(15) to activate the
phone mode
2)press MEN (10): the display will
show the phone setup menu
3)turn the knob/button (11) to
choose SELECT NETWORK fig. 158
4)press the knob/button (11) to
confirm: the display will show the fol-
lowing screen fig. 159
fig. 159F0E3196gfig. 160F0E3198gfig. 161F0E3197g
Page 175 of 202
174
CONNECT NAV
NAVIGATOR
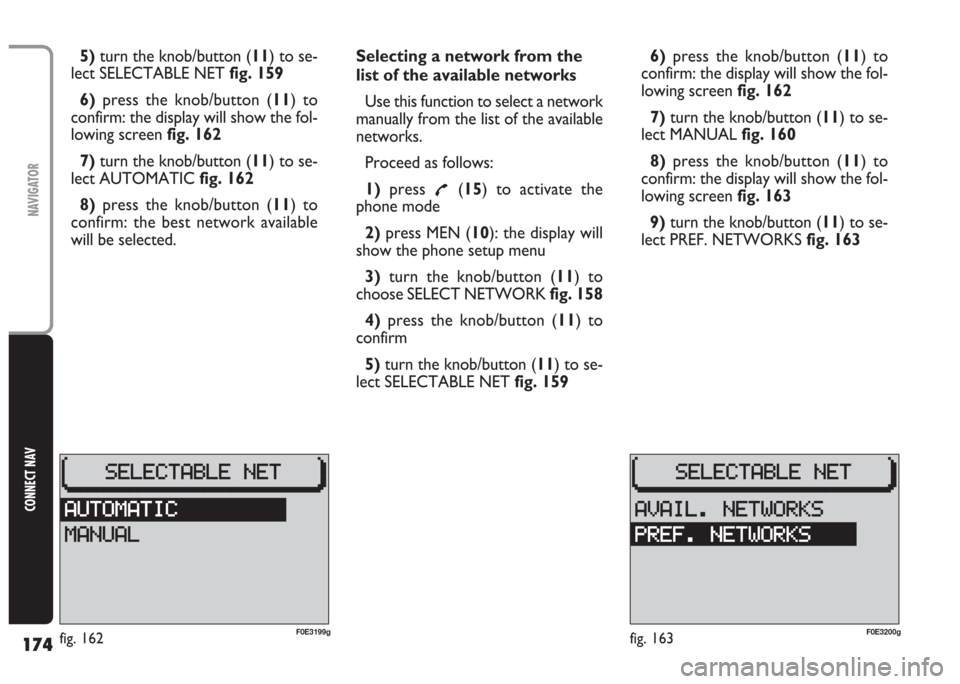
5) turn the knob/button (11) to se-
lect SELECTABLE NET fig. 159
6)press the knob/button (11) to
confirm: the display will show the fol-
lowing screen fig. 162
7)turn the knob/button (11) to se-
lect AUTOMATIC fig. 162
8)press the knob/button (11) to
confirm: the best network available
will be selected.Selecting a network from the
list of the available networks
Use this function to select a network
manually from the list of the available
networks.
Proceed as follows:
1)press
£(15) to activate the
phone mode
2)press MEN (10): the display will
show the phone setup menu
3) turn the knob/button (11) to
choose SELECT NETWORK fig. 158
4) press the knob/button (11) to
confirm
5)turn the knob/button (11) to se-
lect SELECTABLE NET fig. 1596)press the knob/button (11) to
confirm: the display will show the fol-
lowing screen fig. 162
7)turn the knob/button (11) to se-
lect MANUAL fig. 160
8)press the knob/button (11) to
confirm: the display will show the fol-
lowing screen fig. 163
9)turn the knob/button (11) to se-
lect PREF. NETWORKS fig. 163
fig. 163F0E3200gfig. 162F0E3199g
Page 176 of 202
175
CONNECT NAV
NAVIGATOR
10)press the knob/button (11) to
confirm: the display will show the list
of the available networks
11) turn the knob/button (11) to se-
lect the required network
12)press the knob/button (11) to
confirm the selection
Should the selected network be not
available (e.g.: overload or poor signal),
the display will show a dedicated
warning message.
In this case another network shall be
selected.Displaying the selected
network
Use this function to display the se-
lected network.
Proceed as follows:
1)press
£(15) to activate the
phone mode
2) press MEN (10): the display will
show the phone setup menu
3)turn the knob/button (11) to
choose SELECT NETWORK fig. 158
4) press the knob/button (
11) to
confirm: the display will show the fol-
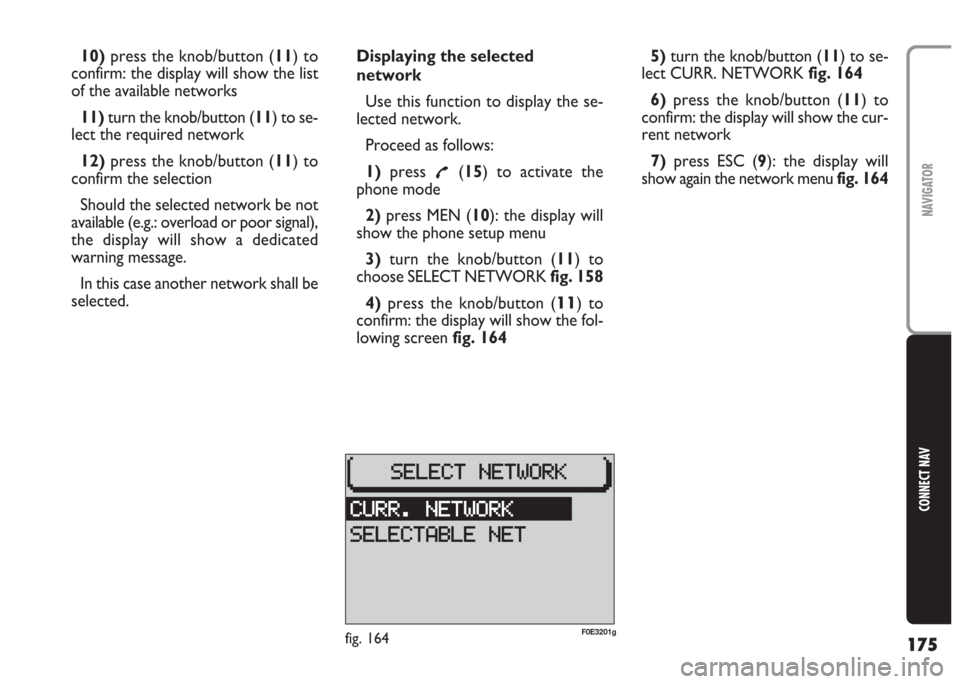
lowing screen fig. 1645)turn the knob/button (11) to se-
lect CURR. NETWORK fig. 164
6) press the knob/button (11) to
confirm: the display will show the cur-
rent network
7)press ESC (9): the display will
show again the network menu fig. 164
fig. 164F0E3201g
Page 177 of 202
176
CONNECT NAV
NAVIGATOR
PHONEBOOK
Entering names/phone
numbers
To display the names/phone numbers
contained in the phone book, proceed
as follows:
1)press
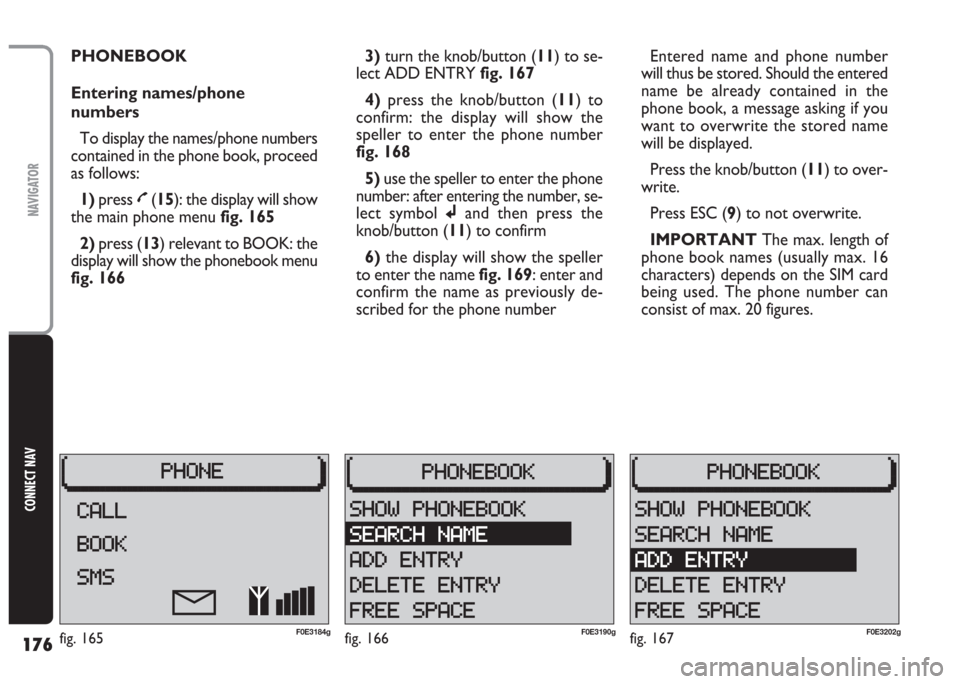
£(15): the display will show
the main phone menu fig. 165
2) press (13) relevant to BOOK: the
display will show the phonebook menu
fig. 1663)turn the knob/button (11) to se-
lect ADD ENTRY fig. 167
4) press the knob/button (11) to
confirm: the display will show the
speller to enter the phone number
fig. 168
5)use the speller to enter the phone
number: after entering the number, se-
lect symbol jand then press the
knob/button (11) to confirm
6)the display will show the speller
to enter the name fig. 169: enter and
confirm the name as previously de-
scribed for the phone numberEntered name and phone number
will thus be stored. Should the entered
name be already contained in the
phone book, a message asking if you
want to overwrite the stored name
will be displayed.
Press the knob/button (11) to over-
write.
Press ESC (9) to not overwrite.
IMPORTANT The max. length of
phone book names (usually max. 16
characters) depends on the SIM card
being used. The phone number can
consist of max. 20 figures.
fig. 167F0E3202gfig. 166F0E3190gfig. 165F0E3184g
Page 178 of 202
177
CONNECT NAV
NAVIGATOR
Deleting entries from
the phone book
To delete one or more entry from
the phone book, proceed as follows:
1)press
£(15): the display will show
the main phone menu fig. 165
2) press (13) relevant to BOOK: the
display will show the phone book
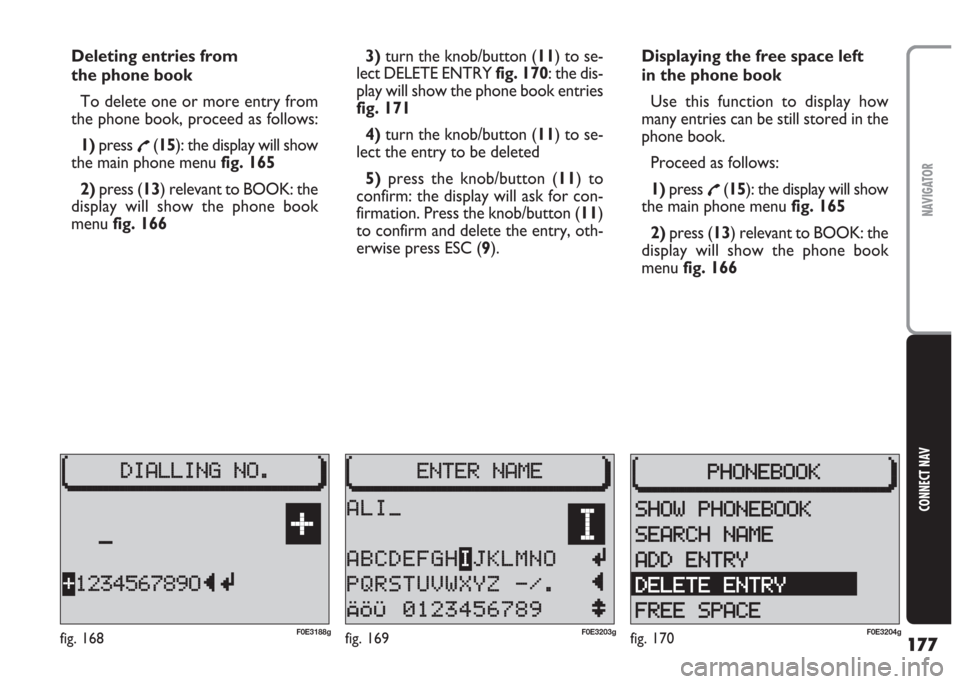
menu fig. 1663)turn the knob/button (11) to se-
lect DELETE ENTRY fig. 170: the dis-
play will show the phone book entries
fig. 171
4)turn the knob/button (11) to se-
lect the entry to be deleted
5)press the knob/button (11) to
confirm: the display will ask for con-
firmation. Press the knob/button (11)
to confirm and delete the entry, oth-
erwise press ESC (9).Displaying the free space left
in the phone book
Use this function to display how
many entries can be still stored in the
phone book.
Proceed as follows:
1) press
£(15): the display will show
the main phone menu fig. 165
2) press (13) relevant to BOOK: the
display will show the phone book
menu fig. 166
fig. 170F0E3204gfig. 168F0E3188gfig. 169F0E3203g
Page 179 of 202
178
CONNECT NAV
NAVIGATOR
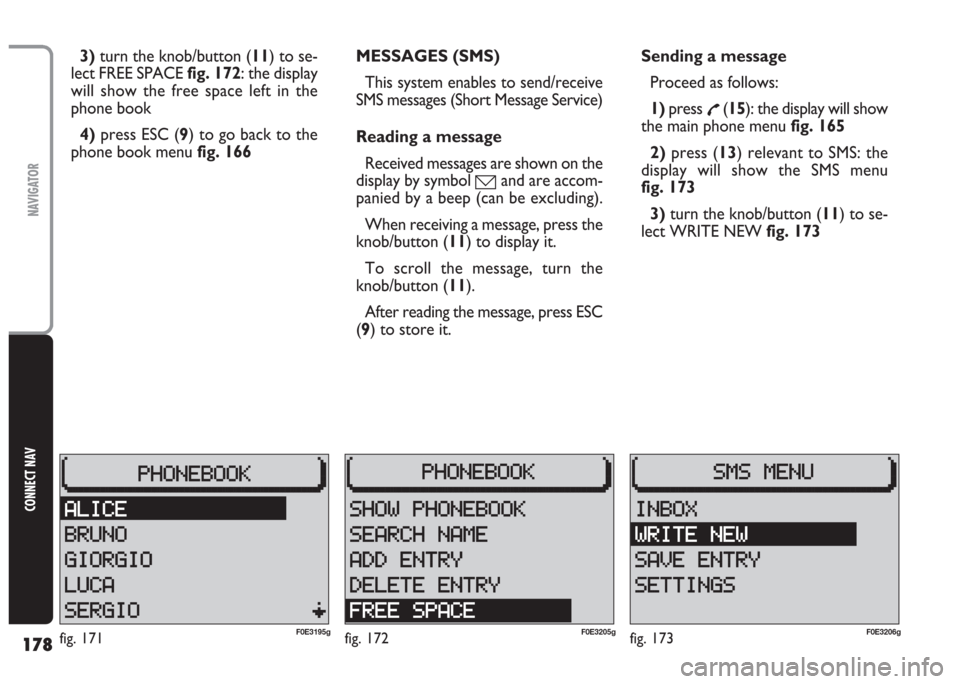
3)turn the knob/button (11) to se-
lect FREE SPACE fig. 172: the display
will show the free space left in the
phone book
4)press ESC (9) to go back to the
phone book menu fig. 166MESSAGES (SMS)
This system enables to send/receive
SMS messages (Short Message Service)
Reading a message
Received messages are shown on the
display by symbol
óand are accom-
panied by a beep (can be excluding).
When receiving a message, press the
knob/button (11) to display it.
To scroll the message, turn the
knob/button (11).
After reading the message, press ESC
(9) to store it.Sending a message
Proceed as follows:
1)press
£(15): the display will show
the main phone menu fig. 165
2) press (13) relevant to SMS: the
display will show the SMS menu
fig. 173
3)turn the knob/button (11) to se-
lect WRITE NEW fig. 173
fig. 173F0E3206gfig. 171F0E3195gfig. 172F0E3205g
Page 180 of 202
179
CONNECT NAV
NAVIGATOR
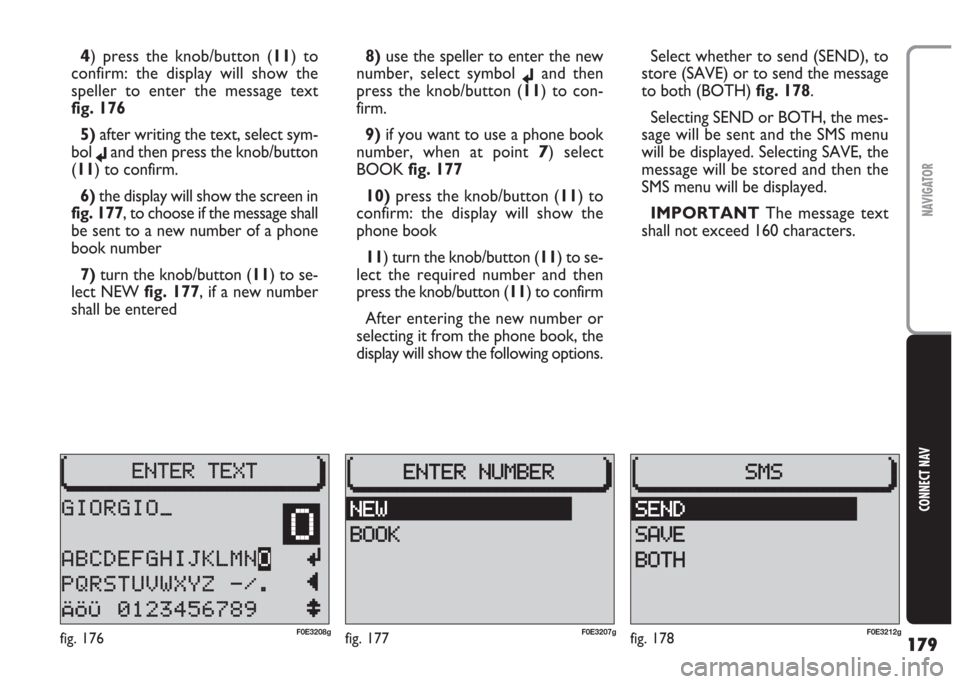
4) press the knob/button (11) to
confirm: the display will show the
speller to enter the message text
fig. 176
5) after writing the text, select sym-
bol
jand then press the knob/button
(11) to confirm.
6)the display will show the screen in
fig. 177, to choose if the message shall
be sent to a new number of a phone
book number
7) turn the knob/button (11) to se-
lect NEW fig. 177, if a new number
shall be entered8)use the speller to enter the new
number, select symbol
jand then
press the knob/button (11) to con-
firm.
9)if you want to use a phone book
number, when at point
7) select
BOOK fig. 177
10)press the knob/button (11) to
confirm: the display will show the
phone book
11) turn the knob/button (11) to se-
lect the required number and then
press the knob/button (11) to confirm
After entering the new number or
selecting it from the phone book, the
display will show the following options.Select whether to send (SEND), to
store (SAVE) or to send the message
to both (BOTH) fig. 178.
Selecting SEND or BOTH, the mes-
sage will be sent and the SMS menu
will be displayed. Selecting SAVE, the
message will be stored and then the
SMS menu will be displayed.
IMPORTANT The message text
shall not exceed 160 characters.
fig. 177F0E3207gfig. 176F0E3208gfig. 178F0E3212g