FIAT MULTIPLA 2006 1.G Owners Manual
Manufacturer: FIAT, Model Year: 2006, Model line: MULTIPLA, Model: FIAT MULTIPLA 2006 1.GPages: 266, PDF Size: 4.61 MB
Page 191 of 266
190
SAFETY
DEVICES
CORRECT USE
OF THE CAR
WARNING
LIGHTS AND
MESSAGES
CAR
MAINTENANCE
TECHNICAL
SPECIFICATIONS
INDEX
DASHBOARD
AND CONTROLS
IN AN
EMERGENCY
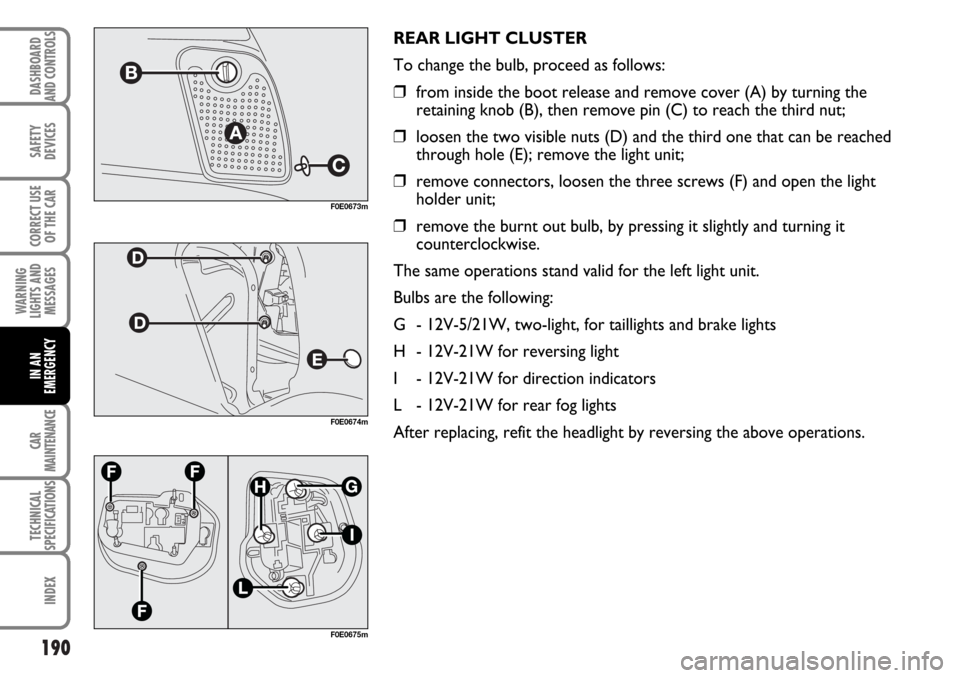
REAR LIGHT CLUSTER
To change the bulb, proceed as follows:
❒from inside the boot release and remove cover (A) by turning the
retaining knob (B), then remove pin (C) to reach the third nut;
❒loosen the two visible nuts (D) and the third one that can be reached
through hole (E); remove the light unit;
❒remove connectors, loosen the three screws (F) and open the light
holder unit;
❒remove the burnt out bulb, by pressing it slightly and turning it
counterclockwise.
The same operations stand valid for the left light unit.
Bulbs are the following:
G - 12V-5/21W, two-light, for taillights and brake lights
H - 12V-21W for reversing light
I - 12V-21W for direction indicators
L - 12V-21W for rear fog lights
After replacing, refit the headlight by reversing the above operations.
F0E0673m
F0E0674m
F0E0675m
Page 192 of 266
191
SAFETY
DEVICES
CORRECT USE
OF THE CAR
WARNING
LIGHTS AND
MESSAGES
CAR
MAINTENANCE
TECHNICAL
SPECIFICATIONS
INDEX
DASHBOARD
AND CONTROLS
IN AN
EMERGENCY
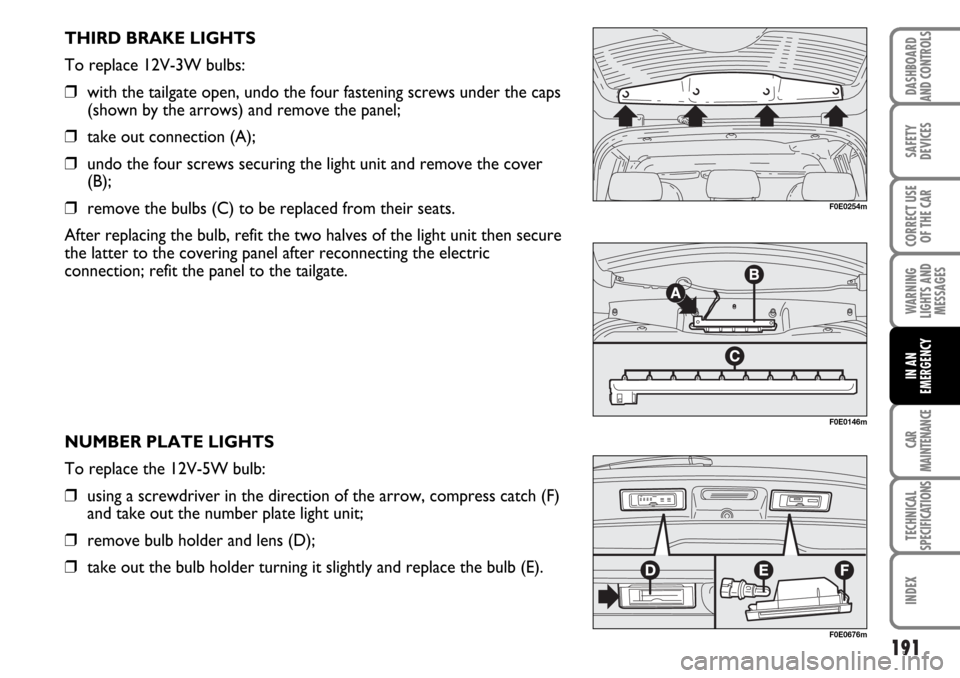
THIRD BRAKE LIGHTS
To replace 12V-3W bulbs:
❒with the tailgate open, undo the four fastening screws under the caps
(shown by the arrows) and remove the panel;
❒take out connection (A);
❒undo the four screws securing the light unit and remove the cover
(B);
❒remove the bulbs (C) to be replaced from their seats.
After replacing the bulb, refit the two halves of the light unit then secure
the latter to the covering panel after reconnecting the electric
connection; refit the panel to the tailgate.
NUMBER PLATE LIGHTS
To replace the 12V-5W bulb:
❒using a screwdriver in the direction of the arrow, compress catch (F)
and take out the number plate light unit;
❒remove bulb holder and lens (D);
❒take out the bulb holder turning it slightly and replace the bulb (E).
F0E0254m
F0E0146m
F0E0676m
Page 193 of 266
192
SAFETY
DEVICES
CORRECT USE
OF THE CAR
WARNING
LIGHTS AND
MESSAGES
CAR
MAINTENANCE
TECHNICAL
SPECIFICATIONS
INDEX
DASHBOARD
AND CONTROLS
IN AN
EMERGENCY
IF AN INTERIOR LIGHT BURNS OUT
For the type of bulb and power rating, see “If a bulb burns out”.
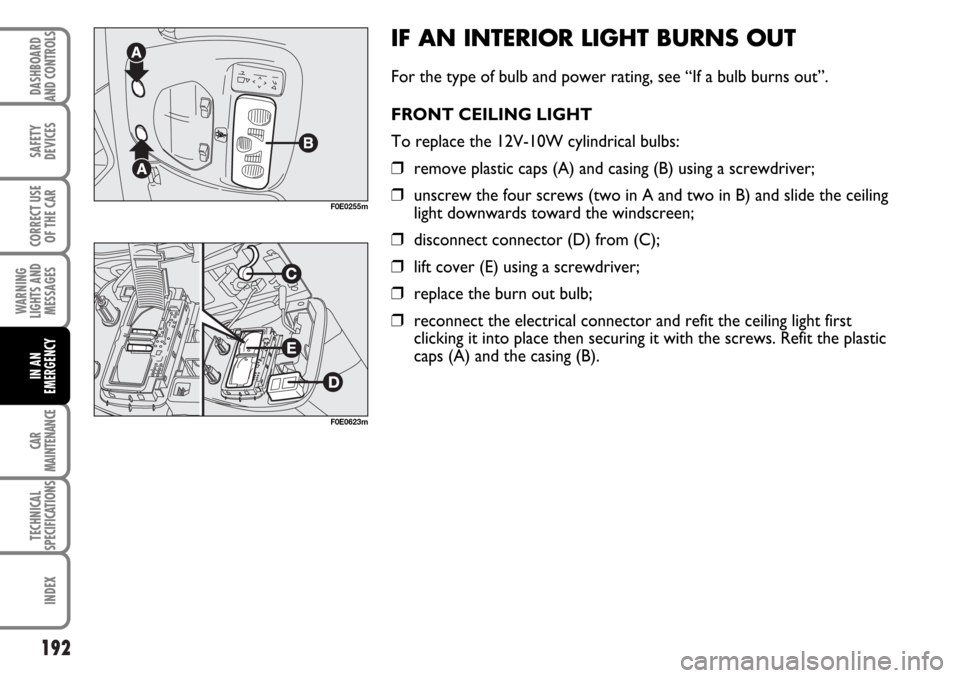
FRONT CEILING LIGHT
To replace the 12V-10W cylindrical bulbs:
❒remove plastic caps (A) and casing (B) using a screwdriver;
❒unscrew the four screws (two in A and two in B) and slide the ceiling
light downwards toward the windscreen;
❒disconnect connector (D) from (C);
❒lift cover (E) using a screwdriver;
❒replace the burn out bulb;
❒reconnect the electrical connector and refit the ceiling light first
clicking it into place then securing it with the screws. Refit the plastic
caps (A) and the casing (B).
F0E0255m
F0E0623m
Page 194 of 266
193
SAFETY
DEVICES
CORRECT USE
OF THE CAR
WARNING
LIGHTS AND
MESSAGES
CAR
MAINTENANCE
TECHNICAL
SPECIFICATIONS
INDEX
DASHBOARD
AND CONTROLS
IN AN
EMERGENCY
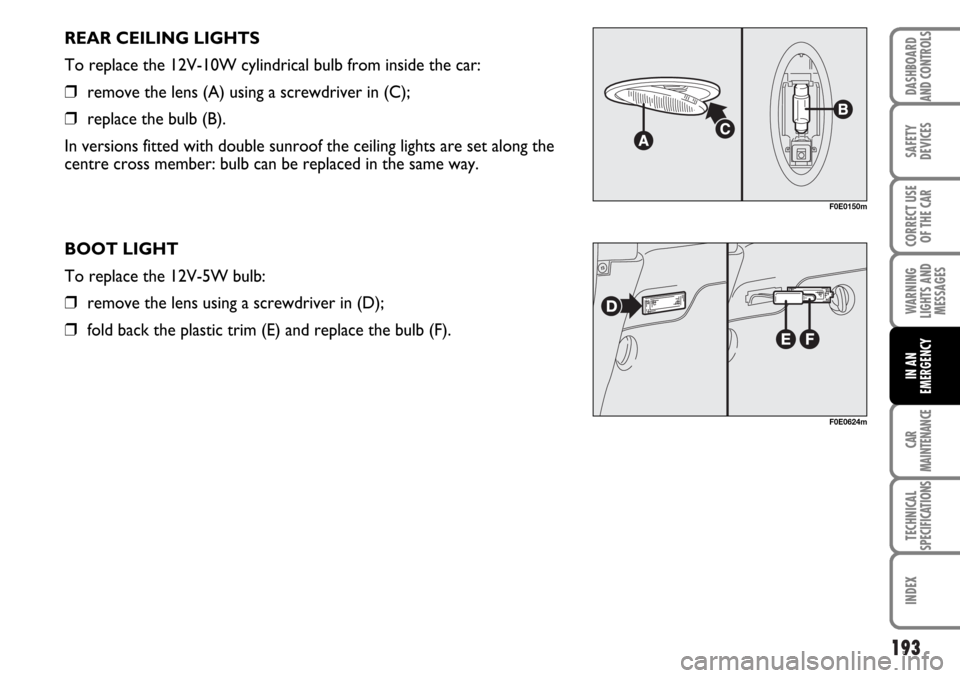
REAR CEILING LIGHTS
To replace the 12V-10W cylindrical bulb from inside the car:
❒remove the lens (A) using a screwdriver in (C);
❒replace the bulb (B).
In versions fitted with double sunroof the ceiling lights are set along the
centre cross member: bulb can be replaced in the same way.
BOOT LIGHT
To replace the 12V-5W bulb:
❒remove the lens using a screwdriver in (D);
❒fold back the plastic trim (E) and replace the bulb (F).
F0E0150m
F0E0624m
Page 195 of 266
194
SAFETY
DEVICES
CORRECT USE
OF THE CAR
WARNING
LIGHTS AND
MESSAGES
CAR
MAINTENANCE
TECHNICAL
SPECIFICATIONS
INDEX
DASHBOARD
AND CONTROLS
IN AN
EMERGENCY
IF A FUSE BLOWS
GENERAL
The fuse is a protective device for the electric system: it comes into
action (i.e. it cuts off) mainly due to a fault or improper action on the
system.
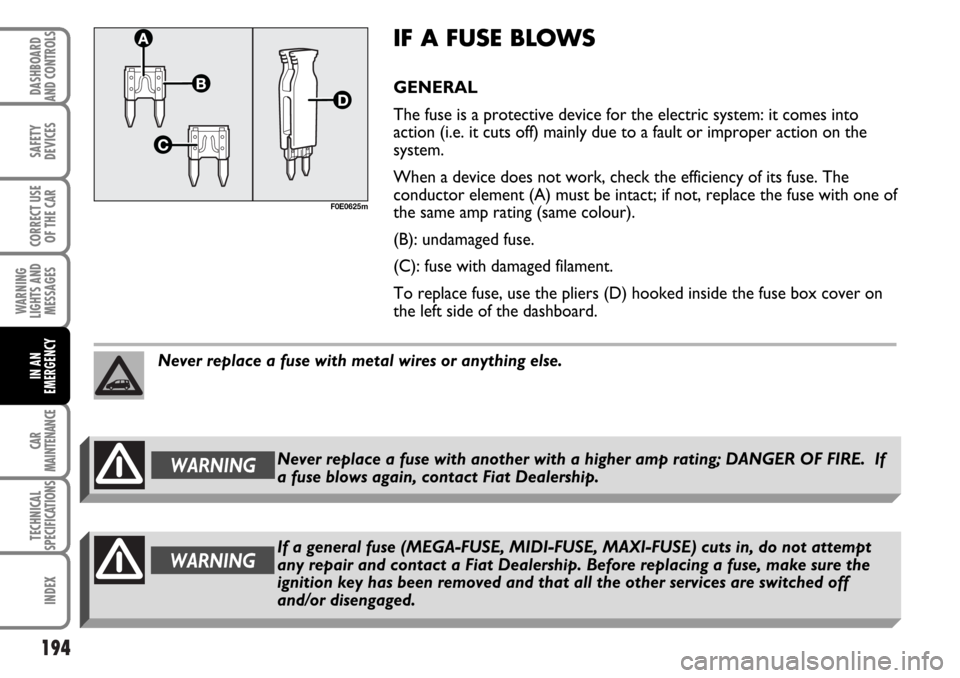
When a device does not work, check the efficiency of its fuse. The
conductor element (A) must be intact; if not, replace the fuse with one of
the same amp rating (same colour).
(B): undamaged fuse.
(C): fuse with damaged filament.
To replace fuse, use the pliers (D) hooked inside the fuse box cover on
the left side of the dashboard.
F0E0625m
Never replace a fuse with metal wires or anything else.
WARNINGIf a general fuse (MEGA-FUSE, MIDI-FUSE, MAXI-FUSE) cuts in, do not attempt
any repair and contact a Fiat Dealership. Before replacing a fuse, make sure the
ignition key has been removed and that all the other services are switched off
and/or disengaged.
WARNINGNever replace a fuse with another with a higher amp rating; DANGER OF FIRE. If
a fuse blows again, contact Fiat Dealership.
Page 196 of 266
195
SAFETY
DEVICES
CORRECT USE
OF THE CAR
WARNING
LIGHTS AND
MESSAGES
CAR
MAINTENANCE
TECHNICAL
SPECIFICATIONS
INDEX
DASHBOARD
AND CONTROLS
IN AN
EMERGENCY
Certain fuses are protected by a plastic grid.
To replace these fuses, first of all remove the grid
using a screwdriver. Replace the blown fuse and refit
the plastic grid.
To locate the fuse, refer to the tables on the following
pages.
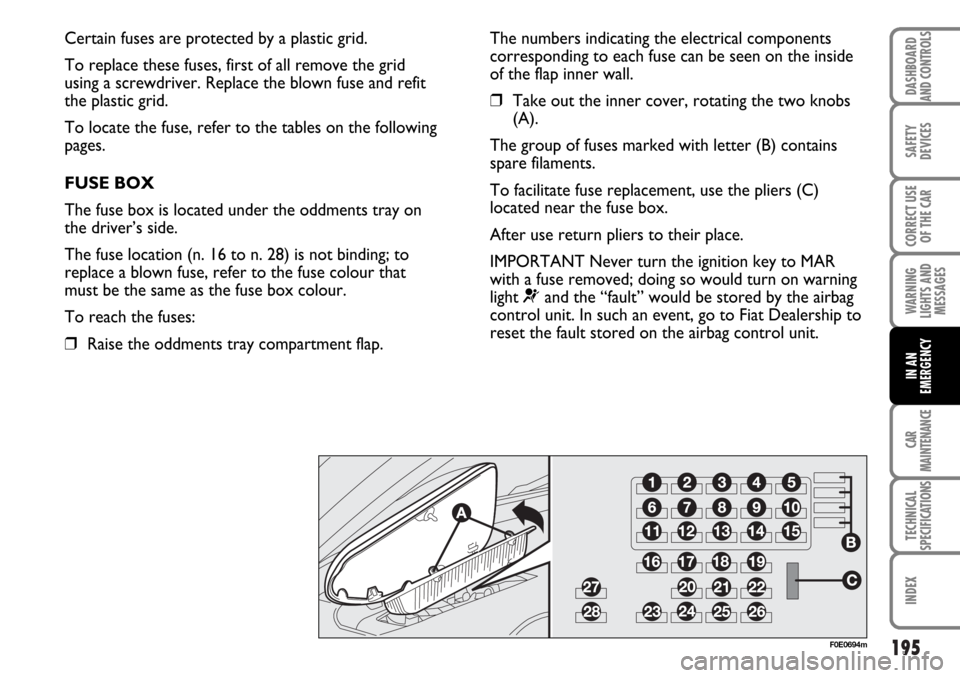
FUSE BOX
The fuse box is located under the oddments tray on
the driver’s side.
The fuse location (n. 16 to n. 28) is not binding; to
replace a blown fuse, refer to the fuse colour that
must be the same as the fuse box colour.
To reach the fuses:
❒Raise the oddments tray compartment flap.
F0E0694m
The numbers indicating the electrical components
corresponding to each fuse can be seen on the inside
of the flap inner wall.
❒Take out the inner cover, rotating the two knobs
(A).
The group of fuses marked with letter (B) contains
spare filaments.
To facilitate fuse replacement, use the pliers (C)
located near the fuse box.
After use return pliers to their place.
IMPORTANT Never turn the ignition key to MAR
with a fuse removed; doing so would turn on warning
light
¬and the “fault” would be stored by the airbag
control unit. In such an event, go to Fiat Dealership to
reset the fault stored on the airbag control unit.
Page 197 of 266
196
SAFETY
DEVICES
CORRECT USE
OF THE CAR
WARNING
LIGHTS AND
MESSAGES
CAR
MAINTENANCE
TECHNICAL
SPECIFICATIONS
INDEX
DASHBOARD
AND CONTROLS
IN AN
EMERGENCY
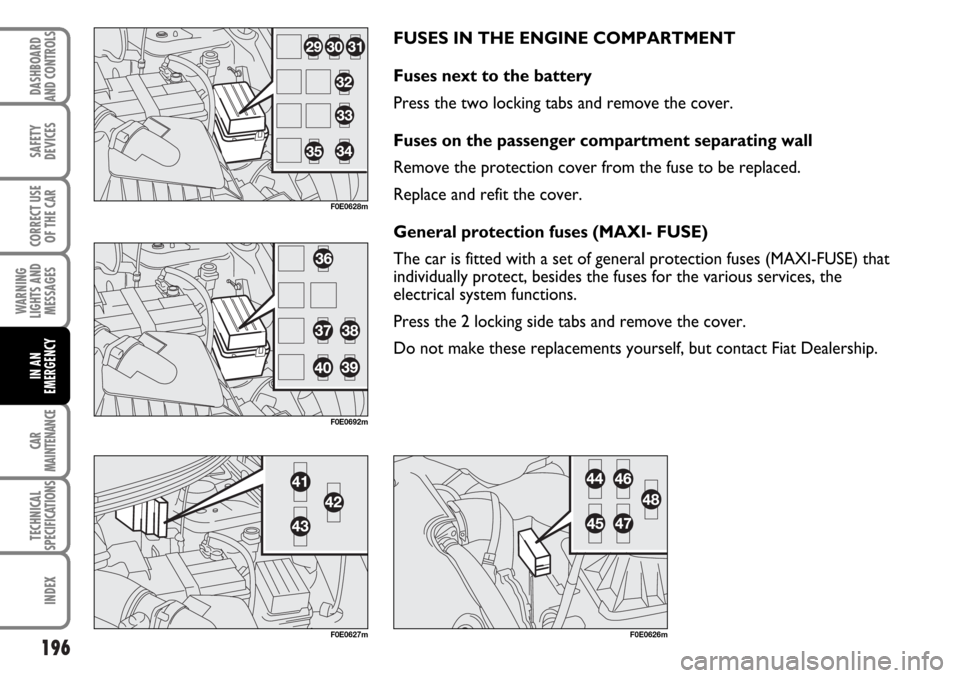
FUSES IN THE ENGINE COMPARTMENT
Fuses next to the battery
Press the two locking tabs and remove the cover.
Fuses on the passenger compartment separating wall
Remove the protection cover from the fuse to be replaced.
Replace and refit the cover.
General protection fuses (MAXI- FUSE)
The car is fitted with a set of general protection fuses (MAXI-FUSE) that
individually protect, besides the fuses for the various services, the
electrical system functions.
Press the 2 locking side tabs and remove the cover.
Do not make these replacements yourself, but contact Fiat Dealership.
F0E0626mF0E0627m
F0E0628m
F0E0692m
Page 198 of 266
197
SAFETY
DEVICES
CORRECT USE
OF THE CAR
WARNING
LIGHTS AND
MESSAGES
CAR
MAINTENANCE
TECHNICAL
SPECIFICATIONS
INDEX
DASHBOARD
AND CONTROLS
IN AN
EMERGENCY
1
2
2
3
3
3
4
5
6
6
6
6
6
6
6
7
7
7
7
8
8
8
8
9
9
10 10
10
10
20
20
20
10
30
10
10
10
10
10
10
10
10
10
10
10
10
10
10
10
15
15
20
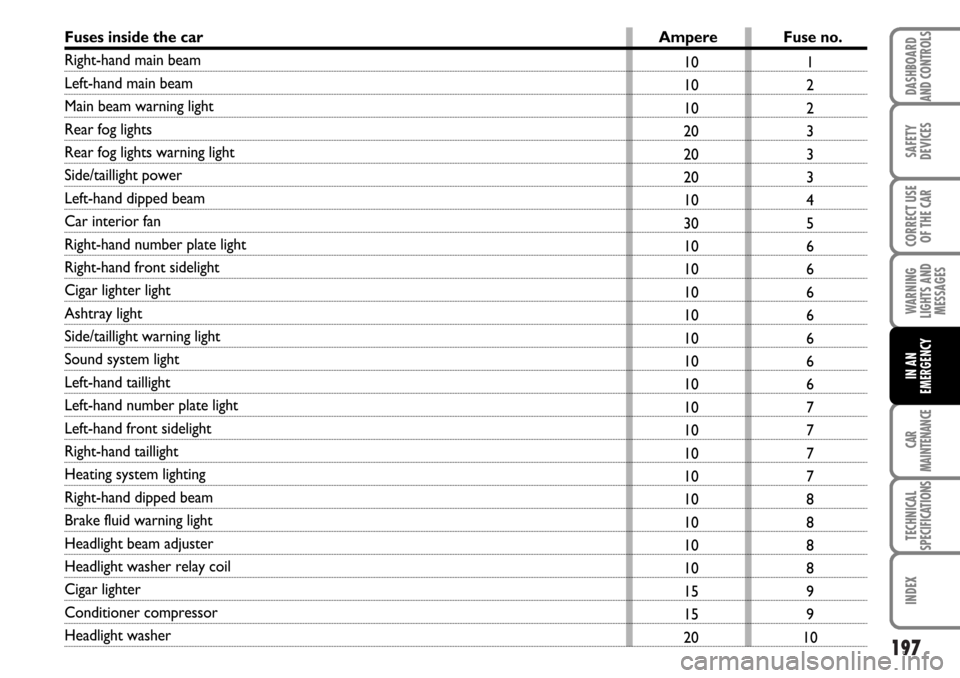
Fuses inside the car Ampere Fuse no.
Right-hand main beam
Left-hand main beam
Main beam warning light
Rear fog lights
Rear fog lights warning light
Side/taillight power
Left-hand dipped beam
Car interior fan
Right-hand number plate light
Right-hand front sidelight
Cigar lighter light
Ashtray light
Side/taillight warning light
Sound system light
Left-hand taillight
Left-hand number plate light
Left-hand front sidelight
Right-hand taillight
Heating system lighting
Right-hand dipped beam
Brake fluid warning light
Headlight beam adjuster
Headlight washer relay coil
Cigar lighter
Conditioner compressor
Headlight washer
Page 199 of 266
198
SAFETY
DEVICES
CORRECT USE
OF THE CAR
WARNING
LIGHTS AND
MESSAGES
CAR
MAINTENANCE
TECHNICAL
SPECIFICATIONS
INDEX
DASHBOARD
AND CONTROLS
IN AN
EMERGENCY
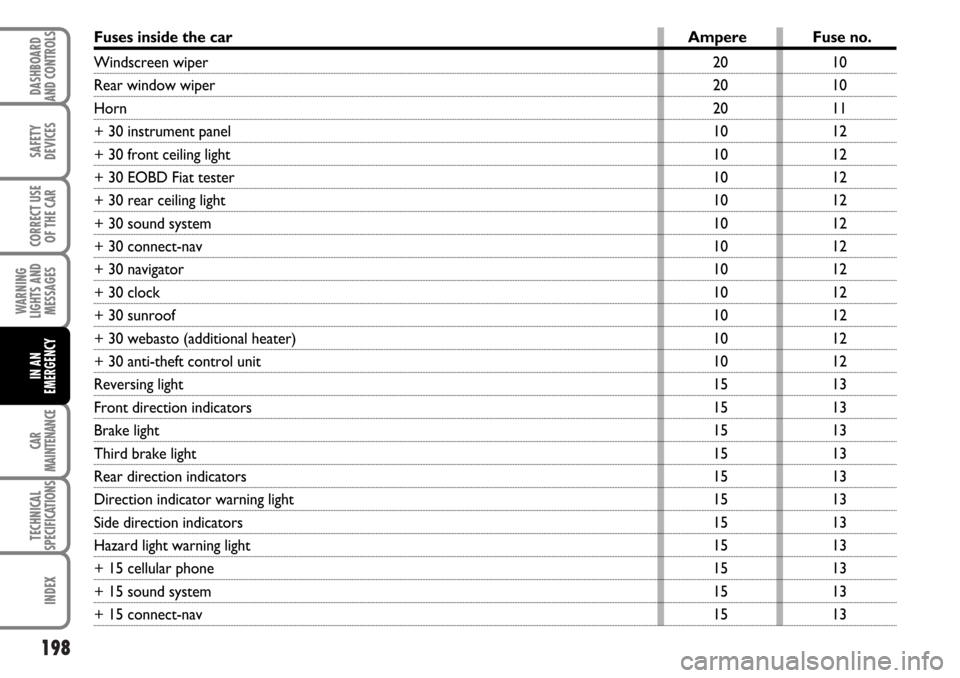
10
10
11
12
12
12
12
12
12
12
12
12
12
12
13
13
13
13
13
13
13
13
13
13
13 20
20
20
10
10
10
10
10
10
10
10
10
10
10
15
15
15
15
15
15
15
15
15
15
15Windscreen wiper
Rear window wiper
Horn
+ 30 instrument panel
+ 30 front ceiling light
+ 30 EOBD Fiat tester
+ 30 rear ceiling light
+ 30 sound system
+ 30 connect-nav
+ 30 navigator
+ 30 clock
+ 30 sunroof
+ 30 webasto (additional heater)
+ 30 anti-theft control unit
Reversing light
Front direction indicators
Brake light
Third brake light
Rear direction indicators
Direction indicator warning light
Side direction indicators
Hazard light warning light
+ 15 cellular phone
+ 15 sound system
+ 15 connect-nav
Fuses inside the car Ampere Fuse no.
Page 200 of 266
199
SAFETY
DEVICES
CORRECT USE
OF THE CAR
WARNING
LIGHTS AND
MESSAGES
CAR
MAINTENANCE
TECHNICAL
SPECIFICATIONS
INDEX
DASHBOARD
AND CONTROLS
IN AN
EMERGENCY
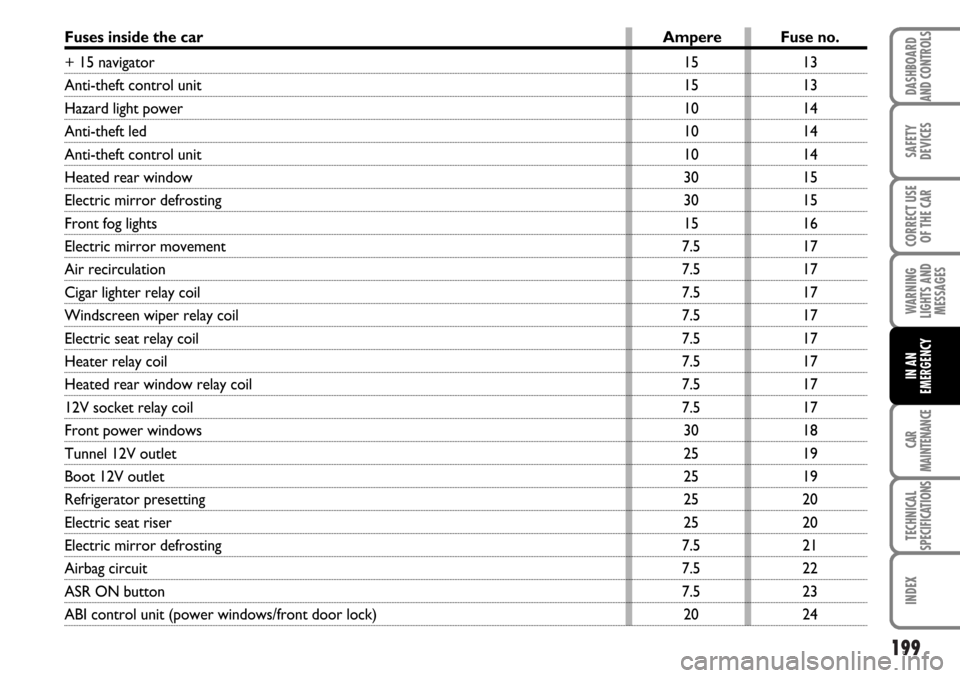
13
13
14
14
14
15
15
16
17
17
17
17
17
17
17
17
18
19
19
20
20
21
22
23
24 15
15
10
10
10
30
30
15
7.5
7.5
7.5
7.5
7.5
7.5
7.5
7.5
30
25
25
25
25
7.5
7.5
7.5
20
Fuses inside the car Ampere Fuse no.
+ 15 navigator
Anti-theft control unit
Hazard light power
Anti-theft led
Anti-theft control unit
Heated rear window
Electric mirror defrosting
Front fog lights
Electric mirror movement
Air recirculation
Cigar lighter relay coil
Windscreen wiper relay coil
Electric seat relay coil
Heater relay coil
Heated rear window relay coil
12V socket relay coil
Front power windows
Tunnel 12V outlet
Boot 12V outlet
Refrigerator presetting
Electric seat riser
Electric mirror defrosting
Airbag circuit
ASR ON button
ABI control unit (power windows/front door lock)