FIAT SEICENTO 2001 1.G Clarion PU1573 Manual
Manufacturer: FIAT, Model Year: 2001, Model line: SEICENTO, Model: FIAT SEICENTO 2001 1.GPages: 79, PDF Size: 1.02 MB
Page 31 of 79
30
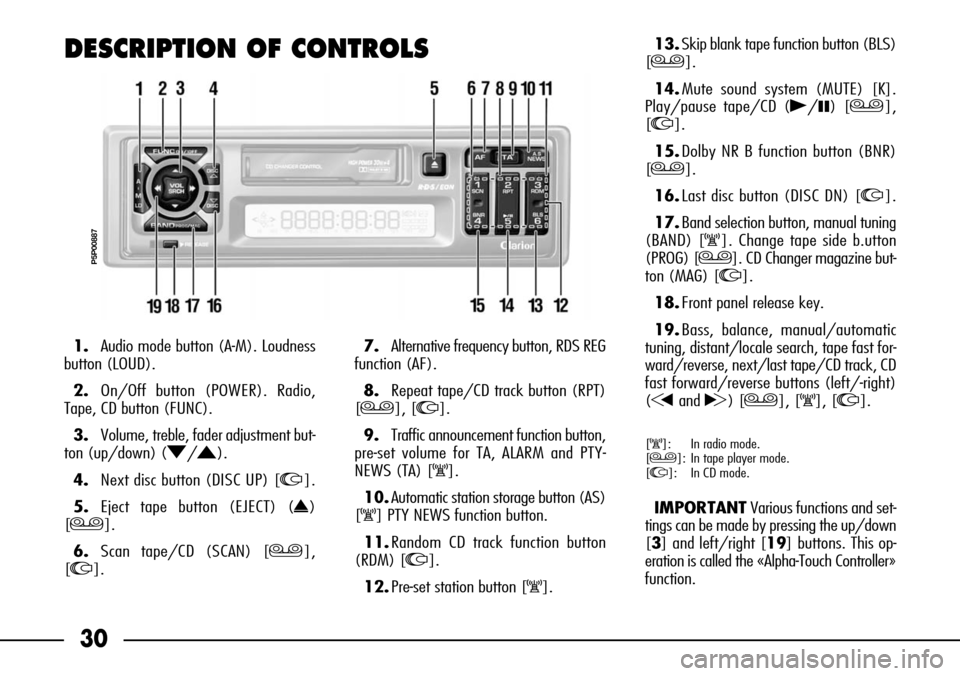
DESCRIPTION OF CONTROLS
P5P00887
1.Audio mode button (A-M). Loudness
button (LOUD).
2.On/Off button (POWER). Radio,
Tape, CD button (FUNC).
3.Volume, treble, fader adjustment but-
ton (up/down) (O/N).
4.Next disc button (DISC UP) [I].
5.Eject tape button (EJECT) (˚)
[J].
6.Scan tape/CD (SCAN) [J],
[I].7.Alternative frequency button, RDS REG
function (AF).
8.Repeat tape/CD track button (RPT)
[J], [I].
9.Traffic announcement function button,
pre-set volume for TA, ALARM and PTY-
NEWS (TA) [K].
10.Automatic station storage button (AS)
[K] PTY NEWS function button.
11.Random CD track function button
(RDM) [I].
12.Pre-set station button [K].13.Skip blank tape function button (BLS)
[J].
14.Mute sound system (MUTE) [K].
Play/pause tape/CD (˙/❙❙) [J],
[I].
15.Dolby NR B function button (BNR)
[J].
16.Last disc button (DISC DN) [I].
17.Band selection button, manual tuning
(BAND) [K]. Change tape side b.utton
(PROG) [J]. CD Changer magazine but-
ton (MAG) [I].
18.Front panel release key.
19.Bass, balance, manual/automatic
tuning, distant/locale search, tape fast for-
ward/reverse, next/last tape/CD track, CD
fast forward/reverse buttons (left/-right)
(Gand H) [J], [K], [I].
[K]: In radio mode.
[J]: In tape player mode.
[I]: In CD mode.
IMPORTANTVarious functions and set-
tings can be made by pressing the up/down
[3] and left/right [19] buttons. This op-
eration is called the «Alpha-Touch Controller»
function.
Page 32 of 79
31
ENGLISH
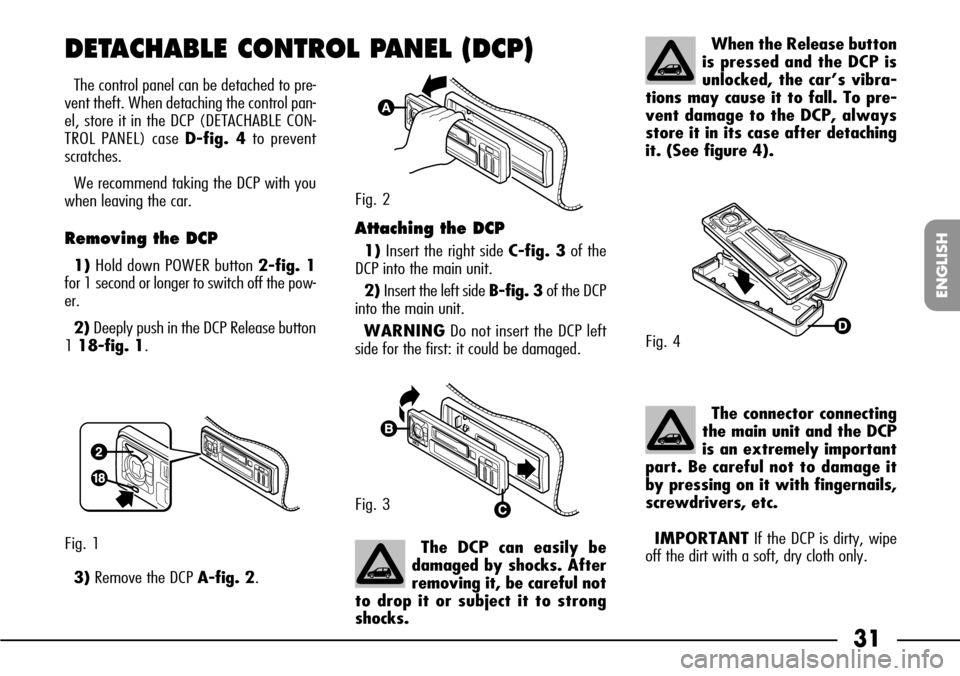
The control panel can be detached to pre-
vent theft. When detaching the control pan-
el, store it in the DCP (DETACHABLE CON-
TROL PANEL) case D-fig. 4to prevent
scratches.
We recommend taking the DCP with you
when leaving the car.
Removing the DCP
1)Hold down POWER button 2-fig. 1
for 1 second or longer to switch off the pow-
er.
2)Deeply push in the DCP Release button
1 18-fig. 1.
3)Remove the DCP A-fig. 2.
Fig. 1
DETACHABLE CONTROL PANEL (DCP)
Attaching the DCP
1)Insert the right side C-fig. 3of the
DCP into the main unit.
2)Insert the left side B-fig. 3of the DCP
into the main unit.
WARNINGDo not insert the DCP left
side for the first: it could be damaged.
The DCP can easily be
damaged by shocks. After
removing it, be careful not
to drop it or subject it to strong
shocks.The connector connecting
the main unit and the DCP
is an extremely important
part. Be careful not to damage it
by pressing on it with fingernails,
screwdrivers, etc.
IMPORTANTIf the DCP is dirty, wipe
off the dirt with a soft, dry cloth only.
When the Release button
is pressed and the DCP is
unlocked, the car’s vibra-
tions may cause it to fall. To pre-
vent damage to the DCP, always
store it in its case after detaching
it. (See figure 4).
Fig. 2
Fig. 3
Fig. 4
Page 33 of 79
32
BALANCE ADJUSTMENT
G: Increase left speaker sound;
H: Increase right speaker sound.
FADER ADJUSTMENT
N: Increase front speaker sound;
O: Increase rear speaker sound.
LOUDNESS
Keep the loudness button (LOUD) [1]
pressed for longer than 2 seconds to acti-
vate/deactivate this function. The message
“LD” will appear on the display when the
function is on.
MUTE FUNCTION
This function will automatically turn the vol-
ume down to zero.
Press the MUTE [14]. The sound will dis-
appear and the message “MUTE” will ap-
pear on the display. Press the MUTE but-
ton again to turn the function off.OPERATION
MAIN OPERATIONS
IMPORTANTTurn the volume down be-
fore turning the sound system off. Sound
quality will be perfect and the sound system
will not be damaged when you turn it back
on.
Turning the sound system on
and adjusting the volume
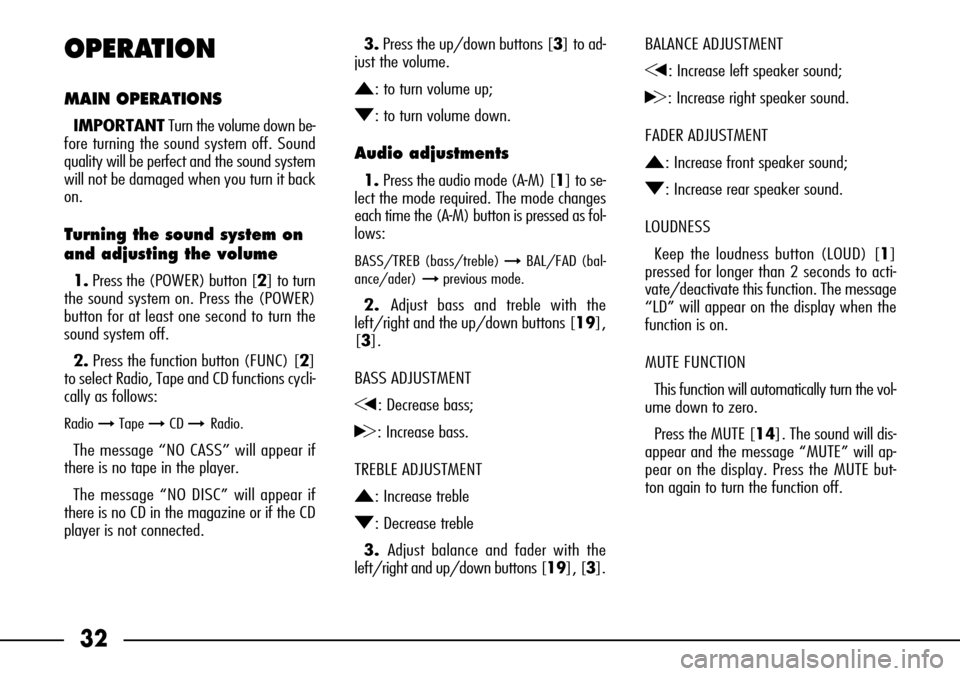
1.Press the (POWER) button [2] to turn
the sound system on. Press the (POWER)
button for at least one second to turn the
sound system off.
2.Press the function button (FUNC) [2]
to select Radio, Tape and CD functions cycli-
cally as follows:
Radio ➞Tape ➞CD ➞ Radio.
The message “NO CASS” will appear if
there is no tape in the player.
The message “NO DISC” will appear if
there is no CD in the magazine or if the CD
player is not connected.3.Press the up/down buttons [3] to ad-
just the volume.
N: to turn volume up;
O: to turn volume down.
Audio adjustments
1. Press the audio mode (A-M) [1] to se-
lect the mode required. The mode changes
each time the (A-M) button is pressed as fol-
lows:
BASS/TREB (bass/treble) ➞BAL/FAD (bal-
ance/ader)➞previous mode.
2. Adjust bass and treble with the
left/right and the up/down buttons [19],
[3].
BASS ADJUSTMENT
G: Decrease bass;
H: Increase bass.
TREBLE ADJUSTMENT
N: Increase treble
O: Decrease treble
3. Adjust balance and fader with the
left/right and up/down buttons [19], [3].
Page 34 of 79
![FIAT SEICENTO 2001 1.G Clarion PU1573 Manual 33
ENGLISH
RADIO FUNCTIONS
Listening to the radio
1. Press the function button (FUNC) [2]
to select radio mode.
Press the BAND button [17] to select the
reception band FM (FM1, FM2, FM3) ot
AM (MW/LW) FIAT SEICENTO 2001 1.G Clarion PU1573 Manual 33
ENGLISH
RADIO FUNCTIONS
Listening to the radio
1. Press the function button (FUNC) [2]
to select radio mode.
Press the BAND button [17] to select the
reception band FM (FM1, FM2, FM3) ot
AM (MW/LW)](/img/10/4724/w960_4724-33.png)
33
ENGLISH
RADIO FUNCTIONS
Listening to the radio
1. Press the function button (FUNC) [2]
to select radio mode.
Press the BAND button [17] to select the
reception band FM (FM1, FM2, FM3) ot
AM (MW/LW). The band will change each
time the button is pressed as follows:
FM1 ➞FM2 ➞FM3 ➞AM ➞FM1
(FM band is split into three sections FM1,
FM2, FM3 with the same reception range
to allow the pre-setting of 18 fm stations).
2.Press the right or left button [19]. Tun-
ing will automatically stop at the frequen-
cy of a station (automatic tuning).
Automatic tuning
There are two types of automatic tuning:
distant (DX), tuning in to all the stations
which can be received, and local (LO), tun-
ing into the stations with the strongest sig-
nals only.
Distant automatic tuning (DX)
1. Press the BAND button [17] to select
the band.2.Press the right or left button [19].The
message “DX” will appear on the display.
Tuning will automatically stop at a station
frequency.
Local automatic tuning (LO)
1. Press the BAND button [17] to select
the band.
2.Press the right or left button [19] for
longer than 1 second. The message “LO”
will appear on the display. Tuning will au-
tomatically stop at a station frequency.
Manual tuning
1. Press the BAND button [17] to select
the band.
2.Press the BAND button [17] for longer
than 2 seconds.
3.The message “MAN” will appear on the
display and manual tuning is possible.
4. Press the left/right buttons [19] to
tune to the stations
The system will return automatically to au-
tomatic tuning after 7 seconds.
Manual station storage
24 stations (6 each in the FM1, FM2,
FM3, AM bands) can be stored as follows:
1. Press the BAND button [17] to select
the band.
2. Press the left/right buttons [19] to
tune to the station to be stored.
3. Press the pre-setting button [12]
where to store the station for 2 seconds or
more.
IMPORTANTWhen storing a station,
the station previously stored for that but-
ton will be deleted.
Automatic storage
1.Press the BAND button [17] to select
the band.
2.Press the AS button [10] for 2 seconds
or more. Strong signals will be automatically
stored in pre-set memory.
(If less than 6 strong stations are avail-
able, the previously stored stations will be
kept for the pre-set buttons where no new
stations can be stored).
Page 35 of 79
![FIAT SEICENTO 2001 1.G Clarion PU1573 Manual 34
Recalling pre-set stations
1. Press the BAND button [17] to select
the band.
2.Press the pre-set buttons [12] to se-
lect the required station.
RDS FUNCTIONS
RDS (Radio Data System)
The radio must FIAT SEICENTO 2001 1.G Clarion PU1573 Manual 34
Recalling pre-set stations
1. Press the BAND button [17] to select
the band.
2.Press the pre-set buttons [12] to se-
lect the required station.
RDS FUNCTIONS
RDS (Radio Data System)
The radio must](/img/10/4724/w960_4724-34.png)
34
Recalling pre-set stations
1. Press the BAND button [17] to select
the band.
2.Press the pre-set buttons [12] to se-
lect the required station.
RDS FUNCTIONS
RDS (Radio Data System)
The radio must be tuned to FM to access
the RDS functions.
The RDS system gives you automatic tun-
ing to the optimal frequency of the RDS-en-
abled stations being listened to (AF func-
tion). You can therefore continue to listen
to the station without having to alter the fre-
quency when you change the area. Obvi-
ously the station you are listening to must
be picked up in the area you are travelling
through.
If the signal is very weak and/or if the
reception is bad, the sound system will mute
for a few seconds while seeking an alter-
native frequency for the station. If this oc-
curs frequently, we recommend turning the
AF function off.If an RDS station can non longer be picked
up in your current position and the AF func-
tion is on, the message “AF” on the display
will flash. As soon as correct reception is re-
stored, “AF” will stop flashing.
The RDS will also display the name of the
station you are listening to (PS function).
Alternative frequency search
(AF function)
Press the AF button [7] to activate/de-
activate the function. When the function is
on, the message AF will appear (or flash)
on the display.
If reception worsens, the message “AF”
will start flashing and the device will attempt
to tune to an alternative frequency. If the
switch-over is not possible, the message
“SEARCH” will appear on the display and
the sound system will tune to the current
station before starting the search.
REG function
(regional programmes)
The REG function can only be used when
the AF function is on.
The REG function (regional programmes)
tunes to local (regional) stations only. Press
the AF button [7] for longer than 2 seconds
to turn the function on/off. The message
“REG” will appear on the display when the
function is on.
If you are listening to a regional station
and the function is off, the regional station
of the new area will be picked up as you
change area.
The REG function is not active when re-
ceiving a national station.
Manual tuning to regional
stations
This function is available only when re-
gional stations are received, with AF func-
tion on and REG, function off. Follow this
procedure:
1. Press one of the pre-set buttons [12]
to recall a regional station.
2.If the station reception is not optimal,
press the same pre-set button [12] and the
radio will tune to a regional station.
Page 36 of 79
35
ENGLISH
TA function
(traffic announcements)
With this function, you can:
– Automatically search only the FM-RDS
stations enabled to broadcast traffic an-
nouncements. The message “TP” will ap-
pear on the display when you are tuned to
one of these stations.
– Receive traffic announcements while you
are listening to a tape or CD.
To start the function, press the TA button
[9]. If the initial station is not enabled to pro-
vide traffic announcements (the message
“TP” will not appear on the display), the ra-
dio will automatically tune to the closest sta-
tion broadcasting traffic announcements and
the message “TA” will appear on the display.
IMPORTANT
If no RDS TA stations can be received, the
system will continue the search indetermi-
nately. To stop the search, press the TA but-
ton [9] again.
If, on the other hand, a station has been
found, the system will turn to TA stand-by
until the traffic announcement starts. In this
case, the message “TRA INFO” followed by
PS (Programme Service name) will appear
on the display.The playback of a CD or tape will be inter-
rupted to allow to listen to traffic announce-
ments broadcast by an RDS TA station.
Press the TA button [9] during traffic an-
nouncement broadcasting to stop listening
to the announcement and the system will
return to TA stand-by mode.
To memorise stations with the TP function
on, follow the storage procedure described
in the paragraph “Manual station storage”.
Alternatively to manual storage, press the
AS button [10] for 2 seconds or more to
automatically store the stations with the TP
function on (see “Automatic storage”).
To turn the function off, press the TA but-
ton [9] again.
EON function
(Enhanced Other Network)
Circuits grouping stations enabled to broad-
cast traffic announcements (NEWS) are
available in some countries.
In this case, the station programme en-
abled to broadcast traffic announcements you
are listening to will be temporarily interrupt-
ed whenever traffic announcements are
broadcast by other stations in the network.
This function may not be available is some
countries/regions.
PTY-NEWS function
This function tunes to a PTY programme
broadcasting NEWS.
Tune the sound system to FM band and
press the NEWS button [10] to turn the
function on. The message “NEWS” will ap-
pear on the display.
Reception of the tuned station will be tem-
porarily interrupted and a PTY NEWS station
will be played. Press the NEWS button [10]
again to return to the previous station.
You can adjust the PTY-NEWS station vol-
ume as required, according to the procedure
shown in the next paragraph. The volume,
consequently, can change when the func-
tion is turned on/off.
IMPORTANT
PTY-NEWS broadcasts are not available in
all countries. In TA stand-by, the RDS TA sta-
tions have priority over PTY-NEWS stations.
Emergency messages will interrupt all oth-
er operations. They can only be received
from RDS stations. The message “ALARM”
will appear on the display and the message
can be listened to.
To delete the “ALARM” broadcasts, press
the AF button [7].
Page 37 of 79
36
Pre-setting TA, emergency
(ALARM) and PTY-NEWS
functions volume
You can adjust the volume for TA, ALARM
and PTY-NEWS functions as required.
During TA, ALARM and PTY-NEWS broad-
casts, the sound system volume will auto-
matically adapt to the pre-set volume lev-
el.
The factory setting is TA VOL 9.
Volume will not change if it is set to a high-
er level during TA, ALARM and PTY-NEWS
broadcasts. If it is set to a level, it will
change to the volume set with the follow-
ing procedure:
1.Press the TA button [9] for more than
2 seconds. If the volume is not adjusted
within the following 7 seconds, the display
will automatically return to radio mode.
2. To adjust the volume, use the up/down
buttons [3].
3. Press the TA button [9] to end the pro-
cedure.
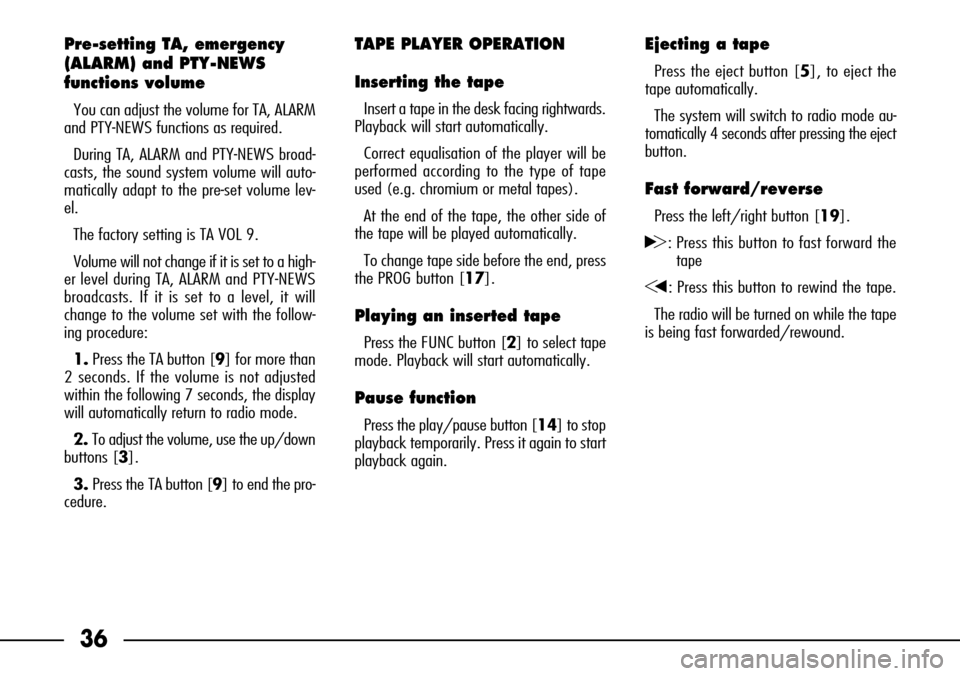
TAPE PLAYER OPERATION
Inserting the tape
Insert a tape in the desk facing rightwards.
Playback will start automatically.
Correct equalisation of the player will be
performed according to the type of tape
used (e.g. chromium or metal tapes).
At the end of the tape, the other side of
the tape will be played automatically.
To change tape side before the end, press
the PROG button [17].
Playing an inserted tape
Press the FUNC button [2] to select tape
mode. Playback will start automatically.
Pause function
Press the play/pause button [14] to stop
playback temporarily. Press it again to start
playback again.
Ejecting a tape
Press the eject button [5], to eject the
tape automatically.
The system will switch to radio mode au-
tomatically 4 seconds after pressing the eject
button.
Fast forward/reverse
Press the left/right button [19].
H: Press this button to fast forward the
tape
G: Press this button to rewind the tape.
The radio will be turned on while the tape
is being fast forwarded/rewound.
Page 38 of 79
![FIAT SEICENTO 2001 1.G Clarion PU1573 Manual 37
ENGLISH
Last/next track search
(auto program control
function)
Press the left/right button [19] twice.
H: Press this button twice to go to the be-
ginning of the next track
G: Press this button tw FIAT SEICENTO 2001 1.G Clarion PU1573 Manual 37
ENGLISH
Last/next track search
(auto program control
function)
Press the left/right button [19] twice.
H: Press this button twice to go to the be-
ginning of the next track
G: Press this button tw](/img/10/4724/w960_4724-37.png)
37
ENGLISH
Last/next track search
(auto program control
function)
Press the left/right button [19] twice.
H: Press this button twice to go to the be-
ginning of the next track
G: Press this button twice to return to the
beginning of the track being played.
Press the button again to go to the be-
ginning of the last track.
During automatic search, the radio will be
played.
Scanning tape tracks
(forward)
Press the SCN button [6] to play the first
10 seconds of each track on the tape. The
message “SCAN” will appear on the display.
Press the SCN button [6] again to stop the
scan.
Repeat track
Press the RPT button [8] to play the last
track again. The message “RPT” will appear
on the display. To quit this mode, press the
RPT button again [8].
Dolby B noise reduction
function
Press the Dolby B NR [15] to start the
function. The message “B NR” will appear
on the display. Press the button again to turn
the function off.
Skip blank tape function
This function will skip blank tape sections
lasting for longer than 12 seconds and au-
tomatically start playing the next recorded
section.
To turn the function on, press the BLS but-
ton [13] until the message “BLS” appears
on the display. Press the button again to turn
the function off.
IMPORTANT
In some cases, the following functions may
not work correctly:
– next/last track search;
– track scan;
– repeat track;
– skip blank tape.
This can be caused by:
– low level recordings (weak sounds and
not perfect recording);
– tapes containing conversations;
– tapes with blank sections lasting less than
12 seconds;
– tapes with long periods of silence in the
recordings;
– tapes without blank sections (e.g. live
recordings);
– tapes with a lot of noise in the blank sec-
tions.
Page 39 of 79
38
RATSCHLÄGE
SICHERHEIT IM
STRAßENVERKEHR
Wir empfehlen Ihnen, sich vor Fahrbeginn
mit den verschiedenen Funktionen des Au-
toradios (z.B. mit dem Speichern der Ra-
diosender) vertraut zu machen.
EMPFANGSBEDINGUNGEN
Die Empfangsbedingungen ändern sich
ständig während der Fahrt. Der Empfang
kann in der Nähe von Bergen, Gebäuden
oder Brücken gestört sein, vor allem, wenn
sich der eingestellte Sender in ziemlicher Ent-
fernung befindet.
ZUR BEACHTUNGBei der Wiederga-
be von Verkehrsinformationen kann die
Lautstärke deutlich über der normalen Wie-
dergabelautstärke liegen.
PFLEGE UND WARTUNG
Die Bauweise des Radios garantiert ein
langjähriges Funktionieren, ohne daß eine
spezielle Wartung durchgeführt werden
muß. Sollte ein Defekt auftreten, so wen-
den Sie sich am besten an den Kunden-
dienst.
Reinigen Sie die Blende nur mit einem wei-
chen antistatischen Tuch. Produkte zur Rei-
nigung oder zur Glanzpolitur könnten die
Oberfläche angreifen.
KASSETTE
Für eine optimale Wiedergabequalität ge-
ben wir hier einige Ratschläge:
– Verwenden Sie keine Kassetten min-
derwertiger Qualität, mit Verformungen oder
abgelösten Etichetten;
– Nehmen Sie die Kassetten nach dem Ab-
spielen aus dem Autoradio heraus;
– Keine anderen Gegenstände in das Kas-
settenfach einführen;
– Die Kassetten nicht der Sonnenstrah-
lung, übermäßiger Hitze oder hoher Luft-
feuchtigkeit aussetzen;
– Legen Sie die Kassetten nach dem Ge-
brauch wieder in ihre Hüllen zurück;
– Schmutz auf den Tonköpfen kann auf
die Dauer eine Verringerung der hohen Tö-
ne bei der Wiedergabe bewirken. Wir ra-
ten Ihnen daher, den Tonwiedergabekopf
regelmäßig mit den eigens dazu vorgese-
henen, schmirgelfreien Reinigungskassetten
zu behandeln; Eine zu hohe Lautstärke
während der Fahrt kann Ihr
Leben und das anderer Per-
sonen gefährden. Deshalb raten
wir, die Lautstärke so einzustellen,
daß Geräusche von außen (Hupen,
Sirenen von Rettungswagen oder
der Polizei, usw.) noch hörbar blei-
ben.
Page 40 of 79
39
DEUTSCH
– Verwenden Sie vorzugsweise Kassetten
C-60, aber auf jeden Fall nicht längere als
C -90, damit stets eine einwandfreie Wie-
dergabe gewährleistet ist. Das sehr dünne
Band in den längeren Kassetten kann sich
sehr leicht verheddern;
– Führen Sie in das Autoradio keine Kas-
setten mit lockerem Band ein, besonders
wenn Sie Kassetten vom Typ C-90 verwen-
den, da das Band herausgleiten und die Kas-
settenmechanik blockieren kann. Sobald das
Gerät eine Verlangsamung des Bandlauf
oder ähnliche Störungen wahrnimmt, wird
die Kassette automatisch ausgeworfen;
– Die Kassettenmechanik darf nicht ge-
schmiert werden;
– Die Tonwiedergabeköpfe nicht mit ma-
gnetischen oder harten Gegenständen
berühren.COMPACT DISC
Falls Sie einen CD-Spieler verwenden, be-
achten Sie, daß Schmutz oder Riefen auf
der CD Sprünge bei der Wiedergabe und ei-
ne schlechte Klangqualität verursachen kön-
nen. Dasselbe geschieht, wenn Sie die CD
versehentlich verbiegen.
Für eine optimale Wiedergabequalität ge-
ben wir hier einige Ratschläge:
– Verwenden Sie ausschließlich CD´s mit
dem Markenzeichen:– Legen Sie die CD´s nach dem Abspielen
wieder in ihre Hüllen zurück, damit keine
Kratzer und Riefen entstehen, die beim Ab-
spielen Unterbrechungen hervorrufen kön-
nen;
– Setzen Sie die CD´s nicht für längere
Zeit der direkten Sonnenbestrahlung, hohen
Temperaturen oder Feuchtigkeit aus, weil
sie sich dadurch verformen;
– Bekleben Sie die CD´s nicht mit Etiketten
und schreiben nicht auf die bespielte Seite.
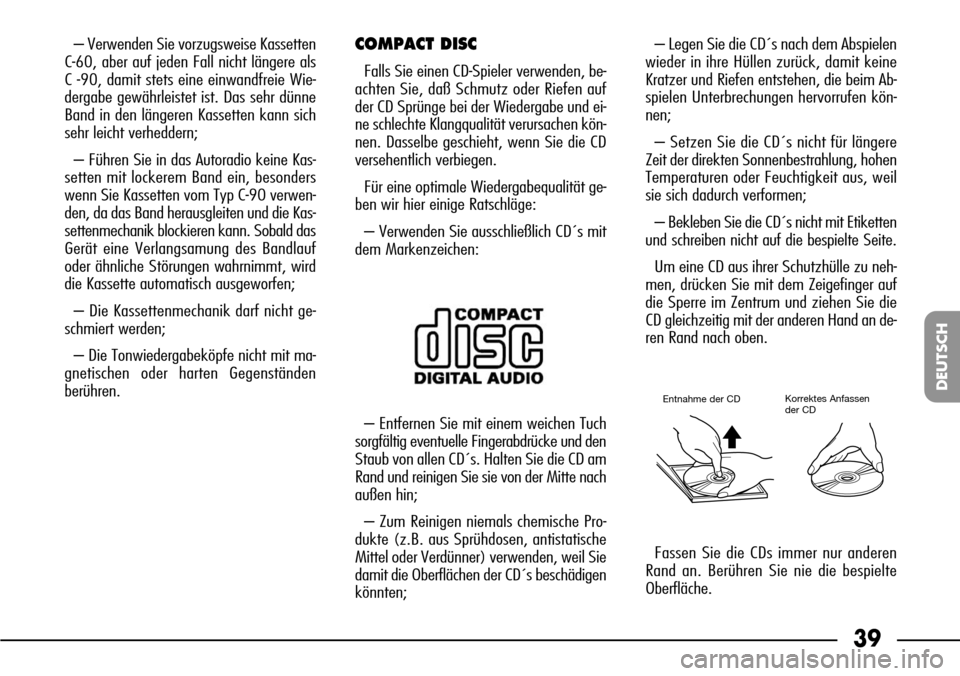
Um eine CD aus ihrer Schutzhülle zu neh-
men, drücken Sie mit dem Zeigefinger auf
die Sperre im Zentrum und ziehen Sie die
CD gleichzeitig mit der anderen Hand an de-
ren Rand nach oben.
– Entfernen Sie mit einem weichen Tuch
sorgfältig eventuelle Fingerabdrücke und den
Staub von allen CD´s. Halten Sie die CD am
Rand und reinigen Sie sie von der Mitte nach
außen hin;
– Zum Reinigen niemals chemische Pro-
dukte (z.B. aus Sprühdosen, antistatische
Mittel oder Verdünner) verwenden, weil Sie
damit die Oberflächen der CD´s beschädigen
könnten;Fassen Sie die CDs immer nur anderen
Rand an. Berühren Sie nie die bespielte
Oberfläche.
Modo corretto di tenere
il compact discEstrazione del discoEntnahme der CDKorrektes Anfassen
der CD