FORD MUSTANG 1969 Volume One Chassis
Manufacturer: FORD, Model Year: 1969, Model line: MUSTANG, Model: FORD MUSTANG 1969Pages: 413, PDF Size: 75.81 MB
Page 141 of 413
03-07-03
Ford Design Non-Integral Power Steering System
03-07-03
5.
Lower the vehicle and disconnect
the fluid return hose from the reser-
voir.
6. Disconnect the fluid pressure
hose from the pump outlet fitting.
7.
Remove 1 bolt attaching the
hoses,
insulator, and the retainer to
the frame side rail and remove the
hoses,
and the insulator and retainer
as an assembly from the vehicle.
8. Remove the pressure and return
hoses from the retainer and insulator.
INSTALLATION
1.
Install the pressure and return
hoses in the insulator and retainer.
Paint stripe on pressure hose must be
aligned with slot in insulator. Paint or
tape band on return hose must be cen-
tered in insulator. Position the assem-
bly to the frame side rail and install
the attaching bolt.
2.
Place a hose clamp on the fluid
return hose and install the hose on the
power steering pump reservoir return
fitting.
3.
Torque the pump outlet fitting to
specification (Part 3-13). Then, con-
nect the pressure hose to the outlet fit-
ting and torque the fitting to specifica-
tion.
4.
Raise the vehicle and connect the
pressure and return lines to the con-
trol valve.
5.
Install the clamp to retain the
hose tubes to the control valve.
6. Lower the vehicle and fill the
power steering pump reservoir with
fluid, C1AZ-19582-A, to the proper
level (Part 3-1).
7.
Start the engine and turn the
steering wheel to each end of its travel
several times to cycle the system.
Then, check for fluid leaks.
8. Stop the engine and again check
the power steering fluid level (Part
3-1). Add fluid as required.
REMOVAL AND INSTALLATION
HOISTING INSTRUCTIONS
Damage to suspension and/or steer-
ing linkage components may occur if
care is not exercised when positioning
the hoist adapters of 2 post hoists
prior to lifting the vehicle.
If a 2 post hoist is used to lift the
vehicle, place the adapters under the
front suspension lower arms. Do not
allow the adapters to contact the
steering linkage.
STEERING GEAR
Refer to Group 3-6, Section 3 for
detailed instructions.
POWER STEERING PUMP
Refer to Group 3-10, Section 3 for
detailed instructions.
POWER STEERING CONTROL
VALVE
REMOVAL
1.
Disconnect the 4 fluid line fit-
tings at the control valve, and drain
the fluid from the lines. Turn the front
wheels to the left and right several
times to force all the fluid from the
system.
2.
Loosen the clamping nut and
bolt at the right end of the sleeve.
3.
Remove the roll pin from the
steering arm-to-idler arm rod -through
the slot in the sleeve.
4.
Remove the control valve ball
stud nut.
5.
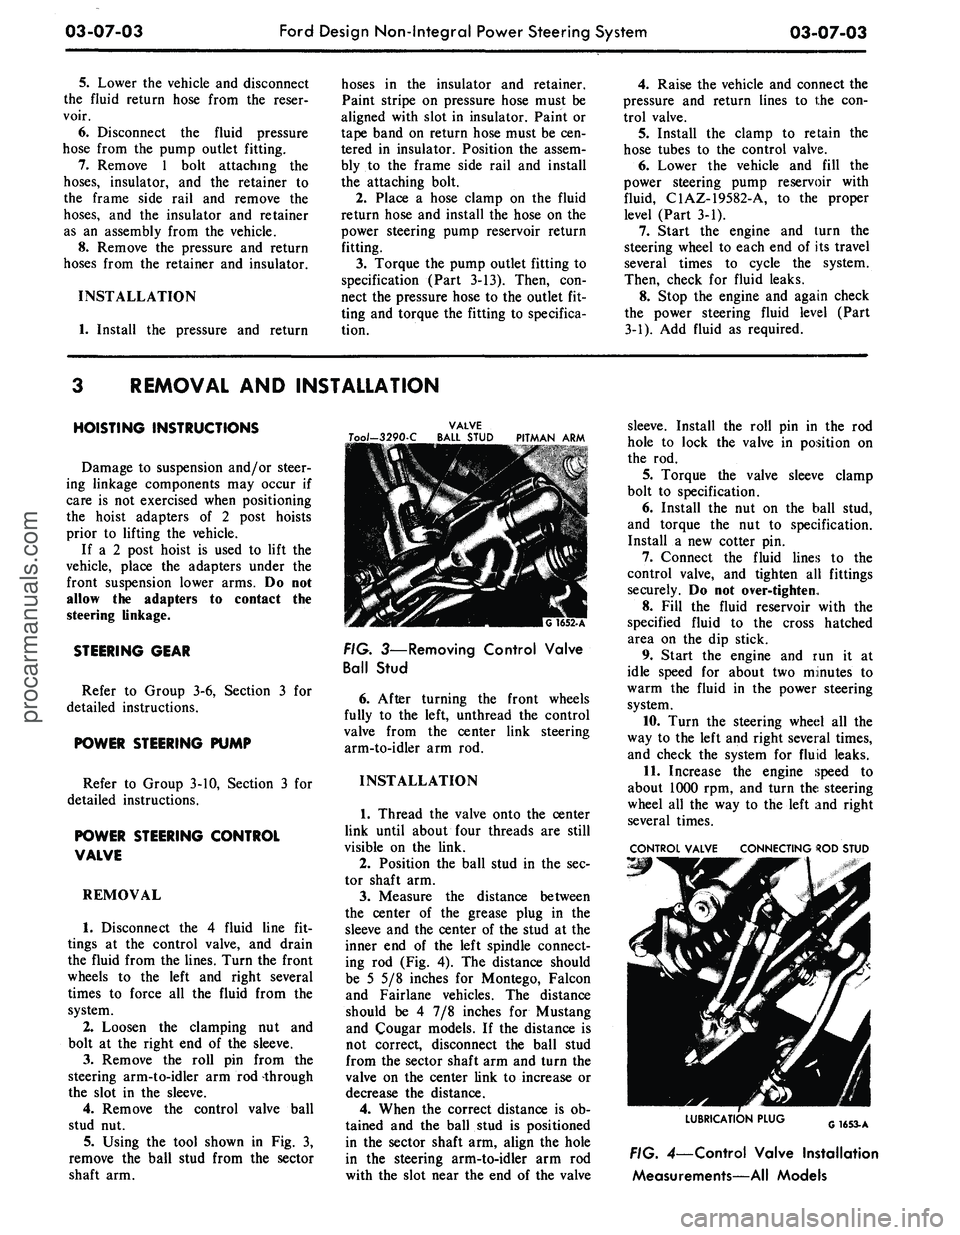
Using the tool shown in Fig. 3,
remove the ball stud from the sector
shaft arm.
VALVE
Too/-3290-C BALL STUD PITMAN ARM
FIG. 3—Removing Control Valve
Ball Stud
6. After turning the front wheels
fully to the left, unthread the control
valve from the center link steering
arm-to-idler arm rod.
INSTALLATION
1.
Thread the valve onto the center
link until about four threads are still
visible on the link.
2.
Position the ball stud in the sec-
tor shaft arm.
3.
Measure the distance between
the center of the grease plug in the
sleeve and the center of the stud at the
inner end of the left spindle connect-
ing rod (Fig. 4). The distance should
be 5 5/8 inches for Montego, Falcon
and Fairlane vehicles. The distance
should be 4 7/8 inches for Mustang
and Cougar models. If the distance is
not correct, disconnect the ball stud
from the sector shaft arm and turn the
valve on the center link to increase or
decrease the distance.
4.
When the correct distance is ob-
tained and the ball stud is positioned
in the sector shaft arm, align the hole
in the steering arm-to-idler arm rod
with the slot near the end of the valve
sleeve. Install the roll pin in the rod
hole to lock the valve in position on
the rod.
5.
Torque the valve sleeve clamp
bolt to specification.
6. Install the nut on the ball stud,
and torque the nut to specification.
Install a new cotter pin.
7.
Connect the fluid lines to the
control valve, and tighten all fittings
securely. Do not over-tighten.
8. Fill the fluid reservoir with the
specified fluid to the cross hatched
area on the dip stick.
9. Start the engine and run it at
idle speed for about two minutes to
warm the fluid in the power steering
system.
10.
Turn the steering wheel all the
way to the left and right several times,
and check the system for fluid leaks.
11.
Increase the engine speed to
about 1000 rpm, and turn the steering
wheel all the way to the left and right
several times.
CONTROL VALVE CONNECTING ROD STUD
LUBRICATION PLUG
G1653-A
FIG. 4—Control Valve Installation
Measurements—All Modelsprocarmanuals.com
Page 142 of 413
03-07-04
Ford Design Non-Integral Power Steering System
03-07-04
12.
Stop the engine, and check the
control valve and hose connections for
fluid leaks. Correct the cause of any
leaks.
13.
Check the fluid level, and refill
the reservoir if necessary.
14.
With the engine running check
the position of the steering wheel
when the front wheels are in the
straight-ahead position.Do not make
any adjustments until toe-in is
checked.
15.
Keep the engine running, and
check toe-in. If either toe-in or steer-
ing wheel position is not correct make
all necessary adjustments (Part 3-1) at
the spindle connecting rod sleeves.
16.
Check the effort to turn the
wheels in both directions. The effort
should be about equal in both direc-
tions.
POWER CYLINDER
REMOVAL
1.
Disconnect the two fluid lines
from the power cylinder and allow
them to drain into a container.
CENTER LINK
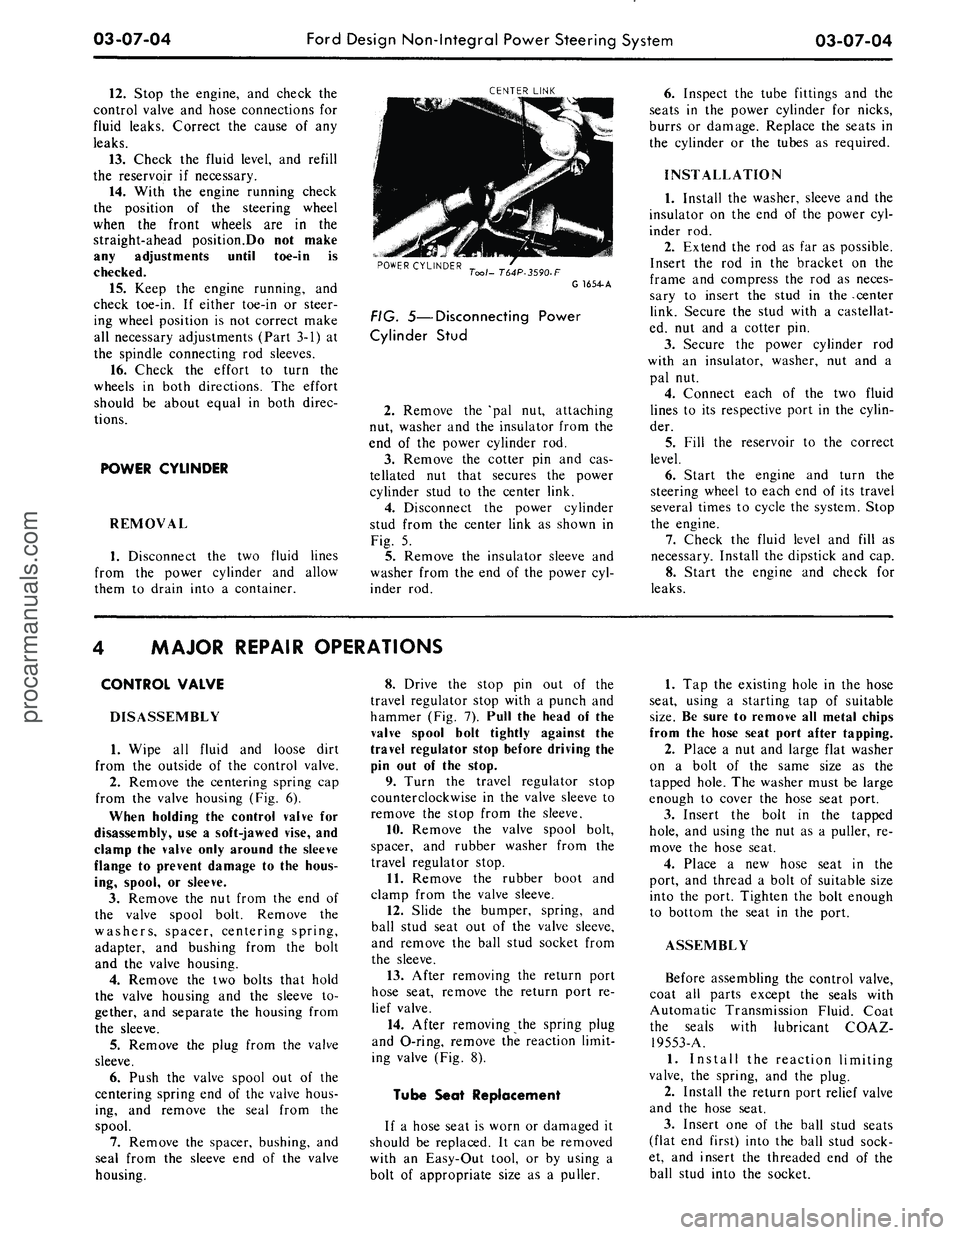
POWER CYLINDER
Tool- T64P-3590-F
G 1654-A
FIG. 5—Disconnecting Power
Cylinder Stud
2.
Remove the 'pal nut, attaching
nut, washer and the insulator from the
end of the power cylinder rod.
3.
Remove the cotter pin and cas-
tellated nut that secures the power
cylinder stud to the center link.
4.
Disconnect the power cylinder
stud from the center link as shown in
Fig. 5.
5.
Remove the insulator sleeve and
washer from the end of the power cyl-
inder rod.
6. Inspect the tube fittings and the
seats in the power cylinder for nicks,
burrs or damage. Replace the seats in
the cylinder or the tubes as required.
INSTALLATION
1.
Install the washer, sleeve and the
insulator on the end of the power cyl-
inder rod.
2.
Extend the rod as far as possible.
Insert the rod in the bracket on the
frame and compress the rod as neces-
sary to insert the stud in the -center
link. Secure the stud with a castellat-
ed, nut and a cotter pin.
3.
Secure the power cylinder rod
with an insulator, washer, nut and a
pal nut.
4.
Connect each of the two fluid
lines to its respective port in the cylin-
der.
5.
Fill the reservoir to the correct
level.
6. Start the engine and turn the
steering wheel to each end of its travel
several times to cycle the system. Stop
the engine.
7.
Check the fluid level and fill as
necessary. Install the dipstick and cap.
8. Start the engine and check for
leaks.
MAJOR REPAIR OPERATIONS
CONTROL VALVE
DISASSEMBLY
1.
Wipe all fluid and loose dirt
from the outside of the control valve.
2.
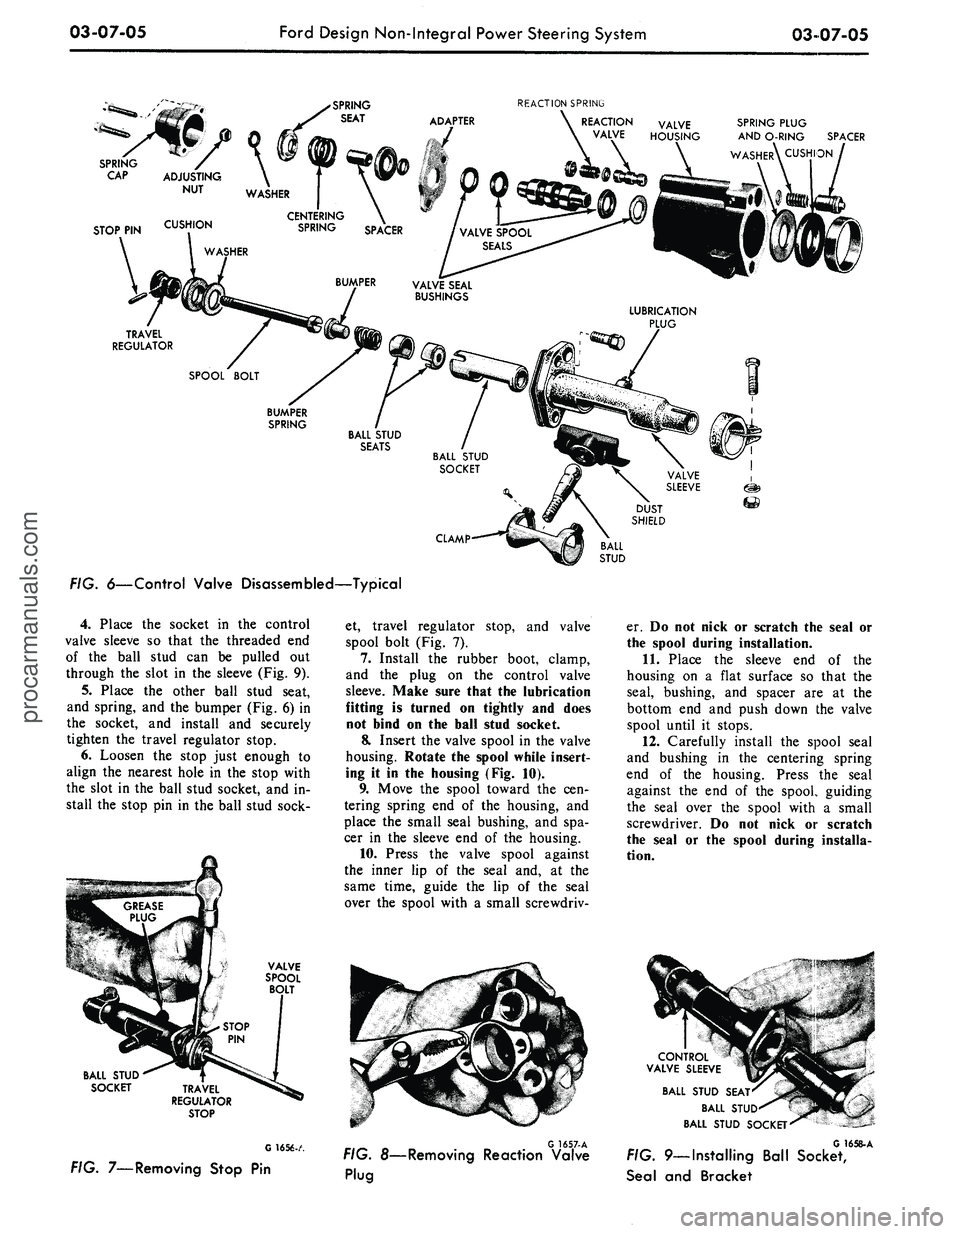
Remove the centering spring cap
from the valve housing (Fig. 6).
When holding the control valve for
disassembly, use a soft-jawed vise, and
clamp the valve only around the sleeve
flange to prevent damage to the hous-
ing, spool, or sleeve.
3.
Remove the nut from the end of
the valve spool bolt. Remove the
washers, spacer, centering spring,
adapter, and bushing from the bolt
and the valve housing.
4.
Remove the two bolts that hold
the valve housing and the sleeve to-
gether, and separate the housing from
the sleeve.
5.
Remove the plug from the valve
sleeve.
6. Push the valve spool out of the
centering spring end of the valve hous-
ing, and remove the seal from the
spool.
7.
Remove the spacer, bushing, and
seal from the sleeve end of the valve
housing.
8. Drive the stop pin out of the
travel regulator stop with a punch and
hammer (Fig. 7). Pull the head of the
valve spool bolt tightly against the
travel regulator stop before driving the
pin out of the stop.
9. Turn the travel regulator stop
counterclockwise in the valve sleeve to
remove the stop from the sleeve.
10.
Remove the valve spool bolt,
spacer, and rubber washer from the
travel regulator stop.
11.
Remove the rubber boot and
clamp from the valve sleeve.
12.
Slide the bumper, spring, and
ball stud seat out of the valve sleeve,
and remove the ball stud socket from
the sleeve.
13.
After removing the return port
hose seat, remove the return port re-
lief valve.
14.
After removing the spring plug
and O-ring, remove the reaction limit-
ing valve (Fig. 8).
Tube Seat Replacement
If a hose seat is worn or damaged it
should be replaced. It can be removed
with an Easy-Out tool, or by using a
bolt of appropriate size as a puller.
1.
Tap the existing hole in the hose
seat, using a starting tap of suitable
size.
Be sure to remove all metal chips
from the hose seat port after tapping.
2.
Place a nut and large flat washer
on a bolt of the same size as the
tapped hole. The washer must be large
enough to cover the hose seat port.
3.
Insert the bolt in the tapped
hole,
and using the nut as a puller, re-
move the hose seat.
4.
Place a new hose seat in the
port, and thread a bolt of suitable size
into the port. Tighten the bolt enough
to bottom the seat in the port.
ASSEMBLY
Before assembling the control valve,
coat all parts except the seals with
Automatic Transmission Fluid. Coat
the seals with lubricant COAZ-
19553-A.
1.
Install the reaction limiting
valve, the spring, and the plug.
2.
Install the return port relief valve
and the hose seat.
3.
Insert one of the ball stud seats
(flat end first) into the ball stud sock-
et, and insert the threaded end of the
ball stud into the socket.procarmanuals.com
Page 143 of 413
03-07-05
Ford Design Non-Integral Power Steering System
03-07-05
•
SPRING
SEAT
REACTION
SPRING
\
REACTION
\
VALVE
VALVE
HOUSING
SPRING PLUG
AND O-RING SPACER
WASHERX
CUSHION
STOP
PIN
TRAVEL
REGULATOR
CLAMP
FIG. 6—Control Valve Disassembled—Typical
4.
Place
the
socket
in the
control
valve sleeve
so
that
the
threaded
end
of
the
ball stud
can be
pulled
out
through
the
slot
in the
sleeve (Fig.
9).
5.
Place
the
other ball stud seat,
and spring,
and the
bumper (Fig.
6) in
the socket,
and
install
and
securely
tighten
the
travel regulator stop.
6. Loosen
the
stop just enough
to
align
the
nearest hole
in the
stop with
the slot
in the
ball stud socket,
and in-
stall
the
stop
pin in the
ball stud sock-
VAIVE
SPOOL
BOLT
BALL
STUD
SOCKET
TRAVEL
REGULATOR
STOP
G
1656-A
FIG. 7—Removing Stop
Pin
et, travel regulator stop,
and
valve
spool bolt
(Fig. 7).
7.
Install
the
rubber boot, clamp,
and
the
plug
on the
control valve
sleeve. Make sure that
the
lubrication
fitting
is
turned
on
tightly
and
does
not bind
on the
ball stud socket.
8. Insert
the
valve spool
in the
valve
housing. Rotate
the
spool while insert-
ing
it in the
housing
(Fig. 10).
9. Move
the
spool toward
the cen-
tering spring
end of the
housing,
and
place
the
small seal bushing,
and spa-
cer
in the
sleeve
end of the
housing.
10.
Press
the
valve spool against
the inner
lip of the
seal
and, at the
same time, guide
the lip of the
seal
over
the
spool with
a
small screwdriv-
G
1657-A
FIG. 8—Removing Reaction Valve
Plug
er.
Do not
nick
or
scratch
the
seal
or
the spool during installation.
11.
Place
the
sleeve
end of the
housing
on a
flat surface
so
that
the
seal, bushing,
and
spacer
are at the
bottom
end and
push down
the
valve
spool until
it
stops.
12.
Carefully install
the
spool seal
and bushing
in the
centering spring
end
of the
housing. Press
the
seal
against
the end of the
spool., guiding
the seal over
the
spool with
a
small
screwdriver.
Do not
nick
or
scratch
the seal
or the
spool during installa-
tion.
CONTROL
VALVE
SLEEVE
BALL
STUD
SEAT-
BALL
STUD'
BALL
STUD
SOCKET'
G
16
58-A
FIG. 9—Installing Ball Socket,
Seal
and
Bracketprocarmanuals.com
Page 144 of 413
03-07-06
Ford Design Non-Integral Power Steering System
03-07-06
VALVE HOUSING
VALVE SPOOL
G
1659-
A
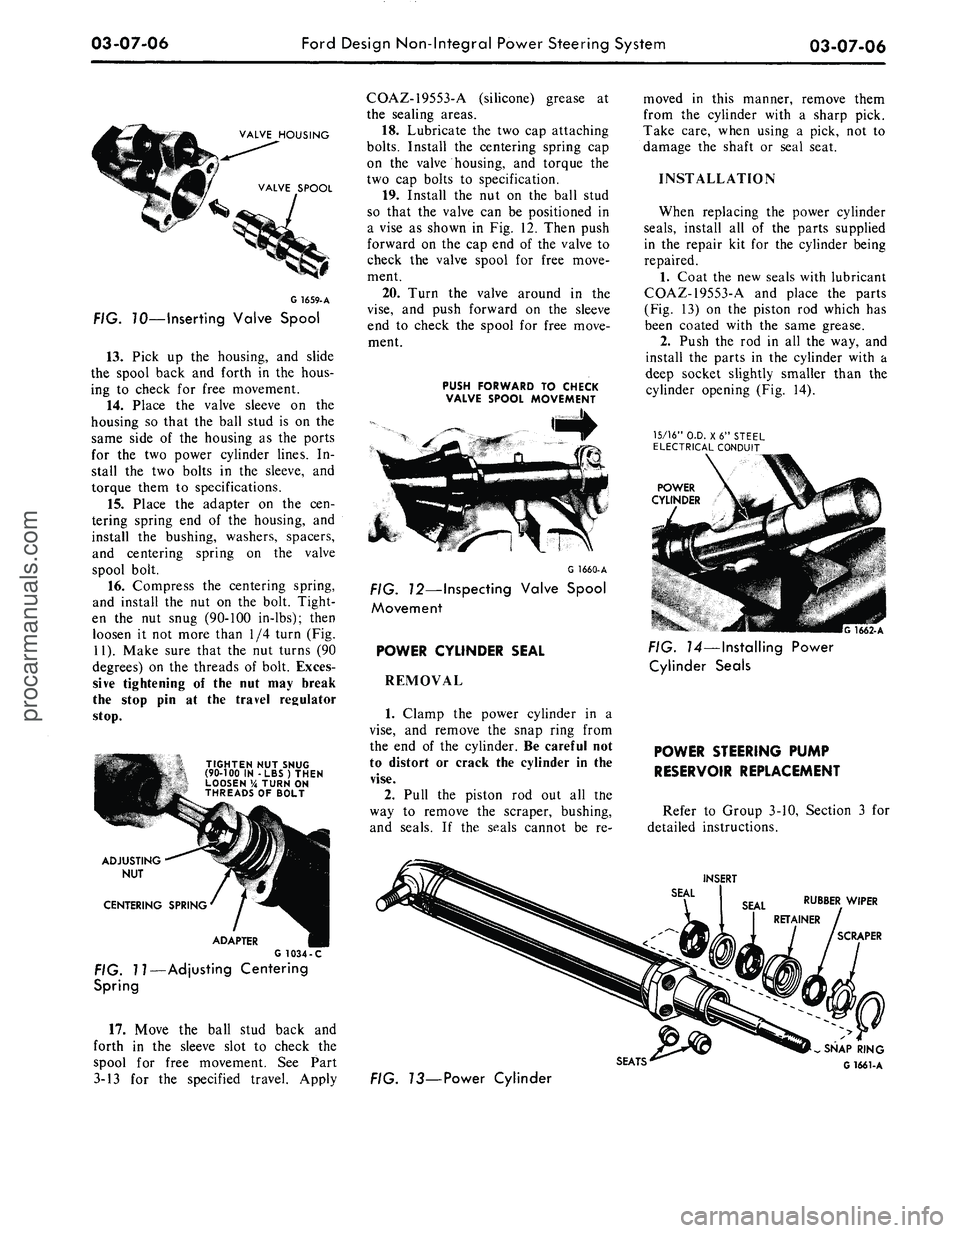
FIG. 70—Inserting Valve Spool
13.
Pick up the housing, and slide
the spool back and forth in the hous-
ing to check for free movement.
14.
Place the valve sleeve on the
housing so that the ball stud is on the
same side of the housing as the ports
for the two power cylinder lines. In-
stall the two bolts in the sleeve, and
torque them to specifications.
15.
Place the adapter on the cen-
tering spring end of the housing, and
install the bushing, washers, spacers,
and centering spring on the valve
spool bolt.
16.
Compress the centering spring,
and install the nut on the bolt. Tight-
en the nut snug (90-100 in-lbs); then
loosen it not more than 1/4 turn (Fig.
11).
Make sure that the nut turns (90
degrees) on the threads of bolt. Exces-
sive tightening of the nut may break
the stop pin at the travel regulator
stop.
TIGHTEN NUT SNUG
(90-100 IN -LBS) THEN
LOOSEN % TURN ON
THREADS OF BOLT
ADJUSTING
NUT
CENTERING SPRING
ADAPTER
G 1034 -C
FIG. 11—Adjusting Centering
Spring
17.
Move the ball stud back and
forth in the sleeve slot to check the
spool for free movement. See Part
3-13 for the specified travel. Apply
COAZ-19553-A (silicone) grease at
the sealing areas.
18.
Lubricate the two cap attaching
bolts.
Install the centering spring cap
on the valve housing, and torque the
two cap bolts to specification.
19.
Install the nut on the ball stud
so that the valve can be positioned in
a vise as shown in Fig. 12. Then push
forward on the cap end of the valve to
check the valve spool for free move-
ment.
20.
Turn the valve around in the
vise,
and push forward on the sleeve
end to check the spool for free move-
ment.
PUSH FORWARD TO CHECK
VALVE SPOOL MOVEMENT
G 1660-A
FIG. 12—Inspecting Valve Spool
Movement
POWER CYLINDER SEAL
REMOVAL
1.
Clamp the power cylinder in a
vise,
and remove the snap ring from
the end of the cylinder. Be careful not
to distort or crack the cylinder in the
vise.
2.
Pull the piston rod out all the
way to remove the scraper, bushing,
and seals. If the seals cannot be re-
moved in this manner, remove them
from the cylinder with a sharp pick.
Take care, when using a pick, not to
damage the shaft or seal seat.
INSTALLATION
When replacing the power cylinder
seals,
install all of the parts supplied
in the repair kit for the cylinder being
repaired.
1.
Coat the new seals with lubricant
COAZ-19553-A and place the parts
(Fig. 13) on the piston rod which has
been coated with the same grease.
2.
Push the rod in all the way, and
install the parts in the cylinder with a
deep socket slightly smaller than the
cylinder opening (Fig. 14).
15/16"
O.D. X6" STEEL
ELECTRICAL CONDUIT
POWER
CYLINDER
G 1662-A
FIG. 14—Installing Power
Cylinder Seals
POWER STEERING PUMP
RESERVOIR REPLACEMENT
Refer to Group 3-10, Section 3 for
detailed instructions.
INSERT
RUBBER WIPER
SCRAPER
SEATS'
FIG. 73—Power Cylinder
SNAP RING
G 1661-Aprocarmanuals.com
Page 145 of 413
03-08-01
Ford Design Integral Power Steering Gear
03-08-01
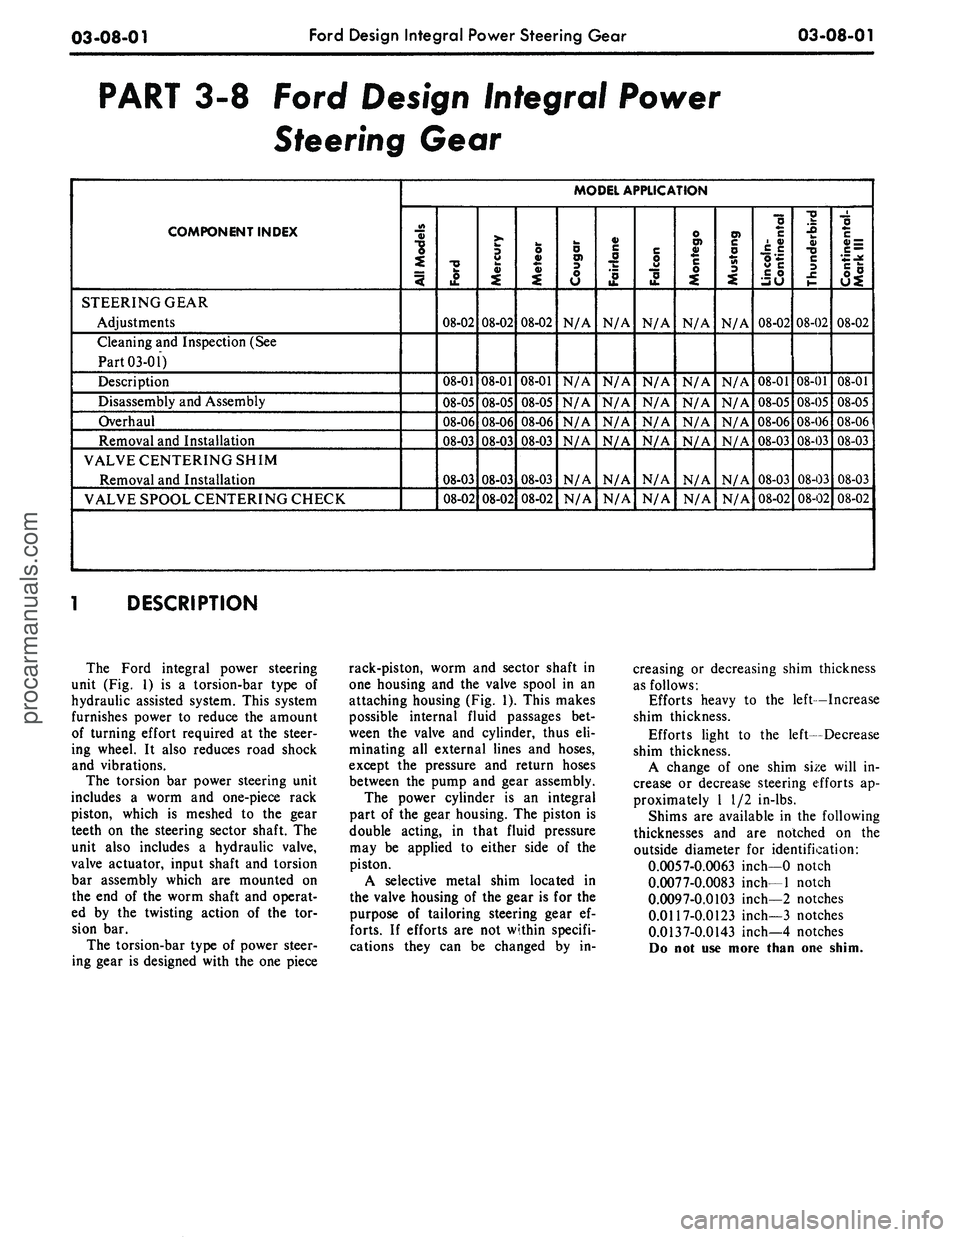
PART
3-8
Ford Design Integral Power
Steering Gear
COMPONENT INDEX
STEERING GEAR
Adjustments
Cleaning
and
Inspection
(See
Part 03-01)
Description
Disassembly
and
Assembly
Overhaul
Removal
and
Installation
VALVE CENTERING SHIM
Removal
and
Installation
VALVE SPOOL CENTERING CHECK
MODEL APPLICATION
All Models
Ford
08-02
08-01
08-05
08-06
08-03
08-03
08-02
Mercury
08-02
08-01
08-05
08-06
08-03
08-03
08-02
Meteor
08-02
08-01
08-05
08-06
08-03
08-03
08-02
Cougar
N/A
N/A
N/A
N/A
N/A
N/A
N/A
Fairlane
N/A
N/A
N/A
N/A
N/A
N/A
N/A
Falcon
N/A
N/A
N/A
N/A
N/A
N/A
N/A
Montego
N/A
N/A
N/A
N/A
N/A
N/A
N/A
Mustang
N/A
N/A
N/A
N/A
N/A
N/A
N/A
Lincoln-
Continental
08-02
08-01
08-05
08-06
08-03
08-03
08-02
Thunderbird
08-02
08-01
08-05
08-06
08-03
08-03
08-02
Continental-
Mark
III
08-02
08-01
08-05
08-06
08-03
08-03
08-02
DESCRIPTION
The Ford integral power steering
unit
(Fig. 1) is a
torsion-bar type
of
hydraulic assisted system. This system
furnishes power
to
reduce
the
amount
of turning effort required
at the
steer-
ing wheel.
It
also reduces road shock
and vibrations.
The torsion
bar
power steering unit
includes
a
worm
and
one-piece rack
piston, which
is
meshed
to the
gear
teeth
on the
steering sector shaft.
The
unit also includes
a
hydraulic valve,
valve actuator, input shaft
and
torsion
bar assembly which
are
mounted
on
the
end of the
worm shaft
and
operat-
ed
by the
twisting action
of the tor-
sion
bar.
The torsion-bar type
of
power steer-
ing gear
is
designed with
the one
piece
rack-piston, worm
and
sector shaft
in
one housing
and the
valve spool
in an
attaching housing
(Fig. 1).
This makes
possible internal fluid passages
bet-
ween
the
valve
and
cylinder, thus
eli-
minating
all
external lines
and
hoses,
except
the
pressure
and
return hoses
between
the
pump
and
gear assembly.
The power cylinder
is an
integral
part
of the
gear housing.
The
piston
is
double acting,
in
that fluid pressure
may
be
applied
to
either side
of the
piston.
A selective metal shim located
in
the valve housing
of the
gear
is for the
purpose
of
tailoring steering gear
ef-
forts.
If
efforts
are not
within specifi-
cations they
can be
changed
by in-
creasing
or
decreasing shim thickness
as follows:
Efforts heavy
to the
left—Increase
shim thickness.
Efforts light
to the
left—Decrease
shim thickness.
A change
of one
shim size will
in-
crease
or
decrease steering efforts
ap-
proximately
1 1/2
in-lbs.
Shims
are
available
in the
following
thicknesses
and are
notched
on the
outside diameter
for
identification:
0.0057-0.0063 inch—0 notch
0.0077-0.0083 inch—1 notch
0.0097-0.0103 inch—2 notches
0.0117-0.0123 inch—3 notches
0.0137-0.0143 inch—4 notches
Do
not use
more than
one
shim.
procarmanuals.com
Page 146 of 413
03-08-02
Ford Design Integral Power Steering Gear
03-08-02
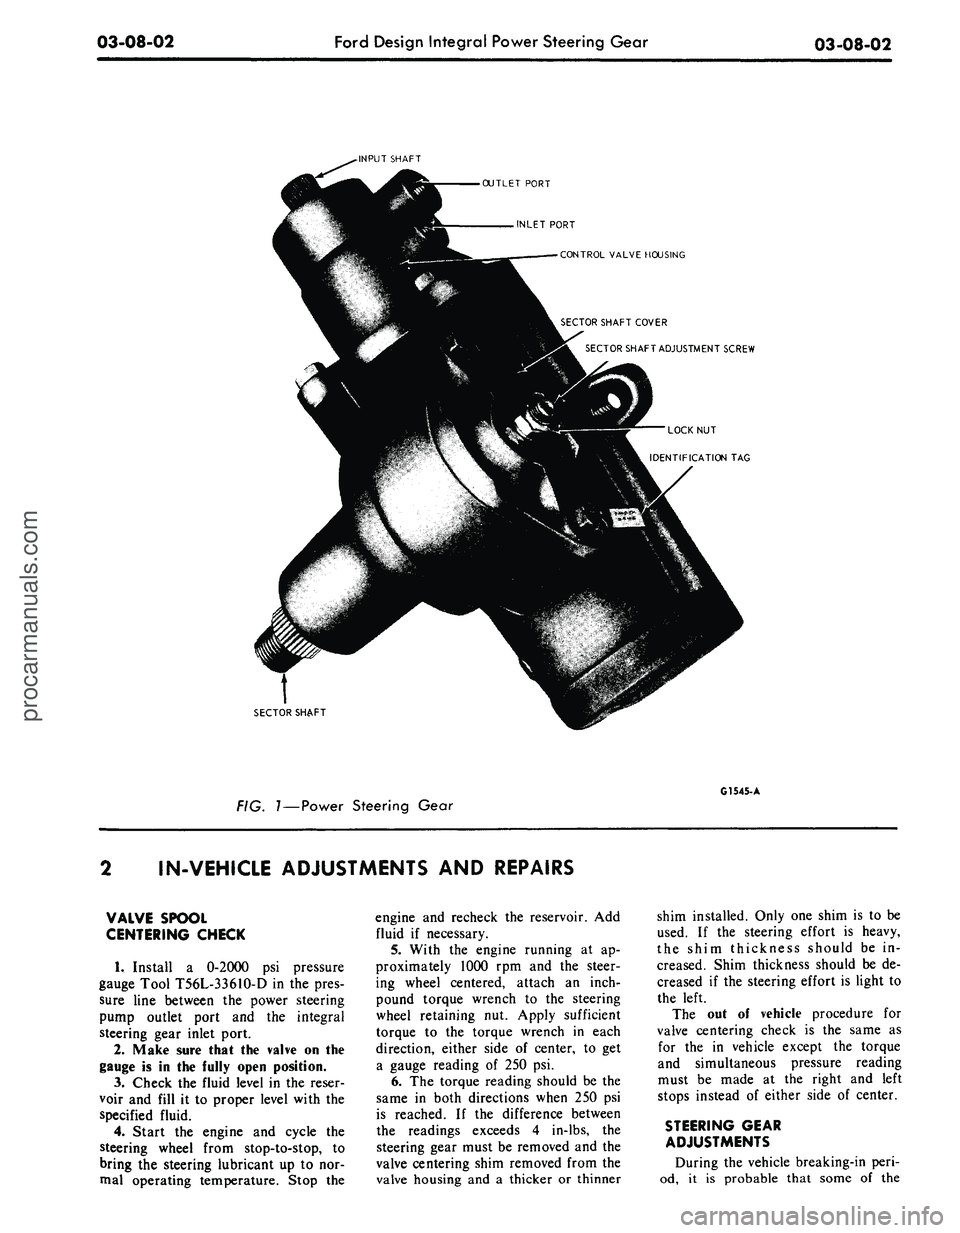
-INPUT SHAFT
OUTLET PORT
INLET PORT
CONTROL VALVE HOUSING
SECTOR SHAFT COVER
SECTOR SHAFT ADJUSTMENT SCREW
LOCK NUT
IDENTIFICATION TAG
SECTOR SHAFT
FIG.
1—Power
Steering Gear
G1545- A
IN-VEH1CLE ADJUSTMENTS AND REPAIRS
VALVE SPOOL
CENTERING CHECK
1.
Install a 0-2000 psi pressure
gauge Tool T56L-33610-D in the pres-
sure line between the power steering
pump outlet port and the integral
steering gear inlet port.
2.
Make sure that the valve on the
gauge is in the fully open position.
3.
Check the fluid level in the reser-
voir and fill it to proper level with the
specified fluid.
4.
Start the engine and cycle the
steering wheel from stop-to-stop, to
bring the steering lubricant up to nor-
mal operating temperature. Stop the
engine and recheck the reservoir. Add
fluid if necessary.
5.
With the engine running at ap-
proximately 1000 rpm and the steer-
ing wheel centered, attach an inch-
pound torque wrench to the steering
wheel retaining nut. Apply sufficient
torque to the torque wrench in each
direction, either side of center, to get
a gauge reading of 250 psi.
6. The torque reading should be the
same in both directions when 250 psi
is reached. If the difference between
the readings exceeds 4 in-lbs, the
steering gear must be removed and the
valve centering shim removed from the
valve housing and a thicker or thinner
shim installed. Only one shim is to be
used. If the steering effort is heavy,
the shim thickness should be in-
creased. Shim thickness should be de-
creased if the steering effort is light to
the left.
The out of vehicle procedure for
valve centering check is the same as
for the in vehicle except the torque
and simultaneous pressure reading
must be made at the right and left
stops instead of either side of center.
STEERING GEAR
ADJUSTMENTS
During the vehicle breaking-in peri-
od, it is probable that some of theprocarmanuals.com
Page 147 of 413
03-08-03
Ford Design Integral Power Steering Gear
03-08-03
factory adjustments will change. These
changes in adjustment do not neces-
sarily affect the satisfactory operation
of the steering gear assembly, and
therefore ordinarily do not require
readjustment unless there is excessive
lash or other malfunctioning.
ADJUSTMENT IN
VEHICLE
The only adjustment which can be
performed is the total over center
position load, to eliminate excessive
lash between the sector and rack
teeth.
1.
Disconnect the pitman arm from
the sector shaft.
2.
Disconnect the fluid return line
at the reservoir, at the same time cap
the reservoir return line pipe.
3.
Place the end of the return line
in a clean container and cycle the
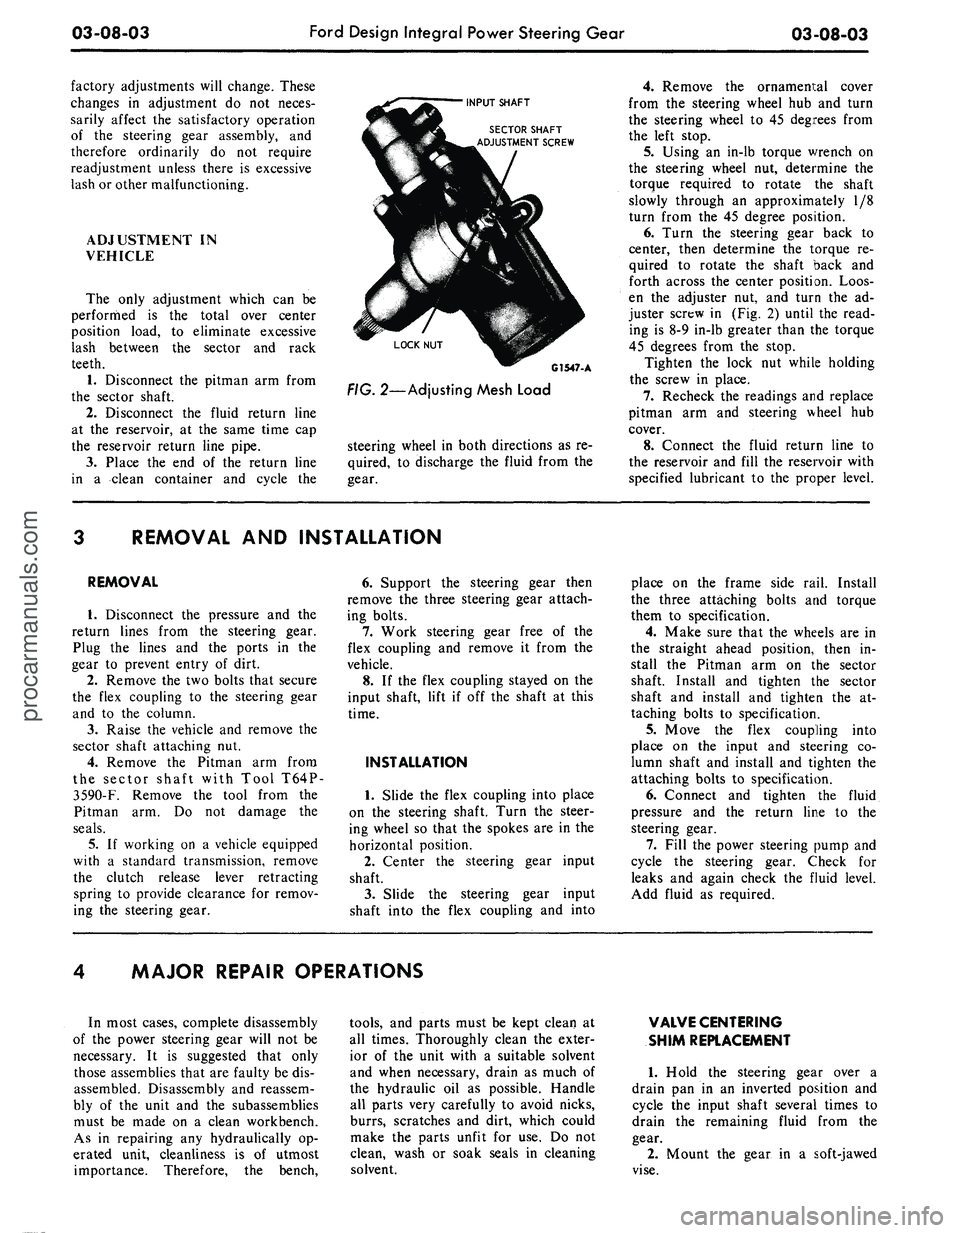
INPUT SHAFT
SECTOR SHAFT
ADJUSTMENT SCREW
C1547- A
FIG.
2—Adjusting Mesh Load
steering wheel in both directions as re-
quired, to discharge the fluid from the
gear.
4.
Remove the ornamental cover
from the steering wheel hub and turn
the steering wheel to 45 degrees from
the left stop.
5.
Using an in-lb torque wrench on
the steering wheel nut, determine the
torque required to rotate the shaft
slowly through an approximately 1/8
turn from the 45 degree position.
6. Turn the steering gear back to
center, then determine the torque re-
quired to rotate the shaft back and
forth across the center position. Loos-
en the adjuster nut, and turn the ad-
juster screw in (Fig. 2) until the read-
ing is 8-9 in-lb greater than the torque
45 degrees from the stop.
Tighten the lock nut while holding
the screw in place.
7.
Recheck the readings and replace
pitman arm and steering wheel hub
cover.
8. Connect the fluid return line to
the reservoir and fill the reservoir with
specified lubricant to the proper level.
REMOVAL AND INSTALLATION
REMOVAL
1.
Disconnect the pressure and the
return lines from the steering gear.
Plug the lines and the ports in the
gear to prevent entry of dirt.
2.
Remove the two bolts that secure
the flex coupling to the steering gear
and to the column.
3.
Raise the vehicle and remove the
sector shaft attaching nut.
4.
Remove the Pitman arm from
the sector shaft with Tool T64P-
3590-F.
Remove the tool from the
Pitman arm. Do not damage the
seals.
5.
If working on a vehicle equipped
with a standard transmission, remove
the clutch release lever retracting
spring to provide clearance for remov-
ing the steering gear.
6. Support the steering gear then
remove the three steering gear attach-
ing bolts.
7.
Work steering gear free of the
flex coupling and remove it from the
vehicle.
8. If the flex coupling stayed on the
input shaft, lift if off the shaft at this
time.
INSTALLATION
1.
Slide the flex coupling into place
on the steering shaft. Turn the steer-
ing wheel so that the spokes are in the
horizontal position.
2.
Center the steering gear input
shaft.
3.
Slide the steering gear input
shaft into the flex coupling and into
place on the frame side rail. Install
the three attaching bolts and torque
them to specification.
4.
Make sure that the wheels are in
the straight ahead position, then in-
stall the Pitman arm on the sector
shaft. Install and tighten the sector
shaft and install and tighten the at-
taching bolts to specification.
5.
Move the flex coupling into
place on the input and steering co-
lumn shaft and install and tighten the
attaching bolts to specification.
6. Connect and tighten the fluid
pressure and the return line to the
steering gear.
7.
Fill the power steering pump and
cycle the steering gear. Check for
leaks and again check the fluid level.
Add fluid as required.
MAJOR REPAIR OPERATIONS
In most cases, complete disassembly
of the power steering gear will not be
necessary. It is suggested that only
those assemblies that are faulty be dis-
assembled. Disassembly and reassem-
bly of the unit and the subassemblies
must be made on a clean workbench.
As in repairing any hydraulically op-
erated unit, cleanliness is of utmost
importance. Therefore, the bench,
tools,
and parts must be kept clean at
all times. Thoroughly clean the exter-
ior of the unit with a suitable solvent
and when necessary, drain as much of
the hydraulic oil as possible. Handle
all parts very carefully to avoid nicks,
burrs,
scratches and dirt, which could
make the parts unfit for use. Do not
clean, wash or soak seals in cleaning
solvent.
VALVE CENTERING
SHIM REPLACEMENT
1.
Hold the steering gear over a
drain pan in an inverted position and
cycle the input shaft several times to
drain the remaining fluid from the
gear.
2.
Mount the gear in a soft-jawed
vise.procarmanuals.com
Page 148 of 413
03-08-04
Ford Design Integral Power Steering Gear
03-08-04
3.
Turn the input shaft to either
stop then, turn it back approximately
1 3/4 turns to center the gear.
4.
Remove the two sector shaft
cover attaching screws and the
identif-
ication tag.
5.
Tap the lower end of the sector
shaft with a soft-faced hammer to
loosen it, then lift the cover and shaft
from the housing as an assembly. Dis-
card the O-ring.
6. Remove the four valve housing
attaching bolts. Lift the valve housing
from the steering gear housing while
holding the piston to prevent it from
rotating off the worm shaft.
7.
Remove the valve housing and
the lube passage O-ring and discard
them.
8. Place the valve housing, worm
and piston assembly in the bench
mounted holding fixture Tool T57L-
500-A with the piston on the top.
9. Rotate the piston upward (back
off) 3 1/2 turns.
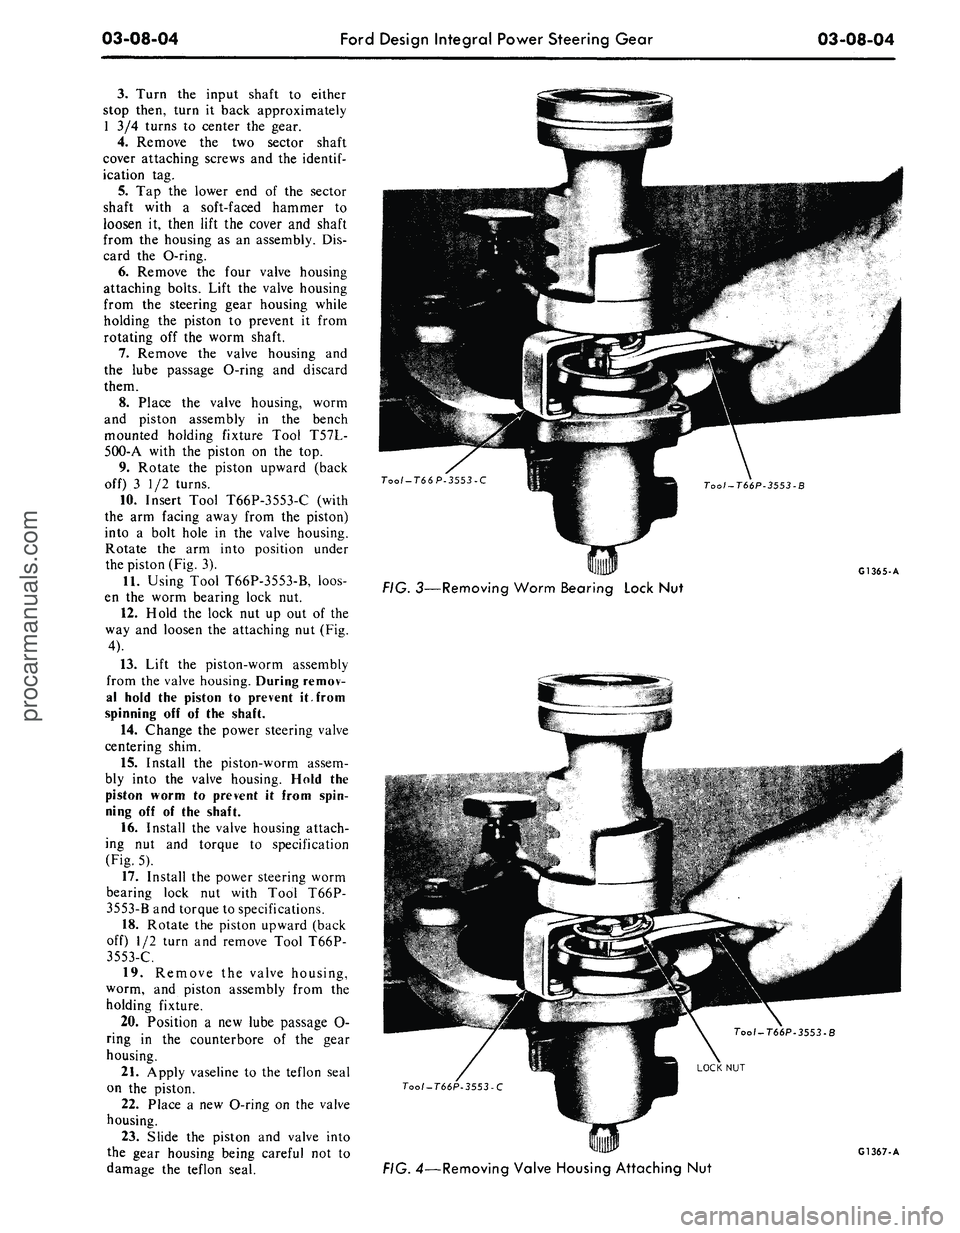
10.
Insert Tool T66P-3553-C (with
the arm facing away from the piston)
into a bolt hole in the valve housing.
Rotate the arm into position under
the piston (Fig. 3).
11.
Using Tool T66P-3553-B, loos-
en the worm bearing lock nut.
12.
Hold the lock nut up out of the
way and loosen the attaching nut (Fig.
4).
13.
Lift the piston-worm assembly
from the valve housing. During remov-
al hold the piston to prevent it.from
spinning off of the shaft.
14.
Change the power steering valve
centering shim.
15.
Install the piston-worm assem-
bly into the valve housing. Hold the
piston worm to prevent it from spin-
ning off of the shaft.
16.
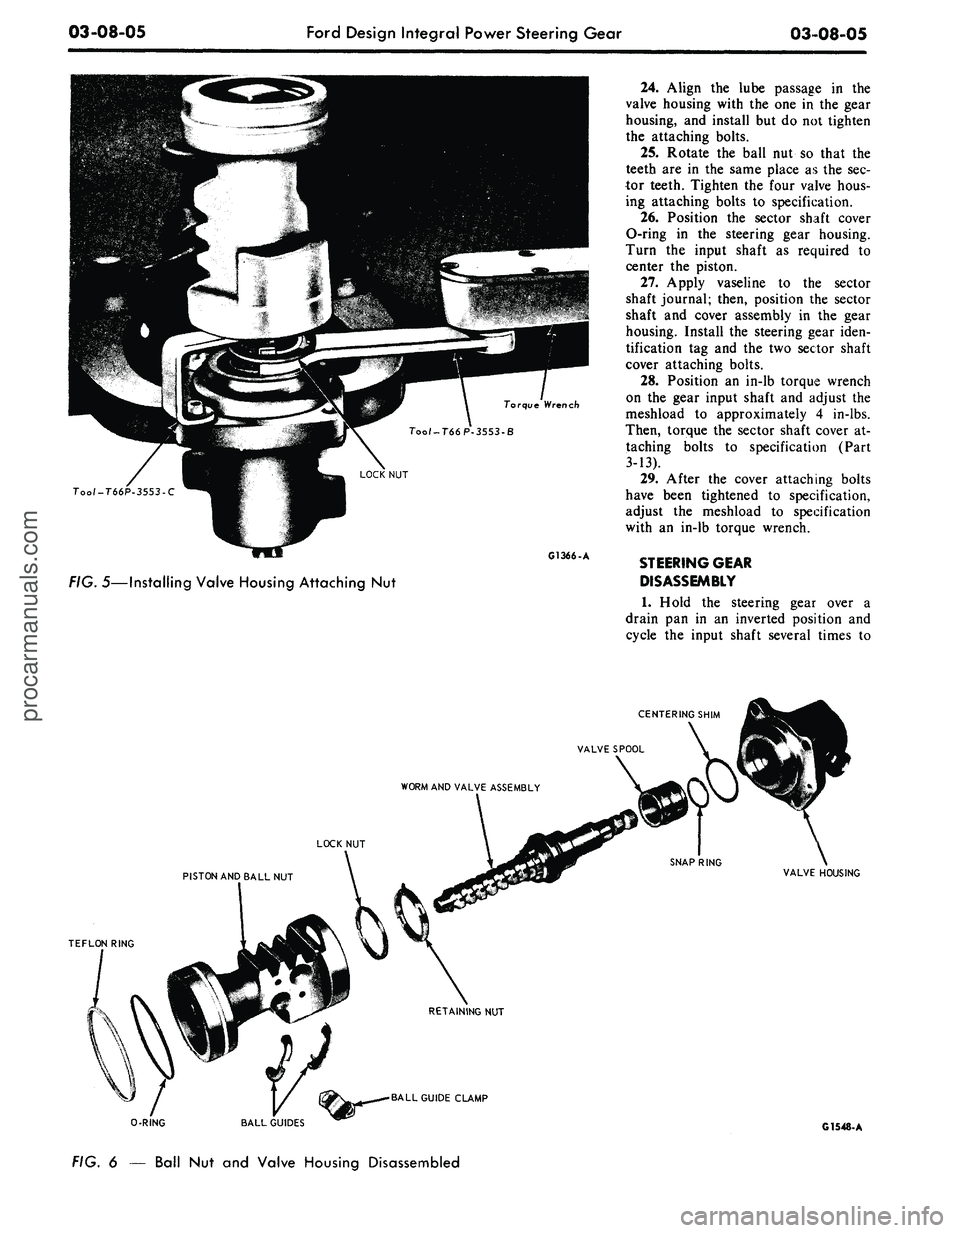
Install the valve housing attach-
ing nut and torque to specification
(Fig. 5).
17.
Install the power steering worm
bearing lock nut with Tool T66P-
3553-B and torque to specifications.
18.
Rotate the piston upward (back
off) 1/2 turn and remove Tool T66P-
3553-C.
19.
Remove the valve housing,
worm, and piston assembly from the
holding fixture.
20.
Position a new lube passage O-
ring in the counterbore of the gear
housing.
21.
Apply vaseline to the teflon seal
on the piston.
22.
Place a new O-ring on the valve
housing.
23.
Slide the piston and valve into
the gear housing being careful not to
damage the teflon seal.
G1365-A
FIG. 3—Removing Worm Bearing Lock Nut
Tool-T66P-3553-C
G1367-A
FIG. 4—Removing Valve Housing Attaching Nutprocarmanuals.com
Page 149 of 413
03-08-05
Ford Design Integral Power Steering Gear
03-08-05
rque Wrench
Tool-T66P-3553-C
G1366-A
FIG.
5—Installing Valve Housing Attaching
Nut
24.
Align
the
lube passage
in the
valve housing with
the
one
in
the gear
housing,
and
install but
do
not tighten
the attaching bolts.
25.
Rotate
the
ball
nut so
that
the
teeth
are in the
same place
as
the sec-
tor teeth. Tighten
the
four valve hous-
ing attaching bolts
to
specification.
26.
Position
the
sector shaft cover
O-ring
in the
steering gear housing.
Turn
the
input shaft
as
required
to
center
the
piston.
27.
Apply vaseline
to the
sector
shaft journal; then, position
the
sector
shaft
and
cover assembly
in
the
gear
housing. Install
the
steering gear iden-
tification
tag and the
two sector shaft
cover attaching bolts.
28.
Position
an
in-lb torque wrench
on
the
gear input shaft
and
adjust
the
meshload
to
approximately
4
in-lbs.
Then, torque the sector shaft cover
at-
taching bolts
to
specification (Part
3-13).
29.
After
the
cover attaching bolts
have been tightened
to
specification,
adjust
the
meshload
to
specification
with
an
in-lb torque wrench.
STEERING GEAR
DISASSEMBLY
1.
Hold
the
steering gear over
a
drain
pan
in an
inverted position
and
cycle
the
input shaft several times
to
CENTERING SHIM
WORM AND VALVE ASSEMBLY
LOCK NUT
PISTON AND BALL NUT
VALVE HOUSING
TEFLON RING
•BALL GUIDE CLAMP
0-RING
BALL GUIDES
G1548-A
FIG.
6 —
Ball
Nut and
Valve Housing Disassembledprocarmanuals.com
Page 150 of 413
03-08-06
Ford Design Integral Power Steering Gear
03-08-06
VALVE HOUSING
7W-T65P
C1239 -A
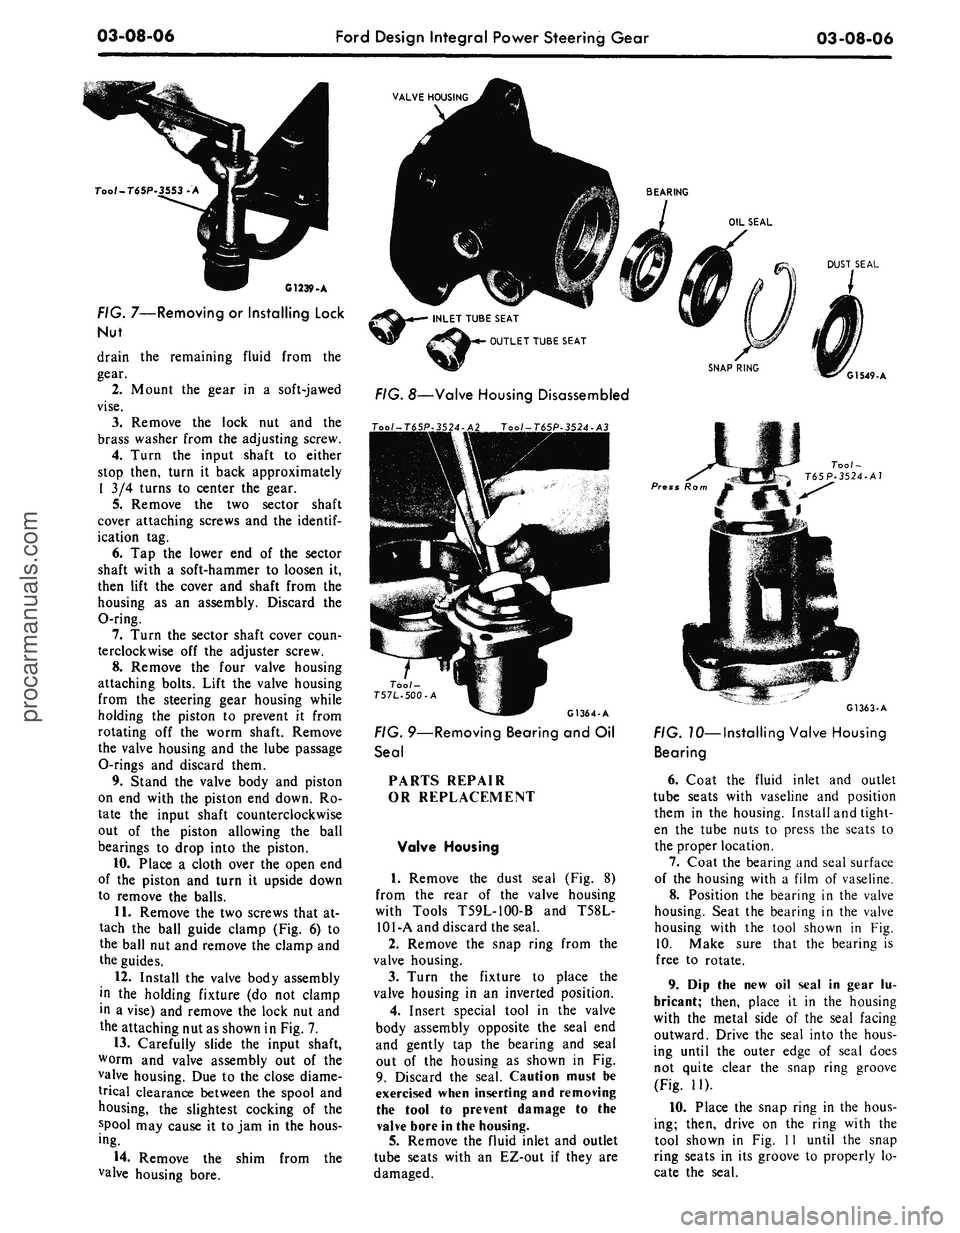
FIG. 7—Removing or Installing Lock
Nut
drain the remaining fluid from the
gear.
2.
Mount the gear in a soft-jawed
vise.
3.
Remove the lock nut and the
brass washer from the adjusting screw.
4.
Turn the input shaft to either
stop then, turn it back approximately
1 3/4 turns to center the gear.
5.
Remove the two sector shaft
cover attaching screws and the
identif-
ication tag.
6. Tap the lower end of the sector
shaft with a soft-hammer to loosen it,
then lift the cover and shaft from the
housing as an assembly. Discard the
O-ring.
7.
Turn the sector shaft cover coun-
terclockwise off the adjuster screw.
8. Remove the four valve housing
attaching bolts. Lift the valve housing
from the steering gear housing while
holding the piston to prevent it from
rotating off the worm shaft. Remove
the valve housing and the lube passage
O-rings and discard them.
9. Stand the valve body and piston
on end with the piston end down. Ro-
tate the input shaft counterclockwise
out of the piston allowing the ball
bearings to drop into the piston.
10.
Place a cloth over the open end
of the piston and turn it upside down
to remove the balls.
11.
Remove the two screws that at-
tach the ball guide clamp (Fig. 6) to
the ball nut and remove the clamp and
the guides.
12.
Install the valve body assembly
in the holding fixture (do not clamp
in a vise) and remove the lock nut and
the attaching nut as shown in Fig. 7.
13.
Carefully slide the input shaft,
worm and valve assembly out of the
valve housing. Due to the close diame-
trical clearance between the spool and
housing, the slightest cocking of the
spool may cause it to jam in the hous-
ing.
14.
Remove the shim from the
valve housing bore.
OIL SEAL
INLET TUBE SEAT
OUTLET TUBE SEAT
DUST SEAL
G1549-A
FIG.
8—Valve Housing Disassembled
Too/-T<
Tool-
T57L-500-A ,^^^
G1364-A
FIG. 9—Removing Bearing and Oil
Seal
PARTS REPAIR
OR REPLACEMENT
Valve Housing
1.
Remove the dust seal (Fig. 8)
from the rear of the valve housing
with Tools T59L-100-B and T58L-
101-A and discard the seal.
2.
Remove the snap ring from the
valve housing.
3.
Turn the fixture to place the
valve housing in an inverted position.
4.
Insert special tool in the valve
body assembly opposite the seal end
and gently tap the bearing and seal
out of the housing as shown in Fig.
9. Discard the seal. Caution must be
exercised when inserting and removing
the tool to prevent damage to the
valve bore in the housing.
5.
Remove the fluid inlet and outlet
tube seats with an EZ-out if they are
damaged.
Press Ra
Tool-
T65P-3524-A7
G1363-A
FIG. 10—Installing Valve Housing
Bearing
6. Coat the fluid inlet and outlet
tube seats with vaseline and position
them in the housing. Install and tight-
en the tube nuts to press the seats to
the proper location.
7.
Coat the bearing and seal surface
of the housing with a film of vaseline.
8. Position the bearing in the valve
housing. Seat the bearing in the valve
housing with the tool shown in Fig.
10.
Make sure that the bearing is
free to rotate.
9. Dip the new oil seal in gear lu-
bricant; then, place it in the housing
with the metal side of the seal facing
outward. Drive the seal into the hous-
ing until the outer edge of seal does
not quite clear the snap ring groove
(Fig. 11).
10.
Place the snap ring in the hous-
ing; then, drive on the ring with the
tool shown in Fig. 11 until the snap
ring seats in its groove to properly lo-
cate the seal.procarmanuals.com