GEELY CK 2008 Workshop Manual
Manufacturer: GEELY, Model Year: 2008, Model line: CK, Model: GEELY CK 2008Pages: 392, PDF Size: 38.86 MB
Page 311 of 392

304Section 4 Service Caution & NoticeI. Service CautionRefrigerant Treatment
•During the treatment, the operator shall be careful not to inhale A/C refrigerant or lubricant vapor. Long-
term exposure to the A/C environment will cause the operator's eye, nose and throat liable to stimulation.
In addition, based on the consideration on the environment influence, when discharging the HFC-134a
from the A/C system, we suggest using the recyclable and rechargeable devices. If sudden system fault
occurs, it is recommended to place the device on a ventilated place before starting service.
•For HFC-134a service equipment, it is recommended not to perform the pressurization check or leakage
inspection. If these mixture combust, it may result in severe human injury or property loss.
•Please be noticed not to let the refrigerant leak near the spark or other hot objects. If the refrigerant gas
contacts the spark or similar heat source (e.g. cigarette or heater), it may generate poisonous gas. The
refrigerant is extremely liable to leakage during the transportation. In this case, please eliminate or remove
the heat source mentioned above and keep good ventilation.
•It is very dangerous to handle the liquid refrigerant. Only a drop of refrigerant can result in local frostbite
on skin if dropped on the skin of the operator. Therefore, it is specified that the operator shall always
wear glove and eye protection during the handling of the liquid refrigerant. If liquid refrigerant gets in
your eyes or on your skin, Wash the area with much cool water. Go immediately to hospital for professional
treatment.
Refrigerant Preservation
• Refrigerant preservation container is a high pressure resistant equipment. If it is put in hot treatment, the
explosion may arise, and the resulting metal fragments and the splashed liquid refrigerant will result in
severe human injury. It is recommended to preserve the refrigerant below 40°C.II. Service NoticeInsufficient Refrigerant Handling
•If the refrigerant is founded to be insufficient during the fault diagnosis, it is recommended not to add
refrigerant because of the following facts: the pressure readings indicated by different pressure gauge
are different, thus you will be unable to determine the exact amount of the refrigerant to be added, and
excessive or insufficient refrigerant may cause a series of chained negative effects such as damaged
refrigerant circulation parts or deteriorated refrigeration effect. Therefore, if the refrigerant is found to
be insufficient, it is recommended to drain the refrigerant from the refrigerant circulation pipeline and fill
specified amount of the refrigerant.
Compressor Oil Handling
•For this type of vehicle, it is recommended to use SW-100 type compressor oil. Use of PAG compressor
oil other than the SW-100 type may cause the A/C compressor to be damaged.
•During the operation, please be noticed not to splash the SW-100 type compressor oil onto the vehicle
surface. Therefore, if this happens, please wipe it off immediately, otherwise the compressor oil will
damage the paint on the vehicle surface.
Page 312 of 392

305•Compared with the early used mineral oil, the SW-100 type compressor oil is of comparatively high
moisture absorption performance. If you mix the moisture object with the SW-100 type compressor oil, it
will damage the Refrigeration system. Therefore, after treating the compressor oil or removing the
refrigeration system components, the lid shall be covered immediately to prevent the SW-100 type
compressor oil from absorbing the moisture.Section 5 The Refrigeration System Operation ProcedureI. Refill RefrigerantNotice:•During the filling of refrigerant into the refrigeration system, be careful that it is required to
have the professionals operate under the specified standard and procedure, otherwise it will
reduce the A/C efficiency greatly and even damage the refrigeration system components.
Refill the HFC-134a refrigerant
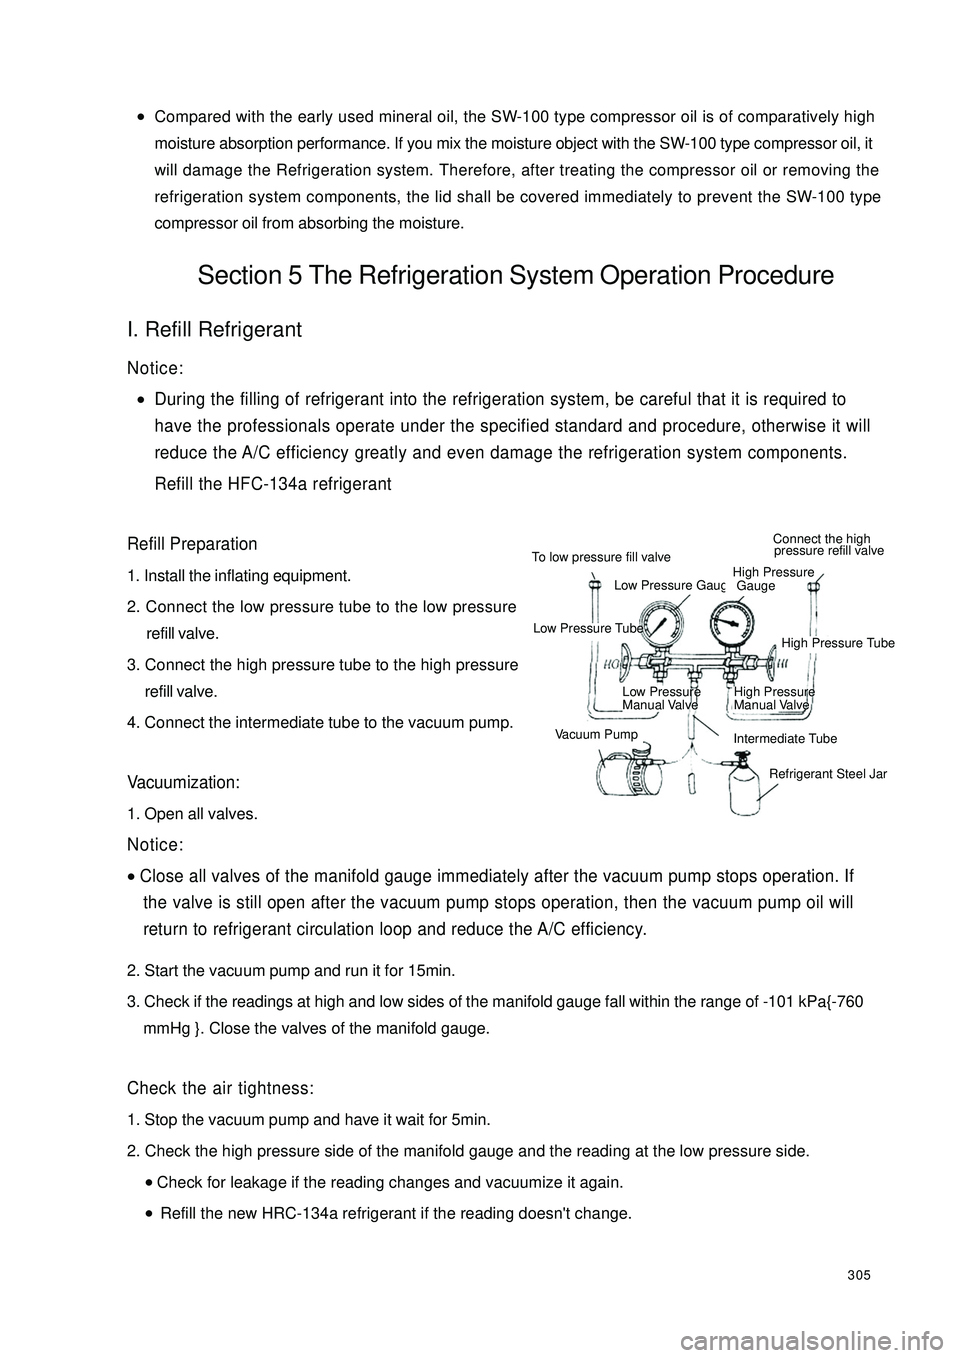
Refill Preparation1. Install the inflating equipment.
2. Connect the low pressure tube to the low pressure
refill valve.
3. Connect the high pressure tube to the high pressure
refill valve.
4. Connect the intermediate tube to the vacuum pump.Vacuumization:1. Open all valves.Notice:•Close all valves of the manifold gauge immediately after the vacuum pump stops operation. If
the valve is still open after the vacuum pump stops operation, then the vacuum pump oil will
return to refrigerant circulation loop and reduce the A/C efficiency.2. Start the vacuum pump and run it for 15min.
3. Check if the readings at high and low sides of the manifold gauge fall within the range of -101 kPa{-760
mmHg }. Close the valves of the manifold gauge.Check the air tightness:1. Stop the vacuum pump and have it wait for 5min.
2. Check the high pressure side of the manifold gauge and the reading at the low pressure side.
•Check for leakage if the reading changes and vacuumize it again.
•Refill the new HRC-134a refrigerant if the reading doesn't change.To low pressure fill valveLow Pressure GaugeHigh Pressure
GaugeConnect the high
pressure refill valveLow Pressure TubeHigh Pressure TubeLow Pressure
Manual ValveHigh Pressure
Manual ValveVacuum PumpIntermediate Tube
Refrigerant Steel Jar
Page 313 of 392

3063. Check for leakage if the reading changes and vacuumize it again.
4. Refill the new HFC-134a refrigerant if the reading doesn’t change.
Fill the new HFC-134a refrigerant
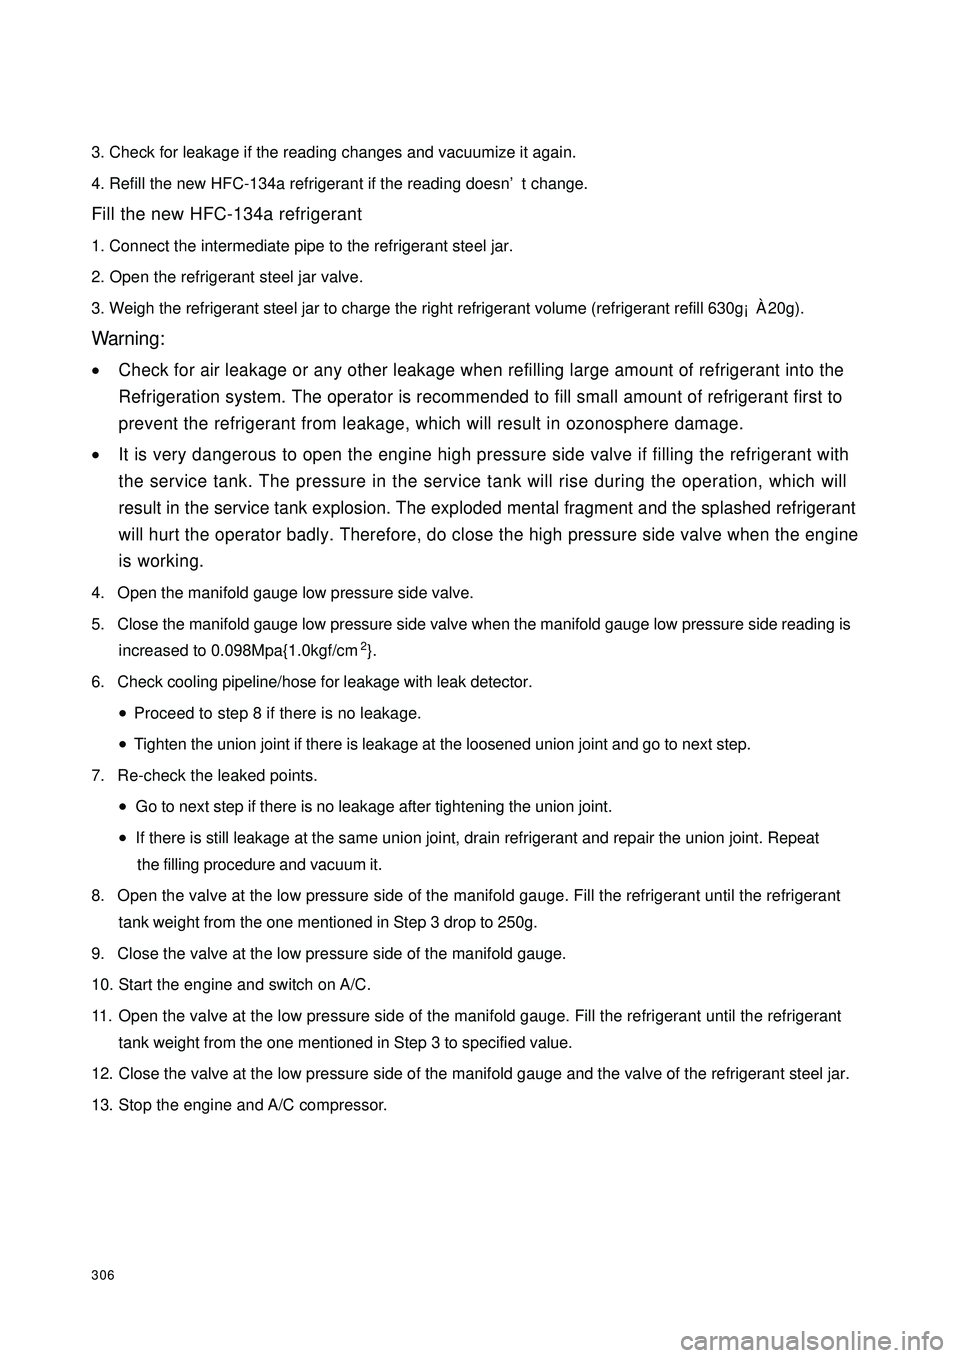
1. Connect the intermediate pipe to the refrigerant steel jar.
2. Open the refrigerant steel jar valve.
3. Weigh the refrigerant steel jar to charge the right refrigerant volume (refrigerant refill 630g¡À20g).Warning:•Check for air leakage or any other leakage when refilling large amount of refrigerant into the
Refrigeration system. The operator is recommended to fill small amount of refrigerant first to
prevent the refrigerant from leakage, which will result in ozonosphere damage.•It is very dangerous to open the engine high pressure side valve if filling the refrigerant with
the service tank. The pressure in the service tank will rise during the operation, which will
result in the service tank explosion. The exploded mental fragment and the splashed refrigerant
will hurt the operator badly. Therefore, do close the high pressure side valve when the engine
is working.4. Open the manifold gauge low pressure side valve.
5. Close the manifold gauge low pressure side valve when the manifold gauge low pressure side reading is
increased to 0.098Mpa{1.0kgf/cm2}.
6. Check cooling pipeline/hose for leakage with leak detector.
•Proceed to step 8 if there is no leakage.
•Tighten the union joint if there is leakage at the loosened union joint and go to next step.
7. Re-check the leaked points.
•Go to next step if there is no leakage after tightening the union joint.
•If there is still leakage at the same union joint, drain refrigerant and repair the union joint. Repeat
the filling procedure and vacuum it.
8. Open the valve at the low pressure side of the manifold gauge. Fill the refrigerant until the refrigerant
tank weight from the one mentioned in Step 3 drop to 250g.
9. Close the valve at the low pressure side of the manifold gauge.
10. Start the engine and switch on A/C.
11. Open the valve at the low pressure side of the manifold gauge. Fill the refrigerant until the refrigerant
tank weight from the one mentioned in Step 3 to specified value.
12. Close the valve at the low pressure side of the manifold gauge and the valve of the refrigerant steel jar.
13. Stop the engine and A/C compressor.
Page 314 of 392

307Check For Leakage:
1. Using leak detector, check refrigerant steel jar for leakage.
•Go to Step 3 if there is no leakage.
•Tighten the union joint if there is leakage at the loosened union joint and go to next step.
2. Re-check the leaked points.
•Go to next step if there is no leakage after tightening the union joint.
•If there is still leakage at the same union joint, drain refrigerant and vacuum the union joint.
3. Disconnect the high and low pressure pipe at the refill valve.
4. Install the filling valve cap.
Check Refrigerant Pressure:
1. Install the manifold gauge.
2. Warm up the engine and run it with constant 1800rpm.
3. Set the rpm of the cooling fan to the HIGHEST.
4. Turn on the A/C switch.
5. Set to internal circulation mode.
6. Set the temperature control mode to the COLDEST.
7. Set to be ventilation mode.
8. Close all door and windows.
9. Measure the environment temperature and the reading of the high pressure side and low pressure side
from the manifold gauge.
•Shoot the Refrigeration system trouble as required if it is not as specified in the technical specification.
The Performance Inspection of the Refrigeration System:
1. Check refrigerant pressure.
•Go to next step if the pressure value is correct.
•Shoot the Refrigeration system trouble promptly if the pressure value is not as specified in the
technical specification.
2. Insert a thermometer into the middle vent port at the driver's side.
3. Warm up the engine and run it at the constant 1800rpm.
4. Set the rpm of the cooling fan to the HIGHEST.
5. Switch on A/C.
6. Set to internal circulation mode.
7. Set the temperature control mode to the COLDEST.
8. Set to Ventilation Mode.
9. Close all doors and windows.
10. Wait until A/C output temperature is constant. (When the environment temperature is 38°C, the temperature
at the middle ventilation port at the drivers side is 10°C~16°C. )
Page 315 of 392

308Section 6 Basic System1. Blower Removal / Installation
1. Disconnect the negative (--) terminal cable from the battery.
2. Remove instrument panel.
3. Remove motor connector.
4. Remove the resistor connector.
5. Remove the band.
6. Remove bolt. Remove blower.
7. The installation is in the reverse order of the removal.
2. Heater Removal / Installation
1. Remove water hose No. 1 and 2.
2. Remove instrument panel.
3. Remove the band.
4. Remove 2 wind door cables.
5. Remove heater.
6. The installation is in the reverse order of
the removal.
3. The Evaporator Removal / Installation
1. Remove evaporator inlet and outlet pipeline.
2. Remove instrument panel.
3. Remove thermistor connector.
4. Remove 2 bands.
Page 316 of 392

3095. Remove evaporator.
6. The installation is in the reverse order of the removal.The Evaporator Installation Guide1. Pack certain SW-100 compressor oil into the refrigerant circuit when installing a new evaporator.
Refill: (approximate)
15ml {15 cc, }Check Evaporator1. Remove evaporator.
2. Remove the evaporator core from the evaporator.
3. Check for crack, damage or oil leakage.
•Replace the evaporator core if any of the above-mentioned fault occurs.
4. Check the fin for bending.
•Flat it with a flat head screwdriver if it is bent.Check Heater1. Remove the heater.
2. Remove heating core from the heater.
3. Check for crack, damage or refrigerant leakage.
•Replace the heating core if any of the above-mentioned faults occurs.
4. Check the fin for bending
•Flat it with a flat head screwdriver if it is bent.
5. Check heater inlet hose and outlet hose for bend or damange.
•Repair the hose if necessary.
Page 317 of 392

3104. A/C Compressor Removal / Installation1. Disconnect the negative (--) terminal cable from the battery.
2. Drain the refrigerant from the system.
3. Detach the radiator.
4. Loose the drive belt and then remove the drive belt.Notice:•If anything moisture or any foreign matter enters into the Refrigeration system for circulation,
the cooling performance of the Refrigeration system will obviously deteriorate with abnormal
noise. Plug the port immediately after removing any cooling circulation component to prevent
anything moistur or any foreign matter from entering the circulation.5. Remove the compressor inlet and outlet pipe.
6. Removemagnetic clutch connector.
7. Remove the compressor.
8. The installation is in the reverse order of the removal.
9. Adjust the drive belt.
10. Check the Refrigeration system performance.5. The Condenser Removal / Installation1. Disconnect the negative (--) terminal cable from the battery.
2. Drain the refrigerant from the system.Notice:•If anything moisture or any foreign matter enters into the Refrigeration system for circulation,
the cooling performance of the Refrigeration system will obviously deteriorate with abnormal
noise. Plug the port immediately after removing any cooling circulation component to prevent
anything moistur or any foreign matter from entering the circulation.3. Remove the condenser inlet and outlet pipeline to prevent the compressor oil from splashing.
4. Remove condenser fan connector.
5. Remove the engine hood lock.
6. Remove the engine hood lock support brace.
7. Remove the condenser.
8. The installation is in the reverse order of the removal.
9. Check the Refrigeration system performance.The Condenser Installation Description:1. When installing the new condenser, it is recommended to fill certain SW-100 compressor oil into the
refrigerant circuit.Refill: (approximate)
20ml{20 cc }
Page 318 of 392

311Check the condenser1. Check for crack, damage or oil leakage.
•Replace the condenser if any of the above-mentioned faults occurs.
2. Check if the fin area is blocked by dust.
•Clean it if it is blocked.
3. Check if the fin area bends.
•If the fin area bends, level it with a flat head screwdriver.6. Refrigeration Pipeline Removal / Installation1. Remove battery.
2. Drain the refrigerant from the system.
3. Remove air filter.
4. Remove the clamp.
5. Remove the compressor inlet hose.
6. Remove the compressor outlet hose.
7. Remove liquid pipe I.
8. Remove pressure switch connector.
9. Remove the pipe clamp.
10. Remove liquid pipe II.
11. The installation is in the reverse order of the removal.Notice:•If anything moisture or any foreign matter enters into the Refrigeration system for circulation,
the cooling performance of the Refrigeration system will obviously deteriorate with abnormal
noise. Plug the port immediately after removing any cooling circulation component to prevent
anything moistur or any foreign matter from entering the circulation.
Introduction Of The Refrigeration Pipeline Removal:
Nuts union type:Loose the nuts with 2 wrenches and then remove the refrigeration pipe (or the hose).Slider joint type:Clip the slider block recess end with pliers or the similar tool and remove the attaching bolt or screw cap.
Page 319 of 392

312Introduction Of The Refrigeration Pipeline Installation:
1. It is recommended to fill some SW-100 compressor oil into the refrigerating circulation when installing a
new refrigeration pipe or cooling hose.
Refill: (approximate)
5ml{5 cc}: Refrigeration pipe
10ml{10 cc}: Condenser hose
2. Fill compressor oil to O-ring and other connecting points.
3. Tighten the connecting points.
Nuts union or slider joint type:
1. Tighten the nuts or the bolts of the connectiong
points by hand.
2. Tighten the connecting points with specified
torque wrench. It is connected with nuts. Tighten
the nuts with a wrench or a torque wrench.
3. Clip the slider block recess with pliers or other
similar tool and clamp the pipe used to connect
slider block. Tighten the bolt or the nuts at the
connecting points with a torque wrench.
7. A/C control panel removal / installation:
1. Disconnect the negative (--) terminal cable from the battery.
2. Remove the auxiliary console.
3. Disconnect the hot and cold air cable and airflow allocating cable.
4. Remove A/C control panel.
5. Disconnect blower switch connector.
6. Remove the lighting wire harness connector.
7. Remove the inside and outside circulation switch connector.
8. The installation is in the reverse order of the removal.Slider BuldgeSlider RecessionTorque Wrench
Page 320 of 392

313Section 7 A/C System Faults Check & TroubleshootingI. A/C System Faults CheckInspection shall be made to isolate the fault area and its cause when the fault of A/C system occurs, and then
specific service could be performed. Inspect the whole system before re-using A/C system after a long term
of storage.
First step is initial inspection by direct "see, listen and touch". Test the system with the leak detector if
necessary.
1. Check the Refrigeration System
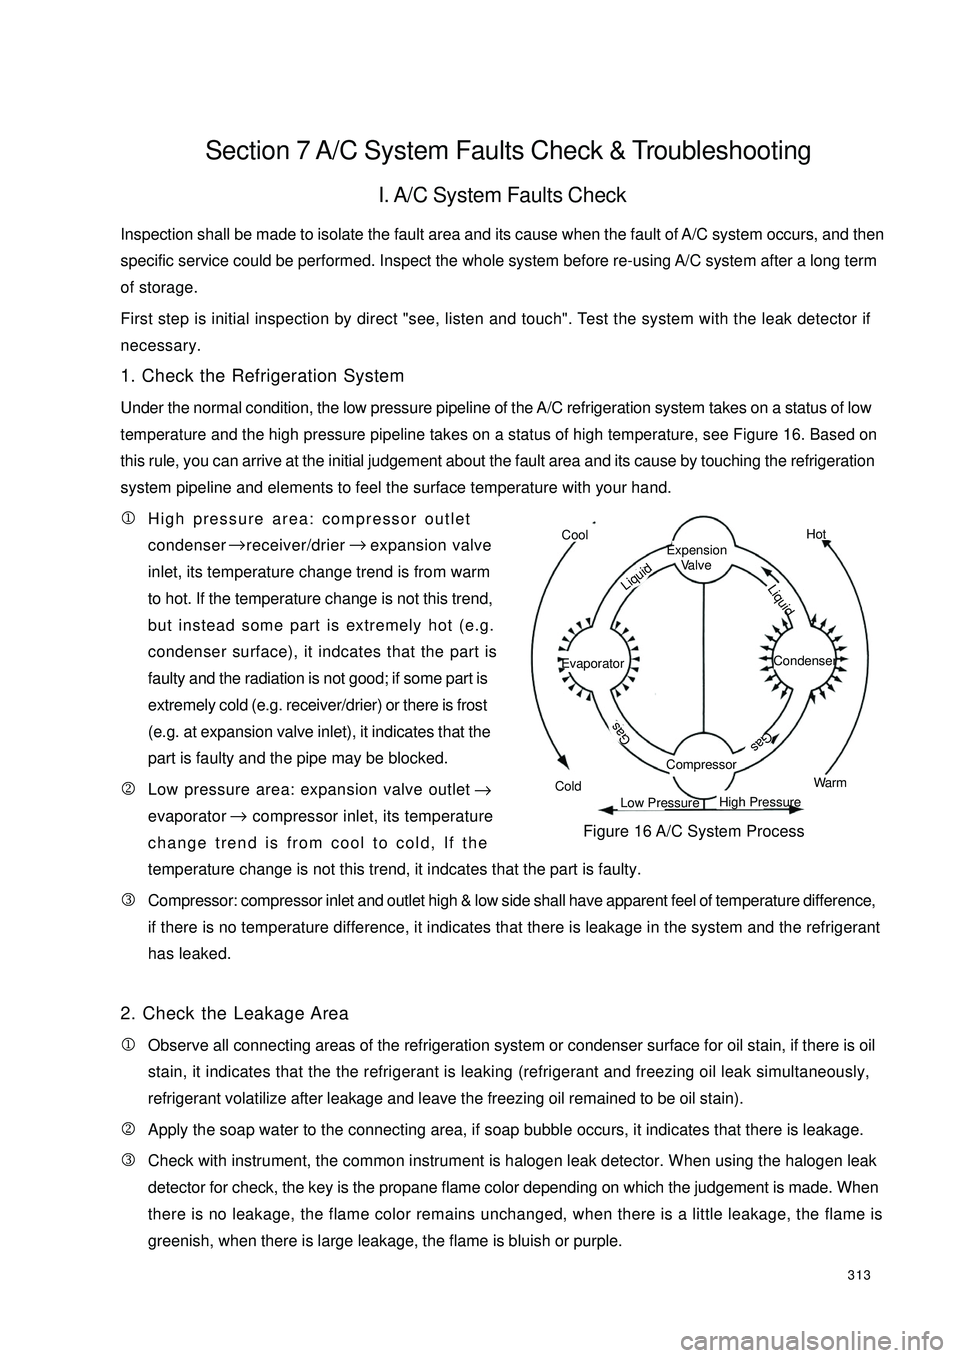
Under the normal condition, the low pressure pipeline of the A/C refrigeration system takes on a status of lowtemperature and the high pressure pipeline takes on a status of high temperature, see Figure 16. Based onthis rule, you can arrive at the initial judgement about the fault area and its cause by touching the refrigeration
system pipeline and elements to feel the surface temperature with your hand.
1High pressure area: compressor outlet
condenser receiver/drier expansion valve
inlet, its temperature change trend is from warm
to hot. If the temperature change is not this trend,
but instead some part is extremely hot (e.g.
condenser surface), it indcates that the part is
faulty and the radiation is not good; if some part is
extremely cold (e.g. receiver/drier) or there is frost
(e.g. at expansion valve inlet), it indicates that the
part is faulty and the pipe may be blocked.
2Low pressure area: expansion valve outlet
evaporator compressor inlet, its temperature
change trend is from cool to cold, If the
temperature change is not this trend, it indcates that the part is faulty.
3Compressor: compressor inlet and outlet high & low side shall have apparent feel of temperature difference,
if there is no temperature difference, it indicates that there is leakage in the system and the refrigerant
has leaked.
2. Check the Leakage Area
1Observe all connecting areas of the refrigeration system or condenser surface for oil stain, if there is oil
stain, it indicates that the the refrigerant is leaking (refrigerant and freezing oil leak simultaneously,
refrigerant volatilize after leakage and leave the freezing oil remained to be oil stain).
2Apply the soap water to the connecting area, if soap bubble occurs, it indicates that there is leakage.
3Check with instrument, the common instrument is halogen leak detector. When using the halogen leak
detector for check, the key is the propane flame color depending on which the judgement is made. When
there is no leakage, the flame color remains unchanged, when there is a little leakage, the flame is
greenish, when there is large leakage, the flame is bluish or purple.CoolColdHotWarmExpension
Va l v eCompressorEvaporator Condenser Gas
GasLiquid LiquidLow PressureHigh PressureFigure 16 A/C System Process → →
→→