HONDA INTEGRA 1998 4.G Workshop Manual
Manufacturer: HONDA, Model Year: 1998, Model line: INTEGRA, Model: HONDA INTEGRA 1998 4.GPages: 1681, PDF Size: 54.22 MB
Page 471 of 1681
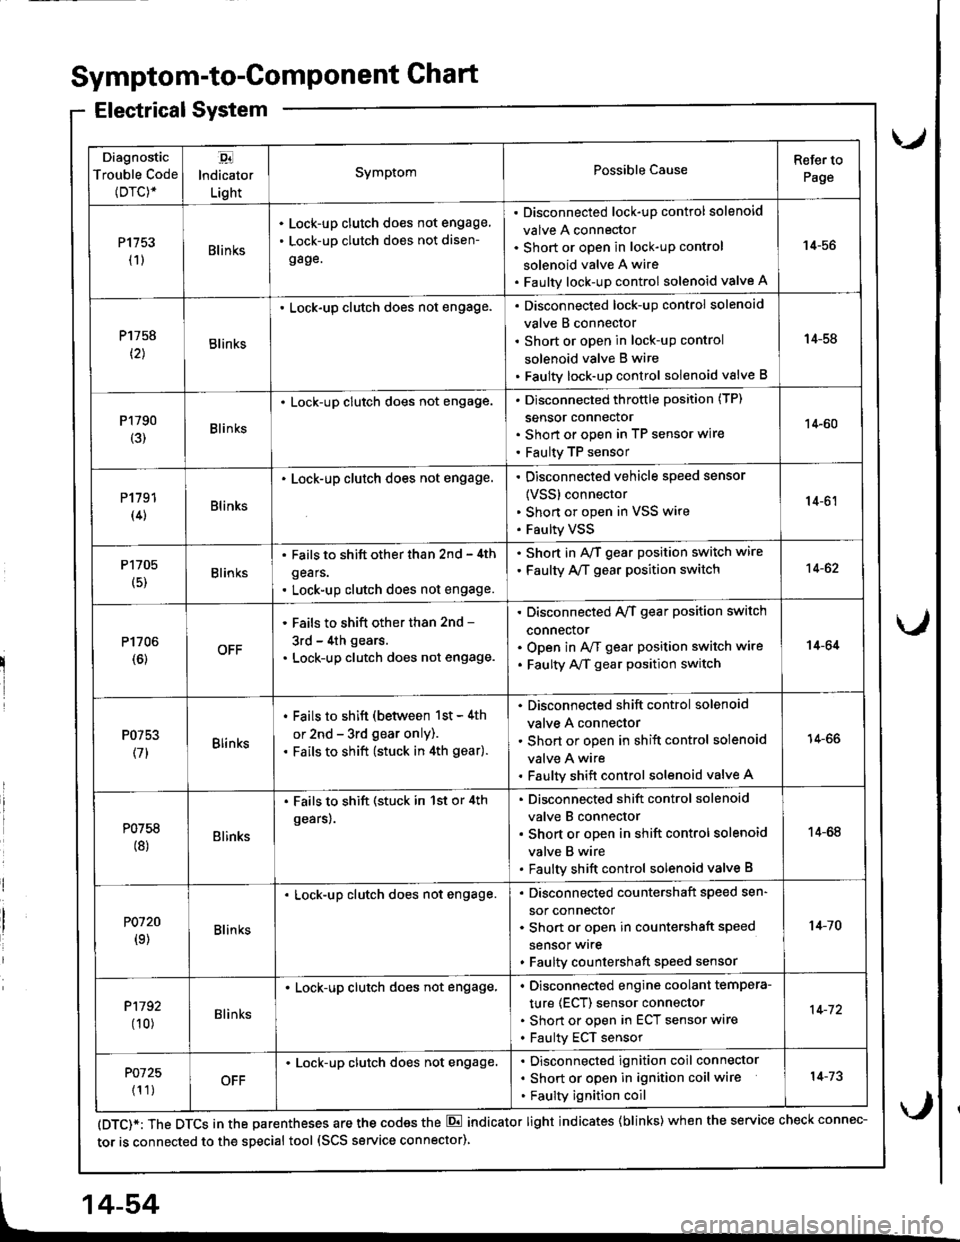
Diagnostic
Trouble Code(Drc)*
,94
lndicator
Light
SymptomPossible CauseRefer to
Page
P1153(1)Blin ks
Lock-up clutch does not engage,
Lock-up clutch does not disen-
gage.
Disconnected lock-up control solenoid
valve A connector
Short or open in lock-uP control
solenoid valve A wire
Faulty lock-up control solenoid valve A
14-56
P1758
t2lBlinks
. Lock-up clutch does not engage.Disconnected lock-up control solenoid
valve B connector
Short or open in lock-uP control
solenoid valve B wire
Faulty lock-up control solenoid valve B
14-58
P1790(3)Blinks
. Lock-up clutch does not engage.Disconnected throttle position (TP)
sensor connector
Short or open in TP seflsor wire
Faulty TP sensor
14-60
P1191(4)Blinks
. Lock-up clutch does not engage.Disconnected vehicle speed sensor
{VSS} connector
Shon or open in VSS wire
Faulty VSS
14-61
P1705
(5)Blinks
. Fails to shift other than 2nd - 4th
gears.
. Lock-up clutch does not engage.
. Shod in AvT gear position switch wire
. Faulty A,/T gear position switch14-62
P1706(6)OFF
' Fails to shift other than 2nd -
3rd - 4th gears.
. Lock-up clutch does not engage.
Disconnected A/T gear position switch
connector
Open in A/f gear position switch wire
Faulty A/f gear position switch
14-64
P0753
(71Blinks
. Fails to shift (between 1st - 4th
or 2nd - 3rd gear only).. Fails to shift (stuck in 4th gear).
Disconnected shift control solenoid
valve A connector
Short or open in shift control solenoid
valve A wire
Faulty shift control solenoid valve A
14-66
P0758(8)Blinks
. Fails to shift (stuck in 1st or 4th
gears).
Disconnected shift control solenoid
valve B connector
Short or open in shift control solenoid
valve B wire
Faulty shift control solenoid valve B
14-68
P0120(9)Blin ks
Lock-up clutch does not engage.Disconnected countershaft speed sen-
sor connector
Short or open in countershaft speed
sensor wrre
Faulty countershaft speed sensor
1+10
P1192
00)Blinks
. Lock-up clutch does not engage,Disconnected engine coolant tempera-
ture (ECT) sensor connector
Short or open in ECT sensor wire
Faulty ECT sensor
14-72
P0725
{1 1)OFF
Lock-up clutch does not engage.Disconnected ignition coil connector
Short or open in ignition coil wire
Faulty ignition coil
14-73
Symptom-to-ComPonent Chart
Electrical System
(DTC)*: The DTCS in the parentheses are the codes the E indicator light indicates {blinks) when the service check connec-
tor is connected to the special tool (SCS service connector)
4-54
Page 472 of 1681
u.drrf,,
J
J
J
14-55
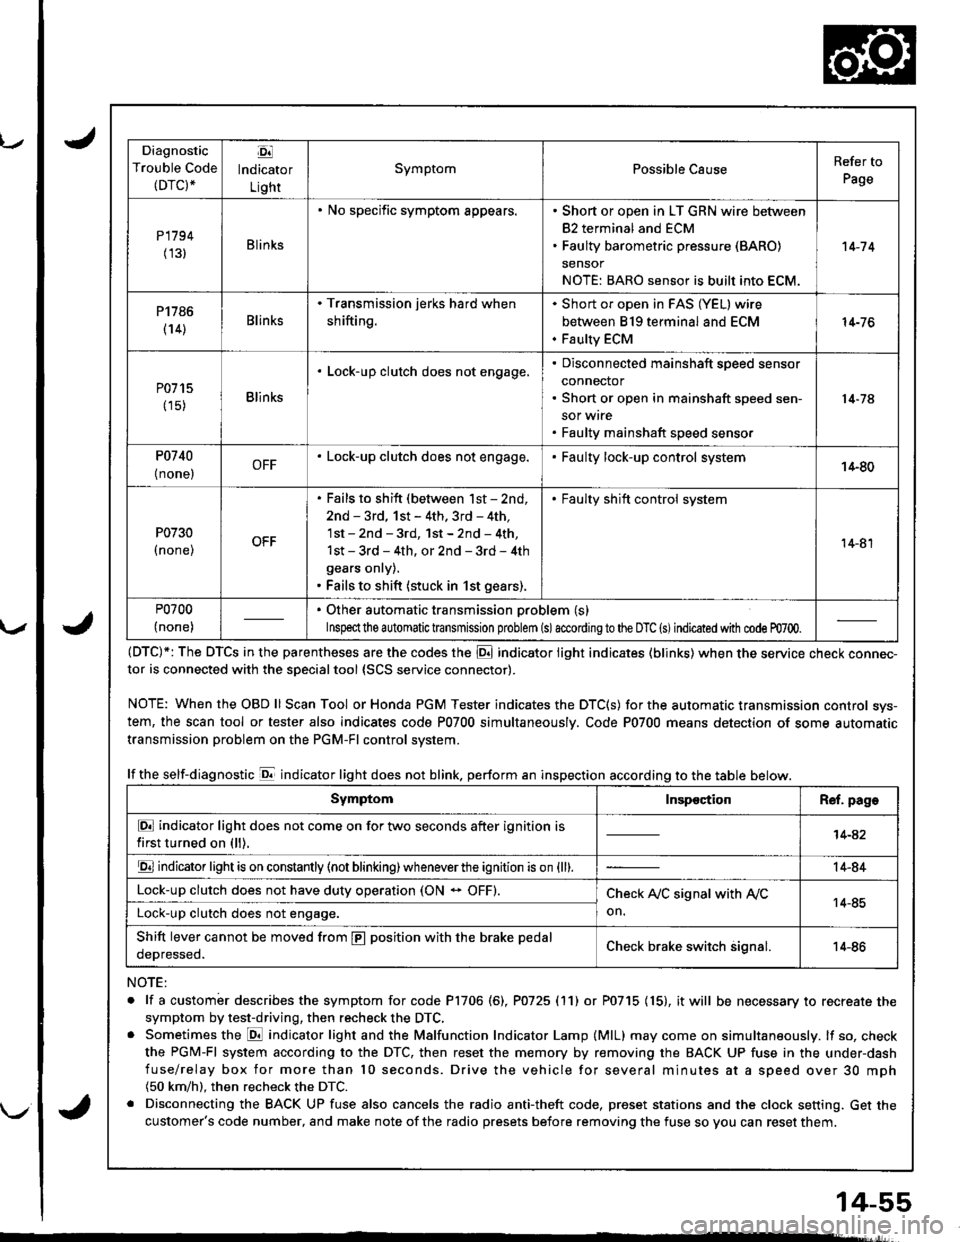
Diagnostic
Trouble Code(DTC).
Ej
lndicator
Light
SymptomPossible CauseRefer to
Page
P1794
(131Blinks
. No specific symptom appears.. Short or open in LT GRN wire between
82 terminal and ECM. Faulty barometric pressure (BARO)
sensor
NOTE: BARO sensor is built into ECM.
't 4-7 4
P1786
(14)Blinks
. Transmission jerks hard when
shifting.
Short or open in FAS (YEL) wire
between 819 terminal and ECM
Faulty ECM
14-76
P0715
(15)Blinks
. Lock-up clutch does not engage,Disconnected mainshaft speed sensor
connector
Short or open in mainshaft speed sen-
sor wrre
Faulty mainshaft speed senso.
14-74
P0740
{ none,OFF. Lock-up clutch does not engage.Faulty lock-up control system14-80
P0730
I none,
. Fails to shift (between lst - 2nd,
2nd - 3rd, 1st - 4th. 3rd - 4th,
1st - 2nd - 3rd, 1st - 2nd - 4th,
1st - 3rd - 4th, or 2nd - 3rd - 4th
gears onry).. Fails to shift (stuck in 1st gears).
. Faulty shift control system
14-81
P0700
(none)
. Other automatic transmission problem (s)
Inspeclthe a utomatic transmission problem (s)accordingto the DTC (s)indicated with code m700.
(DTC)*: The DTCS in the parentheses are the codes the E indicator light indicates (blinks) when the service cnecK connec-tor is connected with the sDecialtool {SCS service connector).
NOTE: WhentheOBDll Scan Tool orHonda PGM Tester indicates the DTC(S) for the automatic transmission control sys-
tem, the scan tool or tester also indicates code P0700 simultaneously. Code P0700 means detection of some automatic
transmission problem on the PGM-Fl control system.
lf the self-diagnostic E indicator light does not blink. perform an inspection according to the table below.
NOTE:
. lf a custombr describes the symptom for code P1706 (6), P0725 (11) or P0715 (15), it will be necessary to recreate the
symptom by test-driving, then recheck the DTC,. Sometimes the E indicator light and the Malfunction Indicator Lamp (MlL) may come on simultaneously. lf so, check
the PGM-Fl system according to the DTC, then reset the memory by removing the BACK UP fuse in the under-dash
fuse/relay box for more than l0 seconds. Drive the vehicle for several minutes at a speed over 30 mph(50 km/h). then recheck the DTC.
. Disconnecting the BACK UP fuse also cancels the radio anti-theft code, preset stations and the clock setting. Get the
customer's code number, and make note of the radio presets before removing the fuse so you can reset them.
SymptomInspectionR€f. page
E indicator light does not come on for two seconds after ignition is
first turned on (ll).14-42
E indicator light is on constantly (not blinking) wheneverthe ignition is on {ll).14-84
Lock-up clutch does not have duty operation (ON - OFF).Check A,/C signal with Ay'C
on.14-85Lock-up clutch does not engage.
Shift lever cannot be moved from E position with the brake pedal
oeDresseo.Check brake switch signal.14-86
Page 473 of 1681
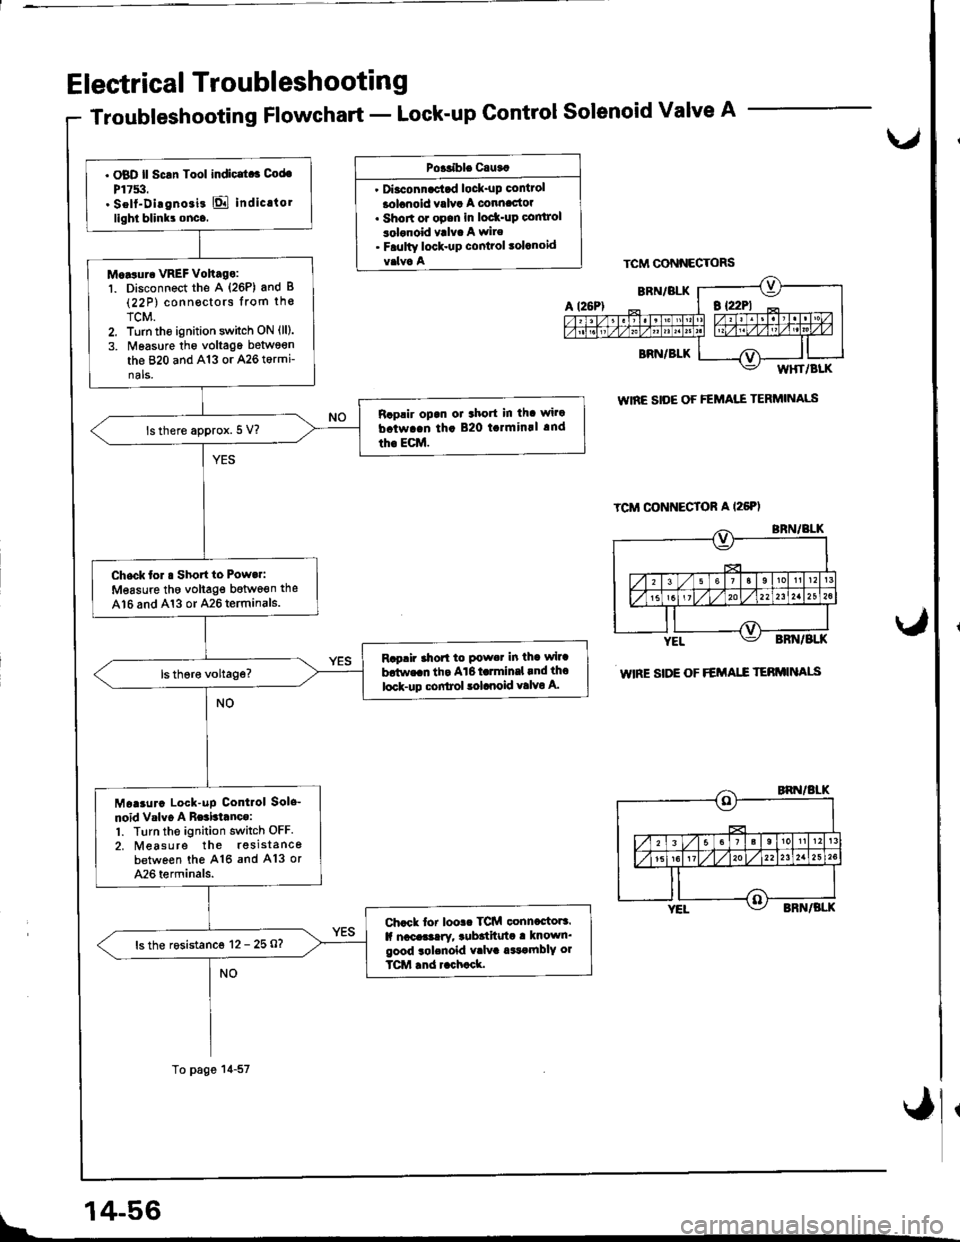
Electrical Troubleshooting
Troubleshooting Flowchart - Lock-up Control Solenoid Valve A
Po+tible Cauta
' Diaconnac'tad lock-up control
lolanoid valva A connac'toa. Shon or opan in lod(-up co|ltrol
3olonoid valva A wire. Faulty lock-up cont?ol lolanoid
TCM CONNECTORS
WIRE SIOE OF FEMAI."E TERMINALS
WIRE SIDE OF FEMA.E TEBMINAIS
L/
. OBD ll Scrn Tool indic|t.3 Cod.
P17!i:t.. Self-Dirgnoii! E indic.torlight blinkr onco.
M.Nur. VREF Voh.go:'t. Disconnect the A (26P) and B(22 P) conn€ctors lrom th€
TCM.2. Turn tho ignition switch ON (ll).
3. Nleasure tho voltage betwson
the 820 and A13 or A26 tormi-nals.
Raplir opan or 3hort in tha wi.a
b.twa.n th. B20 t.lmin!l .nd
th€ EcM.lsthere approx. 5 V?
Check tor a Short to Powa.i
Measure tho voltag€ botwoen the
A16 and A13 or A26 terminals.
Rap!fu ahorl to Pow.t in tha wlra
b!tw..n th. A16 t rmln.l rnd tho
lock-up c!filtol lolaooid valvo A.
Moaaurc Lock-uP Contlol Sole-
noid Vrlvo A Be3bianco:1. Ttrrn the ignition switch OFF.
2. Measure the rssistancebetween the A16 and A13 or
A26 terminals.
Chack tor loolc TCM conncctora.lf naca!3!ry, rub3tftuta a known'good rolcnold v.lva a$amblY ol
TCM .nd r.ch.ck.
ls the rosistanco 12 - 25 O?
To page 14-57
\
14-56
Page 474 of 1681
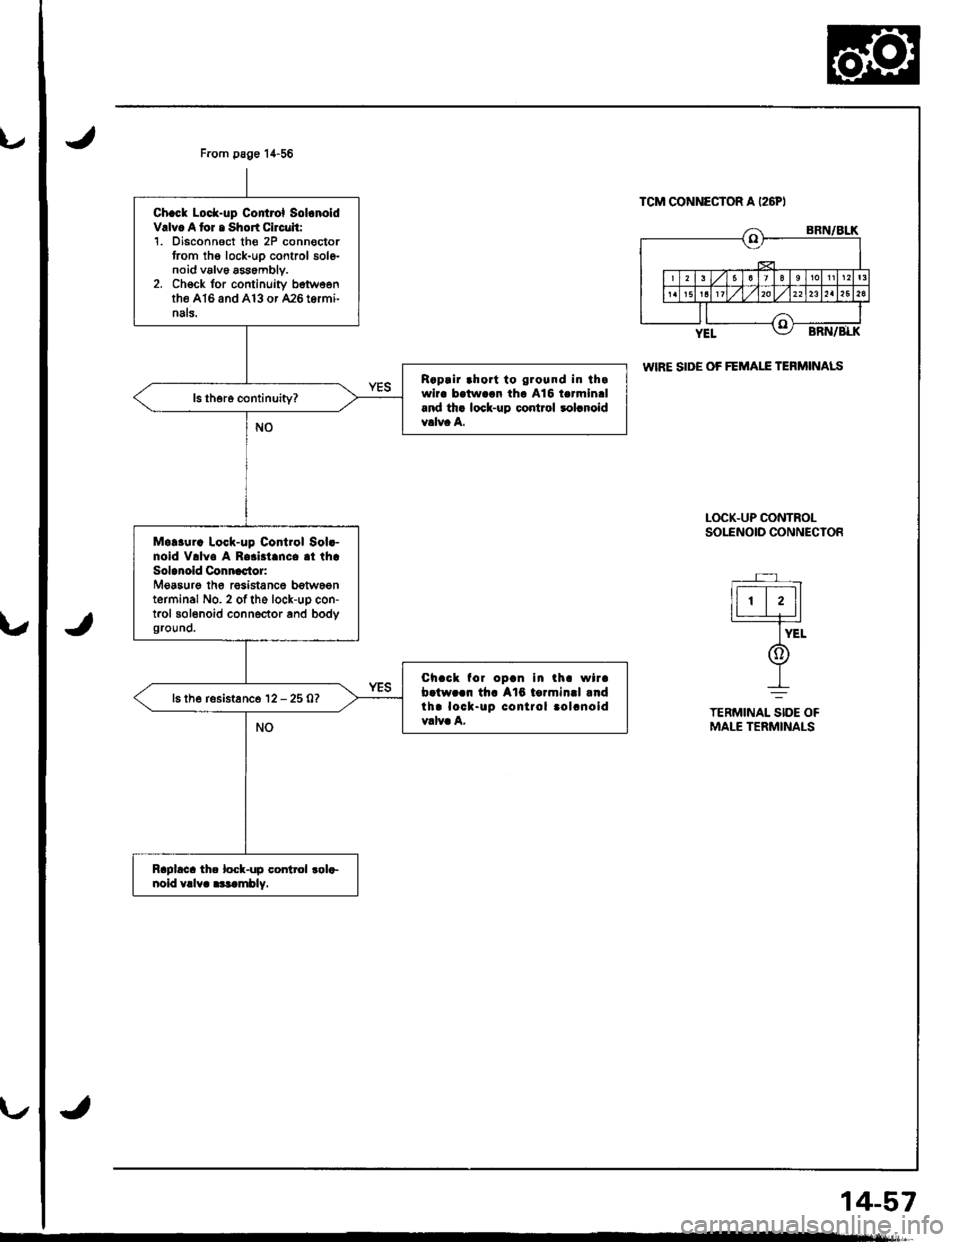
F.om page 14-56
Chack Lock-up Control Sol.noldV.lv. A tor . Short Circuit:1. Disconnoct th€ 2P connoctortrom thg lock-uo control solenoid v6lv6 assembly.2. Ch€ck for continuity betweenthe A'16 and 413 or A26 tErminals.
Raprir ahori to grosnd in thawira botwaan tha 416 tormin.l.nd th. lock-up control rol.noidYalva A.
Mqltura Lock-up Control Sol.-noid Vrlv. A R.3i.t.nc. .t thaSolonoid Connactor:Msasurg th6 resistance betweenterminal No. 2 otthe lock-up con-trol solonoid connector and bodygrouno.
Chack for opln In tha wirab.tw..n th. A16 tormin.l .ndth. lock-up control .ol.noidvalva A,
ls the resistance 12 - 25 0?
Raplaca thc locl-up control rola-noid Yrlv. .3lambly.
TCM CONNECTOR A I26PI
WIRE SIDE OF FEMALE TENMNALS
LOCK-UP CONTROLSOLENOIO CONNECIOR
r ,
Itr-t-r1lI L____L__Fr I-l*.
@
+
TERMINAL SIDE OFMALE TERMINALS
14-57
Page 475 of 1681
Electrical Troubleshooti n g
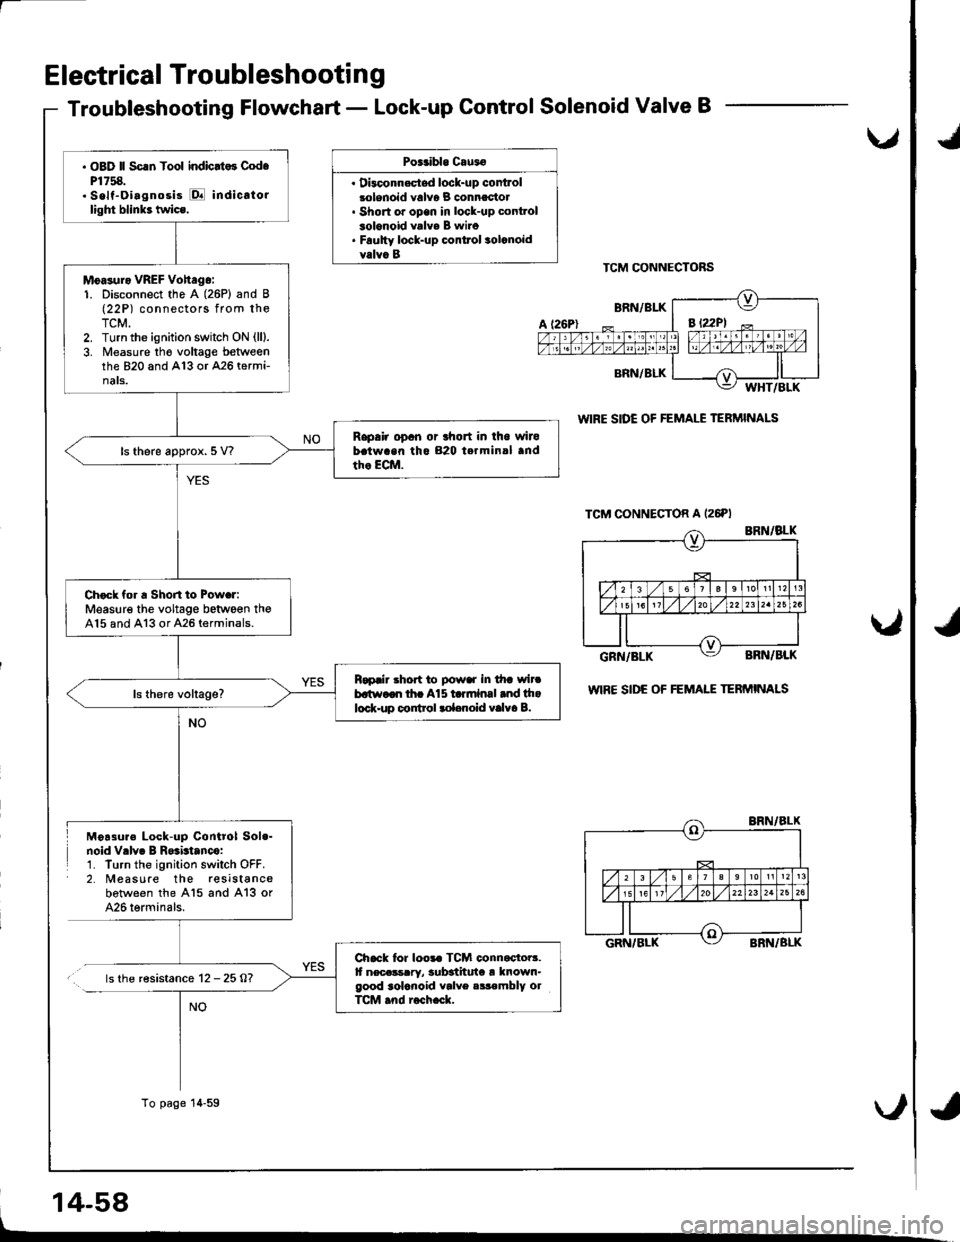
Troubleshooting Flowchart - Lock-up Control Solenoid Valve B
Poitibl. Cau3o
. Dbconn.stsd lock-up controlsolenoid valv6 B connectol. Short or open in lock-up cont.ol3olonoid valva B wiro. Faulty lock-up conttol solcnoidvalva BTCM CONNECTORS
WIRE SIDE OF FEMALE TERMINALS
wlRE SIDE OF FEMAIE TERMINALS
Moa3ure Lock-up Control Sol.-noid Vrlv. B R$btanco:1. Turn the ignition switch OFF.2. Measure the reslstancebotween the A15 and A13 or426 terminals.
.. ls the r€sistance 12 -25A?
14-58
u,
NO
. OBD ll Scrn Tool indicrt.3 Cod.P1758.. Self-Oiagnosis E indicato.light blink3 twics.
Moasuro VREF Vohago:1. Disconnect the A (26P) and B(22P) connectors from theTCM.2. Turn the ignition switch ON (ll).
3. Measure tho voltage betweenthe 820 and A13 or 426 termi-nats.
Rapair opan or lhort in iho wirobatwaan tho 820 terminal andth. ECM.ls there approx. 5 V?
Check for a Shon to Powar:Measure the voltage between th€A15 and A13 or A26 terminals.
Rapair .hort to powar in tha wircbatr.,aon tha A15 ta.mlnal and thalock.up control rol.noid valva B.
Chack for loo.. TCM connactoB.It necassrry, 3ub3thuta ! known-good 3olcnoid valve .ir€mbly olTCM .nd r6ch.ck.
To page 14-59
*d
*,
Page 476 of 1681
\/
J
14-59
From page 14-58
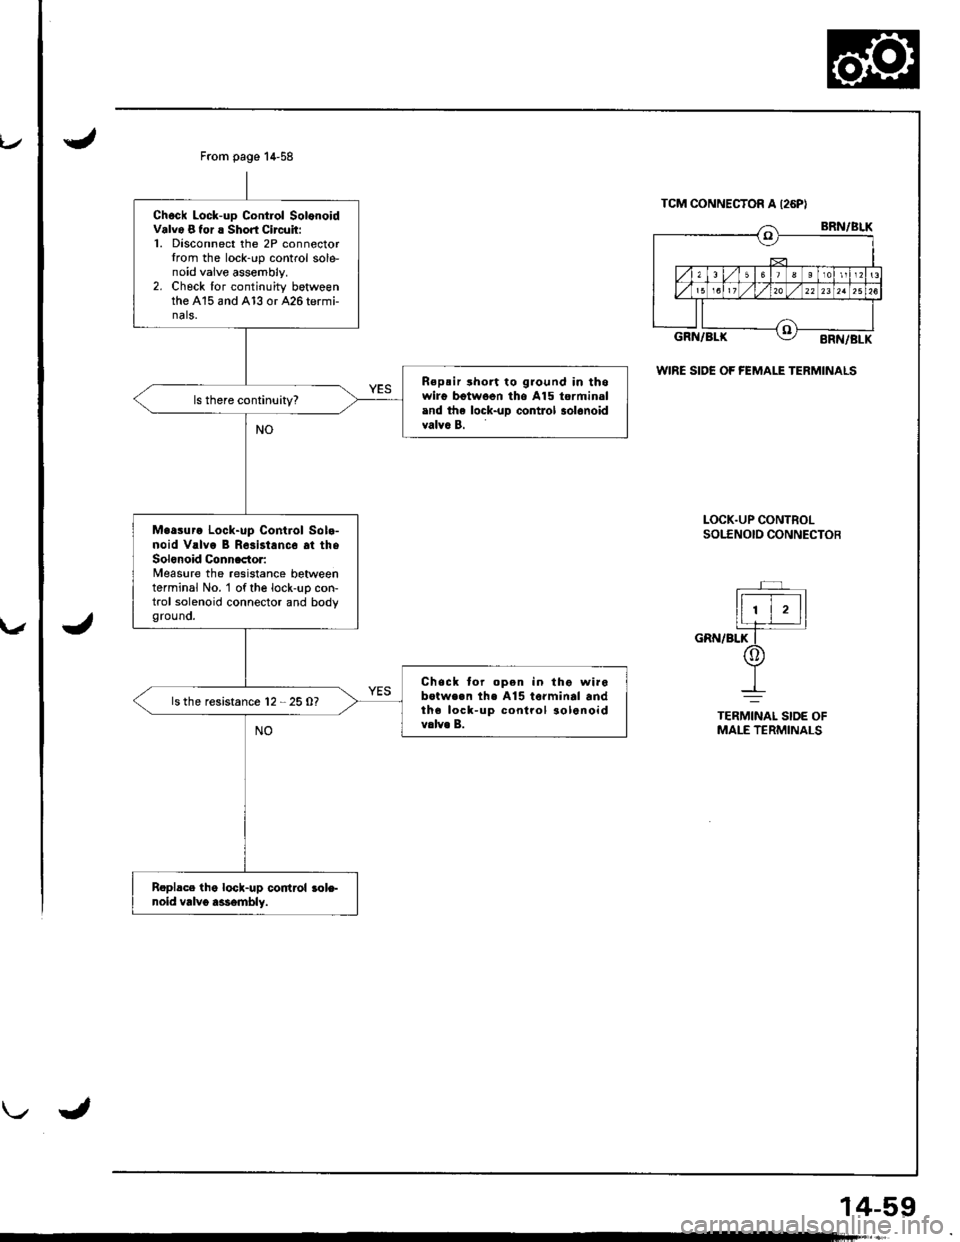
Chock Lock-up Contlol SolonoidValv6 8 tor ! Short Circuit:1. Disconnect the 2P connectorIrom the lock-rrp control sole-noid vaive assembly.2. Check for continuity betweenthe A15 and A13 or 426 termi-nals.
Rspsir rhort to ground in thowirg bgtwoen tho A15 torminaland the lock-uD control 3ol6noidvalva B.
Maasuro Lock-up Control Sola-noid V.lvo B Rosist.nc6 at theSolonoid Connactor:Measure the resistance betweenterminal No. 'l of the lock-uo con-trol solenoid connector and bodygrouno.
Chack tor open in tho wir6botwe.n th€ A15 to.minal andtha lock-up conlrol aolenoidv.lv. B.
ls the resistance 12 - 25 O?
Roplace lhe lock-up codrol role-noid vrlvo a$embly.
TCM CONNECTOR A I26PI
WIRE SIDE OF fEMALE TERMINALS
LOCK.UP CONTBOLsotf Noto coNNEcToB
r '
ll ' | , llIr_e_rtjl
cnrurefiT-/Or
-L--=
TERMINAI SIDE OFMALE TERMINALS
Page 477 of 1681
Electrical Troubleshooting
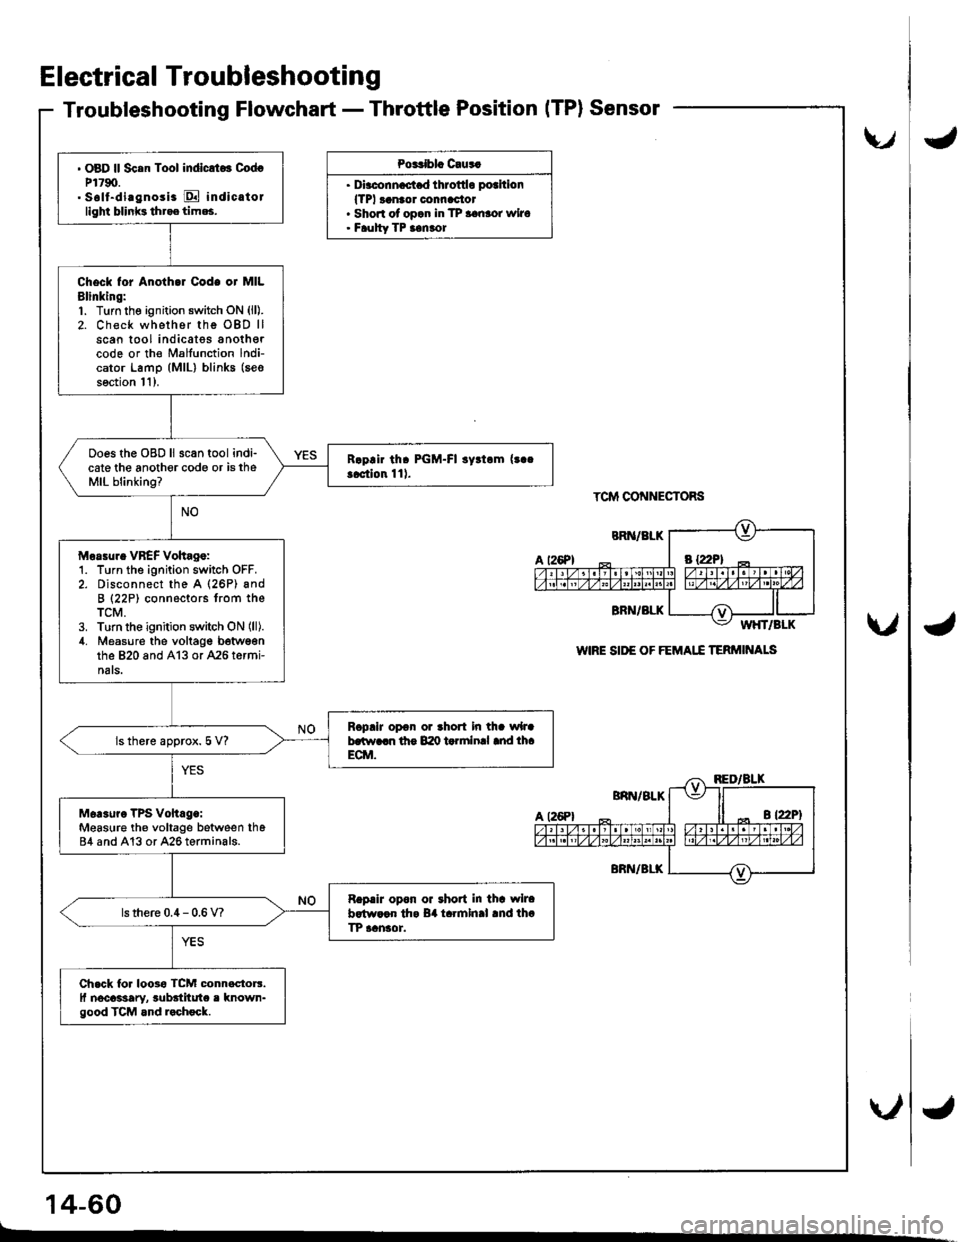
Troubleshooting Flowchart - Throttle PositionITP}Sensor
Po3Cblc C!us.
. Dirc.nn.c.t d throttlo pothion
lTPl ranaor connac'tor. Shon of opan in TP aanror wiro. Faulty TP ianror
TCM CONNECTORS
WIRE SII'E OF FEMAI.I TERMI'TALS
' OBD ll Sc.n Tool indlclto3 CodcP1790.. Soll-di.gnosi. E indic.tollighi blinks tht.e tim*,
Check tor Anoth.r Code or MILBlinking:1. Turn the ignition switch oN (ll).
2. Check whether rhe OBD llscan tool indicatss anothercode or the Malfunction lndi-cator Lamp (MlL) blinks (seo
soction l1).
Ooes the OBD ll scan tool indi-cate the anothor code or is theMIL blinking?
Morrur. VBEF Vohag.:1. Turn the ignition switch OFF.2. Disconnect the A (26P) andB (22P) connectors trom theTCM.3. Turn the ignition switch ON (ll).
4. Measure the voltage b6twsonthe 820 and A13 or 426 termi-nats.
RcpaiJ opon or thort in tha wlJab.tt r..n lho 840 t rlnlnal md lh.ECM.ls there approx. 5 V?
Mer3uro TPs vohrg.:Measure th€ voltage between th684 and A13 or A26 terminals.
Rapair opon oa rhoat in thr wlrab.tw.cn th. B4 t.rmln.l .nd th.TP aansor.ls there 0.4 - 0.6 V?
Ch.ck lor loosa TcM connactorr.ll nocassary, rubditut. r known-good TCM and r.chock.
t26Pl
U
\./
\"/
14-60
.d
{
4
Page 478 of 1681
IJ
v
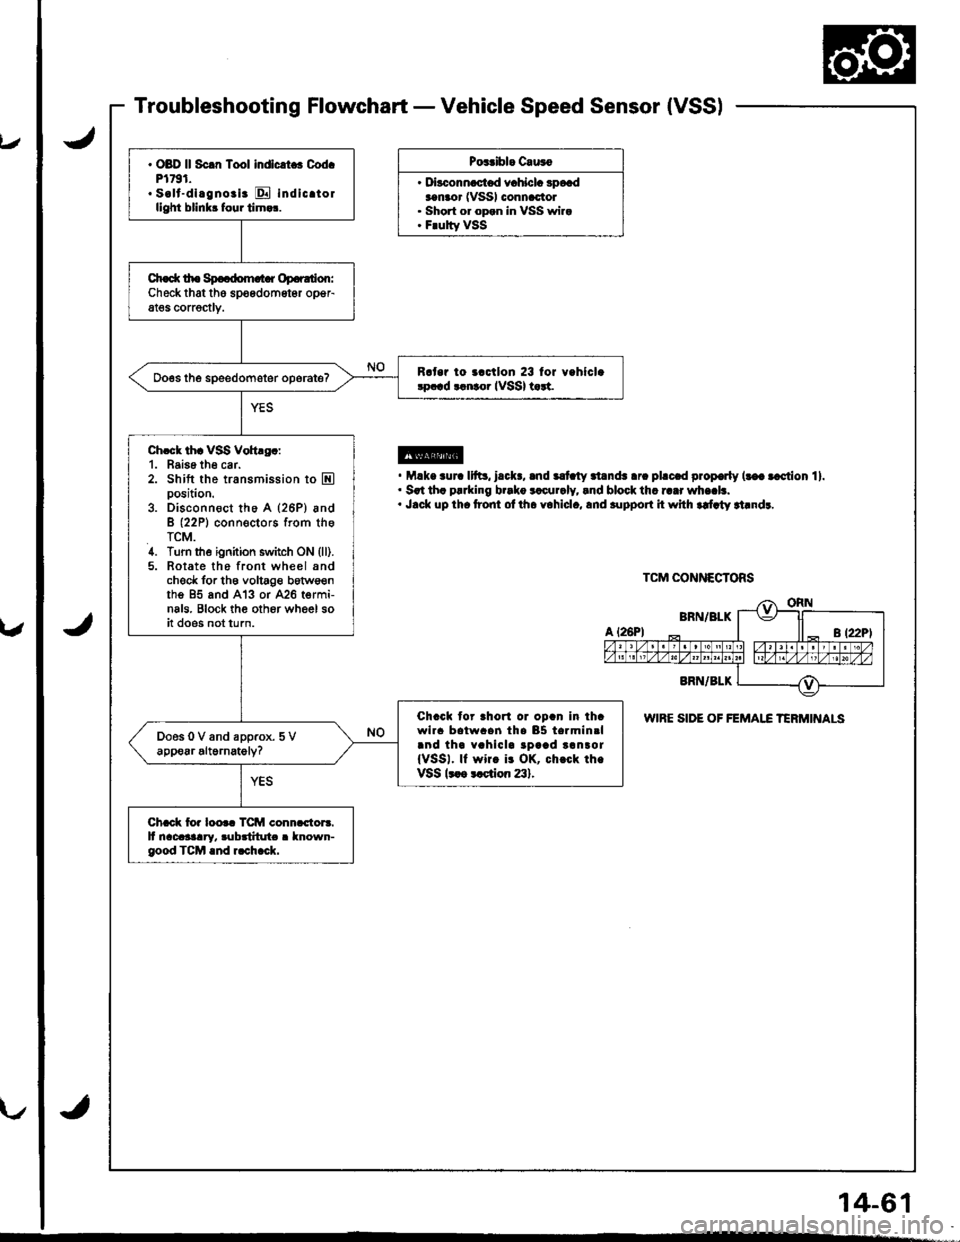
Troubleshooting Flowchart - Vehicle Speed Sensor {VSS)
Pos.ibl. C.u3o
. D|""."-"t"d .r"hl"L 3p*daanaor (VSSI connactol. Short or opan in VSS wira. F.ulty VSS
@. M.k. .ur. 11ft3, l.cl(., .nd ilt ty .l.nds .r. pl.c.d prop€rly (t€a .cction 11.. Srt th. p!.king b..ko rlcur.ly, lnd block thr r..r wh..b.. J.ck up th. t?ont ol ih. yohlcl., lnd .upport it whh rdlty rt.ndr.
WIRE SIDE OF FEMAI.C TERMINALS
. OBD ll Sc.n Tool indlcrt . Cod.Pl791.. s.lt-dl.gno.i. E indicrtorllghi blinkr four tirn.r.
Ch.d( tho Sp..dom.t r Op.r.don:Checkthat the spoedometgr opeFat€s corrsctlv.
R.t.r io ..ctlon 23 lor v.hlcl.!p.!d tlnto. IVSSI t rt.
Ch.ck thr VSS Voh.g.:1. Baise th6 car.2. Shift the transmission to Eposition.
3. Disconn€ct tho A (26P) andB (22P1 conn€ctors from theTCM.4. Turn the ignition switch ON (ll).
5. Rotate the front wheel sndcheck for th6 voltage botws€nthe 95 and A'13 or 426 termi-nals. Block th€ oth6r wheel soit does not turn.
Chack tor ahorl or opan in ihawlra batwaan tha 85 tarmin.land tha vahicla tpaad tanror{VSSI. ll wirc i! OK, ch.ck th.VSSk ot ction 23).
Chack io. loo.c TCM conn.ctors.It nacasaary. rubditut . known-good TCM .nd r.ch.ck.
TCM CONNECTORS
14-61
Page 479 of 1681
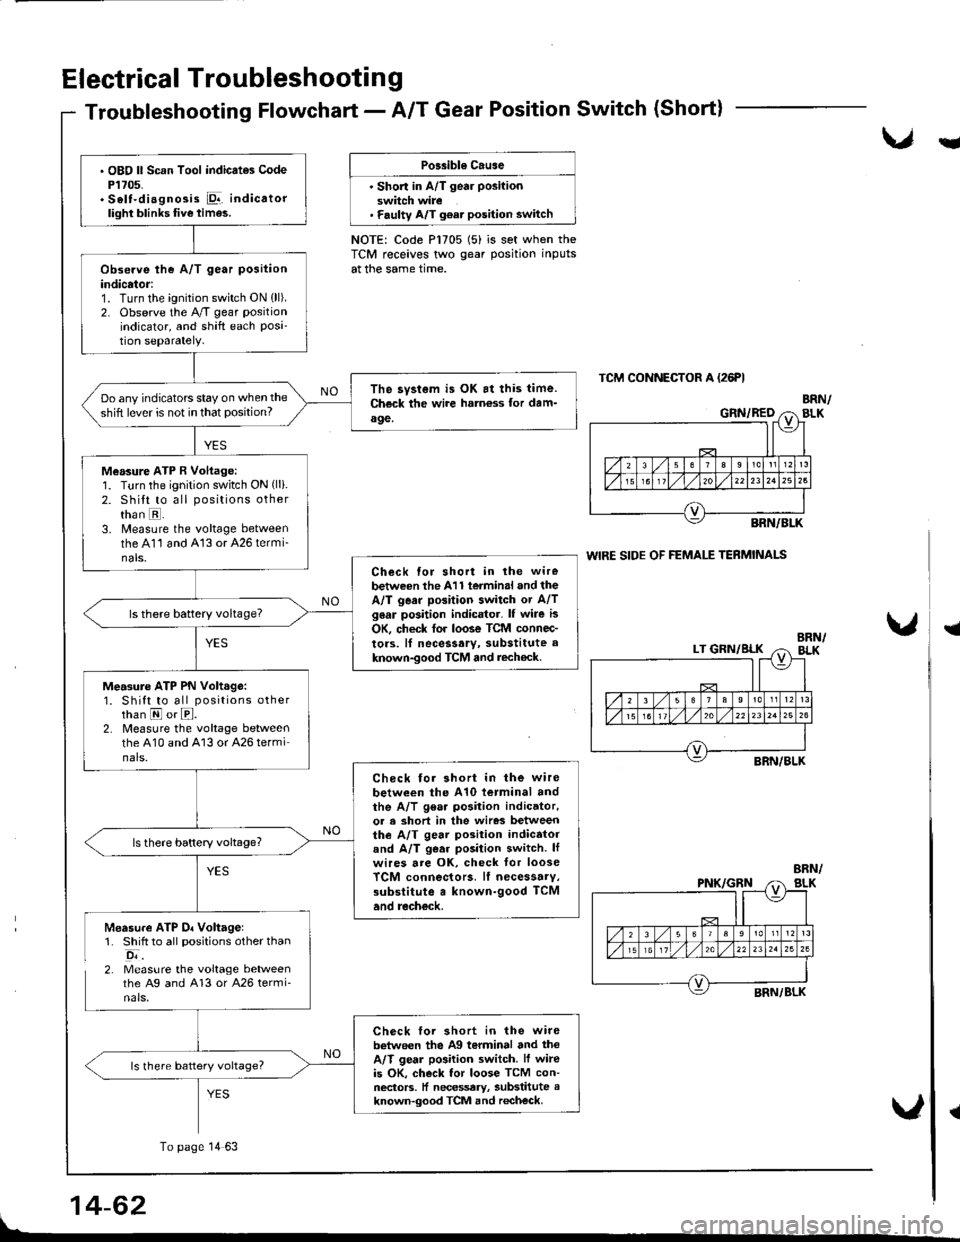
Electrical Troubleshootin g
Troubleshooting Flowchart - A/T Gear Position Switch (Short)
Llu
Po$ible Cause
' Shon in A/T gea. position
switch wire. F.ulty A/T g€at position switch
NOTE: Code P1705 (5) is set when theTCM receives two gear position inputs
at the same time.
TCM CONNECTOR A {26FI
WIRE SIDE OF FEMALE TERMINALS
{
Measure ATP D. Voltagel1. Shift to all positions other than
o;.2. Measure the voltage betweenthe Ag and 413 or A26 termi'nals.
{
14-62
. OBO ll Scan Tool indicates CodeP1705.. S6lt-diagnosis Pr-,.. indicatorlight blinks five times.
Observe the A/T gear position
indicator:1. Turn the ignition switch ON {ll).2. Observe the A/T gear position
indicator, and shift each Posi-tion separately.
The syslem is OK at this time.Ch€ck the wite hotn€ss for dam-a9e,
Do any indicators stay on when the
shift lever is not in that position?
Measure ATP R Voltage:1. Turn the ignition switch ON (lli.
2. shitt to all positions otherthan E.3. Measure the voltage betweenthe A11 and 413 or 426 termi-nals.Check for short in ihe wire
betwe€n the 411 termin.l and theA/T gear position switch or A/Tg6ar position indicator. lf wire is
OK, check tor lo6e TCM connec-
tors. lf necessary, substitute a
known-good TCM and rech€ck.
ls there battery voltageT
Measure ATP PN Volt.go:1. Shift to all positions otherthan E or E.2. Measure the voltage betweenthe 410 and A13 or 426 terminals.
Check for 3hort in the wire
between the A10 tetminal andthe A/T gear position indicator,or a short in the wir63 betweenthe A/T gear position indicatorand A/T g€ar position switch. lfwires are oK, check for looseTCM connecto13. lf necessarv,3ubslitute a known-good TCM
and recheck.
Check for 3hort in the wirebetween the Ag terminal and thoA/T gear po3ition switch. lf wireis OK, check tor loose TCM con-neclors. ll necessary, substitute aknown-good TCM and recheck.
To page 14 63
Page 480 of 1681
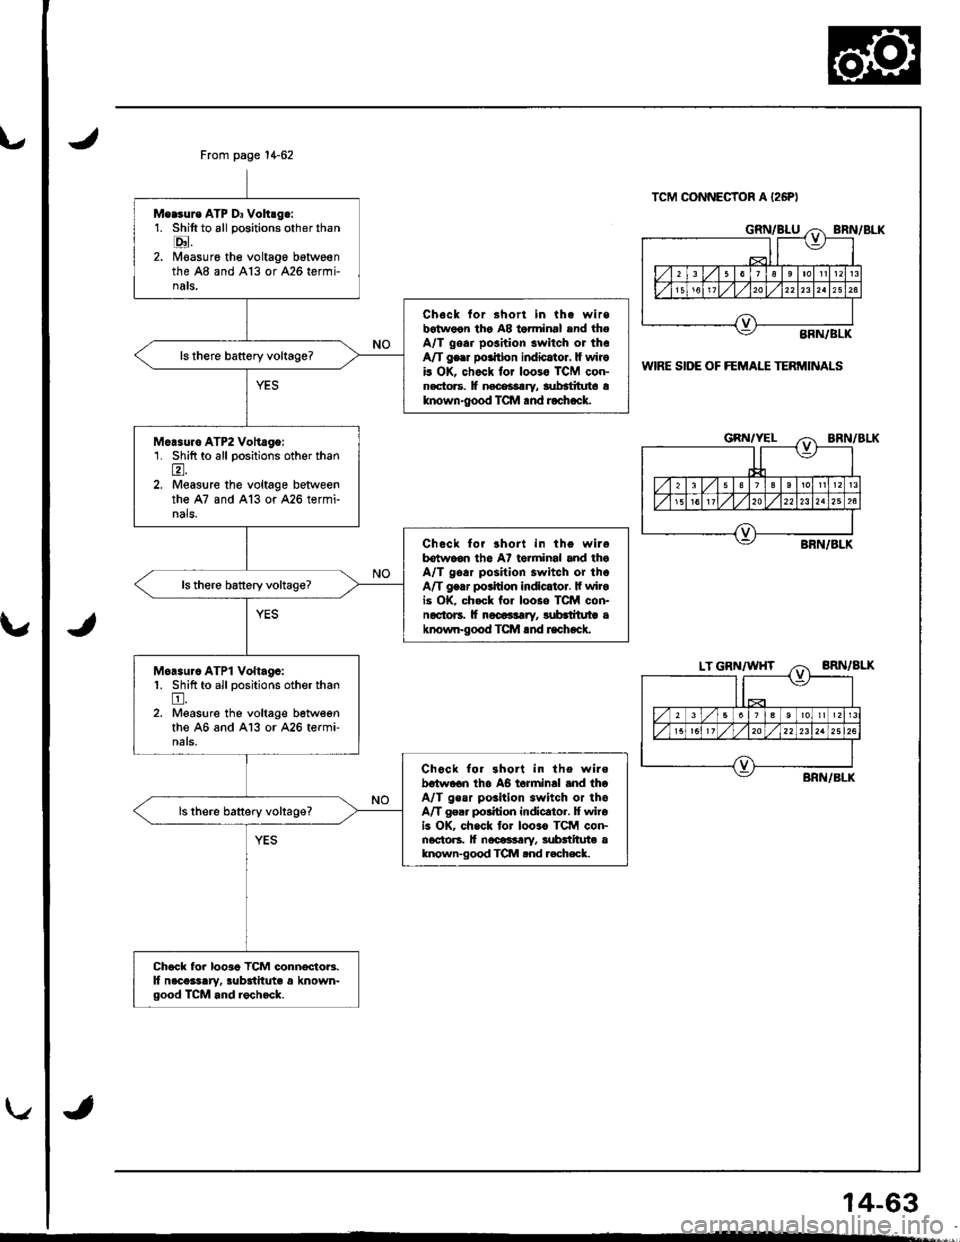
Measure ATP D3 Voltrg.:1. Shift to all positions other than
E.2. Moasure the voltago botwg€nthe A8 and A13 or A26 termi-nals.
Chock for shori in the wirsbotwoon tho A8 torminal snd tfieA/T goai position switch or theA/T ge.r po.idon indicaioi, It wirois OX, ch6ck for loore TCM con-n€cto]s. lf n.ceacary, aub6tftrjt6 aknown.good TC.M .nd Jocicck.
ls there battery voltage?
Me.suro ATP2 Volt6go:1. Shilt to all positions otherthan
A.2. Measure the voltage betlveenthe A7 and A13 or A26 termi-nals.
Check fo? 3hort in tho wirebstwaon tha At torminal and thoA/T goar position switch or thoA/T ge.r po.ldon indlcltor. lf wirois OK. ch.ck for looso TCM con-noctors. lf nocoalary, lubctiiuto aknown-good TCM rnd rech.ck.
M6a.urc ATPI Voltagc:1. Shift to all positions other thantr.2. Measure the voltag€ betweonthe 46 and Al3 or 426 termi-nals,
Chock for 3holt in the wirob6two6n tho AO torminal and thoA/T gear po3ition .witch or thoA/T ger. po.ition indicator. I wir6is OK. ch.ck tor looso TCM con-nocto6. lf noca3srry, sub6titut6 aknown-good TCIVI .nd r.ch€ck.
ls there battery voltage?
Chack for looaa TCM connocioF.ll n6ce$ary, iubstitute a known-good TCM .nd rech.ck.
TCM CONNECIOR A {26P)
BRN/BLK
BFN/BLK
WIRE SIDE OF FEMALE TERMINALS
GRN/YEL
LT GRN/WHT
BRN/BLK
14-63