HONDA INTEGRA 1998 4.G Workshop Manual
Manufacturer: HONDA, Model Year: 1998, Model line: INTEGRA, Model: HONDA INTEGRA 1998 4.GPages: 1681, PDF Size: 54.22 MB
Page 461 of 1681
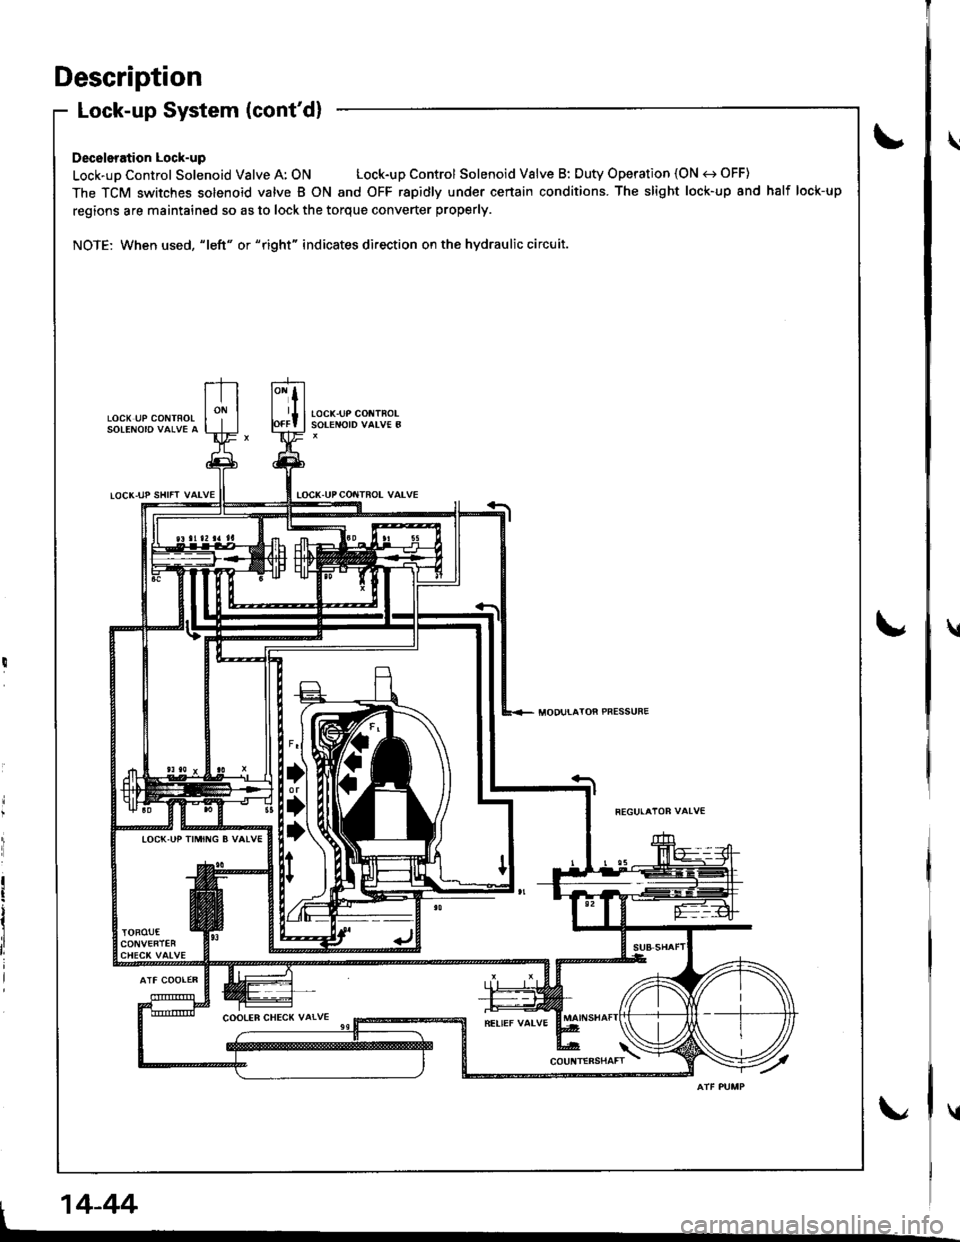
Description
LOCX UP CONTFOLSOLENOIO VAI.VE A
Lock-up System (cont'd)
Deceleration Lock-up
Lock-up Control Solenoid Valve A: ON Lock-up Control Solenoid Valve B: Duty Operation (ON e) OFF)
The TCM switches solenoid valve B ON and OFF rapidly under certain conditions. The slight lock-up and half lock-up
regions are maintained so as to lock the torque converter properly.
NOTE: When used, "|eft" or "right" indicates direction on the hydraulic circuit.
tocK-uP col{TFoLSOTENOID VALV€ B
IOCK-UPCOITTROL VALVE
locK.uP trMrr{G B vAlv€
I 14-44I
\
\
u
Page 462 of 1681
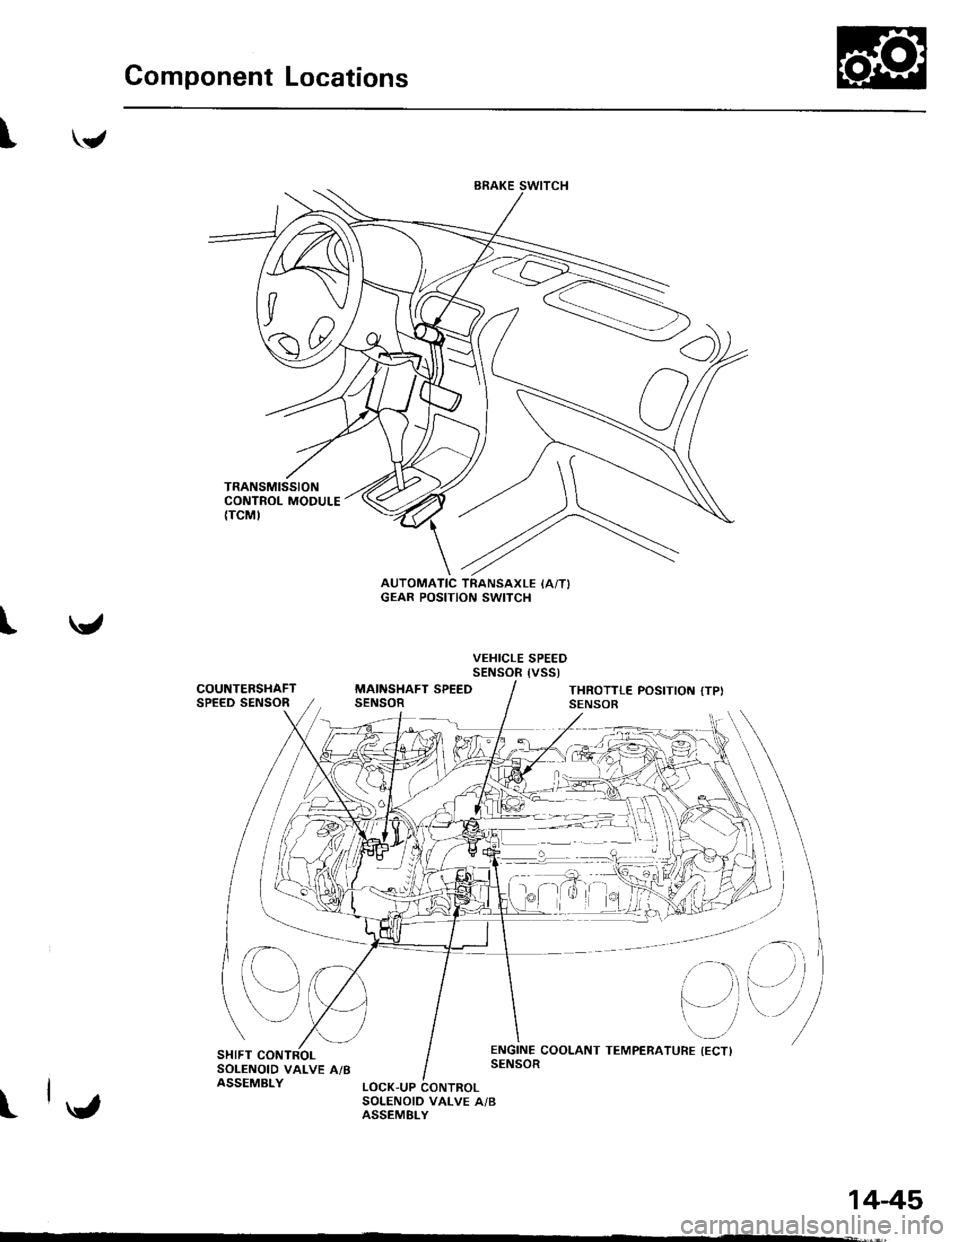
Component Locations
"/,4
'JJ-N
{7v
A0t
\ /
t
AUTOMATIC TRANSAXLE IAiTIGEAR POSITION SWITCH
VEHICLE SPEEDSENSOR {VSSt
COUNTERSHAFTSPEED SENSORMAINSHAFT SPEEDSENSORTHROTTLE POSITIOT{ {TPI
e
SHIFT CONTROLSOLENOID VALVE A/BASSEMBLY
I
- ::::i ---l
1445
Page 463 of 1681
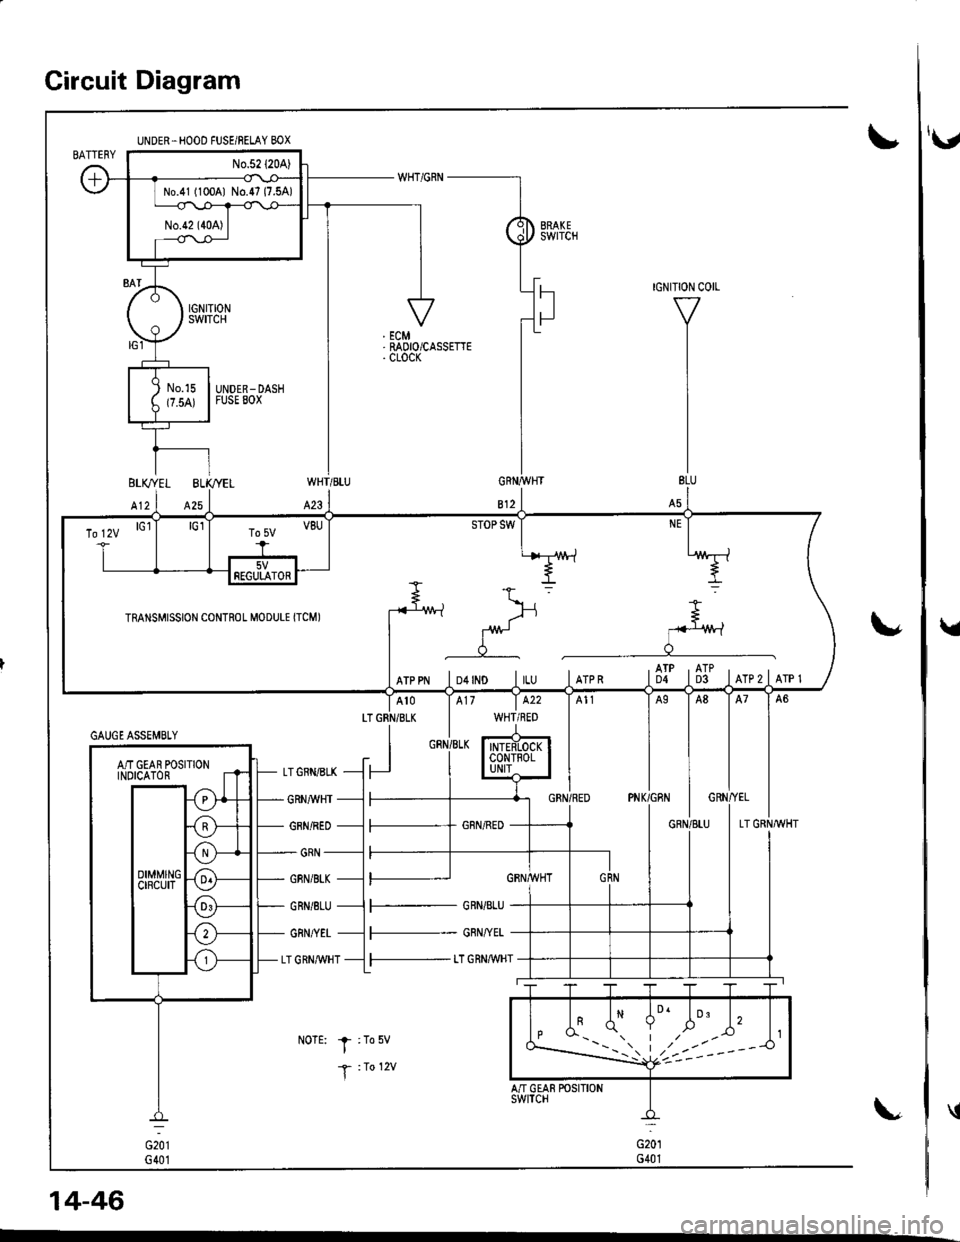
Circuit Diagram
UNDER.HOOD FUSE/BELAY BOX
No.41 (100A1 No.47 (7.5A)
\'
WHT/BLU
423
LTGRN/BLK
I
GRNI/VHT
GRN/RED
GRN
GBN/BI"K
GRN/8LU
GRN/YET
LT GRN,M/HT
NoTE: I :To5v
T :1o 12v
14-46
\,
GAUGE ASSEMBTY
AiT GEAR POSITIONINOICATOR
To lzv lGl
rRANsMrssroN coNTRoL M.DULE rrcMr -fu
*> =
g
=.
I f- J:*
rrppr lo+rlo lru lrrpn tflt ti]t lrrezlerer
5VFEGULATOR
F- GRN/BLU
l--- GRN/YEL
l-- t"T GRN,aWHT
'v
Page 464 of 1681
'.J
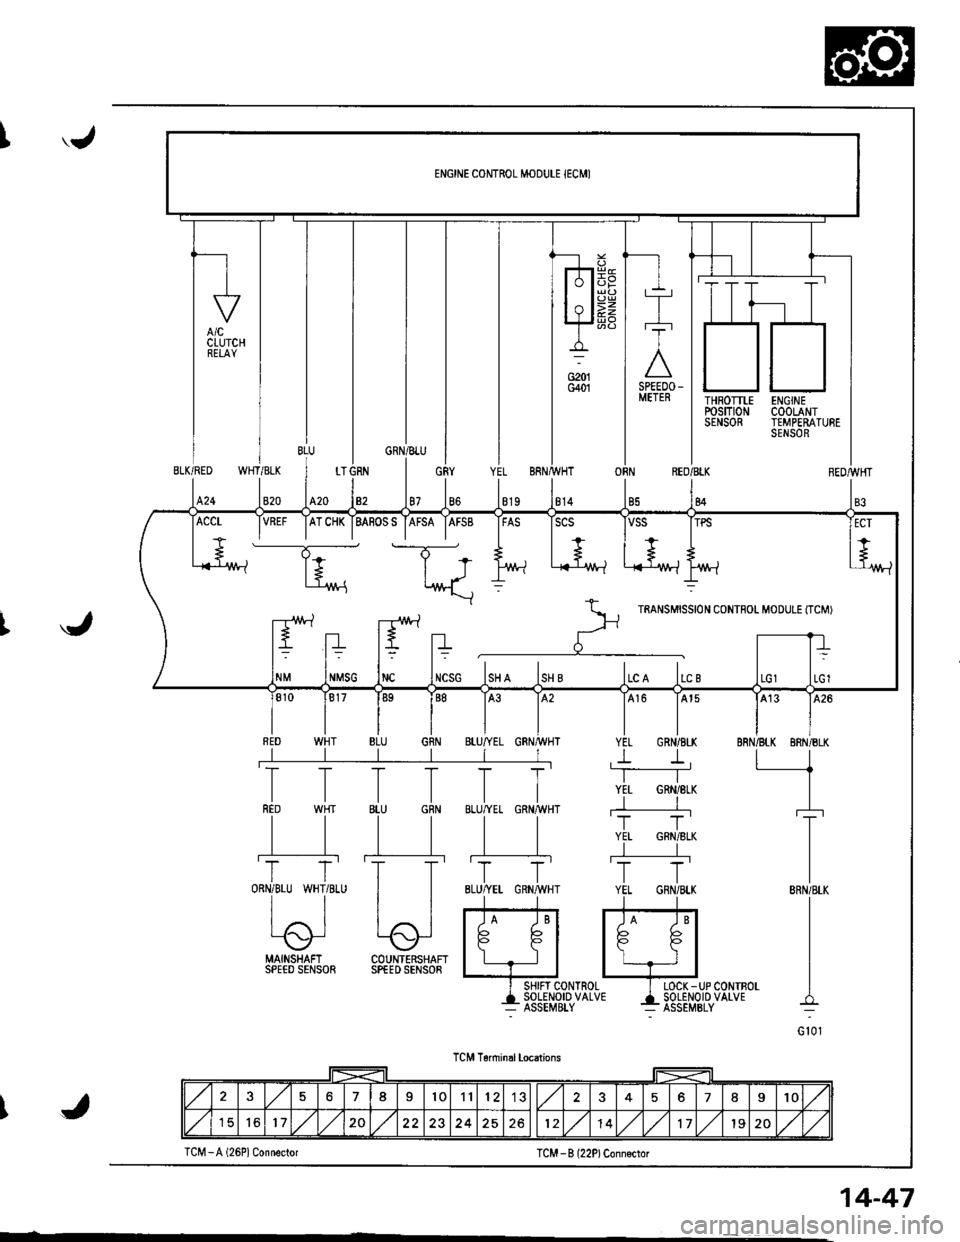
THROTTLErcsm0NSENSOR
ENGINECOOLANTTEMPERATURESENSOR
WHT/BLKBLK/RED
820424
OBNREO/BLK
84
J
MAINSHAFI COUNTERSHAFISPEED SENSOR SPfED SENSOR
I SHIFT CONTROL I LOCK -UP CONTBOL
+135Eil,?1o'uo'u' 4i85El,o''P'uo'u'
TCM T6nninal locations
TCM -B l22P)Conn€ctor
VREF IATCHK IBASOSS IAFSA IAFSB IFAS ISCS
----T;- t-T-*
+.. | +.., I + ,+
l+ | J l/vt-l .i{-'1M-l L-{-lr^/t-lt't'/!-?
*\::
r--rr!\.1 -r!\./ rartsurssrot coNTFoL M'DULE tTcMr
ltEltn r' -rrt= t= t? t=
NMSG INC INCSG ISH A ISH B ILC A ILC B
576I101112578I10
151617,/1,/20251214,/1,/171920,/1,/J
TCM -A (26P1 Connector
14-47
Page 465 of 1681
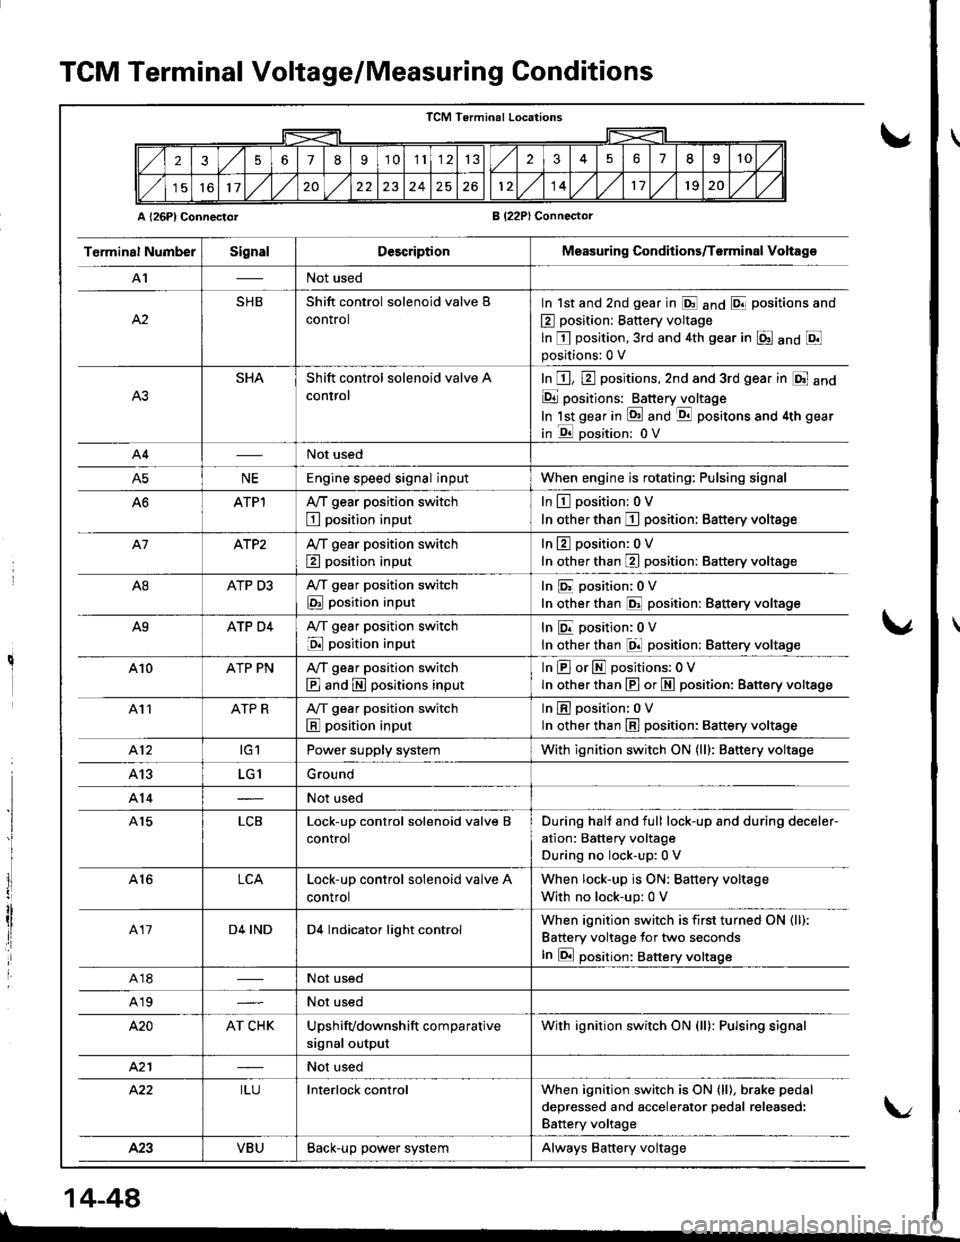
TCM Terminal Voltage/Measuring Conditions
A l26Pl ConnectorB (22PlConnector
TCM Terminal Locations
256789'1011132351II10
11,/l/2024261214,/l/1120,/1,/
T6rminal NumberSignalDescriptionMeasuring Conditions/T€rminal Voltag€
A'INot used
A2
SHBShift control solenoid valve B
control
In 1st and 2nd gear in E anO E positions and
E position: Battery voltage
ln E position,3rd and 4th gear in E anO Epositions:0 V
SHAShift control solenoid valve A
control
In E, E positions,2nd and 3rd gear in E and
E positions: Batteryjloltage
In lst gear in !d and -qtl positons and 4th gear
in E oosition: 0V
A4Not used
A5NEEngine speed signal inputWhen engine is rotating: Pulsing signal
ATPlA,/T gear position switch
E position input
In L!-l position: 0 V
In other than I position: Battery voltage
A7ATP2Ay'T gear position switch
E position input
In 13 position:0 V
In other than E position: Battery voltage
A8ATP D3A,/T gear position switch
E position input
In E position:0V
In other than @ position: Battery voltage
A9ATP D4A,/T gear position switch
E position input
InEposition;0V
In other than El position: Battery voltage
410ATP PNA,/T gear position switch
E and E positions input
InEorEpositions:OV
In other than E or N position: Battery vottage
411ATP RA/T gear position switch
E position input
lnEposition: oV
ln other than E position: 8attery voltage
412tGlPower supply systemWith ignition switch ON (lll: Battery voltage
413LG1Ground
A14Not used
A15LCBLock-up control solenoid valve B
control
During hall and full lock-up and during deceler-
ation: Battery voltage
During no lock-up:0 V
A16LCALock-up control solenoid valve A
control
When lock-up is ON; Battery voltage
With no lock-up: 0 V
417D4 INDD4 Indicator light controlWhen ignition switch is first turned ON (ll):
Battery voltage for two seconds
In E position: Battery voltsge
A18Not used
A19Not used
420AT CHKUpshifvdownshift comparative
signal output
With ignition switch ON (ll): Pulsing signal
421Not used
422ILUInterlock controlWhen ignition switch is ON (ll), brake pedal
deoressed and accelerator oedal released:
Battery voltage
423VBUBack-up power systemAlways Battery voltage
I
lI
I
14-44
\/
Page 466 of 1681
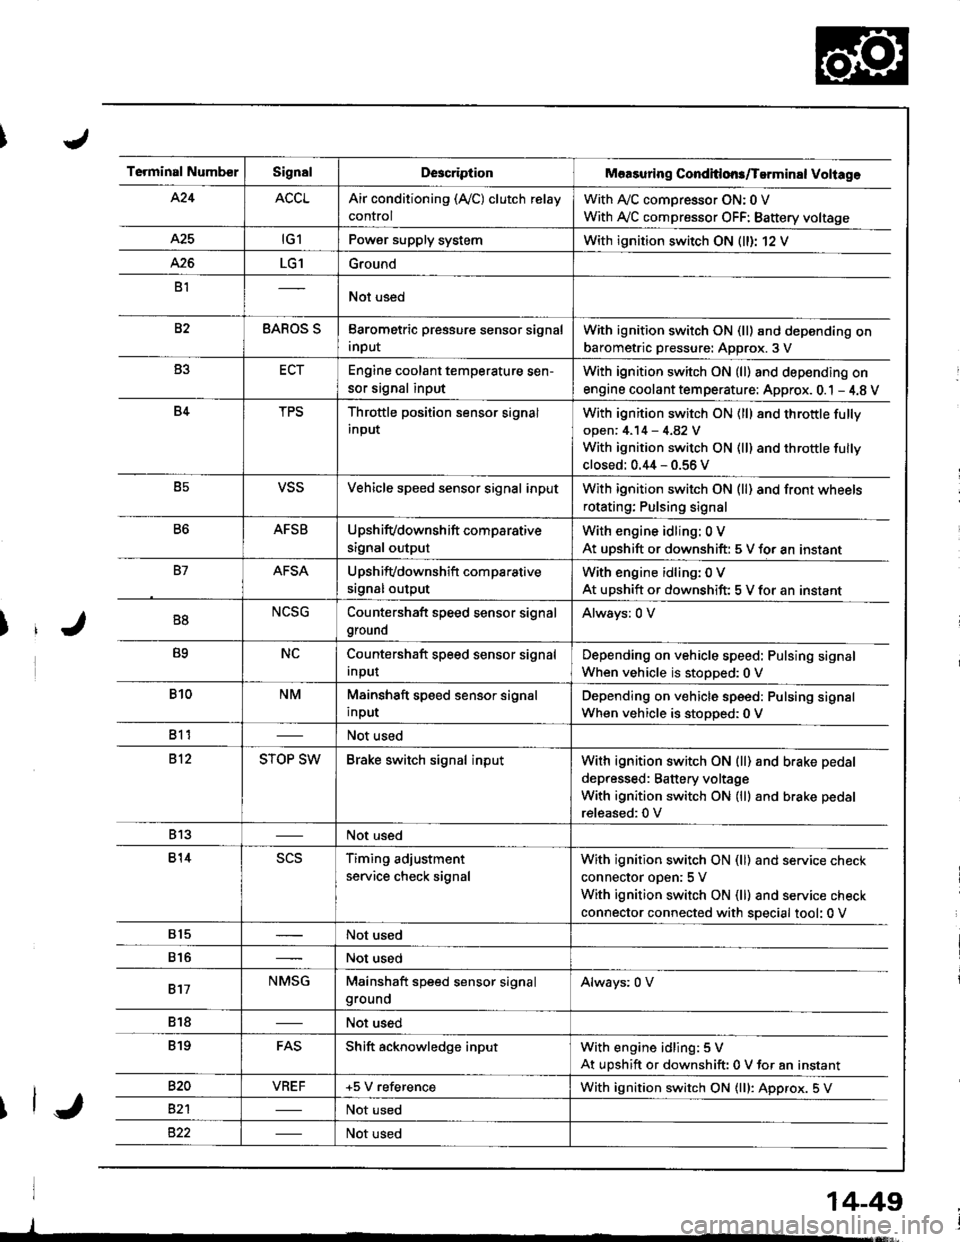
Terminal NumberSignalDescriptionMaasuring Conditlons/Tarminal Voliage
424ACCLAir conditioning (Ay'C) clutch relay
control
With A,/C comDressor ON: 0 V
With Ay'C compressor OFF: Battery voltage
A25tG1Power supply systemWith ignition switch ON (ll)r 12 V
426LG1Ground
B1Not used
82BAROS SBarometric pressure sensor signal
input
With ignition switch ON (ll) and depending on
barometric pressure: Approx. 3 V
B3ECTEngine coolant temperature sen-
sor signal input
With ignition switch ON (ll) and depending on
engine coolant tem perature: Approx. 0.1 - 4.8 V
B4TPSThrottle position sensor signal
input
With ignition switch ON (ll) 8nd throttle fully
open: 4.14 - 4.82 V
With ignition switch ON (ll) and throttle fully
closed: 0.44 - 0.56 V
B5VSSVehicle speed sensor signal inputWith ignition switch ON (ll) and front wheels
rotating; Pulsing signal
B6AFSBUpshifvdownshift comparative
signal output
With engine idling: 0 V
At uDshift or downshift: 5 V for an instant
B7AFSAUpshifvdownshift com parative
srgnal output
With engine idling: 0 V
At upshift or downshift: 5 V for an instant
B8NCSGCountershaft speed sensor signal
ground
Always: 0 V
B9NCCountershaft speed sensor signal
Input
Depending on vehicle speed: Pulsing signal
When vehicle is stopped:0 V
B10NMMainshaft speed sensor signal
input
Depending on vehicle speed: Pulsing signal
When vehicle is stoDoed: 0 V
811Not used
812STOP SWBrake switch signal inputWith ignition switch ON {ll) and b.ake pedal
depressed: Battery voltage
With ignition switch ON (lll and brake pedal
released:0 V
813Not used
814scsTiming adjustment
service check signal
With ignition switch ON (ll) and service check
connector oDen:5 V
With ignition switch ON (ll) and service check
connector connected with special tool: 0 V
815Not used
816Not used
817NMSGMainshaft speed sensor signalgroundAlways: 0 V
818Not used
819FASShift acknowledge inputWith engine idling: 5 V
At upshift or downshift: 0 V for an instant
820VBEF+5 V referenceWith ignition switch ON {lll: Approx. 5 V
82'lNot used
Not used
14-49
Page 467 of 1681
![HONDA INTEGRA 1998 4.G Workshop Manual Troubleshooting Procedures
Checking the Diagnostic Trouble Code (DTC)
with an OBD ll Scan Tool or th€ Honda PGM Tester
When the TCM senses an abnormality in the input or output systems, the lD,] ind HONDA INTEGRA 1998 4.G Workshop Manual Troubleshooting Procedures
Checking the Diagnostic Trouble Code (DTC)
with an OBD ll Scan Tool or th€ Honda PGM Tester
When the TCM senses an abnormality in the input or output systems, the lD,] ind](/img/13/6069/w960_6069-466.png)
Troubleshooting Procedures
Checking the Diagnostic Trouble Code (DTC)
with an OBD ll Scan Tool or th€ Honda PGM Tester
When the TCM senses an abnormality in the input or output systems, the lD,] indicator light in the gauge assembly will
blink. When the 16p Data Link Connector (DLC) (located under the dash on the passenger side) is connected to the OBD ll
Scan Tool or Honda PGM Taster as shown, the scan tool or tester will indicate the Diagnostic Trouble Code (DTC) when
the ignition switch is turned ON {ll}.
When the !r indicator light has been reported on, connect the OBD ll Scan Tool confirming to SAE J1978 or Honda PGM
Tester to the DLC (16P) behind the ashtray. Turn the ignition switch ON (ll) and observe the DTC on the screen ofthe OBD
ll Scan Tool or Honda PGM Tester. After determining the DTC, refer to the electrical system Symptom-to-Component
Chart on pages 14-54 and 14-55.
NOTE: SeetheOBDll ScanTool orHonda PGM Tester user's manual for specific instructions.
OBD-IlSCAN TOOL orHONDA PGM TESTER
Some PGM-Fl problems will also make the lol indicator light come on. After repairing the PGM-Fl system. disconnect the
BACK Up fuse (7.5 A) in the under-hood fuse/relay box for more than 10 seconds to reset the TCM memory, then recheck.
NOTE: Disconnecting the BACK UP fuse also cancels the radio anti-theft code, preset stations and the clock setting. Get
the customer's code number, and make note of the radio presets before removing the fuse so you can reset them
uJ trr
ulu
ai
14-50L
DATA LINK CONNECTOR (16P)
I
il
lt
rJq
Page 468 of 1681
L./Checking th€ Diagnostic Trouble Codo (DTC)
with the Sowica Check Connector and Special Tool
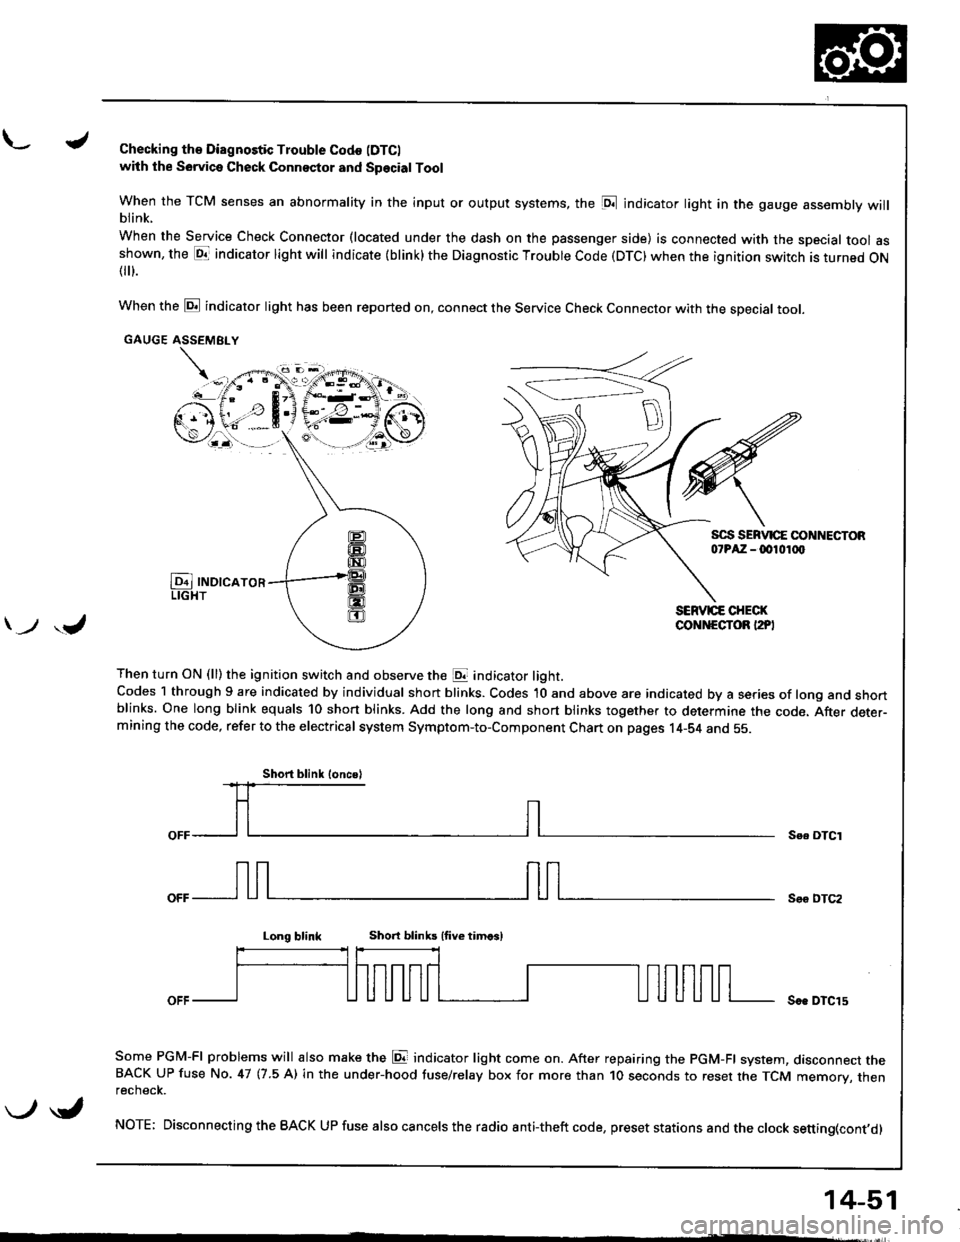
When the TCM senses an abnormality in the input or output systems, the [D;l indicator light in the gauge assembly willblink.
When the Service Check Connector (located under the dash on the passenger side) is connected with the special tool asshown, the E1T indicator light will indicate (blink) the Diagnostic Troubte Code (DTC) when the ignition switch is turned ON{
}.
When the @ indicator light has been reported on, connect the Service Check Connector with the special toot.
GAUGE ASSEMEI.Y
Then turn ON (ll) the ignition switch and observe the E indicator light.Codes 1 through 9 are indicated by individual short blinks. Codes 1O and above are indicated by a series of long and shortblinks. One long blink equals 10 short blinks. Add the long and short blinks together to determine the code. After deter-mining the code, refer to the electrical system Symptom-to-Component Chart on pages 14-S4 and 55.
\-F;ii^r
) ,J
Se. OTCI
Soo DTC2
Long blinkShort blinb lfive timcsl
Soe DTCl5
Some PGM-FI problems will also make the E indicator light come on. After repairing the PGM-FI system, dasconnect theBACK UP fuse No. 47 (7.5 A) in the under-hood tuse/relay box for more than 1O seconds to reset the TCM memory, thenrecnecK.
NOTE; Disconnecting the BACK UP fuse also cancels the radio anti-theft code, preset stations and the clock setting(cont,d)
Short blink loncsl
\-/ \i,
14-51
Page 469 of 1681
Troubleshooting Procedures
(
{
(cont'd)
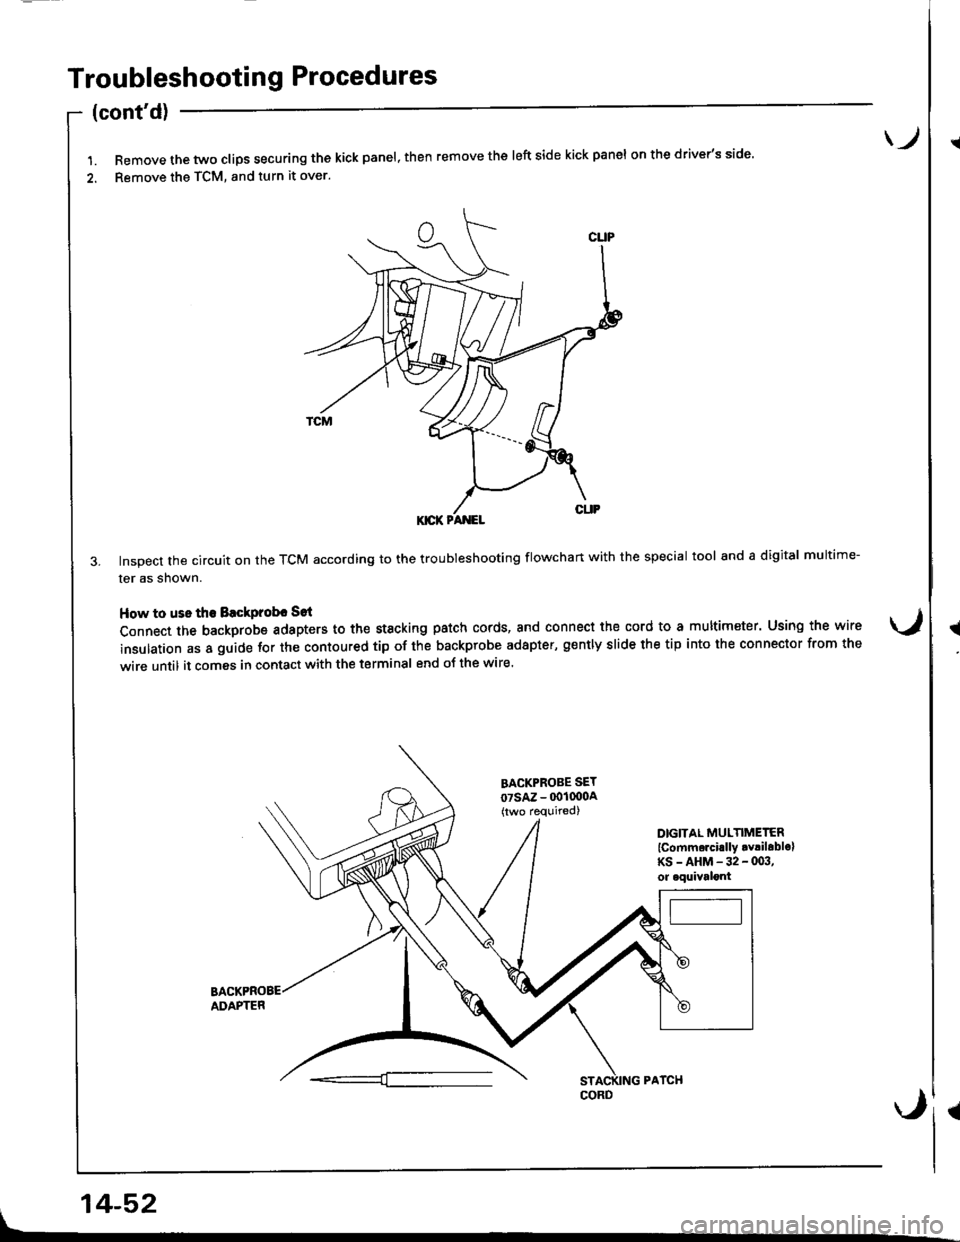
l.Removethetwoc|ipssecuringthekickpane|,thenremovethe|eftsidekickpane|onthedriver,sside.
2. Remove the TCM, and turn it over.
3. Inspect the circuit on the TCM according to the troubleshooting flowchan with the special tool and a digital multime-
ler as shown.
How to uss the Blckprobr Sat
Connect the backprobe adapters to the st8cking patch cords, and connect the cord to a multimeter. Using the wire
insulation as a guide for the contoured tip of the backprobe adapter, g€ntly slide the tip into the connector from the
wire until it comes in contact with the terminal end oJ the wire.
)
BACKPROBE SET
07sAz - 001000A(two required)
DIGITAL MULTIMETER
lcomm.rci.lly .v!ilablolKS-AHM-32-003,or oquivalont
ADAPTER
, 14-52
Page 470 of 1681
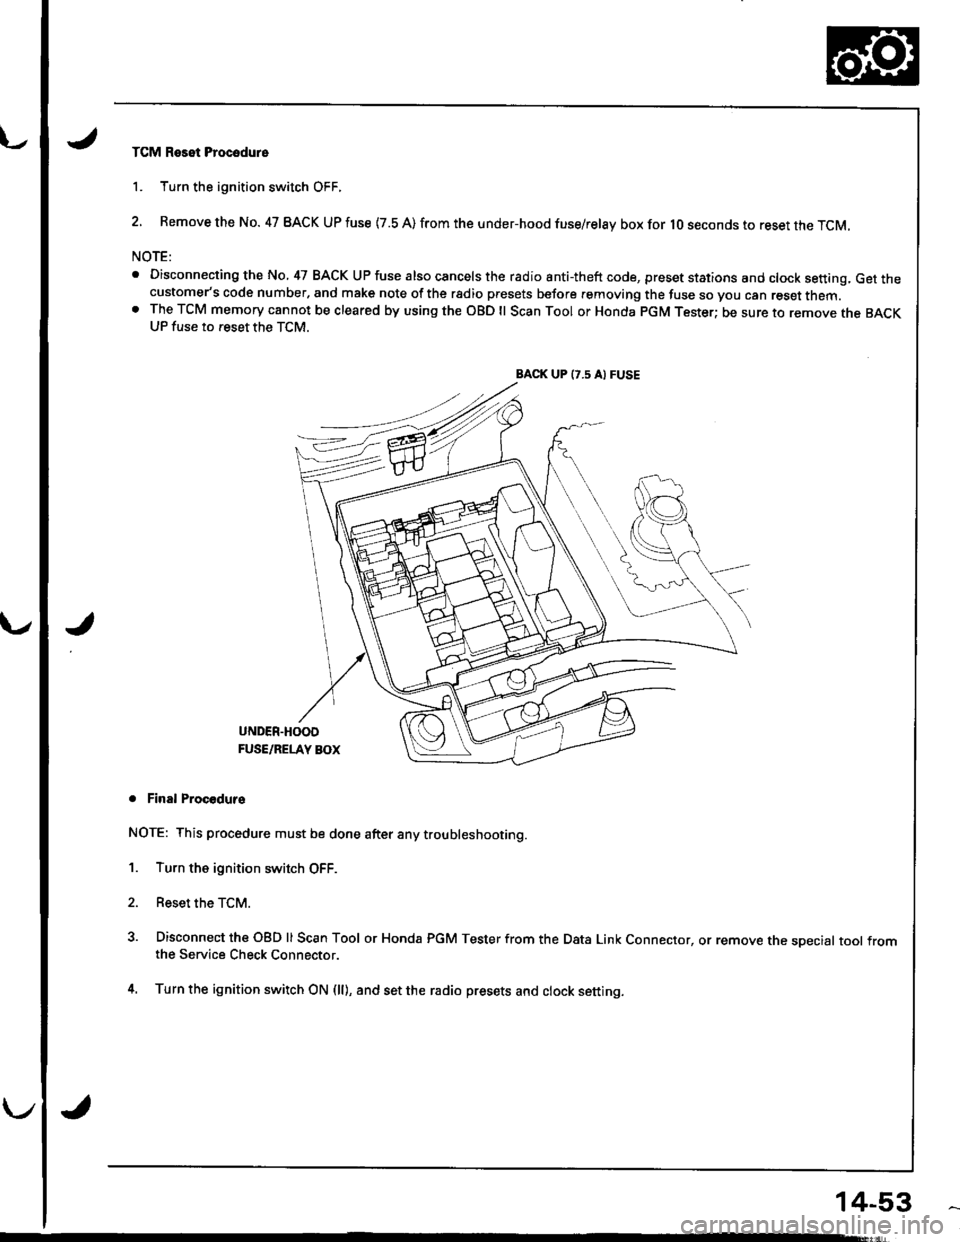
TCM Reset Procodure
1. Turn the ignition switch OFF.
2. Remove the No. 47 BACK UP fuse {7.8 A) from the under-hood fuse/relay box for lO seconds to reset the TCM.
NOTE:
. Disconnecting the No, 47 BACK UP fuse also cancels the radio anti-theft code, preset stations and clock setting, Get thecustomer's code number, and make note of the rsdio presets before removing the fuse so you can reset them.o The TCM memory cannot be cleared by using the OBD ll Scan Tool or Honda pGM Tester; be sure to remove the BACKUP fuse to reset the TCM.
BACK UP (7.5 A) FUSE
J
UNDER.HOOD
FUSE/RELAY BOX
. Final Procodurs
NOTE: This procedure must be done after any trou bleshooting.
1. Turn the ignition switch OFF.
2. Reset the TCM.
3. Disconnect the OBD ll Scan Tool or Honda PGM Tester from the Data Link Connector, or remove the sDecial tool fromthe Service Check Connector.
4. Turn the ignition switch ON (ll), and set the radio presets and clock setting.
14-53