HONDA INTEGRA 1998 4.G Workshop Manual
Manufacturer: HONDA, Model Year: 1998, Model line: INTEGRA, Model: HONDA INTEGRA 1998 4.GPages: 1681, PDF Size: 54.22 MB
Page 741 of 1681
- Hub Bearing Unit
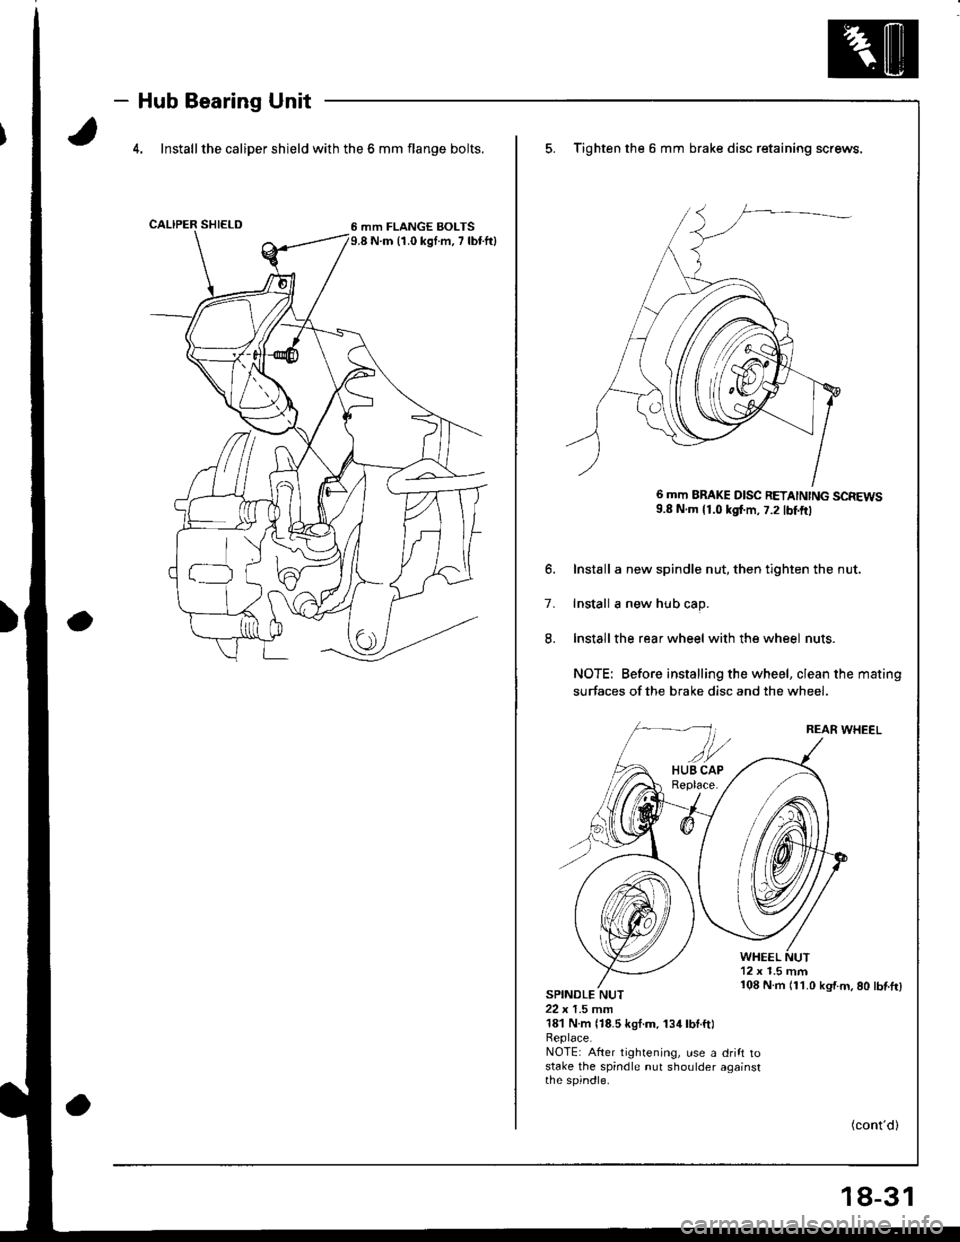
4. Install the caliper shield with the 6 mm flange bolts.
6 mm FLANGE BOLTS9.8 N.m 11.0 kgI.m, 7 lbr.ftl
5. Tighten the 6 mm brake disc retaining screws,
6 mm BBAKE D|SC RETA|NTNG SCREWS9.8 N.m 11.0 kgf.m, 7.2 tbtftl
6. Install a new spindle nut, then tighten the nut.
7. Install a new hub cap.
8. Install the rear wheel with the wheel nuts.
NOTE: Before installing the wheel, clean the mating
surfaces of the brake disc and the wheel.
REAR WHEEL
WHEEL12 x 1.5 mm
SPINDLE NUT22 x 1.5 mm181 N.m {18.5 kgt.m. 134lbl.ftl
108 N.m 111.0 kg'f.m.80 lbf.tr)
Beplace.NOTE: After tightening, use a drift tostake the spindle nut shoulder againstthe spindle.
(cont'd)
18-31
Page 742 of 1681
Rear Suspension
Suspension Arms (cont'dl
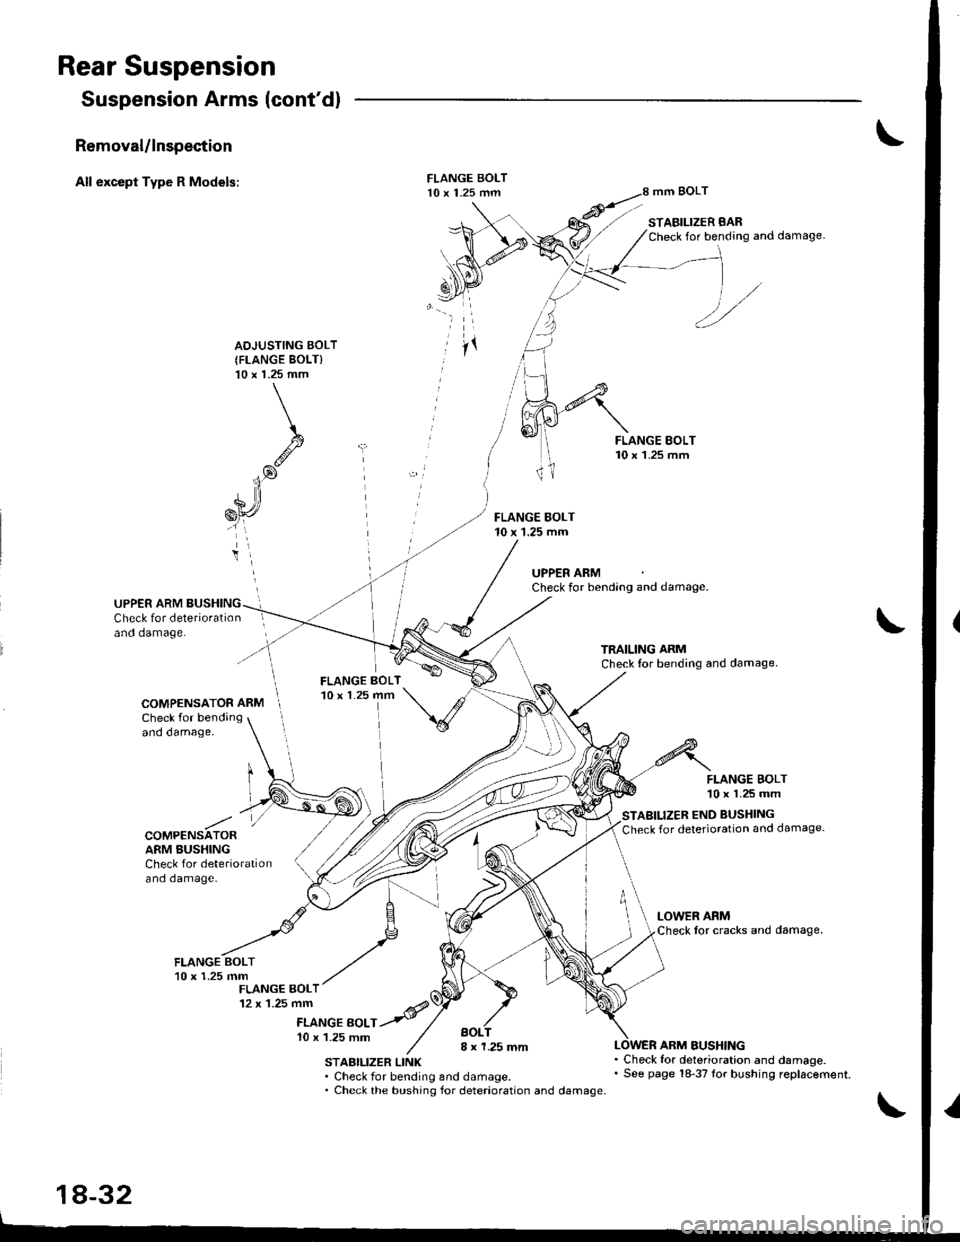
Removal/lnspection
All except Type R Models:mm BOLT
STABILIZER BARCheck for bending and damage.
AOJUSTING BOLT(FLANGE BOLT)'10 x 1.25 mm
FLANGE BOLT10 x 1.25 mm
UPPER ARMCheck for bending and damage.
UPPER ARM BUSHINGCheck for deteriorationand damage.
COMPENSATOR ARMCheck for bendingand damage,
FLANGE BOLT'10 x 1.25 mm
STABILIZER END BUSHING
Check for deterioration and damage.COMPENSATORARM BUSHINGCheck for deteriorationand damage-
FLANGE EOLTl0 x 1.25 mmBOL8 x 1.25 mmSTABILIZER LINK. Check for bending and damage.. Check the bushing for deterioration and damage.
ARM BUSHING
18-32
. Check for deterioration and damage.. See page 18-37Ior bushing replacement.
Page 743 of 1681
)
)
Removal/lnspection
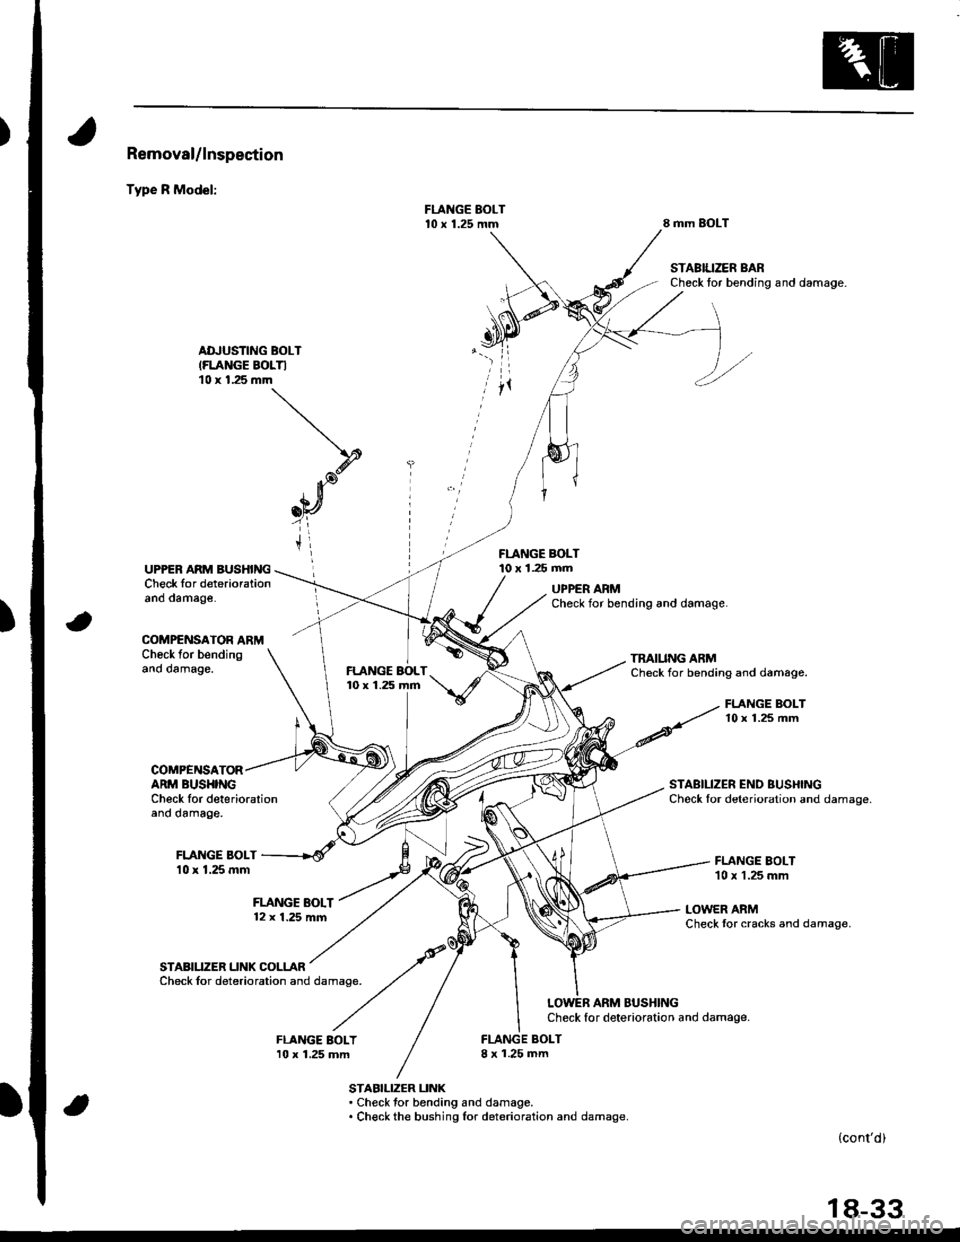
Type R Model:
8 mm SOLT
STABIUZER BARCheck tor bending and damage.
ADJUSTING BOLT(FLANGE BOLTI10 x 1.25 mm
FLANGE BOLT10 x 1.25 mmUPPER ARM BUSHINGCheck for deteriorationano oamage.UPPER ARMCheck for bending and damage.
COMPENSATOR ARMCheck for bendingano oamage,TMIUNG ARMCheck for bending and damage.
COMPENSATORARM BUSHINGCh6ck Ior deteriorationano oamage.
FLANGE BOLT10 x 1.25 mm
STABILIZER END BUSHINGChock lor deterioration and damage.
FLANGE BOLT10 x 1.25 mm
LOWER ARMCheck tor cracks and damage.
STABIUZER UNK COLLARCheck for deterioration and damage.
LOWEB ARM BUSHINGCheck for deterioration and damage.
BOLTI x 1.25 mm
STABILIZER UNK. Check tor bending and damage.. Check the bushing lor deterioration and damage.
(cont'd)
18-33
10 x 1.25 mm
Page 744 of 1681
Rear Suspension
Suspension Arms (cont'dl
Installation
CAUTION: Any bolB or nuts connected to rubber mounts or bushings should be tightened with the vehicl. on th6
ground.
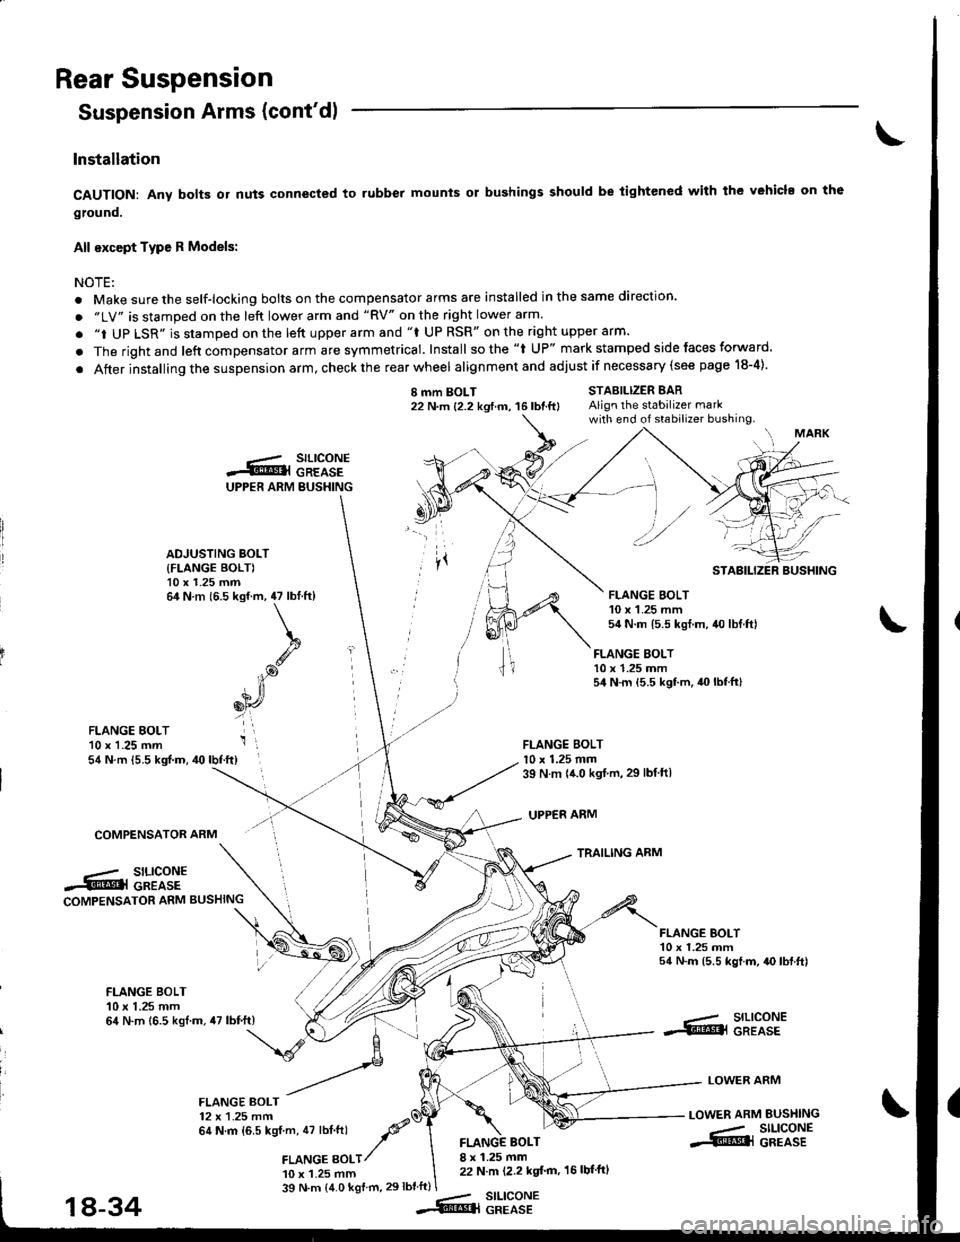
All except Type R Models:
NOTEi
. Make sure the self-locking bolts on the compensator arms are installed in the same direction.
. "LV" is stamped on the left lower arm and "RV" on the right lower arm.
. "i UP LSR" is stamped on the lett upper arm and "f UP RSR" on the right upper arm.
. The rightand left compensator arm are symmetrical. Install sothe "l UP" mark stamped side faces forward.
. After installing the suspension arm, check the rear wheel alignmentand adjust if necessary (see page 18-4).
I mm BOLT22 N.m {2.2 kgtm, 16lbtft}STABILIZER BARAlign the stabilizer markwith end of stabilizer bushing.
FLANGE BOLT10 x 1.25 mm54 N.m {5.5 kgf.m.40lbtft}
FLANGE BOLTl0 x 1.25 mm39 N m {{.0 kgt.m,29 lbtftl
UPPER ARM
TRAILING ARM
FLANGE EOLT'10 x 1.25 mm54 N.m {5.5 kgf.m, 40lbf.ft}
COMPENSATOR ARM
.-/ SILICONE.5tr@l GREASECOMPENSATOR ARM BUSHING
FLANGE BOI-T10 x 1.25 mm54 N.m (5.5 kgf.m, {O lbf.ft)
FLANGE BOLT10 x 1.25 mm64 N.m 16.5 kgl.m.47 lbf.ft)--- SILICONE.S!@l GREASE
LOWER ARM
LOWER ARM BUSI{ING
-- SILIGONE.S@l GREASE
FLANGE BOLT12 x 1.25 mm64 N.m {6.5 kgf m, 47 lbt.ftl -P'a
,amce gotr/
10 x 1.25 mm
BOLT8 x 1.25 mm22 N.m (2.2 kgt'm, 16 lbf'ftl
39 N.m (4.0 kgf m.29lbtft)stLtcoNEGREASE
UPPER ARM BUSHING
.-.- SILICONES@l GREASE
ADJUSTING BOLT
{FLANGE BOLT)10 x 1.25 mm64 N.m (6.5 kgf.m, 47 lbtft)
k
.g
iP
6[r,
i',
STABILIZER BUSHING
FLANGE BOLT10 x 1.25 mm54 N.m 15.5 kgt.m, 40 lbf.ftl
18-34--Rq
Page 745 of 1681
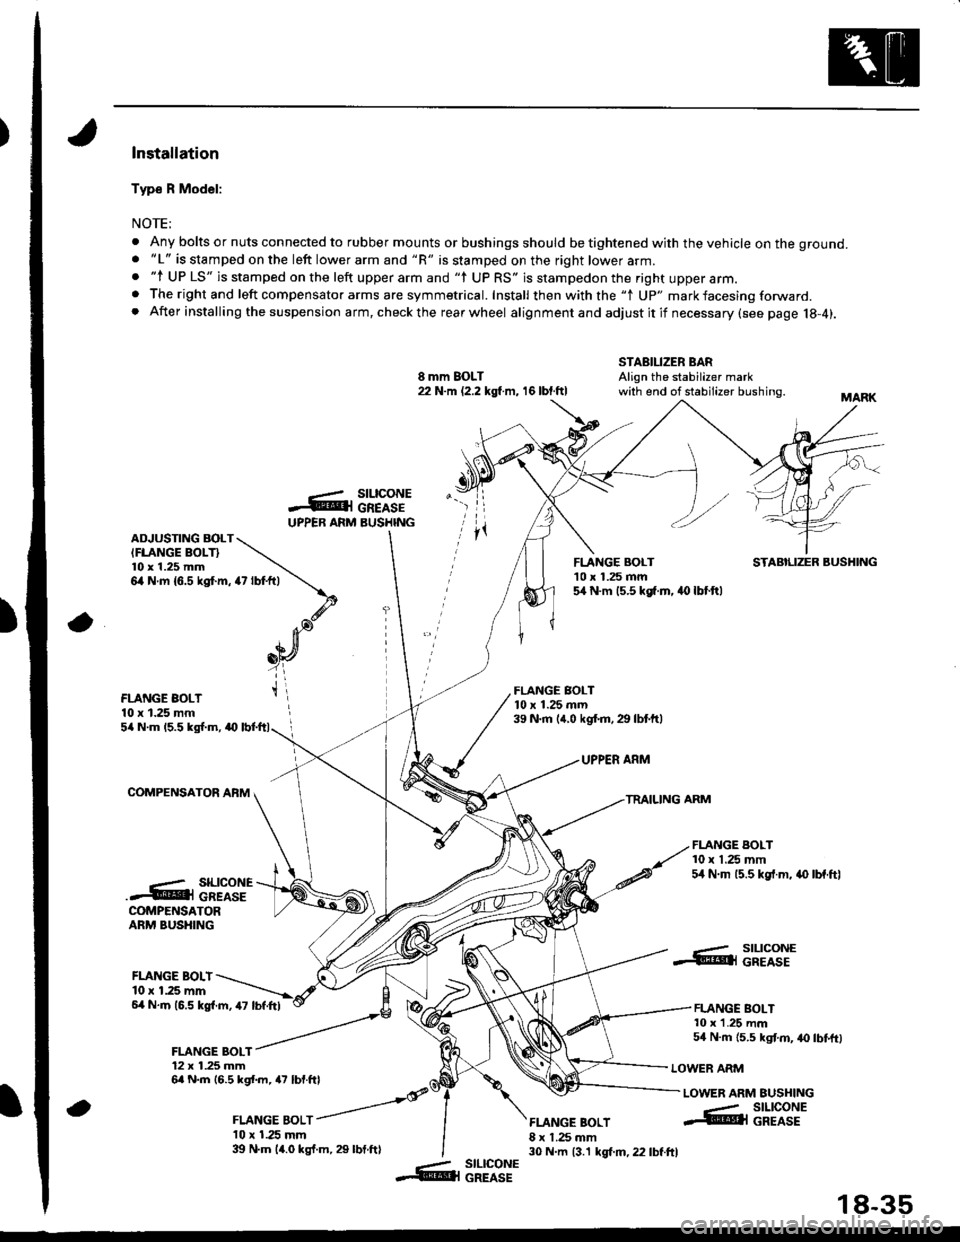
)Installation
Typ€ R Model:
NOTE;
. Any bolts or nuts connected to rubber mounts or bushings should be tightened with the vehicle on the ground.. "L" is stamped on the left lower arm and "R" is stamped on the right lower arm.. "l UP LS" is stamped on the left upper arm and "l UP RS" is stampedon the right upper arm.. The right and left compensator arms are symmetrical. Install then with the "1 Up" mark facesing forward. After installing the suspension arm, checkthe rearwheel alignmentand adjustitif necessary(see page 18-4).
8 mm BOLT22 N.m (2.2 kgl m, 16 lbt.ftl
STABILIZER BARAlign the stabilizer markwith end of stabilizer bushing.
-ArUPPEB ARM
rz tot+,t \
\.d'. Ja),n[
_oY
t\
a
stLtcoNEGREASEBUSHINGADJUSTING BOLTIFLANGE BOLT}l0 x 1.25 mm6,4 N.m {6.5 kgt m,
FLANGE BOLT'10 x 1.25 mm5,[ N.m 15.5 kg[.m. 40 lbt.ftl
STABILIZER BUSHING
FLANGE BOLT10 x 1.25 mm
FLANGE BOLT10 x 1.25 mrn39 N.m (,r.0 kgf.m.29 lbtftl5/a N.m 15.5 kgl.m, a0
COMPENSATOR AFM
UPPER ARM
TRAILING ARM
FLANGE BOLT10 x 1.25 mm54 N.m 15.5 kgf.m, .{) lbf.ftl..- SILICONE.4@i cREAsECOMPENSATORARM BUSHING
FLANGE BOLI10 r 1.25 mm6,4 N.m (6.5 kgl.m, 47 lbf.Itl
FLANGE BOLT12 x 1.25 mm6a N.m 16.5 kgl.m, a7 lbf.ftl
, ror"orr /
l0 x 1.25 mm39 N.m 14.0 kgf.m, 29 lbt.ftl
FLANGE BOLT8 x 1.25 mm30 N.m 13.1 kgt m, 22 lbf.ftl
..- SILICONE.@ll GREASE
FLANGE BOLT10 x 1.25 mm54 N.m {5.5 kgt m, 40 lbtftl
LOWER ARM
LOWER ARM EUSHING
a
--- SILICONE@l GREASE
-- slLlcoNE&l GREASE
18-35
Page 746 of 1681
L
I
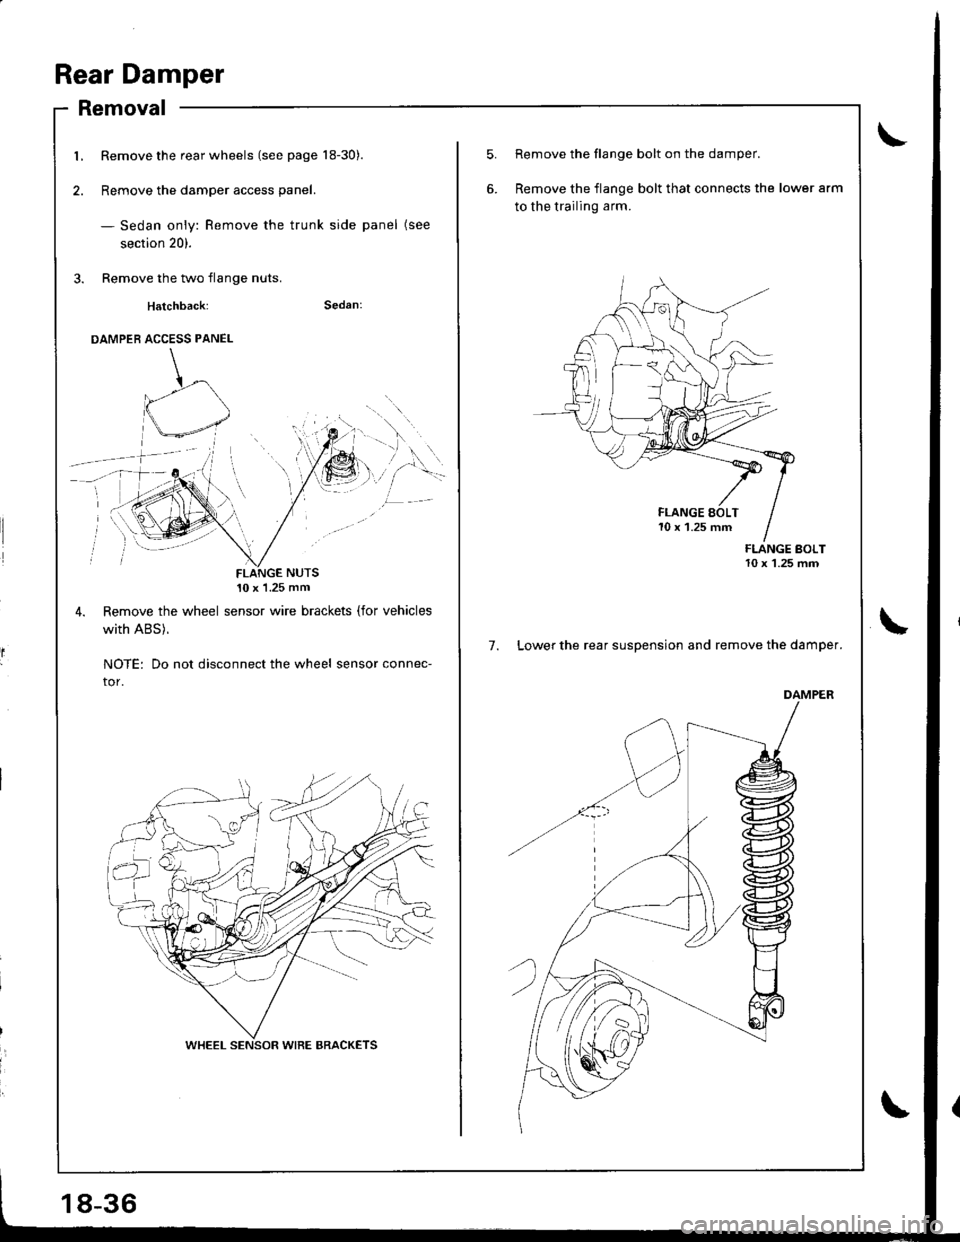
Rear Damper
Removal
Remove the rear wheels (see page 18-30).
Remove the damper access panel.
- Sedan only: Remove the trunk side panel (see
section 20).
Remove the two flange nuts.
Hatchback:
DAMPER ACCESS PANEL
10 x'1.25 mm
Remove the wheel sensor wire brackets (for vehicles
with ABS).
NOTE: Do not disconnect the wheel sensor connec-
tor.
18-36
5.Remove the flange bolt on the damper.
Remove the flange bolt that connects the lower arm
to the trailing arm.
7. Lower the rear suspension and remove the damper.
DAMPER
\
Page 747 of 1681
Disassembly/lnspection
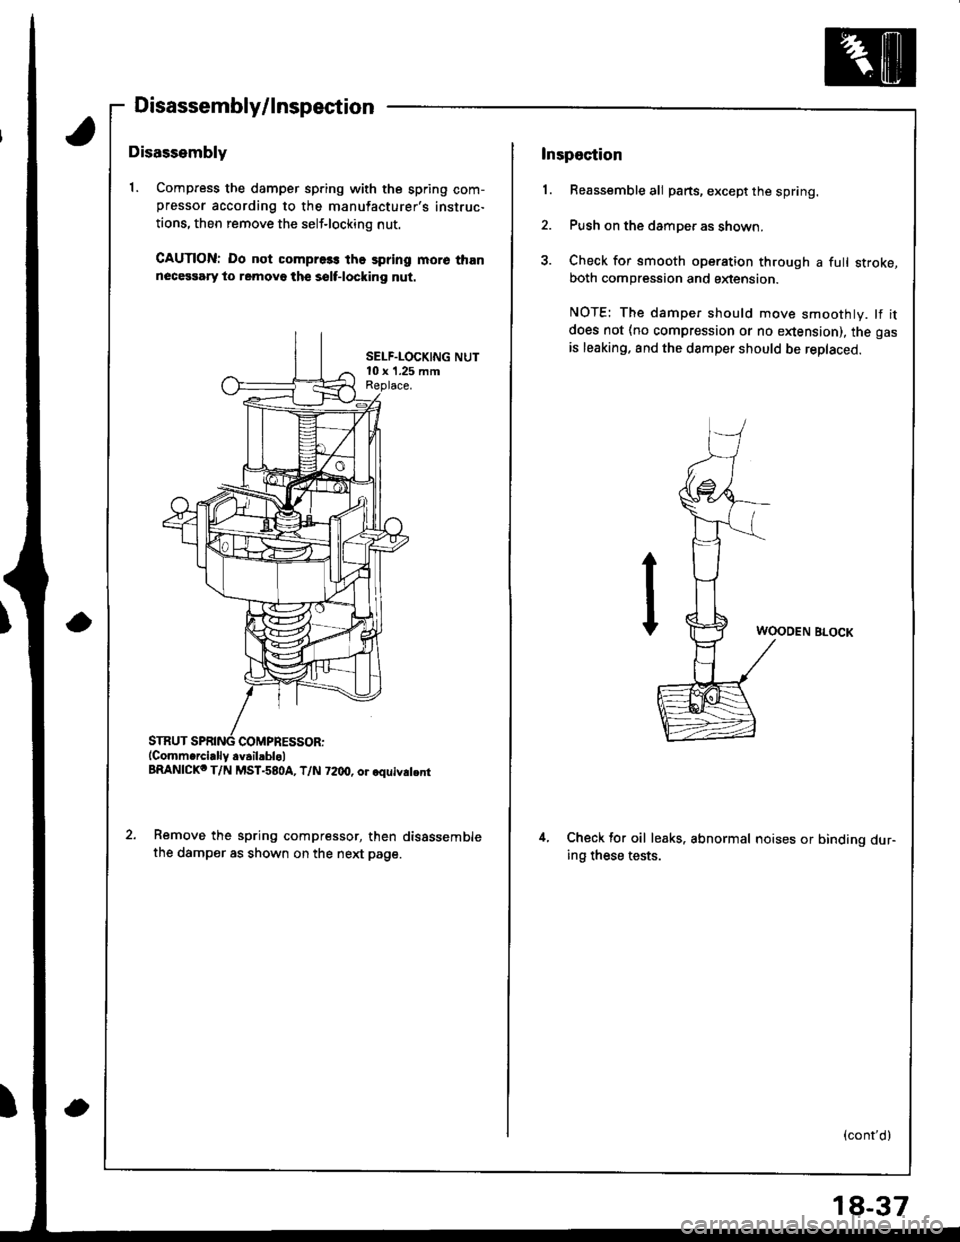
Disassembly
1. Compress the damper sp.ing with the spring com-pressor according to the manufacturer's instruc-
tions, then remove the self-locking nut.
CAUTION: Do not compre3s the spring more thannecessary to removo th€ sslf-locking nut.
SELF.LOCKING NUT10 x '1.25 mmReplace.
COMPRESSOR:(Comm.rcially.v.il.blol
BRANICKo T/N MST-580A, T/N 72dt, or.quiv.t.nr
Remove the spring compressor, then disSssemble
the damper as shown on the next page.
Inspection
1. Reassemble all parts, except the spring.
2. Push on the damper as shown.
3. Check for smooth operation through a full stroke,both compression and sxtension.
NOTE: The damper should move smoothly. lf it
does not (no compression or no enension), the gas
is leaking. and the damper should be replaced.
WOODEN BLOCK
4.Check tor oil leaks. abnormal noises or binding dur-ing these tests.
(cont'd)
18-37
Page 748 of 1681
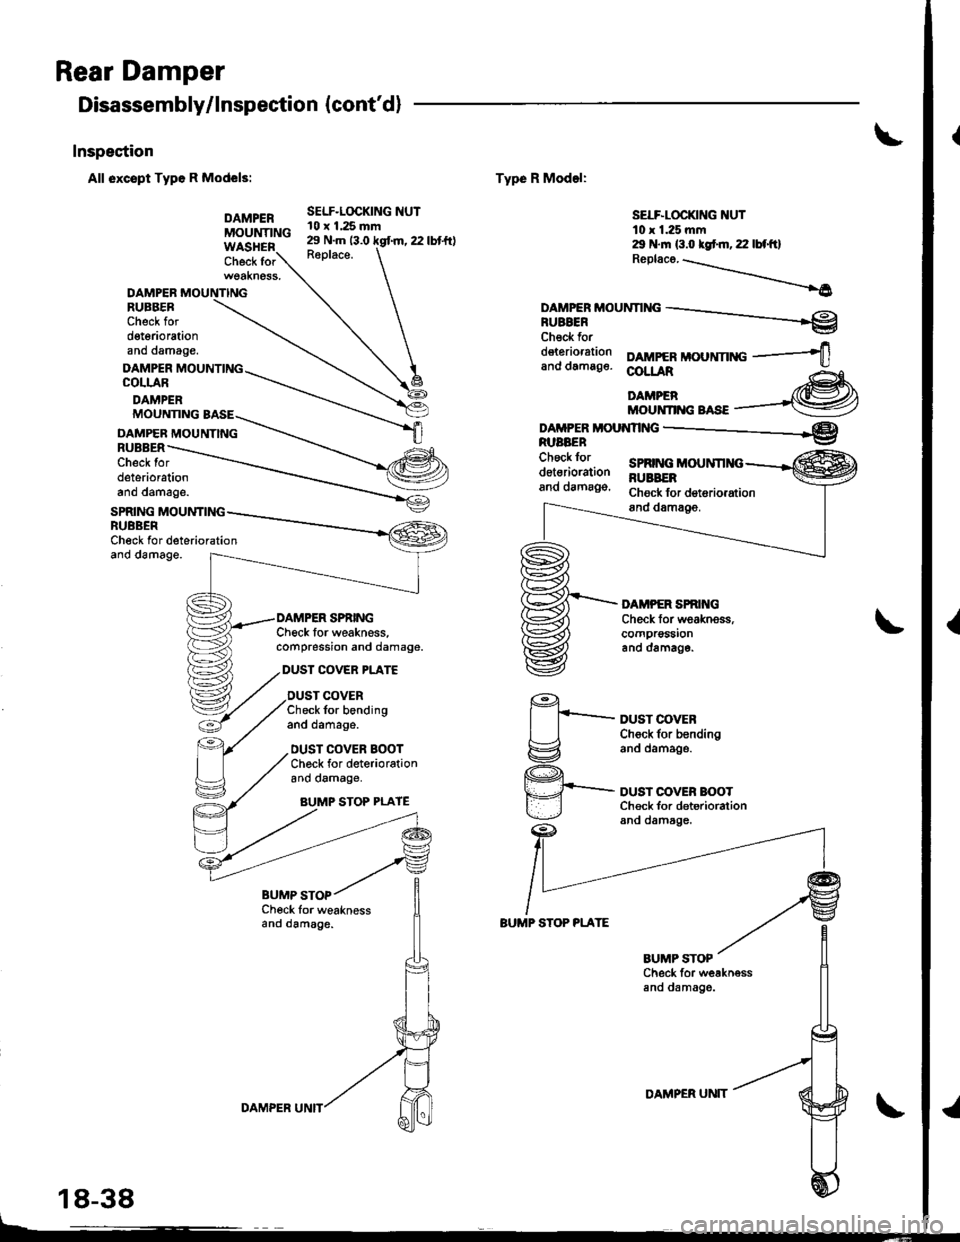
Rear Damper
Disassembly/lnspection {cont'd}
Inspestion
All oxcspt Typo R Models:
DAMPERMOUNTING
Check for
Check Ior weaknessand damag6.
DAMPERRUEBERCheck ford€t6riorationano damage.
DAMPER MOUNTINGCOLLAR
DAMPER
SELF.LOCKING NUT10 x 1.25 mm29 N.m 13.0 kgf.m, 22 lbt'ft)R6place.
Type R Model:
BUMP STOP PLATE
SELF-LOCKING NUTt0 r 1.25 mm29 N.m (3.o kgt m, 22 lbf'ft)Rep|aco. -.\-.--...\
_____6
DAMPTRMoUNnNG -.-__re
Check fordeterioration DAMPERMOUNnNG -----+,and damag6. @L!AR Ag-
liillffi*"*,--@
DAMPTR MoU.{nNG __-_____*e
DUST COVEBCh6ck for b€ndingand oamage.
DUST OOVER BOOTCh€ck for deterioralionand damage.
MOUNNNG BASE
DAMPEB MOUNTINGRUBBERCheck lordeteriorationano oamage.
SPRING MOUNTINGRUBBERCheck for deteriorationano oamage.
Check for weakness,compression and damage.
DUST COVER PLAT€
DUST COVERCheck for bendingano oamage.
DUST COVER BOOTChock for deteriorationano oamage,
AUMP STOP PLAYE
1€')
I t_--tlg:z
q._
Y
Check for weaknessand damage.
BUMP STOP
18-38
DAMPER UNTTDAMPER UN]T
Page 749 of 1681
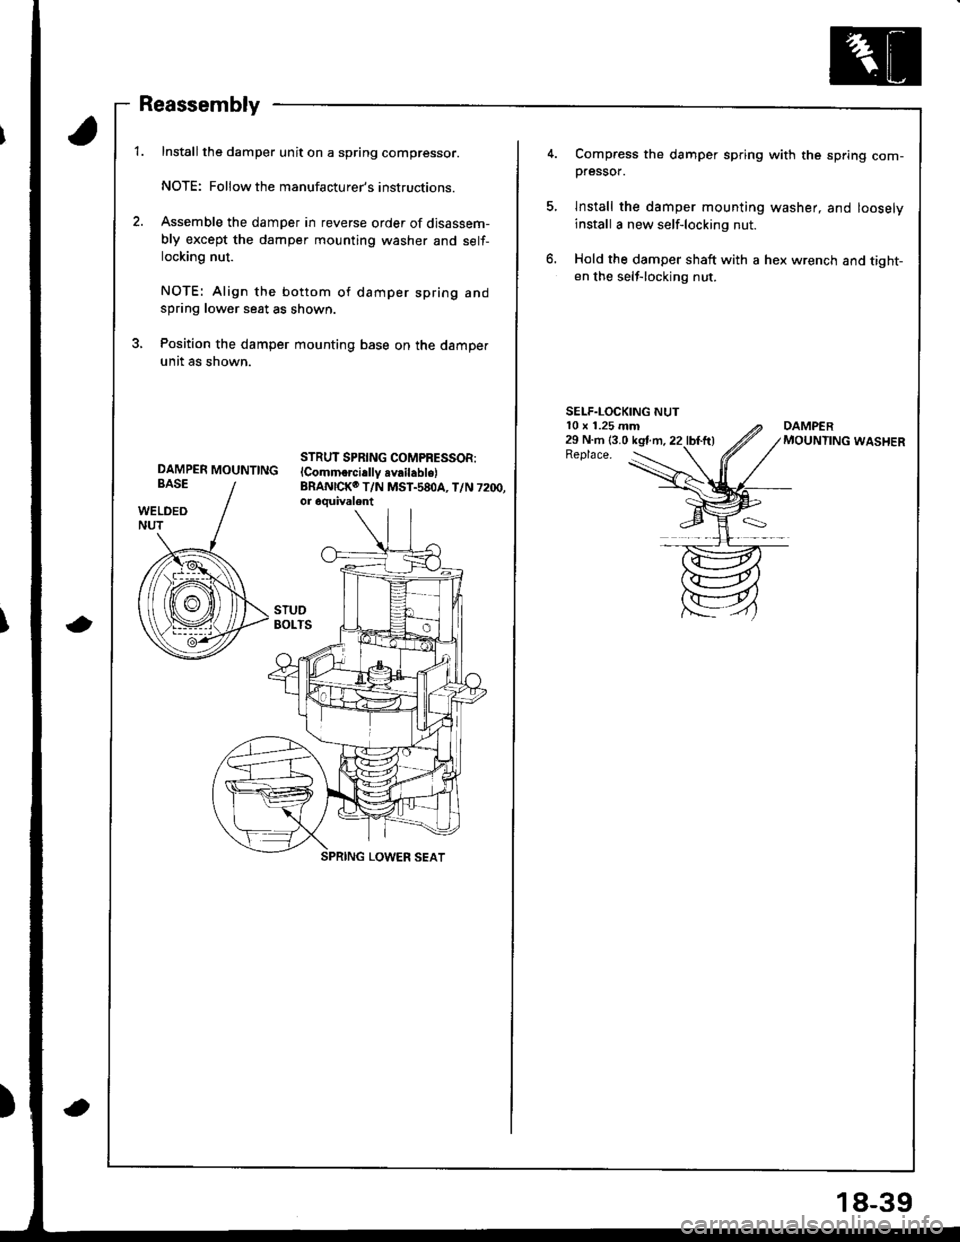
Reassembly
Installthe damper unit on a spring compressor.
NOTE: Followthe manufacturer's instructions.
Assemble the damper in reverse order of disassem-
bly except the damper mounting washer and self-locking nut.
NOTE: Align the bottom of damper spring andspring lower seat as shown.
Position the damper mounting base on the damper
unit as shown.
STRUT SPRING COMPRESSOR:lComm.rci.llv availabls)BRANICKO T/N MST.58OA, T/N 7200,or oquivalent
DAMPER MOUNTTNG
a
a
18-39
Compress the damper spring with the spring com-pressor.
lnstall the damper mounting washer, and loosely
install a new self-locking nut.
Hold the damper shaft with a hex wrench and tight-en the self-locking nut.
SELF.LOCKING NUT10 x 1.25 mm29 N.m (3.0 kstm.22 lbl.ft)Replace.
Page 750 of 1681
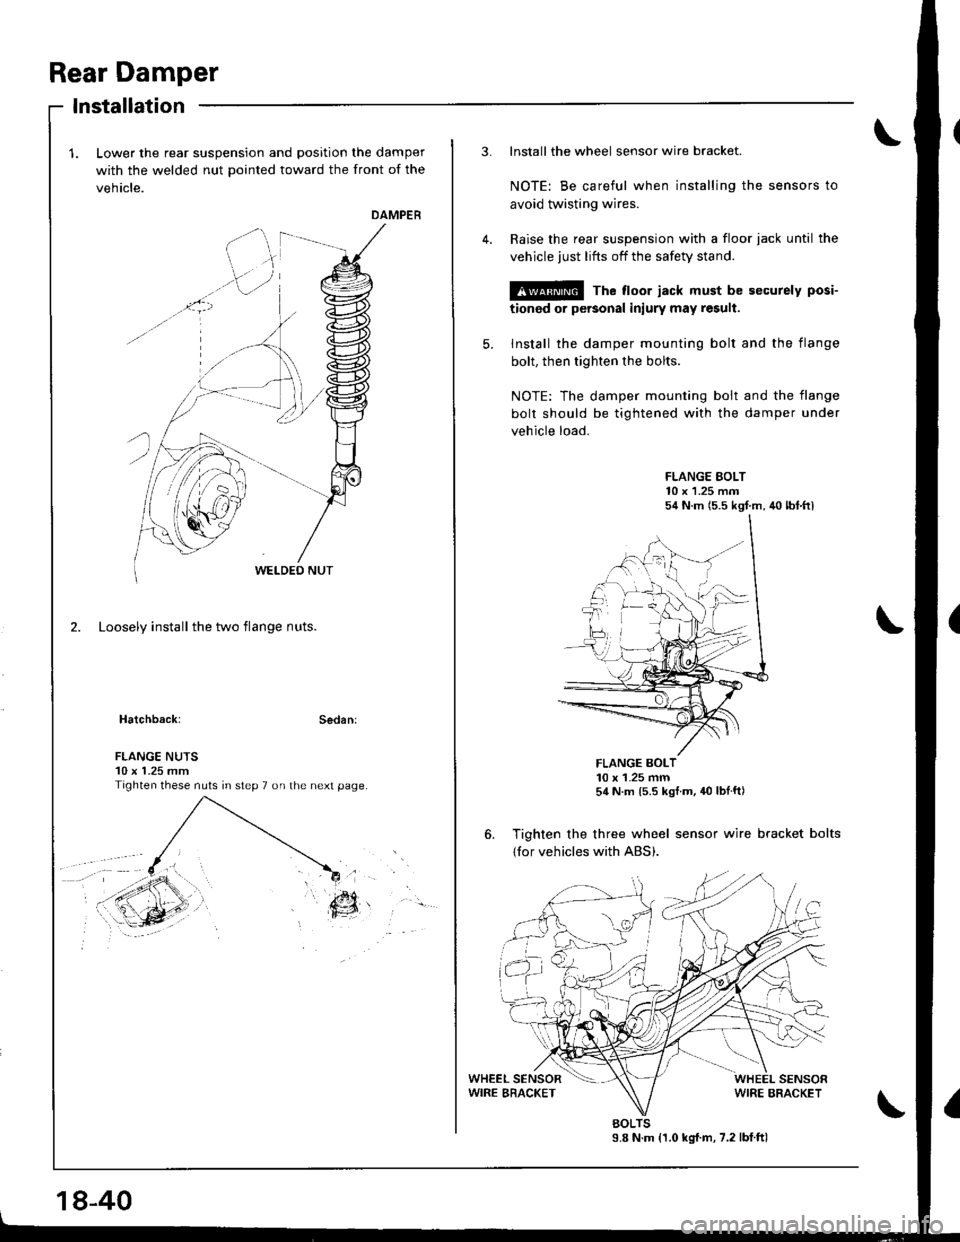
Rear Damper
Lower the rear suspension and position the damper
with the welded nut pointed toward the front of the
vehicle.
DAMPER
2. Loosely install the two flange nuts.
Hatchback:Sedan:
lnstallation
. ',.?7,:..r9\,ir '..
EY
FLANGE NUTS10 x 1.25 mmTighten these nuts in step 7 on the next page.
18-40
3. Install the wheel sensor wire bracket.
NOTE: Be careful when installing the sensors to
avoid twisting wires.
Raise the rear suspension with a floor iack until the
vehicle just lifts off the safety stand.
@ The floor jack must be securely posi-
tionod or personal iniury may result.
5. Install the damper mounting bolt and the flange
bolt, then tighten the bolts.
NOTE: The damper mounting bolt and the flange
bolt should be tightened with the damper under
vehicle load.
FLANGE EOLT10 x 1.25 m.n54 N.m (5.5 kgf m, 40 lbt.ftl
FLANGE BOLT10 x 1-25 mm54 N.m ls.s kgf m, 40 lbtft)
6. Tighten the three wheel sensor wire bracket bolts
{for vehicles with ABS).
9.8 N.m {1.0 kg{.m, 7.2 lbtftlBOLTS