HONDA INTEGRA 1998 4.G Workshop Manual
Manufacturer: HONDA, Model Year: 1998, Model line: INTEGRA, Model: HONDA INTEGRA 1998 4.GPages: 1681, PDF Size: 54.22 MB
Page 711 of 1681
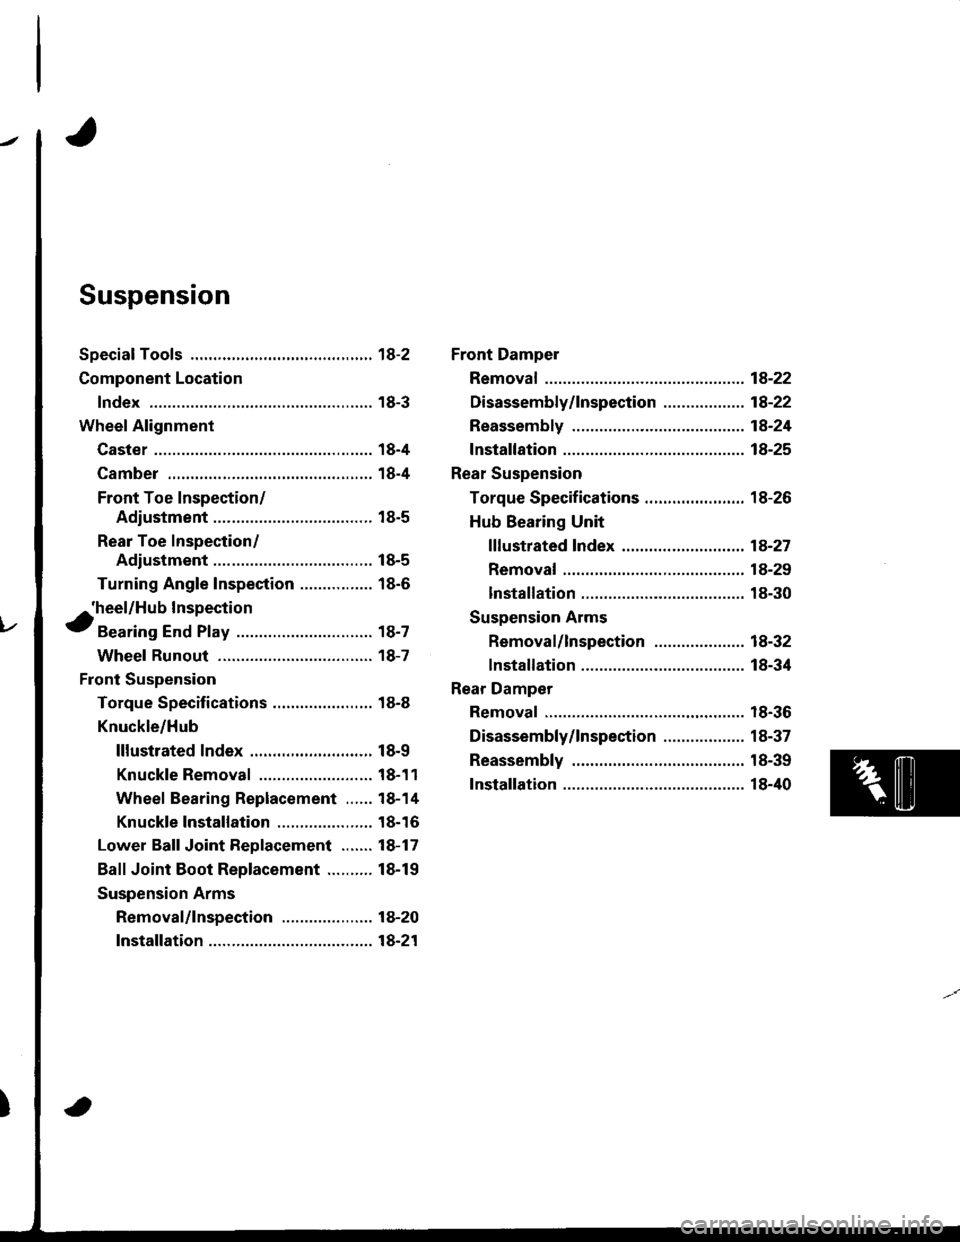
Suspension
Special Tools ............. 18-2
Component Location
lndex ................ ...... 18-3
Wheel Alignment
Caster ............... ...... 18-4
Camber .................. 18-4
Front Toe Inspection/
Adjustment ........ 18-5
Rear Toe Inspection/
Adiustment ........ 18-5
Turning Angle Inspection ................ 18-6
^'heel/Hub Inspection
tBearing End Play .............................. 18-7
Wheel Runout ....... 18-7
Front Suspension
Torque Specifications ...................... 18-8
Knuckle/Hub
lllustrated lndex .........,................. 18-9
Knuckle Removal ......................... 18-11
Wheel Bearing Replacement ...... 18-14
Knuckle 1nsta11ation ..................... 18-16
Lower Ball Joint Replacement ....... 18-17
Ball Joint Boot Replacement .......... 18-19
Suspension Arms
Removal/lnspection .................... 18-20
lnstallation ......... 18-21
Front Dampel
Removal ................. 18-22
Disassembly/lnspection ............. ..... 18-22
Reassembly ........... 18-24
fnstaffation ............. 1A-25
Rear Suspension
Torque Specifications ...................... 18-26
Hub Bearing Unit
f f f ustrated lndex ................ ........... 18-27
Removal ............. 18-29
lnstallation ......... 18-30
Suspension Arms
Removal/lnspection .................... 18-32
lnstallation ......... 18-34
Rear Damper
Removal ................. 18-36
Disassembly/lnspection .................. 18-37
Reassembly ........... 18-39
Installation ............. 18-40
Page 712 of 1681
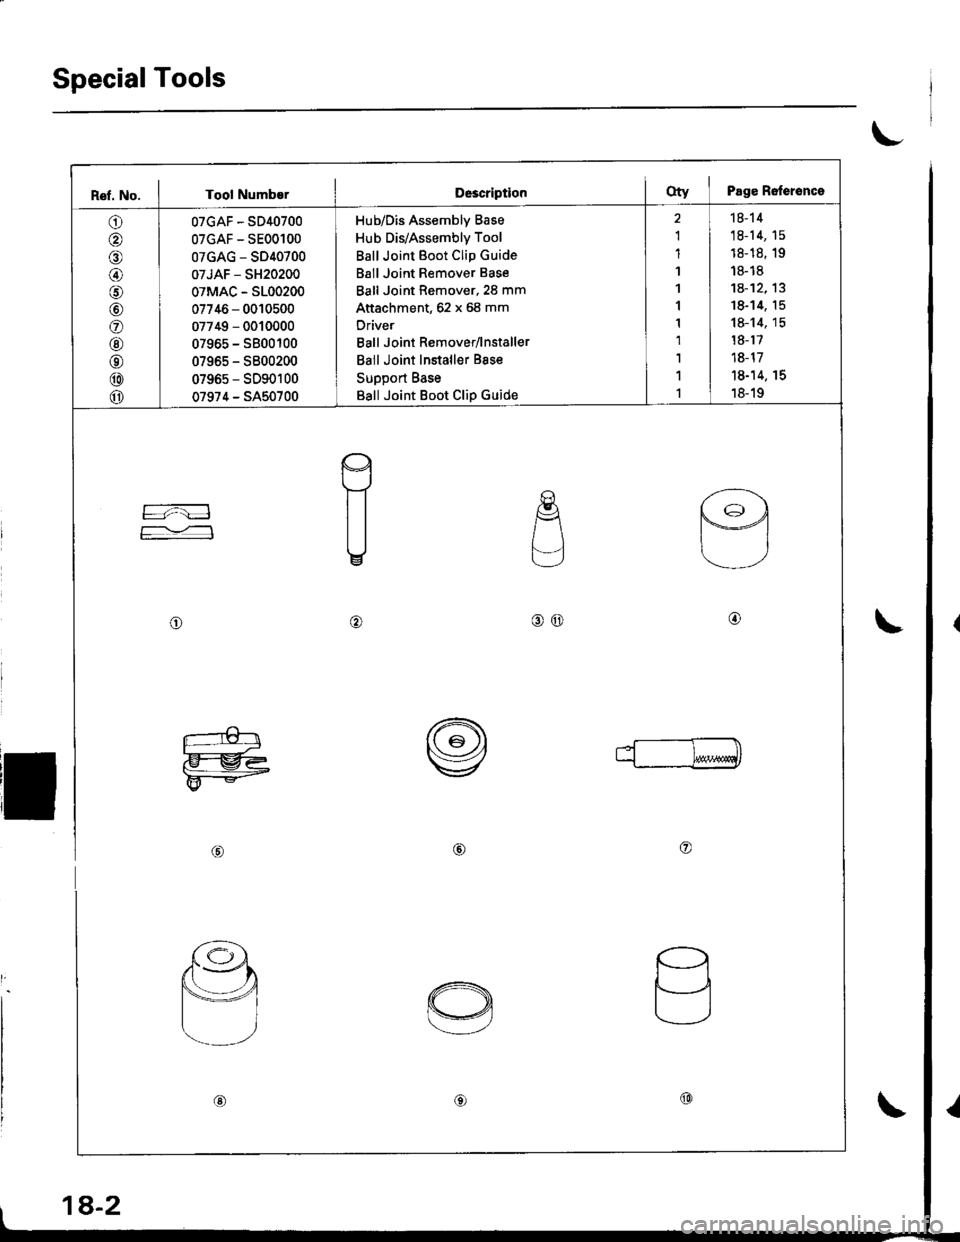
SpecialTools
t
Ref. No. I Tool Numb€rD63criptionoty I Page Relerence
O I oTcAF-sD4o7oo
@ | oTGAF-sEooloo
O I 0TGAG-sD4o7oo
@ 0TJAF - sH2o2oo
O I oTMAc - sLoo2oo
O | 07746 - oolosoo
@ | 07749-ooloooo
@ | 07965-sBooloo
@ | 0796s-sBoo2oo
@ I 07965-sDgo1oo
o 07974 - SA50700
Hub/Dis Assembly Base
Hub Dis/Assembly Tool
Ball Joint Boot Clip Guide
Ball Joint Remover Base
Ball Joint Remover,2S mm
Attachment, 62 x 68 mm
Oriver
Ball Joint Remover/lnstaller
Ball Joint Installer Bsse
Support Base
Ball Joint Boot Clip Guide
2 | 18-14
1 | 18-14, 15
1 | 18-1s, 1e
1 | r8-r8
1 I 1A-12.13
1 18-14. 15
1 I 18-14, 15
r I r8-r7
1 | 18-17
r | 18-14. rs
r I 18-19
re
F=:
E
.E{
L-]
o@
I
o@@
L-€tr
F@
rr--ml
@@o
d sJ4.'
Y@
a
ti
@€)@
1A-2
Page 713 of 1681
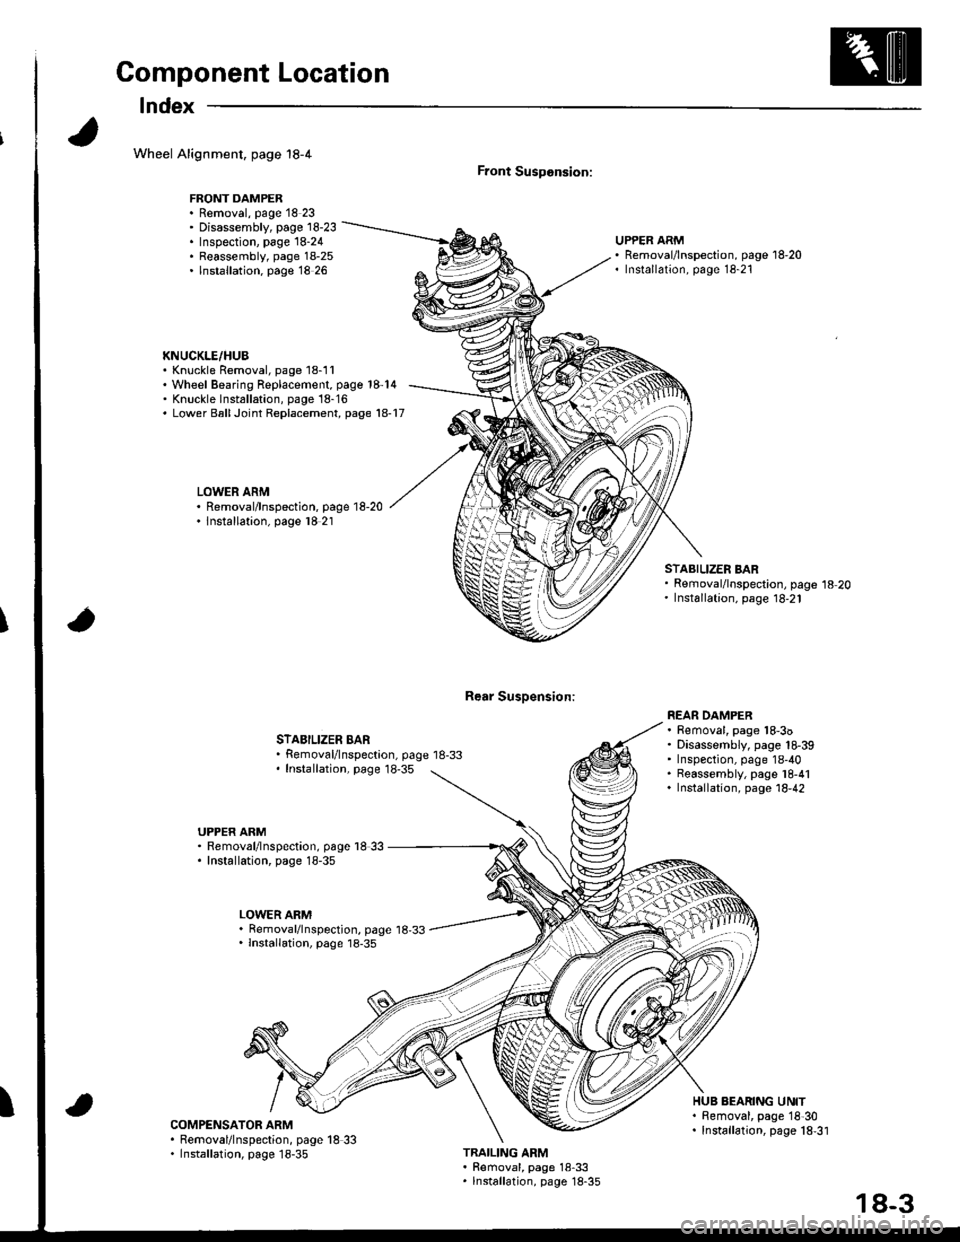
Component Location
lndex
Wheel Alignment, page 18-4
FRONT DAMPER. Removal, page 18 23' Disassembly, page 18-23. Inspection, page 18-24. Reassembly, page 18-25. lnstallation. page 18 26
KNUCKLE/HUB. Knuckle Removal, page 18-11'Wheel Bearing Replacement, page 18-14' Knuckle lnst6llation, page 18-16. Lower BallJoint Replacement, page 18-17
LOWER ARM. Removal/lnspection, page 18-20. lnstallation, page l8 21
Front SusDonsion:
Rear Susoension:
UPPER ARMRemoval/lnspection, page 18-20Installation, page 18-21
STABILIZER BARRemoval/lnspectaon, page 18-33Installation, page 18-35
STABILIZER BARRemoval/lnspection, page 18-20Installation, page 18,21
REAR DAMPER. Removal, page 18-3o. Disassembly, page 18-39' Inspection, page 18-40. Reassembly, page l8-41. Installation, page 18,42
UPPER ARM. Removal/lnspection, page l8 33. Installation, page 18-35
LOWER ARM. Removal/lnspection, page 18,33. lnstallation, page 18-35
ICOMPENSATOR ARM. Removal/lnspection, page 18 33. Installation, page 18-35
HUB BEARING UNIT. Bemoval, page 18'30. Installation, page 18,31
TRAILING ARM. Removal, page 18-33. lnstallation, page 18-35
18-3
Page 714 of 1681
Wheel Alignment
Caster
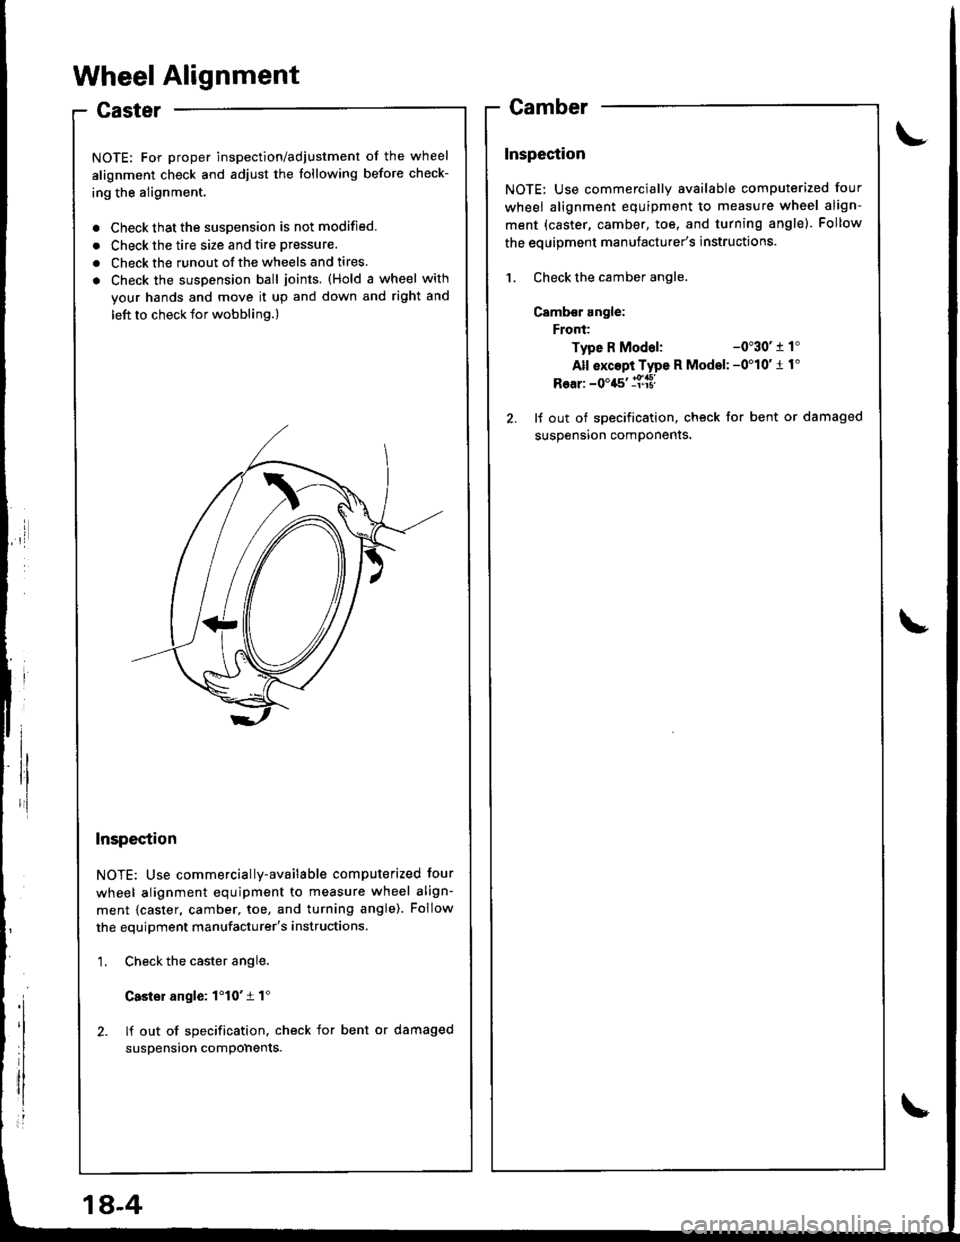
NOTE: For proper inspection/adjustment of the wheel
alignment check and adjust the following before check-
ing the alignment.
. Check that the susoension is not modified.
. Check the tire size and tire pressure.
. Check the runout of the wheels and tires.
. Check the suspension ball joints. (Hold a wheel with
your hands and move it up and down and right and
left to check tor wobbling.)
Inspection
NOTE: Use commercially-available computerized four
wheel alignment equipment to measure wheel align-
ment {caster, camber, toe, and turning angle). Follow
the equipment manufacturer's instructions.
1. Check the caster angle.
Casler angle: 1'10't 1"
2. lf out of specification. check for bent or damaged
suspension compohents.
Camber
Inspection
NOTE: Use commercially available computerized four
wheel alignment equipment to measure wheel align-
ment (caster, camber, toe, and turning angle). Follow
the eouioment manufacturer's instructions.
1. Check the camber angle.
Camb€r angle:
Front:
Type R Modal:-0"30' r 1'
All exc6pi Type R Model: -0'10'1 1"
Rear: -0'45' ll['a8l
2. lf out of specification, check for bent or damaged
susoension comDonents.
1A-4
Page 715 of 1681
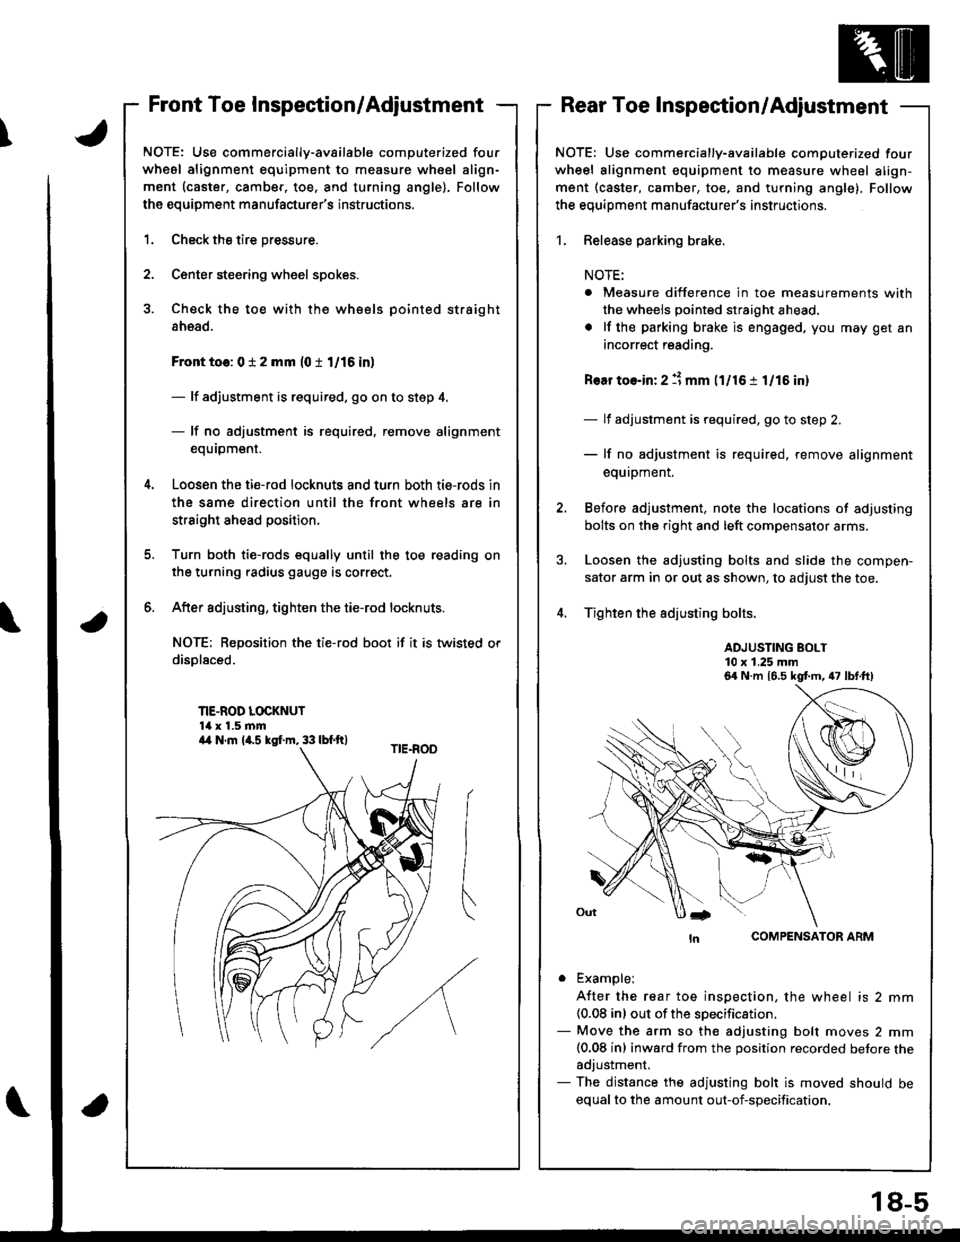
\
Front Toe Inspection/AdjustmentRear Toe Inspection/Adjustment
NOTE: Use commercially-available computerized four
whesl alignment equipment to measure wheel align-
ment (caster, camber, toe. and turning angle). Follow
the equipment manufacturer's instructions.
1.
2.
Check the tire pressure.
C€nter steering wheel spokes.
Check the toe with the wh€els pointed straight
ahead.
Front to6: 0 i 2 mm (0 t 1/16 in)
- lf adjustment is required. go on to step 4.
- lf no adjustment is required, remove alignment
equrpm€nr,
Loosen the ti€-rod locknuts and turn both tie-rods in
the same direction until the front wheels are in
straight ahead position.
Turn both tie-rods equally until the toe reading on
the turning radius gauge is correct.
After sdjusting, tighten the tie-rod locknuts.
NOT€: Reposition the tie-rod boot if it is twisted or
displaced.
TIE-ROD LOCKNUT14 x 1.5 mm
6.
a
NOTE: Use commercially-available computerized four
wheel alignment equipment to measure wheel align-
ment (caster, camber, toe, and turning angle), Follow
the equiDment manufacturer's instructions.
1. Release parking brake.
NOTE:
. Measure difference in toe measurements with
the wheels pointed straight ahead.
. lf the parking brake is engaged. you may get an
incorrect reading.
Rear toe-in: 2 11 mm l1l16 i 1/15 in)
- lf adjustment is required, go to step 2.
- lf no adjustment is required, remove alignment
equipment.
Before adjustment, note the locations of adjusting
bolts on the right and left compensator arms.
Loosen the adjusting bolts and slide the compen-
sator arm in or out as shown, to adjust the toe.
Tighten the adjusting bolts.
ADJUSTING BOLT10 x 1.25 mm
COMPENSATOR ARM
. Example;
A{ter the rear toe inspection, the wheel is 2 mm(0.08 inl out of the soecification.- Move the arm so the adjusting bolt moves 2 mm(0.08 inl inward from the position recorded betore theadjustment.- The distance the adjusting bolt is moved should be
equal to the amount out-of-specification.
6a N.m 16.5 kgt m, 47 lbt.ft)
a4 N.m la.s kgI.m, 33 lbf.ft)
18-5
Page 716 of 1681
l,
Wheel Alignment
Turning Angle Inspection
NOTE: Use commercially-available computerized four
wheel alignment equipment to measure wheel align-
ment (caster, camber, toe, and turning angle). Follow
the equioment manufacturer's instructions.
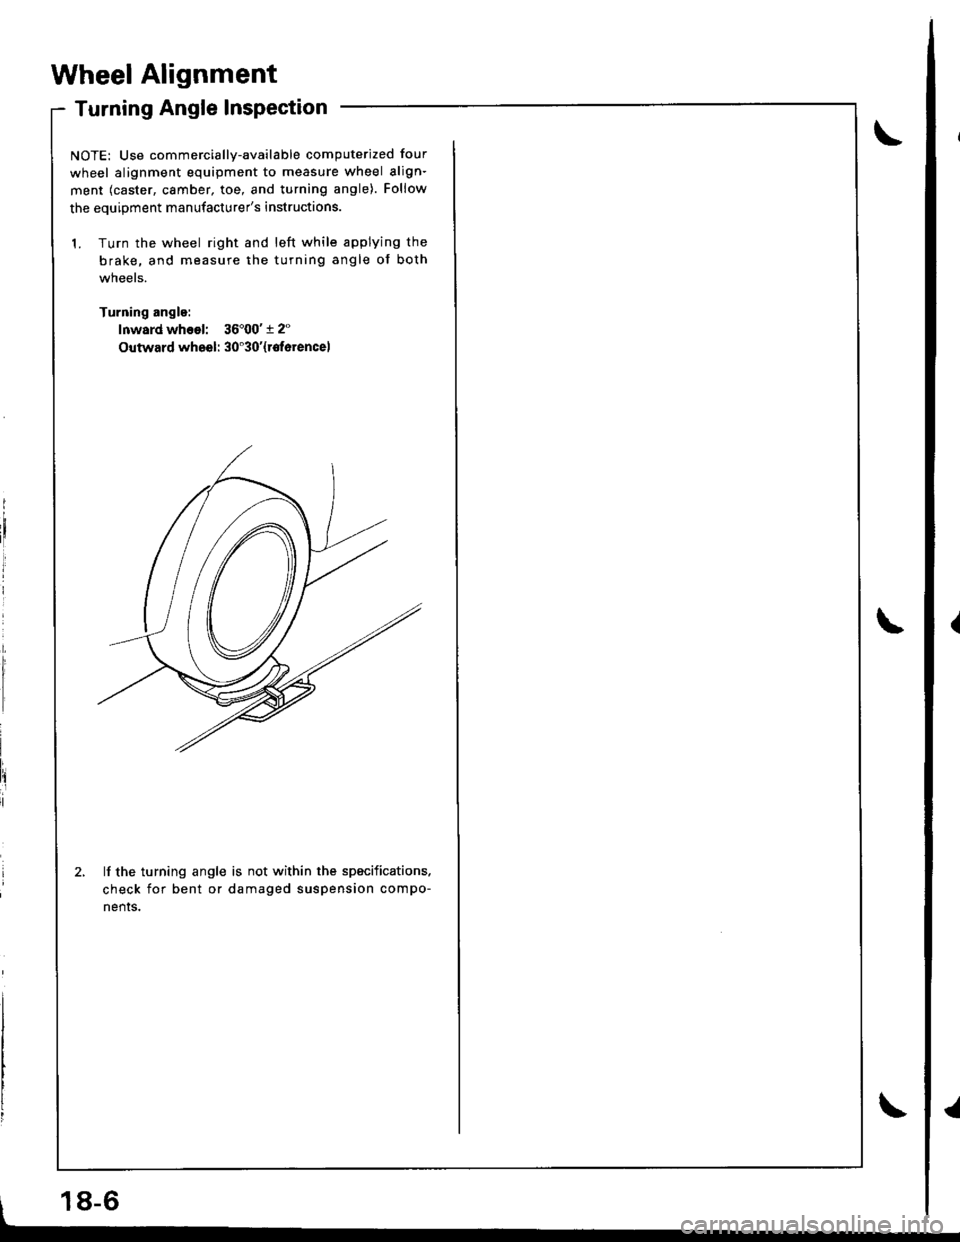
1. Turn the wheel right and left while applying the
brake, and measure the turning angle of both
wneels.
Turning angle:
lnward whsol: 36'00't 2"
Outward wheel: 30'30'{rotorencel
lf the turning angle is not within the specifications.
check for bent or damaged suspension compo-
nenrs.
18-6
Page 717 of 1681
Wheel/Hub Inspection
Bearing End Play
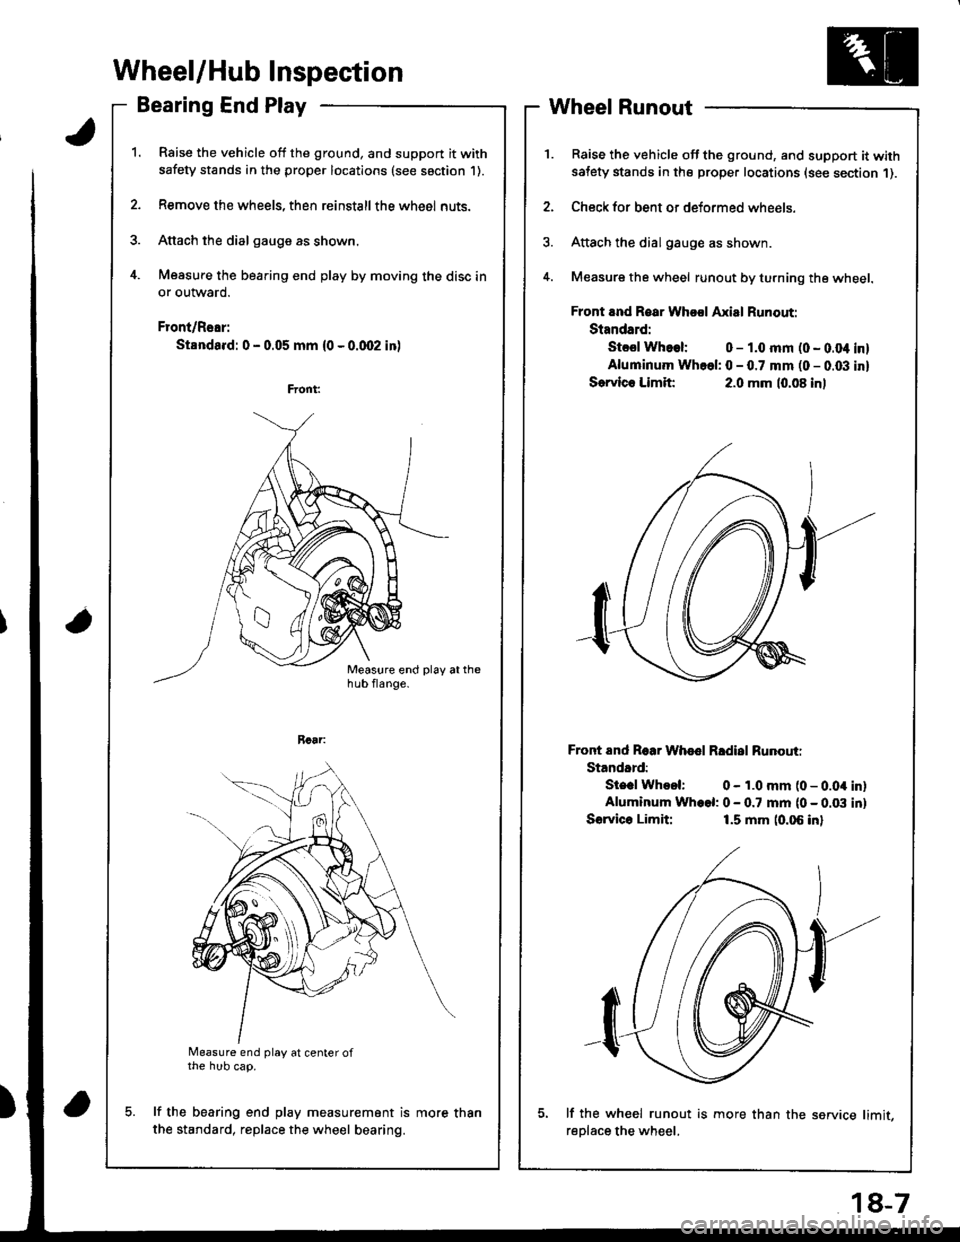
Raise the vehicle off the ground, and support it with
safety stands in the proper locations (see saction 1).
Remove the wheels, then reinstallthe whe6l nuts.
Attach the dial gauge as shown.
Measure the bearing end play by moving the disc in
or outward.
Front/Rear:
Standa.d: 0 - 0.05 mm (0 - 0.qr2 in)
a
Measure end play at center ofthe hub cap.
lf the bearing end play measurement is
the standard, replace the wheel bearing.
Wheel Runout
Raise the vehicle off the ground, and support it withsatety stands in the proper locations (see section 1).
Check for bent or deformed wheels.
Attach the dial gauge as shown.
Measure the wheel runout by turning the wheel.
Front and Roar Whool Axial Runout:
Standard:
Stcsl Whoel: 0 - 1.0 mm (0 - 0.04 inl
Aluminum Whcel: 0 - 0.7 mm (0 - 0.03 inl
Sorvlc. Limit:2.0 mm (0.08 inl
Front End Roar Whod Rldisl Runouti
Standard:
Ste.l Whool: 0 - 1.0 mm (0 - 0.04 inlAluminum Wh.el: 0 - 0.7 mm (0 - 0.03 inl
Sorvico Limit:1.5 mm (0.06 inl
lf the wh€el runout is more than the service limit,
reDlace the wheel.
more than
18-7
Page 718 of 1681
Front Suspension
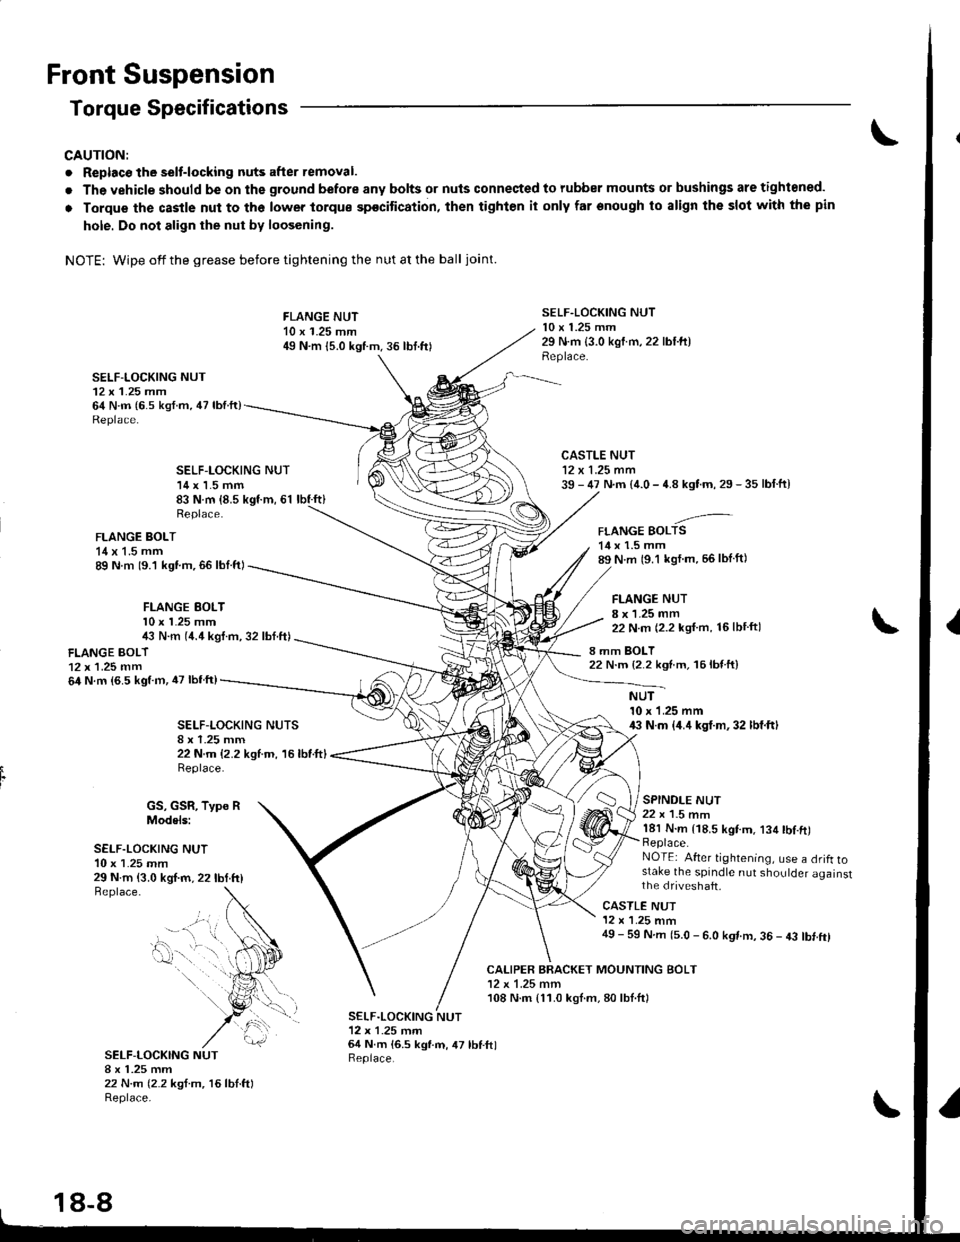
Torque Specifications
CAUTION:
. Replacc the selt-locking nuts after removal.
. The vehicle should be on the ground before any bolts or nuls connected to rubber mounts or bushings are tightoned.
o Torque thc castle nut to the lower torque spocitication, then tighten it only far onough to align the slot with the pin
hole. Do not align the nut bv loosening.
NOTE: Wipe offthegrease before tightening the nutatthe ball joint.
SELF-LOCKING NUT12 x 1.25 mm64 N.m (6.s ksf.m, 47 lbfft)
FLANGE NUT10 x 1.25 mm49 N.m {5.0 kgtm.36 lbt.frl
SELF.LOCKING NUT10 x 1.25 mm29 N.m {3.0 kgtm,22 lbl.ft)Replace.
CALIPER BRACKET MOUNTING BOLT12 x 1.25 mm108 N.m {11.0 kgl.m,80lbl.ftl
SELF-LOCKING NUT14 x 1.5 mm83 N.m {8.5 kgf.m, 61 lbf.ft}
CASTLE NUT12 x 1.25 mm39 - 47 N.m {4.0 - 4.8 kgtm, 29 - 35 lbf.ft}
-'-FLANGE BOLTS14 x 1.5 mm89 N.m (9.1 kgl m, 56lblft)
FLANGE NUT8 x 1.25 mm22 N.m (2.2 kgf.m, 16lbtftl
8 mm BOLT22 N.m {2.2 ksnm, 16lb{ ft}
Replace.
FLANGE BOLT14 x 1.5 mm89 N m 19.1 kgt.m,66 lbl.ftl
FLANGE EOLTl0 x l�25 mm4i, N.m (4.4 kgl.m, 32 lbf.ft)
FLANGE BOLT12x 1.25 mm64 N.m (6.5 kgtm, iU lbfftl
SELF-I-OCKING NUTS
22 N.m {2.2 kgtm, 16lbtftlReplace.
NUT10 x 1.25 mm43 N.m {4.4 kgt.m,32 lbf.ftl
SPINDLE NUT22 x 1.5 nm181 N.m {18.5 kgtm. 134 tbl.ft)Replace.NOTEi After tightening, use a drifl tostake the spindle nut shoulder againstthe dfiveshaft,29 N.m {3.0 kgf.m, 22lbtttlBeplace.
GS, GSR, Type RModels:
SELF.LOCKING NUT10 x 1.25 mm
SELF-LOCKING NUTI x 1.25 mm22 N.m (2.2 ksf.m, 16lbl.ftlReplace-
CASTLE NUT12 x '1.25 mm49 - 59 N.m (5.0 - 6.0 kgt m, 36 - 43 tbt.ftl
SELF.LOCKING NUT12x 1-25 tnrn64 N.m 16.5 kgl.m, 47 lbf.ftlReplace.
- --.." t,..
0-. .
18-8
Page 719 of 1681
Knuckle/Hub
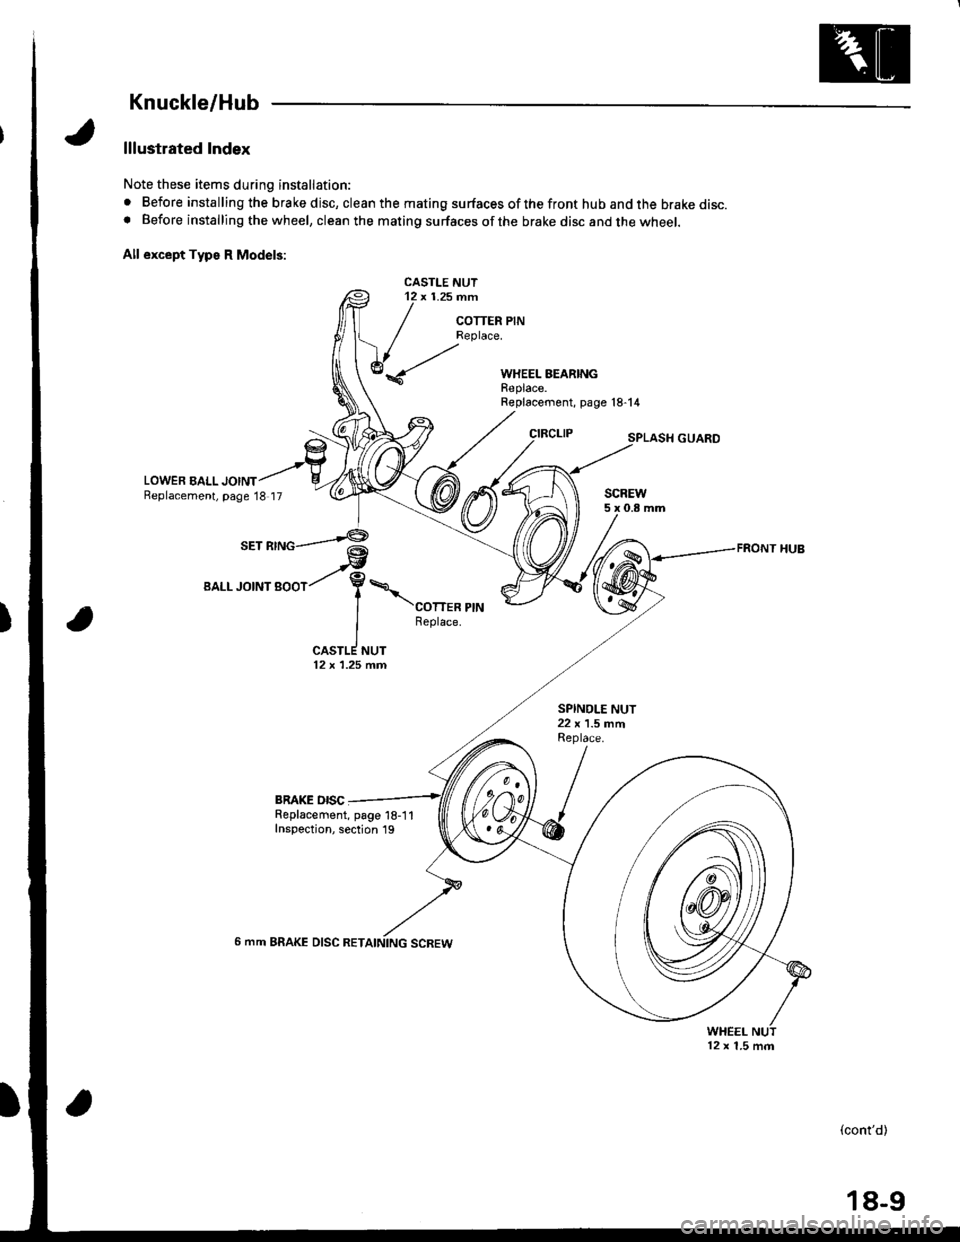
lllustrated Index
Note these items during installation:
. Before installing the brake disc, clean the mating surfaces of the front hub and the brake disc.o Before installing the wheel, clean the mating surfaces ofthe brake disc and the wheel.
All except Typs R Model3:
CASTLE NUT12 x 1.25 nn
COTTER PINReplace.
WHEEL BEARINGReplace.
LOWER EALL JOINTBeplacement, page 18 17
Replacement, page l8-14
CIRCLIP
SCREW5x0.8mm
FRONT HUB@tV,/- ai.1eetL.rotNtgoot/ Y\
| \conen erru
I Reptace.
ICASTLE NUT12 x 1.25 fin
BRAKE OISCReplacement, page 18-1 1Inspection, section 19
6 mm BRAKE DISC RET
WHEEL
(cont'd)
12 x 1.5 m.n
18-9
Page 720 of 1681
Front Suspension
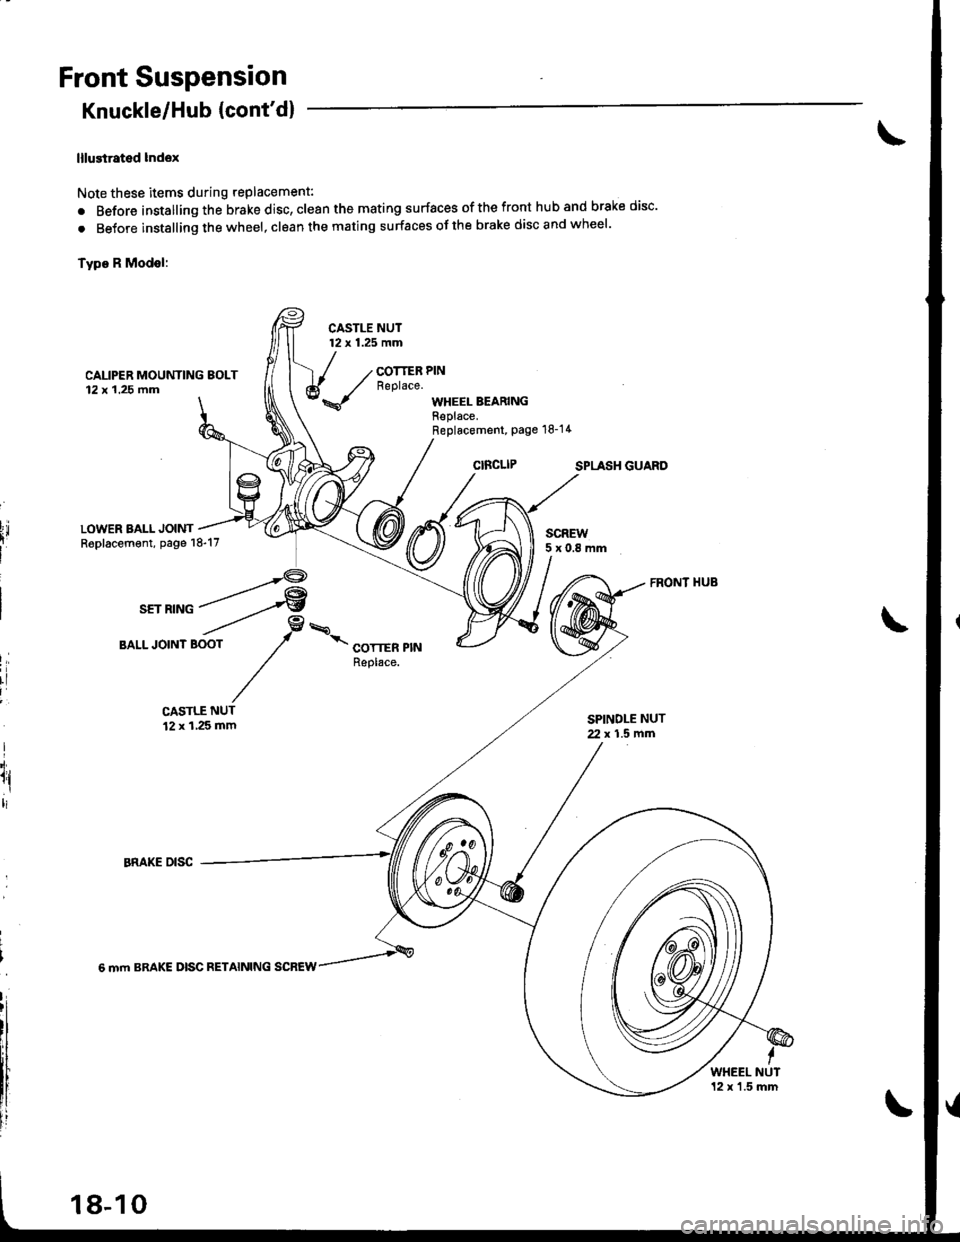
Knuckle/Hub {cont'd}
lllustrated lndox
Note these items during replacement:
. Before installing the brake disc, clean the mating surfaces of the front hub and brake disc'
. BeJore instslling the wheel, clean the mating surfaces ofthe brake disc and wheel'
Type R Modsl:
CASTLE NUT12 x 1.25 mm
CAUPER MOUNTING EOLT12x 1.25 fim
COTTER PINReplace.
WHEEL BEARINGReplace.Replacement, Page 18-14
SPLASH GUARO
LOWER BALL JOINTReplacement, page 18-17SCREW5x0.8mm
I,
rl
I
I'i.
1l,ltl
CASTLE NUT12 x 1,25 mmSPINDLE NUT2. x 1.5 mfi
6 mm BRAKE DISC RETAINING SCREW
WHEEL NUT12 x'1.5 mm
18-10