HONDA INTEGRA 1998 4.G Workshop Manual
Manufacturer: HONDA, Model Year: 1998, Model line: INTEGRA, Model: HONDA INTEGRA 1998 4.GPages: 1681, PDF Size: 54.22 MB
Page 731 of 1681
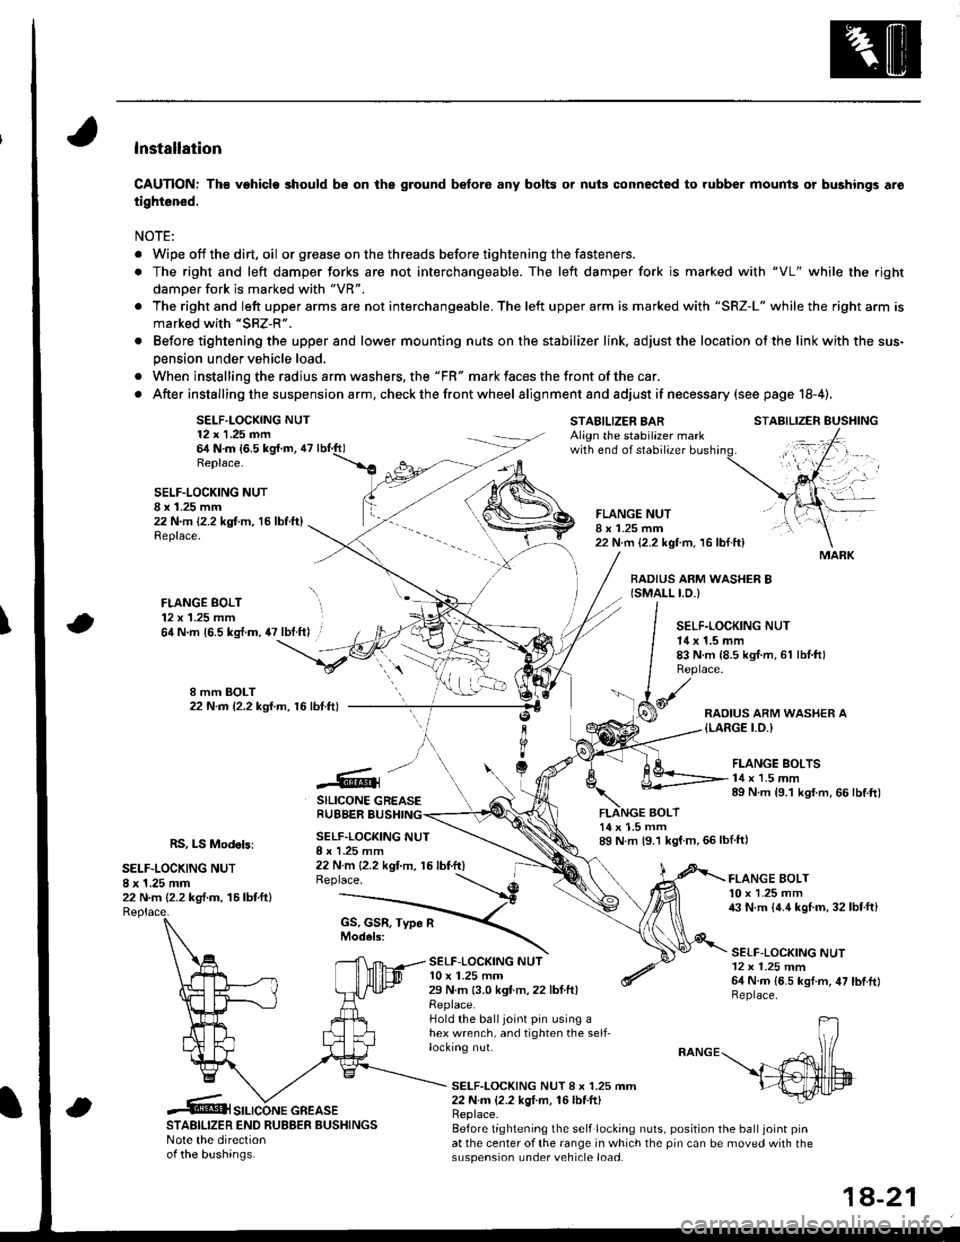
lnstallation
CAUTION: Th€ vehiclo should bs on the ground b€fore any bolts or nuis connectod to rubber mounis or bushings aro
tightened.
NOTE:
. Wipe off thedirt,oil or gr€ase on the threads before tightening the fasteners.
. The right and left damper forks are not interchangeable. The left damper fork is ma.ked with "VL" while the righr
damoer fork is marked with "VR".
. The right and left upper arms are not interchangeable. The left upper arm is marked with "SRZ-L" while the right arm is
marked with "SRZ-R".
. Before tightening the upper and lower mounting nuts on the stabilizer link, adjust the location ot the link with the sus-
pension under vehicle load.
. When installing the radius arm washers, the "FR" mark faces the front ofthe car.
. After installing the suspension a rm, check the front wheel alignmentand adjust if necesssry (see page 18-4).
SELF-LOCKING NUT12 x 1.25 nn64 N.m {6,5 kg{.m, 47Replace.
STABILIZER BARAlign the stabilazer markwith end of stabilizer
BOLT
STABILIZER EUSHING
SELF.LOCKING NUTI x 1.25 mm22 N.m 12.2 kgt m, 16 lbf.ft)Replace.
FLANGE BOLT12 x 1.25 mm
FLANGE NUTI x 1.25 mm22 N.m {2.2 kgt m. 16 lbf.ft}
BADIUS ARM WASHER B{SMALL I.D.)
\64 N.m {6.5 kg{.m, 47 lbt.ft) .SELF.LOCKING NUT14 x 1.5 mm83 N.m {8.5 kgI.m, 61 lbl.ftlReplace.
RAOIUS ARM WASHER A{LARGE I.O.I
.@]
SILICONE GREASERUBBER BUSHING
FLANGE BOLTS14 x 1.5 mm89 N.m {9.1 kgf.m, 66 lbtft)
RS, LS Modebi
SELF.LOCKING NUT8 x 1.25 mm22 N.m (2.2 kg,f.m. 16lbtftl
SELF.LOCKING NUTI x I .25 mm22 N m {2.2 kgt'm, 15 lbf.ft)Replace.
14 x 1.5 mm89 N m {9.1 kgf m,66lblft)
SELF-LOC(ING NUTl0 x 1.25 mm29 N.m 13.0 kgf.m,22 lbtftlReplace.Hold the balljoint pin using ahex wrench, and tighten the self-locking nut.
FLANGE BOLT10 x 1.25 mm43 N.m {4.4 kgl.m, 32lbf.ft}
SELF-LOCKING NUT12 x 1.25 mm64 N.m {6.5 kgf.m, 47 lbtftlReplace.
SELF-LOCKING NUT 8 x 1.25 mm22 N.m {2.2 kgI m, 16lbf.ft)
STABILIZER END RUBBER BUSHINGSNote the directionof the bushinas.
Replace.Before tightening the self locking nuts, position the ball joint pinat the center of the range in which the pin can be moved with thesuspension under vehicle load.
MARK
SILICONE GREASE
1A-21
Page 732 of 1681
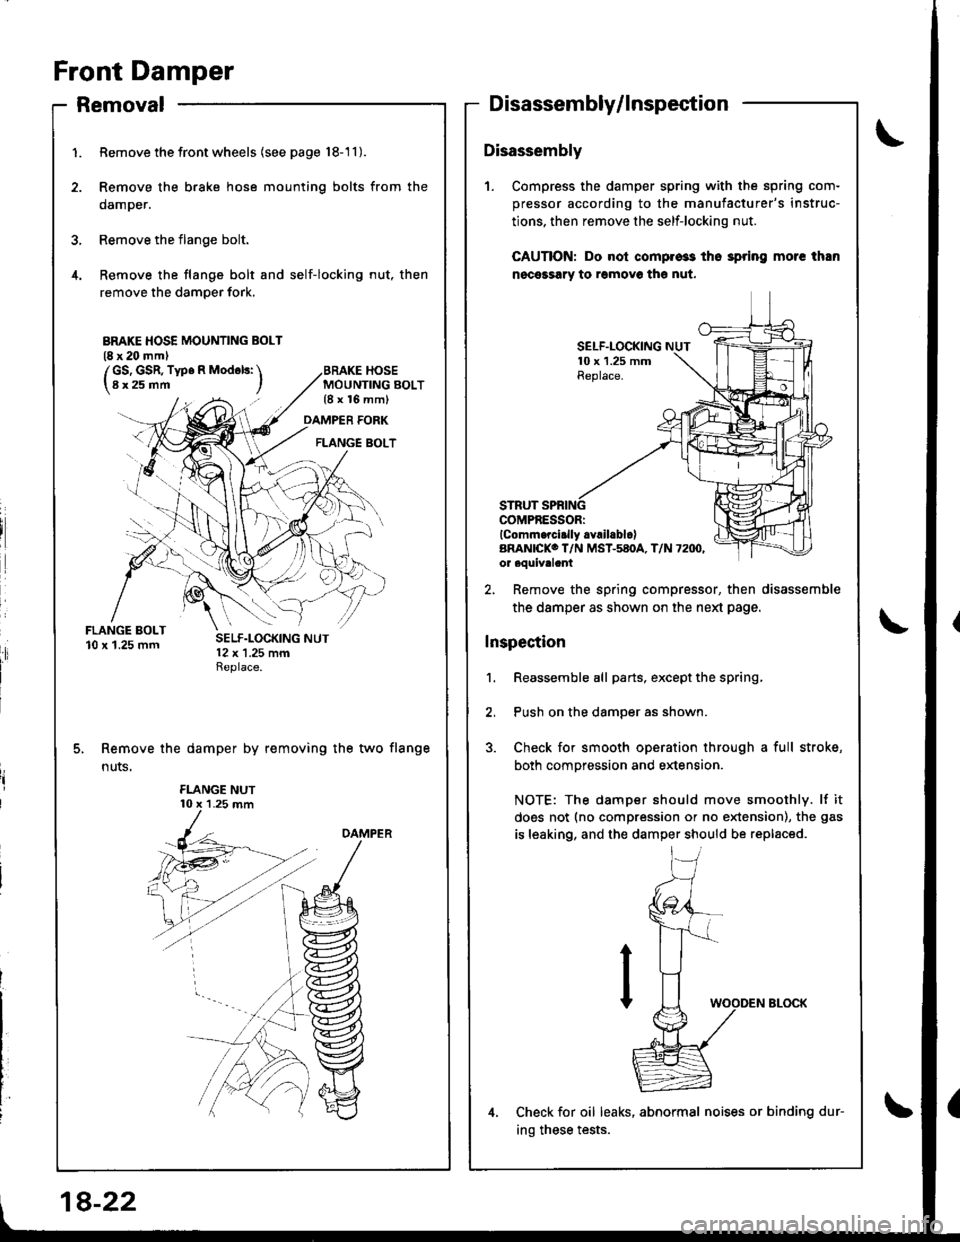
Front Damper
FLANGE BOLT10 x'1.25 mm
1.
4.
Removal
Remove thefrontwheels (see page 18-'11).
Remove the brake hose mounting bolts from the
damper.
Remove the flange bolt.
Remove the flange bolt and self-locking nut, then
remove the damper fork.
MOUNTING BOLT{8 x 16 mm)
Disassembly/lnspection
Disassembly
1. Compress the damper spring with the spring com-
pressor according to the manufacturer's instruc-
tions. then remove the self-locking nut.
CAUTION: Do nol compros3 tho 3pring morc than
nocessary to romovo th€ nut.
DAMPER FORK
FLANGE BOLT
SELF.LOCKING10 x 1.25 mmReplace.
COMPRESSORIlComm.rci.lly .Yrll.blclARAN|CKO T/N MST-580A, T/N 72IX',or aouivalant
Remove the damper by removing the two flange
n uts.
2, Remove the spring compressor, then disassemble
the damper as shown on the neld page.
Inspection
1. Reassemble all parts, exceptthe spring,
2, Push on the damper as shown.
3. Check for smooth operation through a full stroke,
both compression and extension.
NOTE: The damper should move smoothly. lf it
does not (no compression or no extension), the gas
is leaking, and the damper should be replaced.
Check for oil leaks, abnormal noises or binding dur-
ing these tests.
BMKE HOSE MOUNTING BOLT(8 x 20 mml
/GS, GSR, Type R Mod6ls: \l8x25mm I
18-22
Page 733 of 1681
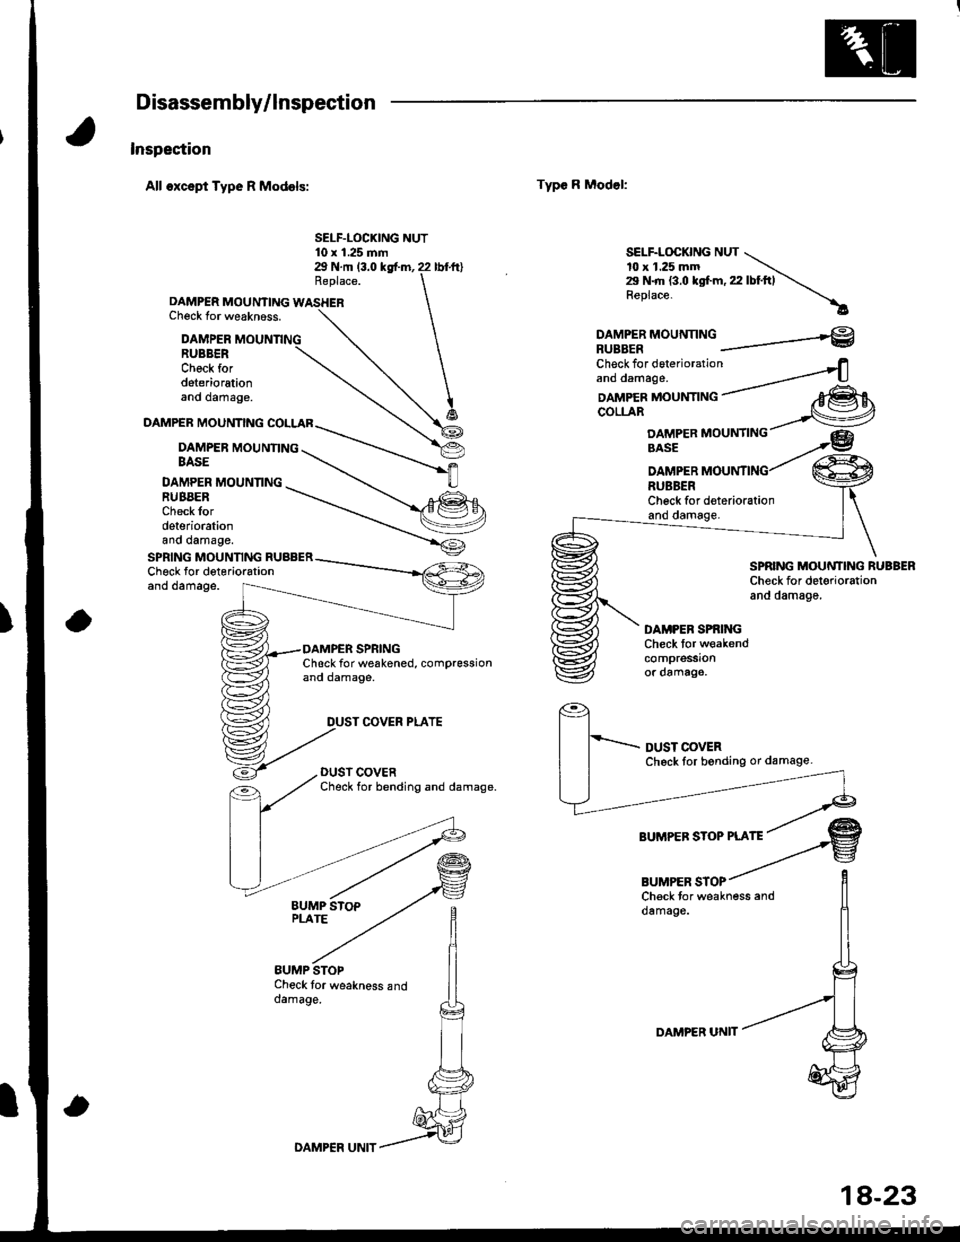
Disassembly/lnspection
Inspection
All oxcspt Type R Models:
Replace.
DAMPER MOUNTING WASHERChsck for weakn6ss.
EUMP STOPCheck tor weakness anddamage.
Type R Model:
SELF.LOCKING NUT10 x 1.25 mm29 N.rr| (3.0 kgf.m, 22 lbf.ft)SELF.LOCKING NUT \10 x 1.25 mm \29 N.rh {3.0 lgfm, 22 lbtftl \Replace. \
DAMPERRUBBERCheck fordeteriorationano oamage.
DAMPER MOUNNNGBASE
DAMPER MOUNNNGRUBBER
DAMPER MOUNTING COLLAR
DAMPER MOUNTINGRUBAERCheck fordeteriorationano oamage.
DAMPER MOUNTNGRUBBERCheckfordeteriorationano oamage,
SPRING MOUNNNG RUABERCheck for deterio.ationano oamage.
SPRING MOUNTING RUBBERCheck for detoriorationand damage.
Check for weakened, compressionand damage.
DUST COVER PLATE
DAMPEB SPRINGCheck tor weakendcompressionor damago,
Check tor weakness anddamage.
BUMPER STOP
:fftt;'"::'"''-"'"" _--4
oampea rnoun-nruc / agEcoLLAR ,_-lVDAMPERMOUNTING- Gb@
DAMP€R UNIT
DAMPER UNIT
18-23
Page 734 of 1681
Front Damper
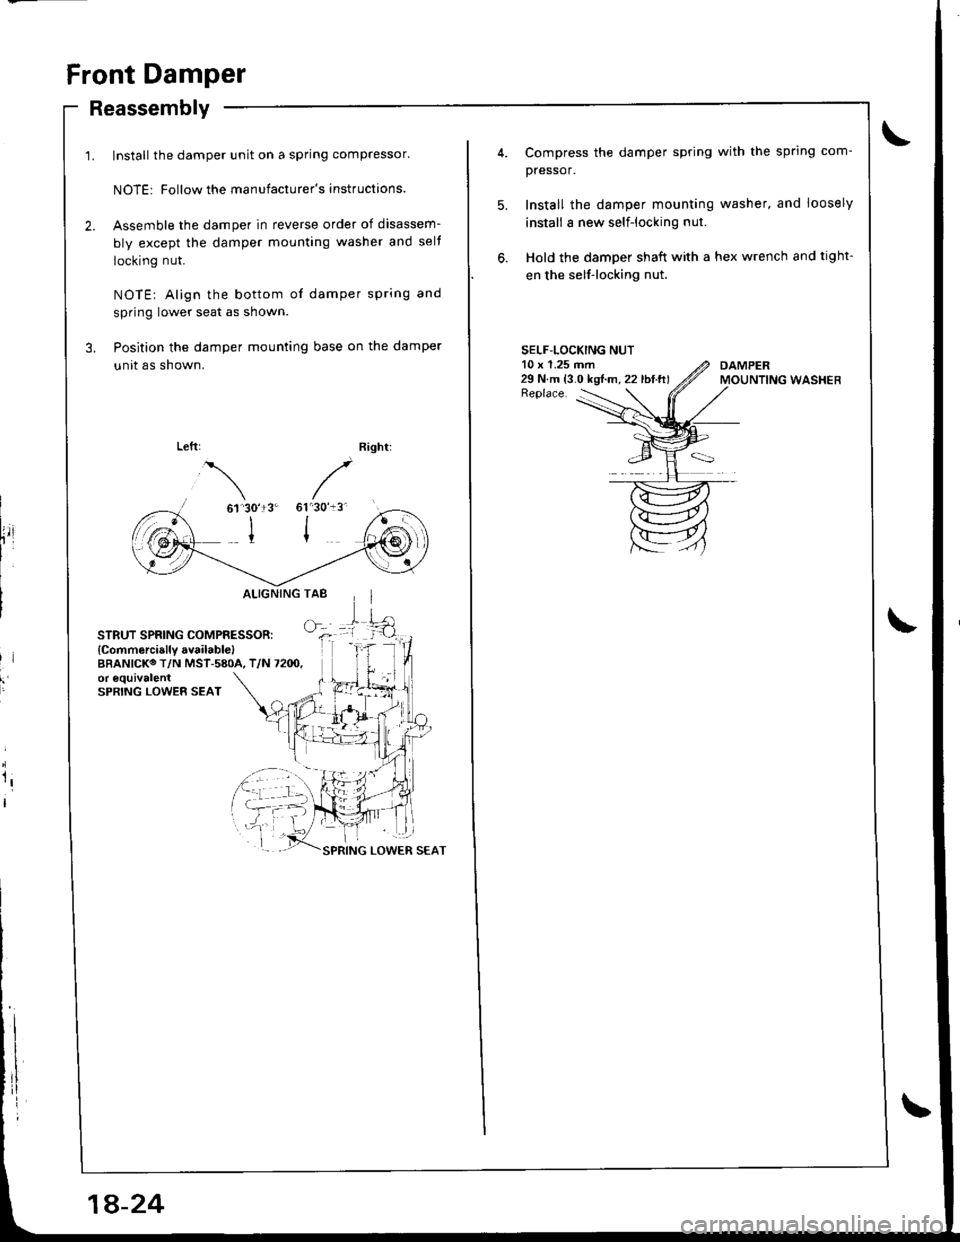
Reassembly
Install the damper unit on a spring compressor'
NOTE: Follow the manufacturer's instructions.
Assemble the damper in reverse order of disassem-
bly except the damper mounting washer and selt
locking nut.
NOTE: Align the bottom of damper spring and
spring lower seat as shown.
Position the damper mounting base on the damper
unit as shown.
61'30'13'
I
STRUT SPRING COMPRESSOR:
{Commercially available)BBANICKO T/N MST-580A, T/N 7200,or equivalentSPRING LOWER SEAT
ALIGNINGTAB
GfL
lr
rl
I
1a-24
Compress the damper spring with the sprlng com-
pressor.
Install the damper mounting washer, and loosely
install a new self-locking nut.
Hold the damper shaft with a hex wrench and tight-
en the self-locking nut.
SELF-LOCKING NUT10 x 1.25 mm29 N.m {3.0 kgt.m, 22 lbI.ft)Replace.
Page 735 of 1681
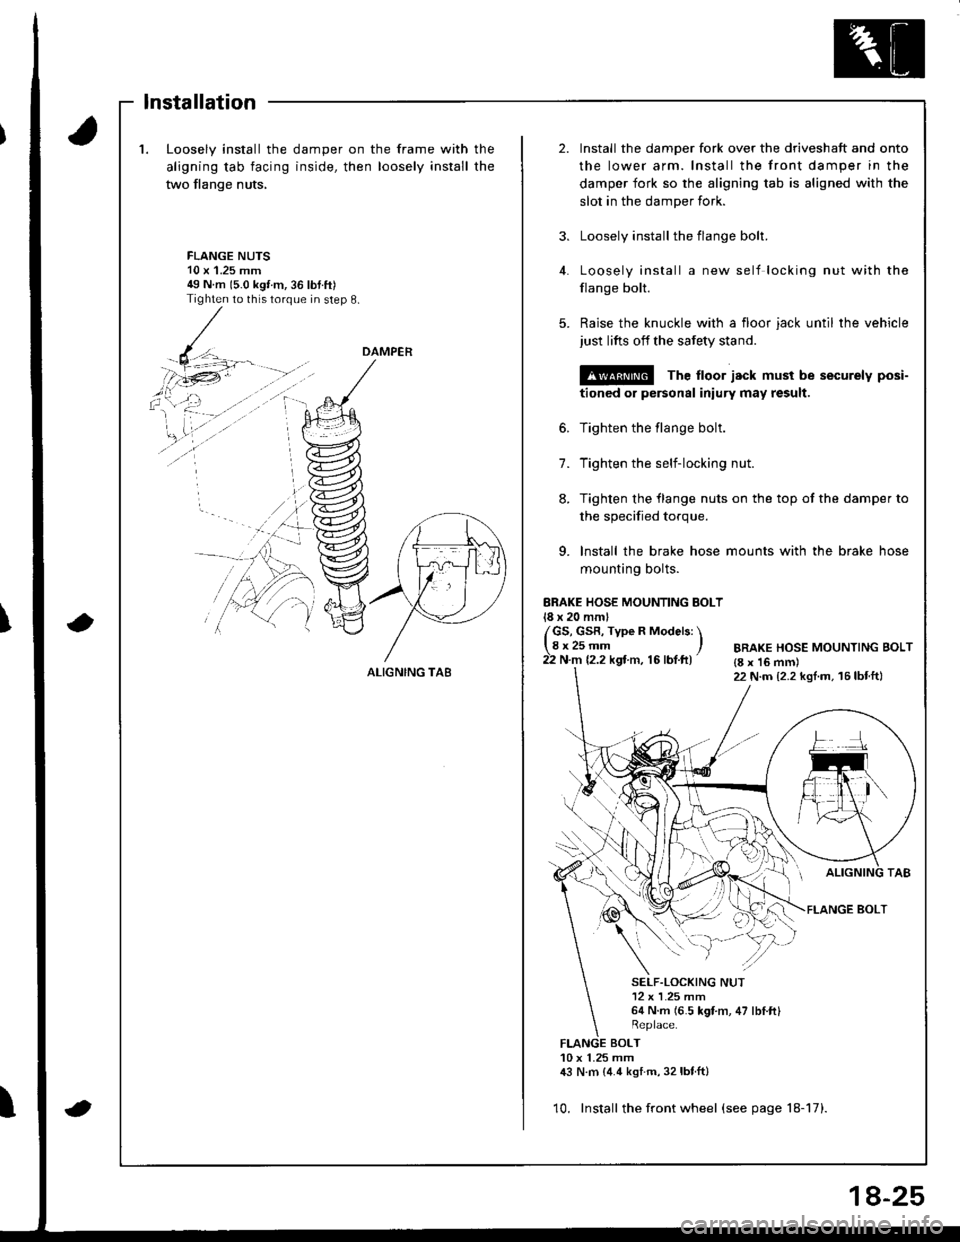
1.Loosely install the
aligning tab facing
two flange nuts,
damper on the frame with
inside, then loosely install
the
the
2.Install the damper fork over the driveshaft and onto
the lower arm. Install the front damper in the
damper fork so the aligning tab is aligned with the
slot in the damper fork.
Loosely install the flange bolt.
Loosely install a new self locking nut with the
flange bolt.
Raise the knuckle with a floor jack until the vehicle
just lifts off the safety stand.
@ The ltoor jack must be securely posi-
tioned or personal iniury may result.
Tighten the flange bolt.
Tighten the self-locking nut.
Tighten the flange nuts on the top of the damper to
3.
FLANGE NUTS10 x'1.25 mm49 N m 15.0 kgt m,36 lbtft)Tighten to this torque in step 8.
4.
5.
6.
7.
8.
the specified torque.
9. lnstall the brake hose mounts with the brake hose
mounting bolts.
ERAKE HOSE MOUNTING BOLT18 x 20 mml
/GS, GsR, Type R Models: \lgr25-- ,22 N.m 12.2 kgt m, 16 lbf.ft)BRAKE HOSE MOUNTING BOLT{8 x 16 mm)22 N.m {2.2 kgl.m, 16lbtft}
FLANGE BOLT
SELF.LOCKING NUT12 x L25 mm64 N.m (6.5 kgt m, 47 lbI.ftl
BOLT10 x 1.25 mm,|:} N.m {4.4 kstm, 32lbtft}
10. Install the front wheel (see page 18-17).
DAMPER
ALIGNING TA8
lnstallation
8-25
Page 736 of 1681
Rear Suspension
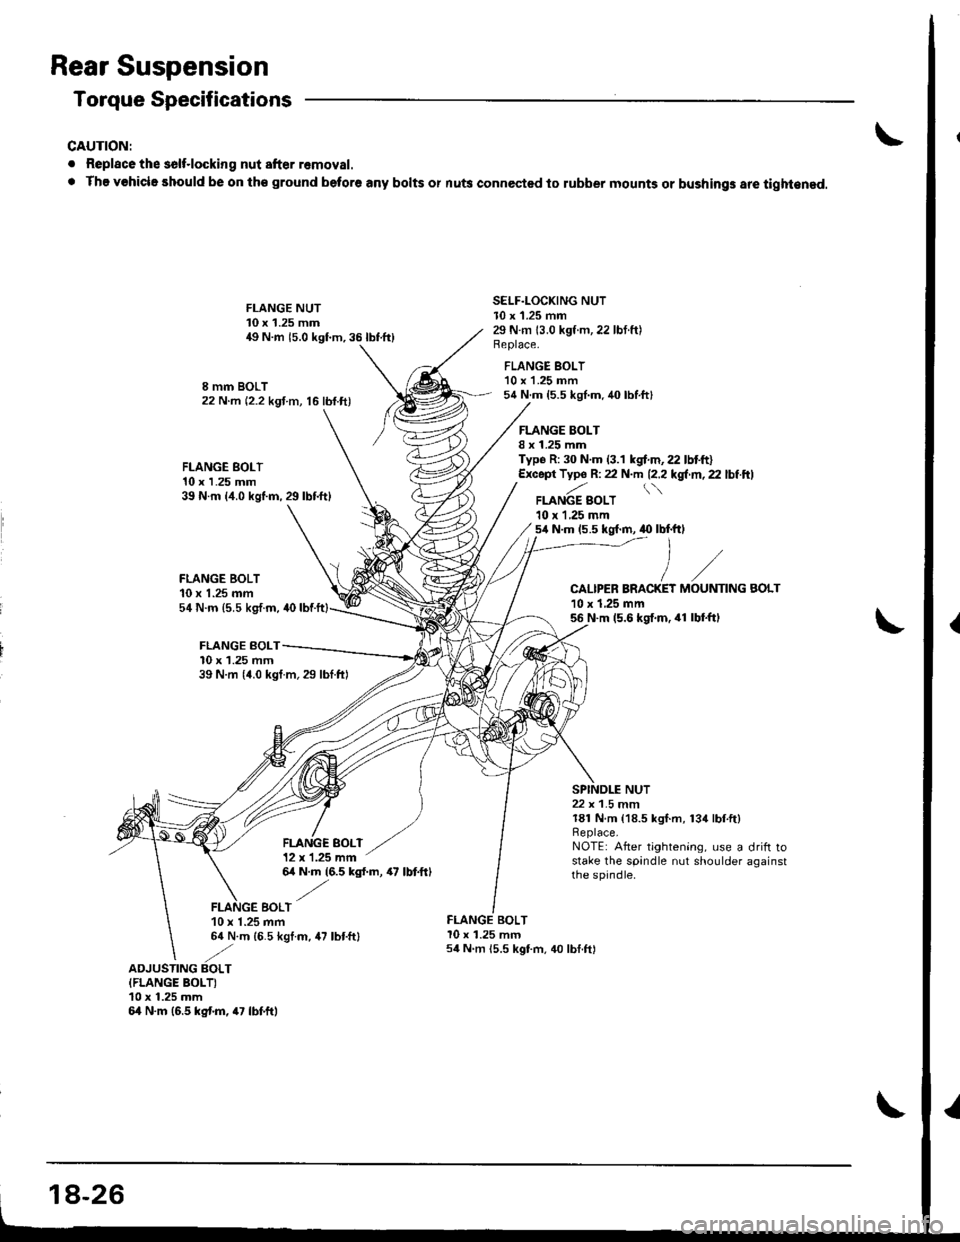
Torque Specifications
CAUTION:
. Replace the solt.locking nut after removal.
. The vohicle should be on th€ ground beto.6 any bolts or nu$ connected to lubber mounts or bushings are tight€ned.
FLANGE BOLT10 x 1.25 mm39 N.m {4.0 kgl.m,29lbtft}
FLANGE BOLT10 x 1.25 mm54 N.m (5.5 kg,f.m, 40
FLANGE BOLT10 x 1.25 mm
I mm BOLT22 N.m (2.2 kgf m, 16 lbf.ft)
FLANGE NUT10 x 1.25 mm49 N.m 15.0 kgf.m,35lbtft)
FLANGE SOLT12 x 1.25 mm
SELF.LOCKING NUTl0 x 1.25 mm29 N.m 13.0 kgt.m,22 lbf.ft)Beplace.
FLANGE BOLT'10 x 'l.25 mm54 N.m {5.5 kgl.m.40 lbtft}
FLANGE BOLTI x 1.25 mmTyp6 R: 30 N.m (3.1 kgf.m,22 lbtft)Except Typ6 R: 22 N.m 12.2l'gl'rn,2.lbiftl
FLANGE SOLT10 r L25 mm5,1N.m (5.5 kg{.m, .0 lbf.ftl
CALIPER BRACKET10 x 1,25 mm56 N.m (5.6 kgf.m. 41 lbl.ftl
NUT
MOUNTING
39 N.m 14.0 kgl m,29 lbtftl
BOLT
22 x 1.5 mm181 N.m {18.5 kgf.m, 134lbf.ft}Replace,NOTE: After tightening, use a drift rostake the spandle nut shoulder againstthe spjndle.64 N.m (6.5 kgl.m, 47 lbtftl
EOLT10 x 1.25 mm64 N.m (6.5 kgl.m, 47 lbtftl
FLANGE BOLTl0 x 1.25 mm54 N m 15.5 kgt m, 40 lbf.ft)
ADJUSTING BOLTIFLANGE BOLTI10 x 1.25 mm64 N.m (6.5 kg{.m, 47 lbf.ft,
18-26
Page 737 of 1681
Hub Bearing Unit
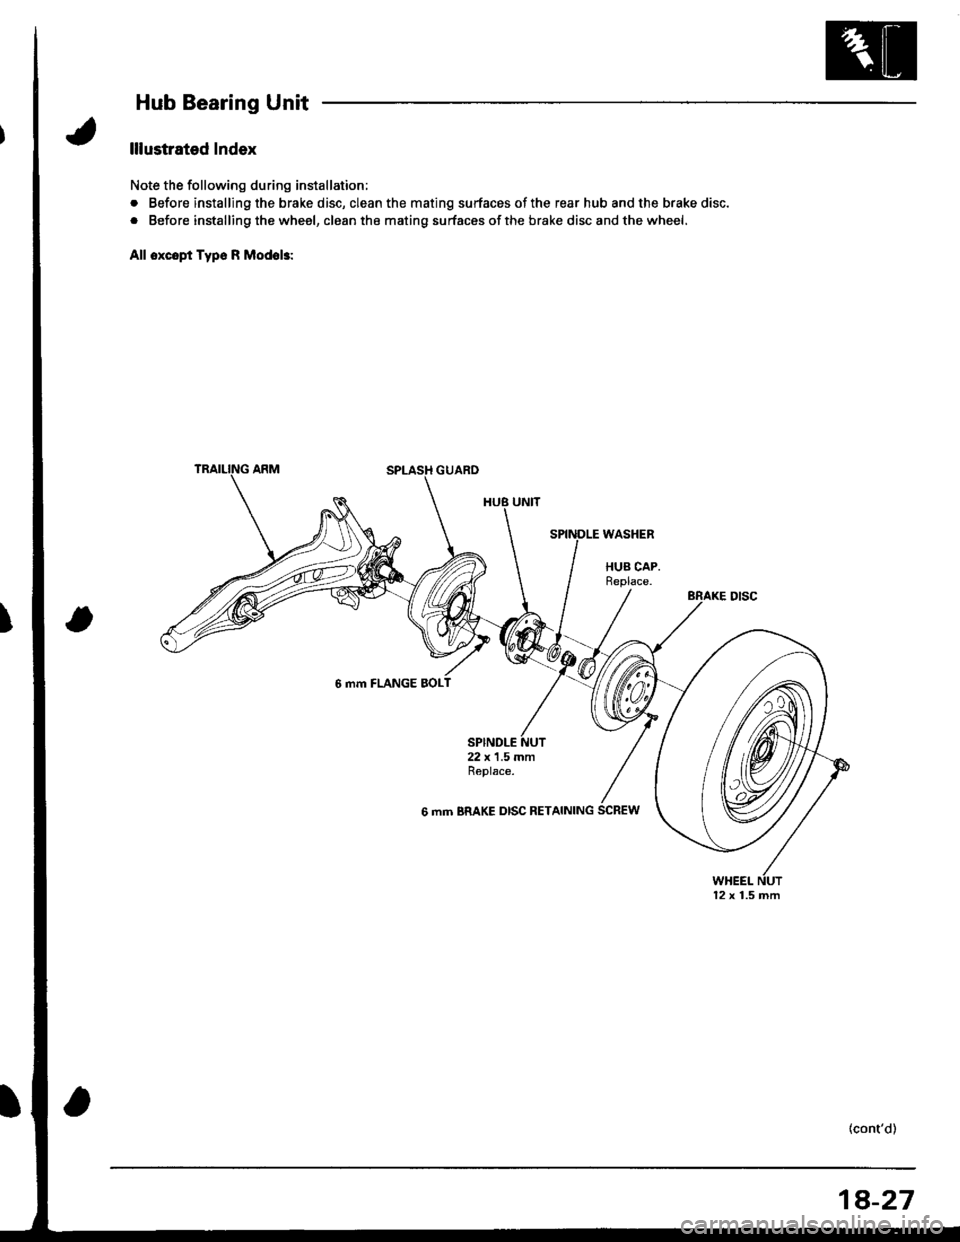
lllustrated Index
Note the following during installation;
. Before installing the brake disc, clean the mating surfaces ofthe rear hub and the brake disc.
. Before installing the wheel, clean the mating surfaces ofthe brake disc and the wheel.
All oxcopt Typo R Modol3:
6 mm FLANGE BOL
SPINDLE22 x 1.5 mmReplace.
6 mm BRAKE DISC RETAINING
WHEEL12 x 1.5 mm
(cont'd)
18-27
Page 738 of 1681
Rear Suspension
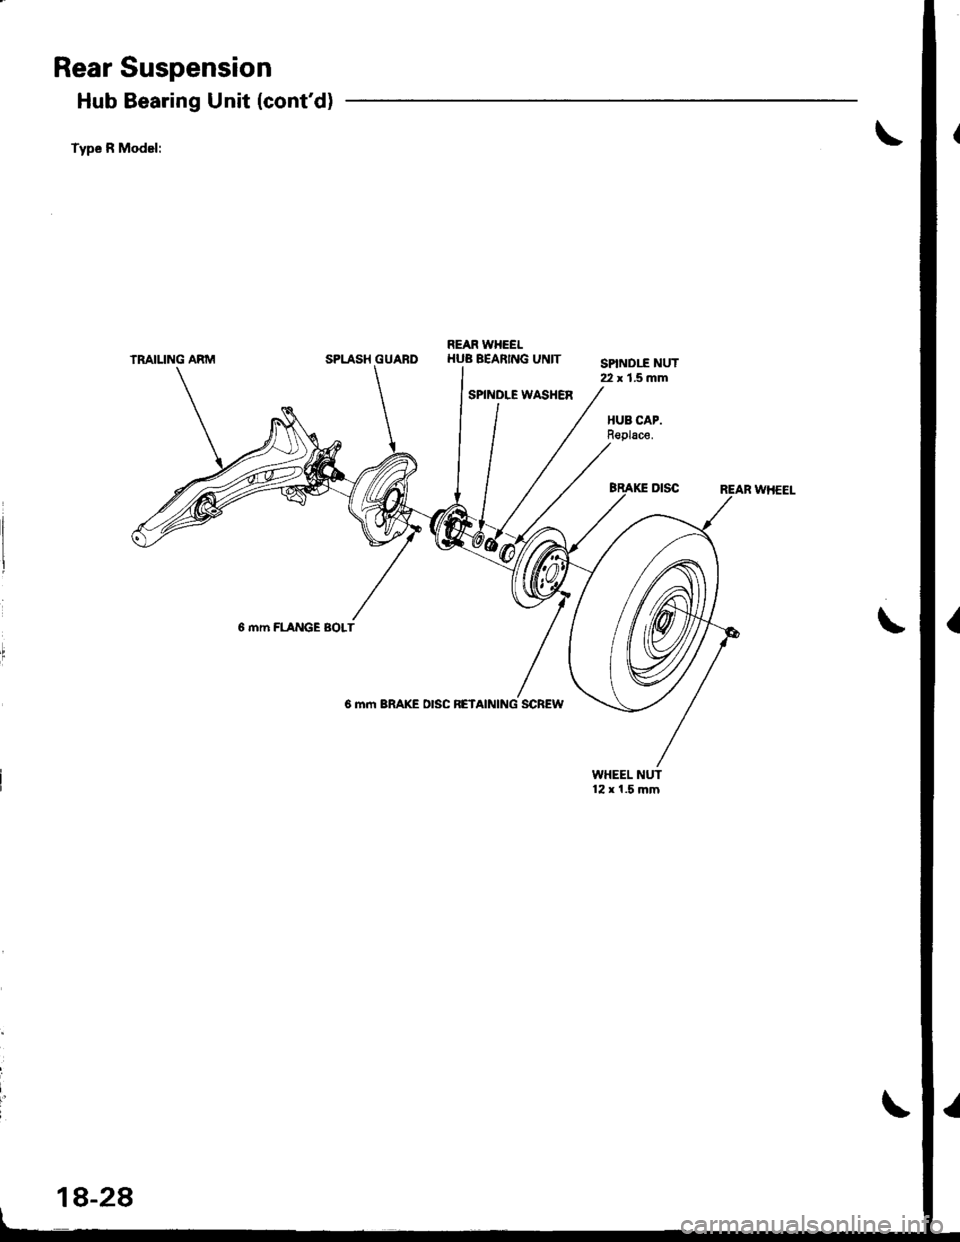
Hub Bearing Unit (cont'd)
Type R Model:
TRAIUNG ARMREAR WHEELSPLASH GUARDHUB BEARING UNIT
SPINDLE WASHER
SPIND1I NUT22 x 1.5 mm
HUB CAP.Replace.
6 mm FLANGE BOLT
6 mm BRAKE DISC RETAINING SCREW
WHEEL NUT12 x 1.5 mm
II
18-28
Page 739 of 1681
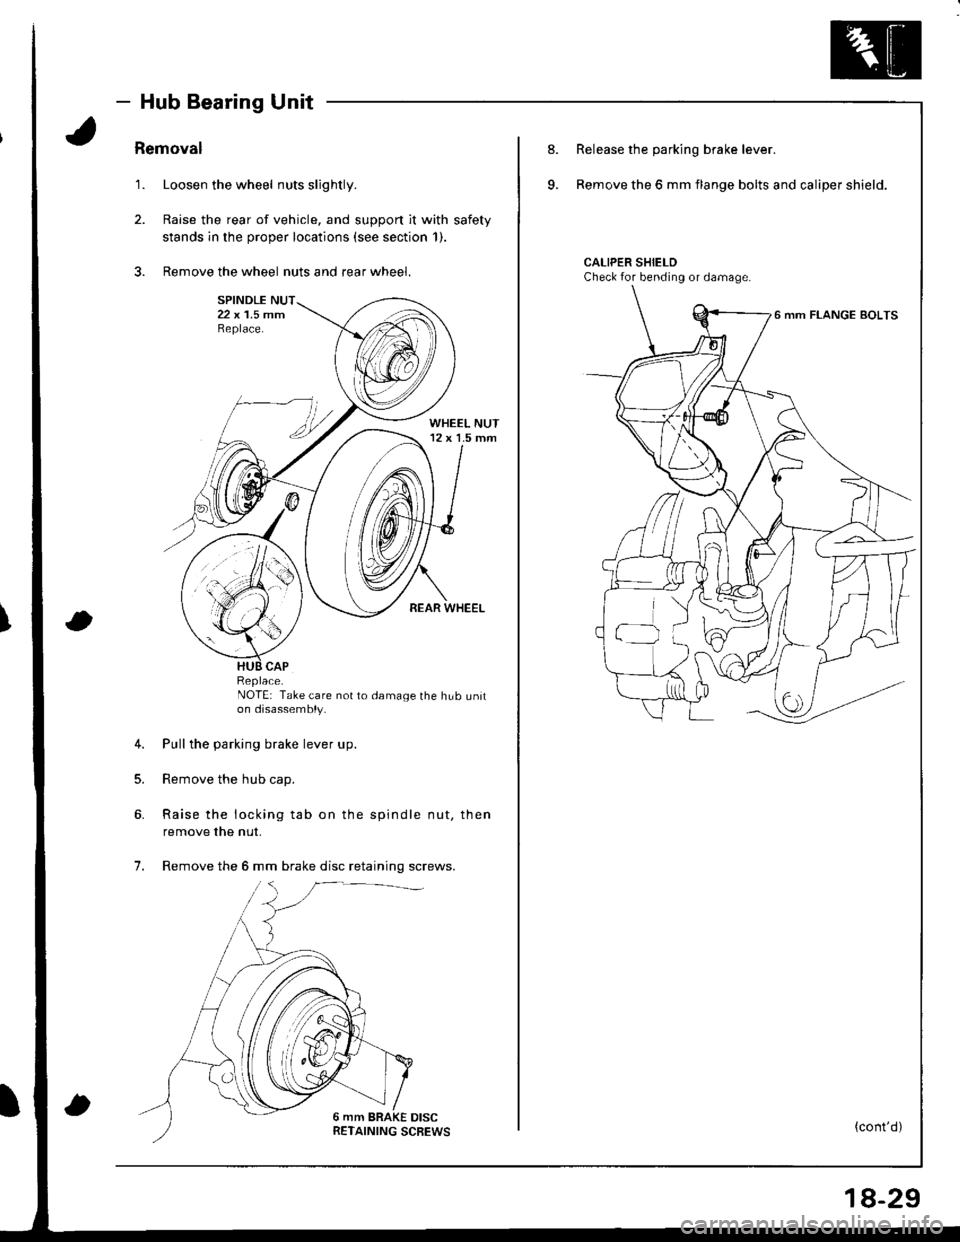
- Hub Bearing Unit
Removal
1. Loosen the wheel nuts slightly.
2. Raise the rear of vehicle, and support it with safety
stands in the proper locations (see section 1).
3. Remove the wheel nuts and rear wheel.
NOTE: Take care not to damage the hub uniton disassembly.
4. Pull the parking brake lever up.
5. Remove the hub cap.
6. Raise the locking tab on the spindle nut, then
remove the nut.
7. Remove the 6 mm brake disc retaining screws.
Replace.
8.
9.
Release the parking brake lever.
Remove the 6 mm flange bolts and caliper shield.
CALIPER SHIELDCheck for bending or damage.
6 mm FLANGE BOLTS
(cont'd)
18-29
Page 740 of 1681
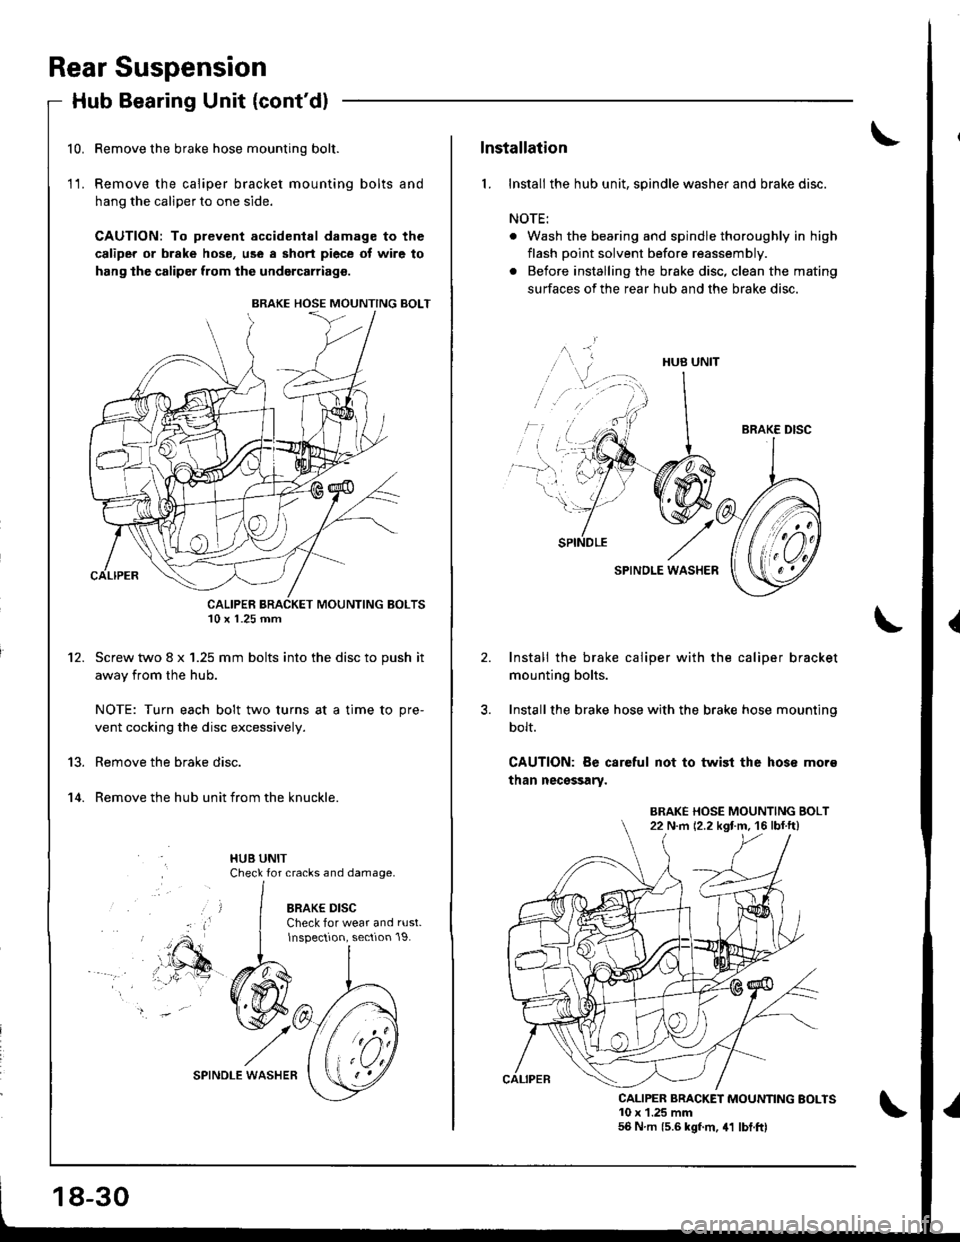
10.
11.
't2.
13.
't 4.
Rear Suspension
Hub Bearing Unit {cont'dl
Remove the brake hose mounting bolt.
Remove the caliper bracket mounting bolts and
hang the caliper to one side.
CAUTION: To prevent accidenlal damage to the
caliper or brake hose, use a short piece of wire to
hang the caliper from the undgrcarriag€.
Screw two 8 x 1.25 mm bolts into the disc to push it
away from the hub.
NOTE: Turn each bolt two turns at a time to pre-
vent cocking the disc excessively.
Remove the brake disc.
Remove the hub unit from the knuckle.
BRAKE HOSE MOUNTING BOLT
10 x 1.25 mm
18-30
lnstallation
l. Install the hub unit, spindle washer and brake disc.
NOTE:
. Wash the bearing and spindle thoroughly in high
flash point solvent before reassembly.
. Before installing the brake disc, clean the mating
surfaces of the rear hub and the brake disc.
HUS UNIT
SPINOLE WASHER
Install the brake caliper with the caliper bracket
mounting bolts.
Install the brake hose with the brake hose mounting
bolt.
CAUTION: Be careful not to twist the hos€ mor€
than nec€ssary.
CALIPER BRACKET MOUNNNG EOLTS10 x 1.25 mm56 N m 15.6 kgf.m, 41 lbt.ftl
^ri
t,--�-
BRAKE DISC
BRAKE HOSE MOUNTING BOLT22 N.m 12.2 kgt m. 16 lbf ftl