seal INFINITI FX35 2008 Workshop Manual
[x] Cancel search | Manufacturer: INFINITI, Model Year: 2008, Model line: FX35, Model: INFINITI FX35 2008Pages: 3924, PDF Size: 81.37 MB
Page 382 of 3924

ASSEMBLYAT-309
< SERVICE INFORMATION >
DE
F
G H
I
J
K L
M A
B
AT
N
O P
14. Install needle bearing to drum support edge surface. CAUTION:
Take care with the direction of needle bearing. Refer toAT-264, "
Location of Adjusting Shims, Needle Bearings,
Thrust Washers and Snap Rings".
Apply petroleum jelly to needle bearing.
15. Install seal rings to drum support. CAUTION:
Do not reuse seal rings.
Apply petroleum jelly to seal rings.
16. Install spring retainer and return spring in transmission case.
17. Set the SST on spring retainer and install snap ring (fixing spring retainer) in transmission case while compressing return spring.
CAUTION:
Securely assemble them using a flat-bladed screwdriver so
that snap ring tension is slightly weak.
SCIA2796E
SCIA3333E
SCIA2324E
SCIA5877E
3AA93ABC3ACD3AC03ACA3AC03AC63AC53A913A773A893A873A873A8E3A773A983AC73AC93AC03AC3
3A893A873A873A8F3A773A9D3AAF3A8A3A8C3A863A9D3AAF3A8B3A8C
Page 385 of 3924

AT-312
< SERVICE INFORMATION >
ASSEMBLY
24. Install revolution sensor to transmission case, and then tightenrevolution sensor mounting bolt to the specified torque. Refer to
AT-249, "
Component".
CAUTION:
Do not subject it to impact by dropping or hitting it.
Do not disassemble.
Do not allow metal filings, etc. to get on the sensor's front
edge magnetic area.
Do not place in an area affected by magnetism.
25. As shown in the figure, use the drift to drive rear oil seal into the rear extension (2WD models) or adapter case (AWD models)
until it is flush.
CAUTION:
Do not reuse rear oil seal.
Apply ATF to rear oil seal.
26. Install return spring to parking pawl. VQ35DE models
SCIA2320E
SCIA5477E
SCIA2445E
3AA93ABC3ACD3AC03ACA3AC03AC63AC53A913A773A893A873A873A8E3A773A983AC73AC93AC03AC3
3A893A873A873A8F3A773A9D3AAF3A8A3A8C3A863A9D3AAF3A8B3A8C
Page 386 of 3924
ASSEMBLYAT-313
< SERVICE INFORMATION >
DE
F
G H
I
J
K L
M A
B
AT
N
O P
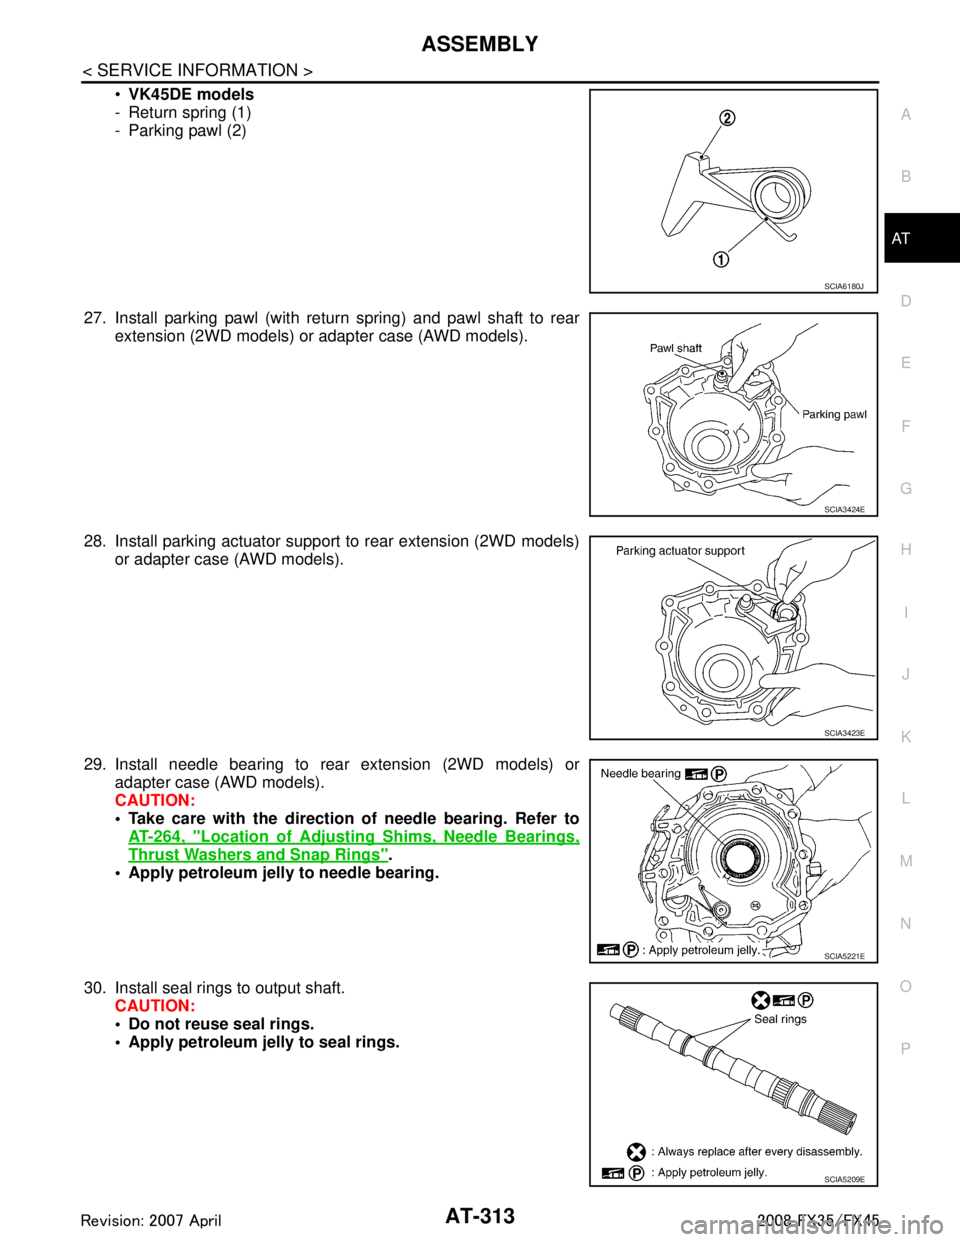
VK45DE models
- Return spring (1)
- Parking pawl (2)
27. Install parking pawl (with return spring) and pawl shaft to rear extension (2WD models) or adapter case (AWD models).
28. Install parking actuator support to rear extension (2WD models) or adapter case (AWD models).
29. Install needle bearing to rear extension (2WD models) or adapter case (AWD models).
CAUTION:
Take care with the direction of needle bearing. Refer toAT-264, "
Location of Adjusting Shims, Needle Bearings,
Thrust Washers and Snap Rings".
Apply petroleum jelly to needle bearing.
30. Install seal rings to output shaft. CAUTION:
Do not reuse seal rings.
Apply petroleum jelly to seal rings.
SCIA6180J
SCIA3424E
SCIA3423E
SCIA5221E
SCIA5209E
3AA93ABC3ACD3AC03ACA3AC03AC63AC53A913A773A893A873A873A8E3A773A983AC73AC93AC03AC3
3A893A873A873A8F3A773A9D3AAF3A8A3A8C3A863A9D3AAF3A8B3A8C
Page 387 of 3924
AT-314
< SERVICE INFORMATION >
ASSEMBLY
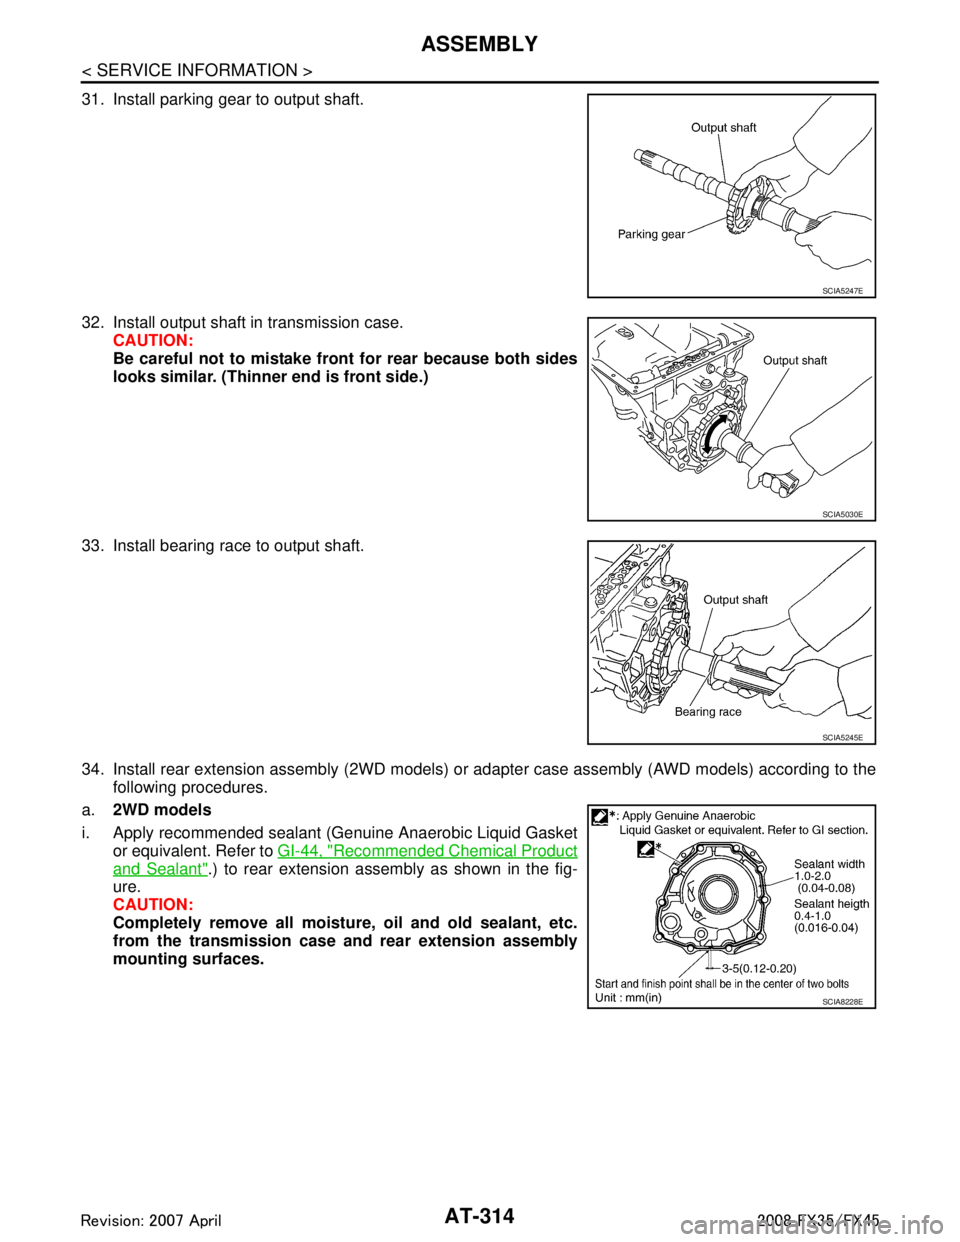
31. Install parking gear to output shaft.
32. Install output shaft in transmission case.CAUTION:
Be careful not to mistake front for rear because both sides
looks similar. (Thinner end is front side.)
33. Install bearing race to output shaft.
34. Install rear extension assembly (2WD models) or adapter case assembly (AWD models) according to the following procedures.
a. 2WD models
i. Apply recommended sealant (Genuine Anaerobic Liquid Gasket or equivalent. Refer to GI-44, "
Recommended Chemical Product
and Sealant".) to rear extension assembly as shown in the fig-
ure.
CAUTION:
Completely remove all moisture, oil and old sealant, etc.
from the transmission case and rear extension assembly
mounting surfaces.
SCIA5247E
SCIA5030E
SCIA5245E
SCIA8228E
3AA93ABC3ACD3AC03ACA3AC03AC63AC53A913A773A893A873A873A8E3A773A983AC73AC93AC03AC3
3A893A873A873A8F3A773A9D3AAF3A8A3A8C3A863A9D3AAF3A8B3A8C
Page 388 of 3924
ASSEMBLYAT-315
< SERVICE INFORMATION >
DE
F
G H
I
J
K L
M A
B
AT
N
O P
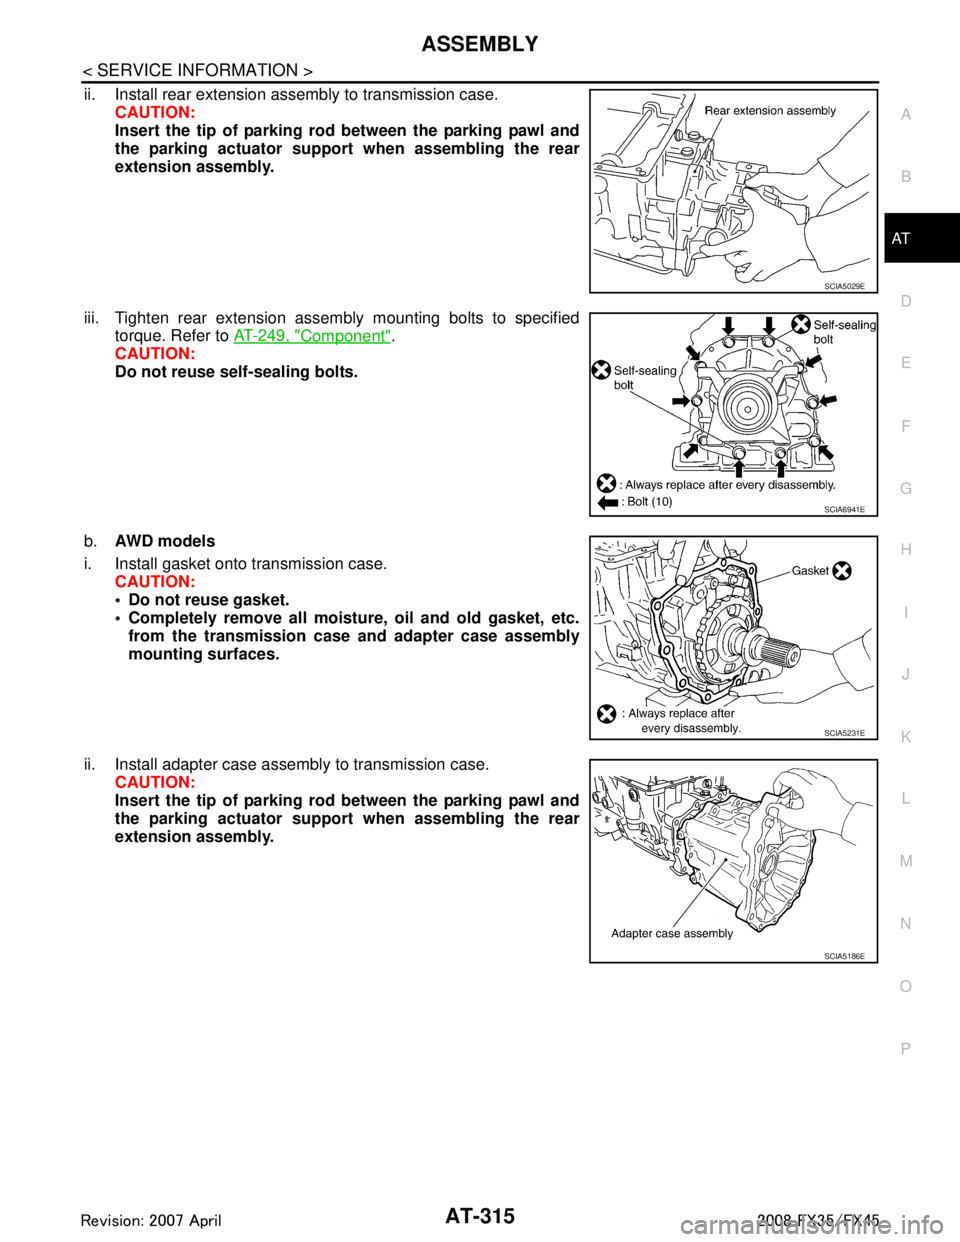
ii. Install rear extension assembly to transmission case. CAUTION:
Insert the tip of parking rod between the parking pawl and
the parking actuator suppor t when assembling the rear
extension assembly.
iii. Tighten rear extension assembly mounting bolts to specified torque. Refer to AT-249, "
Component".
CAUTION:
Do not reuse self-sealing bolts.
b. AWD m od e l s
i. Install gasket onto transmission case. CAUTION:
Do not reuse gasket.
Completely remove all moistu re, oil and old gasket, etc.
from the transmission case and adapter case assembly
mounting surfaces.
ii. Install adapter case assembly to transmission case. CAUTION:
Insert the tip of parking rod between the parking pawl and
the parking actuator suppor t when assembling the rear
extension assembly.
SCIA5029E
SCIA6941E
SCIA5231E
SCIA5186E
3AA93ABC3ACD3AC03ACA3AC03AC63AC53A913A773A893A873A873A8E3A773A983AC73AC93AC03AC3
3A893A873A873A8F3A773A9D3AAF3A8A3A8C3A863A9D3AAF3A8B3A8C
Page 389 of 3924
![INFINITI FX35 2008 Workshop Manual
AT-316
< SERVICE INFORMATION >
ASSEMBLY
iii. Tighten adapter case assembly mounting bolts (1) to specifiedtorque. [With bracket (2).] Refer to AT-249, "
Component".
: Bolt (10)
CAUTION:
Do not reuse INFINITI FX35 2008 Workshop Manual
AT-316
< SERVICE INFORMATION >
ASSEMBLY
iii. Tighten adapter case assembly mounting bolts (1) to specifiedtorque. [With bracket (2).] Refer to AT-249, "
Component".
: Bolt (10)
CAUTION:
Do not reuse](/img/42/57017/w960_57017-388.png)
AT-316
< SERVICE INFORMATION >
ASSEMBLY
iii. Tighten adapter case assembly mounting bolts (1) to specifiedtorque. [With bracket (2).] Refer to AT-249, "
Component".
: Bolt (10)
CAUTION:
Do not reuse self-sealing bolts (3).
Refer to GI section to mark sure icons (symbol marks) in the fig-
ure. Refer to GI-8, "
Component".
35. Install needle bearing in drum support. CAUTION:
Take care with the direction of needle bearing. Refer to
AT-264, "
Location of Adjusting Sh ims, Needle Bearings,
Thrust Washers and Snap Rings".
Apply petroleum jelly to needle bearing.
36. Install direct clutch assembly in reverse brake. CAUTION:
Make sure that drum support edge surface and direct clutch
inner boss edge surface come to almost same place.
37. Install high and low reverse clutch assembly in direct clutch.
SCIA7210E
SCIA5198E
SCIA5019E
SCIA2306E
3AA93ABC3ACD3AC03ACA3AC03AC63AC53A913A773A893A873A873A8E3A773A983AC73AC93AC03AC3
3A893A873A873A8F3A773A9D3AAF3A8A3A8C3A863A9D3AAF3A8B3A8C
Page 392 of 3924
ASSEMBLYAT-319
< SERVICE INFORMATION >
DE
F
G H
I
J
K L
M A
B
AT
N
O P
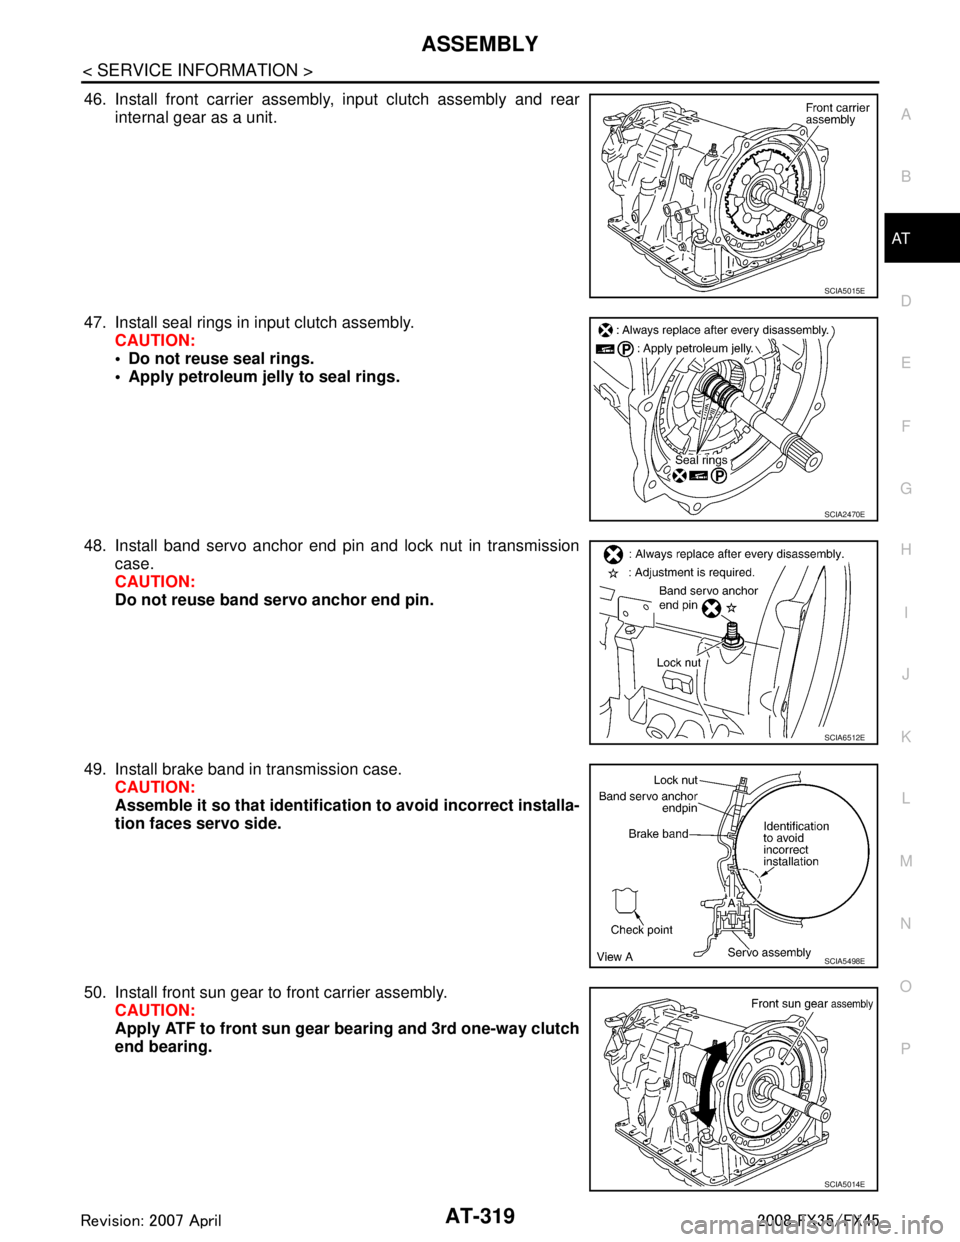
46. Install front carrier assembly, input clutch assembly and rear internal gear as a unit.
47. Install seal rings in input clutch assembly. CAUTION:
Do not reuse seal rings.
Apply petroleum jelly to seal rings.
48. Install band servo anchor end pin and lock nut in transmission case.
CAUTION:
Do not reuse band servo anchor end pin.
49. Install brake band in transmission case. CAUTION:
Assemble it so that identificatio n to avoid incorrect installa-
tion faces servo side.
50. Install front sun gear to front carrier assembly. CAUTION:
Apply ATF to front sun gear bearing and 3rd one-way clutch
end bearing.
SCIA5015E
SCIA2470E
SCIA6512E
SCIA5498E
SCIA5014E
3AA93ABC3ACD3AC03ACA3AC03AC63AC53A913A773A893A873A873A8E3A773A983AC73AC93AC03AC3
3A893A873A873A8F3A773A9D3AAF3A8A3A8C3A863A9D3AAF3A8B3A8C
Page 396 of 3924
ASSEMBLYAT-323
< SERVICE INFORMATION >
DE
F
G H
I
J
K L
M A
B
AT
N
O P
Assembly (2)INFOID:0000000001327412
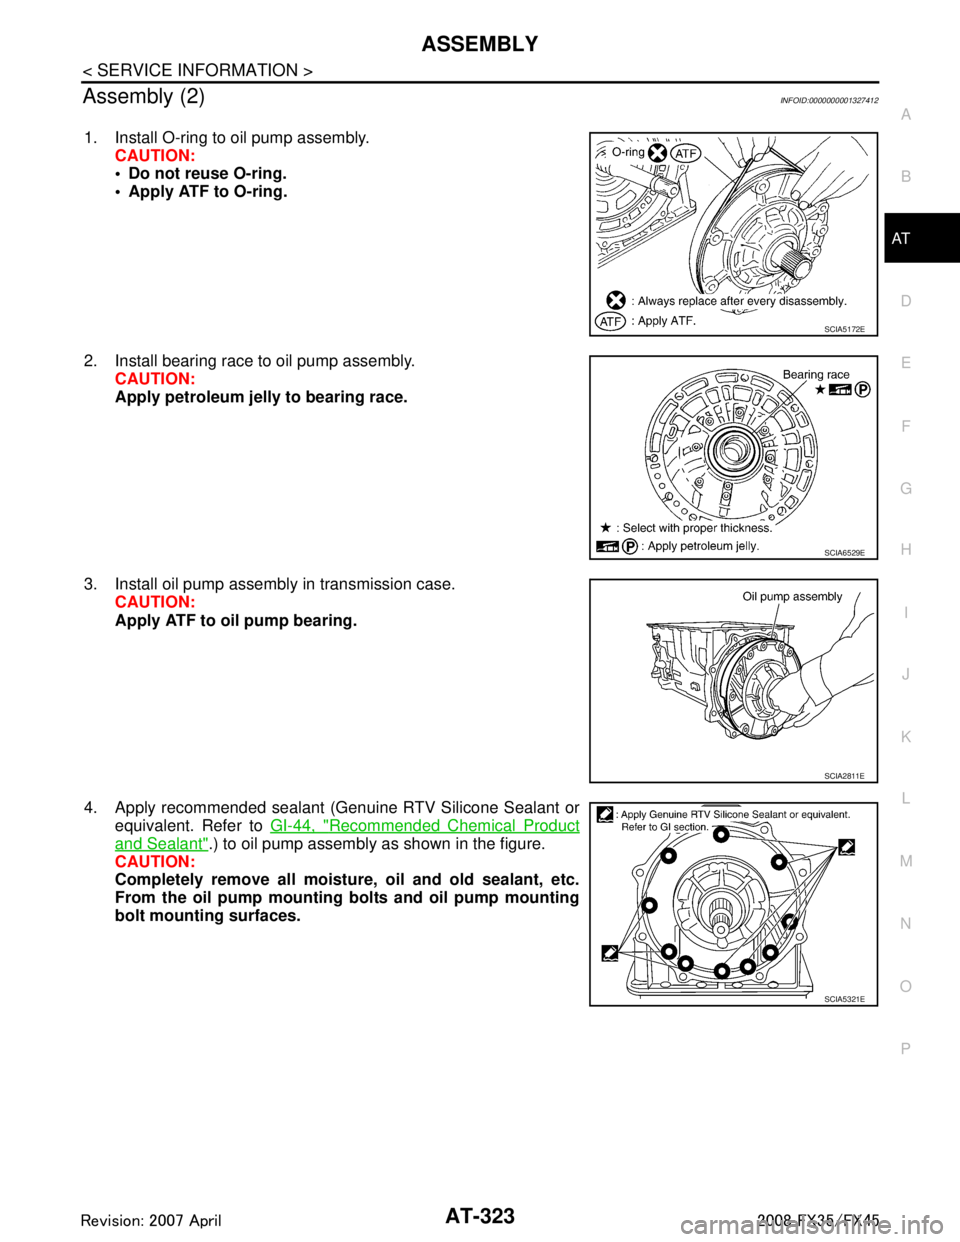
1. Install O-ring to oil pump assembly. CAUTION:
Do not reuse O-ring.
Apply ATF to O-ring.
2. Install bearing race to oil pump assembly. CAUTION:
Apply petroleum jelly to bearing race.
3. Install oil pump assembly in transmission case. CAUTION:
Apply ATF to oil pump bearing.
4. Apply recommended sealant (Genuine RTV Silicone Sealant or equivalent. Refer to GI-44, "
Recommended Chemical Product
and Sealant".) to oil pump assembly as shown in the figure.
CAUTION:
Completely remove all moisture, oil and old sealant, etc.
From the oil pump mounting bolts and oil pump mounting
bolt mounting surfaces.
SCIA5172E
SCIA6529E
SCIA2811E
SCIA5321E
3AA93ABC3ACD3AC03ACA3AC03AC63AC53A913A773A893A873A873A8E3A773A983AC73AC93AC03AC3
3A893A873A873A8F3A773A9D3AAF3A8A3A8C3A863A9D3AAF3A8B3A8C
Page 397 of 3924

AT-324
< SERVICE INFORMATION >
ASSEMBLY
5. Tighten oil pump mounting bolts to specified torque. Refer to AT-
249, "Component".
CAUTION:
Apply ATF to oil pump bushing.
6. Install O-ring to input clutch assembly. CAUTION:
Do not reuse O-ring.
Apply ATF to O-ring.
7. Install converter housing to transmission case, and then tighten converter housing mounting bolts (1) to the specified torque.
Refer to AT-249, "
Component".
: Bolt (8)
CAUTION:
Do not reuse self-sealing bolt (2).
8. Make sure that brake band does not close turbine revolution sensor hole.
9. Install control valve with TCM.
a. Connect TCM connector and park/neutral position switch con- nector.
SCIA2300E
SCIA5011E
SCIA7985E
SCIA5034E
SCIA5449E
3AA93ABC3ACD3AC03ACA3AC03AC63AC53A913A773A893A873A873A8E3A773A983AC73AC93AC03AC3
3A893A873A873A8F3A773A9D3AAF3A8A3A8C3A863A9D3AAF3A8B3A8C
Page 409 of 3924
ATC-4
< SERVICE INFORMATION >
PRECAUTIONS
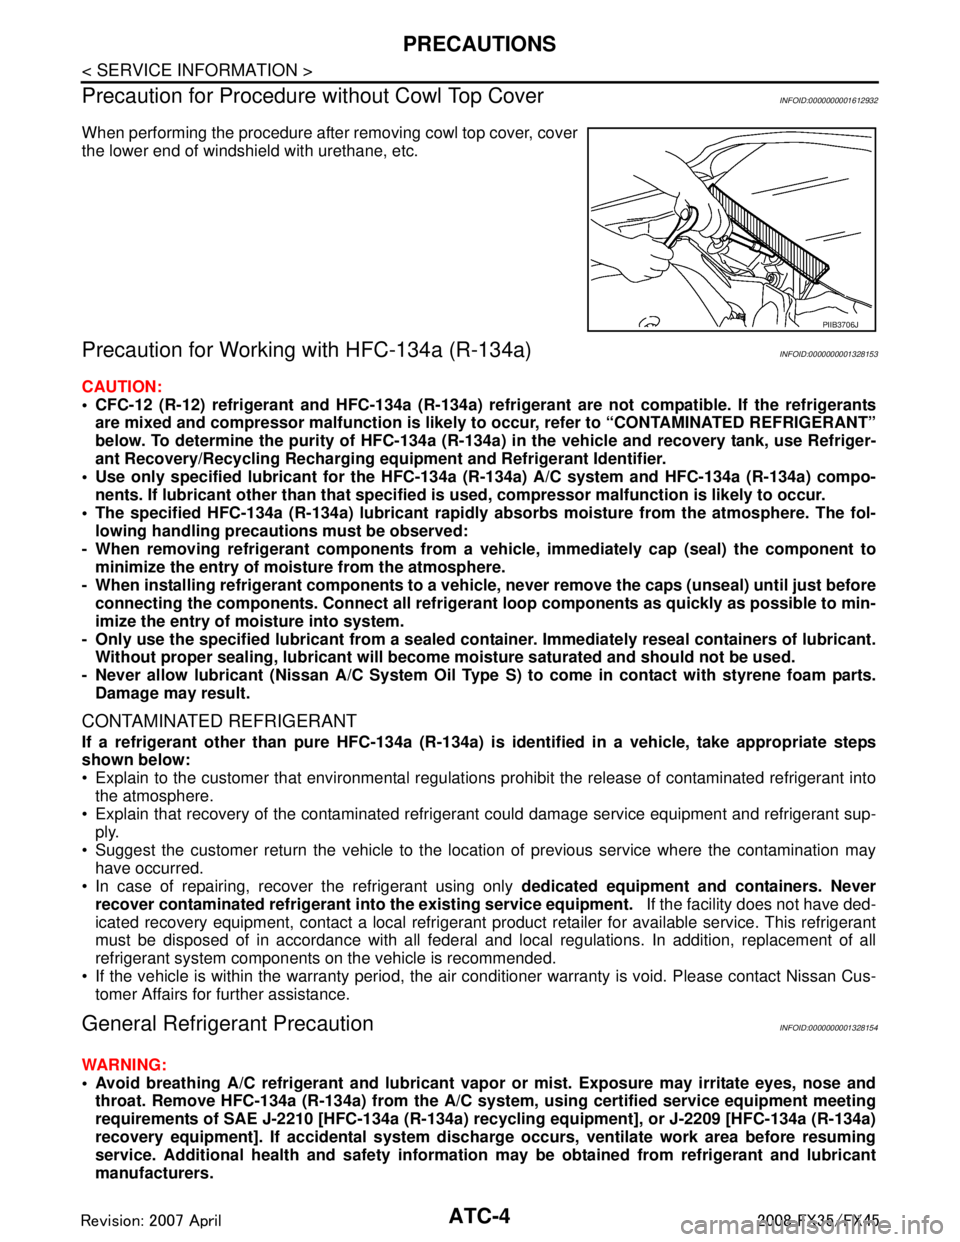
Precaution for Procedure without Cowl Top Cover
INFOID:0000000001612932
When performing the procedure after removing cowl top cover, cover
the lower end of windshield with urethane, etc.
Precaution for Working with HFC-134a (R-134a)INFOID:0000000001328153
CAUTION:
CFC-12 (R-12) refrigerant and HFC-134a (R-134a) refr igerant are not compatible. If the refrigerants
are mixed and compressor malfunct ion is likely to occur, refer to “CONTAMINATED REFRIGERANT”
below. To determine the purity of HFC-134a (R-134a) in the vehicle and recovery tank, use Refriger-
ant Recovery/Recycling Rech arging equipment and Refrigerant Identifier.
Use only specified lubricant for the HFC-134a (R-134a) A/C system and HFC-134a (R-134a) compo-
nents. If lubricant other than that specified is used, compressor malfunction is likely to occur.
The specified HFC-134a (R-134a) lu bricant rapidly absorbs moisture from the atmosphere. The fol-
lowing handling precauti ons must be observed:
- When removing refrigerant components from a vehicle, immediately cap (seal) the component to
minimize the entry of moisture from the atmosphere.
- When installing refrigerant components to a vehic le, never remove the caps (unseal) until just before
connecting the components. Connect all refriger ant loop components as quickly as possible to min-
imize the entry of moisture into system.
- Only use the specified lubricant fr om a sealed container. Immediately reseal containers of lubricant.
Without proper sealing, lubrican t will become moisture saturated and should not be used.
- Never allow lubricant (Nissan A/C System Oil Type S) to come in contact with styrene foam parts.
Damage may result.
CONTAMINATED REFRIGERANT
If a refrigerant other than pure HFC-134a (R-134a) is identified in a vehicle, take appropriate steps
shown below:
Explain to the customer that environmental regulations prohibit the release of contaminated refrigerant into
the atmosphere.
Explain that recovery of the contaminated refri gerant could damage service equipment and refrigerant sup-
ply.
Suggest the customer return the vehicle to the locati on of previous service where the contamination may
have occurred.
In case of repairing, recover the refrigerant using only dedicated equipment and containers. Never
recover contaminated refrigerant into the existing service equipment. If the facility does not have ded-
icated recovery equipment, contact a local refrigerant pr oduct retailer for available service. This refrigerant
must be disposed of in accordance with all federal and local regulations. In addition, replacement of all
refrigerant system components on the vehicle is recommended.
If the vehicle is within the warranty period, the air conditioner warranty is void. Please contact Nissan Cus-
tomer Affairs for further assistance.
General Refrigerant PrecautionINFOID:0000000001328154
WARNING:
Avoid breathing A/C refrigerant and lubricant vap or or mist. Exposure may irritate eyes, nose and
throat. Remove HFC-134a (R-134a) from the A/C syst em, using certified service equipment meeting
requirements of SAE J-2210 [HFC-134a (R-134a) recycling equipment], or J-2209 [HFC-134a (R-134a)
recovery equipment]. If accidental system discharge occurs, ventilate work area before resuming
service. Additional health and saf ety information may be obtained from refrigerant and lubricant
manufacturers.
PIIB3706J
3AA93ABC3ACD3AC03ACA3AC03AC63AC53A913A773A893A873A873A8E3A773A983AC73AC93AC03AC3
3A893A873A873A8F3A773A9D3AAF3A8A3A8C3A863A9D3AAF3A8B3A8C