service INFINITI M35 2006 Factory Service Manual
[x] Cancel search | Manufacturer: INFINITI, Model Year: 2006, Model line: M35, Model: INFINITI M35 2006Pages: 5621, PDF Size: 65.56 MB
Page 5046 of 5621
PREPARATION
RFD-3
C
E
F
G
H
I
J
K
L
MA
B
RFD
Revision: 2006 January2006 M35/M45
PREPARATIONPFP:00002
Special Service ToolsNDS000EZ
The actual shapes of Kent-Moore tools may differ from those of special service tools illustrated here.
To o l n u m b e r
(Kent-Moore No.)
To o l n a m eDescription
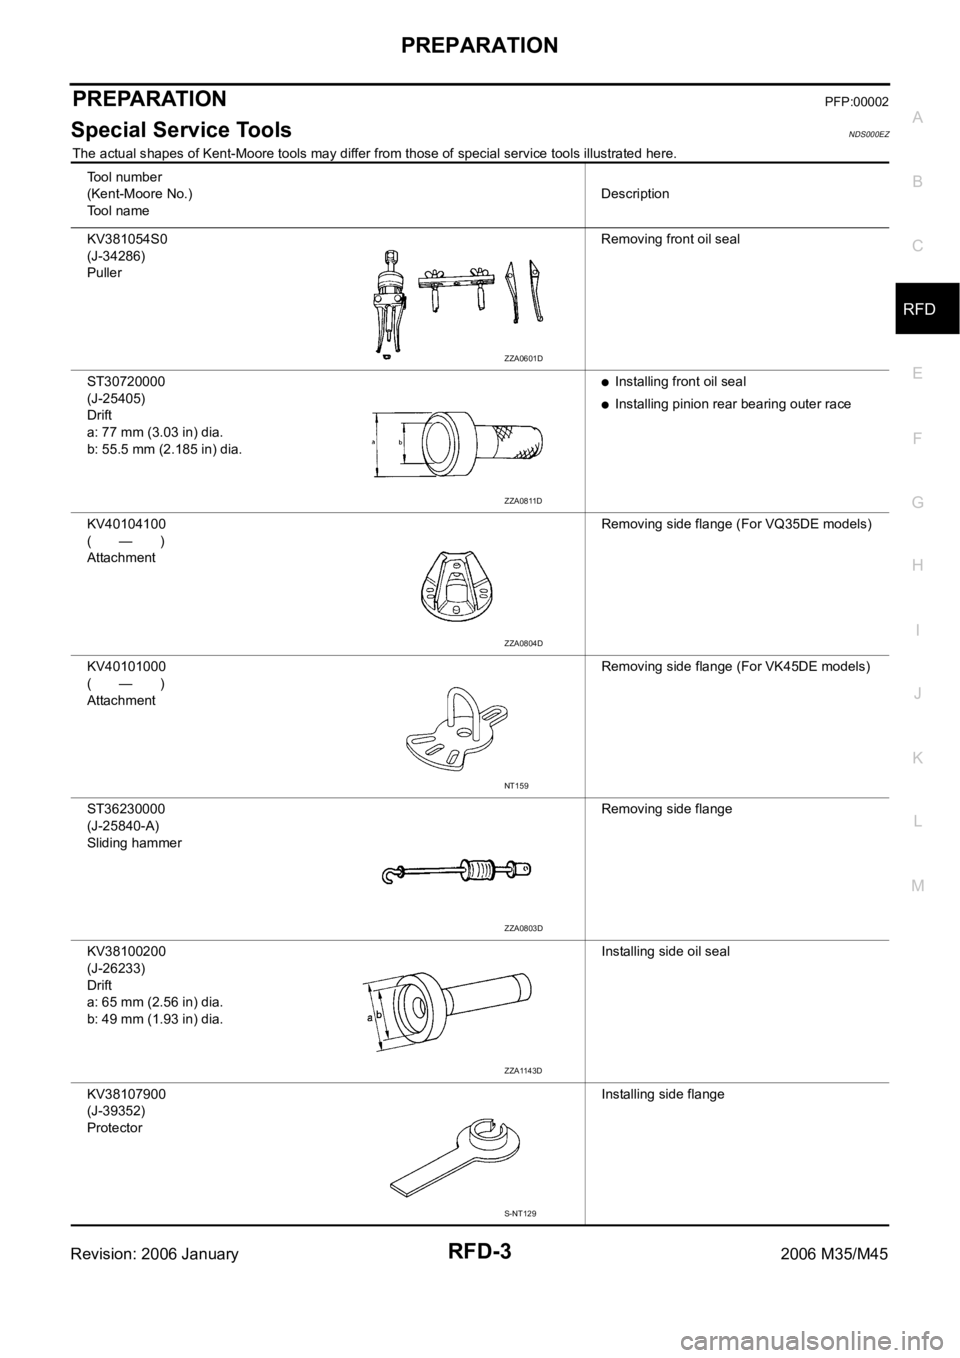
KV381054S0
(J-34286)
PullerRemoving front oil seal
ST30720000
(J-25405)
Drift
a: 77 mm (3.03 in) dia.
b: 55.5 mm (2.185 in) dia.
Installing front oil seal
Installing pinion rear bearing outer race
KV40104100
(—)
AttachmentRemoving side flange (For VQ35DE models)
KV40101000
(—)
AttachmentRemoving side flange (For VK45DE models)
ST36230000
(J-25840-A)
Sliding hammer Removing side flange
KV38100200
(J-26233)
Drift
a: 65 mm (2.56 in) dia.
b: 49 mm (1.93 in) dia.Installing side oil seal
KV38107900
(J-39352)
ProtectorInstalling side flange
ZZA0601D
ZZA0811D
ZZA0804D
NT159
ZZA0803D
ZZA1143D
S-NT129
Page 5049 of 5621
RFD-6
PREPARATION
Revision: 2006 January2006 M35/M45
Commercial Service ToolsNDS000F0
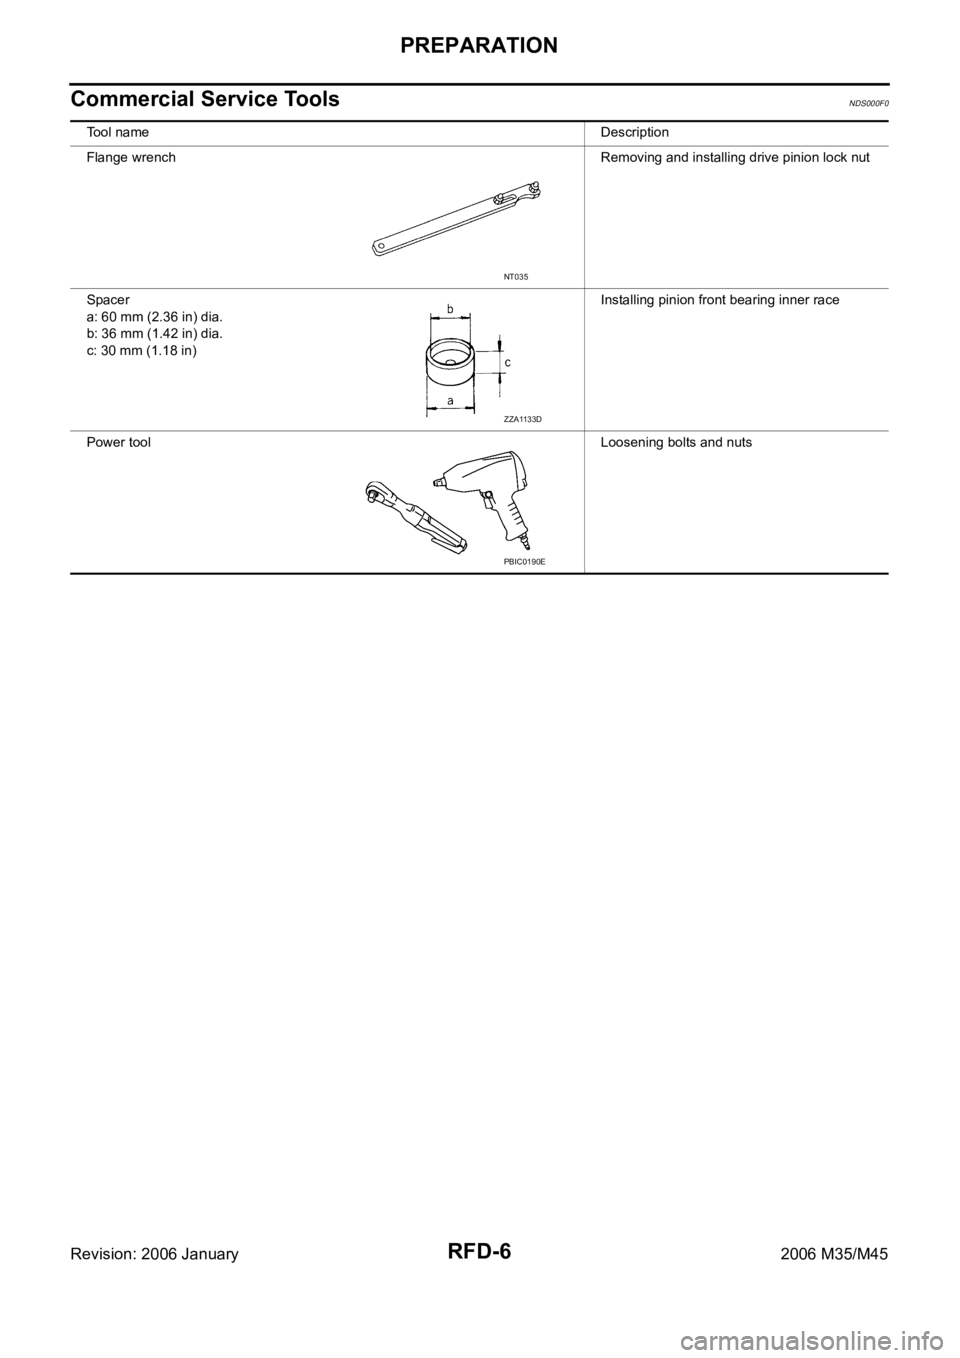
Tool nameDescription
Flange wrench Removing and installing drive pinion lock nut
Spacer
a: 60 mm (2.36 in) dia.
b: 36 mm (1.42 in) dia.
c: 30 mm (1.18 in)Installing pinion front bearing inner race
Power toolLoosening bolts and nuts
NT035
ZZA1133D
PBIC0190E
Page 5080 of 5621
SERVICE DATA AND SPECIFICATIONS (SDS)
RFD-37
C
E
F
G
H
I
J
K
L
MA
B
RFD
Revision: 2006 January2006 M35/M45
SERVICE DATA AND SPECIFICATIONS (SDS)PFP:00030
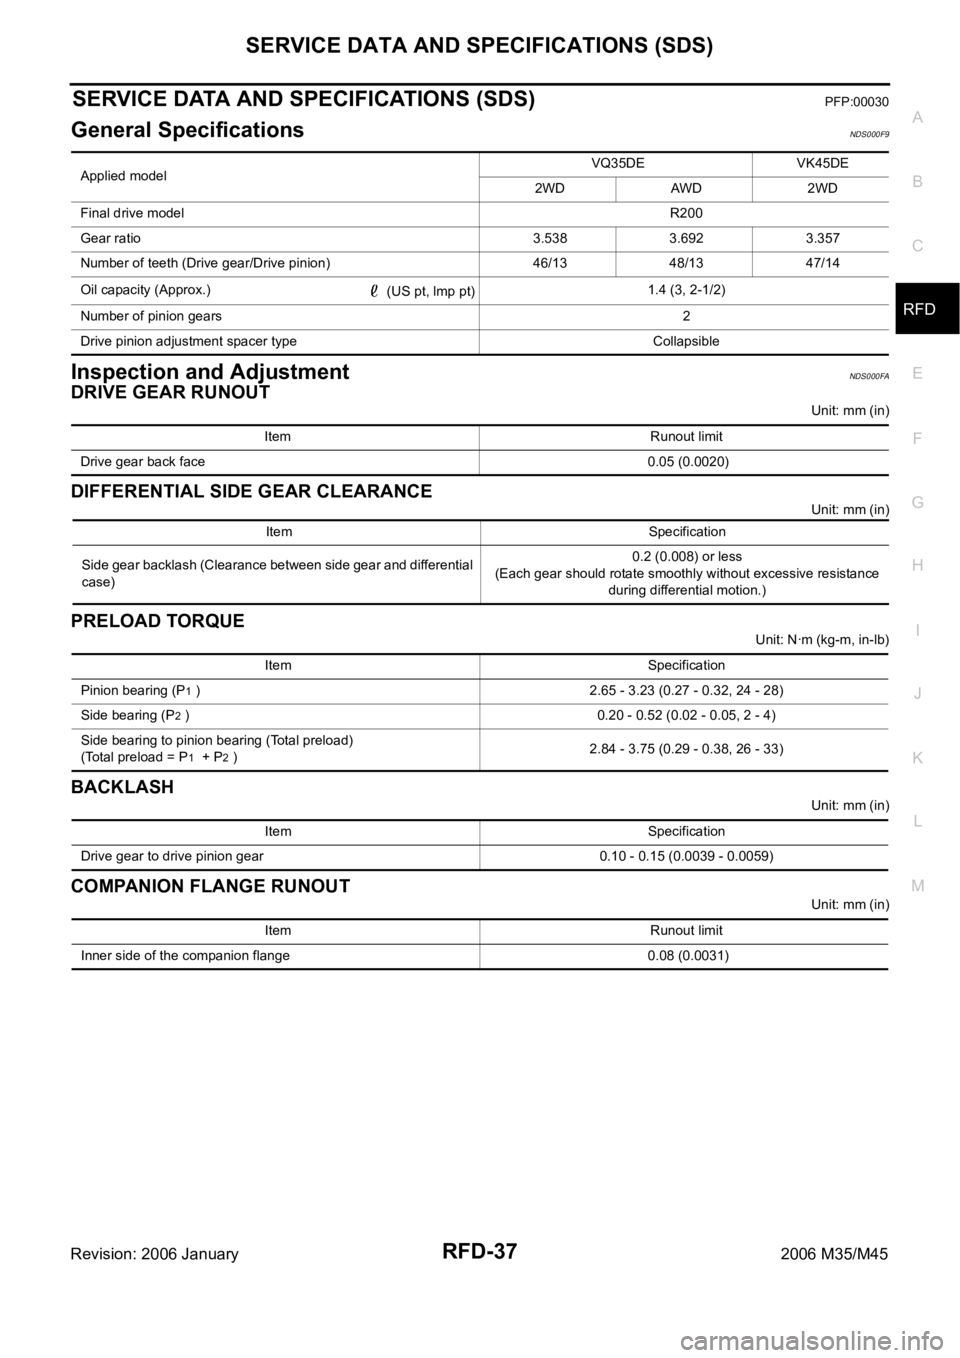
General SpecificationsNDS000F9
Inspection and AdjustmentNDS000FA
DRIVE GEAR RUNOUT
Unit: mm (in)
DIFFERENTIAL SIDE GEAR CLEARANCE
Unit: mm (in)
PRELOAD TORQUE
Unit: Nꞏm (kg-m, in-lb)
BACKLASH
Unit: mm (in)
COMPANION FLANGE RUNOUT
Unit: mm (in) Applied modelVQ35DE VK45DE
2WD AWD 2WD
Final drive modelR200
Gear ratio 3.538 3.692 3.357
Number of teeth (Drive gear/Drive pinion) 46/13 48/13 47/14
Oil capacity (Approx.)
(US pt, lmp pt)1.4 (3, 2-1/2)
Number of pinion gears2
Drive pinion adjustment spacer type Collapsible
Item Runout limit
Drive gear back face 0.05 (0.0020)
Item Specification
Side gear backlash (Clearance between side gear and differential
case)0.2 (0.008) or less
(Each gear should rotate smoothly without excessive resistance
during differential motion.)
Item Specification
Pinion bearing (P
1 ) 2.65 - 3.23 (0.27 - 0.32, 24 - 28)
Side bearing (P
2 ) 0.20 - 0.52 (0.02 - 0.05, 2 - 4)
Side bearing to pinion bearing (Total preload)
(Total preload = P
1 + P2 )2.84 - 3.75 (0.29 - 0.38, 26 - 33)
Item Specification
Drive gear to drive pinion gear 0.10 - 0.15 (0.0039 - 0.0059)
Item Runout limit
Inner side of the companion flange 0.08 (0.0031)
Page 5081 of 5621

RFD-38
SERVICE DATA AND SPECIFICATIONS (SDS)
Revision: 2006 January2006 M35/M45
SELECTIVE PARTS
Side Gear Thrust Washer
Unit: mm (in)
*: Always check with the Parts Department for the latest parts information.
Pinion Height Adjusting Washer
Unit: mm (in)
*: Always check with the Parts Department for the latest parts information.
Side Bearing Adjusting Washer
Unit: mm (in)
*: Always check with the Parts Department for the latest parts information. Thickness Part number* Thickness Part number*
0.75 (0.0295)
0.78 (0.0307)
0.81 (0.0319)
0.84 (0.0331)38424 EC000
38424 EC001
38424 EC002
38424 EC0030.87 (0.0343)
0.90 (0.0350)
0.93 (0.0366)38424 EC004
38424 EC005
38424 EC006
Thickness Part number* Thickness Part number*
3.05 (0.1201)
3.08 (0.1213)
3.11 (0.1224)
3.14 (0.1236)38154 0C000
38154 0C001
38154 0C002
38154 0C0033.17 (0.1248)
3.20 (0.1260)
3.23 (0.1272)
3.26 (0.1283)38154 0C004
38154 0C005
38154 0C006
38154 0C007
Thickness Part number* Thickness Part number*
2.00 (0.0787)
2.05 (0.0807)
2.10 (0.0827)
2.15 (0.0846)
2.20 (0.0866)
2.25 (0.0886)
2.30 (0.0906)38453 N3100
38453 N3101
38453 N3102
38453 N3103
38453 N3104
38453 N3105
38453 N31062.35 (0.0925)
2.40 (0.0945)
2.45 (0.0965)
2.50 (0.0984)
2.55 (0.1004)
2.60 (0.1024)
2.65 (0.1043)38453 N3107
38453 N3108
38453 N3109
38453 N3110
38453 N3111
38453 N3112
38453 N3113
Page 5082 of 5621
RSU-1
REAR SUSPENSION
E SUSPENSION
CONTENTS
C
D
F
G
H
I
J
K
L
M
SECTION RSU
A
B
RSU
Revision: 2006 January2006 M35/M45
REAR SUSPENSION
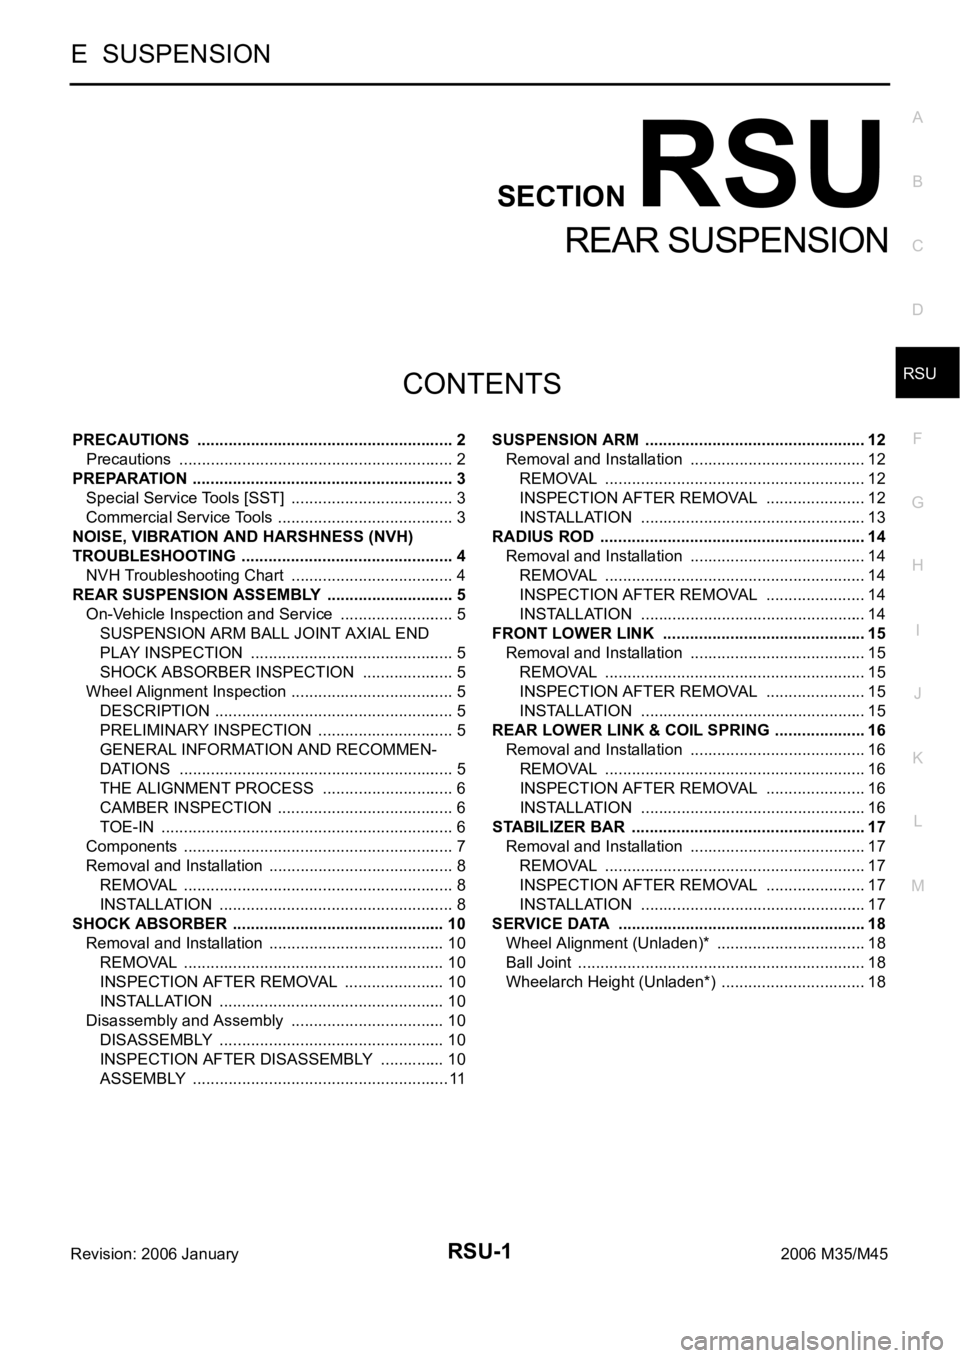
PRECAUTIONS .......................................................... 2
Precautions .............................................................. 2
PREPARATION ........................................................... 3
Special Service Tools [SST] ..................................... 3
Commercial Service Tools ........................................ 3
NOISE, VIBRATION AND HARSHNESS (NVH)
TROUBLESHOOTING ................................................ 4
NVH Troubleshooting Chart ..................................... 4
REAR SUSPENSION ASSEMBLY ............................. 5
On-Vehicle Inspection and Service .......................... 5
SUSPENSION ARM BALL JOINT AXIAL END
PLAY INSPECTION .............................................. 5
SHOCK ABSORBER INSPECTION ..................... 5
Wheel Alignment Inspection ..................................... 5
DESCRIPTION ...................................................... 5
PRELIMINARY INSPECTION ............................... 5
GENERAL INFORMATION AND RECOMMEN-
DATIONS .............................................................. 5
THE ALIGNMENT PROCESS .............................. 6
CAMBER INSPECTION ........................................ 6
TOE-IN .................................................................. 6
Components ............................................................. 7
Removal and Installation .......................................... 8
REMOVAL ........................................................
..... 8
INSTALLATION ..................................................... 8
SHOCK ABSORBER ................................................ 10
Removal and Installation ........................................ 10
REMOVAL ........................................................
... 10
INSPECTION AFTER REMOVAL ....................... 10
INSTALLATION ................................................... 10
Disassembly and Assembly ................................... 10
DISASSEMBLY ................................................... 10
INSPECTION AFTER DISASSEMBLY ............... 10
ASSEMBLY .......................................................... 11SUSPENSION ARM .................................................. 12
Removal and Installation ........................................ 12
REMOVAL ........................................................
... 12
INSPECTION AFTER REMOVAL ....................... 12
INSTALLATION ................................................... 13
RADIUS ROD ............................................................ 14
Removal and Installation ........................................ 14
REMOVAL ........................................................
... 14
INSPECTION AFTER REMOVAL ....................... 14
INSTALLATION ................................................... 14
FRONT LOWER LINK .............................................. 15
Removal and Installation ........................................ 15
REMOVAL ........................................................
... 15
INSPECTION AFTER REMOVAL ....................... 15
INSTALLATION ................................................... 15
REAR LOWER LINK & COIL SPRING ..................
... 16
Removal and Installation ........................................ 16
REMOVAL ........................................................
... 16
INSPECTION AFTER REMOVAL ....................... 16
INSTALLATION ................................................... 16
STABILIZER BAR ..................................................... 17
Removal and Installation ........................................ 17
REMOVAL ........................................................
... 17
INSPECTION AFTER REMOVAL ....................... 17
INSTALLATION ................................................... 17
SERVICE DATA ........................................................ 18
Wheel Alignment (Unladen)* .................................. 18
Ball Joint ................................................................. 18
Wheelarch Height (Unladen*) ................................. 18
Page 5084 of 5621
![INFINITI M35 2006 Factory Service Manual PREPARATION
RSU-3
C
D
F
G
H
I
J
K
L
MA
B
RSU
Revision: 2006 January2006 M35/M45
PREPARATIONPFP:00002
Special Service Tools [SST]NES000J3
The actual shapes of Kent-Moore tools may differ from those of INFINITI M35 2006 Factory Service Manual PREPARATION
RSU-3
C
D
F
G
H
I
J
K
L
MA
B
RSU
Revision: 2006 January2006 M35/M45
PREPARATIONPFP:00002
Special Service Tools [SST]NES000J3
The actual shapes of Kent-Moore tools may differ from those of](/img/42/57023/w960_57023-5083.png)
PREPARATION
RSU-3
C
D
F
G
H
I
J
K
L
MA
B
RSU
Revision: 2006 January2006 M35/M45
PREPARATIONPFP:00002
Special Service Tools [SST]NES000J3
The actual shapes of Kent-Moore tools may differ from those of special service tools illustrated here.
Commercial Service ToolsNES000J4
Tool number
(Kent-Moore No.)
Tool nameDescription
ST3127S000
(See J25742-1)
Preload Gauge
1. GG91030000
(J25765)
Torque wrench
2. HT62940000
(—)
Socket adapter
3. HT62900000
(—)
Socket adapterMeasuring rotating torque of ball joint
NT124
Tool nameDescription
Power tool
Removing wheel nuts
Removing brake caliper assembly
Removing rear suspension component
parts
PBIC0190E
Page 5086 of 5621
REAR SUSPENSION ASSEMBLY
RSU-5
C
D
F
G
H
I
J
K
L
MA
B
RSU
Revision: 2006 January2006 M35/M45
REAR SUSPENSION ASSEMBLYPFP:55020
On-Vehicle Inspection and ServiceNES000J6
Make sure the mounting conditions (looseness, back lash) of each component and component conditions
(wear, damage) are normal.
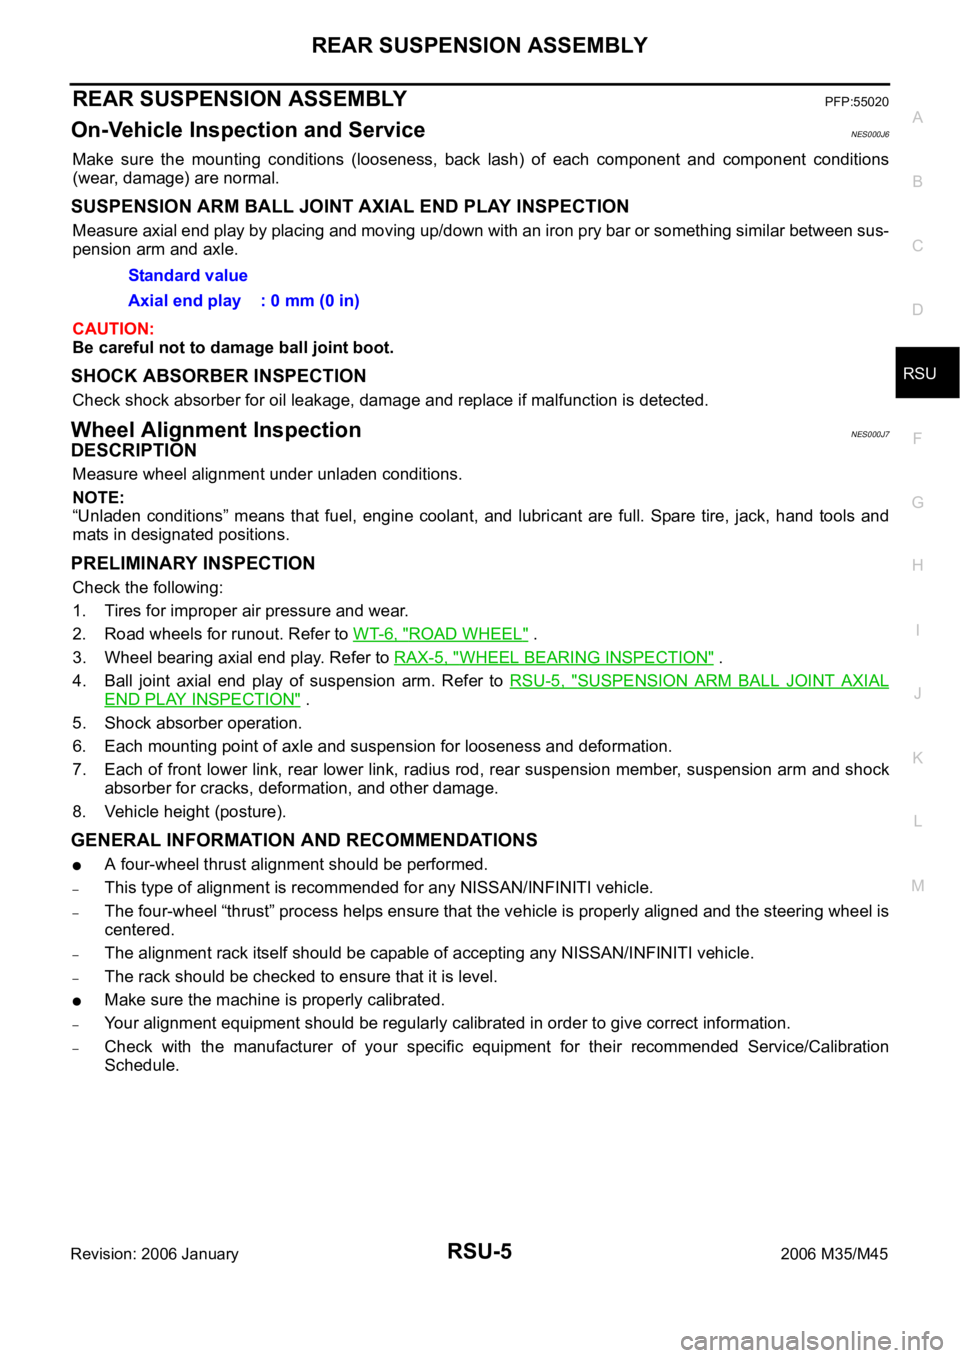
SUSPENSION ARM BALL JOINT AXIAL END PLAY INSPECTION
Measure axial end play by placing and moving up/down with an iron pry bar or something similar between sus-
pension arm and axle.
CAUTION:
Be careful not to damage ball joint boot.
SHOCK ABSORBER INSPECTION
Check shock absorber for oil leakage, damage and replace if malfunction is detected.
Wheel Alignment InspectionNES000J7
DESCRIPTION
Measure wheel alignment under unladen conditions.
NOTE:
“Unladen conditions” means that fuel, engine coolant, and lubricant are full. Spare tire, jack, hand tools and
mats in designated positions.
PRELIMINARY INSPECTION
Check the following:
1. Tires for improper air pressure and wear.
2. Road wheels for runout. Refer to WT-6, "
ROAD WHEEL" .
3. Wheel bearing axial end play. Refer to RAX-5, "
WHEEL BEARING INSPECTION" .
4. Ball joint axial end play of suspension arm. Refer to RSU-5, "
SUSPENSION ARM BALL JOINT AXIAL
END PLAY INSPECTION" .
5. Shock absorber operation.
6. Each mounting point of axle and suspension for looseness and deformation.
7. Each of front lower link, rear lower link, radius rod, rear suspension member, suspension arm and shock
absorber for cracks, deformation, and other damage.
8. Vehicle height (posture).
GENERAL INFORMATION AND RECOMMENDATIONS
A four-wheel thrust alignment should be performed.
–This type of alignment is recommended for any NISSAN/INFINITI vehicle.
–The four-wheel “thrust” process helps ensure that the vehicle is properly aligned and the steering wheel is
centered.
–The alignment rack itself should be capable of accepting any NISSAN/INFINITI vehicle.
–The rack should be checked to ensure that it is level.
Make sure the machine is properly calibrated.
–Your alignment equipment should be regularly calibrated in order to give correct information.
–Check with the manufacturer of your specific equipment for their recommended Service/Calibration
Schedule.Standard value
Axial end play : 0 mm (0 in)
Page 5087 of 5621

RSU-6
REAR SUSPENSION ASSEMBLY
Revision: 2006 January2006 M35/M45
THE ALIGNMENT PROCESS
IMPORTANT:
Use only the alignment specifications listed in this Service Manual.
When displaying the alignment settings, many alignment machines use “indicators”: (Green/red, plus or
minus, Go/No Go). Do NOT use these indicators.
–The alignment specifications programmed into your machine that operate these indicators may not be cor-
rect.
–This may result in an ERROR.
Some newer alignment machines are equipped with an optional “Rolling Compensation” method to “com-
pensate” the sensors (alignment targets or head units). DO NOT use this “Rolling Compensation”
method.
–Use the “Jacking Compensation Method”. After installing the alignment targets or head units, raise the
vehicle and rotate the wheels 1/2 turn both ways.
–See Instructions in the alignment machine you're using for more information on this.
CAMBER INSPECTION
Measure camber of both right and left wheels with a suitable alignment gauge.
Adjust in accordance with the following procedures.
If outside the standard value, adjust with adjusting bolt in front
lower link.
NOTE:
After adjusting camber, be sure to check toe-in.
TOE-IN
If toe-in is not within the specification, adjust with adjusting bolt in
rear lower link.
CAUTION:
Be sure to adjust equally on RH and LH side with adjusting bolt.
If toe-in is not still within the specification, inspect and replace any
damaged or worn rear suspension parts.Standard value
Camber : Refer to RSU-18, "
SERVICE DATA" .
SRA096A
SEIA0227E
SEIA0228E
Page 5099 of 5621
RSU-18
SERVICE DATA
Revision: 2006 January2006 M35/M45
SERVICE DATAPFP:00030
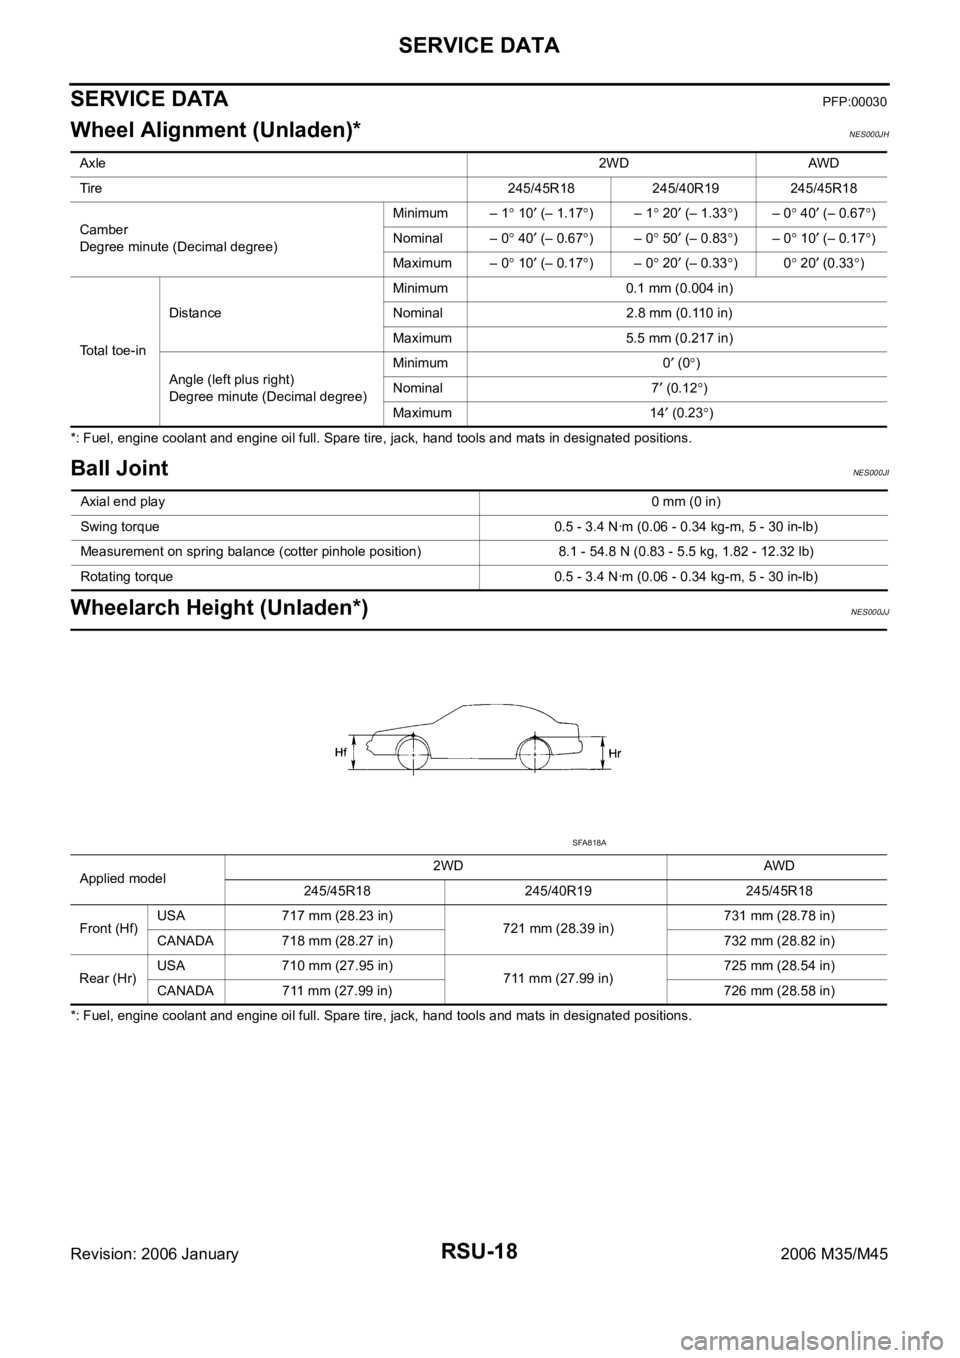
Wheel Alignment (Unladen)*NES000JH
*: Fuel, engine coolant and engine oil full. Spare tire, jack, hand tools and mats in designated positions.
Ball JointNES000JI
Wheelarch Height (Unladen*)NES000JJ
*: Fuel, engine coolant and engine oil full. Spare tire, jack, hand tools and mats in designated positions. Axle2WD AWD
Tire 245/45R18 245/40R19 245/45R18
Camber
Degree minute (Decimal degree)Minimum – 1
10 (– 1.17)– 1 20 (– 1.33)– 0 40 (– 0.67)
Nominal – 0
40 (– 0.67)– 0 50 (– 0.83)– 0 10 (– 0.17)
Maximum – 0
10 (– 0.17)– 0 20 (– 0.33)0 20 (0.33)
Total toe-inDistanceMinimum 0.1 mm (0.004 in)
Nominal 2.8 mm (0.110 in)
Maximum 5.5 mm (0.217 in)
Angle (left plus right)
Degree minute (Decimal degree)Minimum 0
(0)
Nominal 7
(0.12)
Maximum 14
(0.23)
Axial end play0 mm (0 in)
Swing torque 0.5 - 3.4 Nꞏm (0.06 - 0.34 kg-m, 5 - 30 in-lb)
Measurement on spring balance (cotter pinhole position) 8.1 - 54.8 N (0.83 - 5.5 kg, 1.82 - 12.32 lb)
Rotating torque 0.5 - 3.4 Nꞏm (0.06 - 0.34 kg-m, 5 - 30 in-lb)
Applied model2WD AWD
245/45R18 245/40R19 245/45R18
Front (Hf)USA 717 mm (28.23 in)
721 mm (28.39 in)731 mm (28.78 in)
CANADA 718 mm (28.27 in) 732 mm (28.82 in)
Rear (Hr)USA 710 mm (27.95 in)
711 mm (27.99 in)725 mm (28.54 in)
CANADA 711 mm (27.99 in) 726 mm (28.58 in)
SFA818A
Page 5100 of 5621
SB-1
SEAT BELTS
H RESTRAINTS
CONTENTS
C
D
E
F
G
I
J
K
L
M
SECTION SB
A
B
SB
Revision: 2006 January2006 M35/M45
SEAT BELTS
PRECAUTIONS .......................................................... 2
Precautions for Supplemental Restraint System
(SRS) “AIR BAG” and “SEAT BELT PRE-TEN-
SIONER” .................................................................. 2
Precaution for Seat Belt Service .............................. 2
AFTER A COLLISION ........................................... 2
PRE-CRASH SEAT BELT .......................................... 3
Component Parts and Harness Connector Location ..... 3
System Description .................................................. 3
FUNCTION DESCRIPTION .................................. 4
FAIL-SAFE MODE ................................................ 4
CAN Communication System Description ................ 5
CAN Communication Unit ........................................ 5
Schematic ................................................................ 6
Wiring Diagram — PSB — ....................................... 7
Terminals and Reference Value for Pre-Crash Seat
Belt Control Unit ..................................................... 13
Work Flow .............................................................. 13
CONSULT-II Function (PRECRASH SEATBELT) ... 14
CONSULT-II INSPECTION PROCEDURE ......... 14
HOW TO READ SELF-DIAGNOSTIC RESULTS ... 15
SELF-DIAGNOSTIC RESULTS ITEM CHART ... 15
DATA MONITOR ITEM CHART .......................... 15
Preliminary Check .................................................. 16
PRE-CRASH SEAT BELT OPERATION
INSPECTION ...................................................... 16
Diagnoses Symptom Chart .................................... 16
Check CAN Communication System Inspection
[U1000] ................................................................... 16
Ignition Power Supply Circuit Check ...................... 17
Motor Power Supply and Ground Circuit Check
[B2454] ................................................................... 17
Seat Belt Buckle Switch (Driver Side) Circuit Check ... 19
Seat Belt Buckle Switch (Passenger Side) Circuit
Check ..................................................................... 21
Brake Pedal Stroke Sensor Circuit Check [B2453] ... 22
Pre-Crash Seat Belt Motor LH Circuit Check [B2452]
... 25
Pre-Crash Seat Belt Motor RH Circuit Check [B2451] ................................................................... 27
Brake Pedal Stroke Sensor Shield Wire Circuit
Check ..................................................................... 28
Removal and Installation of Pre-Crash Seat Belt
Control Unit ............................................................. 29
REMOVAL ........................................................
... 29
INSTALLATION ................................................... 29
SEAT BELTS ............................................................. 30
System Description ................................................. 30
SEAT BELT WARNING CHIME ........................... 30
SEAT BELT WARNING LAMP ............................. 30
Removal and Installation of Front Seat Belt ........... 30
REMOVAL OF SEAT BELT RETRACTOR .......... 30
INSTALLATION OF SEAT BELT RETRACTOR ... 31
REMOVAL OF SEAT BELT BUCKLE .................. 31
INSTALLATION OF SEAT BELT BUCKLE .......
... 31
Removal and Installation of Rear Seat Belt ............ 32
REMOVAL OF SEAT BELT RETRACTOR .......... 32
INSTALLATION OF SEAT BELT RETRACTOR ... 32
REMOVAL OF SEAT BELT BUCKLE .................. 32
INSTALLATION OF SEAT BELT BUCKLE .......... 33
Seat Belt Inspection ................................................ 33
AFTER A COLLISION ......................................... 33
PRELIMINARY CHECKS .................................... 33
SEAT BELT RETRACTOR ON-VEHICLE
CHECK ................................................................ 34
SEAT BELT RETRACTOR OFF-VEHICLE
CHECK (FRONT SEAT BELT) ............................ 35
SEAT BELT RETRACTOR OFF-VEHICLE
CHECK (REAR SEAT BELT) ............................... 35
LATCH (LOWER ANCHORS AND TETHER FOR
CHILDREN) SYSTEM ............................................... 36
Removal and Installation ........................................ 36
REMOVAL ........................................................
... 36
INSTALLATION ................................................... 36
TOP TETHER STRAP CHILD RESTRAINT ............. 37
Removal and Installation ........................................ 37
REMOVAL ........................................................
... 37
INSTALLATION ................................................... 37