Ignition harness INFINITI QX4 2001 Factory Service Manual
[x] Cancel search | Manufacturer: INFINITI, Model Year: 2001, Model line: QX4, Model: INFINITI QX4 2001Pages: 2395, PDF Size: 43.2 MB
Page 833 of 2395

Diagnostic ProcedureNBEC0172
1 CHECK EXHAUST AIR LEAK
1. Start engine and run it at idle.
2. Listen for an exhaust air leak before three way catalyst.
SEF099P
OK or NG
OK©GO TO 2.
NG©Repair or replace.
2 CHECK FOR INTAKE AIR LEAK
Listen for an intake air leak after the mass air flow sensor.
OK or NG
OK©GO TO 3.
NG©Repair or replace.
3 CHECK HEATED OXYGEN SENSOR 1 (FRONT) CIRCUIT FOR OPEN AND SHORT
1. Turn ignition switch ªOFFº.
2. Disconnect corresponding heated oxygen sensor 1 (front) harness connector.
3. Disconnect ECM harness connector.
4. Check harness continuity between ECM terminal and HO2S1 terminal as follows.
Refer to Wiring Diagram.
MTBL0477
Continuity should exist.
5. Check harness continuity between ECM terminal or HO2S1 terminal and ground as follows.
Refer to Wiring Diagram.
MTBL0478
Continuity should not exist.
6. Also check harness for short to power.
OK or NG
OK©GO TO 4.
NG©Repair open circuit or short to ground or short to power in harness or connectors.
DTC P0171 (RIGHT, -B1), P0174 (LEFT, -B2) FUEL INJECTION SYSTEM
FUNCTION (LEAN)
Diagnostic Procedure
EC-298
Page 836 of 2395

8 CHECK INJECTOR
1. Confirm that the engine is cooled down and there are no fire hazards near the vehicle.
2. Turn ignition switch ªOFFº.
3. Disconnect injector harness connectors on left bank (for DTC P0171), right bank (for DTC P0174).
4. Remove injector gallery assembly. Refer to EC-41.
Keep fuel hose and all injectors connected to injector gallery.
The injector harness connectors on right bank (for DTC P0171), left bank (for DTC P0174) should remain connected.
5. Disconnect all ignition coil harness connectors.
6. Prepare pans or saucers under each injector.
7. Crank engine for about 3 seconds. Make sure that fuel sprays out from injectors.
SEF595Q
Fuel should be sprayed evenly for each injector.
OK or NG
OK©GO TO 9.
NG©Replace injectors from which fuel does not spray out. Always replace O-ring with new
ones.
9 CHECK INTERMITTENT INCIDENT
Refer to ªTROUBLE DIAGNOSIS FOR INTERMITTENT INCIDENTº, EC-140.
©INSPECTION END
GI
MA
EM
LC
FE
AT
TF
PD
AX
SU
BR
ST
RS
BT
HA
SC
EL
IDX
DTC P0171 (RIGHT, -B1), P0174 (LEFT, -B2) FUEL INJECTION SYSTEM
FUNCTION (LEAN)
Diagnostic Procedure (Cont'd)
EC-301
Page 838 of 2395

SEF960Y
WITH GSTNBEC0174S021) Start engine and warm it up to normal operating temperature.
2) Turn ignition switch ªOFFº and wait at least 10 seconds.
3) Disconnect mass air flow sensor harness connector. Then
restart and run engine for at least 5 seconds at idle speed.
4) Stop engine and reconnect mass air flow sensor harness con-
nector.
5) Select ªMODE 7º with GST. Make sure 1st trip DTC P0100 is
detected.
6) Select ªMODE 4º with GST and erase the 1st trip DTC P0100.
7) Start engine again and let it idle for at least 10 minutes.
8) Select ªMODE 7º with GST. The 1st trip DTC P0172 or P0175
should be detected at this stage, if a malfunction exists. If so,
go to ªDiagnostic Procedureº, EC-306.
9) If it is difficult to start engine at step 7, the fuel injection sys-
tem has a malfunction.
10) Crank engine while depressing accelerator pedal.
If engine starts, go to ªDiagnostic Procedureº, EC-306. If
engine does not start, check exhaust and intake air leak visu-
ally.
GI
MA
EM
LC
FE
AT
TF
PD
AX
SU
BR
ST
RS
BT
HA
SC
EL
IDX
DTC P0172 (RIGHT, -B1), P0175 (LEFT, -B2) FUEL INJECTION SYSTEM
FUNCTION (RICH)
DTC Confirmation Procedure (Cont'd)
EC-303
Page 841 of 2395

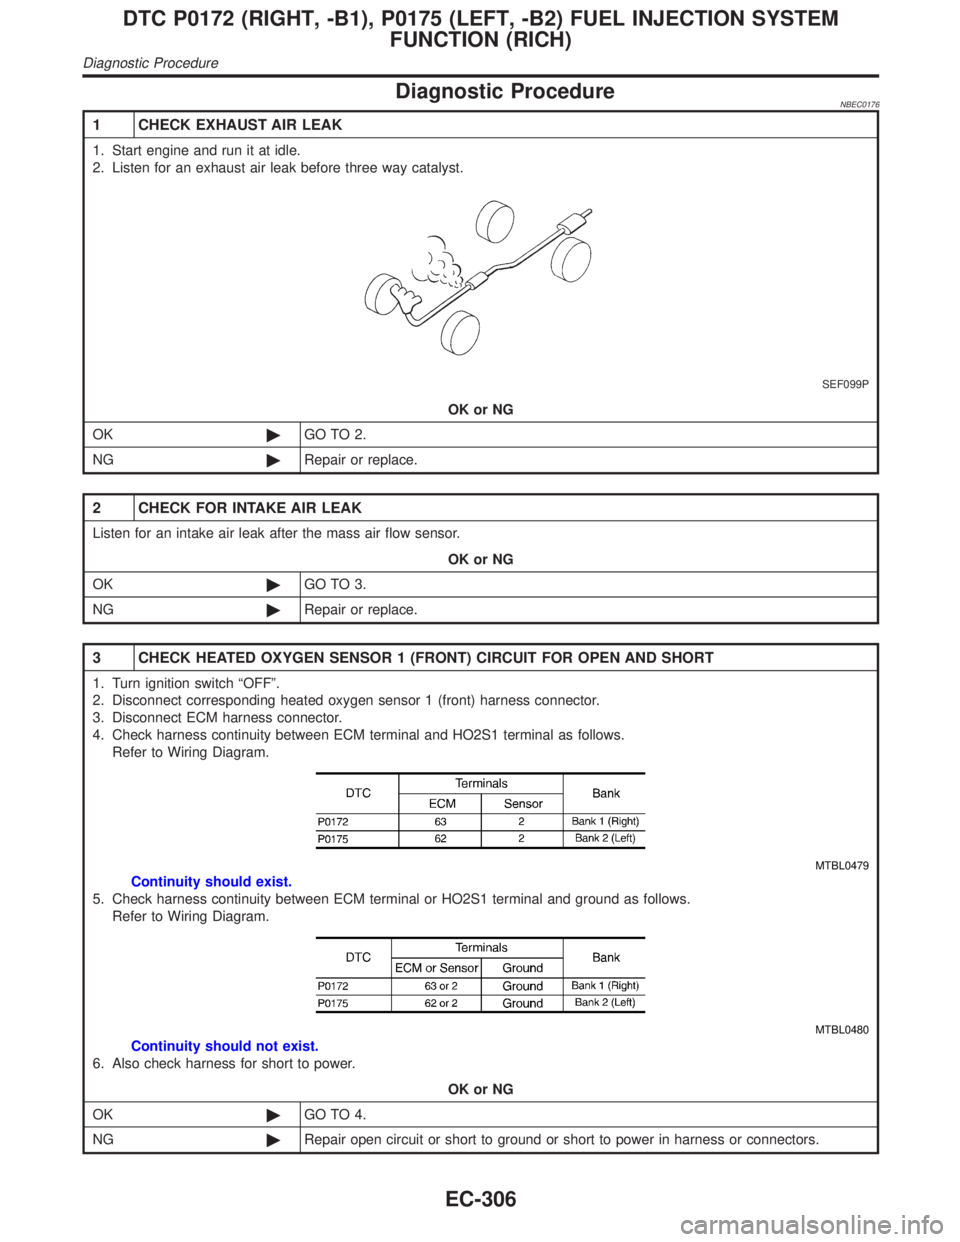
Diagnostic ProcedureNBEC0176
1 CHECK EXHAUST AIR LEAK
1. Start engine and run it at idle.
2. Listen for an exhaust air leak before three way catalyst.
SEF099P
OK or NG
OK©GO TO 2.
NG©Repair or replace.
2 CHECK FOR INTAKE AIR LEAK
Listen for an intake air leak after the mass air flow sensor.
OK or NG
OK©GO TO 3.
NG©Repair or replace.
3 CHECK HEATED OXYGEN SENSOR 1 (FRONT) CIRCUIT FOR OPEN AND SHORT
1. Turn ignition switch ªOFFº.
2. Disconnect corresponding heated oxygen sensor 1 (front) harness connector.
3. Disconnect ECM harness connector.
4. Check harness continuity between ECM terminal and HO2S1 terminal as follows.
Refer to Wiring Diagram.
MTBL0479
Continuity should exist.
5. Check harness continuity between ECM terminal or HO2S1 terminal and ground as follows.
Refer to Wiring Diagram.
MTBL0480
Continuity should not exist.
6. Also check harness for short to power.
OK or NG
OK©GO TO 4.
NG©Repair open circuit or short to ground or short to power in harness or connectors.
DTC P0172 (RIGHT, -B1), P0175 (LEFT, -B2) FUEL INJECTION SYSTEM
FUNCTION (RICH)
Diagnostic Procedure
EC-306
Page 843 of 2395

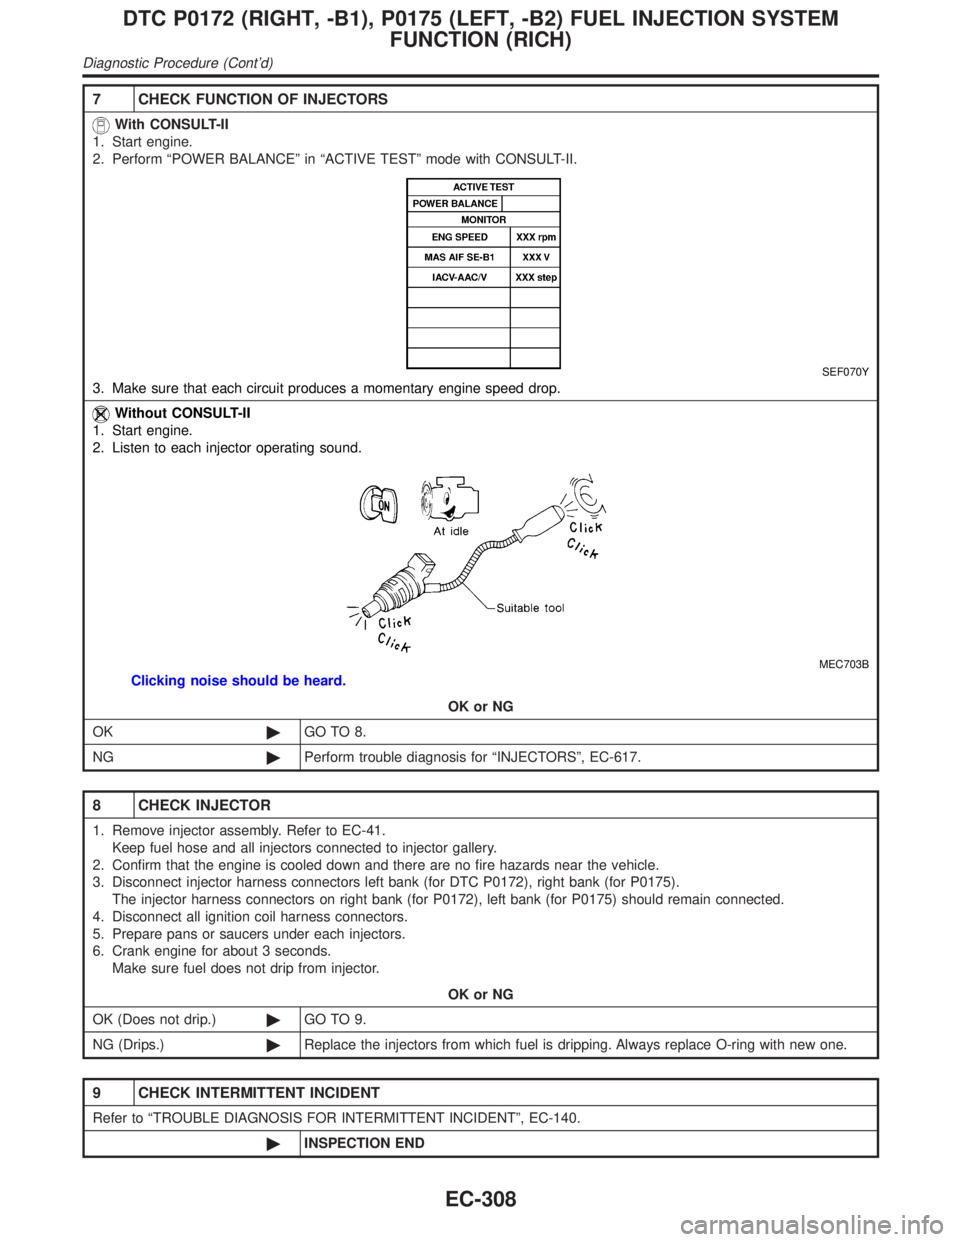
7 CHECK FUNCTION OF INJECTORS
With CONSULT-II
1. Start engine.
2. Perform ªPOWER BALANCEº in ªACTIVE TESTº mode with CONSULT-II.
SEF070Y
3. Make sure that each circuit produces a momentary engine speed drop.
Without CONSULT-II
1. Start engine.
2. Listen to each injector operating sound.
MEC703B
Clicking noise should be heard.
OK or NG
OK©GO TO 8.
NG©Perform trouble diagnosis for ªINJECTORSº, EC-617.
8 CHECK INJECTOR
1. Remove injector assembly. Refer to EC-41.
Keep fuel hose and all injectors connected to injector gallery.
2. Confirm that the engine is cooled down and there are no fire hazards near the vehicle.
3. Disconnect injector harness connectors left bank (for DTC P0172), right bank (for P0175).
The injector harness connectors on right bank (for P0172), left bank (for P0175) should remain connected.
4. Disconnect all ignition coil harness connectors.
5. Prepare pans or saucers under each injectors.
6. Crank engine for about 3 seconds.
Make sure fuel does not drip from injector.
OK or NG
OK (Does not drip.)©GO TO 9.
NG (Drips.)©Replace the injectors from which fuel is dripping. Always replace O-ring with new one.
9 CHECK INTERMITTENT INCIDENT
Refer to ªTROUBLE DIAGNOSIS FOR INTERMITTENT INCIDENTº, EC-140.
©INSPECTION END
DTC P0172 (RIGHT, -B1), P0175 (LEFT, -B2) FUEL INJECTION SYSTEM
FUNCTION (RICH)
Diagnostic Procedure (Cont'd)
EC-308
Page 847 of 2395

Diagnostic ProcedureNBEC0181
1 CHECK FUEL TANK TEMPERATURE SENSOR POWER SUPPLY CIRCUIT
1. Turn ignition switch ªOFFº.
2. Disconnect fuel level sensor unit and fuel pump harness connector.
SEF751UA
3. Turn ignition switch ªONº.
4. Check voltage between fuel level sensor unit terminal 1 and ground with CONSULT-II or tester.
SEF973Y
OK or NG
OK©GO TO 3.
NG©GO TO 2.
2 DETECT MALFUNCTIONING PART
Check the following.
IHarness connectors B1, M2
IHarness connectors M92, F27
IHarness for open or short between ECM and fuel level sensor unit and fuel pump
©Repair harness or connector.
3 CHECK FUEL TANK TEMPERATURE SENSOR GROUND CIRCUIT FOR OPEN AND SHORT
1. Turn ignition switch ªOFFº.
2. Check harness continuity between fuel level sensor unit and fuel pump terminal 2 and body ground. Refer to Wiring
Diagram.
Continuity should exist.
3. Also check harness for short to power.
OK or NG
OK©GO TO 4.
NG©Repair open circuit or short to power in harness or connectors.
DTC P0180 FUEL TANK TEMPERATURE SENSOR
Diagnostic Procedure
EC-312
Page 857 of 2395

3 PERFORM POWER BALANCE TEST
With CONSULT-II
1. Perform ªPOWER BALANCEº in ªACTIVE TESTº mode.
SEF190Y
2. Is there any cylinder which does not produce a momentary engine speed drop?
Without CONSULT-II
When disconnecting each ignition coil harness connector one at a time, is there any cylinder which does not produce a
momentary engine speed drop?
SEF975Y
YesorNo
Ye s©GO TO 5.
No©GO TO 4.
4 CHECK INJECTOR
Does each injector make an operating sound at idle?
MEC703B
YesorNo
Ye s©GO TO 5.
No©Check injector(s) and circuit(s). Refer to EC-616.
DTC P0300 - P0306 NO.6-1CYLINDER MISFIRE, MULTIPLE CYLINDER
MISFIRE
Diagnostic Procedure (Cont'd)
EC-322
Page 861 of 2395

12 CHECK HEATED OXYGEN SENSOR 1 (FRONT)
Without CONSULT-II
1. Start engine and warm it up to normal operating temperature.
2. Set voltmeter probes between ECM terminal 63 (HO2S1 bank 1 right signal) or 62 (HO2S1 bank 2 left signal) and
engine ground.
3. Check the following with engine speed held at 2,000 rpm constant under no load.
SEF967XA
CAUTION:
Discard any heated oxygen sensor which has been dropped from a height of more than 0.5 m (19.7 in) onto a
hard surface such as a concrete floor; use a new one.
OK or NG
OK©GO TO 14.
NG©GO TO 13.
13 REPLACE HEATED OXYGEN SENSOR 1 (FRONT)
1. Turn ignition switch ªOFFº.
2. Check heated oxygen sensor 1 (front) harness protector color.
SEF505Y
©Replace malfunctioning heated oxygen sensor 1 (front).
DTC P0300 - P0306 NO.6-1CYLINDER MISFIRE, MULTIPLE CYLINDER
MISFIRE
Diagnostic Procedure (Cont'd)
EC-326
Page 863 of 2395

SEF332I
Component DescriptionNBEC0185The knock sensor is attached to the cylinder block. It senses
engine knocking using a piezoelectric element. A knocking vibration
from the cylinder block is sensed as vibrational pressure. This
pressure is converted into a voltage signal and sent to the ECM.
Freeze frame data will not be stored in the ECM for the knock
sensor. The MIL will not light for knock sensor malfunction.
The knock sensor has one trip detection logic.
ECM Terminals and Reference ValueNBEC0663Specification data are reference values and are measured between each terminal and ground.
CAUTION:
Do not use ECM ground terminals when measuring input/output voltage. Doing so may result in dam-
age to the ECM's transistor. Use a ground other than ECM terminals, such as the ground.
TERMI-
NAL
NO.WIRE
COLORITEM CONDITION DATA (DC Voltage)
93 W Knock sensor[Engine is running]
IIdle speedApproximately 2.5V
On Board Diagnosis LogicNBEC0187Malfunction is detected when an excessively low or high voltage
from the knock sensor is sent to ECM.
Possible CauseNBEC0491IHarness or connectors
(The knock sensor circuit is open or shorted.)
IKnock sensor
SEF058Y
DTC Confirmation ProcedureNBEC0188NOTE:
If ªDTC Confirmation Procedureº has been previously conducted,
always turn ignition switch ªOFFº and wait at least 10 seconds
before conducting the next test.
TESTING CONDITION:
Before performing the following procedure, confirm that bat-
tery voltage is more than 10V at idle.
DTC P0325 KNOCK SENSOR (KS)
Component Description
EC-328
Page 866 of 2395

Diagnostic ProcedureNBEC0190
1 CHECK KNOCK SENSOR INPUT SIGNAL CIRCUIT FOR OPEN AND SHORT-I
1. Turn ignition switch ªOFFº.
2. Disconnect ECM harness connector.
3. Check resistance between ECM terminal 93 and engine ground.
NOTE:
It is necessary to use an ohmmeter which can measure more than 10 MW.
SEF321X
4. Also check harness for short to ground and short to power.
OK or NG
OK©GO TO 5.
NG©GO TO 2.
2 CHECK KNOCK SENSOR INPUT SIGNAL CIRCUIT FOR OPEN AND SHORT-II
1. Disconnect knock sensor harness connector.
2. Check harness continuity between ECM terminal 93 and knock sensor terminal 2. Refer to Wiring Diagram.
Continuity should exist.
3. Also check harness for short to ground and short to power.
OK or NG
OK©GO TO 4.
NG©GO TO 3.
3 DETECT MALFUNCTIONING PART
Check the following.
IHarness connectors F19, F116
IHarness for open or short between ECM and knock sensor
©Repair open circuit or short to ground or short to power in harness or connectors.
GI
MA
EM
LC
FE
AT
TF
PD
AX
SU
BR
ST
RS
BT
HA
SC
EL
IDX
DTC P0325 KNOCK SENSOR (KS)
Diagnostic Procedure
EC-331