Battery INFINITI QX4 2001 Factory Service Manual
[x] Cancel search | Manufacturer: INFINITI, Model Year: 2001, Model line: QX4, Model: INFINITI QX4 2001Pages: 2395, PDF Size: 43.2 MB
Page 1219 of 2395

XENON HEADLAMP=NBEL0188S07Xenon type headlamp is adopted to the low beam headlamps. Xenon bulbs do not use a filament. Instead,
they produce light when a high voltage current is passed between two tungsten electrodes through a mixture
of xenon (an inert gas) and certain other metal halides. In addition to added lighting power, electronic control
of the power supply gives the headlamps stable quality and tone color.
Following are some of the many advantage of the xenon type headlamp.
IThe light produced by the headlamps is white color approximating sunlight that is easy on the eyes.
ILight output is nearly double that of halogen headlamps, affording increased area of illumination.
IThe light features a high relative spectral distribution at wavelengths to the human eye is most sensitive,
which means that even in the rain, more light is reflected back from the road surface toward the vehicle,
for added visibility.
IPower consumption is approximately 25 percent less than halogen headlamps, reducing battery load.
SEL571X
HEADLAMP (FOR USA) Ð XENON TYPE Ð
System Description (Cont'd)
EL-34
Page 1225 of 2395

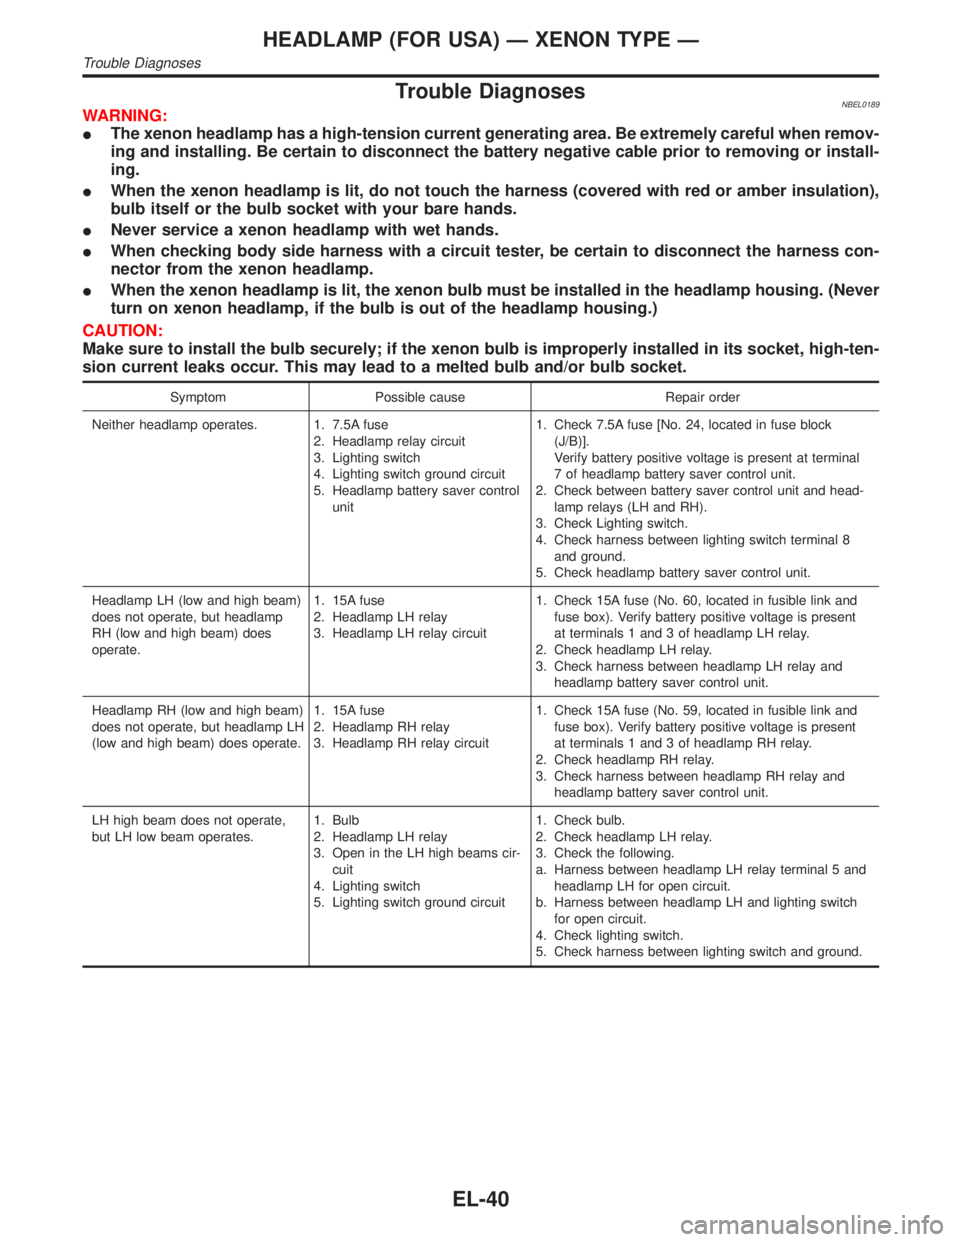
Trouble DiagnosesNBEL0189WARNING:
IThe xenon headlamp has a high-tension current generating area. Be extremely careful when remov-
ing and installing. Be certain to disconnect the battery negative cable prior to removing or install-
ing.
IWhen the xenon headlamp is lit, do not touch the harness (covered with red or amber insulation),
bulb itself or the bulb socket with your bare hands.
INever service a xenon headlamp with wet hands.
IWhen checking body side harness with a circuit tester, be certain to disconnect the harness con-
nector from the xenon headlamp.
IWhen the xenon headlamp is lit, the xenon bulb must be installed in the headlamp housing. (Never
turn on xenon headlamp, if the bulb is out of the headlamp housing.)
CAUTION:
Make sure to install the bulb securely; if the xenon bulb is improperly installed in its socket, high-ten-
sion current leaks occur. This may lead to a melted bulb and/or bulb socket.
Symptom Possible cause Repair order
Neither headlamp operates. 1. 7.5A fuse
2. Headlamp relay circuit
3. Lighting switch
4. Lighting switch ground circuit
5. Headlamp battery saver control
unit1. Check 7.5A fuse [No. 24, located in fuse block
(J/B)].
Verify battery positive voltage is present at terminal
7 of headlamp battery saver control unit.
2. Check between battery saver control unit and head-
lamp relays (LH and RH).
3. Check Lighting switch.
4. Check harness between lighting switch terminal 8
and ground.
5. Check headlamp battery saver control unit.
Headlamp LH (low and high beam)
does not operate, but headlamp
RH (low and high beam) does
operate.1. 15A fuse
2. Headlamp LH relay
3. Headlamp LH relay circuit1. Check 15A fuse (No. 60, located in fusible link and
fuse box). Verify battery positive voltage is present
at terminals 1 and 3 of headlamp LH relay.
2. Check headlamp LH relay.
3. Check harness between headlamp LH relay and
headlamp battery saver control unit.
Headlamp RH (low and high beam)
does not operate, but headlamp LH
(low and high beam) does operate.1. 15A fuse
2. Headlamp RH relay
3. Headlamp RH relay circuit1. Check 15A fuse (No. 59, located in fusible link and
fuse box). Verify battery positive voltage is present
at terminals 1 and 3 of headlamp RH relay.
2. Check headlamp RH relay.
3. Check harness between headlamp RH relay and
headlamp battery saver control unit.
LH high beam does not operate,
but LH low beam operates.1. Bulb
2. Headlamp LH relay
3. Open in the LH high beams cir-
cuit
4. Lighting switch
5. Lighting switch ground circuit1. Check bulb.
2. Check headlamp LH relay.
3. Check the following.
a. Harness between headlamp LH relay terminal 5 and
headlamp LH for open circuit.
b. Harness between headlamp LH and lighting switch
for open circuit.
4. Check lighting switch.
5. Check harness between lighting switch and ground.
HEADLAMP (FOR USA) Ð XENON TYPE Ð
Trouble Diagnoses
EL-40
Page 1226 of 2395

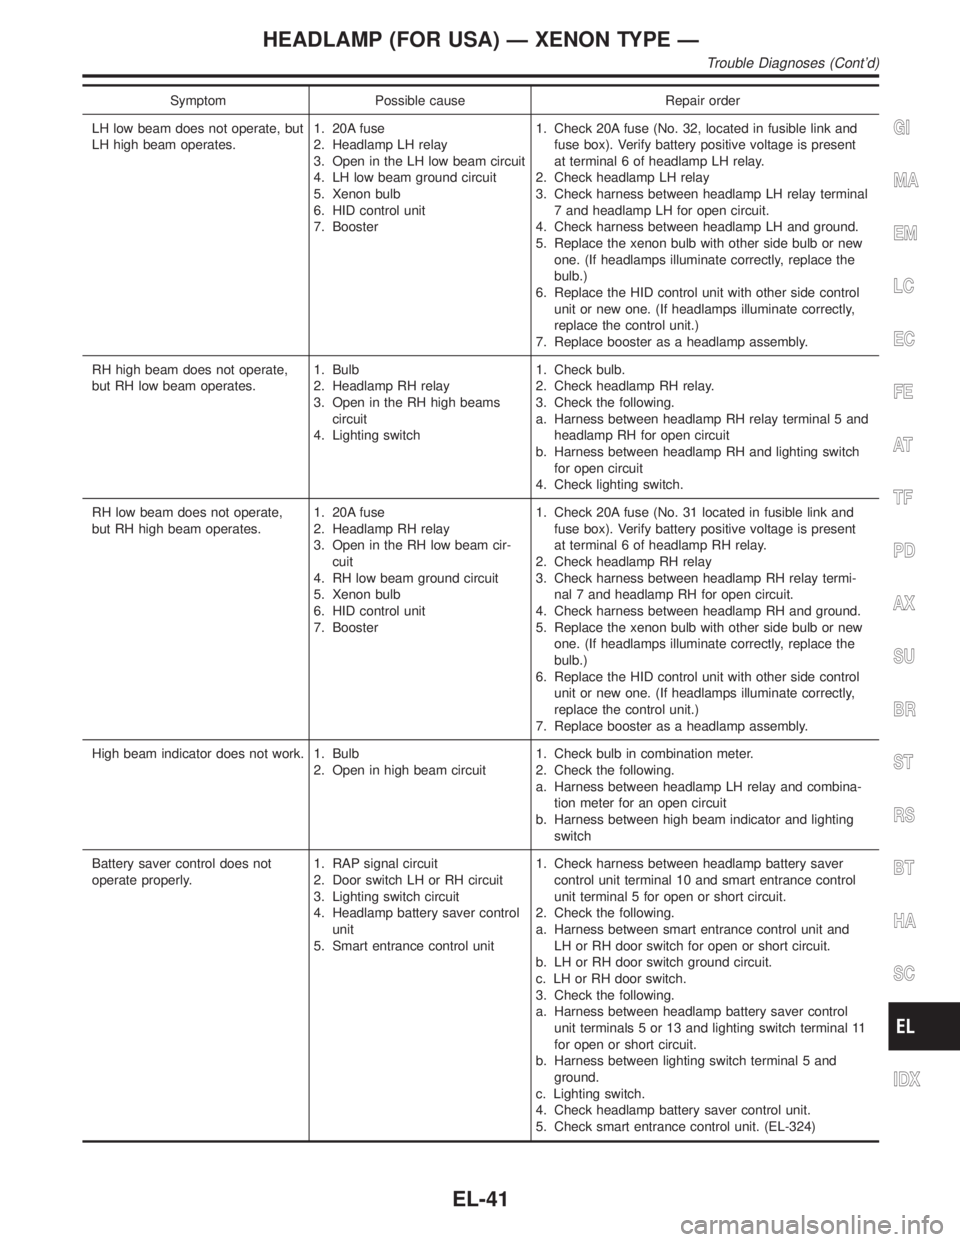
Symptom Possible cause Repair order
LH low beam does not operate, but
LH high beam operates.1. 20A fuse
2. Headlamp LH relay
3. Open in the LH low beam circuit
4. LH low beam ground circuit
5. Xenon bulb
6. HID control unit
7. Booster1. Check 20A fuse (No. 32, located in fusible link and
fuse box). Verify battery positive voltage is present
at terminal 6 of headlamp LH relay.
2. Check headlamp LH relay
3. Check harness between headlamp LH relay terminal
7 and headlamp LH for open circuit.
4. Check harness between headlamp LH and ground.
5. Replace the xenon bulb with other side bulb or new
one. (If headlamps illuminate correctly, replace the
bulb.)
6. Replace the HID control unit with other side control
unit or new one. (If headlamps illuminate correctly,
replace the control unit.)
7. Replace booster as a headlamp assembly.
RH high beam does not operate,
but RH low beam operates.1. Bulb
2. Headlamp RH relay
3. Open in the RH high beams
circuit
4. Lighting switch1. Check bulb.
2. Check headlamp RH relay.
3. Check the following.
a. Harness between headlamp RH relay terminal 5 and
headlamp RH for open circuit
b. Harness between headlamp RH and lighting switch
for open circuit
4. Check lighting switch.
RH low beam does not operate,
but RH high beam operates.1. 20A fuse
2. Headlamp RH relay
3. Open in the RH low beam cir-
cuit
4. RH low beam ground circuit
5. Xenon bulb
6. HID control unit
7. Booster1. Check 20A fuse (No. 31 located in fusible link and
fuse box). Verify battery positive voltage is present
at terminal 6 of headlamp RH relay.
2. Check headlamp RH relay
3. Check harness between headlamp RH relay termi-
nal 7 and headlamp RH for open circuit.
4. Check harness between headlamp RH and ground.
5. Replace the xenon bulb with other side bulb or new
one. (If headlamps illuminate correctly, replace the
bulb.)
6. Replace the HID control unit with other side control
unit or new one. (If headlamps illuminate correctly,
replace the control unit.)
7. Replace booster as a headlamp assembly.
High beam indicator does not work. 1. Bulb
2. Open in high beam circuit1. Check bulb in combination meter.
2. Check the following.
a. Harness between headlamp LH relay and combina-
tion meter for an open circuit
b. Harness between high beam indicator and lighting
switch
Battery saver control does not
operate properly.1. RAP signal circuit
2. Door switch LH or RH circuit
3. Lighting switch circuit
4. Headlamp battery saver control
unit
5. Smart entrance control unit1. Check harness between headlamp battery saver
control unit terminal 10 and smart entrance control
unit terminal 5 for open or short circuit.
2. Check the following.
a. Harness between smart entrance control unit and
LH or RH door switch for open or short circuit.
b. LH or RH door switch ground circuit.
c. LH or RH door switch.
3. Check the following.
a. Harness between headlamp battery saver control
unit terminals 5 or 13 and lighting switch terminal 11
for open or short circuit.
b. Harness between lighting switch terminal 5 and
ground.
c. Lighting switch.
4. Check headlamp battery saver control unit.
5. Check smart entrance control unit. (EL-324)
GI
MA
EM
LC
EC
FE
AT
TF
PD
AX
SU
BR
ST
RS
BT
HA
SC
IDX
HEADLAMP (FOR USA) Ð XENON TYPE Ð
Trouble Diagnoses (Cont'd)
EL-41
Page 1227 of 2395

BATTERY SAVER CONTROL UNIT INSPECTION TABLENBEL0189S01
Terminal No.Wire
colorItem ConditionVoltage
(Approximate value)
1 B/W Ignition ON power
supplyIgnition switch OFF or ACC Less than 1V
ON or START Battery voltage
2 PU/W Headlamp relays
(LH and RH)Ignition switch
(with lighting switch
except OFF or 1ST)OFF or ACC More than 45 sec-
onds after ignition
switch is turned
OFF or ACCBattery voltage
Within 45 seconds
after ignition switch
is turned OFF or
ACCLess than 1V
ON or START Less than 1V
Headlamps illuminate by auto light control. Less than 1V
3 L Headlamp switch Ignition switch ON Lighting switch Except PASS or
2NDBattery voltage
PASS or 2ND Less than 1V
Headlamps illuminate by auto light control. Less than 1V
4 B Ground Ð Ð
5 G Tail lamp switch Lighting switch OFF Battery voltage
1ST or 2ND Less than 1V
6 R Tail lamp relay Ignition switch
(with lighting switch
1ST or 2ND)OFF or ACC More than 45 sec-
onds after ignition
switch is turned
OFF or ACCBattery voltage
Within 45 seconds
after ignition switch
is turned OFF or
ACCLess than 1V
ON or START Less than 1V
Headlamps illuminate by auto light control. Less than 1V
7 G/R Power supply Ð Battery voltage
8 PU/W Headlamp relays
(LH and RH)Ignition switch
(with lighting switch
except OFF or 1ST)OFF or ACC More than 45 sec-
onds after ignition
switch is turned
OFF or ACCBattery voltage
Within 45 seconds
after ignition switch
is turned OFF or
ACCLess than 1V
ON or START Less than 1V
Headlamps illuminate by auto light control. Less than 1V
9 L Headlamp switch Ignition switch ON Lighting switch Except PASS or
2NDBattery voltage
PASS or 2ND Less than 1V
Headlamps illuminate by auto light control. Less than 1V
HEADLAMP (FOR USA) Ð XENON TYPE Ð
Trouble Diagnoses (Cont'd)
EL-42
Page 1228 of 2395

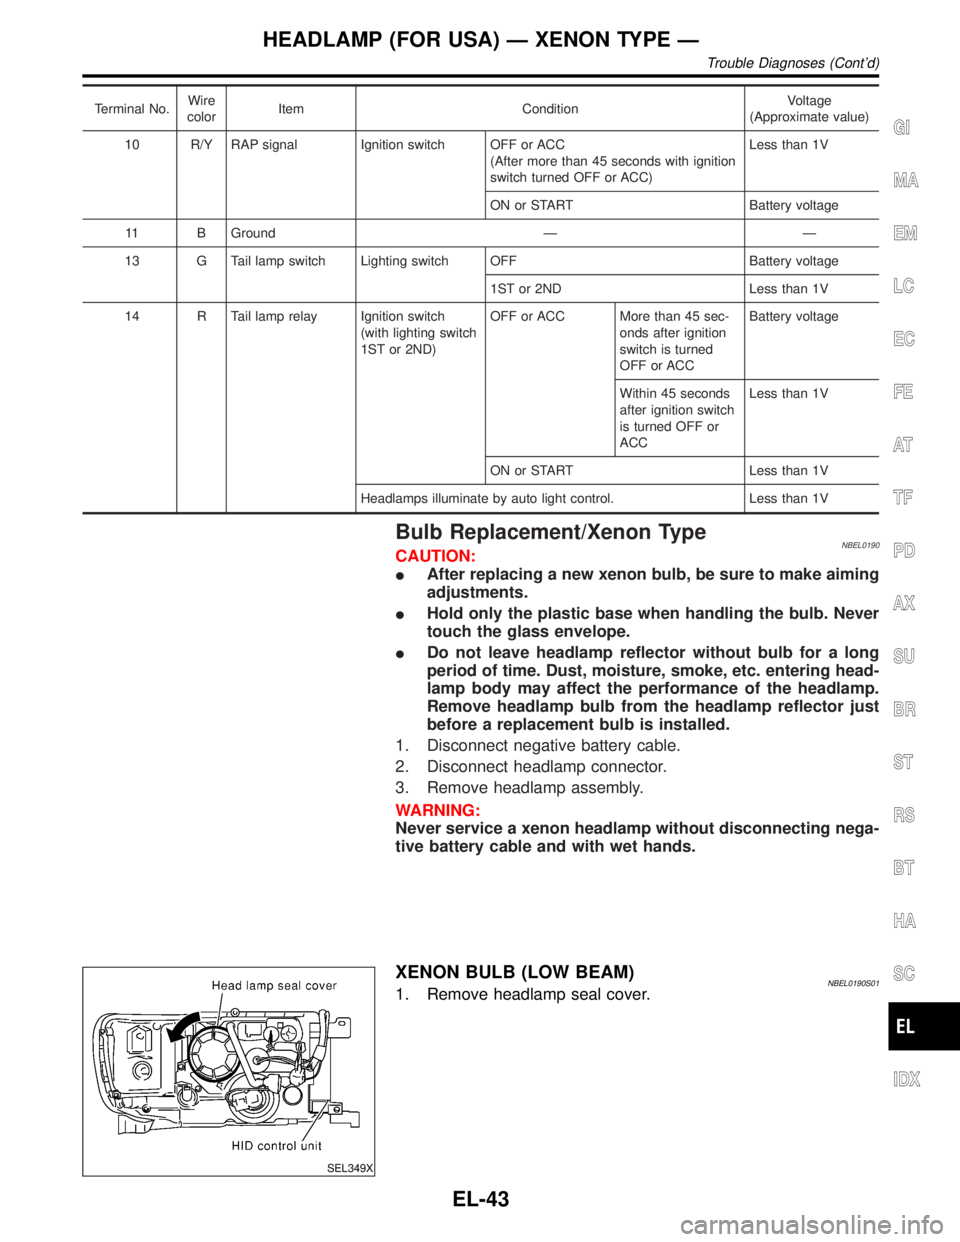
Terminal No.Wire
colorItem ConditionVoltage
(Approximate value)
10 R/Y RAP signal Ignition switch OFF or ACC
(After more than 45 seconds with ignition
switch turned OFF or ACC)Less than 1V
ON or START Battery voltage
11 B Ground Ð Ð
13 G Tail lamp switch Lighting switch OFF Battery voltage
1ST or 2ND Less than 1V
14 R Tail lamp relay Ignition switch
(with lighting switch
1ST or 2ND)OFF or ACC More than 45 sec-
onds after ignition
switch is turned
OFF or ACCBattery voltage
Within 45 seconds
after ignition switch
is turned OFF or
ACCLess than 1V
ON or START Less than 1V
Headlamps illuminate by auto light control. Less than 1V
Bulb Replacement/Xenon TypeNBEL0190CAUTION:
IAfter replacing a new xenon bulb, be sure to make aiming
adjustments.
IHold only the plastic base when handling the bulb. Never
touch the glass envelope.
IDo not leave headlamp reflector without bulb for a long
period of time. Dust, moisture, smoke, etc. entering head-
lamp body may affect the performance of the headlamp.
Remove headlamp bulb from the headlamp reflector just
before a replacement bulb is installed.
1. Disconnect negative battery cable.
2. Disconnect headlamp connector.
3. Remove headlamp assembly.
WARNING:
Never service a xenon headlamp without disconnecting nega-
tive battery cable and with wet hands.
SEL349X
XENON BULB (LOW BEAM)NBEL0190S011. Remove headlamp seal cover.
GI
MA
EM
LC
EC
FE
AT
TF
PD
AX
SU
BR
ST
RS
BT
HA
SC
IDX
HEADLAMP (FOR USA) Ð XENON TYPE Ð
Trouble Diagnoses (Cont'd)
EL-43
Page 1231 of 2395

Component Parts and Harness Connector
Location
NBEL0161
SEL460X
System DescriptionNBEL0192The headlamp system for Canada vehicles contains a daytime light control unit that activates the high beam
headlamps at approximately half illumination whenever the engine is running. If the parking brake is applied
before the engine is started the daytime lights will not be illuminated. The daytime lights will illuminate once
the parking brake is released. Thereafter, the daytime lights will continue to operate when the parking brake
is applied.
And battery saver system is controlled by the headlamp battery saver control unit and smart entrance control
unit.
Power is supplied at all times
Ito headlamp LH relay terminals 1 and 3
Ithrough 15A fuse (No. 60, located in the fuse and fusible link box), and
Ito headlamp LH relay terminal 6
Ithrough 20A fuse (No. 32, located in the fuse and fusible link box), and
Ito headlamp RH relay terminals 1 and 3
Ithrough 15A fuse (No. 59, located in the fuse and fusible link box), and
Ito headlamp RH relay terminal 6
Ithrough 20A fuse (No. 31, located in the fuse and fusible link box), and
Ito headlamp battery saver control unit terminal 7, and
Ito smart entrance control unit terminal 10
Ithrough 7.5A fuse [No. 24, located in the fuse block (J/B)].
Ground is supplied
Ito daytime light control unit terminal 16,
Ito auto light control unit terminal 5 and
Ito headlamp battery saver control unit terminals 4 and 11.
When the ignition switch is in the ON or START position, power is also supplied
HEADLAMP (FOR CANADA) Ð DAYTIME LIGHT SYSTEM Ð
Component Parts and Harness Connector Location
EL-46
Page 1232 of 2395

Ito daytime light control unit terminal 3,
Ito auto light control unit terminal 1,
Ito headlamp battery saver control unit terminal 10, and
Ito smart entrance control unit terminal 33
Ithrough 7.5A fuse [No. 11, located in the fuse block (J/B)], and
Ito headlamp battery saver control unit terminal 1
Ithrough 10A fuse [No. 16, located in the fuse block (J/B)].
When the ignition switch is in the START position, power is supplied
Ito daytime light control unit terminal 2
Ithrough 7.5A fuse [No. 26, located in the fuse block (J/B)].
When the ignition switch is in the ACC or ON position, power is supplied
Ito auto light control unit terminal 2
Ithrough 10A fuse [No. 9, located in the fuse block (J/B)].
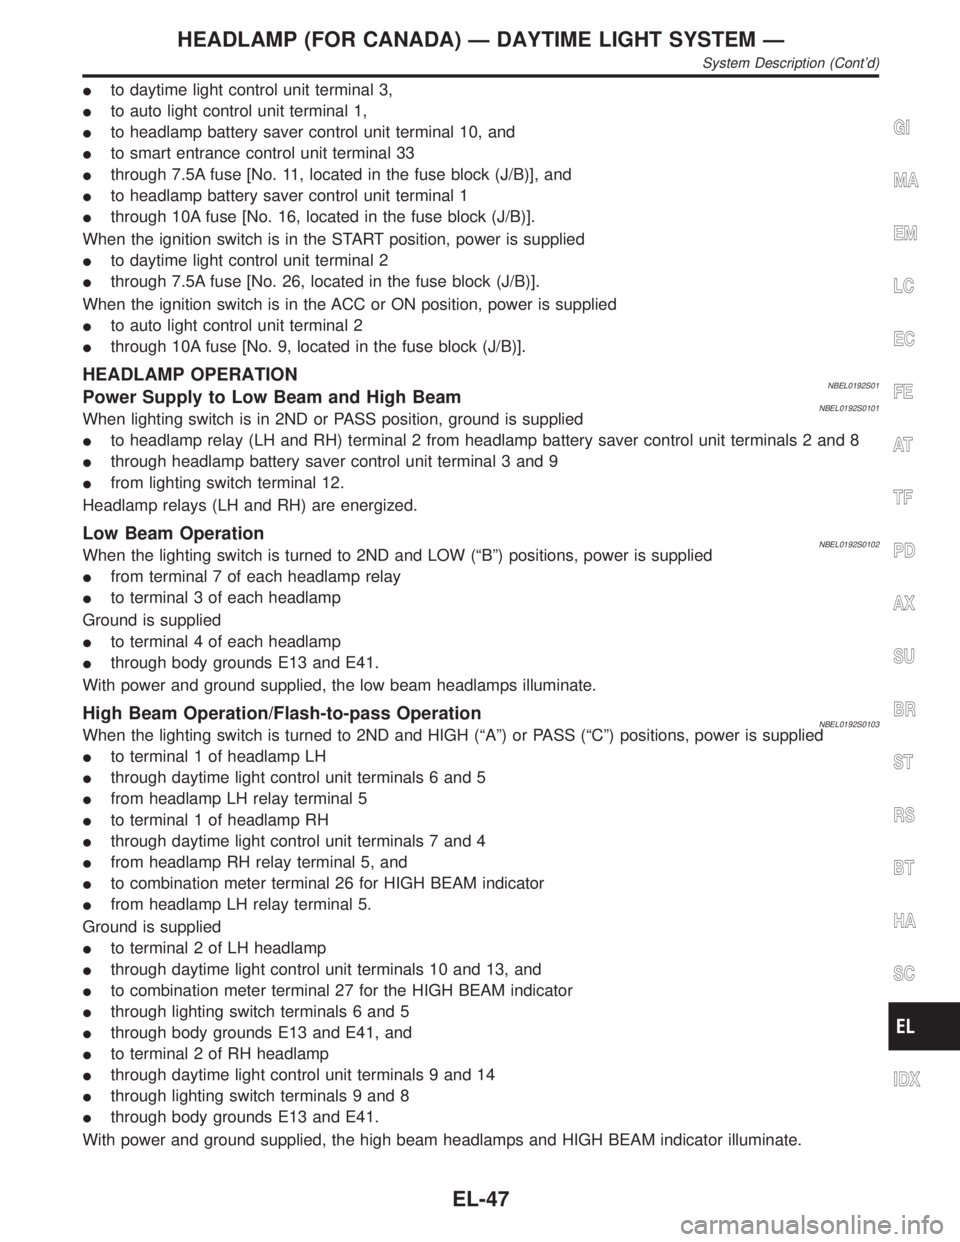
HEADLAMP OPERATIONNBEL0192S01Power Supply to Low Beam and High BeamNBEL0192S0101When lighting switch is in 2ND or PASS position, ground is supplied
Ito headlamp relay (LH and RH) terminal 2 from headlamp battery saver control unit terminals 2 and 8
Ithrough headlamp battery saver control unit terminal 3 and 9
Ifrom lighting switch terminal 12.
Headlamp relays (LH and RH) are energized.
Low Beam OperationNBEL0192S0102When the lighting switch is turned to 2ND and LOW (ªBº) positions, power is supplied
Ifrom terminal 7 of each headlamp relay
Ito terminal 3 of each headlamp
Ground is supplied
Ito terminal 4 of each headlamp
Ithrough body grounds E13 and E41.
With power and ground supplied, the low beam headlamps illuminate.
High Beam Operation/Flash-to-pass OperationNBEL0192S0103When the lighting switch is turned to 2ND and HIGH (ªAº) or PASS (ªCº) positions, power is supplied
Ito terminal 1 of headlamp LH
Ithrough daytime light control unit terminals 6 and 5
Ifrom headlamp LH relay terminal 5
Ito terminal 1 of headlamp RH
Ithrough daytime light control unit terminals 7 and 4
Ifrom headlamp RH relay terminal 5, and
Ito combination meter terminal 26 for HIGH BEAM indicator
Ifrom headlamp LH relay terminal 5.
Ground is supplied
Ito terminal 2 of LH headlamp
Ithrough daytime light control unit terminals 10 and 13, and
Ito combination meter terminal 27 for the HIGH BEAM indicator
Ithrough lighting switch terminals 6 and 5
Ithrough body grounds E13 and E41, and
Ito terminal 2 of RH headlamp
Ithrough daytime light control unit terminals 9 and 14
Ithrough lighting switch terminals 9 and 8
Ithrough body grounds E13 and E41.
With power and ground supplied, the high beam headlamps and HIGH BEAM indicator illuminate.
GI
MA
EM
LC
EC
FE
AT
TF
PD
AX
SU
BR
ST
RS
BT
HA
SC
IDX
HEADLAMP (FOR CANADA) Ð DAYTIME LIGHT SYSTEM Ð
System Description (Cont'd)
EL-47
Page 1233 of 2395

BATTERY SAVER CONTROLNBEL0192S02When the ignition switch is turned from ON (or START) to OFF (or ACC) positions while headlamps are
illuminated, The RAP signal is supplied to terminal 10 of the headlamp battery saver control unit from smart
entrance control unit terminal 5.
After counting 45 seconds by the RAP signal from the smart entrance control unit to headlamp battery saver
control unit, the ground supply to terminal 2 of headlamp LH and RH relays from headlamp battery saver con-
trol unit terminals 2 and 8 is terminated.
Then headlamps are turned off.
The headlamps are turned off when LH or RH door is opened even if 45 seconds have not passed after the
ignition switch is turned from ON (or START) to OFF (or ACC) positions while headlamps are illuminated.
When the lighting switch is turned from OFF to 2ND after headlamps are turned to off by the battery saver
control, ground is supply
Ito headlamp battery saver control unit terminals 5 and 13 from lighting switch terminal 11, and
Ito headlamp LH and RH relays terminal 2 from headlamp battery saver control unit terminals 2 and 8
Ithrough headlamp battery saver control unit terminals 3 and 9, and
Ithrough lighting switch terminal 12.
Then headlamps illuminate again.
AUTO LIGHT OPERATIONNBEL0192S03For auto light operation, refer to ªHEADLAMPº (EL-33).
DAYTIME LIGHT OPERATIONNBEL0192S04With the engine running, the lighting switch in the OFF or 1ST position and parking brake released, power is
supplied
Ithrough daytime light control unit terminals 3 and 7
Ito terminal 1 of RH headlamp
Ithrough terminal 2 of RH headlamp
Ito daytime light control unit terminal 9
Ithrough daytime light control unit terminal 6
Ito terminal 1 of LH headlamp.
Ground is supplied to terminal 2 of LH headlamp.
Ithrough daytime light control unit terminals 10 and 16
Ithrough body grounds E13 and E41.
Because the high beam headlamps are now wired in series, they operate at half illumination.
HEADLAMP (FOR CANADA) Ð DAYTIME LIGHT SYSTEM Ð
System Description (Cont'd)
EL-48
Page 1241 of 2395

Trouble DiagnosesNBEL0193DAYTIME LIGHT CONTROL UNIT INSPECTION TABLENBEL0193S01
Terminal
No.Wire
colorItem ConditionVoltage
(Approximate values)
1 Y/B Alternator
When turning ignition switch to ªONº Less than 1V
When engine is running Battery voltage
When turning ignition switch to ªOFFº Less than 1V
2 Y/R Start signal
When turning ignition switch to ªSTº Battery voltage
When turning ignition switch to ªONº from ªSTº Less than 1V
When turning ignition switch to ªOFFº Less than 1V
3 G Power source
When turning ignition switch to ªONº Battery voltage
When turning ignition switch to ªSTº Battery voltage
When turning ignition switch to ªOFFº Less than 1V
4 R/L Power source
When turning ignition switch to ªONº Battery voltage
When turning ignition switch to ªOFFº Battery voltage
5 R/W Power source
When turning ignition switch to ªONº Battery voltage
When turning ignition switch to ªOFFº Battery voltage
6 R LH hi beam When lighting switch is turned to the 2ND position with
ªHI BEAMº positionBattery voltage
When releasing parking brake with engine running and
turning lighting switch to ªOFFº (daytime light operation)
CAUTION:
Block wheels and ensure selector lever is in N or P
position.Approx. half battery
voltage
HEADLAMP (FOR CANADA) Ð DAYTIME LIGHT SYSTEM Ð
Trouble Diagnoses
EL-56
Page 1242 of 2395

Terminal
No.Wire
colorItem ConditionVoltage
(Approximate values)
7 L/R RH hi beam When lighting switch is turned to the 2ND position with
ªHI BEAMº positionBattery voltage
When releasing parking brake with engine running and
turning lighting switch to ªOFFº (daytime light operation)
CAUTION:
Block wheels and ensure selector lever is in N or P
position.Approx. half battery
voltage
9 PU RH hi beam
(ground)When lighting switch is turned to the 2ND position with
ªHI BEAMº positionLess than 1V
When releasing parking brake with engine running and
turning lighting switch to ªOFFº (daytime light operation)
CAUTION:
Block wheels and ensure selector lever is in N or P
position.Approx. half battery
voltage
10 GY LH hi beam
(ground)When lighting switch is turned to the 2ND position with
ªHI BEAMº positionLess than 1V
When releasing parking brake with engine running and
turning lighting switch to ªOFFº (daytime light operation)
CAUTION:
Block wheels and ensure selector lever is in N or P
position.Approx. half battery
voltage
13
14L/W
W/RLighting switch
(Hi beam)When turning lighting switch to ªHI BEAMº Battery voltage
When turning lighting switch to ªFLASH TO PASSº Battery voltage
16 B Ground Ð Ð
17 L/G Parking brake
switch
When parking brake is released Battery voltage
When parking brake is set Less than 1.5V
BATTERY SAVER CONTROL UNIT INSPECTION TABLENBEL0193S02Refer to ªHEADLAMP (FOR USA)º, EL-42.
Bulb ReplacementNBEL0194Refer to ªHEADLAMP (FOR USA)º (EL-43).
GI
MA
EM
LC
EC
FE
AT
TF
PD
AX
SU
BR
ST
RS
BT
HA
SC
IDX
HEADLAMP (FOR CANADA) Ð DAYTIME LIGHT SYSTEM Ð
Trouble Diagnoses (Cont'd)
EL-57