check engine INFINITI QX4 2001 Factory Service Manual
[x] Cancel search | Manufacturer: INFINITI, Model Year: 2001, Model line: QX4, Model: INFINITI QX4 2001Pages: 2395, PDF Size: 43.2 MB
Page 971 of 2395

4 CHECK IGNITION TIMING AND ENGINE IDLE SPEED
Check the following items. Refer to ªBasic Inspectionº, EC-101.
MTBL0656
Models with CONSULT-II©GO TO 6.
Models without CON-
SULT-II©GO TO 6.
5 CHECK THROTTLE POSITION SWITCH
With CONSULT-II
1. Start engine and warm it up to normal operating temperature.
2. Turn ignition switch ªOFFº.
3. Remove vacuum hose connected to throttle opener.
4. Connect suitable vacuum hose to vacuum pump and the throttle opener.
5. Apply vacuum [more than þ40.0 kPa (þ300 mmHg, þ11.81 inHg)] until the throttle drum becomes free from the rod of
the throttle opener.
SEF793W
6. Turn ignition switch ªONº.
7. Select ªDATA MONITORº mode with CONSULT-II.
8. Check indication of ªCLSD THL/P SWº under the following conditions.
Measurement must be made with throttle position switch installed in vehicle.
MTBL0355
OK or NG
OK (With CONSULT-II)©GO TO 8.
OK (Without CONSULT-
II)©GO TO 9.
NG©GO TO 7.
DTC P0510 CLOSED THROTTLE POSITION SWITCH
Diagnostic Procedure (Cont'd)
EC-436
Page 972 of 2395

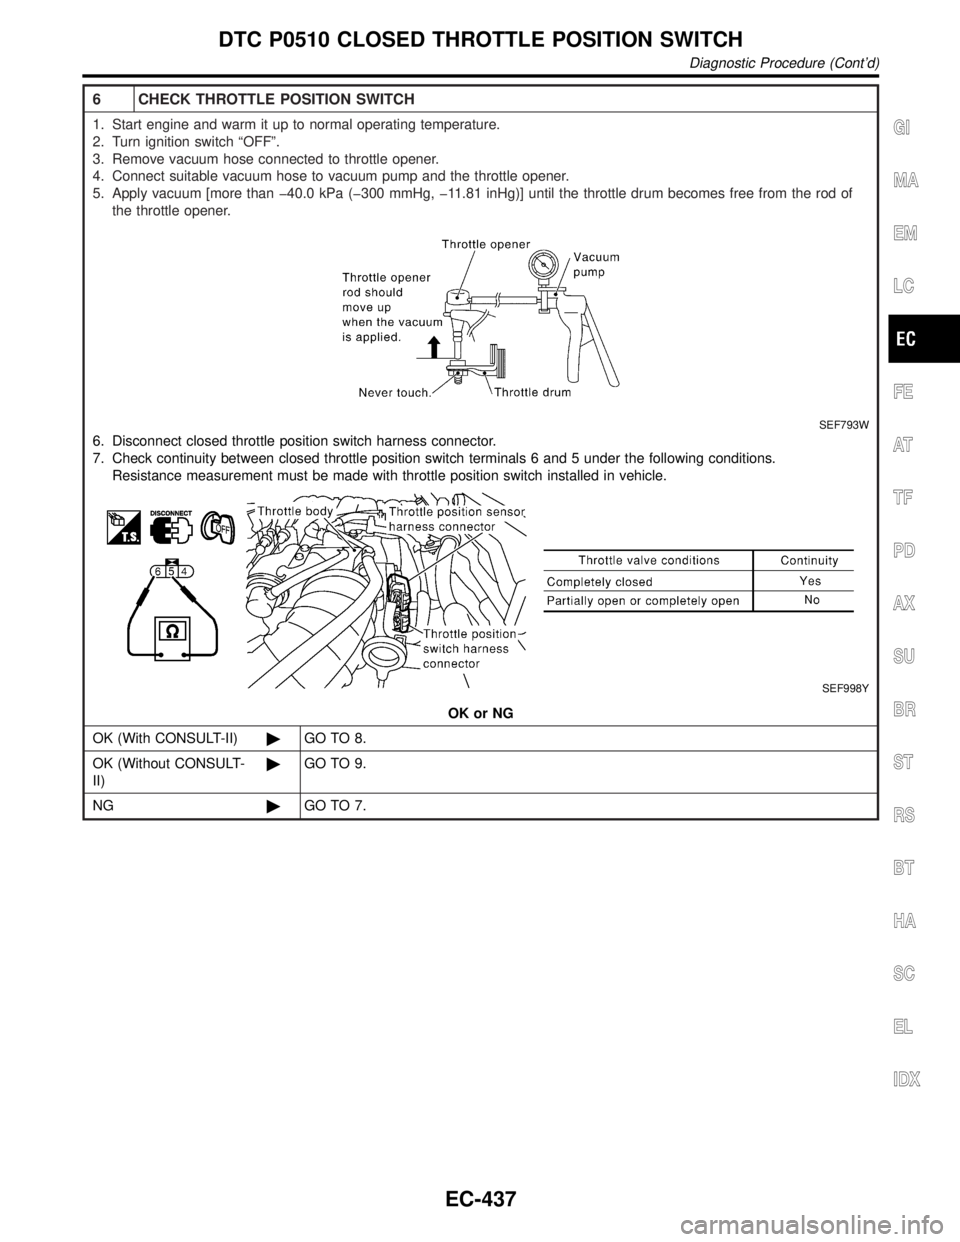
6 CHECK THROTTLE POSITION SWITCH
1. Start engine and warm it up to normal operating temperature.
2. Turn ignition switch ªOFFº.
3. Remove vacuum hose connected to throttle opener.
4. Connect suitable vacuum hose to vacuum pump and the throttle opener.
5. Apply vacuum [more than þ40.0 kPa (þ300 mmHg, þ11.81 inHg)] until the throttle drum becomes free from the rod of
the throttle opener.
SEF793W
6. Disconnect closed throttle position switch harness connector.
7. Check continuity between closed throttle position switch terminals 6 and 5 under the following conditions.
Resistance measurement must be made with throttle position switch installed in vehicle.
SEF998Y
OK or NG
OK (With CONSULT-II)©GO TO 8.
OK (Without CONSULT-
II)©GO TO 9.
NG©GO TO 7.
GI
MA
EM
LC
FE
AT
TF
PD
AX
SU
BR
ST
RS
BT
HA
SC
EL
IDX
DTC P0510 CLOSED THROTTLE POSITION SWITCH
Diagnostic Procedure (Cont'd)
EC-437
Page 973 of 2395

7 ADJUST THROTTLE POSITION SWITCH
Check the following items. Refer to ªBasic Inspectionº, EC-101.
MTBL0655
Is it possible to adjust closed throttle position switch?
YesorNo
Yes (With CONSULT-II)©GO TO 9.
Yes (Without CONSULT-
II)©GO TO 9.
No©Replace throttle position switch.
8 CHECK THROTTLE POSITION SENSOR
With CONSULT-II
1. Start engine and warm it up to normal operating temperature.
2. Stop engine (ignition switch OFF).
3. Remove the vacuum hose connected to the throttle opener.
4. Connect suitable vacuum hose to the vacuum pump and the opener.
5. Apply vacuum [more than þ40.0 kPa (þ300 mmHg, þ11.81 inHg)] until the throttle drum becomes free from the rod of
the throttle opener.
SEF793W
6. Turn ignition switch ON.
7. Select ªDATA MONITORº mode with CONSULT-II.
8. Check voltage of ªTHRTL POS SENº under the following conditins.
Voltage measurement must be made with throttle position sensor installed in vehicle.
MTBL0230
OK or NG
OK©GO TO 10.
NG©Replace throttle position sensor.
DTC P0510 CLOSED THROTTLE POSITION SWITCH
Diagnostic Procedure (Cont'd)
EC-438
Page 974 of 2395

9 CHECK THROTTLE POSITION SENSOR
1. Start engine and warm it up to normal operating temperature.
2. Stop engine (ignition switch OFF).
3. Remove the vacuum hose connected to the throttle opener.
4. Connect suitable vacuum hose to the vacuum pump and the opener.
5. Apply vacuum [more than þ40.0 kPa (þ300 mmHg, þ11.81 inHg)] until the throttle drum becomes free from the rod of
the throttle opener.
SEF793W
6. Turn ignition switch ON.
7. Check voltage between ECM terminal 91 (Throttle position sensor signal) and ground.
Voltage measurement must be made with throttle position sensor installed in vehicle.
SEF348X
OK or NG
OK©GO TO 10.
NG©Replace throttle position sensor.
10 CHECK INTERMITTENT INCIDENT
Refer to ªTROUBLE DIAGNOSIS FOR INTERMITTENT INCIDENTº, EC-140.
©INSPECTION END
GI
MA
EM
LC
FE
AT
TF
PD
AX
SU
BR
ST
RS
BT
HA
SC
EL
IDX
DTC P0510 CLOSED THROTTLE POSITION SWITCH
Diagnostic Procedure (Cont'd)
EC-439
Page 990 of 2395

Diagnostic ProcedureNBEC0704
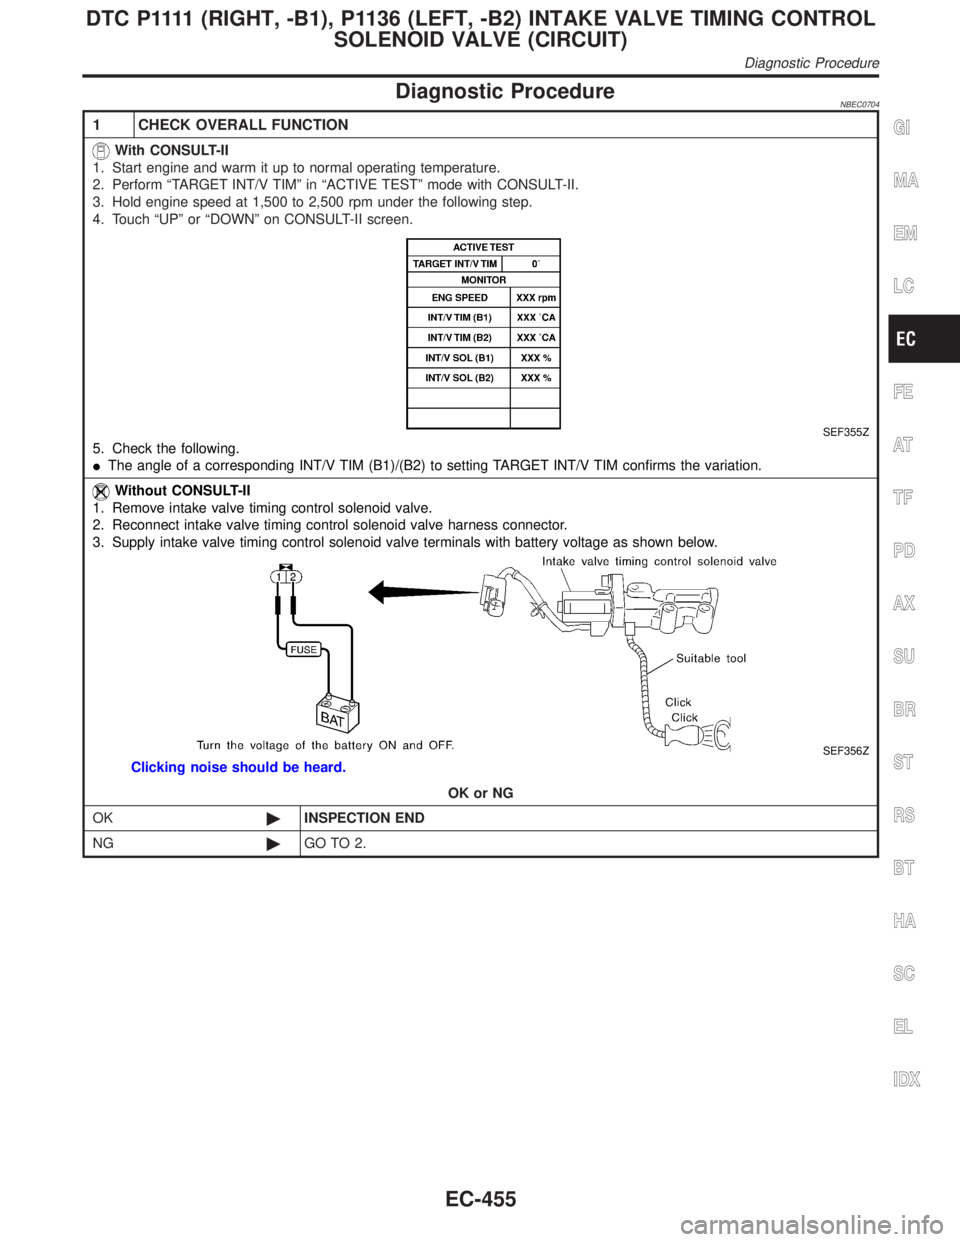
1 CHECK OVERALL FUNCTION
With CONSULT-II
1. Start engine and warm it up to normal operating temperature.
2. Perform ªTARGET INT/V TIMº in ªACTIVE TESTº mode with CONSULT-II.
3. Hold engine speed at 1,500 to 2,500 rpm under the following step.
4. Touch ªUPº or ªDOWNº on CONSULT-II screen.
SEF355Z
5. Check the following.
IThe angle of a corresponding INT/V TIM (B1)/(B2) to setting TARGET INT/V TIM confirms the variation.
Without CONSULT-II
1. Remove intake valve timing control solenoid valve.
2. Reconnect intake valve timing control solenoid valve harness connector.
3. Supply intake valve timing control solenoid valve terminals with battery voltage as shown below.
SEF356Z
Clicking noise should be heard.
OK or NG
OK©INSPECTION END
NG©GO TO 2.
GI
MA
EM
LC
FE
AT
TF
PD
AX
SU
BR
ST
RS
BT
HA
SC
EL
IDX
D T C P 1111(RIGHT, -B1), P1136 (LEFT, -B2) INTAKE VALVE TIMING CONTROL
SOLENOID VALVE (CIRCUIT)
Diagnostic Procedure
EC-455
Page 991 of 2395

2 INTAKE VALVE TIMING CONTROL SOLENOID VALVE POWER SUPPLY CIRCUIT
1. Stop engine.
2. Disconnect intake valve timing control solenoid valve harness connector.
SEF357Z
3. Turn ignition switch ªONº.
4. Check voltage between terminal 1 and ground with CONSULT-II or tester.
SEF603X
OK or NG
OK©GO TO 4.
NG©GO TO 3.
3 DETECT MALFUNCTION PART
Check the following.
IHarness connectors M32, F23
I10A fuse
IHarness continuity between fuse and intake valve timing control solenoid valve
©Repair harness or connectors.
4 CHECK INTAKE VALVE TIMING CONTROL SOLENOID VALVE OUTPUT CIRCUIT FOR OPEN AND
SHORT
1. Turn ignition switch ªOFFº.
2. Disconnect ECM harness connector.
3. Check harness connectors continuity between ECM terminal 13 (Right) or 15 (Left) and terminal 2. Refer to Wiring Dia-
gram.
Continuity should exist.
4. Also check harness for short to ground and short to power.
OK or NG
OK©GO TO 5.
NG©Repair open circuit or short to ground or short to power in harness or connectors.
D T C P 1111(RIGHT, -B1), P1136 (LEFT, -B2) INTAKE VALVE TIMING CONTROL
SOLENOID VALVE (CIRCUIT)
Diagnostic Procedure (Cont'd)
EC-456
Page 996 of 2395

SEF174Y
PROCEDURE FOR MALFUNCTION BNBEC0528S02TESTING CONDITION:
IFor best results, perform the test at a temperature above
5ÉC (41ÉF).
IBefore performing the following procedure, confirm that
battery voltage is more than 10V at idle, then stop engine
immediately.
With CONSULT-IINBEC0528S02011) Turn ignition switch ªOFFº and wait at least 10 seconds.
2) Turn ignition switch ªONº.
3) Check ªCOOLAN TEMP/Sº in ªDATA MONITORº mode with
CONSULT-II.
4) Confirm COOLAN TEMP/S value is 40ÉC (104ÉF) or less.
If the value is more than 40ÉC (104ÉF), park the vehicle in a
cool place and retry from step 1.
5) Start engine and wait until COOLAN TEMP/S value increases
to more than 55ÉC (131ÉF).
If 1st trip DTC is detected, go to ªDiagnostic Procedureº,
EC-463.
With GSTNBEC0528S0202Follow the procedure ªWith CONSULT-IIº above.
SEF174Y
PROCEDURE FOR MALFUNCTION CNBEC0528S03TESTING CONDITION:
IFor best results, perform the test at a temperature above
5ÉC (41ÉF).
IBefore performing the following procedure, confirm that
battery voltage is more than 10V at idle.
With CONSULT-IINBEC0528S03011) Start engine and warm it up to normal operating temperature.
2) Turn ignition switch ªOFFº and wait at least 10 seconds.
3) Turn ignition switch ªONº again and select ªDATA MONITORº
mode with CONSULT-II.
4) Start engine and let it idle for at least 20 seconds. If 1st trip
DTC is detected, go to ªDiagnostic Procedureº, EC-463.
With GSTNBEC0528S0302Follow the procedure ªWith CONSULT-IIº above.
GI
MA
EM
LC
FE
AT
TF
PD
AX
SU
BR
ST
RS
BT
HA
SC
EL
IDX
DTC P1130 SWIRL CONTROL VALVE CONTROL SOLENOID VALVE
DTC Confirmation Procedure (Cont'd)
EC-461
Page 1000 of 2395

6 CHECK SWIRL CONTROL VALVE CONTROL SOLENOID VALVE
With CONSULT-II
1. Reconnect the disconnected harness connectors.
2. Start engine and let it idle.
3. Remove vacuum hose connected to swirl control valve actuator.
4. Select ªSWIRL CONT SOL VALVEº in ªACTIVE TESTº mode with CONSULT-II.
5. Touch ªONº and ªOFFº on CONSULT-II screen.
6. Check vacuum existence and operation delay time under the following conditions.
SEF004Z
Without CONSULT-II
1. Reconnect ECM harness connector.
2. Remove vacuum hose connected to swirl control valve actuator.
3. Start engine and let it idle.
4. Apply 12V of direct current between swirl control valve control solenoid valve terminals 1 and 2.
5. Check vacuum existence and operation delay time under the following conditions.
SEF005Z
OK or NG
OK©GO TO 7.
NG©Replace intake manifold collector assembly.
7 CHECK INTERMITTENT INCIDENT
Perform ªTROUBLE DIAGNOSIS FOR INTERMITTENT INCIDENTº, EC-140.
©INSPECTION END
GI
MA
EM
LC
FE
AT
TF
PD
AX
SU
BR
ST
RS
BT
HA
SC
EL
IDX
DTC P1130 SWIRL CONTROL VALVE CONTROL SOLENOID VALVE
Diagnostic Procedure (Cont'd)
EC-465
Page 1001 of 2395

PROCEDURE BNBEC0530S02
1 CHECK INTAKE SYSTEM
1. Start engine and let it idle.
2. Check intake air system for air leaks.
OK or NG
OK (With CONSULT-II)©GO TO 2.
OK (Without CONSULT-
II)©GO TO 3.
NG©Repair intake system.
2 CHECK SWIRL CONTROL VALVE CONTROL SOLENOID VALVE CIRCUIT
With CONSULT-II
1. Select ªSWIRL CONT SOL VALVEº in ªACTIVE TESTº mode with CONSULT-II.
2. Touch ªONº and ªOFFº on CONSULT-II screen.
SEF003Z
3. Make sure that clicking sound is heard from the swirl control valve control solenoid valve.
OK or NG
OK©GO TO 6.
NG©GO TO 3.
DTC P1130 SWIRL CONTROL VALVE CONTROL SOLENOID VALVE
Diagnostic Procedure (Cont'd)
EC-466
Page 1004 of 2395

7 CHECK SWIRL CONTROL VALVE CONTROL SOLENOID VALVE
With CONSULT-II
1. Reconnect the disconnected harness connectors.
2. Start engine and let it idle.
3. Remove vacuum hose connected to swirl control valve actuator.
4. Select ªSWIRL CONT SOL/Vº in ªACTIVE TESTº mode with CONSULT-II.
5. Touch ªONº and ªOFFº on CONSULT-II screen.
6. Check vacuum existence and operation delay time under the following conditions.
SEF004Z
Without CONSULT-II
1. Reconnect ECM harness connector.
2. Remove vacuum hose connected to swirl control valve actuator.
3. Start engine and let it idle.
4. Apply 12V of direct current between swirl control valve control solenoid valve terminals 1 and 2.
5. Check vacuum existence and operation delay time under the following conditions.
SEF005Z
OK or NG
OK©GO TO 8.
NG©Replace intake manifold collector assembly.
GI
MA
EM
LC
FE
AT
TF
PD
AX
SU
BR
ST
RS
BT
HA
SC
EL
IDX
DTC P1130 SWIRL CONTROL VALVE CONTROL SOLENOID VALVE
Diagnostic Procedure (Cont'd)
EC-469