ISUZU KB P190 2007 Workshop Repair Manual
Manufacturer: ISUZU, Model Year: 2007, Model line: KB P190, Model: ISUZU KB P190 2007Pages: 6020, PDF Size: 70.23 MB
Page 531 of 6020

FRONT WHEEL DRIVE 4C1-27
Reassembly
Minor Components
Reassembly Steps
1. Differential cage
2. Thrust washer
3. Side gear
▲ 4. Pinion gear
▲
5. Cross pin
▲ 6. Lock pin
▲ 7. Ring gear
▲ 8. Bolt
Important Operations
4. Pinion Gear
Install the pinion gear by engaging it with the side gears while
turning both pinion gears simultaneously in the same direction.
BACK TO CHAPTER INDEX
TO MODEL INDEX
ISUZU KB P190 2007
Page 532 of 6020

4C1-28 FRONT WHEEL DRIVE
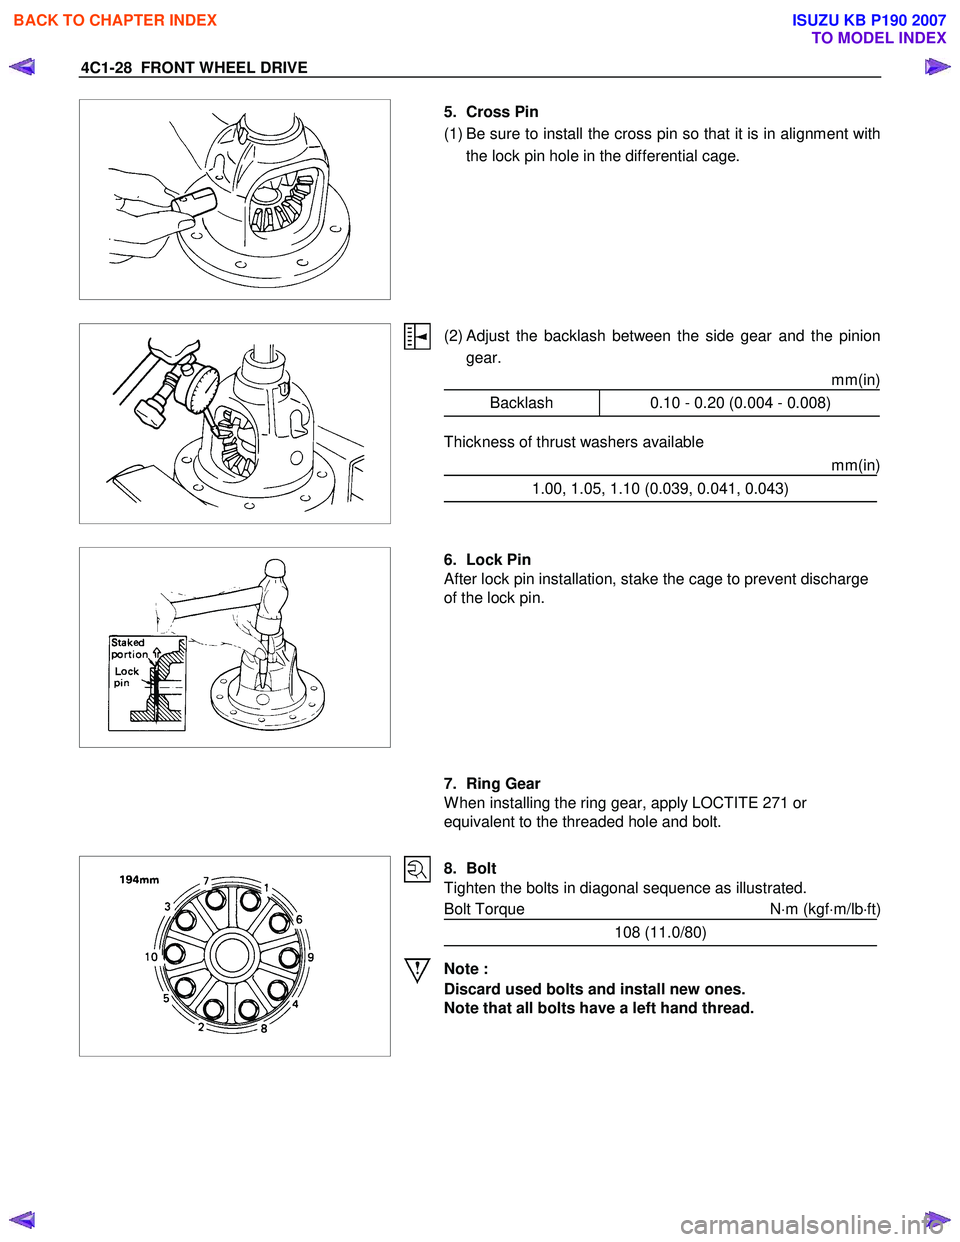
5. Cross Pin
(1) Be sure to install the cross pin so that it is in alignment with the lock pin hole in the differential cage.
(2) Adjust the backlash between the side gear and the pinion
gear. mm(in)
Backlash 0.10 - 0.20 (0.004 - 0.008)
Thickness of thrust washers available
mm(in)
1.00, 1.05, 1.10 (0.039, 0.041, 0.043)
6. Lock Pin
After lock pin installation, stake the cage to prevent discharge
of the lock pin.
7. Ring Gear
W hen installing the ring gear, apply LOCTITE 271 or
equivalent to the threaded hole and bolt.
8. Bolt
Tighten the bolts in diagonal sequence as illustrated.
Bolt Torque N⋅m (kgf ⋅m/lb ⋅ft)
108 (11.0/80)
Note :
Discard used bolts and install new ones.
Note that all bolts have a left hand thread.
BACK TO CHAPTER INDEX
TO MODEL INDEX
ISUZU KB P190 2007
Page 533 of 6020

FRONT WHEEL DRIVE 4C1-29
Major Components
RTW 54CLF000201
Reassembly Steps
1. Diff. carrier
▲ 2. Outer bearing outer race
▲ 3. Inner bearing outer race
▲ 4. Adjust shim
▲ 5. Inner bearing
▲ 6. Collapsible spacer
7. Pinion gear
8. Outer bearing
▲ 9. Oil seal
10. Dust cover
11. Flange
▲ 12. Flange nut
▲ 13. Adjust shim
▲ 14. Side bearing
15. Bearing outer race
16. Diff. cage assembly
▲ 17. Bearing cap
▲ 18. Bolt
19. Axle case
▲ 20. Differential assembly
21. Bolt
BACK TO CHAPTER INDEX
TO MODEL INDEX
ISUZU KB P190 2007
Page 534 of 6020

4C1-30 FRONT WHEEL DRIVE
Important Operations
2. Outer Bearing Outer Race
Installer : 9-8522-1141-0
Grip : 5-8840-0007-0
3. Inner Bearing Outer Race
Installer : 9-8522-1274-0
Grip : 5-8840-0007-0
4. Adjust Shim
Adjustment of drive pinion mounting distance
(1) Apply gear oil to the inner and outer drive pinion bearing.
Clean the pinion setting gage set.
Then install the gage set together with the inner and oute
r
bearings.
1. Pilot : 5-8840-2085-0
2. Nut and bolt : 5-8840-2089-0
3. Gage plate : 5-8840-2087-0
BACK TO CHAPTER INDEX
TO MODEL INDEX
ISUZU KB P190 2007
Page 535 of 6020

FRONT WHEEL DRIVE 4C1-31
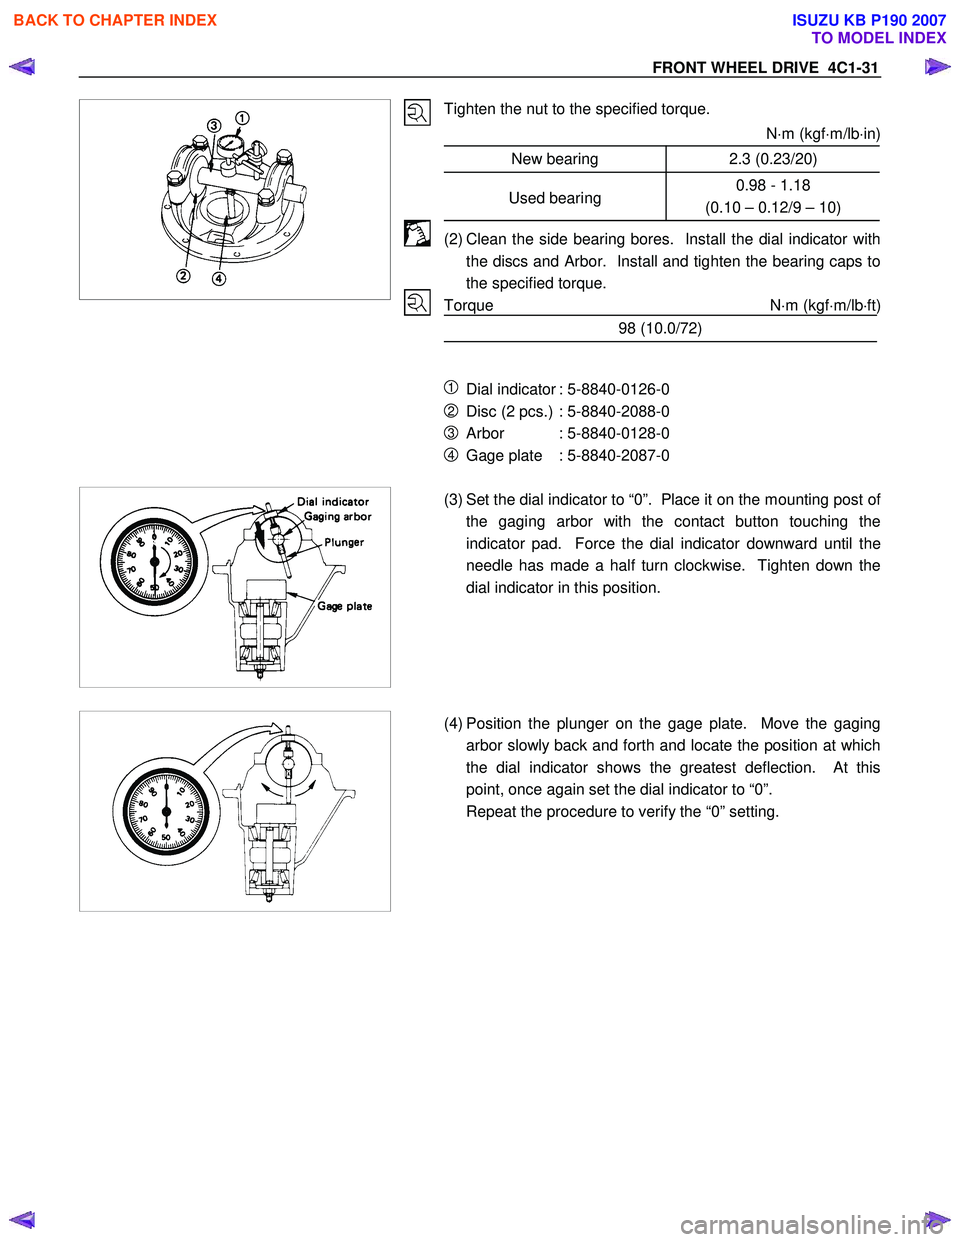
Tighten the nut to the specified torque.
N⋅m (kgf ⋅m/lb ⋅in)
New bearing 2.3 (0.23/20)
Used bearing 0.98 - 1.18
(0.10 – 0.12/9 – 10)
(2) Clean the side bearing bores. Install the dial indicator with the discs and Arbor. Install and tighten the bearing caps to
the specified torque.
Torque N ⋅m (kgf ⋅m/lb ⋅ft)
98 (10.0/72)
1 Dial indicator : 5-8840-0126-0
2 Disc (2 pcs.) : 5-8840-2088-0
3 Arbor : 5-8840-0128-0
4 Gage plate : 5-8840-2087-0
(3) Set the dial indicator to “0”. Place it on the mounting post of
the gaging arbor with the contact button touching the
indicator pad. Force the dial indicator downward until the
needle has made a half turn clockwise. Tighten down the
dial indicator in this position.
(4) Position the plunger on the gage plate. Move the gaging
arbor slowly back and forth and locate the position at which
the dial indicator shows the greatest deflection. At this
point, once again set the dial indicator to “0”.
Repeat the procedure to verify the “0” setting.
BACK TO CHAPTER INDEX
TO MODEL INDEX
ISUZU KB P190 2007
Page 536 of 6020

4C1-32 FRONT WHEEL DRIVE
(5)
After the ZERO setting is obtained, rotate the gaging arbor
until the dial indicator rod does not touch the gaging plate.
Record the number the dial indicator needle points to.
(6) Record the pinion depth code on the head of the drive
pinion.
The number indicates a necessary change in the pinion mounting distance. A plus number indicates the need for a
greater mounting distance (which can be achieved b
y
decreasing the shim thickness). A minus number indicates
the need for a smaller mounting distance (which can be
achieved by increasing the shim thickness). If examination
reveals pinion depth code “0”, the pinion is “nominal”.
BACK TO CHAPTER INDEX
TO MODEL INDEX
ISUZU KB P190 2007
Page 537 of 6020

FRONT WHEEL DRIVE 4C1-33
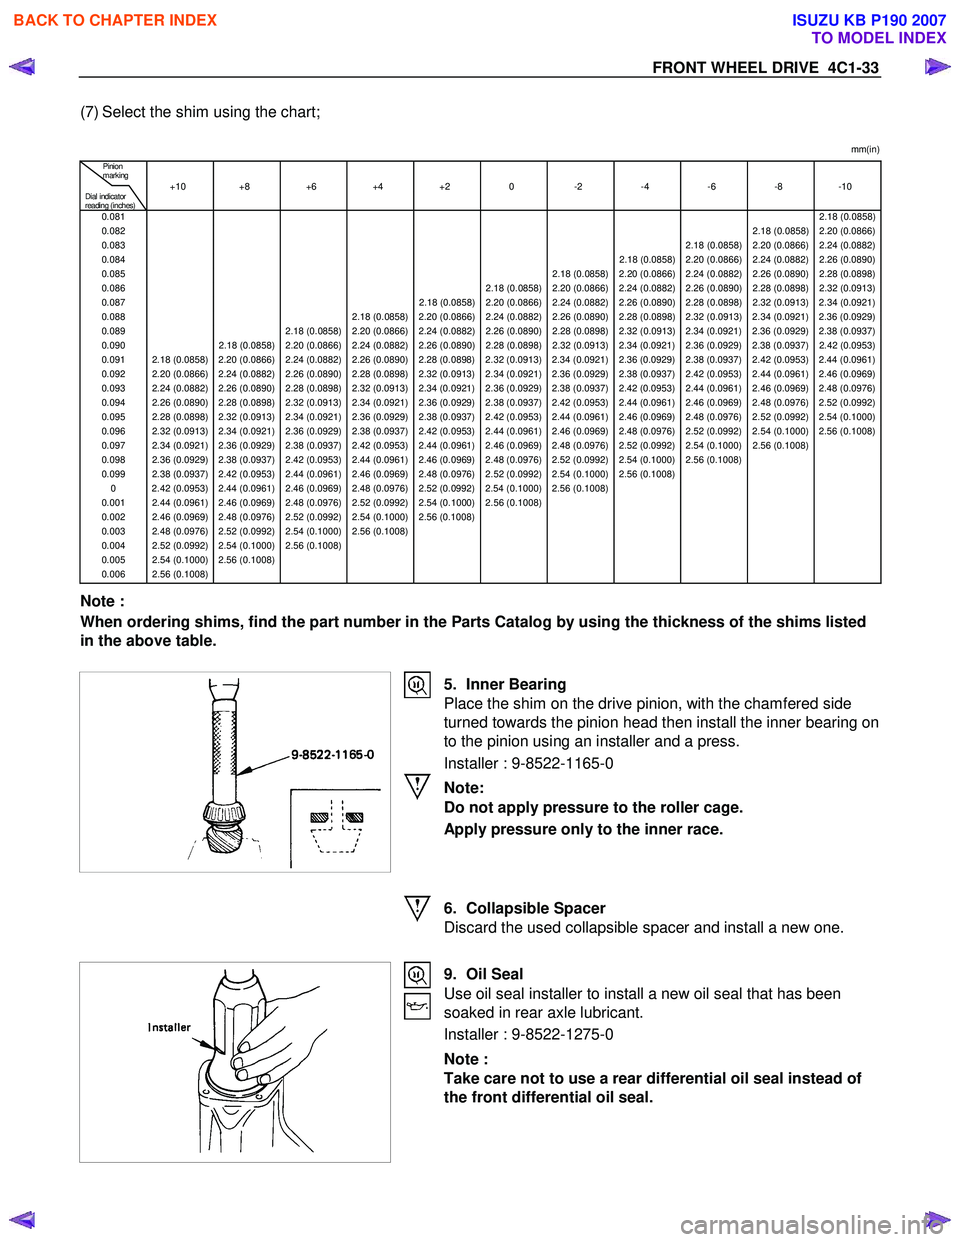
(7) Select the shim using the chart;
mm(in)
Pinion
marking
+10 +8 +6 +4 +2 0 -2 -4 -6 -8 -10 Dial indicator
reading (inches)
0.081 2.18 (0.0858)0.082 2.18 (0.0858) 2.20 (0.0866)0.083 2.18 (0.0858) 2.20 (0.0866) 2.24 (0.0882)0.084 2.18 (0.0858) 2.20 (0.0866) 2.24 (0.0882) 2.26 (0.0890)0.085 2.18 (0.0858) 2.20 (0.0866) 2.24 (0.0882) 2.26 (0.0890) 2.28 (0.0898)0.086 2.18 (0.0858) 2.20 (0.0866) 2.24 (0.0882) 2.26 (0.0890) 2.28 (0.0898) 2.32 (0.0913)0.087 2.18 (0.0858) 2.20 (0.0866) 2.24 (0.0882) 2.26 (0.0890) 2.28 (0.0898) 2.32 (0.0913) 2.34 (0.0921)0.088 2.18 (0.0858) 2.20 (0.0866) 2.24 (0.0882) 2.26 (0.0890) 2.28 (0.0898) 2.32 (0.0913) 2.34 (0.0921) 2.36 (0.0929)0.089 2.18 (0.0858) 2.20 (0.0866) 2.24 (0.0882) 2.26 (0.0890) 2.28 (0.0898) 2.32 (0.0913) 2.34 (0.0921) 2.36 (0.0929) 2.38 (0.0937 )0.090 2.18 (0.0858) 2.20 (0.0866) 2.24 (0.0882) 2.26 (0.0890) 2.28 (0.0898) 2.32 (0.0913) 2.34 (0.0921) 2.36 (0.0929) 2.38 (0.0937) 2.42 (0.0953)0.091 2.18 (0.0858) 2.20 (0.0866) 2.24 (0.0882) 2.26 (0.0890) 2.28 (0.0898) 2.32 (0.0913) 2.34 (0.0921) 2.36 (0.0929) 2.38 (0.0937) 2.42 (0.0953) 2.44 (0.0961)0.092 2.20 (0.0866) 2.24 (0.0882) 2.26 (0.0890) 2.28 (0.0898) 2.32 (0.0913) 2.34 (0.0921) 2.36 (0.0929) 2.38 (0.0937) 2.42 (0.0953) 2.44 (0.0961) 2.46 (0.0969)0.093 2.24 (0.0882) 2.26 (0.0890) 2.28 (0.0898) 2.32 (0.0913) 2.34 (0.0921) 2.36 (0.0929) 2.38 (0.0937) 2.42 (0.0953) 2.44 (0.0961) 2.46 (0.0969) 2.48 (0.0976)0.094 2.26 (0.0890) 2.28 (0.0898) 2.32 (0.0913) 2.34 (0.0921) 2.36 (0.0929) 2.38 (0.0937) 2.42 (0.0953) 2.44 (0.0961) 2.46 (0.0969) 2.48 (0.0976) 2.52 (0.0992)0.095 2.28 (0.0898) 2.32 (0.0913) 2.34 (0.0921) 2.36 (0.0929) 2.38 (0.0937) 2.42 (0.0953) 2.44 (0.0961) 2.46 (0.0969) 2.48 (0.0976) 2.52 (0.0992) 2.54 (0.1000)0.096 2.32 (0.0913) 2.34 (0.0921) 2.36 (0.0929) 2.38 (0.0937) 2.42 (0.0953) 2.44 (0.0961) 2.46 (0.0969) 2.48 (0.0976) 2.52 (0.0992) 2.54 (0.1000) 2.56 (0.1008)0.097 2.34 (0.0921) 2.36 (0.0929) 2.38 (0.0937) 2.42 (0.0953) 2.44 (0.0961) 2.46 (0.0969) 2.48 (0.0976) 2.52 (0.0992) 2.54 (0.1000) 2.56 (0.1008) 0.098 2.36 (0.0929) 2.38 (0.0937) 2.42 (0.0953) 2.44 (0.0961) 2.46 (0.0969) 2.48 (0.0976) 2.52 (0.0992) 2.54 (0.1000) 2.56 (0.1008) 0.099 2.38 (0.0937) 2.42 (0.0953) 2.44 (0.0961) 2.46 (0.0969) 2.48 (0.0976) 2.52 (0.0992) 2.54 (0.1000) 2.56 (0.1008) 0 2.42 (0.0953) 2.44 (0.0961) 2.46 (0.0969) 2.48 (0.0976) 2.52 (0.0992) 2.54 (0.1000) 2.56 (0.1008) 0.001 2.44 (0.0961) 2.46 (0.0969) 2.48 (0.0976) 2.52 (0.0992) 2.54 (0.1000) 2.56 (0.1008) 0.002 2.46 (0.0969) 2.48 (0.0976) 2.52 (0.0992) 2.54 (0.1000) 2.56 (0.1008) 0.003 2.48 (0.0976) 2.52 (0.0992) 2.54 (0.1000) 2.56 (0.1008) 0.004 2.52 (0.0992) 2.54 (0.1000) 2.56 (0.1008) 0.005 2.54 (0.1000) 2.56 (0.1008) 0.006 2.56 (0.1008)
Note :
When ordering shims, find the part number in the Parts Catalog by using the thickness of the shims listed
in the above table.
5. Inner Bearing
Place the shim on the drive pinion, with the chamfered side
turned towards the pinion head then install the inner bearing on
to the pinion using an installer and a press.
Installer : 9-8522-1165-0
Note:
Do not apply pressure to the roller cage.
Apply pressure only to the inner race.
6. Collapsible Spacer
Discard the used collapsible spacer and install a new one.
9. Oil Seal
Use oil seal installer to install a new oil seal that has been
soaked in rear axle lubricant.
Installer : 9-8522-1275-0
Note :
Take care not to use a rear differential oil seal instead of
the front differential oil seal.
BACK TO CHAPTER INDEX
TO MODEL INDEX
ISUZU KB P190 2007
Page 538 of 6020

4C1-34 FRONT WHEEL DRIVE
12. Flange Nut and Washer
(1) Apply lubricant to the pinion threads.
(2) Tighten the nut to the specified torque using the pinion flange holder.
Pinion flange holder : 5-8840-0133-0
Torque N ⋅m (kgf ⋅m/lb ⋅ft
)
177 - 275 (18 - 28/130 - 202)
Discard used flange nut and install new one.
(3) Pinion bearing preload
(a) Measure the bearing preload by using a torque meter. Note the scale reading required to rotate the flange.
(b) continue tightening until the specified starting torque is obtained.
Starting Torque N⋅m (kgf ⋅m/lb ⋅in
)
0.63 - 1.13 (0.06 – 0.12/5 - 10)
13. Adjust Shim
(1)
Attach the side bearing to the differential assembly without
shims. Support the opposite side using a pilot to prevent
bearing damage.
1 Installer : 9-8522-1164-0
2 Drive handle : 5-8840-0007-0
3 Pilot : 9-8521-1743-0
(2) Insert the differential cage assembly with bearing oute
r
races into the side bearing bores of the carrier.
(3) Using two sets of feeler gauges, insert a feeler stock o
f
sufficient thickness between each bearing outer race and
the carrier to remove all end plat. Make certain the feele
r
stock is pushed to the bottom of the bearing bores.
Mount the dial indicator on the carrier so that the indicato
r
stem is at right angles to a tooth on the ring gear.
Dial indicator : 5-8840-0126-0
BACK TO CHAPTER INDEX
TO MODEL INDEX
ISUZU KB P190 2007
Page 539 of 6020

FRONT WHEEL DRIVE 4C1-35
(4) Adjust feeler gauge thickness from side to side until ring
gear backlash is in the specified range.
Backlash mm(in) 0.13 - 0.18 (0.005 - 0.007)
W ith zero end play and correct backlash established,remove the feeler gauge packs, determine the thickness o
f
the shims required and add 0.05 mm (0.002 in) to each
shim pack to provide side bearing preload. Always use ne
w
shims.
(5) Remove side bearing
Remover : 5-8840-0013-0
Pilot : 9-8521-1743-0
14. Side Bearing
Install the side bearings together with the selected shims.
1 Installer : 9-8522-1164-0
2 Drive handle : 5-8840-0007-0
3 Pilot : 9-8521-1743-0
17. Bearing Cap
Align the setting marks applied at disassembly.
BACK TO CHAPTER INDEX
TO MODEL INDEX
ISUZU KB P190 2007
Page 540 of 6020

4C1-36 FRONT WHEEL DRIVE
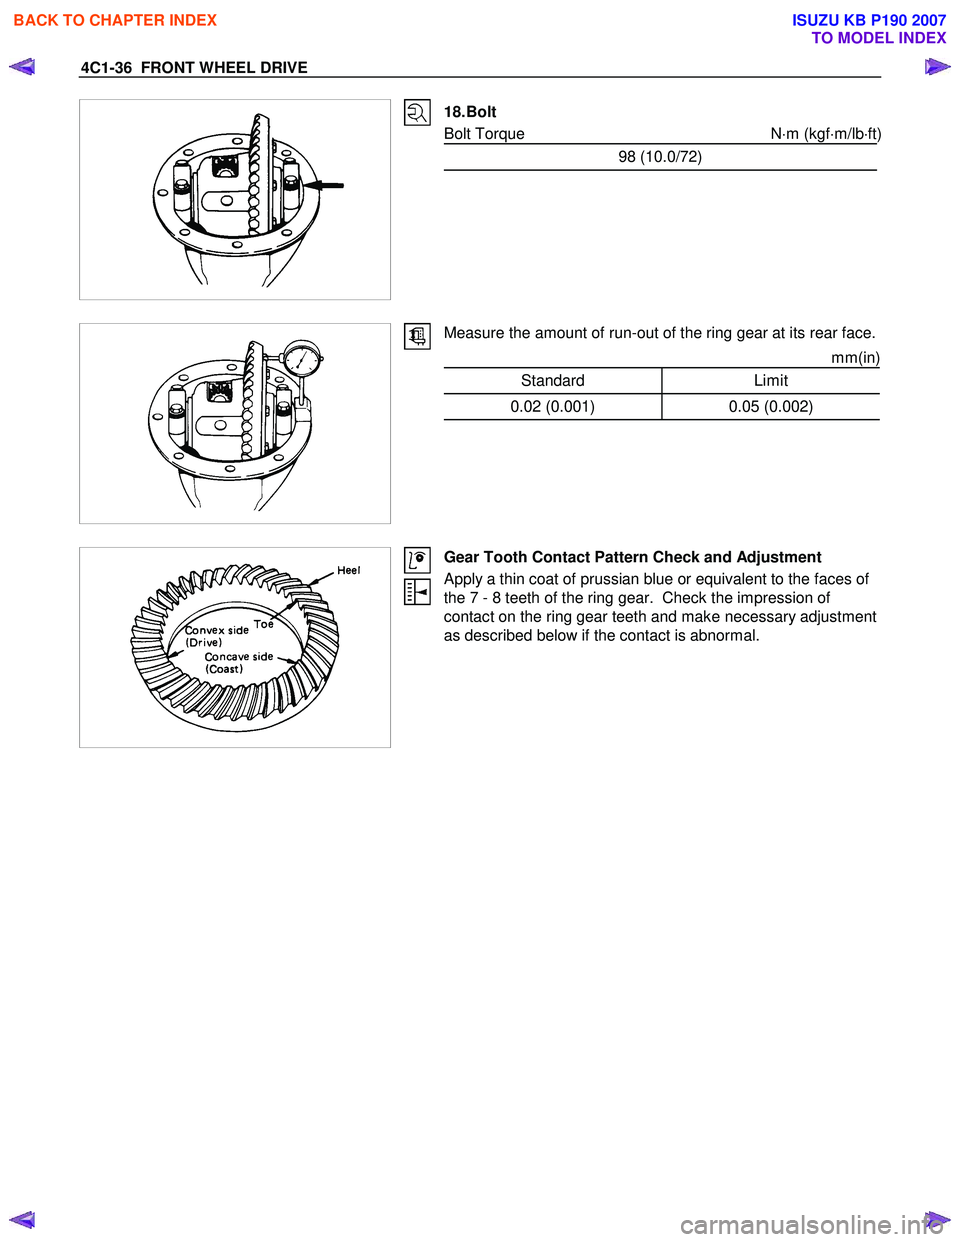
18. Bolt
Bolt Torque N⋅m (kgf ⋅m/lb ⋅ft)
98 (10.0/72)
Measure the amount of run-out of the ring gear at its rear face.
mm(in)
Standard Limit
0.02 (0.001) 0.05 (0.002)
Gear Tooth Contact Pattern Check and Adjustment
Apply a thin coat of prussian blue or equivalent to the faces of
the 7 - 8 teeth of the ring gear. Check the impression of
contact on the ring gear teeth and make necessary adjustment
as described below if the contact is abnormal.
BACK TO CHAPTER INDEX
TO MODEL INDEX
ISUZU KB P190 2007