sensor ISUZU KB P190 2007 Workshop Repair Manual
[x] Cancel search | Manufacturer: ISUZU, Model Year: 2007, Model line: KB P190, Model: ISUZU KB P190 2007Pages: 6020, PDF Size: 70.23 MB
Page 3530 of 6020
Engine Management – V6 – Service Operations Page 6C1-3–6
Basic Diagnostic Tools Required
Use of incorrect electrical circuit diagnostic
tools when performing certain service
procedures could result in incorrect
diagnostic results or damage to components.
The following electrical circuit testing tools are required to perform the diagnostic procedures detailed in this Section:
• Test lamp, refer to 8A Electrical – Body and Chassis for further information.
• Digital multimeter with 10 M Ω ohms impedance, refer to 8A Electrical – Body and Chassis for further information.
• Connector test adapter kit Tool No. J35616-A.
1.3 Service Operations Not Covered In This
Section
There are situations where components and/or procedures related to the powertrain management system are covered in
other Sections of the service documentation. To aid technicians in locating the necessary service procedures for these
components and/or procedures, refer to the stated references.
Air-conditioning System
For A/C pressure switch replacement procedure, refer to 2A Heater and Air-conditioning.
Electrical Components
For the following electrical system component replacement procedures, refer to the appropriate Sections as follows:
• Extended brake pedal travel switch and stop lamp switch service operations, refer to 5C Brakes.
• Fuse and relay locations, refer to 8A Electrical-Body and Chassis.
• Cruise control switch assembly service operations, refer to 8C Cruise Control – HFV6.
• Powertrain interface module PIM removal and installation procedure, refer to 6E1 Powertrain Interface Module – V6.
• Neutral start and back-up lamp switch, refer to 7C4 Automatic Transmission – 4L60E – On-vehicle Servicing.
• Vehicle speed sensor service operations, refer to:
− 7C4 Automatic Transmission – 4L60E – On-vehicle Servicing
− 7B1 Manual Transmission – V6
Fuel System
For the following fuel system component replacement procedures, refer to 6C Fuel System – V6.
• Fuel system cleaning,
• Fuel system leak and pressure test,
• Fuel feed hose to fuel rail replacement,
• Fuel line quick connect fittings,
• Evaporative emission control canister,
• Fuel filter,
• Fuel hose / pipes layout,
• Fuel pump motor assembly and fuel pressure regulator assembly,
• Fuel sender assembly service operations.
BACK TO CHAPTER INDEX
TO MODEL INDEX
ISUZU KB P190 2007
Page 3531 of 6020
Engine Management – V6 – Service Operations Page 6C1-3–7
Transmission – Automatic
For automatic transmission sensors and components, refer to 7C4 Automatic Transmission – 4L60E – On-vehicle
Servicing.
Transmission – Manual
For manual transmission sensors and other components, refer to 7B1 Manual Transmission – V6.
1.4 Warning Caution and Notes
This Section contains various W ARNINGS, CAUTIONS and NOTE statements that you must observe carefully to reduce
the risk of death or injury during service, repair procedures or vehicle operation. Incorrect service or repair procedures
may damage the vehicle or cause operational faults. W ARNINGS, CAUTION and NOTE statements are not exhaustive.
GM Holden LTD can not possibly warn of all the potentially hazardous consequences of failure to follow these
instructions.
Definition of WARNING, CAUTION and NOTE Statements
Diagnosis and repair procedures in this Section contain both general and specific W ARNING, CAUTION and NOTE
statements. GM Holden LTD is dedicated to the presentation of service information that helps the technician to diagnose
and repair the systems necessary for proper operation of the vehicle. Certain procedures may present a hazard to the
technician if they are not followed in the recommended manner. W ARNING, CAUTION and NOTE statements are
designed to help prevent these hazards from occurring, but not all hazards can be foreseen.
WARNING defined
A W ARNING statement immediately precedes an operating procedure or maintenance practice which, if not correctly
followed, could result in death or injury. A W ARNING statement alerts you to take necessary action or not to take a
prohibited action. If a W ARNING statement is ignored, the following consequences may occur:
• Death or injury to the technician or other personnel working on the vehicle,
• Death or injury to other people in or near the workplace area, and / or
• Death or injury to the driver / or passenger(s) of the vehicle or other people, if the vehicle has been improperly
repaired.
CAUTION defined
A CAUTION statement immediately precedes an operating procedure or maintenance practice which, if not correctly
followed, could result in damage to or destruction of equipment, or corruption of data. If a CAUTION statement is ignored,
the following consequences may occur:
• Damage to the vehicle,
• Unnecessary vehicle repairs or component replacement,
• Faulty operation or performance of any system or component being repaired,
• Damage to any system or components which depend on the proper operation of the system or component being
repaired,
• Faulty operation or performance of any systems or components which depend on the proper operation or
performance of the system or component under repair,
• Damage to fasteners, basic tools or special tools and / or
• Leakage of coolant, lubricant or other vital fluids.
NOTE defined
A NOTE statement immediately precedes or follows an operating procedure, maintenance practice or condition that
requires highlighting. A NOTE statement also emphasises necessary characteristics of a diagnostic or repair procedure.
A NOTE statement is designed to:
• Clarify a procedure,
• Present additional information for accomplishing a procedure,
BACK TO CHAPTER INDEX
TO MODEL INDEX
ISUZU KB P190 2007
Page 3533 of 6020
Engine Management – V6 – Service Operations Page 6C1-3–9
2 General Service Operations
2.1 Accelerator Pedal Position Sensor
Remove
1 Turn the ignition switch off.
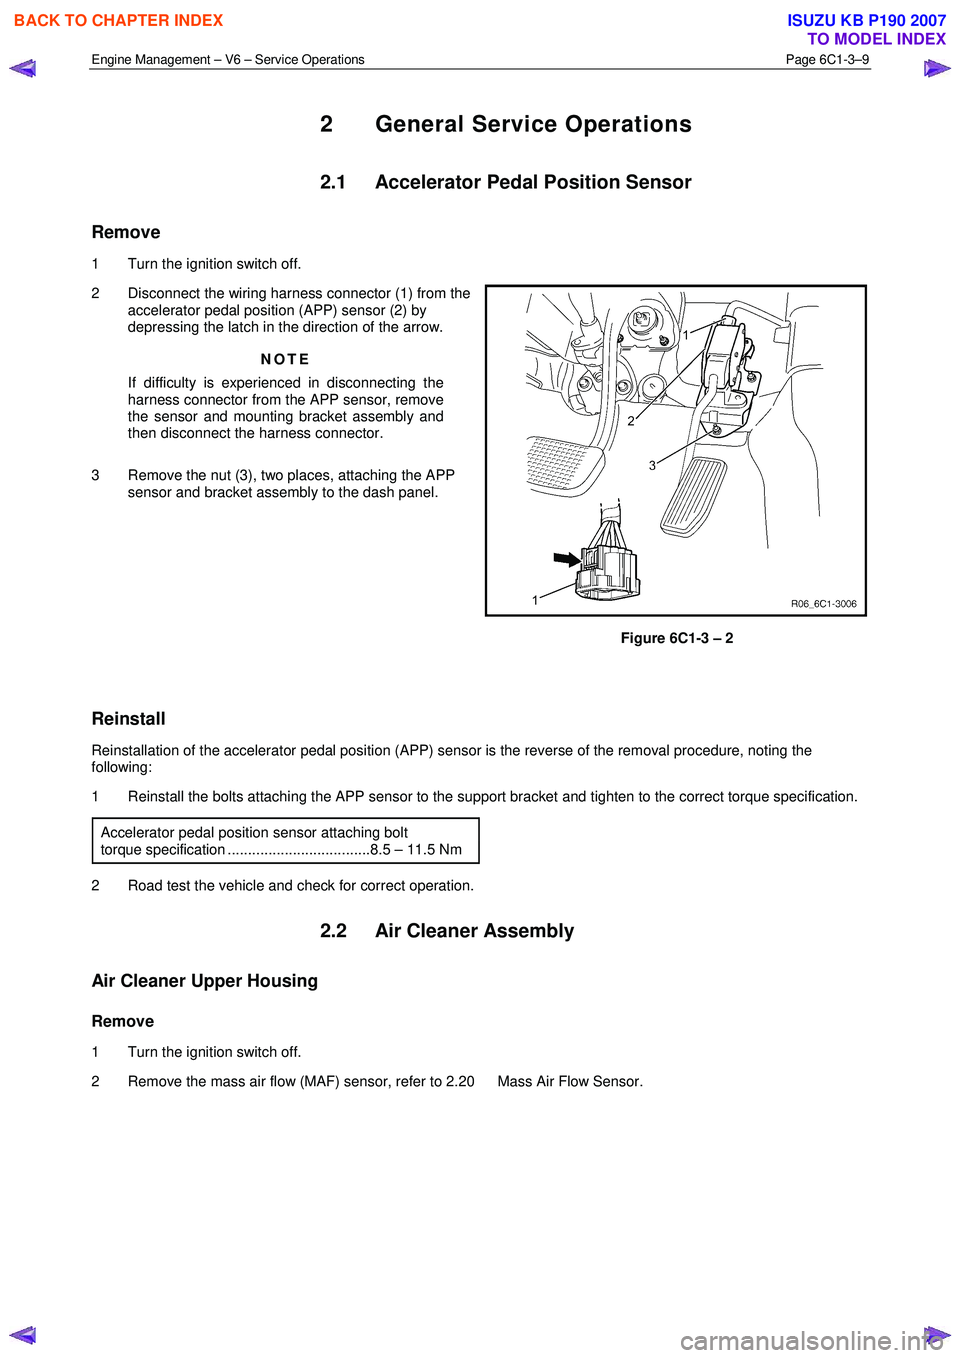
2 Disconnect the wiring harness connector (1) from the accelerator pedal position (APP) sensor (2) by
depressing the latch in the direction of the arrow.
NOTE
If difficulty is experienced in disconnecting the
harness connector from the APP sensor, remove
the sensor and mounting bracket assembly and
then disconnect the harness connector.
3 Remove the nut (3), two places, attaching the APP sensor and bracket assembly to the dash panel.
Figure 6C1-3 – 2
Reinstall
Reinstallation of the accelerator pedal position (APP) sensor is the reverse of the removal procedure, noting the
following:
1 Reinstall the bolts attaching the APP sensor to the support bracket and tighten to the correct torque specification.
Accelerator pedal position sensor attaching bolt
torque specification ...................................8.5 – 11.5 Nm
2 Road test the vehicle and check for correct operation.
2.2 Air Cleaner Assembly
Air Cleaner Upper Housing
Remove
1 Turn the ignition switch off.
2 Remove the mass air flow (MAF) sensor, refer to 2.20 Mass Air Flow Sensor.
BACK TO CHAPTER INDEX
TO MODEL INDEX
ISUZU KB P190 2007
Page 3535 of 6020
Engine Management – V6 – Service Operations Page 6C1-3–11
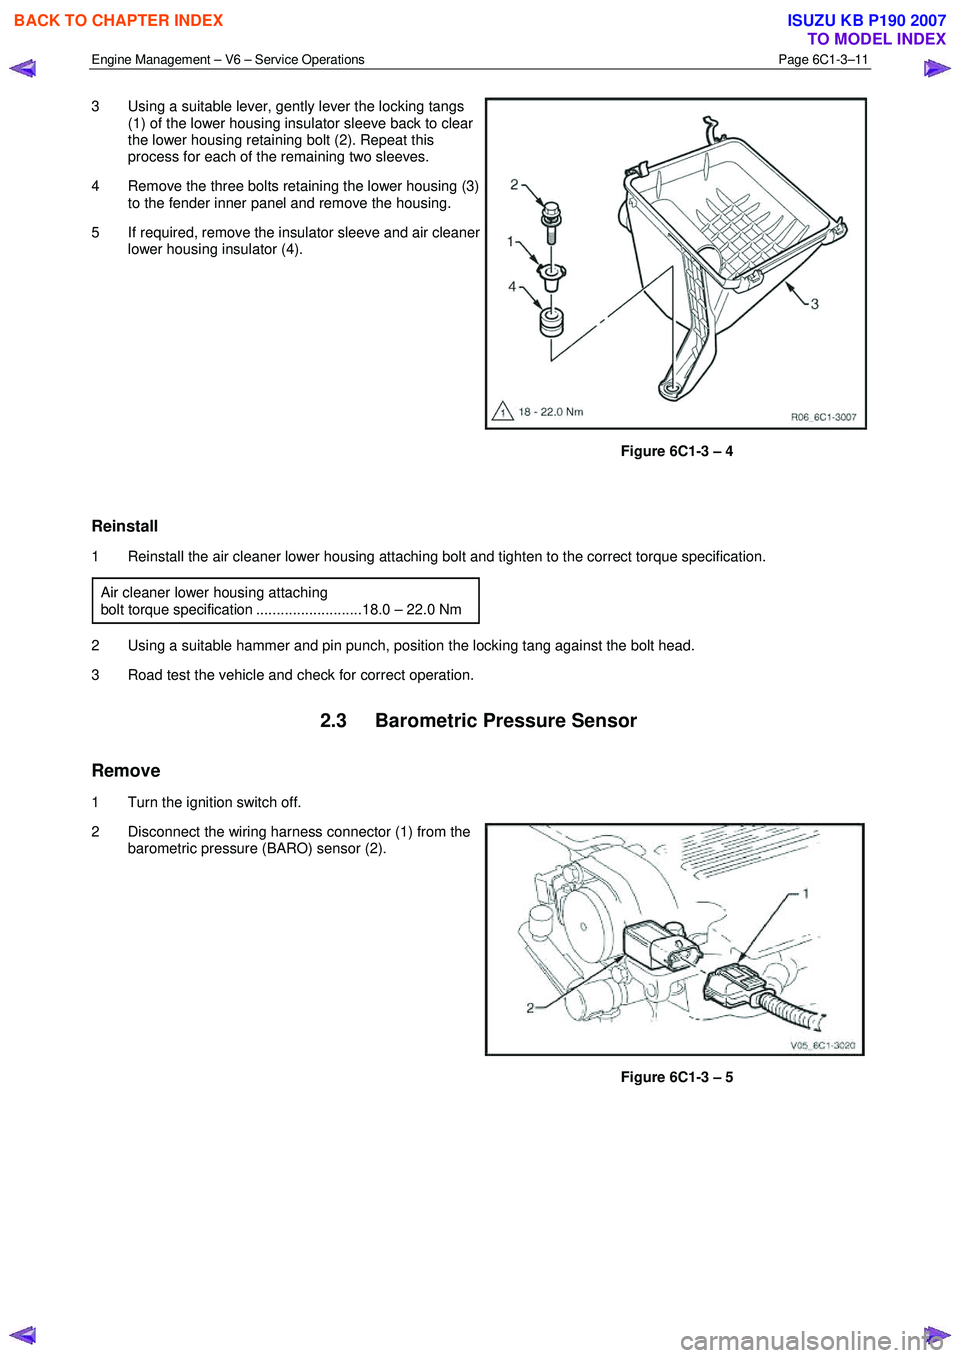
3 Using a suitable lever, gently lever the locking tangs
(1) of the lower housing insulator sleeve back to clear
the lower housing retaining bolt (2). Repeat this
process for each of the remaining two sleeves.
4 Remove the three bolts retaining the lower housing (3) to the fender inner panel and remove the housing.
5 If required, remove the insulator sleeve and air cleaner lower housing insulator (4).
Figure 6C1-3 – 4
Reinstall
1 Reinstall the air cleaner lower housing attaching bolt and tighten to the correct torque specification.
Air cleaner lower housing attaching
bolt torque specification ..........................18.0 – 22.0 Nm
2 Using a suitable hammer and pin punch, position the locking tang against the bolt head.
3 Road test the vehicle and check for correct operation.
2.3 Barometric Pressure Sensor
Remove
1 Turn the ignition switch off.
2 Disconnect the wiring harness connector (1) from the barometric pressure (BARO) sensor (2).
Figure 6C1-3 – 5
BACK TO CHAPTER INDEX
TO MODEL INDEX
ISUZU KB P190 2007
Page 3536 of 6020
Engine Management – V6 – Service Operations Page 6C1-3–12
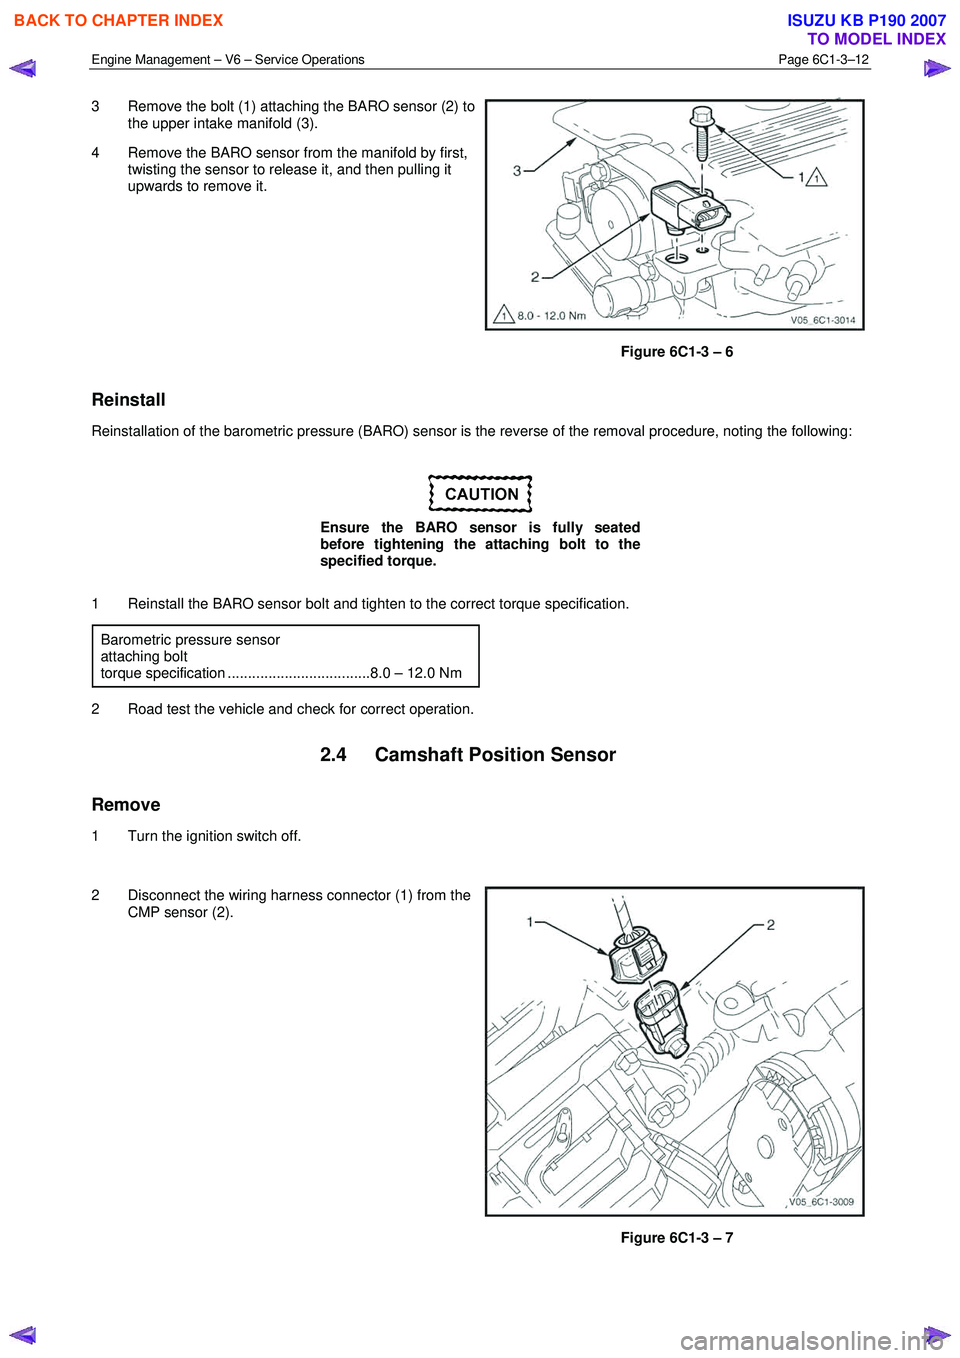
3 Remove the bolt (1) attaching the BARO sensor (2) to
the upper intake manifold (3).
4 Remove the BARO sensor from the manifold by first, twisting the sensor to release it, and then pulling it
upwards to remove it.
Figure 6C1-3 – 6
Reinstall
Reinstallation of the barometric pressure (BARO) sensor is the reverse of the removal procedure, noting the following:
Ensure the BARO sensor is fully seated
before tightening the attaching bolt to the
specified torque.
1 Reinstall the BARO sensor bolt and tighten to the correct torque specification. Barometric pressure sensor
attaching bolt
torque specification ...................................8.0 – 12.0 Nm
2 Road test the vehicle and check for correct operation.
2.4 Camshaft Position Sensor
Remove
1 Turn the ignition switch off.
2 Disconnect the wiring harness connector (1) from the CMP sensor (2).
Figure 6C1-3 – 7
BACK TO CHAPTER INDEX
TO MODEL INDEX
ISUZU KB P190 2007
Page 3537 of 6020
Engine Management – V6 – Service Operations Page 6C1-3–13
Clean the area around the CMP sensor before
removal to avoid debris from entering the
engine.
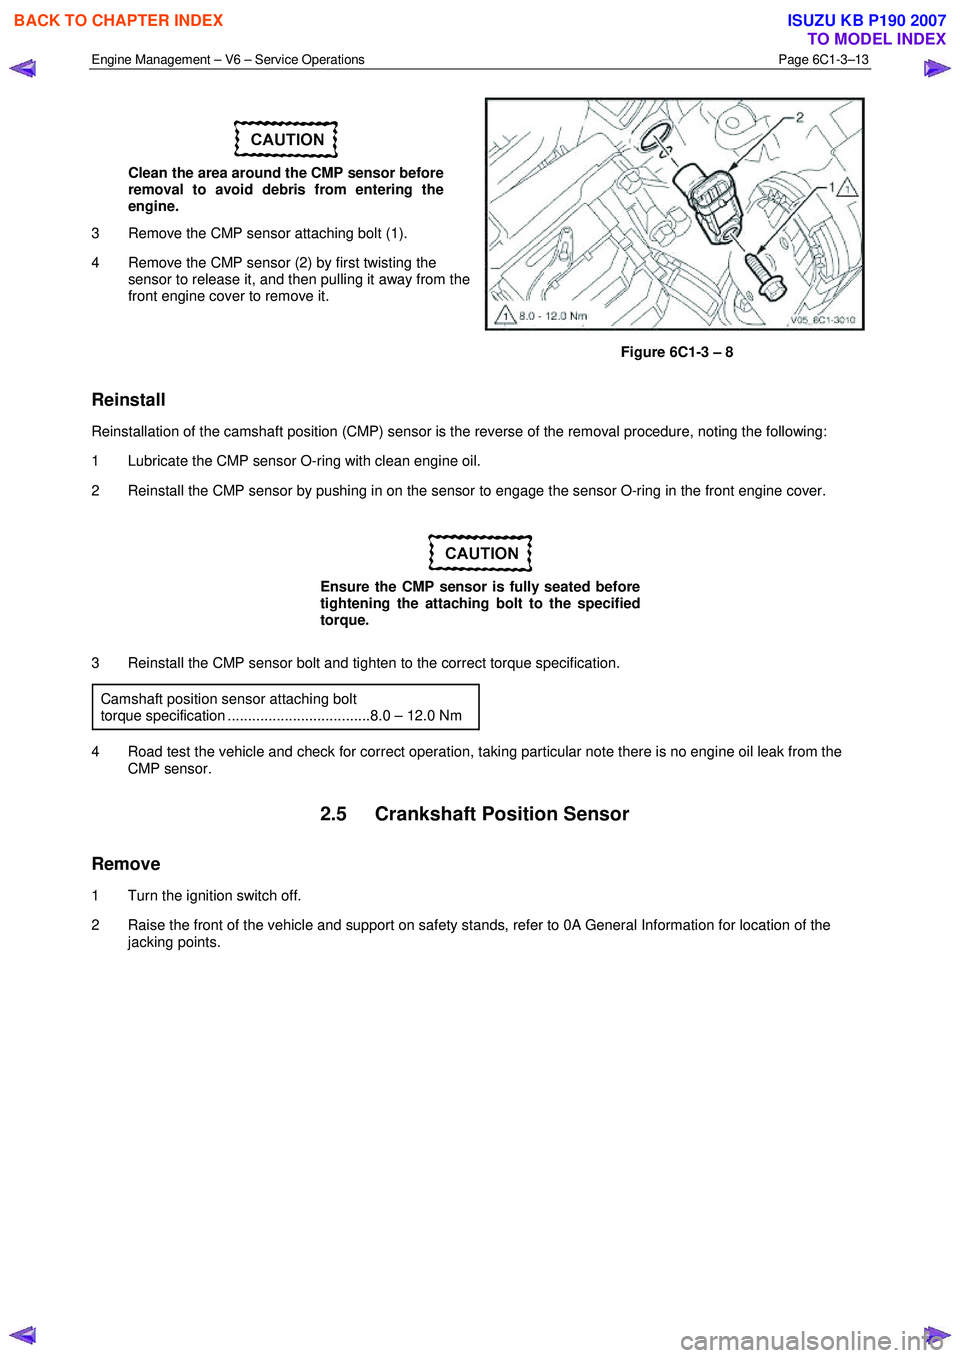
3 Remove the CMP sensor attaching bolt (1).
4 Remove the CMP sensor (2) by first twisting the sensor to release it, and then pulling it away from the
front engine cover to remove it.
Figure 6C1-3 – 8
Reinstall
Reinstallation of the camshaft position (CMP) sensor is the reverse of the removal procedure, noting the following:
1 Lubricate the CMP sensor O-ring with clean engine oil.
2 Reinstall the CMP sensor by pushing in on the sensor to engage the sensor O-ring in the front engine cover.
Ensure the CMP sensor is fully seated before
tightening the attaching bolt to the specified
torque.
3 Reinstall the CMP sensor bolt and tighten to the correct torque specification. Camshaft position sensor attaching bolt
torque specification ...................................8.0 – 12.0 Nm
4 Road test the vehicle and check for correct operation, taking particular note there is no engine oil leak from the CMP sensor.
2.5 Crankshaft Position Sensor
Remove
1 Turn the ignition switch off.
2 Raise the front of the vehicle and support on safety stands, refer to 0A General Information for location of the jacking points.
BACK TO CHAPTER INDEX
TO MODEL INDEX
ISUZU KB P190 2007
Page 3538 of 6020
Engine Management – V6 – Service Operations Page 6C1-3–14
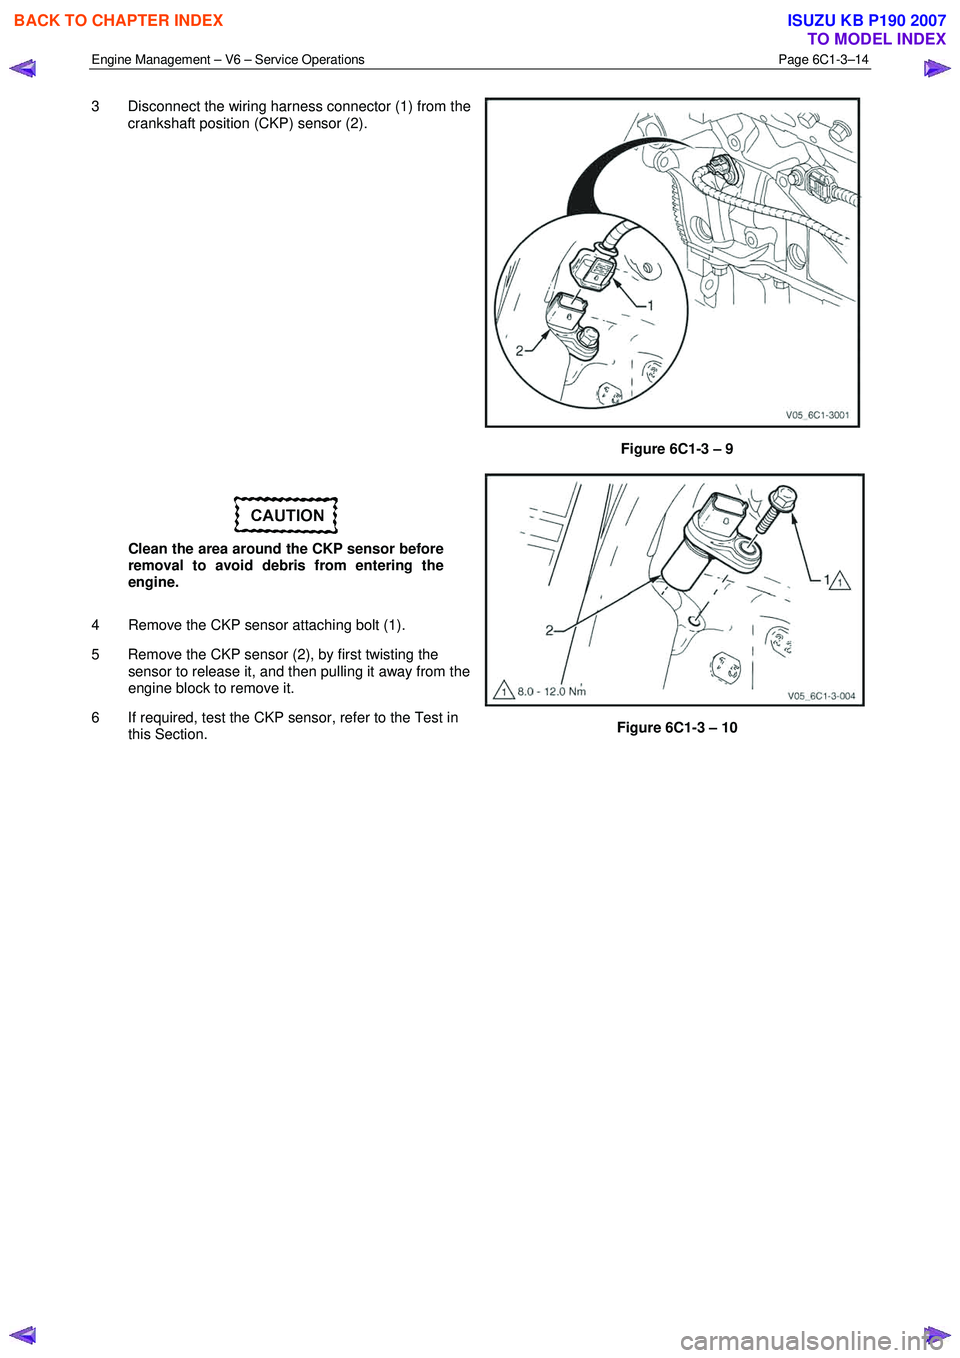
3 Disconnect the wiring harness connector (1) from the
crankshaft position (CKP) sensor (2).
Figure 6C1-3 – 9
Clean the area around the CKP sensor before
removal to avoid debris from entering the
engine.
4 Remove the CKP sensor attaching bolt (1).
5 Remove the CKP sensor (2), by first twisting the sensor to release it, and then pulling it away from the
engine block to remove it.
6 If required, test the CKP sensor, refer to the Test in this Section.
Figure 6C1-3 – 10
BACK TO CHAPTER INDEX
TO MODEL INDEX
ISUZU KB P190 2007
Page 3539 of 6020
Engine Management – V6 – Service Operations Page 6C1-3–15
Test
To prevent component and damage use
connector test adaptor kit J 35616-A.
Resistance Check
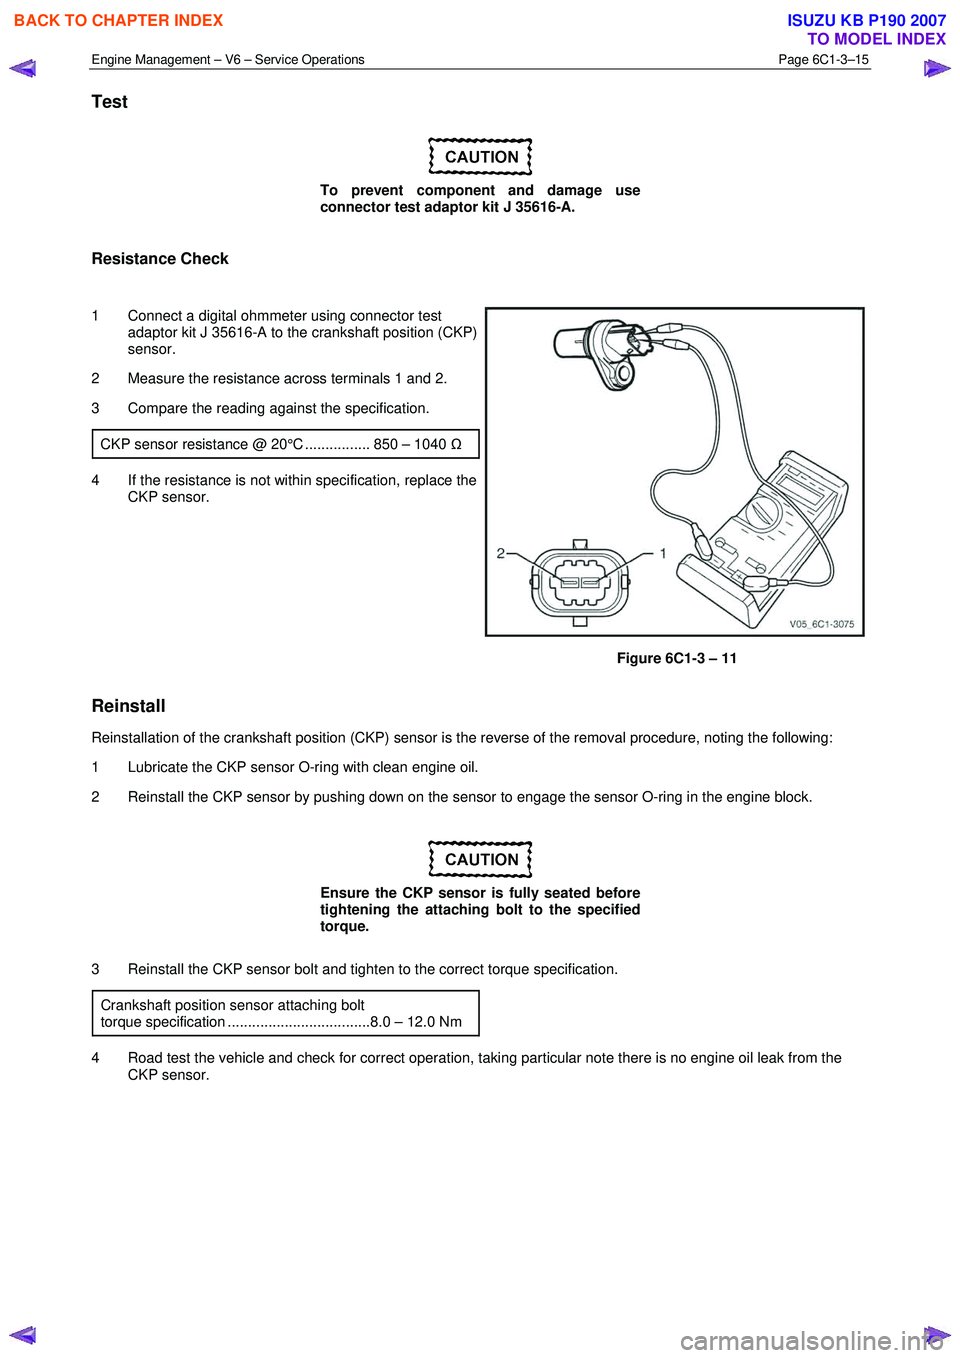
1 Connect a digital ohmmeter using connector test adaptor kit J 35616-A to the crankshaft position (CKP)
sensor.
2 Measure the resistance across terminals 1 and 2.
3 Compare the reading against the specification.
CKP sensor resistance @ 20°C ................ 850 – 1040 Ω
4 If the resistance is not within specification, replace the
CKP sensor.
Figure 6C1-3 – 11
Reinstall
Reinstallation of the crankshaft position (CKP) sensor is the reverse of the removal procedure, noting the following:
1 Lubricate the CKP sensor O-ring with clean engine oil.
2 Reinstall the CKP sensor by pushing down on the sensor to engage the sensor O-ring in the engine block.
Ensure the CKP sensor is fully seated before
tightening the attaching bolt to the specified
torque.
3 Reinstall the CKP sensor bolt and tighten to the correct torque specification. Crankshaft position sensor attaching bolt
torque specification ...................................8.0 – 12.0 Nm
4 Road test the vehicle and check for correct operation, taking particular note there is no engine oil leak from the CKP sensor.
BACK TO CHAPTER INDEX
TO MODEL INDEX
ISUZU KB P190 2007
Page 3540 of 6020
Engine Management – V6 – Service Operations Page 6C1-3–16
2.6 Engine Coolant Temperature Sensor
Remove
To avoid serious personal injury, never
remove the engine coolant temperature (ECT)
sensor when the engine is hot. Allow the
engine to cool to ambient temperature (less
than 50 °
°°
°
C) before performing this procedure.
1 Turn the ignition switch off.
To avoid serious personal injury, never
remove the coolant filler cap when the engine
is hot. Allow the engine to cool to ambient
temperature (less than 50 °
°°
°
C) before
performing this procedure.
2 Allow the engine to cool to ambient temperature less than 50 °C, and slowly remove coolant filler cap located on the
coolant outlet housing.
3 Drain approximately two litres of coolant into a suitable container, refer to 6B1 – Engine Cooling – V6.
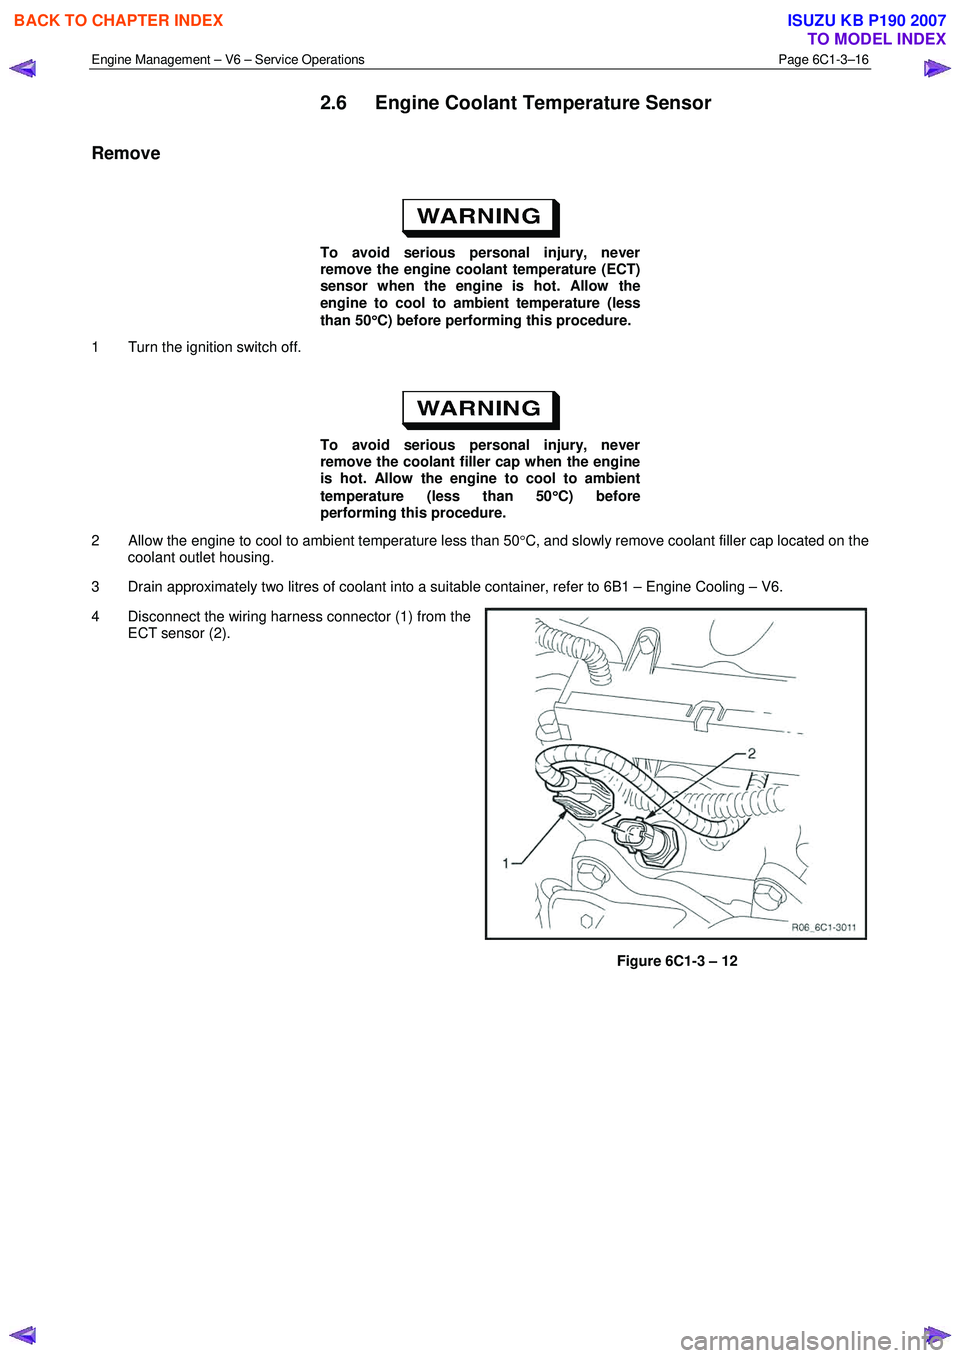
4 Disconnect the wiring harness connector (1) from the ECT sensor (2).
Figure 6C1-3 – 12
BACK TO CHAPTER INDEX
TO MODEL INDEX
ISUZU KB P190 2007
Page 3541 of 6020
Engine Management – V6 – Service Operations Page 6C1-3–17
Clean the area around the ECT before
removal to avoid debris from entering the
engine.
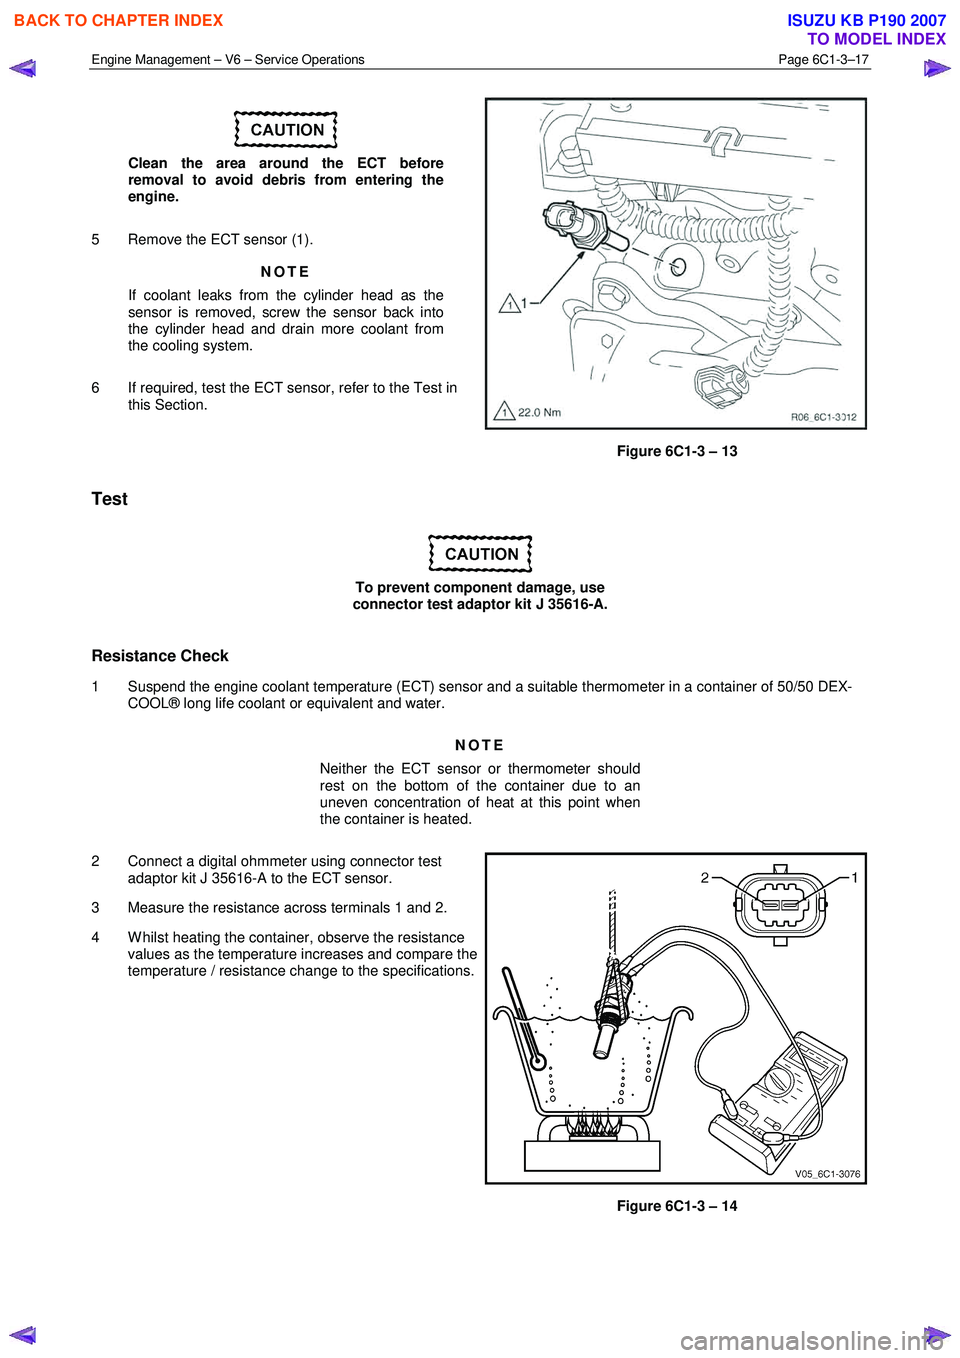
5 Remove the ECT sensor (1). NOTE
If coolant leaks from the cylinder head as the
sensor is removed, screw the sensor back into
the cylinder head and drain more coolant from
the cooling system.
6 If required, test the ECT sensor, refer to the Test in this Section.
Figure 6C1-3 – 13
Test
To prevent component damage, use
connector test adaptor kit J 35616-A.
Resistance Check
1 Suspend the engine coolant temperature (ECT) sensor and a suitable thermometer in a container of 50/50 DEX- COOL® long life coolant or equivalent and water.
NOTE
Neither the ECT sensor or thermometer should
rest on the bottom of the container due to an
uneven concentration of heat at this point when
the container is heated.
2 Connect a digital ohmmeter using connector test adaptor kit J 35616-A to the ECT sensor.
3 Measure the resistance across terminals 1 and 2.
4 W hilst heating the container, observe the resistance values as the temperature increases and compare the
temperature / resistance change to the specifications.
Figure 6C1-3 – 14
BACK TO CHAPTER INDEX
TO MODEL INDEX
ISUZU KB P190 2007