torque ISUZU TROOPER 1995 Workshop Manual
[x] Cancel search | Manufacturer: ISUZU, Model Year: 1995, Model line: TROOPER, Model: ISUZU TROOPER 1995Pages: 1928
Page 551 of 1928
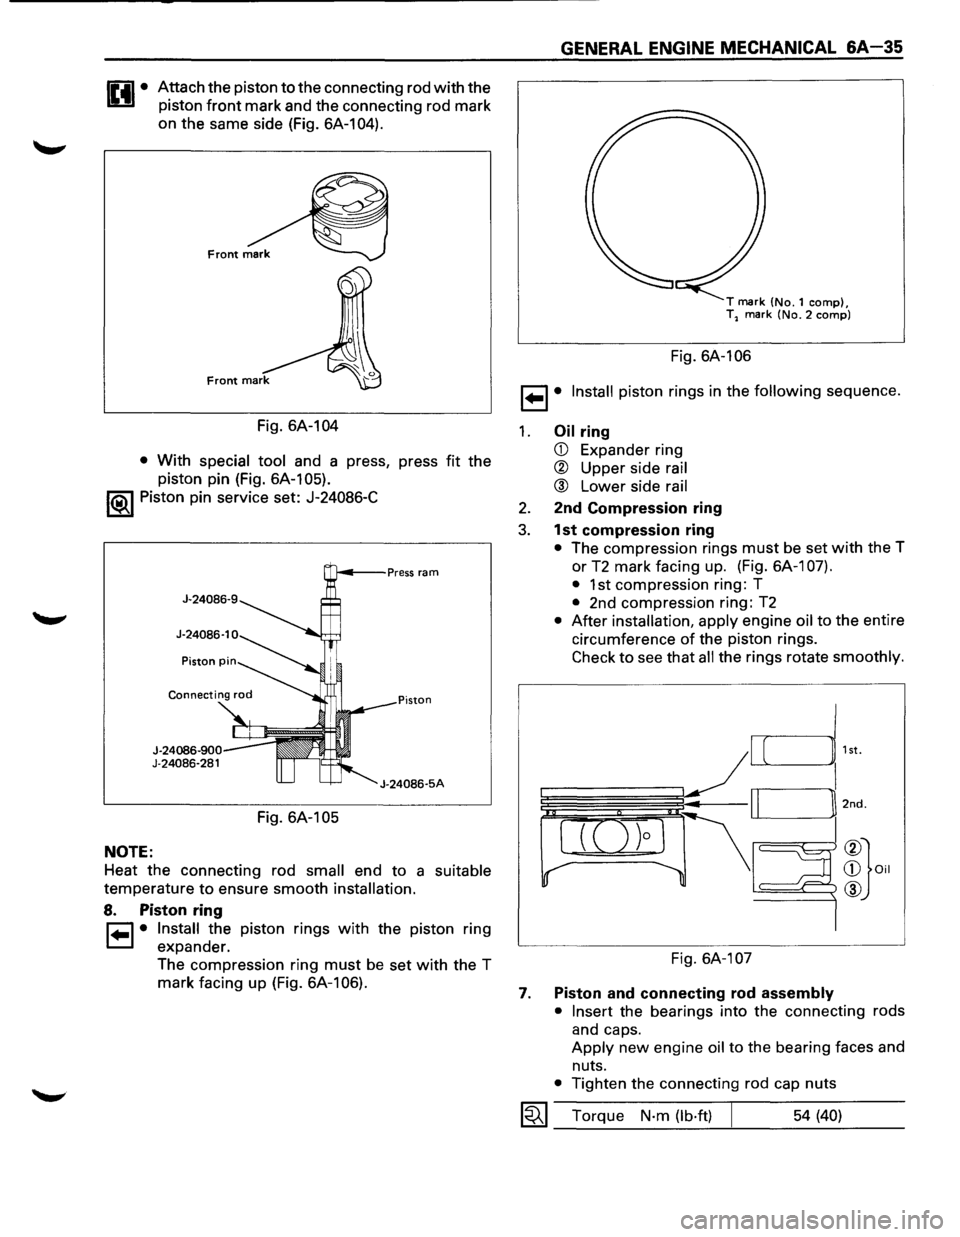
Attach the piston to the connecting rod with the
piston
front mark and the connecting rod mark
on the same side (Fig. 6A-104).
Fig. 6A-104
• With special tool and a press, press fit the
piston pin (Fig. 6A-105).
1®1 Piston pin service set: J-24086-C
NOTE:
J-24086-900 J-24086-281
Fig. 6A-105
J-24086-5A
Heat the connecting rod small end to a suitable
temperature to ensure smooth installation.
8. Piston ring
r=1 • Install the piston rings with the piston ring
1=.1 expander.
The compression ring
must be set with the T
mark facing up (Fig. 6A-106).
GENERAL ENGINE MECHANICAL &A-35
T mark (No.1 comp), T2 mark (No.2 comp)
Fig. 6A-106
1 ... 1• Install piston rings in the following sequence.
1. Oil ring
CD Expander ring
® Upper side rail
® Lower side rail
2. 2nd Compression ring
3. 1st compression ring
• The compression rings must be set with the T
or
T2 mark facing up. (Fig. 6A-1 07).
•
1st compression ring: T
• 2nd compression ring: T2
• After installation, apply engine oil to the entire
circumference
of the piston rings.
Check to see that all the rings rotate smoothly.
Fig. 6A-107
7. Piston and connecting rod assembly
• Insert
the bearings into the connecting rods
and caps.
Apply new engine oil to the bearing faces and
nuts.
• Tighten the connecting rod cap nuts
1~1 Torque N·m (lb·ft) 54 (40)
Page 555 of 1928
1,.!.,1 REASSEMBLY
14. Cylinder block
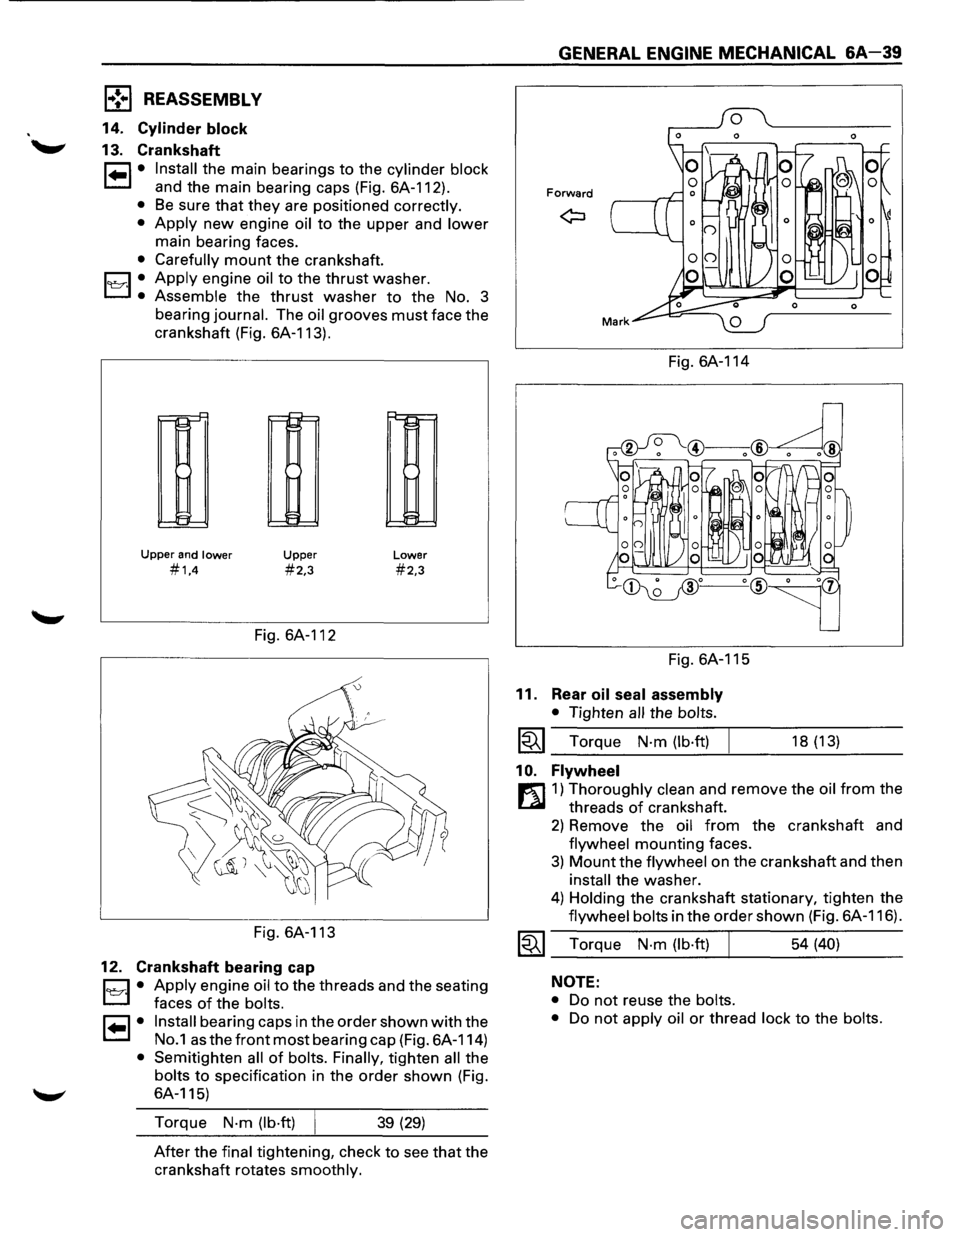
13. Crankshaft
1•1• Install the main bearings to the cylinder block
and the main bearing caps (Fig. 6A-112).
• Be sure that they are positioned correctly.
•
Apply new engine oil to the upper and lower
main bearing faces.
• Carefully mount the crankshaft.
1~·1 .• Apply engine oil to the thrust washer.
Assemble the thrust washer to the No. 3
bearing
journal. The oil grooves must face the
crankshaft (Fig. 6A-113).
r--!::"
11-1
~
Upper and lower
#1,4
Upper
#2,3
Fig. 6A-112
Fig. 6A-113
12. Crankshaft bearing cap
Lower
#2,3
D • Apply engine oil to the threads and the seating
L:J faces of the bolts.
I• I• Install bearing caps in the order shown with the
No.1 as the front most bearing cap (Fig. 6A-114)
• Semitighten all of bolts. Finally, tighten all the
bolts to specification in the order shown (Fig.
6A-115)
Torque
N·m (lb·ft) 39 (29)
After the final tightening, check to see that the
crankshaft rotates
smoothly.
GENERAL ENGINE MECHANICAL &A-39
Forward
Fig. 6A-114
Fig. 6A-115
11. Rear oil seal assembly
• Tighten all the bolts.
~~~ Torque N·m (lb·ft)
1 0. Flywheel
18 (13)
r:l]1) Thoroughly clean and remove the oil from the
threads
of crankshaft.
2) Remove the oil from the crankshaft and
flywheel mounting faces.
3) Mount the flywheel on the crankshaft and then
install the washer.
4) Holding the crankshaft stationary, tighten the
flywheel bolts in the order shown (Fig. 6A-116).
~~~ Torque N·m (lb·ft) 54 (40)
NOTE:
•
Do not reuse the bolts.
•
Do not apply oil or thread lock to the bolts.
Page 557 of 1928
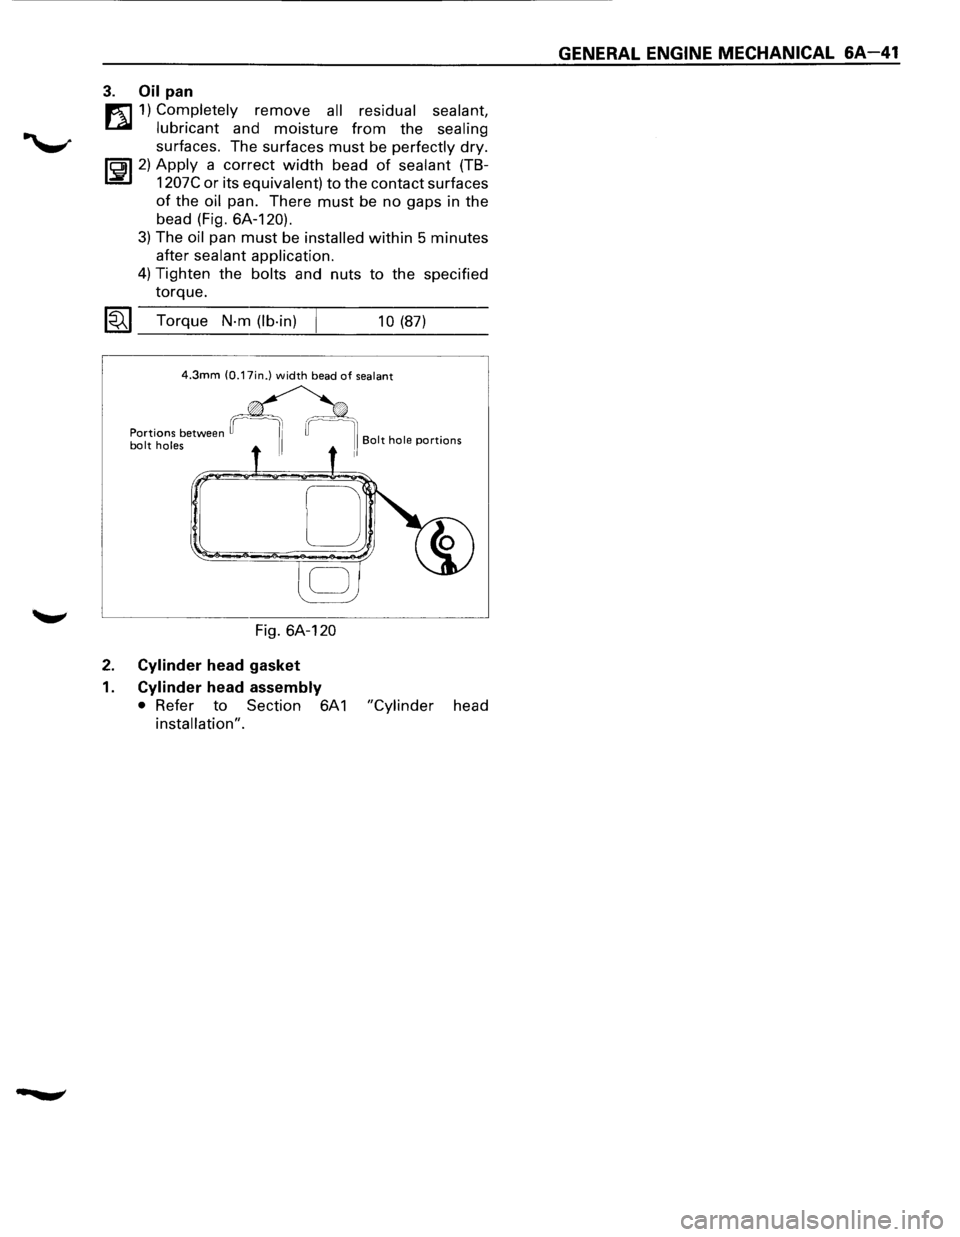
3. Oil pan
m 1) Completely remove all residual sealant,
t..al lubricant and moisture from the sealing
surfaces. The surfaces must be perfectly dry.
li5il 2) Apply a correct width bead of sealant (TB
L::!i!J 1207C or its equivalent) to the contact surfaces
of the oil pan. There must be no gaps in the
bead (Fig. 6A-120).
3) The oil pan must be installed within 5 minutes
after sealant application.
4) Tighten the bolts and nuts to the specified
torque.
1«.1 Torque N·m (lb-in) 10 (87)
4.3mm (0.17in.) width bead of sealant
Fig. 6A-120
2. Cylinder head gasket
1. Cylinder head assembly
• Refer to Section 6A 1 "Cylinder head
installation".
GENERAL ENGINE MECHANICAL 6A-41
Page 559 of 1928
ENGINE (V6 3.2L DOHC AND SOHC) 6A 1-1
SECTION 6A1
3.2L V6 ENGINE
CONTENTS
General Description .................. 6A1-2 Crankshaft Pulley ................... 6A1-24
Cylinder Block . . . . . . . . . . . . . . . . . . . . . 6A 1-3 Camshaft/Rocker Arm (SOHC) ........ 6A1-25
Cylinder Head ...................... 6A1-3 Camshaft/Swing Arm/Hydraulic Lash
Valve Train ........................ 6A1-3 Adjusters (DOHC) ................. 6A1-29
Intake Manifold .................... 6A1-3 Timing Chain (DOHC) ................ 6A1-33
Exhaust Manifold ................... 6A1-3 Valve stem Oil Controller and
Piston and
Connecting Rod .......... 6A1-3 Valve Spring ..................... 6A1-38
Crankshaft and Bearing .............. 6A1-3 Cylinder Head (SOHC) ............... 6A1-42
Oil Pump .......................... 6A1-3 Cylinder Head (DOHC) ............... 6A1-46
Engine Lubrication . . . . . . . . . . . . . . . . . . 6A 1-3 Oil Pan ............................ 6A 1-50
On-Vehicle Service . . . . . . . . . . . . . . . . . . 6A1-4 Oil Pump .......................... 6A 1-52
Cylinder Head Cover LH (SOHC) ....... 6A1-4 Oil Pump Oil seal ................... 6A 1-53
Cylinder Head Cover RH (SOHC) ...... 6A1-5 Oil Filter ........................... 6A 1-54
Cylinder Head Cover (DOHC) . . . . . . . . . 6A 1-6 Oil Cooler .......................... 6A 1-55
Common Chamber Duct (DOHC) ...... 6A1-8 Piston, Piston Rings and Connecting Rod . 6A 1-56
Common Chamber (SOHC) ........... 6A1-10 Crankshaft and Main Bearings ........ 6A1-57
Common Chamber (DOHC) ........... 6A1-12 Rear Oil Seal ....................... 6A1-60
Intake Manifold (SOHC) .............. 6A1-14 Engine Assembly .................... 6A1-61
Intake Manifold (DOHC) ............. 6A1-16 Main Data and Specification ........... 6A1-63
LH Exhaust Manifold . . . . . . . . . . . . . . . . 6A 1-18 General Specification ................ 6A 1-63
RH Exhaust Manifold ................ 6A1-19 Torque Specification ................ 6A1-64
Timing Belt ........................ 6A1-20 Special Tools ........................ 6A1-69
Page 562 of 1928
6A1-4 ENGINE (V6 3.2L DOHC AND SOHC)
ON-VEHICLE SERVICE
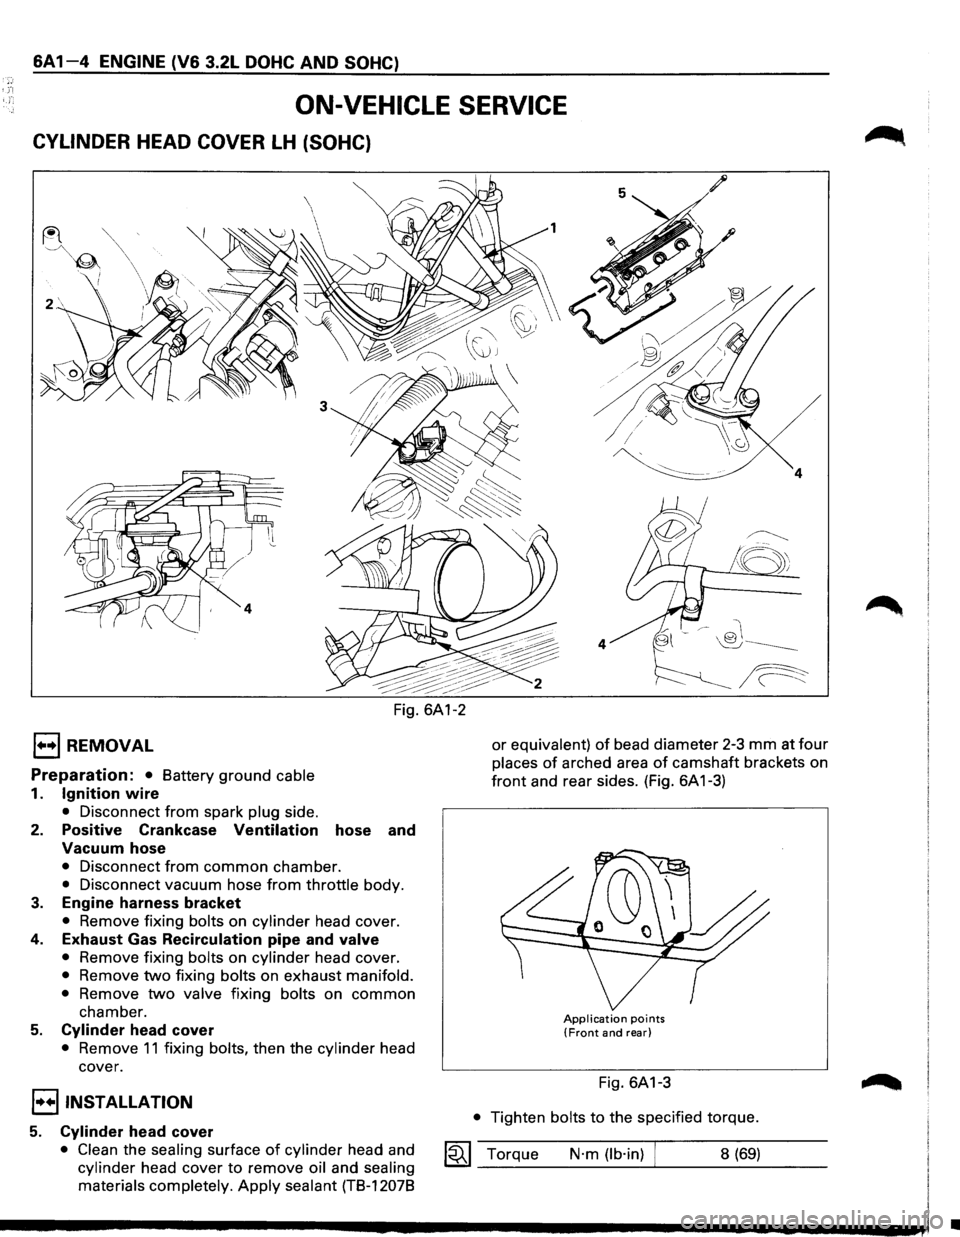
CYLINDER HEAD COVER LH (SOHC)
1••1 REMOVAL
Preparation: • Battery ground cable
1. Ignition wire
• Disconnect from spark plug side.
2. Positive Crankcase Ventilation hose and
Vacuum hose
• Disconnect from common chamber.
• Disconnect vacuum hose from throttle body.
3. Engine harness bracket
• Remove fixing bolts on cylinder head cover.
4. Exhaust Gas Recirculation pipe and valve
• Remove fixing bolts on cylinder head cover.
• Remove two fixing bolts on exhaust manifold.
•
Remove two valve fixing bolts on common
chamber.
5. Cylinder head cover
• Remove 11 fixing bolts, then the cylinder head
cover.
I••IINST ALLA TION
5. Cylinder head cover
• Clean the sealing surface of cylinder head and
cylinder head cover to remove oil and sealing
materials completely.
Apply sealant (TB-12078
/
~
!8;
4
or equivalent) of bead diameter 2-3 mm at four
places of arched area of camshaft brackets on
front and rear sides. (Fig. 6A 1-3)
Application points (Front and rear)
Fig. 6A1-3
• Tighten bolts to the specified torque.
1~1 Torque N·m (lb·in) 8 (69)
•
Page 563 of 1928
4. Exhaust Gas Recirculation pipe and valve
• Tighten each fixing bolt to the specified torque.
Valve fixing bolt
1«1 Torque N·m (lb·in) 8 (69)
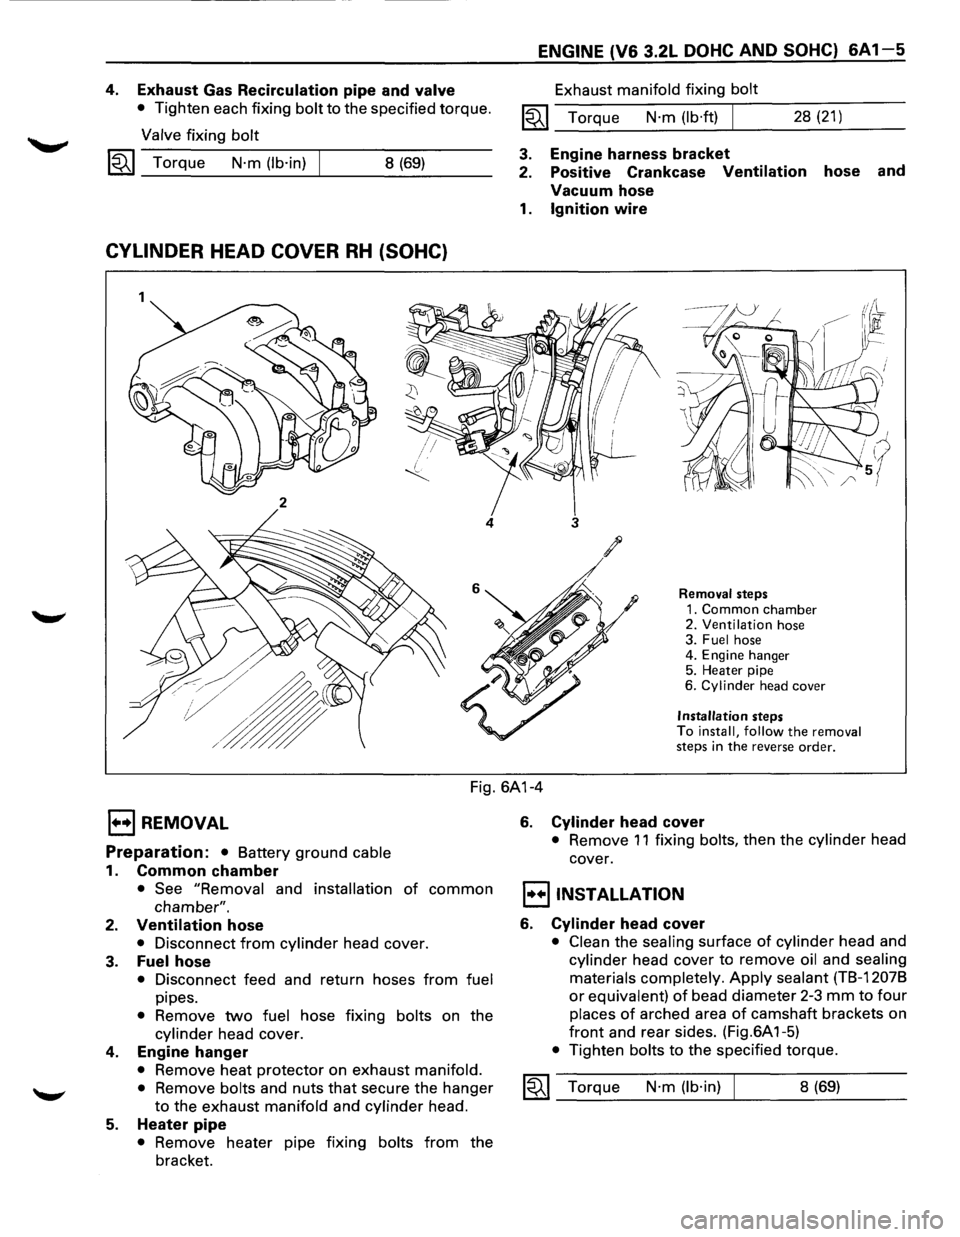
CYLINDER HEAD COVER RH (SOHC)
1
2
4
ENGINE (V6 3.2L DOHC AND SOHC) 6A1-5
Exhaust manifold fixing bolt
1«1 Torque N·m (lb·ft) I 28 (21)
3. Engine harness bracket
2. Positive Crankcase
Ventilation hose and
Vacuum hose
1. Ignition wire
3
Removal steps
1. Common chamber 2. Ventilation hose
3. Fuel hose
4. Engine hanger
5. Heater pipe
6.
Cylinder head cover
Installation steps
To install, follow the removal
steps in the reverse order.
Fig. 6A1-4
EJ REMOVAL
Preparation: • Battery ground cable
1. Common chamber
• See "Removal and installation of common
chamber".
2. Ventilation hose
• Disconnect from cylinder head cover.
3. Fuel hose
• Disconnect feed and return hoses from fuel
pipes.
• Remove two fuel hose fixing bolts on the
cylinder head cover.
4. Engine hanger
• Remove heat protector on exhaust manifold.
•
Remove bolts and nuts that secure the hanger
to the exhaust manifold and cylinder head.
5. Heater pipe
• Remove heater pipe fixing bolts from the
bracket.
6. Cylinder head cover
• Remove 11 fixing bolts, then the cylinder head
cover.
I•+IINSTALLATION
6. Cylinder head cover
• Clean the sealing surface of cylinder head and
cylinder head cover to remove oil and sealing
materials completely.
Apply sealant (TB-12078
or equivalent) of bead diameter 2-3 mm to four
places of arched area of camshaft brackets on
front and rear sides. (Fig.6A 1-5)
• Tighten bolts to the specified torque.
1«1 Torque N·m (lb·in) 8 (69)
Page 564 of 1928
6A1-6 ENGINE (V6 3.2L DOHC AND SOHC)
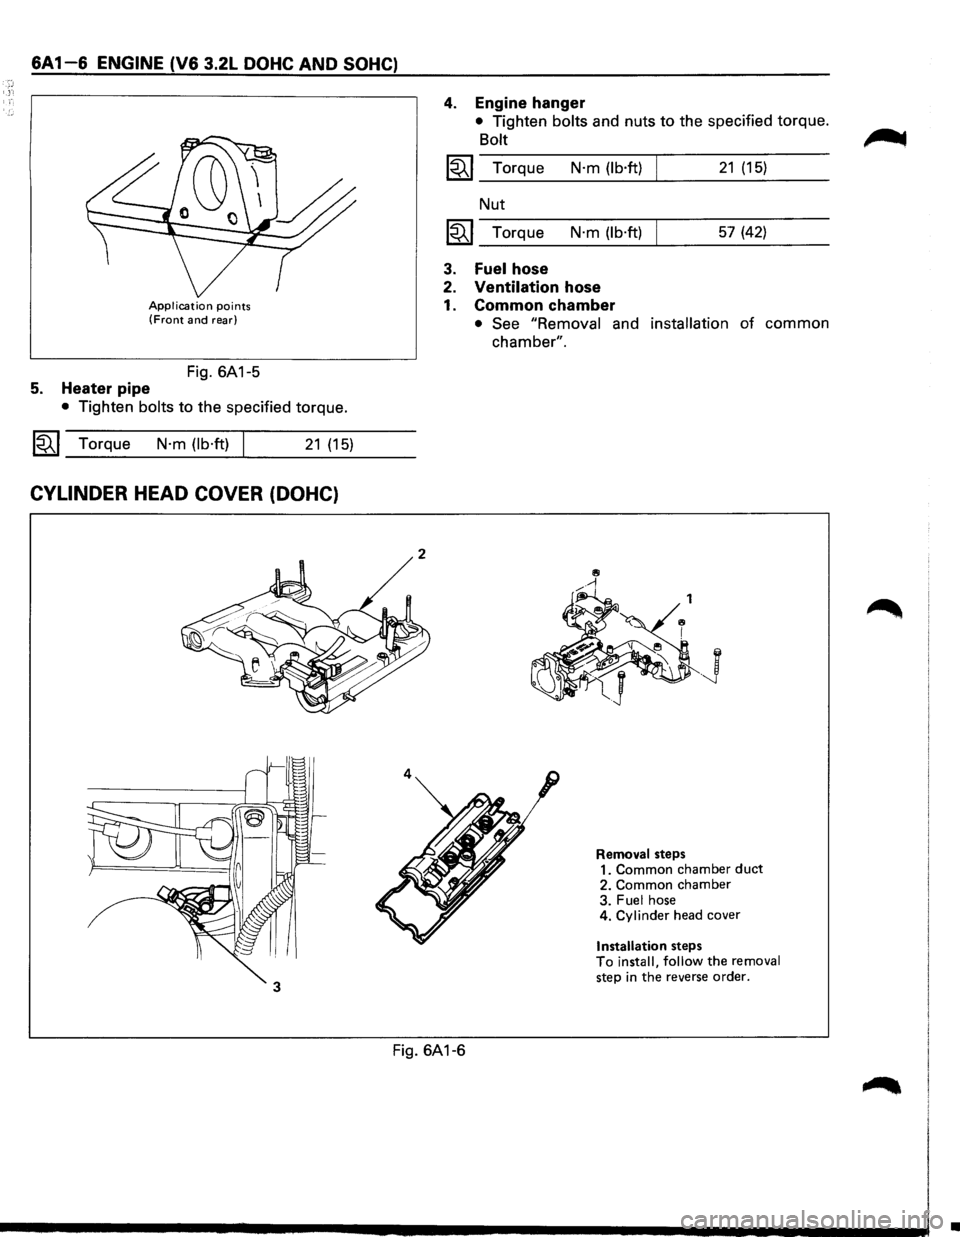
Application points (Front and rear)
Fig. 6A1-5
5. Heater pipe
• Tighten bolts to the specified torque.
~~~ Torque N·m (lb·ft) I 21 (15)
CYLINDER HEAD COVER (DOHC)
2
4
4. Engine hanger
• Tighten bolts and nuts to the specified torque.
Bolt
~~~ Torque N·m (lb·ft) 21 (15)
Nut
~~~ Torque N·m (lb·ft) 57 (42)
3. Fuel hose
2. Ventilation hose
1. Common chamber
• See "Removal and installation of common
chamber".
.J
Removal steps
1. Common chamber duct 2. Common chamber
3. Fuel hose
4. Cylinder head cover
Installation steps To install, follow the removal step in the reverse order.
Fig. 6A1-6
•
Page 565 of 1928
E) REMOVAL
Preparation: Battery ground
1. Common chamber duct
• Refer to "Common chamber removal and
installation" in this section.
2. Common chamber
• Refer to "Common chamber removal and
installation" in this section.
3. Fuel hose
• Disconnect feed and return hose from fuel pipe.
4. Cylinder head cover
I••IINSTALLATION
4. Cylinder head cover
• Clean the sealing surface of cylinder head and
cylinder head cover to remove oil and sealing
materials completely.
Apply sealant (TB-12078
or equivalent) of bead diameter 2-3 mm to four
places of arched area of camshaft brackets on
front and rear sides. (Fig. 6A 1-7)
• Tighten bolts to the specified torque.
1«1 Torque N·m (lb·in) 8 (69)
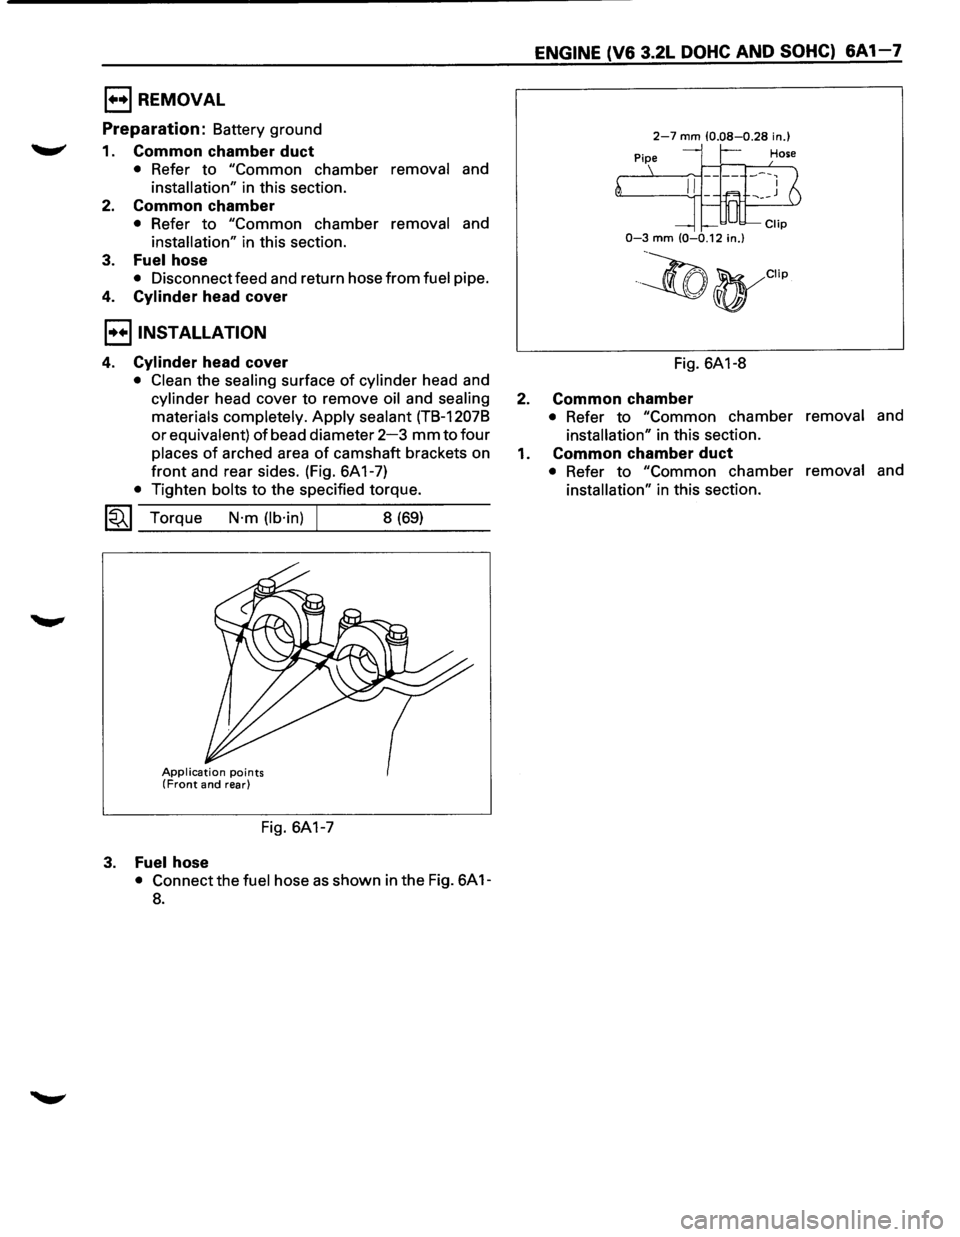
Application points (Front and rear)
Fig. 6A1-7
3. Fuel hose
• Connect the fuel hose as shown in the Fig. 6A 1-
8.
ENGINE (V6 3.2L DOHC AND SOHC) 6A 1-7
2-7 mm (0.08-0.28 in.)
r-
0-3 mm (0-0.12 in.)
·~(t)yCIIp
Fig. 6A1-8
2. Common chamber
• Refer to "Common chamber removal and
installation" in this section.
1. Common chamber duct
• Refer to "Common chamber removal and
installation" in this section.
Page 566 of 1928
6A1-8 ENGINE (V6 3.2L DOHC AND SOHC)
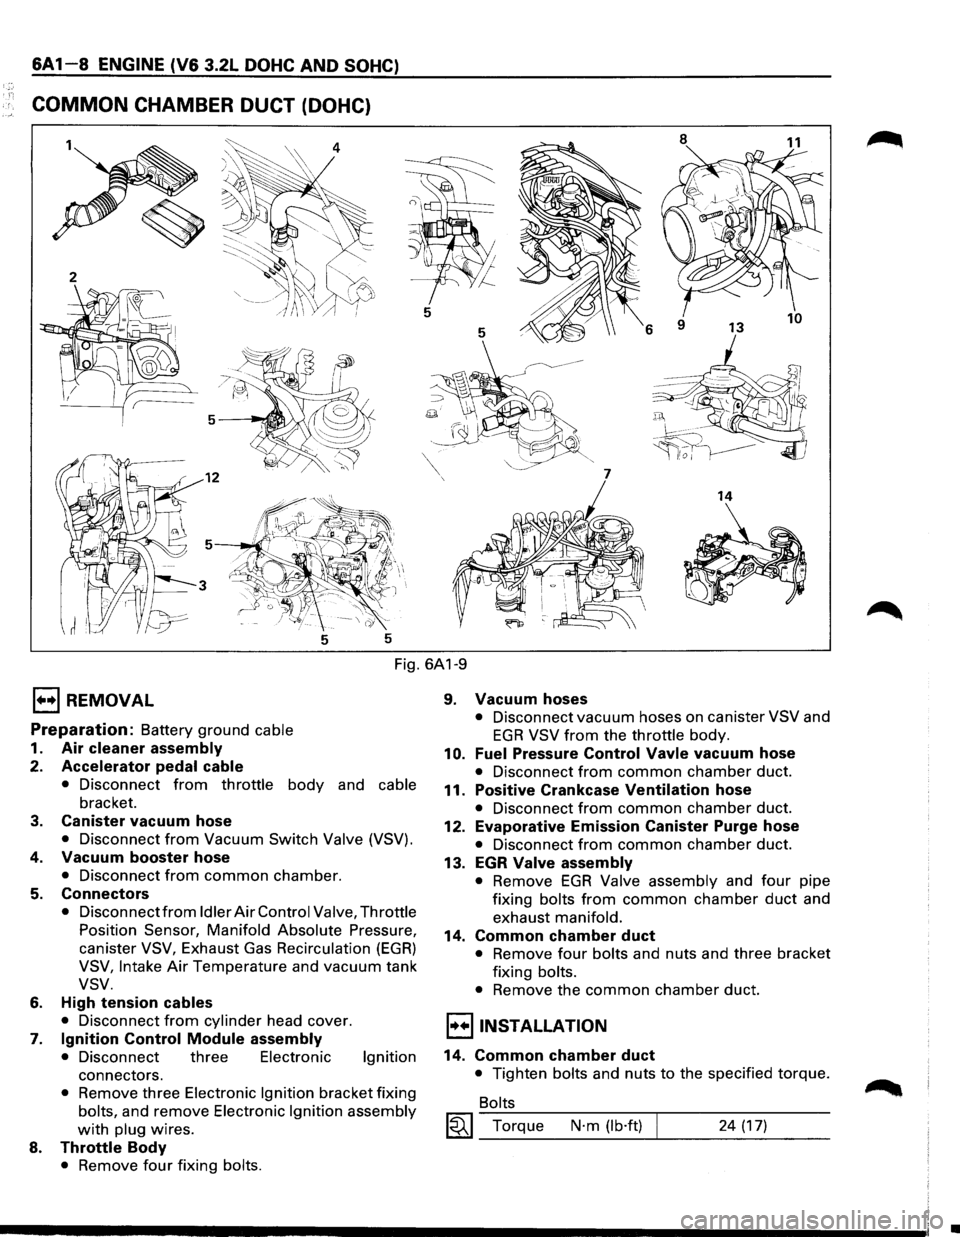
COMMON CHAMBER DUCT (DOHC)
8
11
5
5
6
7
14
5 5
Fig. 6A1-9
E) REMOVAL
Preparation: Battery ground cable
1. Air cleaner assembly
2. Accelerator pedal cable
• Disconnect from throttle body and cable
bracket.
3. Canister vacuum hose
• Disconnect from Vacuum Switch Valve (VSV).
4. Vacuum booster hose
• Disconnect from common chamber.
5. Connectors
• Disconnect from Idler Air Control Valve, Throttle
Position Sensor, Manifold Absolute Pressure,
canister VSV, Exhaust Gas Recirculation (EGR)
VSV, Intake Air Temperature and vacuum tank
vsv.
6. High tension cables
• Disconnect from cylinder head cover.
7. Ignition Control Module assembly
• Disconnect three Electronic Ignition
connectors.
• Remove three Electronic Ignition bracket fixing
bolts, and remove Electronic Ignition assembly
with plug wires.
8. Throttle Body
• Remove four fixing bolts.
9. Vacuum hoses
• Disconnect vacuum hoses on canister VSV and
EGR VSV from the throttle body.
10. Fuel Pressure Control Vavle vacuum hose
• Disconnect from common chamber duct.
11. Positive Crankcase Ventilation hose
• Disconnect from common chamber duct.
12. Evaporative Emission Canister Purge hose
• Disconnect from common chamber duct.
13. EGR Valve assembly
• Remove EGR Valve assembly and four pipe
fixing bolts from common chamber duct and
exhaust manifold.
14. Common chamber duct
• Remove four bolts and nuts and three bracket
fixing bolts.
• Remove the common chamber duct.
l·u·IINSTALLATION
14. Common chamber duct
• Tighten bolts and nuts to the specified torque.
Bolts
~~~ Torque N·m (lb·ft) 24 (17)
•
Page 567 of 1928
Nuts
~~~ Torque N·m (lb·ft) 24 (17)
13. Exhaust Gas Recirculation Valve assembly
• Tighten bolts to the specified torque.
Exhaust Gas Recirculation
Valve Side
~~~ Torque N·m (lb·in) I 8 (69)
Exhaust Manifold Side
~~~ Torque N·m (lb·ft) 28 (21)
12. Evaporative Emission Canister Purge hose
11. Positive Crankcase Vantilatlon hose
10. Fuel Pressure Control Valve vacuum hose
8. Throttle body
• Tighten bolts to the specified torque.
~~~ Torque N·m (lb·ft) I 19 (14)
9. Vacuum hose
• Connect vacuum hoses on canister Vacuum
Switching Valve
and Exhaust Gas Recirculation
Vacuum Switching Valve to the throttle body.
7. Ignition Control Module assembly
• Tighten bolts to the specified torque and
connect connector.
~~~ Torque N·m (lb·ft)
6. High tension cables
5. Connectors
• Connect each connector.
4. Vacuum booster hose
3. Canister vacuum hose
2. Accelerator Pedal cable
19 (14)
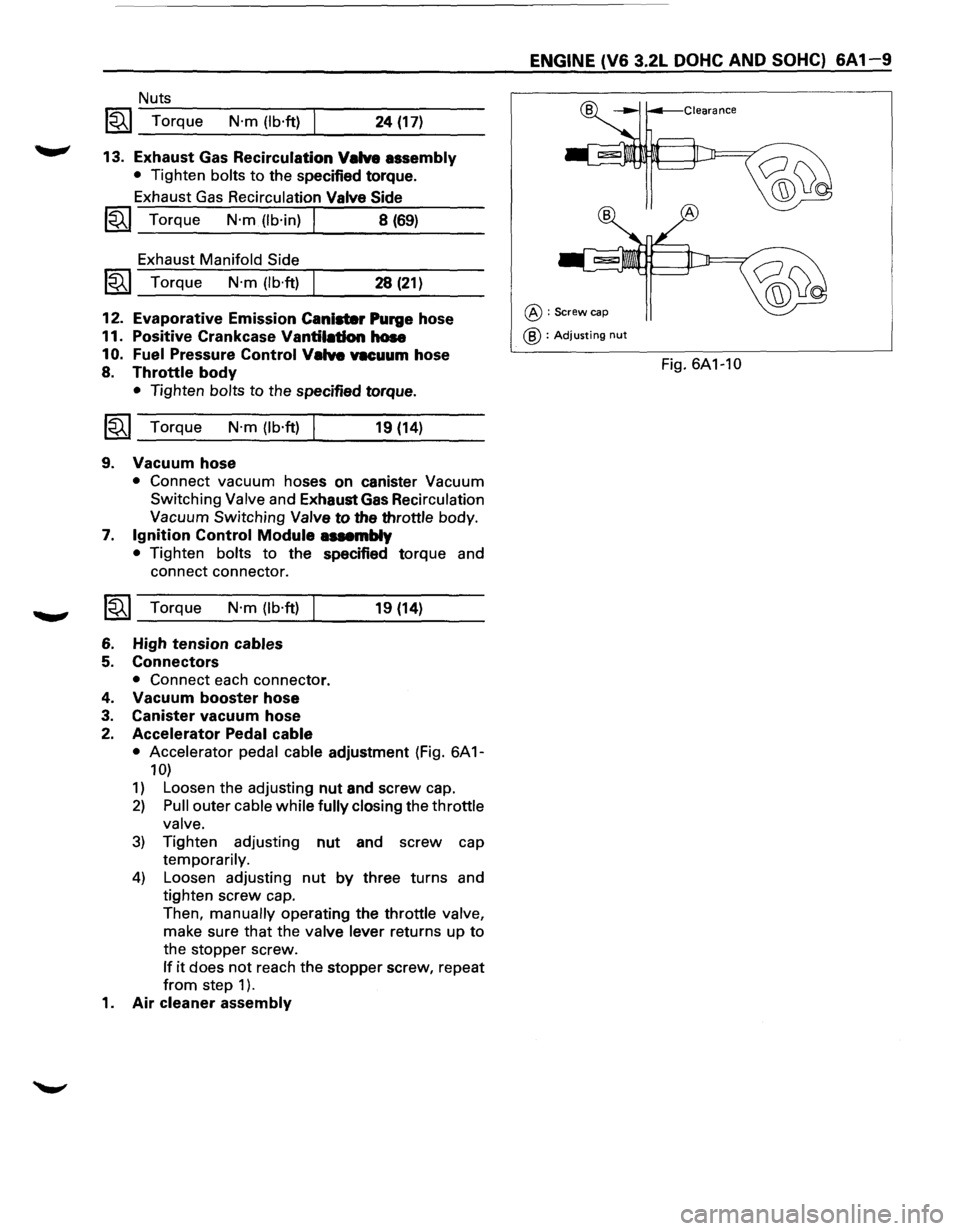
• Accelerator pedal cable adjustment (Fig. 6A 1-
10)
1) Loosen the adjusting nut and screw cap.
2) Pull outer cable while fully closing the throttle
valve.
3) Tighten adjusting nut and screw cap
temporarily.
4) Loosen adjusting nut by three turns and
tighten screw cap.
Then,
manually operating the throttle valve,
make sure that the valve lever returns up to
the stopper screw.
If it does not reach the stopper screw, repeat
from step 1 ).
1. Air cleaner assembly
ENGINE (V6 3.2L DOHC AND SOHC) 6A 1-9
@:Screw cap
@ : Adjusting nut
Fig. 6A1-10