sensor ISUZU TROOPER 1995 Workshop Manual
[x] Cancel search | Manufacturer: ISUZU, Model Year: 1995, Model line: TROOPER, Model: ISUZU TROOPER 1995Pages: 1928
Page 822 of 1928
6E2-126 DRIVEABILITV AND EMISSIONS
3. Water hoses
• Reconnect to throttle body.
2. Throttle cable and clip
1. Air duct and air cleaner upper cover
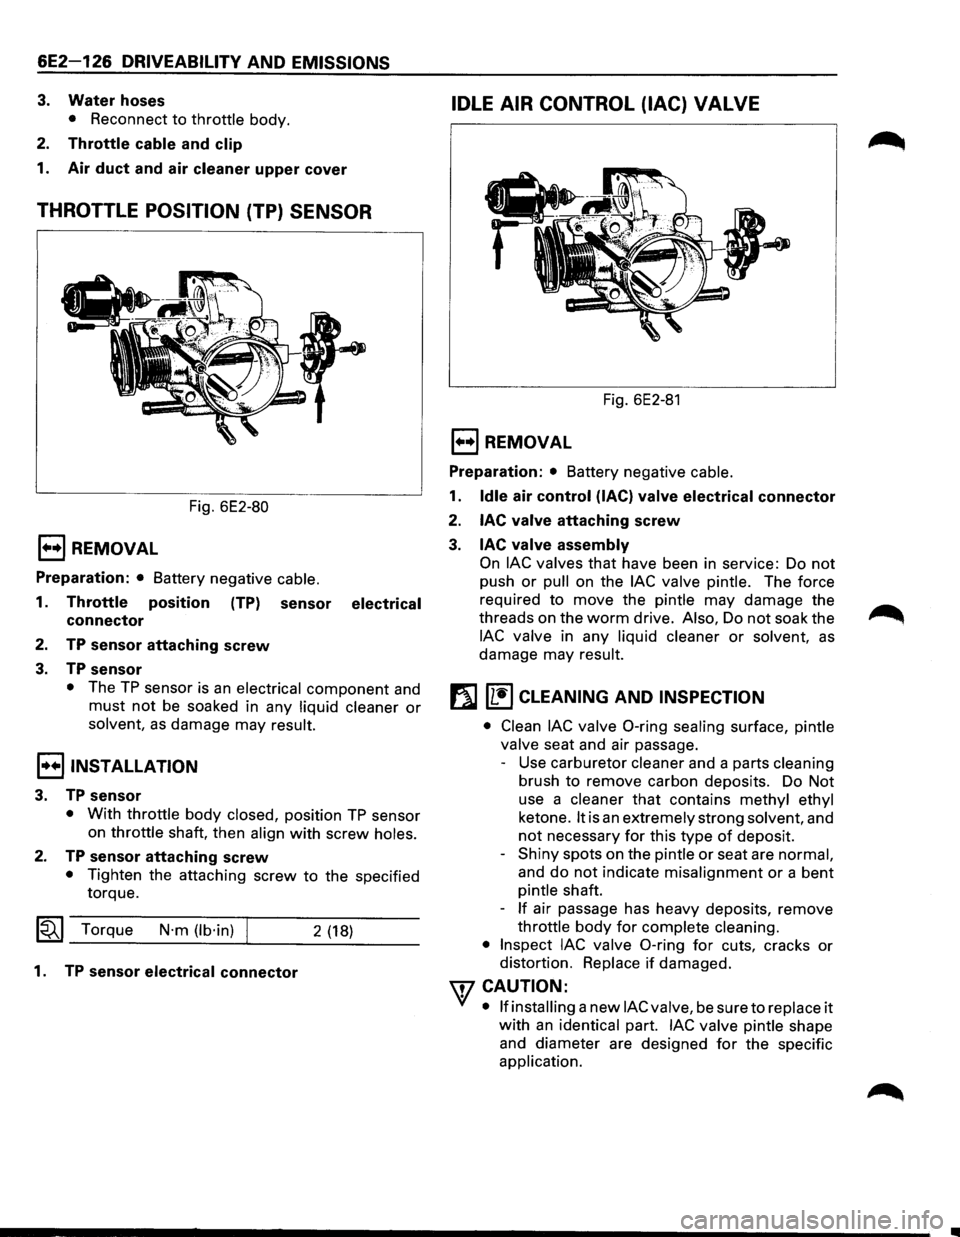
THROTTLE POSITION (TP) SENSOR
Fig. 6E2-80
1••1 REMOVAL
Preparation: • Battery negative cable.
1. Throttle position (TP) sensor electrical
connector
2. TP sensor attaching screw
3. TP sensor
• The TP sensor is an electrical component and
must not be soaked in any liquid cleaner or
solvent, as damage may result.
I••IINSTALLATION
3. TP sensor
• With throttle body closed, position TP sensor
on throttle shaft, then align
with screw holes.
2. TP sensor attaching screw
• Tighten the attaching screw to the specified
torque.
~~~ Torque N·m (lb·in) 2 (18)
1. TP sensor electrical connector
IDLE AIR CONTROL (lAC) VALVE
Fig. 6E2-81
E) REMOVAL
Preparation: • Battery negative cable.
1. Idle air control (lAC) valve electrical connector
2.
lAC valve attaching screw
3. lAC valve assembly
On lAC valves that have been in service: Do not
push or pull on the lAC valve pintle. The force
required
to move the pintle may damage the
threads on the
worm drive. Also, Do not soak the
lAC valve in any liquid cleaner or solvent, as
damage may result.
f}J [1!) CLEANING AND INSPECTION
• Clean lAC valve 0-ring sealing surface, pintle
valve seat and air passage.
- Use carburetor cleaner and a parts cleaning
brush
to remove carbon deposits. Do Not
use a cleaner
that contains methyl ethyl
ketone.
It is an extremely strong solvent, and
not necessary for this type of deposit.
-
Shiny spots on the pintle or seat are normal,
and
do not indicate misalignment or a bent
pintle shaft.
-
If air passage has heavy deposits, remove
throttle
body for complete cleaning.
• Inspect lAC valve 0-ring for cuts, cracks or
distortion. Replace
if damaged.
WCAUTION:
VI • If installing a new lAC valve, be sure to replace it
with an identical part. lAC valve pintle shape
and diameter are designed
for the specific
application.
Page 826 of 1928
6E2-130 DRIVEABILITY AND EMISSIONS
CHART C-2C
IDLE AIR CONTROL (lAC) SYSTEM CHECK
Circuit Description:
The engine control module (ECM) controls engine idle speed with idler air control (lAC) valve. To increase idle
speed, the ECM retracts the lAC valve pintle away from its seat, allowing more air to bypass the throttle bore. To
decrease
idle speed, it extends the lAC valve pintle towards its seat, reducing bypass air flow. A "Scan tool" will
read the ECM commands to the lAC valve in counts. Higher counts indicate more air bypass (higher idle). Lower
counts indicate
less air is allowed to bypass (lower idle).
Test Description:
Number below re{er to circled numbers on the diagnostic chart.
1. The lAC tester is used to extend and retract the lAC valve. Valve movement is verified by an engine speed
change.
If no change in engine speed occurs, the valve can be retested when removed from the throttle body.
2. This step checks the quality of the lAC movement in step 1. Between 700 revolution per minute (rpm) and
about
1500 rpm, the engine speed should change smoothly with each flash of the tester light in both extend
and retract.
If the lAC valve is retracted beyond the control range (about 1500 rpm), it may take many flashes
in the extend position before engine speed will begin to drop. This is normal on certain engines, fully
extending lAC may cause engine stall. This may be normal.
3. Steps 1 and 2 verified proper lAC valve operation. This step checks the lAC circuits. Each lamp on the node
light should flash red and green while the lAC valve is cycled. While the sequence of color is not important if
either light "OFF" or does not flash red and green, check the circuits for faults, beginning with poor terminal
contacts.
Diagnostic Aids:
A slow, unstable, or fast idle may be caused by a non-lAC system problem that cannot overcome by the lAC valve.
Out
of control range lAC "Scan tool" counts will be above 60 if idle is too low, and zero counts if idle is too high. The ..-...
following checks should be made to repair a non-lAC system problem. _......._
• Vacuum Leak (High Idle)
If idle
is too high, stop the engine. Fully extend (low) lAC with tester.
Start engine.
If idle speed is above 800 rpm, locate and correct vacuum leak including PCV system. Also check
for binding of throttle blade or linkage.
•
Lean heated oxygen sensor signal (High Air/Fuel Ratio)
The
idle speed may be too high or too low. Engine speed may vary up and down and disconnecting the lAC
valve
does not help. Diagnostic trouble code 44 may be set. "Scan tool" oxygen (02) voltage will be less than
100 mV (.1 volt). Check for low regulated fuel pressure, water in fuel, or a restricted injector.
• Rich heated oxygen sensor signal (Low Air/Fuel Ratio)
The
idle speed will be too low. "Scan tool" lAC counts will usually be above 80. System is obviously rich and
may exhibit
black smoke in exhaust.
"Scan tool" 02 voltage will be fixed about 750 mV (.75 volt).
Check
for high fuel pressure, leaking or sticking injector. Silicon contaminated heated oxygen sensor will
"Scan
tool" an 02 voltage slow to respond.
• Throttle Body
Remove
lAC valve and inspect bore for foreign material.
• lAC Valve
Electrical Connections
lAC valve
connections should be carefully checked for proper contact.
• PCV Valve
An incorrect or faulty PCV valve may result in an incorrect idle speed.
• Refer to "Rough, Unstable, Incorrect Idle or Stalling" in "Symptoms," Section "6E2-B".
• If
intermittent poor driveability or idle symptoms are resolved by disconnecting the lAC, carefully recheck
connections,
valve terminal resistance, or replace lAC.
Page 830 of 1928
6E2-134 DRIVEABILITV AND EMISSIONS
SECTION C-3
EVAPORATIVE EMISSION (EVAP) CONTROL SYSTEM
(ELECTRONICALL V CONTROLLED)
CONTENTS
General Description ...................... 6E2-134
Purpose ............................ 6E2-134
Vapor Canister ........................ 6E2-134
Evaporative Emission (EVAP) Control System .. 6E2-134 Results of Incorrect Operation ............. 6E2-135
Diagnosis ............................. 6E2-135
Visual Check of Canister ................. 6E2-135
On-Vehicle service . . . . . . . . . . . . . . . . . . . . . . 6E2-135
Fuel Vapor Canister . . . . . . . . . . . . . . . . . . . . 6E2-135
Canister Hoses . . . . . . . . . . . . . . . . . . . . . . . 6E2-135
Chart C-3 Evaporate Emission Canister
Purge Valve . . . . . . . . . . . . . . . . . . . . . . . . . 6E2-136
GENERAL DESCRIPTION
PURPOSE
The basic Evaporative Emission (EVAP) Control
System used on
all vehicles is the charcoal canister
storage method. This method transfers fuel
vapor
from the fuel tank to an activated carbon (charcoal)
storage device (canister)
to hold the vapors when the
vehicle
is not operating. When the engine is running,
the fuel
vapor is purged from the carbon element by
intake air flow and consumed in the normal
combustion process.
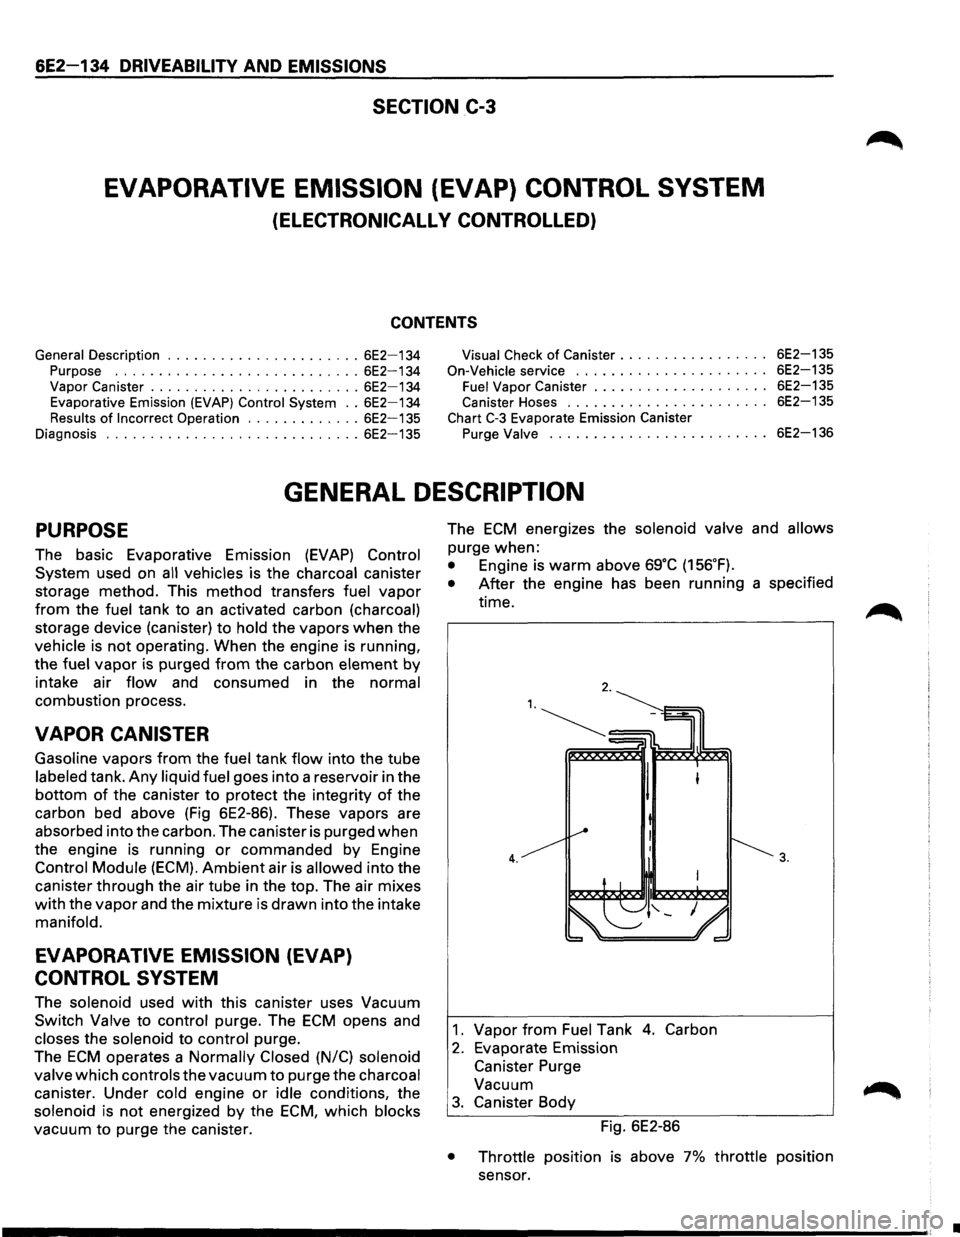
VAPOR CANISTER
Gasoline vapors from the fuel tank flow into the tube
labeled tank.
Any liquid fuel goes into a reservoir in the
bottom of the canister to protect the integrity of the
carbon bed above (Fig 6E2-86). These vapors are
absorbed into the carbon. The canister is purged
when
the engine is running or commanded by Engine
Control Module (ECM).
Ambient air is allowed into the
canister through the air tube in the top. The air mixes
with the vapor and the mixture is drawn into the intake
manifold.
EVAPORATIVE EMISSION (EVAP)
CONTROL SYSTEM
The solenoid used with this canister uses Vacuum
Switch Valve to control purge. The ECM opens and
closes the solenoid to control purge.
The
ECM operates a Normally Closed (N/C) solenoid
valve
which controls the vacuum to purge the charcoal
canister. Under cold engine
or idle conditions, the
solenoid is
not energized by the ECM, which blocks
vacuum
to purge the canister. The
ECM energizes
the solenoid valve and allows
purge when:
• Engine is warm above sg·c (156.F).
• After the engine has been running a specified
time.
4.
1. Vapor from Fuel Tank 4. Carbon
2. Evaporate Emission
Canister Purge
Vacuum
3. Canister Body
Fig. 6E2-86
3.
• Throttle position is above 7% throttle position
sensor.
•
Page 834 of 1928
6E2-138 DRIVEABILITY AND EMISSIONS
SECTION C4
ELECTRONIC IGNITION (EI) SYSTEM/IGNITION CONTROL (IC)
CONTENTS
General Description . . . . . . . . . . . . . . . . . . . . . 6E2-138
Purpose
............................ 6E2-138
Operation
........................... 6E2-138
Results of Incorrect Operation . . . . . . . . . . . 6E2-139
How diagnostic trouble code (DTC) 42 is
Determined ........................ 6E2-139
Diagnosis. . . . . . . . . . . . . . . ............. 6E2-139
Diagnostic
trouble code (DTC) 12 . . . . . . . . . 6E2-139
On-Vechicle Service . .
. . . . . . . . . . . . . . . . . . . 6E2-139
Electronic Ignition (EI) Assembly .......... 6E2-139
Crankshaft Position (CKP) Sensor ......... 6E2-140
Ignition Coil
.......................... 6E2-140
Ignition Control
Module (ICM) ............ 6E2-140
Ignition
Timing ....................... 6E2-140
Chart
C-4D-1 Electronic Ignition (EI) misfire
at
Idle .............................. 6E2-142
Chart C-4D-2 Electronic Ignition (EI) misfire
Under Load .......................... 6E2-144
GENERAL DESCRIPTION
PURPOSE
The Electronic Ignition (EI) system controls fuel
combustion by providing a spark to ignite the
compressed
air/fuel mixture at the correct time. To
provide improved engine performance,
fuel economy,
and
control of exhaust emissions, the Engine Control
Module
(ECM) controls spark advance timing with the
Ignition Control (IC) system.
OPERATION
The "EI" is a "waste spark" system in which 2 plugs are
fired
simultaneously from one coil. The spark plugs are
paired
to a coil, so that when both fire, one cylinder is
on the compression stroke and the other is on exhaust.
There is
Iitie resistance across the plug gap on the
exhaust stroke, so the
plug requires very little voltage
to fire, thereby providing the other plug (compression)
with maximum available voltage.
The system uses a magnetic Crankshaft Position (CKP)
sensor which protrudes into the block, within
approximately .050" of the crankshaft reluctor. The
reluctor is a special wheel cast on the crankshaft that
has seven machined
slots, six of which are equally
spaced 60° apart). The seventh slot is spaced 1 oo from
one
of the other slots. As the reluctor rotates with the
crankshaft, the
slots change the magnetic field of the
sensor, causing
an induced voltage pulse.
By counting the time between pulses, the Ignition
Control Module (ICM)
can recognize the pulse of the
seventh
slot (sync pulse). Based on this sync pulse, the
module sends the reference signal to the ECM to
calculate CKP (used to fire coils in correct sequence)
and engine speed.
To
properly control timing, the ECM relies on the
following information:
• Engine load (manifold absolute pressure or
vacuum).
• Atmospheric (barometric) pressure.
• Engine temperature.
• Intake air temperature.
• CKP
• Engine speed (revolution per minute).
The ignition
control system consisits of the "EI"
assembly (coils, module,
and CKP sensor), ECM and
connecting wires. These circuits
perform the following
functions:
• "EI" reference
The CKP sensor sends a signal to the ICM which
generates a reference
pulse which is sent to the
ECM. The ECM uses this signal to calculate CKP
and engine speed (also used to trigger the
injector).
• Reference ground (GND)
This wire is GNd through the module and makes
sure the GNd circuit has no
voltage drop between
the
ICM and the ECM, which if open, could affect
performance.
• Bypass
At about 400 revolution per minute, the ECM
applies 5 volts to this circuit to switch spark timing
control from the ICM to the ECM. An open or
grounded bypass circuit
will set a diagnostic
trouble code 42 and the engine will run at base
timing,
plus a small amount of advance built into
the
ICM.
• IGNITION CONTROL (IC)
The ECM uses this circuit (when bypass voltage is
applied) to trigger the "EI" module. The ECM uses
the
CKP to base its calculation of the amount of
spark advance needed under present engine
conditions.
•
Page 835 of 1928
RESULTS OF INCORRECT OPERATION
An open or ground in the Ignition Control (I C) or bypass
circuits
will set a Diagnostic Trouble Code (DTC) 42 and
cause the engine
to run on the Ignition Control Module
(ICM)
timing.
The Engine
Control Module (ECM) uses information
from the Intake Air Temperature (IAT) and engine
coolant sensors in addition to revolution per minute
(rpm) to
calculate spark advance as follows:
• Cold
engine -more spark advance.
• Engine under minimum load based on rpm and
low amount of air flow = more spark advance.
• Hot engine = less spark advance.
• Engine under heavy load based on rpm and high
air
flow = less spark advance.
HOW DIAGNOSTIC TROUBLE CODE (DTC)
42 IS DETERMINED
When the system is running on the ICM, that is, no
voltage on the bypass line, the ICM grounds (GND) the
IC signal. The ECM expects to see no voltage on the IC
line during this condition.lf it sees a voltage, it sets DTC
42 and will not go into the IC mode.
DRIVEABILITY AND EMISSIONS 6E2-139
When the rpm for IC is reached (about 400 rpm) the
ECM applies 5 volts to the bypass line and the IC should
no longer be grounded in the ICM so the IC voltage
should
be varying.
An open in the
IC circuit while running, will result in the
engine continuing to run, but in a back-up
ig~it~on
timing mode (module timing) at a calculated t1mmg
value
and the malfunction indicator lamp will not be
"ON".
If
the IC circuit is shorted to GND, the "Check Engine"
malfunction
indicator lamp will be turned "ON", and a
DTC 42 will be set and the engine will operate in
module timing. Either condition may cause poor
performance and reduced
fuel economy.
If the bypass line is open or GND, the ICM will not
switch to IC mode so the IC voltage will be low and DTC
42 will be set.
If the IC line is grounded, the ICM will switch to IC, but
because the line isGNDtherewill be no ICsignai.A DTC
42 will be set.
DIAGNOSIS
If the engine cranks but will not run, CHART A-3 will be
used to determine if the Electronic Ignition (EI) system
is the cause
of the problem or if it is another part of the
fuel injection system.
If DTC 42 is set, that DTC chart should be used for
diagnosis. If no DTC is set and the ignition system is
suspected, use
CHART C4-D ("EI" Misfire) for
diagnosis.
DIAGNOSTIC TROUBLE CODE (DTC) 12
DTC 12 is used during the on-board diagnostic system
check procedure to test the
DTC display ability of the
ECM. This diagnostic trouble code indicates that the
ECM is not receiving the engine speed (REFERENCE)
signal. This occurs with the ignition key "ON" and the
engine not running.
The "reference"
signal also triggers the fuel injection
system.
Without the "reference" signal the engine
cannot run.
ON-VEHICLE SERVICE
ELECTRONIC IGNITION (EI) ASSEMBLY
1••1 REMOVE OR DISCONNECT
1. Negative battery cable
2. "EI" electrical connectors (3)
3. Spark plug wires. (Note wire positions to proper
coils) (6)
4. "EI" assembly to bracket bolts (3)
5. "EI" assembly from Intake Plenum.
1••1 INSTALL OR CONNECT
1. "EI" assembly bracket to Intake Plenum
Tighten bolts to 25 N·m (19 lb·ft)
2. Spark plug wires to correct spark plugs
3. "EI" electrical connectors
4. Negative battery cable
Page 836 of 1928
6E2-140 DRIVEABILITY AND EMISSIONS
CRANKSHAFT POSITION (CKP) SENSOR
1••1 REMOVE OR DISCONNECT
1. Negative battery cable
2. Sensor electrical connector
3. Sensor bolts
4. Sensor from engine
11!) INSPECT
• Sensor 0-ring for wear, cracks or leakage.
Replace
if necessary. Lube new 0-ring with
engine oil before installing.
1••1 INSTALL OR CONNECT
1. Sensor in engine
2. Sensor bolt tighten to 10 Tighten bolts to 10 N·m
(88 lb·in)
3. Sensor electrical connector
4. Negative battery cable
IGNITION COIL
1••1 REMOVE OR DISCONNECT
1. Coil retaining screws (2 each coil)
2. Coil(s) from module
1••1 INSTALL OR CONNECT
1. Coil(s) to module
2. Coil retaining screws
IGNITION CONTROL MODULE (ICM)
1••1 REMOVE OR DISCONNECT
1. Negative battery cable
2. Electronic ignition assembly from Intake Plenum.
(See previous procedure)
3. Coils from assembly (Se previous procedure)
4. Module from assembly plate
1••1 INSTALL OR CONNECT
1. Module to assembly plate
2. Coils (See previous procedure)
3. "Electronic ignition" assembly to Intake Plenum
(See previous procedure)
4. Negative battery cable
IGNITION TIMING
Because the reluctor is an integral part of the
crankshaft and the crankshaft position sensor is
mounted in a fixed position,
timing adjustment is not
possible .
........................................................................\
........ ;; .
Page 838 of 1928
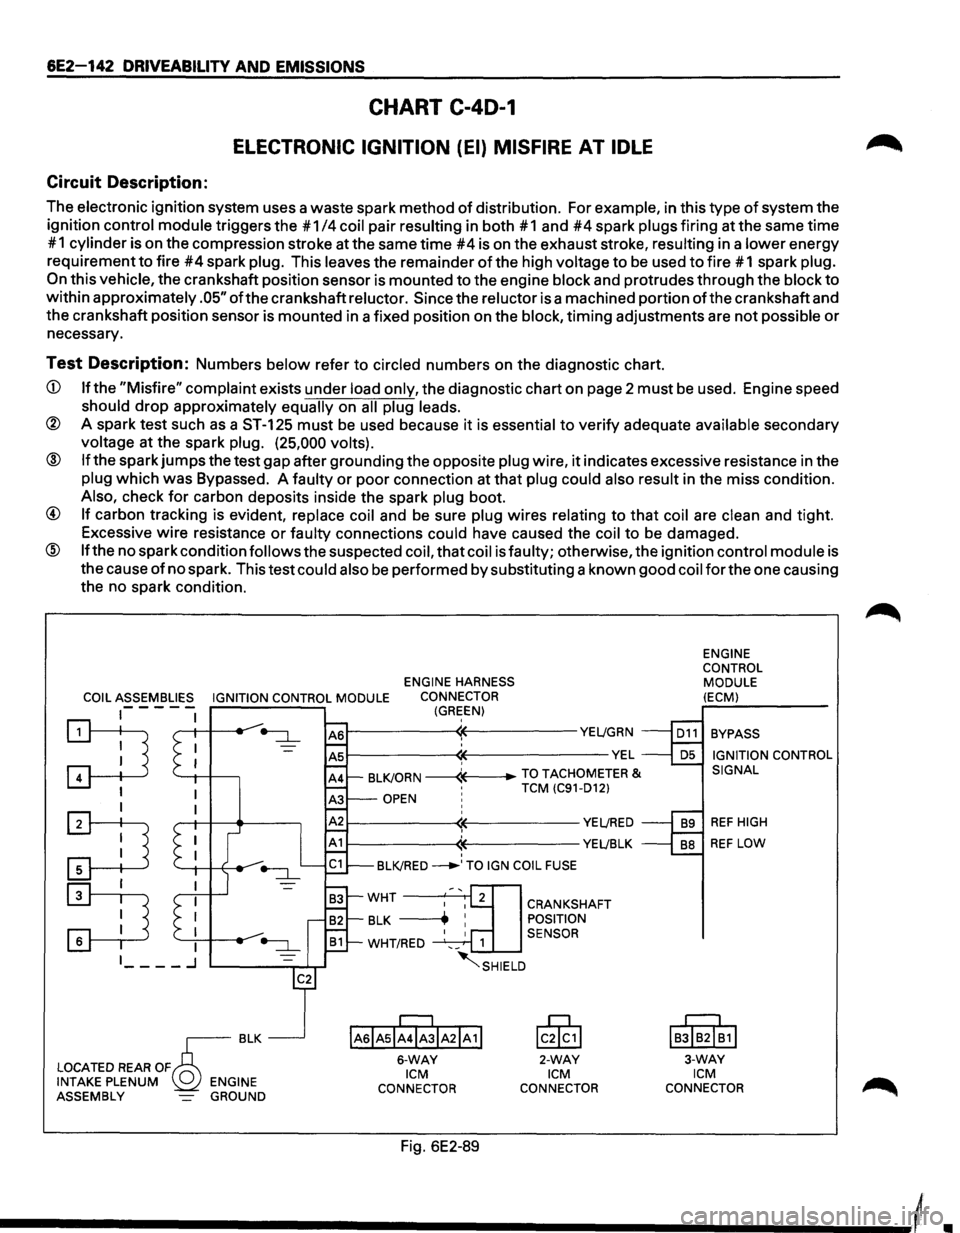
6E2-142 DRIVEABILITY AND EMISSIONS
CHART C-40-1
ELECTRONIC IGNITION (EI) MISFIRE AT IDLE
Circuit Description:
The electronic ignition system uses a waste spark method of distribution. For example, in this type of system the
ignition
control module triggers the #1 /4 coil pair resulting in both #1 and #4 spark plugs firing at the same time
# 1
cylinder is on the compression stroke at the same time #4 is on the exhaust stroke, resulting in a lower energy
requirement
to fire #4 spark plug. This leaves the remainder of the high voltage to be used to fire # 1 spark plug.
On this vehicle, the crankshaft position sensor is mounted to the engine block and protrudes through the block to
within approximately .05" ofthe crankshaft reluctor. Since the reluctor is a machined portion ofthe crankshaft and
the crankshaft position sensor is mounted in a fixed position on the
block, timing adjustments are not possible or
necessary.
Test Description: Numbers below refer to circled numbers on the diagnostic chart.
CD If the "Misfire" complaint exists under load only, the diagnostic chart on page 2 must be used. Engine speed
should drop approximately equally on all plug leads.
® A spark test such as a ST-125 must be used because it is essential to verify adequate available secondary
voltage at the spark plug. (25,000 volts).
@ If the spark jumps the test gap after grounding the opposite plug wire, it indicates excessive resistance in the
plug which was Bypassed. A faulty or poor connection at that plug could also result in the miss condition.
Also, check for carbon deposits inside the spark plug boot.
@ If carbon tracking is evident, replace coil and be sure plug wires relating to that coil are clean and tight.
Excessive
wire resistance or faulty connections could have caused the coil to be damaged.
@ If the no spark condition follows the suspected coil, that coil is faulty; otherwise, the ignition control module is
the cause
of no spark. This test could also be performed by substituting a known good coil for the one causing
the no spark condition.
ENGINE HARNESS
COIL ASSEMBLIES IGNITION CONTROL MODULE CONNECTOR
1-- - - -(GREEN)
~ '--1-1 -+---,
I
:TI
:D
r---------~~----------YE~GRN
~--------~~-------------VEL ' BLKJORN -----4---+-TO TACHOMETER & •
TCM (C91-D12) OPEN ! ' r---------~~----------YE~RED
r-----------<1~----------YEL!BLK ' BLKJRED ___..,TO IGN COIL FUSE
IAsiAsl;rJIA21A 1!
6-WAY ICM
CONNECTOR
Fig. 6E2-89
CRANKSHAFT
POSITION
SENSOR
lc0§,1
2-WAY ICM
CONNECTOR ENGINE
CONTROL
MODULE
(ECM)
BYPASS IGNITION CONTROL
SIGNAL
REF HIGH
REF LOW
IB!IB2I~1I
3-WAY ICM CONNECTOR
Page 840 of 1928
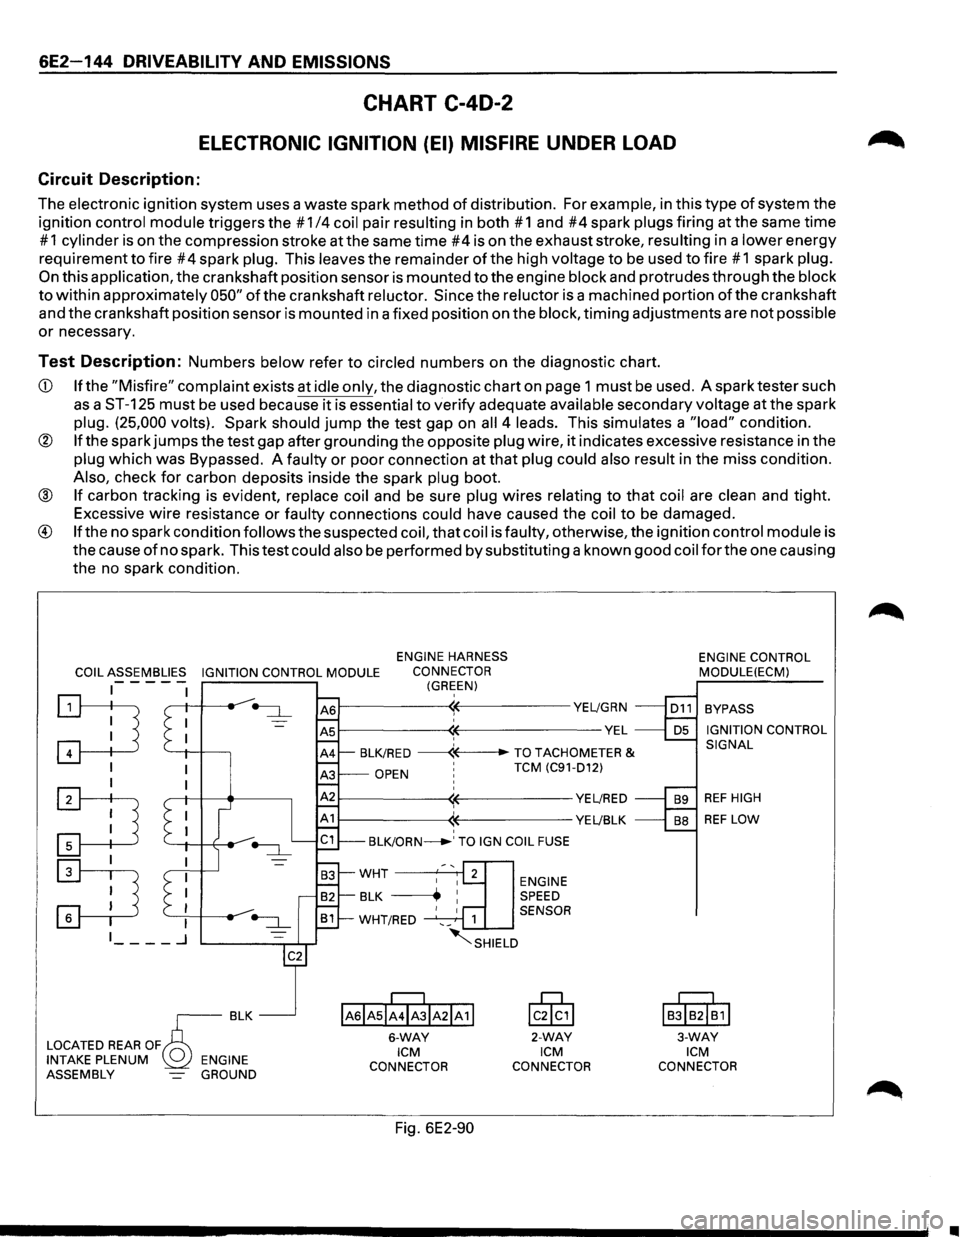
6E2-144 DRIVEABILITY AND EMISSIONS
CHART C-40-2
ELECTRONIC IGNITION (EI) MISFIRE UNDER LOAD
Circuit Description:
The electronic ignition system uses a waste spark method of distribution. For example, in this type of system the
ignition
control module triggers the # 1/4 coil pair resulting in both # 1 and #4 spark plugs firing at the same time
# 1 cylinder is on the compression stroke at the same time #4 is on the exhaust stroke, resulting in a lower energy
requirement
to fire #4 spark plug. This leaves the remainder of the high voltage to be used to fire #1 spark plug.
On this application, the crankshaft position sensor is mounted to the engine block and protrudes through the block
to within approximately 050" of the crankshaft reluctor. Since the reluctor is a machined portion of the crankshaft
and the crankshaft position sensor is mounted in a fixed position on the
block, timing adjustments are not possible
or necessary.
Test Description: Numbers below refer to circled numbers on the diagnostic chart.
CD If the "Misfire" complaint exists at idle only, the diagnostic chart on page 1 must be used. A spark tester such
as a ST-125 must be used because it is essential to verify adequate available secondary voltage at the spark
plug. (25,000 volts). Spark should jump the test gap on all 4 leads. This simulates a "load" condition.
® If the spark jumps the test gap after grounding the opposite plug wire, it indicates excessive resistance in the
plug which was Bypassed. A faulty or poor connection at that plug could also result in the miss condition.
Also, check for carbon deposits inside the spark plug boot.
® If carbon tracking is evident, replace coil and be sure plug wires relating to that coil are clean and tight.
Excessive
wire resistance or faulty connections could have caused the coil to be damaged.
® If the no spark condition follows the suspected coil, that coil is faulty, otherwise, the ignition control module is
the cause
of no spark. This test could also be performed by substituting a known good coil for the one causing
the no spark condition.
COIL ASSEMBLIES IGNITION CONTROL MODULE
ENGINE HARNESS
CONNECTOR
(GREEN) -----
:TI '--+I -l-----,
I
:TI
~
~--------~~-----------YE~GRN
~--------~~--------------VEL ' BLK/RED ------«--TO TACHOMETER &
OPEN ' TCM (C91-D12)
~--------~~-----------YE~RED
1------------((-----------YE~BLK ' BLK/ORN_.' TO IGN COIL FUSE
ENGINE SPEED
1 SENSOR
~SHIELD
IAsiAsii4ibiA21A11
6-WAY ICM
CONNECTOR
Fig. 6E2-90
lcik,l
2-WAY ICM
CONNECTOR ENGINE
CONTROL
MODULE(ECM)
BYPASS
IGNITION CONTROL
SIGNAL
REF HIGH
REF LOW
I
BJIB2I~1I
3-WAY ICM
CONNECTOR
•
Page 842 of 1928
6E2-146 DRIVEABILITY AND EMISSIONS
SECTION C-5
KNOCK SENSOR (KS) SYSTEM
(DOHC ONLY)
CONTENTS
General Description ..................... 6E2-146 On-Vehicle Service ...................... 6E2-147
Purpose
............................ 6E2-146 Knock Sensor (KS) System ............... 6E2-147
Operation . . . . . . . . . . . . . . . . . . . . . . . . . . . 6E2-146 Knock
Sensor
(KS) Module .............. 6E2-147
Diagnosis
............................. 6E2-146 Chart C-5 Knock Sensor (KS) System Check ... 6E2-148
Results
Of Incorrect Knock Sensor (KS)
System Operation .................... 6E2-146
GENERAL DESCRIPTION
PURPOSE
To control spark knock, a Knock Sensor (KS) system
has been added. This system is designed to retard
spark timing up to
20·, to reduce spark knock in the
engine. This
allows the engine to use maximum spark
advance to improve driveability and fuel economy.
Varying octane
levels in gasoline can cause detonation
in engines. Detonation
is called spark knock.
OPERATION
The KS system has two major components:
• KS Module
• KS System
The sensor is mounted in the engine block under the
Intake Manifold assembly. When the KS detects
abnormal vibration (spark knocking) in the engine,
it
produced a voltage that is received by the KS module.
As long
as the KS module sees no voltage from the KS
(knock not present), it sends a signal voltage (8 to 10
volts) to the Engine Control Module (ECM) and the ECM
provides normal spark advance.
When the module detects voltage
from the KS (knock
present),
it turns "OFF" the signal to the ECM and the
voltage at terminal
"D1 0" goes toO volts. The ECM then
retards ignition control
(IC) to reduce spark knock.
The
KS signal line has a shield wire to prevent any false
signals to the
KS module. If the shield wire loses it
ground a false diagnostic trouble code (DTC) 43 may
result
or the ignition timing maybe retard needlessly.
DIAGNOSIS
RESULTS OF INCORRECT KNOCK SENSOR
(KS) SYSTEM OPERATION
Loss of the KS signal or loss of ground at KS module
would cause the signal to the ECM to remain high. This
condition
would cause the ECM to control IC, as if no
spark knocking were happening. No retard
would
occur, and spark knocking could become severe under
heavy engine load conditions. Loss
of the KS signal
to the ECM would cause the ECM
to constantly retard IC. This could result in sluggish
performance and cause a
DTC 43 to set.
A
"Scan tool" will read KC signal in A/D counts. When
detonation is detected,
KC signal counts will
increment, as long as knock is present. "Scan tools"
will
indicate knock being present either by showing
AID counts, or displaying "Yes" (knock present), or
"No" (knock not present). If DTC 43 is present, use that
chart to diagnose system. If no DTC is present and KS
system is suspected, use CHART C-5.
•
Page 843 of 1928
DRIVEABILITY AND EMISSIONS 6E2-147
ON-VEHICLE SERVICE
KNOCK SENSOR (KS) SYSTEM
Refer to engine section of this service manual for intake
removal and access to the knock sensor (KS).
KNOCK SENSOR (KS) MODULE
Refer to (Figure C5-1).
KS module is mounted to a bracket, located at the
upper right hand corner
of the inner fender.
1••1 REMOVE OR DISCONNECT
1. Negative battery cable
2. KS module connector
3. Attaching screws
4. Evaporate emission canister purge bracket
5. KS module
1••1 INSTALL OR CONNECT
1. KS module
2. Attaching screws
3. KS module connector
4. Evaporate emission canister purge bracket
5. Negative battery cable