check engine ISUZU TROOPER 1995 Workshop Manual
[x] Cancel search | Manufacturer: ISUZU, Model Year: 1995, Model line: TROOPER, Model: ISUZU TROOPER 1995Pages: 1928
Page 892 of 1928
7 A-20 AUTOMATIC TRANSMISSION (4L30-E)
CHECKING TRANSMISSION FLUID
LEVEL AND CONDITION
Checking fluid level and condition (color and odor)
at
regular intervals will provide early diagnosis
information about the transmission. This inform
ation may be used to correct a condition that, if not
detected early, could result in major transmission
repairs.
IMPORTANT: When new, automatic transmission
fluid is red in color. As the vehicle is driven, the
transmission
fluid will begin to look darker in color.
The
color may eventually appear light brown.
A DARK
brown color with burnt odor may indicate
excessive
fluid deterioration and signal a need for
fluid change.
FLUID LEVEL
When adding
or changing fluid, use only DEXRON
®-Ill.
Refer to the Maintenance and Lubrication (Section 0
of this manual) for maintenance information and
servicing
interval.
\f CAUTION: DO NOT OVERFILL
Overfilling will cause foaming, loss ~f fluid,
abnormal shifting and possible damage to
the transmission.
1. Start engine and drive vehicle until normal AfT
oil operating temperature is reached:
NOTE: The automatic transmission fluid level
must be checked with the vehicle at normal
A/T oil operating temperature: 75 TO 85°C
(167 TO 185°F) MEASURED WITH TECH1 SCAN
TOOL.
Temperature will greatly affect transmission
fluid level.
If the vehicle is not at normal AfT oil operating
temperature and the proper checking
procedures are
not followed, the result could
be a false reading of the fluid level indicator
and
an incorrect adjustment of the fluid level.
2. Park vehicle on level ground.
3. Move gear selector to "Park".
4. Apply parking brake and block wheels.
5. Allow vehicle to idle for 3 minutes with all
accessories turned off.
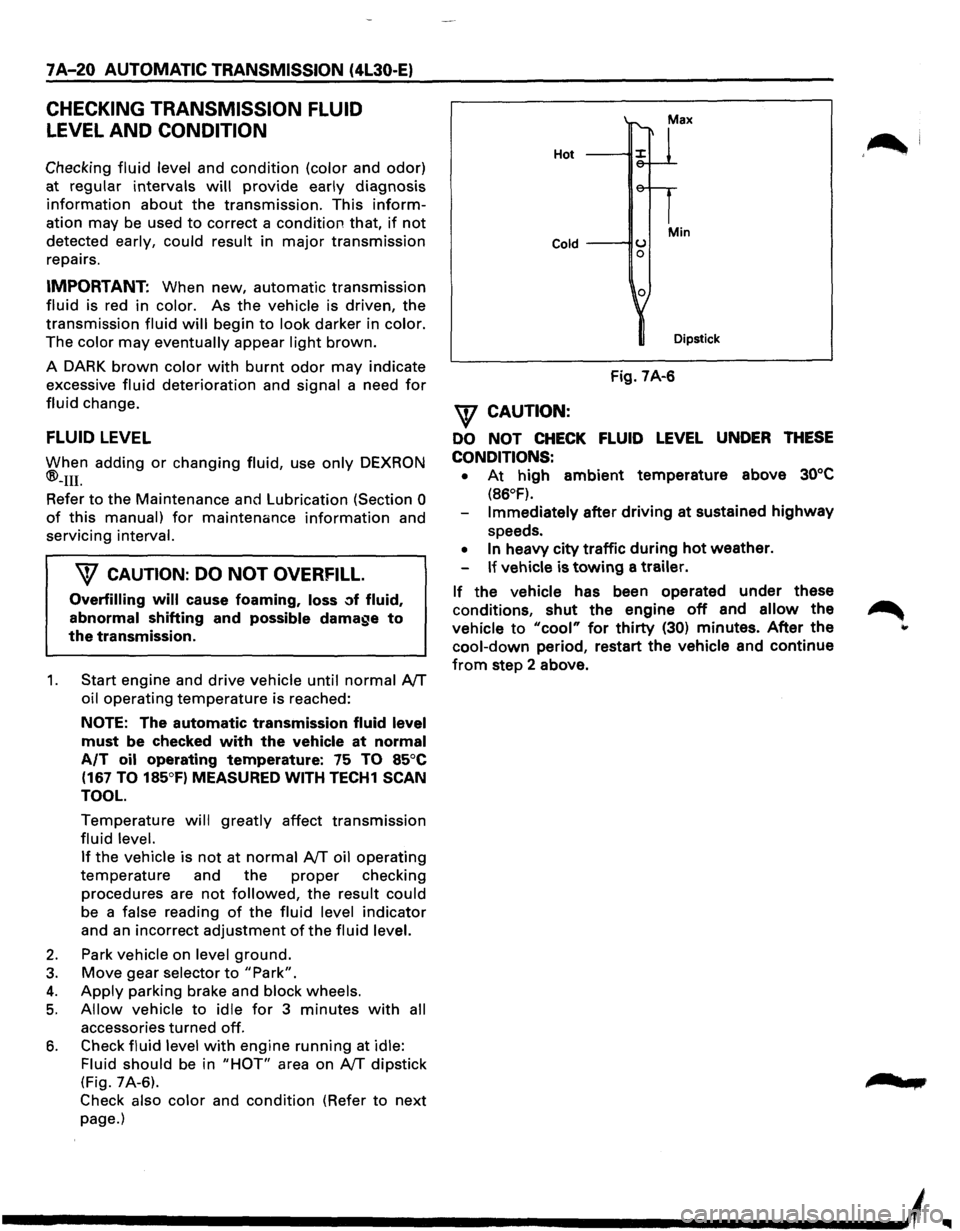
6. Check fluid level with engine running at idle:
Fluid should
be in "HOT" area on AfT dipstick
(Fig. 7A-6).
Check also color and condition (Refer to next
page.)
Hot
Cold ---IIU 0
0
Min
Dipstick
Fig. 7A-6
\f CAUTION:
DO NOT CHECK FLUID LEVEL UNDER THESE
CONDITIONS: •
At high ambient temperature above 30°C
(86°F).
Immediately after driving at sustained highway
speeds.
• In heavy city traffic during hot weather.
If vehicle is towing a trailer.
If the vehicle has been operated under these
conditions,
shut the engine off and allow the
vehicle to "cool" for thirty (30) minutes. After the
cool-down period, restart the vehicle and continue
from step 2 above.
'~I
......
Page 894 of 1928
7 A-22 AUTOMATIC TRANSMISSION (4l30-E)
TEST DRIVING
Some 4L30-E automatic transmission complaints
vehicles will require a test drive as a part of the
diagnostic procedure.
Some codes will not set
unless the vehicle is moving. The purpose of the
test
drive is to duplicate the customer's complaint
condition and set a current Transmission Control
Module (TCM) trouble code. Perform this
procedure before each 4L30-E automatic trans
mission repair, and again after repairs are made.
IMPORTANT:
• Duplicate the condition under which the
customer's complaint was observed.
• Depending on the complaint, line pressure
gauge and the
TECH1 scan tool may be
required
during the test drive.
• During the test drive, it is important to record
all necessary data from the areas being
monitored, for use in diagnosis. Also listen for
and note any unusual noises.
The
following procedure should be used to test
drive 4L30-E automatic
transmission complaint
vehicles:
1. Turn the ignition ON without starting the
engine. Check
that the "CHECK TRANS" lamp
comes on for approximately 2 to 3 seconds
and then goes
out and remains out.
• If the lamp is flashing, GOTO CHECK
TRANS INDICATOR (on page 7A-46).
• If no serial data is present, see Chart 1:
DIAGNOSTIC CONNECTOR AND VOLTAGE
SUPPLY TEST (on page 7A-69 and 7A-70).
• If the lamp stays ON or stays OFF, GOTO
"CHECK TRANS"
CHECK (on page 7A-48).
NOTE:
Remember that, when TECH1 is connected,
line pressure will be at maximum during shifts.
2. Drive the vehicle. During the test drive be sure
that the transmission achieves normal
operating temperature (approx. 20 minutes) ..
Allow the transmission to go through all of 1ts
gear ranges, checking shift timing and
firmness.
Duplicate the owner's complaint
condition as closely as possible during the test
drive.
3. If, during the test drive, the "CHECK TRANS"
lamp comes on, use the TECH1 to check for
trouble codes.
4. If, during the test drive, a problem is felt, but
the "CHECK TRANS" lamp does not come on
and
no trouble codes are present, drive the
vehicle with the TCM disconnected (manually
shifting the vehicle).
•
In Manual L, the vehicle operates in first
gear.
• In Manual 2, the vehicle operates in third
gear.
• In Manual 3 or "D", the vehicle operates in
fourth gear.
If the problem still exists with the TCM
disconnected, refer
to the MECHANICAL/
HYDRAULIC DIAGNOSIS
in this Section.
5. If no problem has been found at this point,
check
all underhood connections that supply
power to the TCM and ignition fuses.
Physically and visually inspect all the TCM
harness connectors
for loose or corroded
terminals. Inspect the TCM ground points.
•
Page 895 of 1928
MECHANICAL/HYDRAULIC DIAGNOSIS
CHECK TRANS INDICATOR CHART
AUTOMATIC TRANSMISSION (4L30-E) 7 A-23
I PERFORM PRELIMINARY INSPECTION FIRST!
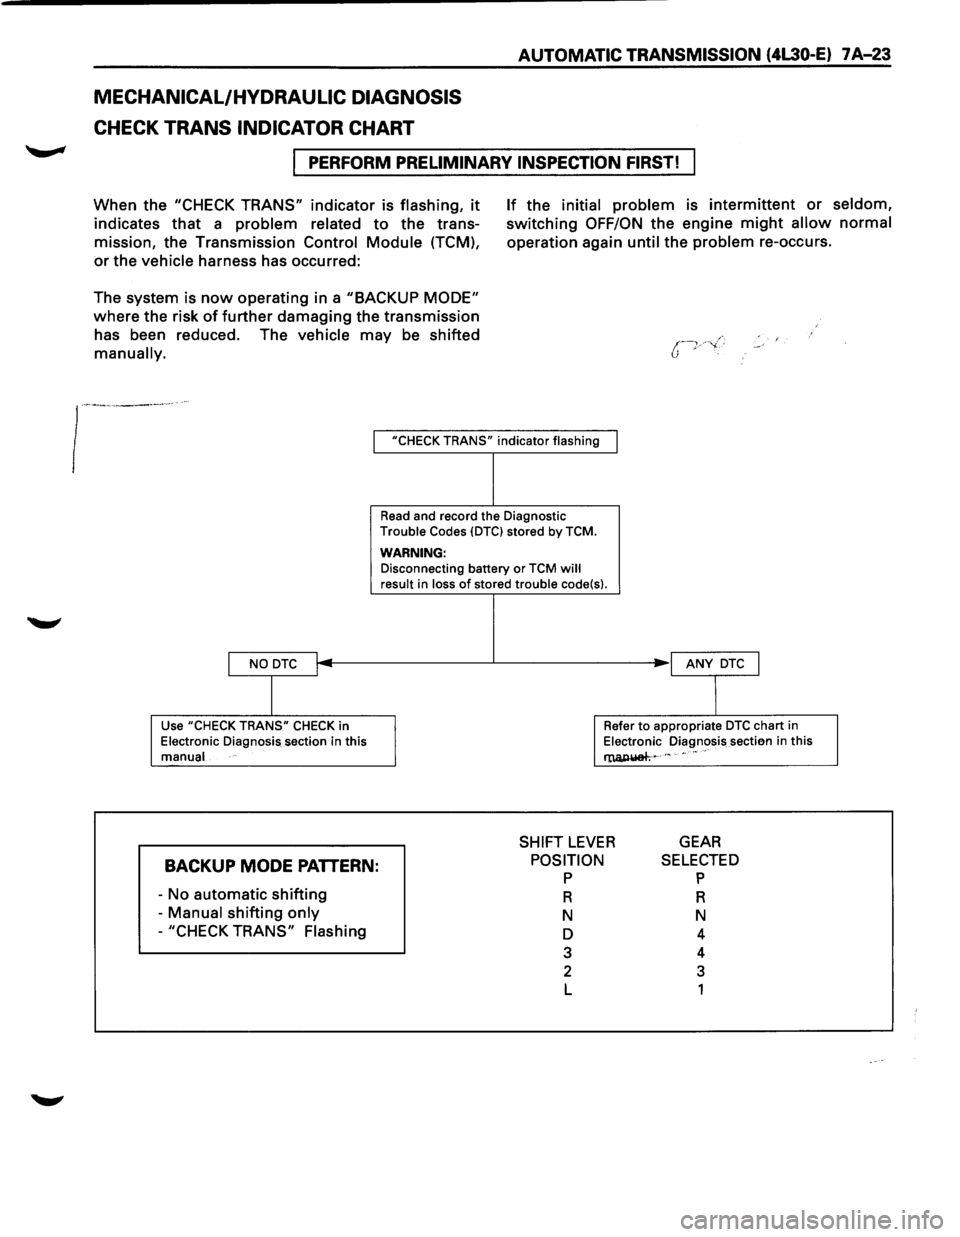
When the "CHECK TRANS" indicator is flashing, it
indicates that a problem related to the trans
mission, the Transmission Control
Module (TCM),
or the vehicle harness has occurred:
The system is
now operating in a "BACKUP MODE"
where the risk of further damaging the transmission
has been reduced. The vehicle may be shifted
manually.
If the initial problem is intermittent or seldom,
switching OFF/ON the engine might allow normal
operation again until the problem re-occurs.
I "CHECK TRANS" indicator flashing
I NO DTC I
I
Use "CHECK TRANS" CHECK in
Electronic Diagnosis section in this
manual
BACKUP MODE PATTERN:
-No automatic shifting
- Manual shifting only
-"CHECK TRANS" Flashing
Read and record the Diagnostic
Trouble Codes {DTCI stored by TCM.
WARNING: Disconnecting battery or TCM will result in loss of stored trouble code{s).
I ANY DTC J
I
Refer to appropriate DTC chart in
Electronic Diagnosis sectien in this
l'lUl,IUiah~ c " • •• "
SHIFT LEVER GEAR
POSITION p
R
N
D
3
2
L
SELECTED p
R
N
4
4
3
1
Page 897 of 1928
AUTOMATIC TRANSMISSION (4L30-E) 7 A-25
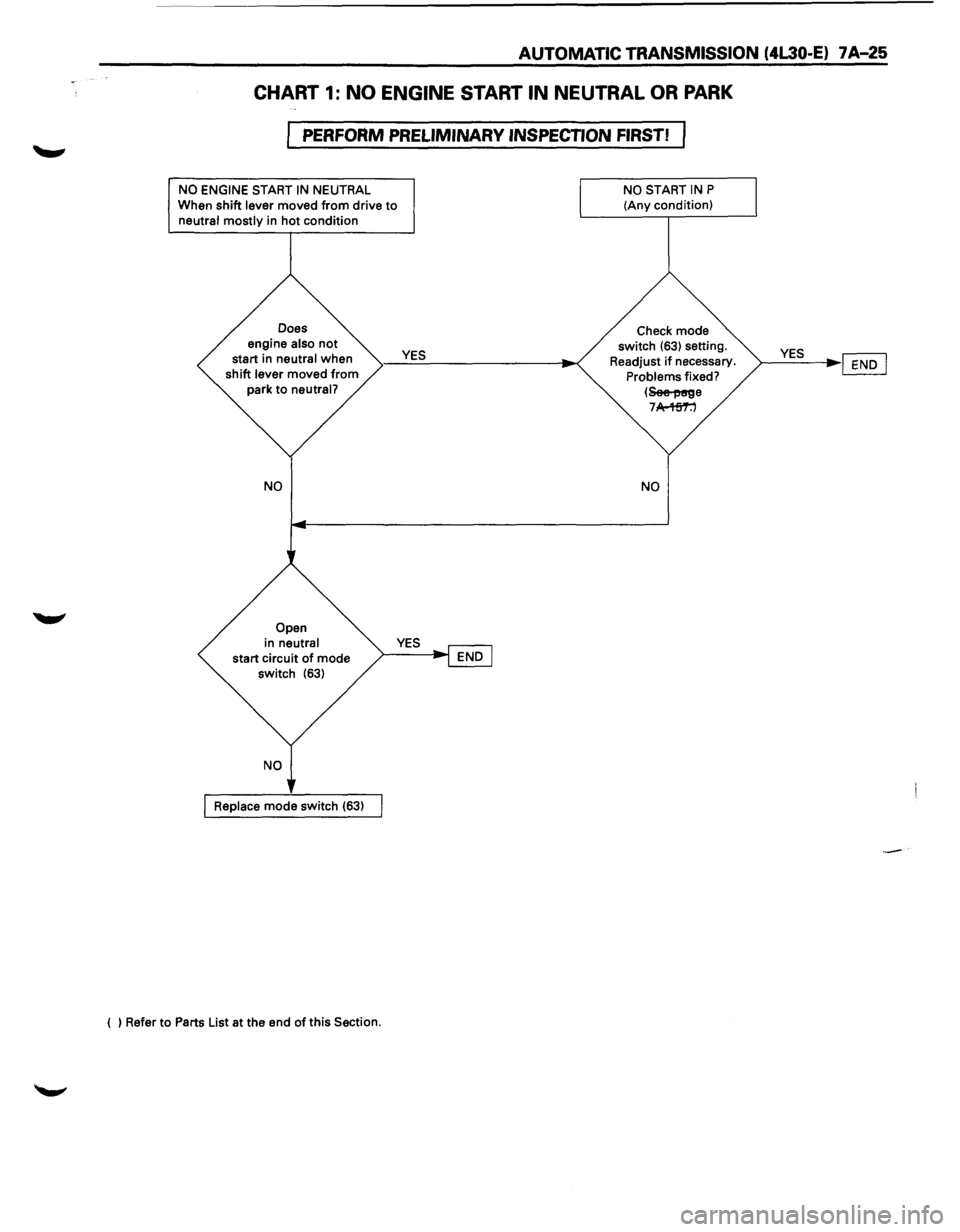
CHART 1: NO ENGINE START IN NEUTRAL OR PARK
PERFORM PRELIMINARY INSPECTION FIRST!
NO ENGINE START IN NEUTRAL
When shift lever moved from drive to neutral mostly in hot condition
Does
engine
also not start in neutral when
shift lever moved from
park to neutral?
NO
Open
in neutral
start circuit of mode
switch (63)
Replace mode switch (63)
( ) Refer
to Parts List at the end of this Section.
YES
NO START IN P
(Any condition)
Check mode
switch
(63) setting.
Readjust
if necessary. Problems fixed?
(~e 7 A-'Hi'1':')
NO
YES ~ ~----l~~
Page 899 of 1928
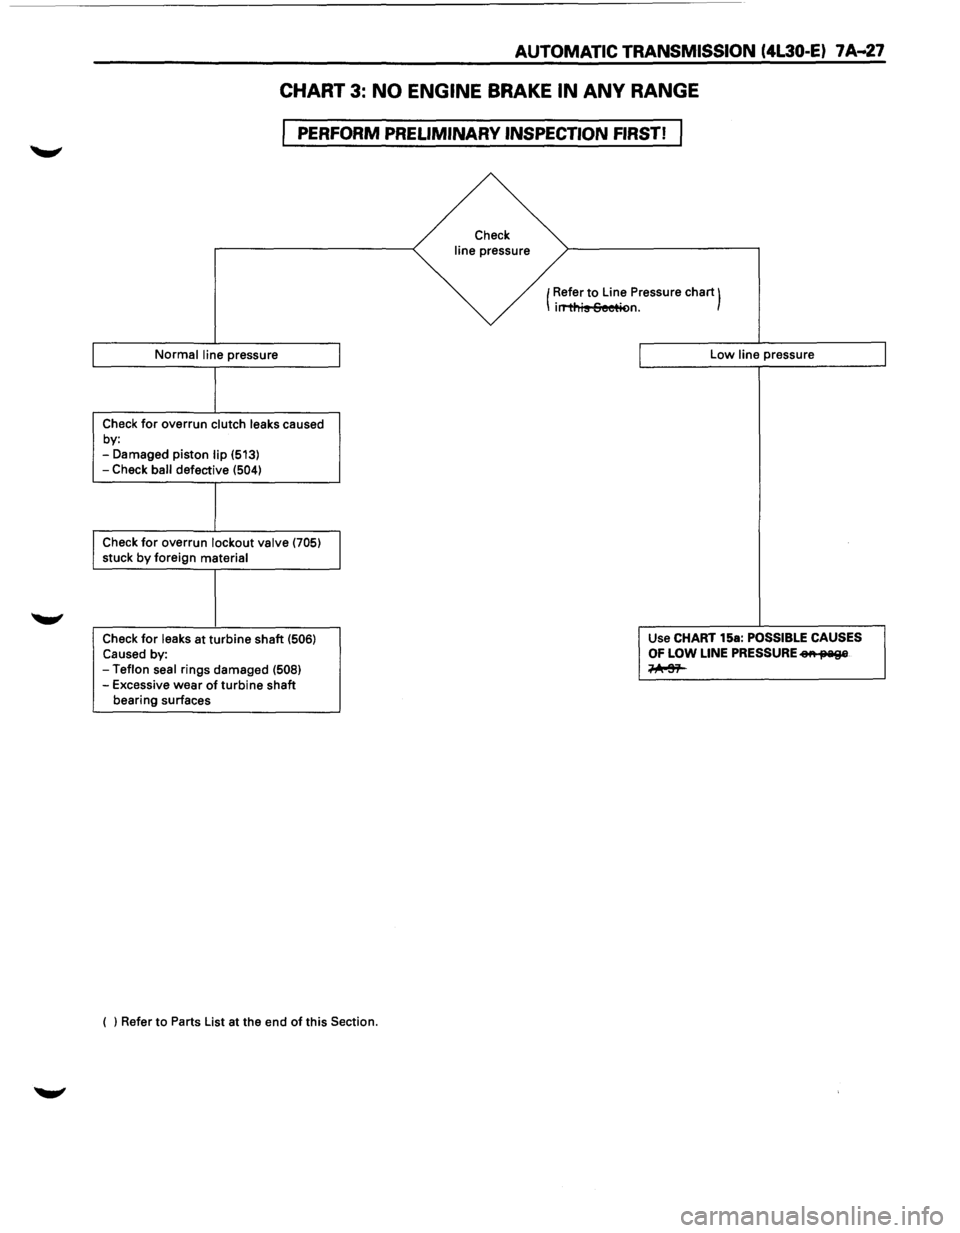
AUTOMATIC TRANSMISSION (4l30-E) 7 A--27
CHART 3: NO ENGINE BRAKE IN ANY RANGE
PERFORM PRELIMINARY INSPECTION FIRST!
Normal line pressure
Check for overrun clutch leaks caused
by:
-Damaged piston lip (513)
-Check ball defective (504)
Check for overrun lockout valve (705) stuck by foreign material
Check
for leaks at turbine shaft (506) Caused by: -Teflon seal rings damaged (508) -Excessive wear of turbine shaft
bearing surfaces
( ) Refer to Parts List at the end
of this Section.
Check
line pressure
(Refer
to Line
Pressure chart) irT'ti'lis Seetit>n.
Low line pressure
Use CHART 15a:
POSSIBLE CAUSES
OF LOW LINE PRESSURE eA fJ'Iil9&
~
Page 901 of 1928
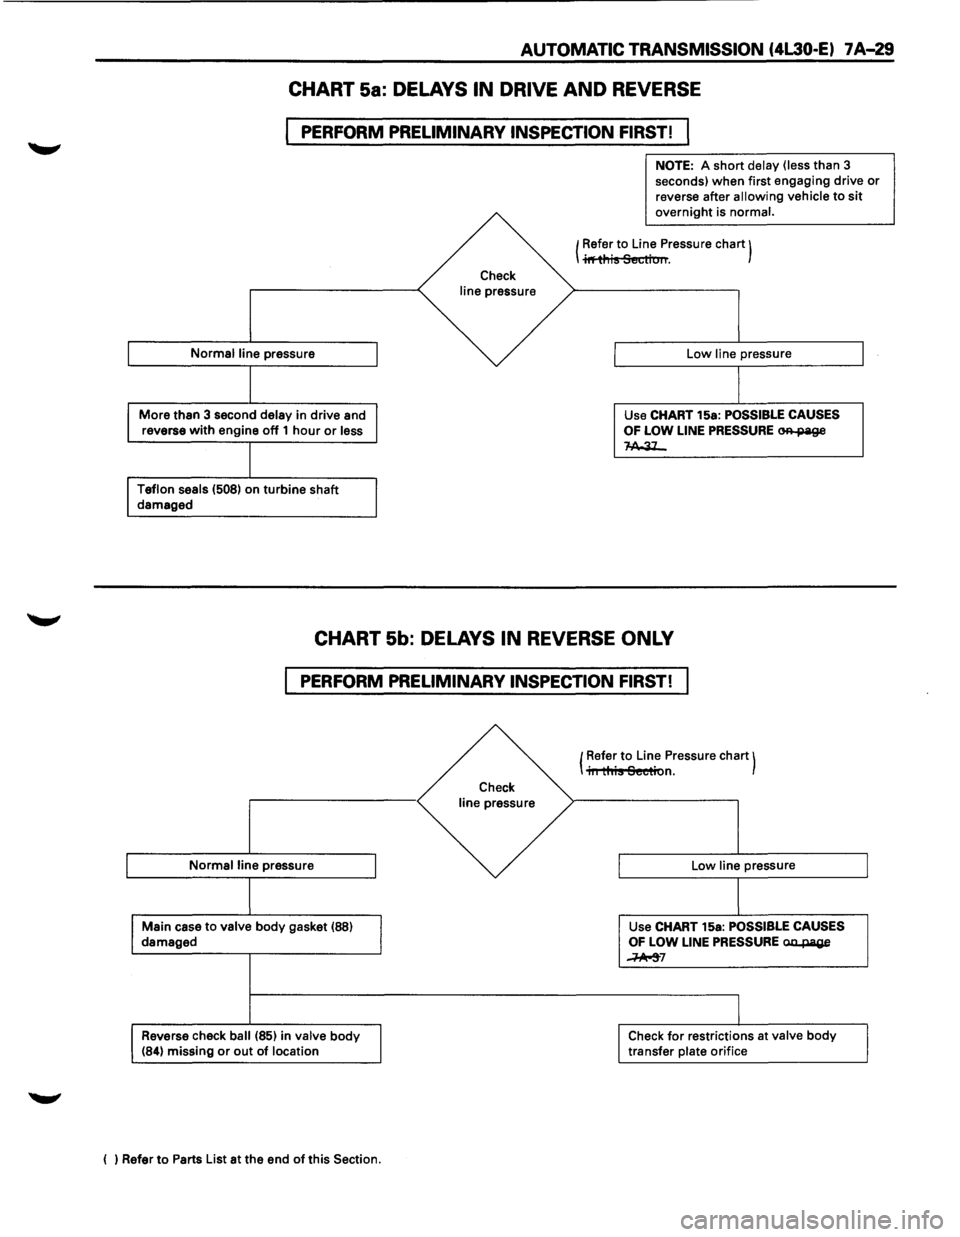
AUTOMATIC TRANSMISSION (4L30·E) 7 A-29
CHART 5a: DELAYS IN DRIVE AND REVERSE
PERFORM PRELIMINARY INSPECTION FIRST! I
Normal line pressure
More than 3 second delay in drive and
reverse with engine off 1 hour or less
Teflon seals (508) on turbine shaft damaged
Check
line pressure
NOTE: A short delay (less than 3
seconds) when first engaging drive or
reverse after allowing vehicle to sit overnight is normal.
1 Refer to Line Pressure chart) I il'fti'1is Section.
Low line pressure
Use CHART 15a:
POSSIBLE CAUSES
OF
LOW LINE PRESSURE OR-page 1-A,.31_
CHART 5b: DELAYS IN REVERSE ONLY
PERFORM PRELIMINARY INSPECTION FIRST!
Normal line pressure
Main case to valve body gasket (88) damaged
Reverse check ball (85) in valve body (84) missing or out of location
( ) Refer to Parts List at the end of this Section.
Check
line pressure (
Refer
to Line
Pressure chart) iii this Section.
Low line pressure
Use CHART 15a:
POSSIBLE CAUSES OF LOW LINE PRESSURE aa..page
~7
Check for restrictions at valve body transfer plate orifice
Page 902 of 1928
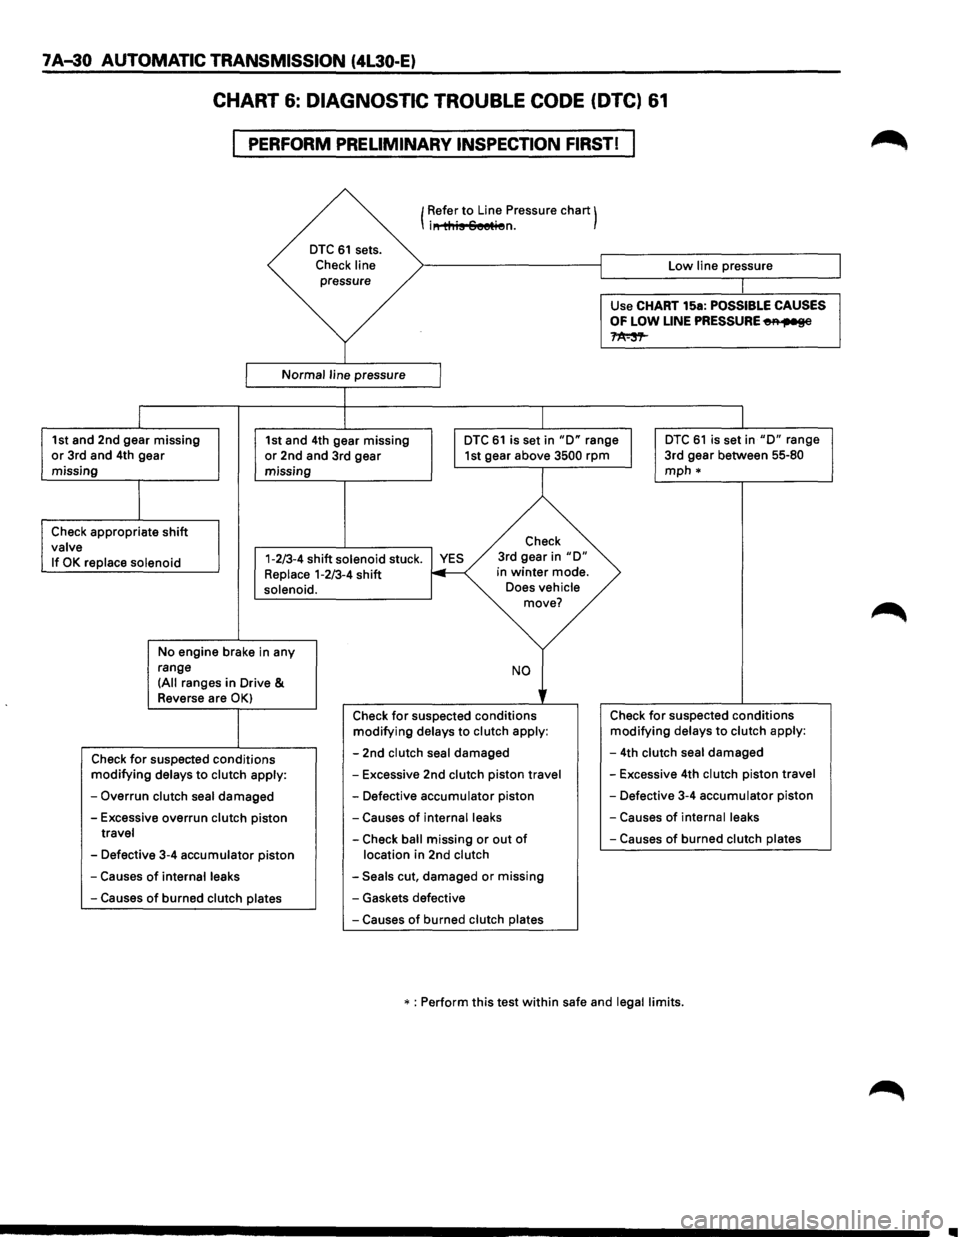
7 A-30 AUTOMATIC TRANSMISSION (4L30-E)
CHART 6: DIAGNOSTIC TROUBLE CODE (DTC) 61
PERFORM PRELIMINARY INSPECTION FIRST!
I
I
DTC 61 sets.
Check line pressure
Normal line pressure
1 Refer to Line Pressure chart) i" this Seetien.
J
Low line pressure
Use
CHART 15a: POSSIBLE CAUSES
OF LOW LINE PRESSURE~
~
1st and 2nd gear missing or 3rd and 4th gear
missing 1st
and 4th gear missing or 2nd and 3rd gear
missing I
DTC 61 is set in "D" range I 1st gear above 3500 rpm
DTC 61 is set in "D" range
3rd gear between 55-80
mph*
I
Check appropriate shift valve Check
If
OK replace solenoid 1-2/3-4 shift solenoid stuck. YES Replace 1-2/3-4 shift 3rd
gear in
"D" in winter mode.
solenoid.
No engine brake in any
range
(All ranges in Drive &
Reverse are OK)
Check for suspected conditions modifying delays to clutch apply:
-Overrun clutch seal damaged
-Excessive overrun clutch piston travel
-Defective 3-4 accumulator piston
-Causes of internal leaks
-Causes of burned clutch plates
Does vehicle move?
NO
' Check for suspected conditions modifying delays to clutch apply:
-2nd clutch seal damaged
-Excessive 2nd clutch piston travel
-Defective accumulator piston
-Causes of internal leaks
-Check ball missing or out of
location in 2nd clutch
-Seals cut, damaged or missing
- Gaskets defective
-Causes of burned clutch plates Check
for suspected
conditions modifying delays to clutch apply:
-4th clutch seal damaged
-Excessive 4th clutch piston travel
-Defective 3-4 accumulator piston
-Causes of internal leaks
-Causes of burned clutch plates
* : Perform this test within safe and legal limits.
..
Page 906 of 1928
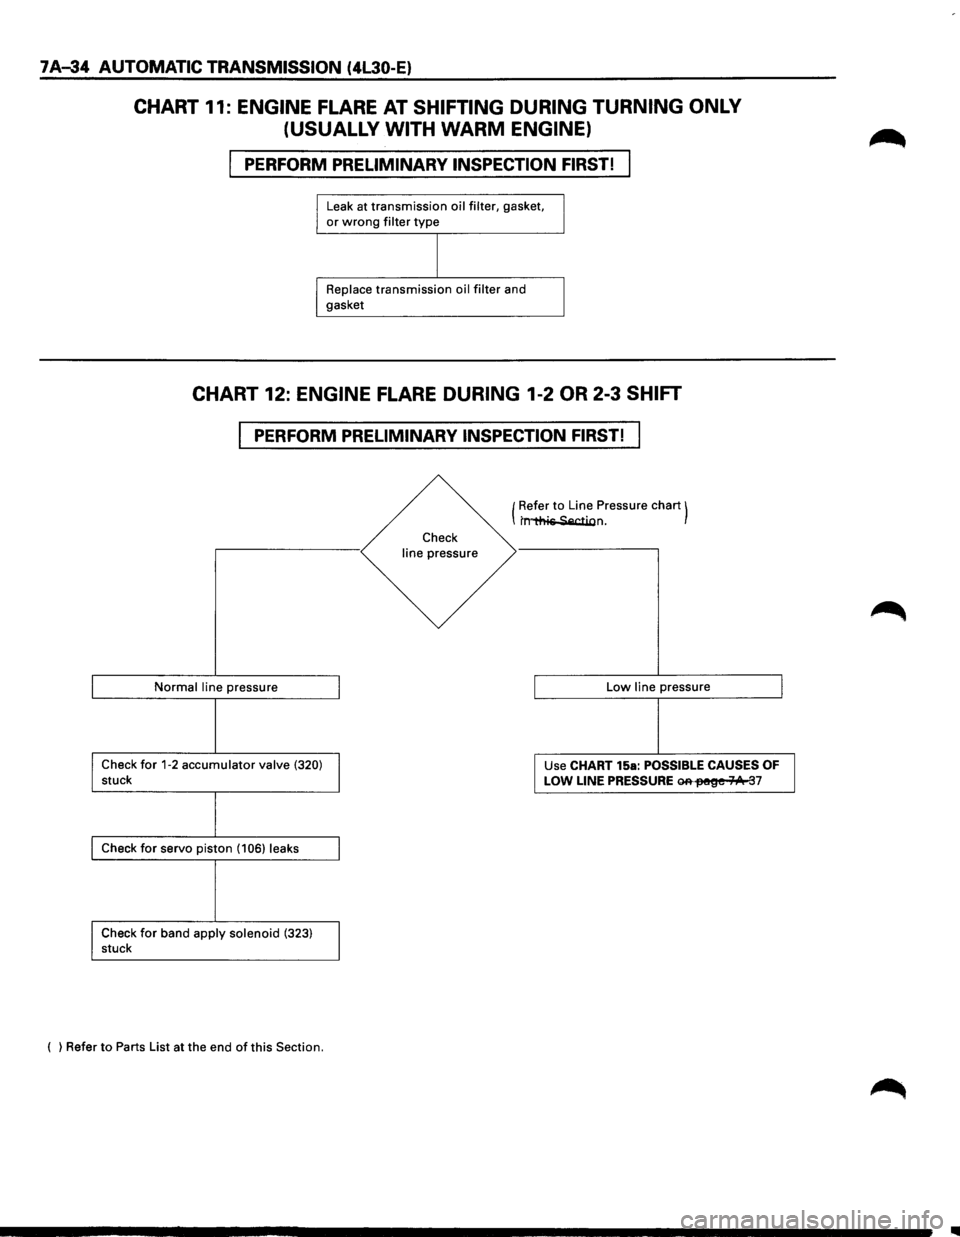
7 A-34 AUTOMATIC TRANSMISSION (4L30-E)
CHART 11: ENGINE FLARE AT SHIFTING DURING TURNING ONLY
(USUALLY WITH
WARM ENGINE)
PERFORM PRELIMINARY INSPECTION FIRST!
Leak at transmission oil filter, gasket, or wrong filter type
Replace transmission oil filter and
gasket
CHART 12: ENGINE FLARE DURING 1-2 OR 2-3 SHIFT
PERFORM PRELIMINARY INSPECTION FIRST!
Normal line pressure
Check for 1-2 accumulator valve (320) stuck
Check for servo piston (106) leaks
Check
for band apply solenoid (323) stuck
( ) Refer
to Parts List at the end of this Section.
Check
line pressure (
Refer
to Line
Pressure chart) t~n.
Low line pressure
Use CHART 15a:
POSSIBLE CAUSES OF
LOW LINE PRESSURE ~fM!~e 71/1t 37
..
Page 911 of 1928
AUTOMATIC TRANSMISSION (4L30-E) 7 A-39
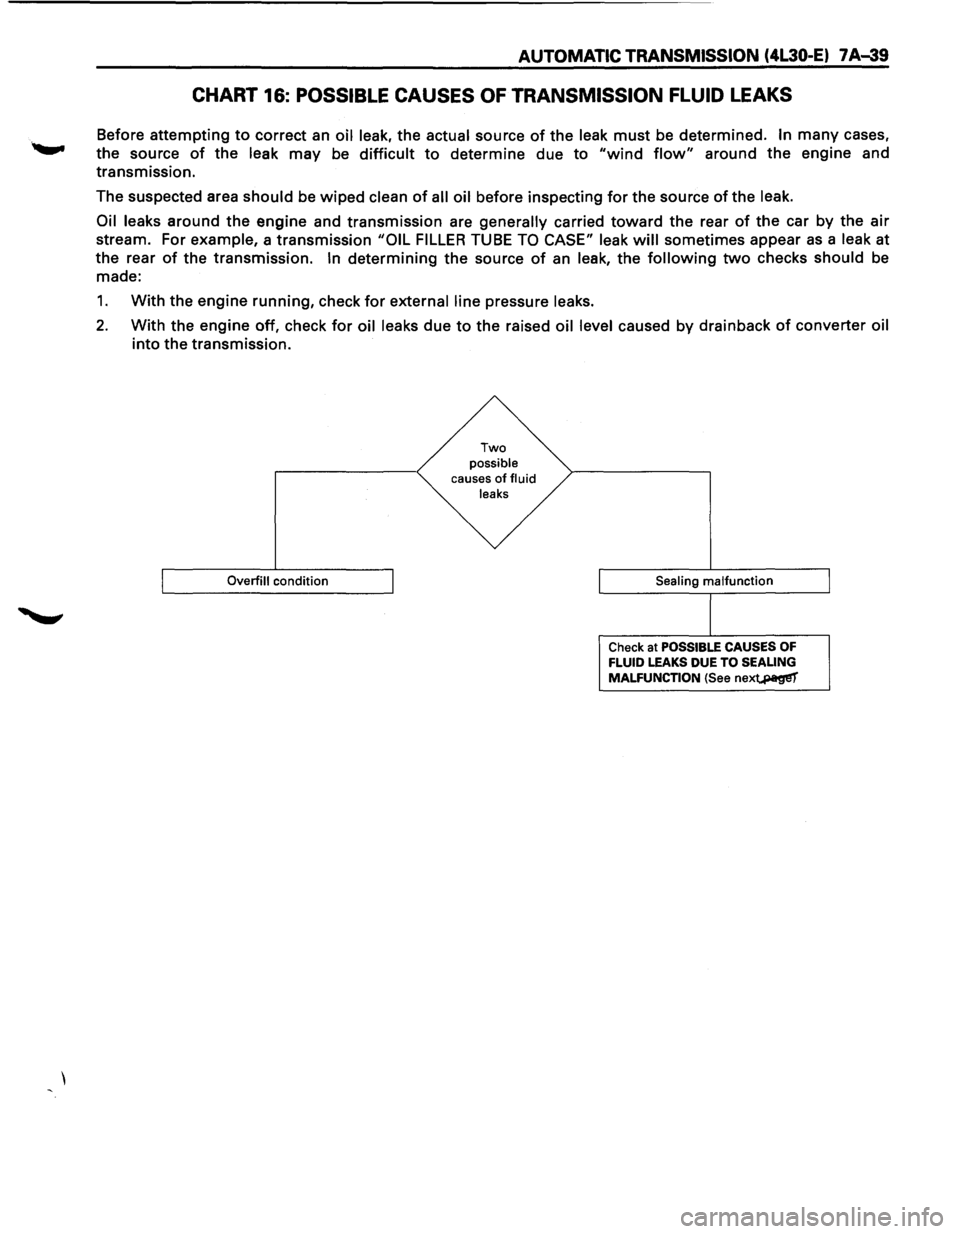
CHART 16: POSSIBLE CAUSES OF TRANSMISSION FLUID LEAKS
Before attempting to correct an oil leak, the actual source of the leak must be determined. In many cases,
the source
of the leak may be difficult to determine due to "wind flow" around the engine and
transmission.
The suspected area
should be wiped clean of all oil before inspecting for the source of the leak.
Oil leaks
around the engine and transmission are generally carried toward the rear of the car by the air
stream. For example, a transmission "OIL FILLER TUBE TO CASE" leak will sometimes appear as a leak at
the rear
of the transmission. In determining the source of an leak, the following two checks should be
made:
1. With the engine running, check for external line pressure leaks.
2. With the engine off, check for oil leaks due to the raised oil level caused by drainback of converter oil
into the transmission.
Overfill condition
Two possible causes of fluid
leaks
Sealing
malfunction
Check at POSSIBLE CAUSES OF FLUID LEAKS DUE TO SEALING
MALFUNCTION (See nex~
Page 913 of 1928
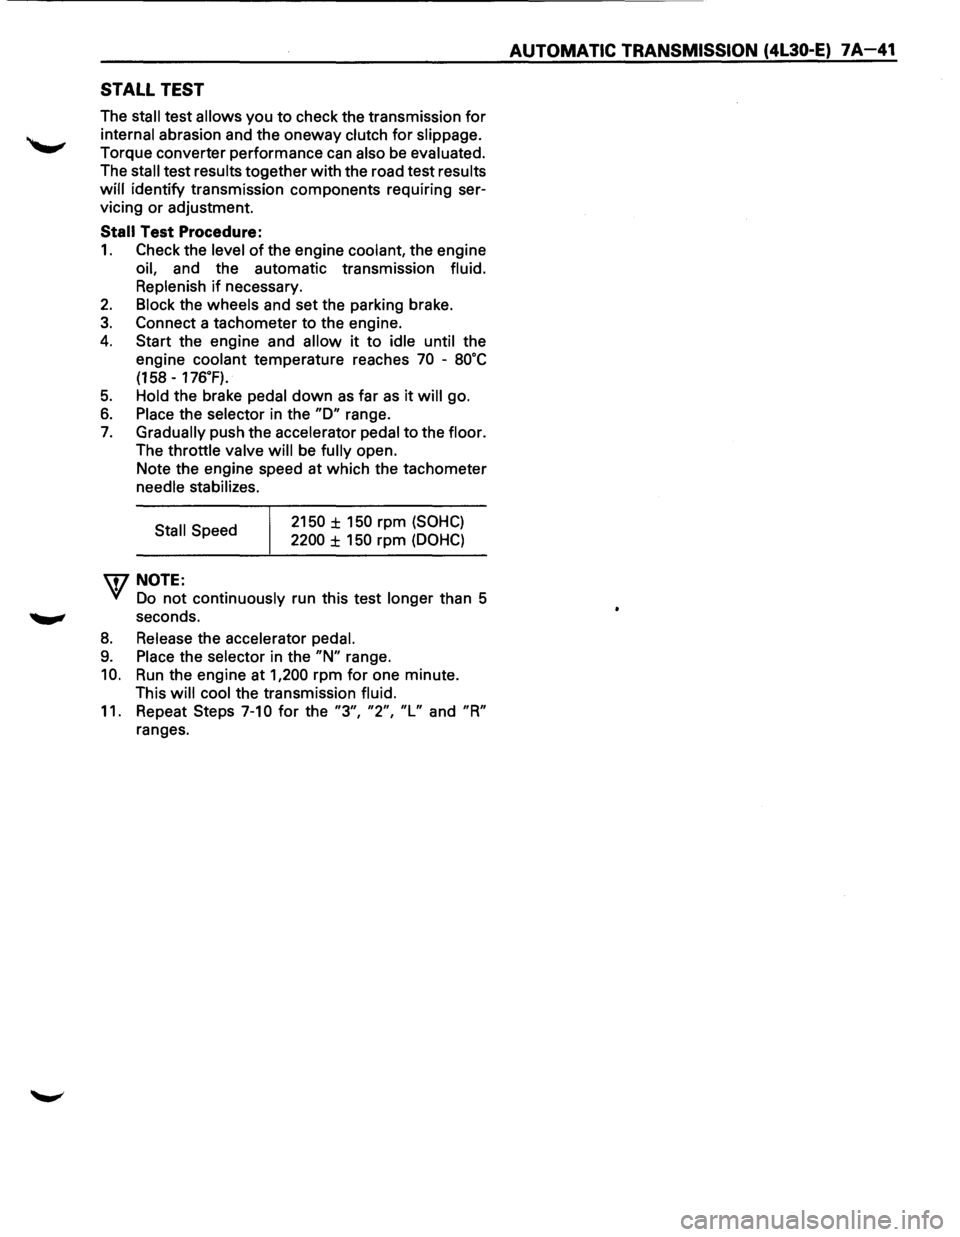
STALL TEST
The stall test allows you to check the transmission for
internal abrasion and the oneway clutch for slippage.
Torque converter performance can also be evaluated.
The
stall test results together with the road test results
will identify transmission components requiring ser
vicing or adjustment.
Stall Test Procedure:
1. Check the level of the engine coolant, the engine
oil, and the automatic transmission fluid.
Replenish
if necessary.
2. Block the wheels and set the parking brake.
3. Connect a tachometer to the engine.
4. Start the engine and allow it to idle until the
engine coolant temperature reaches
70 -8o·c
(158 -176.F).
5. Hold the brake pedal down as far as it will go.
6. Place the selector in the "D" range.
7. Gradually push the accelerator pedal to the floor.
The throttle valve
will be fully open.
Note the engine speed at which the tachometer
needle stabilizes.
Stall Speed
\fl NOTE:
2150 ± 150 rpm (SOHC)
2200 ± 150 rpm (DOHC)
VI Do not continuously run this test longer than 5
........, seconds.
8. Release the accelerator pedal.
9. Place the selector in the "N" range.
10. Run the engine at 1,200 rpm for one minute.
This
will cool the transmission fluid.
11. Repeat Steps 7-10 for the "3", "2", "L" and "R"
ranges.
AUTOMATIC TRANSMISSION (4L30-E) 7A-41