check engine ISUZU TROOPER 1995 Workshop Manual
[x] Cancel search | Manufacturer: ISUZU, Model Year: 1995, Model line: TROOPER, Model: ISUZU TROOPER 1995Pages: 1928
Page 828 of 1928
6E2-132 DRIVEABILITV AND EMISSIONS
CHART C-20
INDUCTION AIR CONTROL PLATE SYSTEM CHECK
(DOHC ONLY)
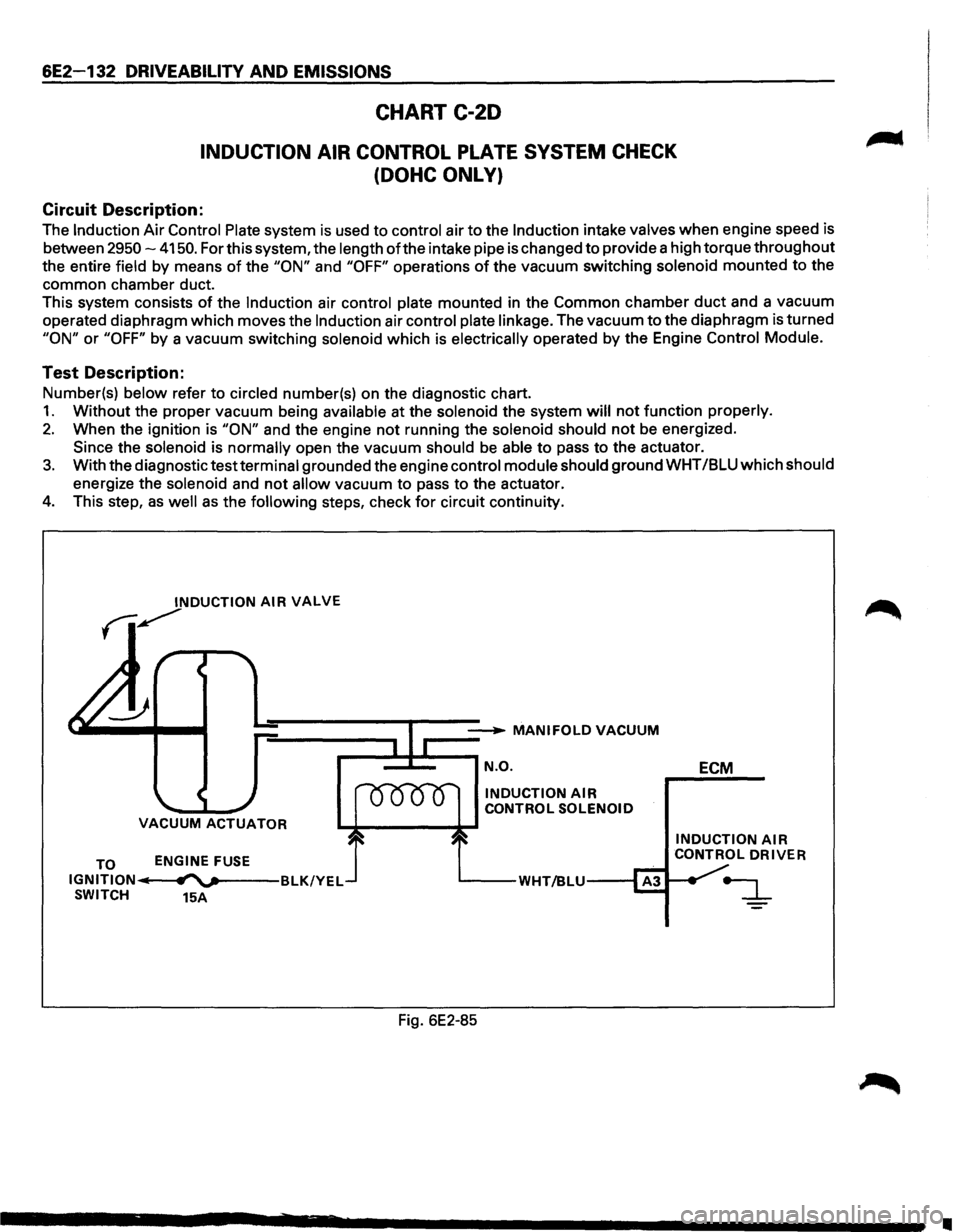
Circuit Description:
The Induction Air Control Plate system is used to control air to the Induction intake valves when engine speed is
between
2950-4150. For this system, the length of the intake pipe is changed to provide a high torque throughout
the entire field by means
of the "ON" and "OFF" operations of the vacuum switching solenoid mounted to the
common chamber duct.
This system consists
of the Induction air control plate mounted in the Common chamber duct and a vacuum
operated diaphragm which moves the
Induction air control plate linkage. The vacuum to the diaphragm is turned
"ON" or "OFF" by a vacuum switching solenoid which is electrically operated by the Engine Control Module.
Test Description:
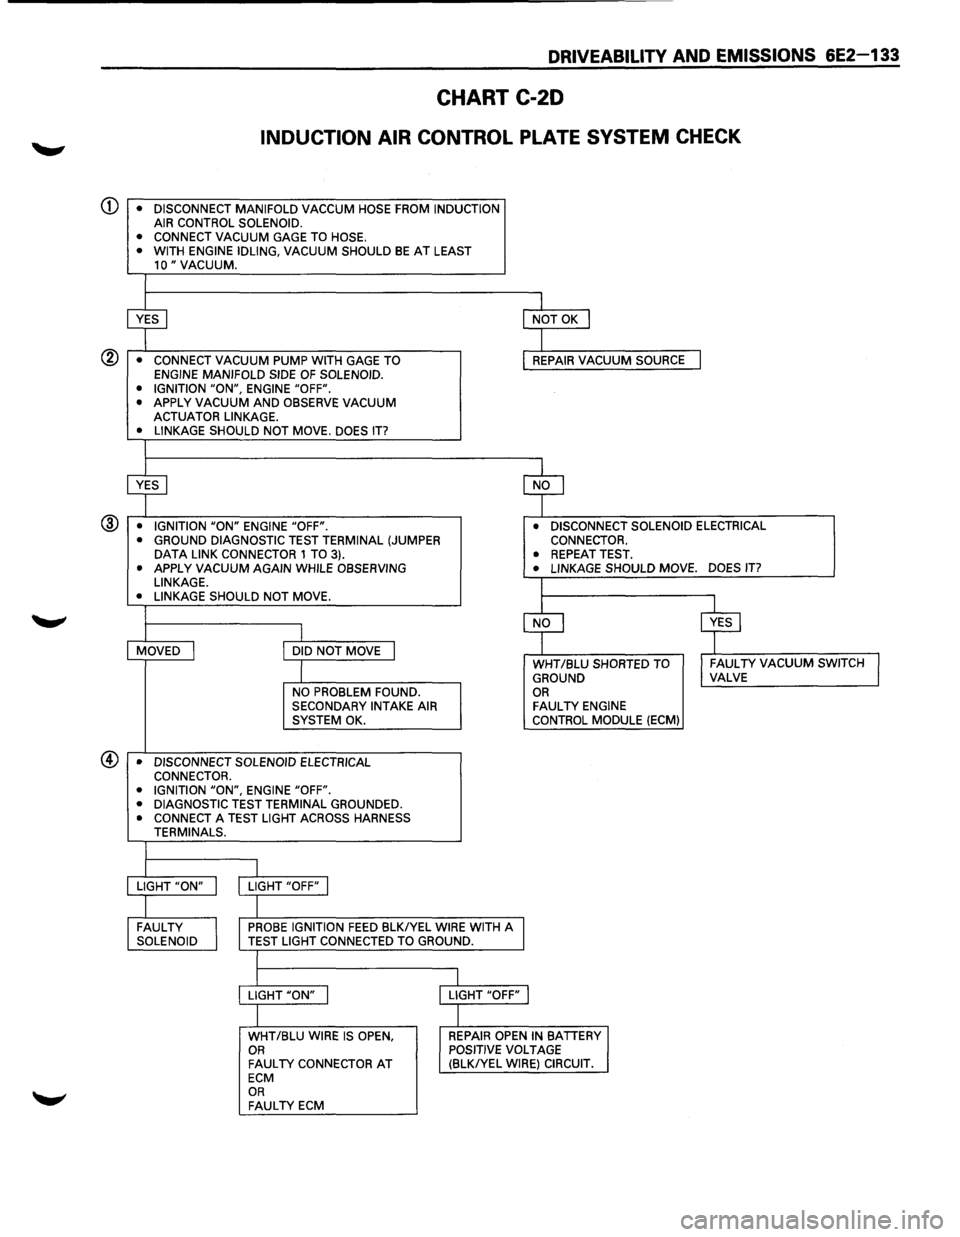
Number(s) below refer to circled number(s) on the diagnostic chart.
1. Without the proper vacuum being available at the solenoid the system will not function properly.
2. When the ignition is "ON" and the engine not running the solenoid should not be energized.
Since the solenoid is normally open the vacuum should
be able to pass to the actuator.
3. With the diagnostic test terminal grounded the engine control module should ground WHT /BLU which should
energize the solenoid and
not allow vacuum to pass to the actuator.
4. This step, as well as the following steps, check for circuit continuity.
INDUCTION AIR VALVE
fi~
__ __...._ MANIFOLDVACUUM
r-=~=-~ N.O.
VACUUM ACTUATOR
TO IGNITION IIi SWITCH ENGINE
FUSE
fl""'v---BLK/YEL
15A
INDUCTION AIR CONTROL
SOLENOID
'----WHT/BLU---1
Fig. 6E2-85 ECM
INDUCTION AIR CONTROL DRIVER
•
Page 829 of 1928
DRIVEABILITV AND EMISSIONS 6E2-133
CHART C-20
INDUCTION AIR CONTROL PLATE SYSTEM CHECK
• CONNECT VACUUM
GAGE TO HOSE.
• WITH ENGINE IDLING, VACUUM SHOULD BE AT LEAST 10" VACUUM.
~
I NOT OK I
I • CONNECT VACUUM PUMP WITH GAGE TO REPAIR VACUUM SOURCE I ENGINE MANIFOLD SIDE OF SOLENOID.
• IGNITION "ON", ENGINE "OFF".
• APPLY VACUUM AND OBSERVE VACUUM ACTUATOR LINKAGE.
• LINKAGE SHOULD NOT MOVE. DOES IT?
~ ~ • IGNITION "ON" ENGINE "OFF". • DISCONNECT SOLENOID ELECTRICAL ® • GROUND DIAGNOSTIC TEST TERMINAL (JUMPER CONNECTOR. DATA LINK CONNECTOR 1 TO 3). • REPEAT TEST. • APPLY VACUUM AGAIN WHILE OBSERVING • LINKAGE SHOULD MOVE. DOES IT?
LINKAGE.
L • LINKAGE SHOULD NOT MOVE.
~ ~ I MOVED I DID NOT MOVE I
I WHT /BLU SHORTED TO I FAULTY VACUUM SWITCH I GROUND VALVE
NO PROBLEM FOUND. OR SECONDARY INTAKE AIR FAUL TV ENGINE SYSTEM OK. CONTROL
MODULE (ECM)
• DISCONNECT SOLENOID ELECTRICAL
CONNECTOR.
• IGNITION
"ON", ENGINE "OFF".
• DIAGNOSTIC TEST TERMINAL GROUNDED. • CONNECT A TEST LIGHT ACROSS HARNESS
TERMINALS.
I LIGHT "ON" I LIGHT "OFF" I
I FAULTY
I
PROBE IGNITION FEED BLKIYEL WIRE WITH A SOLENOID TEST LIGHT CONNECTED TO GROUND.
I
l
LIGHT "ON" I LIGHT "OFF" j
I WHT/BLU WIRE IS OPEN, REPAIR OPEN IN BATTERY OR POSITIVE VOLTAGE FAUL TV CONNECTOR AT (BLKIYEL WIRE) CIRCUIT. ECM OR FAULTY ECM
Page 830 of 1928
6E2-134 DRIVEABILITV AND EMISSIONS
SECTION C-3
EVAPORATIVE EMISSION (EVAP) CONTROL SYSTEM
(ELECTRONICALL V CONTROLLED)
CONTENTS
General Description ...................... 6E2-134
Purpose ............................ 6E2-134
Vapor Canister ........................ 6E2-134
Evaporative Emission (EVAP) Control System .. 6E2-134 Results of Incorrect Operation ............. 6E2-135
Diagnosis ............................. 6E2-135
Visual Check of Canister ................. 6E2-135
On-Vehicle service . . . . . . . . . . . . . . . . . . . . . . 6E2-135
Fuel Vapor Canister . . . . . . . . . . . . . . . . . . . . 6E2-135
Canister Hoses . . . . . . . . . . . . . . . . . . . . . . . 6E2-135
Chart C-3 Evaporate Emission Canister
Purge Valve . . . . . . . . . . . . . . . . . . . . . . . . . 6E2-136
GENERAL DESCRIPTION
PURPOSE
The basic Evaporative Emission (EVAP) Control
System used on
all vehicles is the charcoal canister
storage method. This method transfers fuel
vapor
from the fuel tank to an activated carbon (charcoal)
storage device (canister)
to hold the vapors when the
vehicle
is not operating. When the engine is running,
the fuel
vapor is purged from the carbon element by
intake air flow and consumed in the normal
combustion process.
VAPOR CANISTER
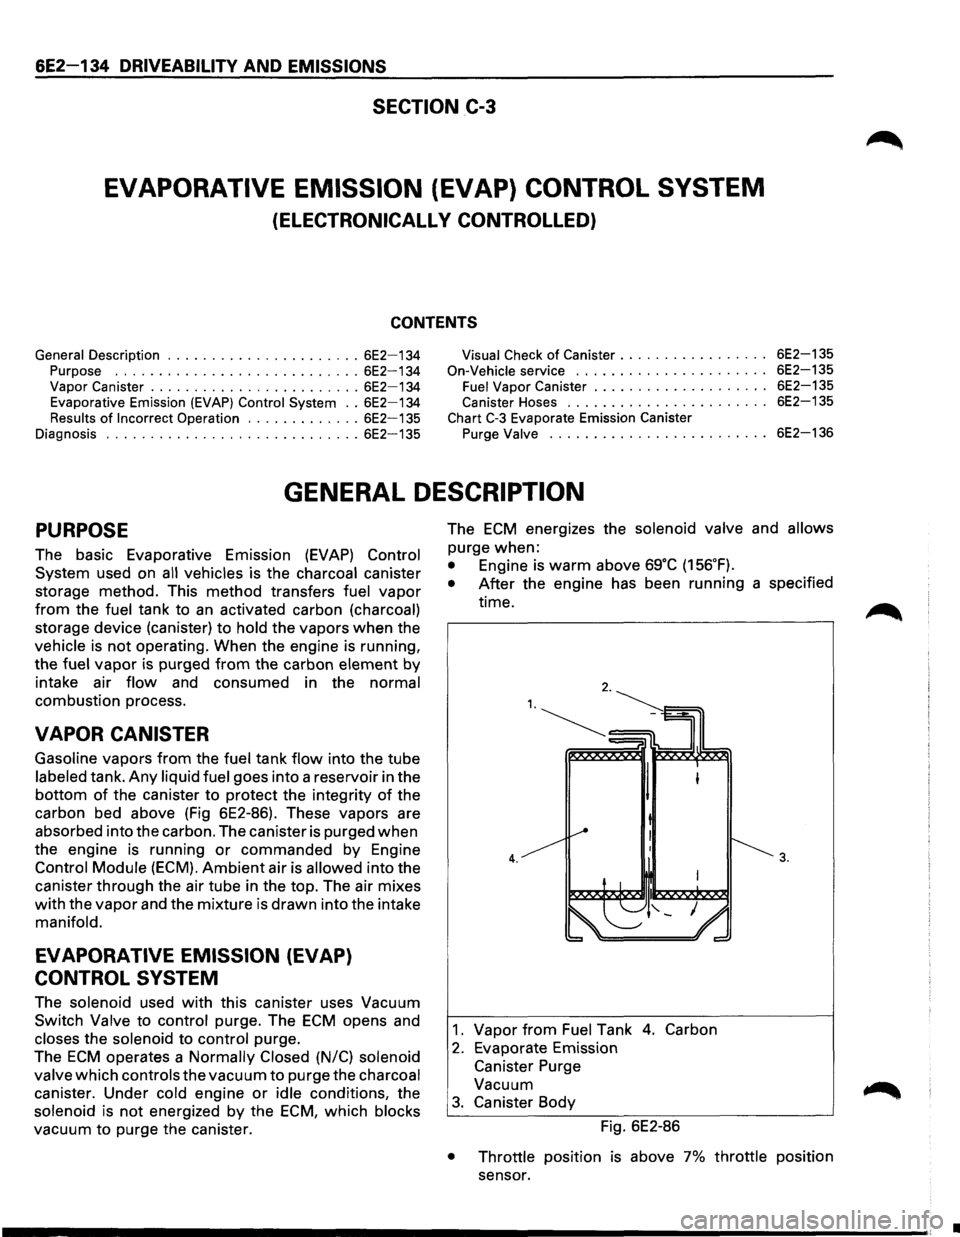
Gasoline vapors from the fuel tank flow into the tube
labeled tank.
Any liquid fuel goes into a reservoir in the
bottom of the canister to protect the integrity of the
carbon bed above (Fig 6E2-86). These vapors are
absorbed into the carbon. The canister is purged
when
the engine is running or commanded by Engine
Control Module (ECM).
Ambient air is allowed into the
canister through the air tube in the top. The air mixes
with the vapor and the mixture is drawn into the intake
manifold.
EVAPORATIVE EMISSION (EVAP)
CONTROL SYSTEM
The solenoid used with this canister uses Vacuum
Switch Valve to control purge. The ECM opens and
closes the solenoid to control purge.
The
ECM operates a Normally Closed (N/C) solenoid
valve
which controls the vacuum to purge the charcoal
canister. Under cold engine
or idle conditions, the
solenoid is
not energized by the ECM, which blocks
vacuum
to purge the canister. The
ECM energizes
the solenoid valve and allows
purge when:
• Engine is warm above sg·c (156.F).
• After the engine has been running a specified
time.
4.
1. Vapor from Fuel Tank 4. Carbon
2. Evaporate Emission
Canister Purge
Vacuum
3. Canister Body
Fig. 6E2-86
3.
• Throttle position is above 7% throttle position
sensor.
•
Page 832 of 1928
6E2-136 DRIVEABILITY AND EMISSIONS
CHART C-3
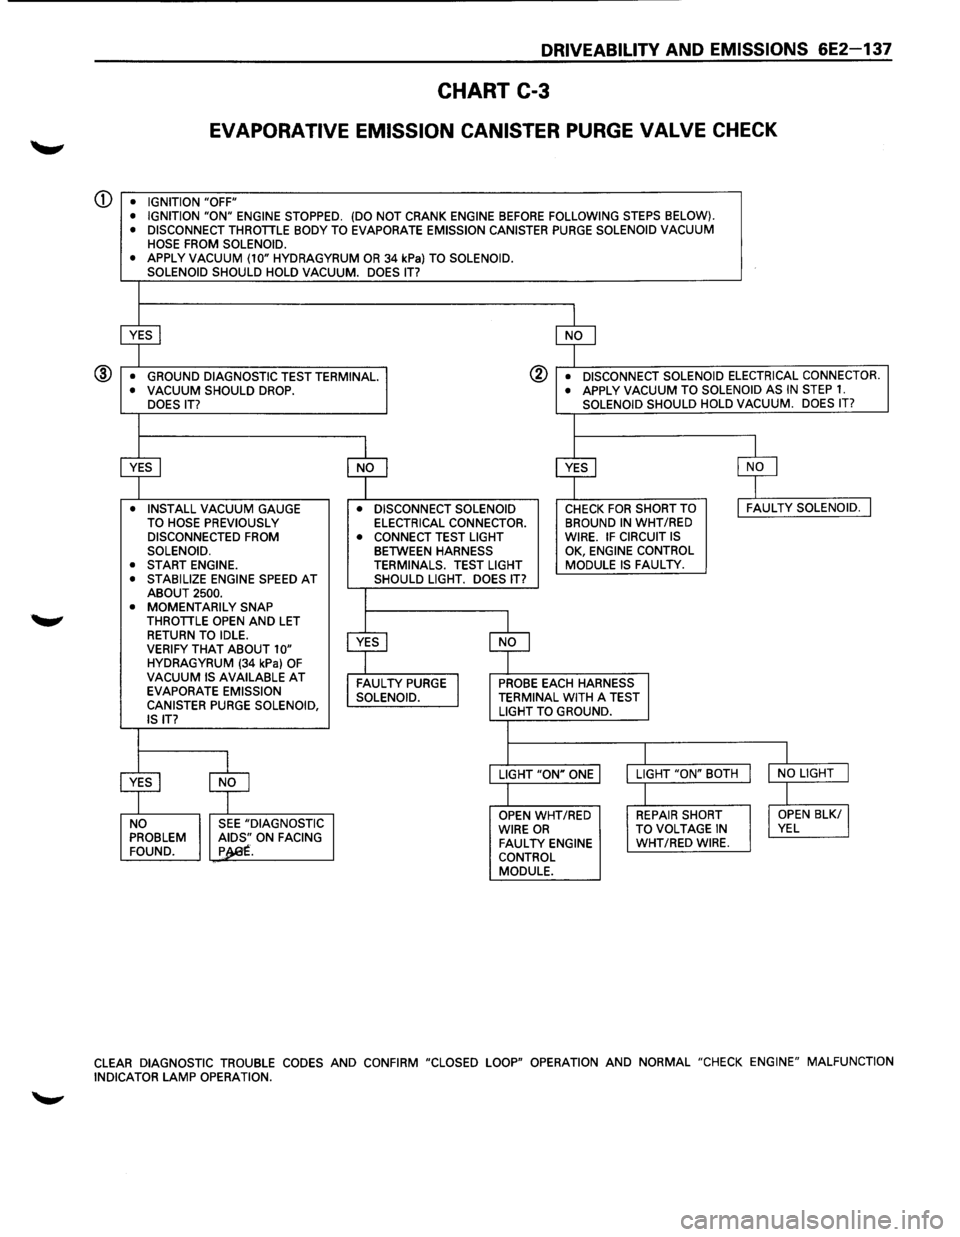
EVAPORATIVE EMISSION CANISTER PURGE VALVE CHECK
Circuit Description:
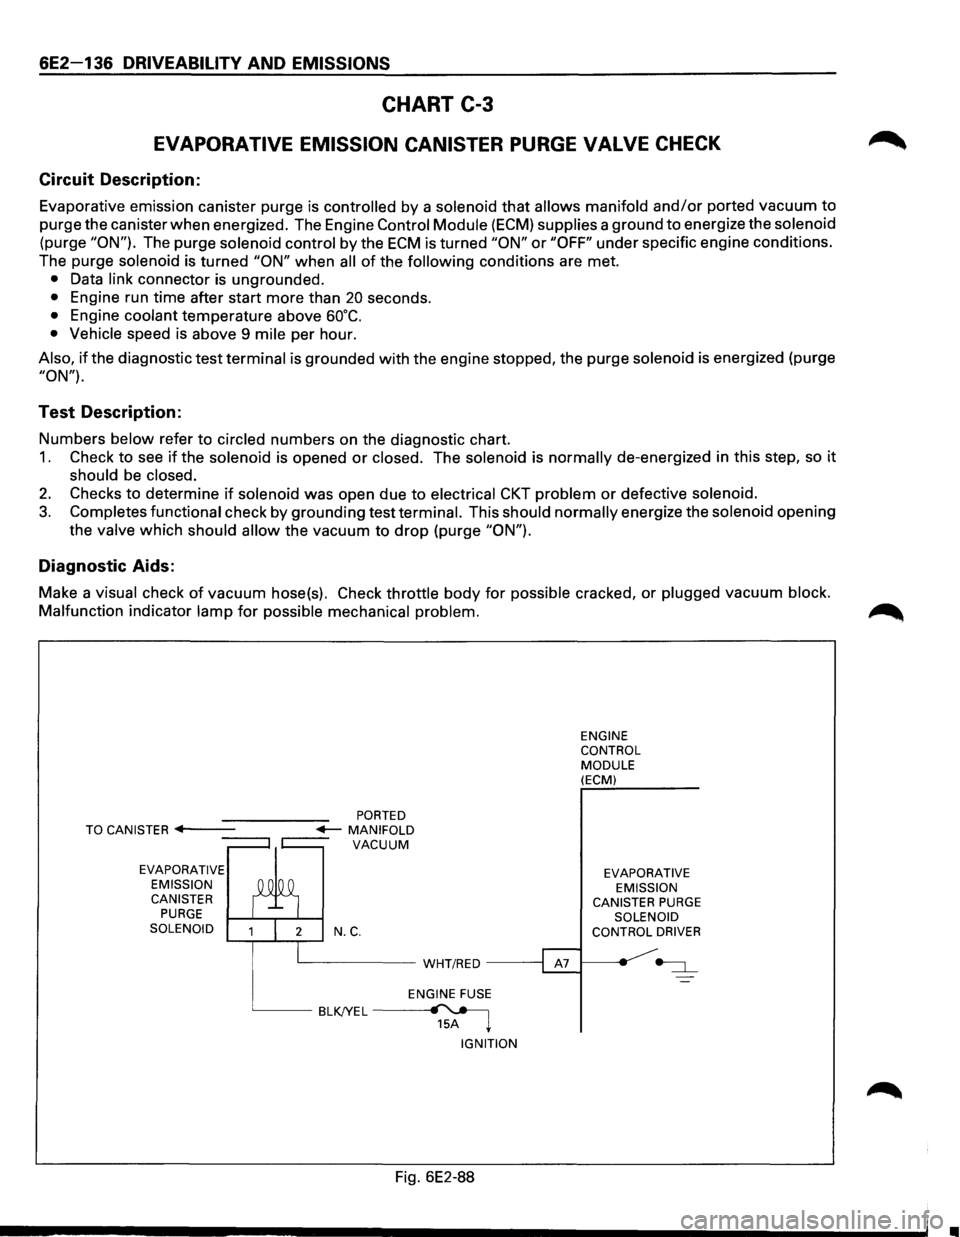
Evaporative emission canister purge is controlled by a solenoid that allows manifold and/or ported vacuum to
purge the canister when energized. The Engine Control Module (ECM) supplies a ground to energize the solenoid
(purge "ON"). The purge solenoid control by the ECM is turned "ON" or "OFF" under specific engine conditions.
The purge
solenoid is turned "ON" when all of the following conditions are met.
• Data link connector is ungrounded.
• Engine run time after start more than 20 seconds.
• Engine coolant temperature above 60°C.
• Vehicle speed is above 9 mile per hour.
Also, if the diagnostic test terminal is grounded with the engine stopped, the purge solenoid is energized (purge
"ON").
Test Description:
Numbers below refer to circled numbers on the diagnostic chart.
1. Check to see if the solenoid is opened or closed. The solenoid is normally de-energized in this step, so it
should be closed.
2. Checks to determine if solenoid was open due to electrical CKT problem or defective solenoid.
3. Completes functional check by grounding test terminal. This should normally energize the solenoid opening
the
valve which should allow the vacuum to drop (purge "ON").
Diagnostic Aids:
Make a visual check of vacuum hose(s). Check throttle body for possible cracked, or plugged vacuum block.
Malfunction
indicator lamp for possible mechanical problem.
EVAPORATIVE
EMISSION CANISTER
PURGE SOLENOID N.C.
L__ _____ WHT/RED -----;
ENGINE FUSE
BLKJYEL~ 15A ~
IGNITION
Fig. 6E2-88
ENGINE
CONTROL
MODULE (ECM)
EVAPORATIVE EMISSION
CANISTER
PURGE SOLENOID
CONTROL DRIVER
•
Page 833 of 1928
DRIVEABILITV AND EMISSIONS 6E2-137
CHART C-3
EVAPORATIVE EMISSION CANISTER PURGE VALVE CHECK
Q) • IGNITION "OFF"
• IGNITION "ON" ENGINE STOPPED. (DO NOT CRANK ENGINE BEFORE FOLLOWING STEPS BELOW).
• DISCONNECT THROTTLE BODY TO EVAPORATE EMISSION CANISTER PURGE SOLENOID VACUUM
HOSE FROM SOLENOID.
•
APPLY VACUUM (10" HYDRAGYRUM OR 34 kPa) TO SOLENOID.
SOLENOID SHOULD HOLD VACUUM. DOES IT?
~ $
• GROUND DIAGNOSTIC TEST TERMINAL. @ • DISCONNECT SOLENOID ELECTRICAL CONNECTOR. ® • VACUUM SHOULD DROP. • APPLY VACUUM TO
SOLENOID AS IN STEP 1. DOES IT? SOLENOID
SHOULD HOLD VACUUM. DOES IT?
I
$ $ $ $
• INSTALL VACUUM GAUGE • DISCONNECT SOLENOID CHECK FOR SHORT TO I FAULTY SOLENOID. J TO HOSE PREVIOUSLY ELECTRICAL CONNECTOR. BROUND IN WHT
/RED DISCONNECTED FROM
• CONNECT TEST LIGHT WIRE. IF CIRCUIT IS SOLENOID. BETWEEN HARNESS
OK,
ENGINE CONTROL
• START ENGINE. TERMINALS. TEST LIGHT MODULE IS FAULTY. •
STABILIZE ENGINE SPEED AT SHOULD LIGHT. DOES IT?
ABOUT 2500.
• MOMENTARILY SNAP
THROTTLE OPEN AND LET
$
RETURN TO IDLE.
~
VERIFY THAT ABOUT 10" HYDRAGYRUM (34 kPa) OF VACUUM IS AVAILABLE AT FAULTY PURGE I PROBE EACH HARNESS
EVAPORATE EMISSION
SOLENOID. TERMINAL WITH A TEST
CANISTER PURGE SOLENOID, LIGHT TO GROUND.
IS IT?
I I
$
$
LIGHT "ON" ONE LIGHT
"ON" BOTH I NO LIGHT J
I I
OPEN WHT/RED REPAIR SHORT I OPEN BLK/ I NO SEE "DIAGNOSTIC
WIRE OR TO VOLTAGE IN VEL PROBLEM ~~.ON FACING FAULTY ENGINE WHT/RED WIRE.
FOUND. p . CONTROL
MODULE.
CLEAR DIAGNOSTIC TROUBLE CODES AND CONFIRM "CLOSED LOOP" OPERATION AND NORMAL "CHECK ENGINE" MALFUNCTION
INDICATOR LAMP OPERATION.
Page 835 of 1928
RESULTS OF INCORRECT OPERATION
An open or ground in the Ignition Control (I C) or bypass
circuits
will set a Diagnostic Trouble Code (DTC) 42 and
cause the engine
to run on the Ignition Control Module
(ICM)
timing.
The Engine
Control Module (ECM) uses information
from the Intake Air Temperature (IAT) and engine
coolant sensors in addition to revolution per minute
(rpm) to
calculate spark advance as follows:
• Cold
engine -more spark advance.
• Engine under minimum load based on rpm and
low amount of air flow = more spark advance.
• Hot engine = less spark advance.
• Engine under heavy load based on rpm and high
air
flow = less spark advance.
HOW DIAGNOSTIC TROUBLE CODE (DTC)
42 IS DETERMINED
When the system is running on the ICM, that is, no
voltage on the bypass line, the ICM grounds (GND) the
IC signal. The ECM expects to see no voltage on the IC
line during this condition.lf it sees a voltage, it sets DTC
42 and will not go into the IC mode.
DRIVEABILITY AND EMISSIONS 6E2-139
When the rpm for IC is reached (about 400 rpm) the
ECM applies 5 volts to the bypass line and the IC should
no longer be grounded in the ICM so the IC voltage
should
be varying.
An open in the
IC circuit while running, will result in the
engine continuing to run, but in a back-up
ig~it~on
timing mode (module timing) at a calculated t1mmg
value
and the malfunction indicator lamp will not be
"ON".
If
the IC circuit is shorted to GND, the "Check Engine"
malfunction
indicator lamp will be turned "ON", and a
DTC 42 will be set and the engine will operate in
module timing. Either condition may cause poor
performance and reduced
fuel economy.
If the bypass line is open or GND, the ICM will not
switch to IC mode so the IC voltage will be low and DTC
42 will be set.
If the IC line is grounded, the ICM will switch to IC, but
because the line isGNDtherewill be no ICsignai.A DTC
42 will be set.
DIAGNOSIS
If the engine cranks but will not run, CHART A-3 will be
used to determine if the Electronic Ignition (EI) system
is the cause
of the problem or if it is another part of the
fuel injection system.
If DTC 42 is set, that DTC chart should be used for
diagnosis. If no DTC is set and the ignition system is
suspected, use
CHART C4-D ("EI" Misfire) for
diagnosis.
DIAGNOSTIC TROUBLE CODE (DTC) 12
DTC 12 is used during the on-board diagnostic system
check procedure to test the
DTC display ability of the
ECM. This diagnostic trouble code indicates that the
ECM is not receiving the engine speed (REFERENCE)
signal. This occurs with the ignition key "ON" and the
engine not running.
The "reference"
signal also triggers the fuel injection
system.
Without the "reference" signal the engine
cannot run.
ON-VEHICLE SERVICE
ELECTRONIC IGNITION (EI) ASSEMBLY
1••1 REMOVE OR DISCONNECT
1. Negative battery cable
2. "EI" electrical connectors (3)
3. Spark plug wires. (Note wire positions to proper
coils) (6)
4. "EI" assembly to bracket bolts (3)
5. "EI" assembly from Intake Plenum.
1••1 INSTALL OR CONNECT
1. "EI" assembly bracket to Intake Plenum
Tighten bolts to 25 N·m (19 lb·ft)
2. Spark plug wires to correct spark plugs
3. "EI" electrical connectors
4. Negative battery cable
Page 838 of 1928
6E2-142 DRIVEABILITY AND EMISSIONS
CHART C-40-1
ELECTRONIC IGNITION (EI) MISFIRE AT IDLE
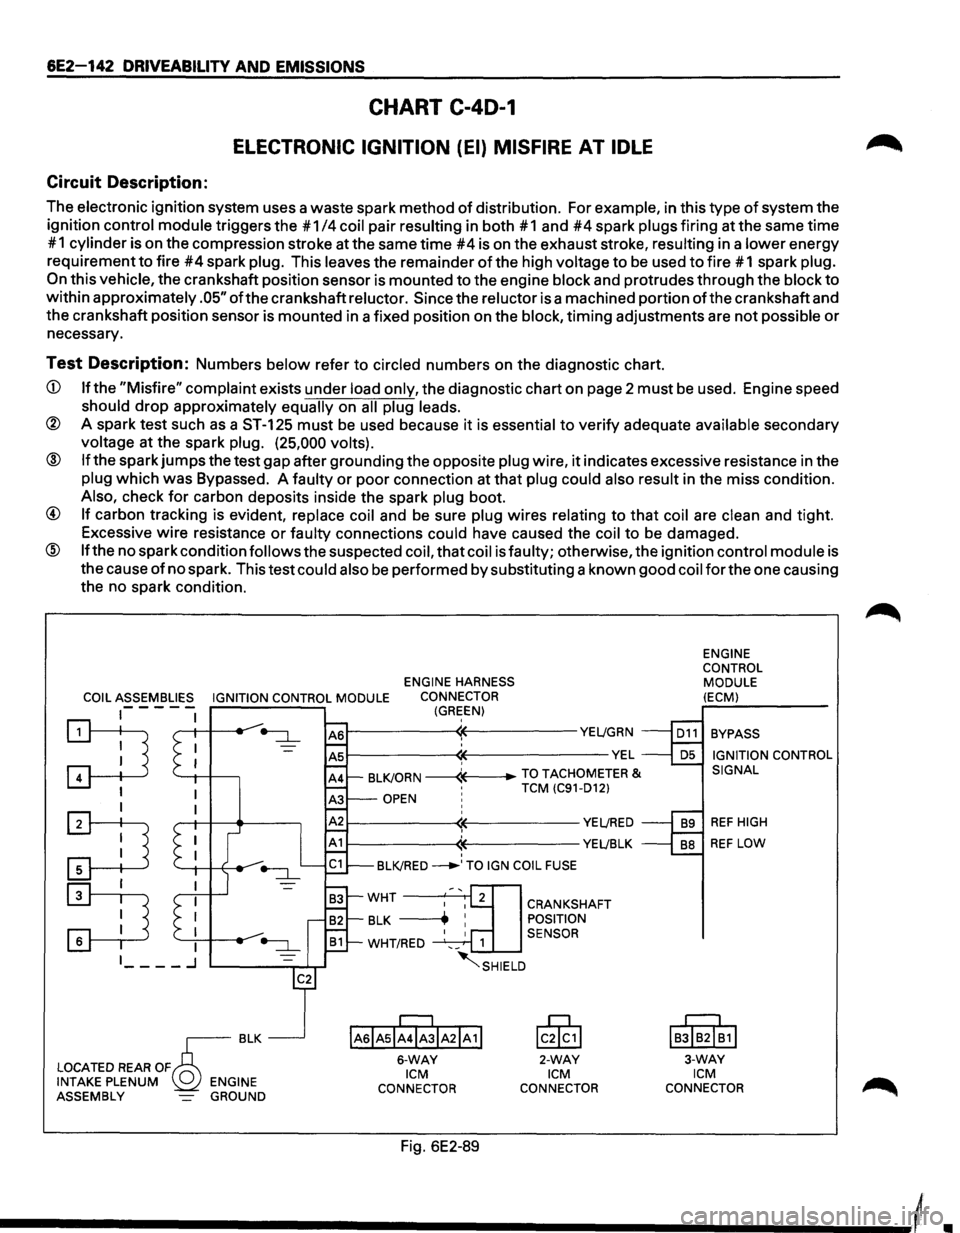
Circuit Description:
The electronic ignition system uses a waste spark method of distribution. For example, in this type of system the
ignition
control module triggers the #1 /4 coil pair resulting in both #1 and #4 spark plugs firing at the same time
# 1
cylinder is on the compression stroke at the same time #4 is on the exhaust stroke, resulting in a lower energy
requirement
to fire #4 spark plug. This leaves the remainder of the high voltage to be used to fire # 1 spark plug.
On this vehicle, the crankshaft position sensor is mounted to the engine block and protrudes through the block to
within approximately .05" ofthe crankshaft reluctor. Since the reluctor is a machined portion ofthe crankshaft and
the crankshaft position sensor is mounted in a fixed position on the
block, timing adjustments are not possible or
necessary.
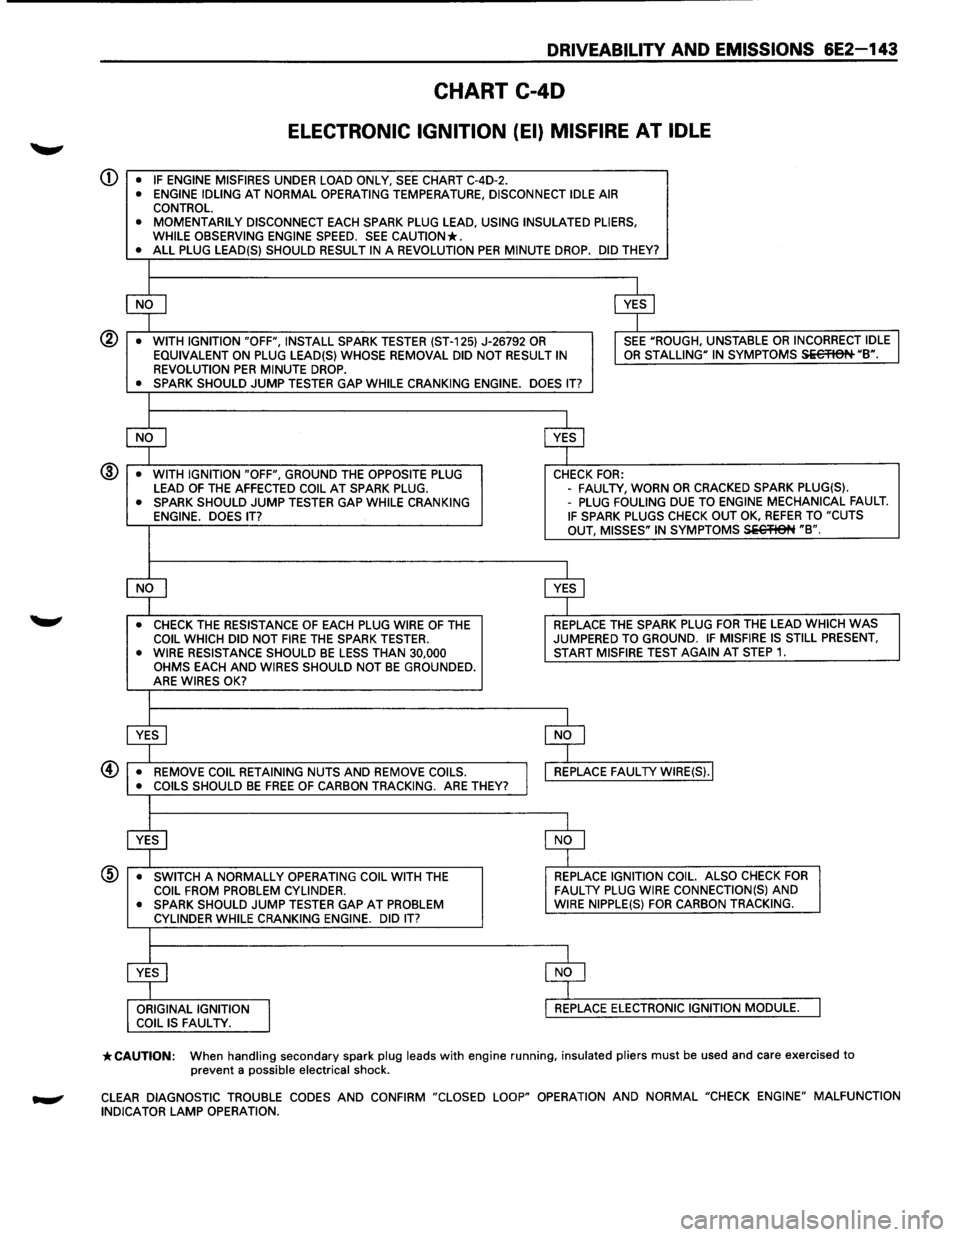
Test Description: Numbers below refer to circled numbers on the diagnostic chart.
CD If the "Misfire" complaint exists under load only, the diagnostic chart on page 2 must be used. Engine speed
should drop approximately equally on all plug leads.
® A spark test such as a ST-125 must be used because it is essential to verify adequate available secondary
voltage at the spark plug. (25,000 volts).
@ If the spark jumps the test gap after grounding the opposite plug wire, it indicates excessive resistance in the
plug which was Bypassed. A faulty or poor connection at that plug could also result in the miss condition.
Also, check for carbon deposits inside the spark plug boot.
@ If carbon tracking is evident, replace coil and be sure plug wires relating to that coil are clean and tight.
Excessive
wire resistance or faulty connections could have caused the coil to be damaged.
@ If the no spark condition follows the suspected coil, that coil is faulty; otherwise, the ignition control module is
the cause
of no spark. This test could also be performed by substituting a known good coil for the one causing
the no spark condition.
ENGINE HARNESS
COIL ASSEMBLIES IGNITION CONTROL MODULE CONNECTOR
1-- - - -(GREEN)
~ '--1-1 -+---,
I
:TI
:D
r---------~~----------YE~GRN
~--------~~-------------VEL ' BLKJORN -----4---+-TO TACHOMETER & •
TCM (C91-D12) OPEN ! ' r---------~~----------YE~RED
r-----------<1~----------YEL!BLK ' BLKJRED ___..,TO IGN COIL FUSE
IAsiAsl;rJIA21A 1!
6-WAY ICM
CONNECTOR
Fig. 6E2-89
CRANKSHAFT
POSITION
SENSOR
lc0§,1
2-WAY ICM
CONNECTOR ENGINE
CONTROL
MODULE
(ECM)
BYPASS IGNITION CONTROL
SIGNAL
REF HIGH
REF LOW
IB!IB2I~1I
3-WAY ICM CONNECTOR
Page 839 of 1928
DRIVEABILITV AND EMISSIONS 6E2-143
CHART C-40
ELECTRONIC IGNITION (EI) MISFIRE AT IDLE
CD • IF ENGINE MISFIRES UNDER LOAD ONLY, SEE CHART C-4D-2. • ENGINE IDLING AT NORMAL OPERATING TEMPERATURE, DISCONNECT IDLE AIR CONTROL. • MOMENTARILY DISCONNECT EACH SPARK PLUG LEAD, USING INSULATED PLIERS,
WHILE OBSERVING ENGINE SPEED. SEE CAUTION*. • ALL PLUG LEAD(S) SHOULD RESULT IN A REVOLUTION PER MINUTE DROP. DID THEY?
$ $
•
WITH IGNITION "OFF", INSTALL SPARK TESTER (ST-125) J-26792 OR I SEE "ROUGH, UNSTABLE OR INCORRECT IDLE
EQUIVALENT ON PLUG LEAD(S) WHOSE REMOVAL DID NOT RESULT IN OR STALLING" IN SYMPTOMS Si€'FISN "B". REVOLUTION PER MINUTE DROP. • SPARK SHOULD JUMP TESTER GAP WHILE CRANKING ENGINE. DOES IT?
$ $
•
WITH IGNITION "OFF", GROUND THE OPPOSITE PLUG CHECK FOR: @
LEAD OF THE AFFECTED COIL AT SPARK PLUG. -
FAUL TV, WORN OR CRACKED SPARK PLUG(S). • SPARK SHOULD JUMP TESTER GAP WHILE CRANKING -PLUG FOULING DUE TO ENGINE MECHANICAL FAULT. ENGINE. DOES IT? IF SPARK PLUGS CHECK OUT OK, REFER TO "CUTS
OUT, MISSES" IN SYMPTOMS SiC'flet~ "B".
~ $
• CHECK THE RESISTANCE OF EACH PLUG WIRE OF THE REPLACE
THE SPARK PLUG FOR THE LEAD WHICH WAS COIL WHICH DID NOT FIRE THE SPARK TESTER. JUMPERED TO GROUND. IF MISFIRE
IS STILL PRESENT, • WIRE RESISTANCE SHOULD BE LESS THAN 30,000 START MISFIRE TEST AGAIN AT STEP 1. OHMS EACH AND WIRES SHOULD NOT BE GROUNDED.
ARE WIRES OK?
$ $
• REMOVE COIL RETAINING NUTS AND REMOVE COILS.
I
REPLACE FAUL TV WIRE(S).I
• COILS SHOULD BE FREE OF CARBON TRACKING. ARE THEY?
$ $
•
SWITCH A NORMALLY OPERATING COIL WITH THE REPLACE IGNITION
COIL. ALSO CHECK FOR COIL FROM PROBLEM CYLINDER. FAULTY PLUG WIRE CONNECTION(S) AND • SPARK SHOULD JUMP TESTER GAP AT PROBLEM WIRE NIPPLE(S) FOR CARBON TRACKING.
CYLINDER WHILE CRANKING ENGINE. DID IT?
$ $
ORIGINAL IGNITION
I
REPLACE ELECTRONIC IGNITION MODULE. COIL IS FAUL TV.
*CAUTION: When handling secondary spark plug leads with engine running, insulated pliers must be used and care exercised to
prevent a possible electrical shock.
CLEAR DIAGNOSTIC TROUBLE CODES AND CONFIRM "CLOSED LOOP" OPERATION AND NORMAL "CHECK ENGINE" MALFUNCTION
INDICATOR LAMP OPERATION.
Page 840 of 1928
6E2-144 DRIVEABILITY AND EMISSIONS
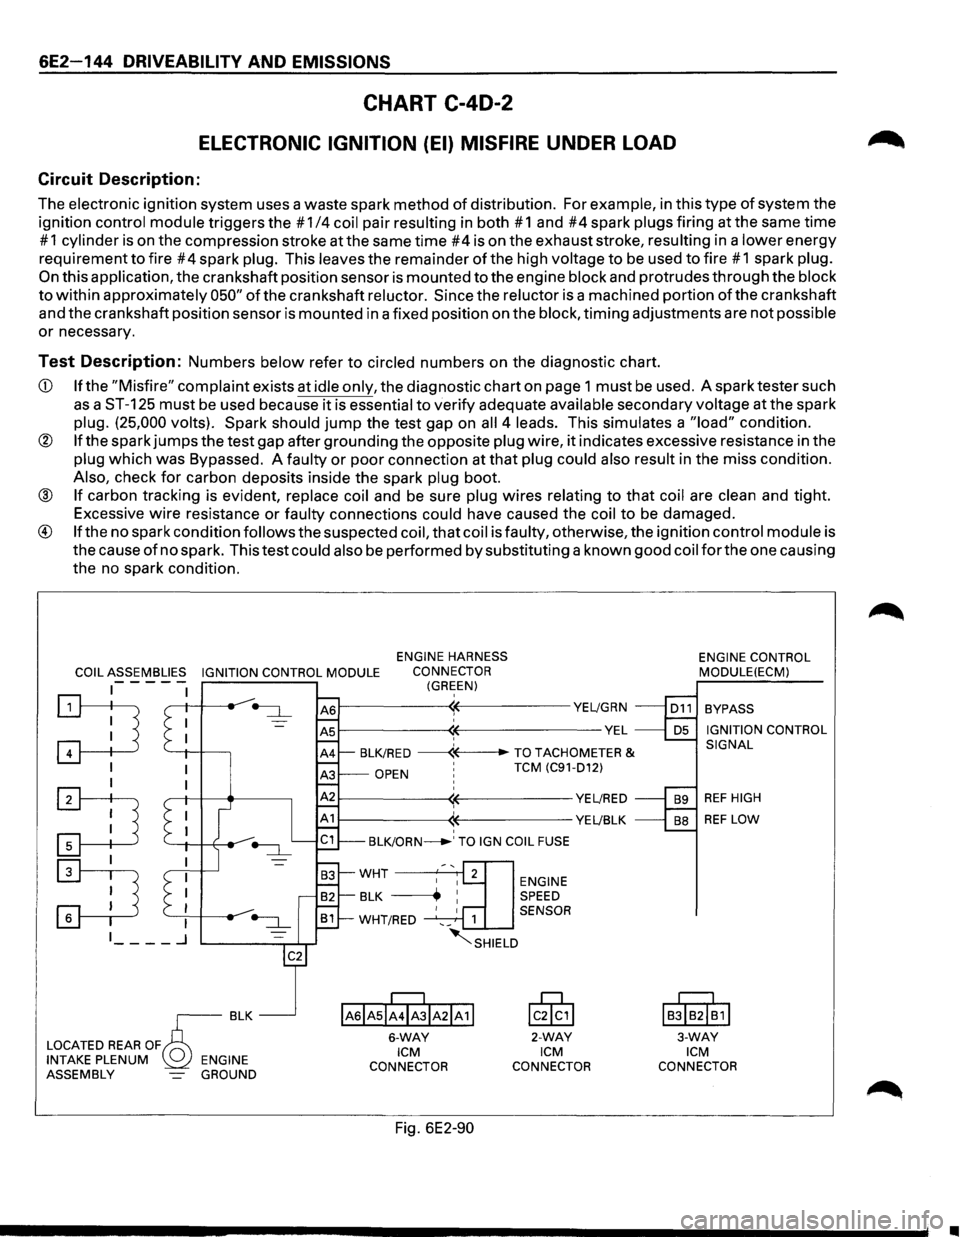
CHART C-40-2
ELECTRONIC IGNITION (EI) MISFIRE UNDER LOAD
Circuit Description:
The electronic ignition system uses a waste spark method of distribution. For example, in this type of system the
ignition
control module triggers the # 1/4 coil pair resulting in both # 1 and #4 spark plugs firing at the same time
# 1 cylinder is on the compression stroke at the same time #4 is on the exhaust stroke, resulting in a lower energy
requirement
to fire #4 spark plug. This leaves the remainder of the high voltage to be used to fire #1 spark plug.
On this application, the crankshaft position sensor is mounted to the engine block and protrudes through the block
to within approximately 050" of the crankshaft reluctor. Since the reluctor is a machined portion of the crankshaft
and the crankshaft position sensor is mounted in a fixed position on the
block, timing adjustments are not possible
or necessary.
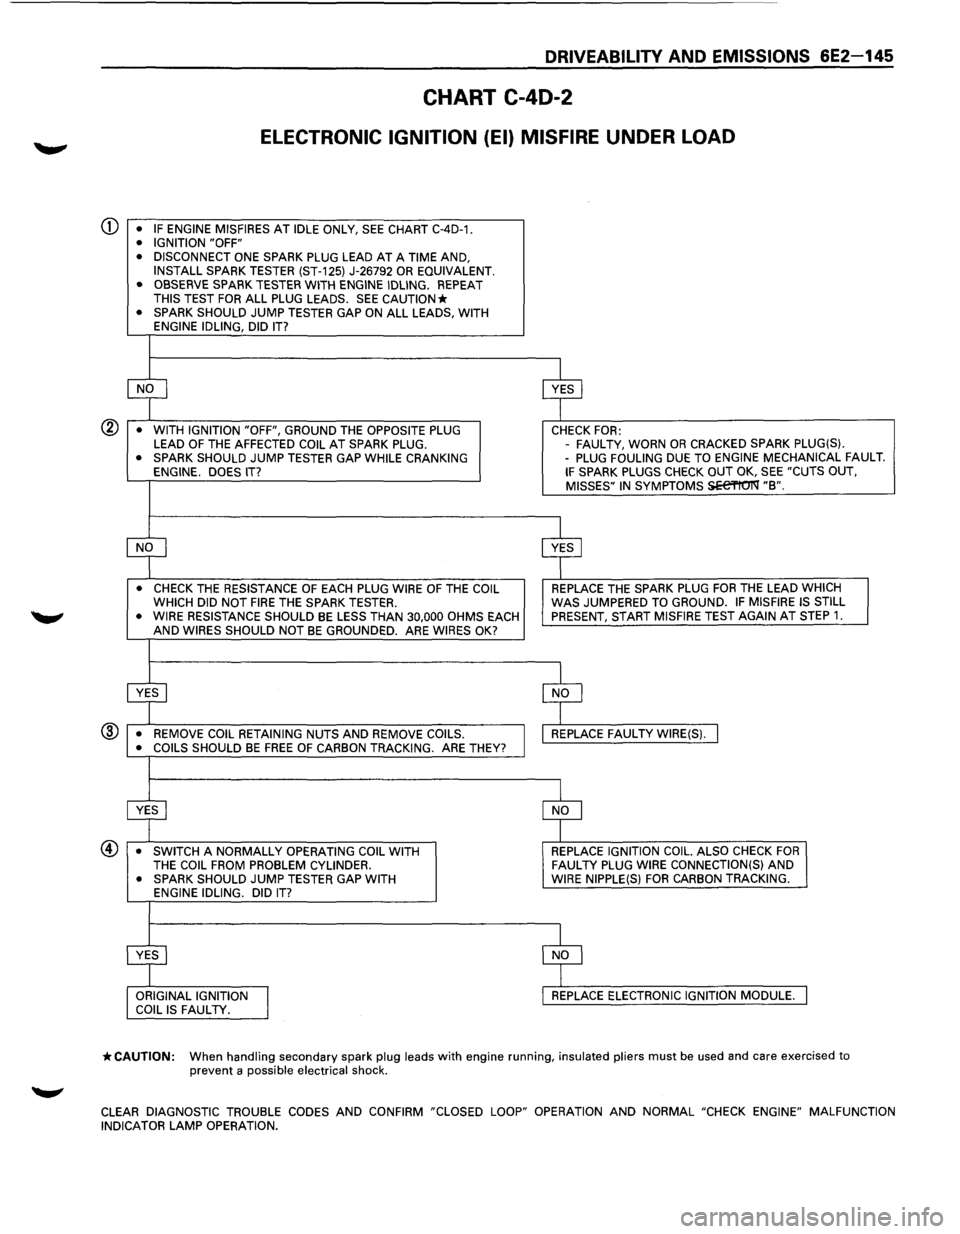
Test Description: Numbers below refer to circled numbers on the diagnostic chart.
CD If the "Misfire" complaint exists at idle only, the diagnostic chart on page 1 must be used. A spark tester such
as a ST-125 must be used because it is essential to verify adequate available secondary voltage at the spark
plug. (25,000 volts). Spark should jump the test gap on all 4 leads. This simulates a "load" condition.
® If the spark jumps the test gap after grounding the opposite plug wire, it indicates excessive resistance in the
plug which was Bypassed. A faulty or poor connection at that plug could also result in the miss condition.
Also, check for carbon deposits inside the spark plug boot.
® If carbon tracking is evident, replace coil and be sure plug wires relating to that coil are clean and tight.
Excessive
wire resistance or faulty connections could have caused the coil to be damaged.
® If the no spark condition follows the suspected coil, that coil is faulty, otherwise, the ignition control module is
the cause
of no spark. This test could also be performed by substituting a known good coil for the one causing
the no spark condition.
COIL ASSEMBLIES IGNITION CONTROL MODULE
ENGINE HARNESS
CONNECTOR
(GREEN) -----
:TI '--+I -l-----,
I
:TI
~
~--------~~-----------YE~GRN
~--------~~--------------VEL ' BLK/RED ------«--TO TACHOMETER &
OPEN ' TCM (C91-D12)
~--------~~-----------YE~RED
1------------((-----------YE~BLK ' BLK/ORN_.' TO IGN COIL FUSE
ENGINE SPEED
1 SENSOR
~SHIELD
IAsiAsii4ibiA21A11
6-WAY ICM
CONNECTOR
Fig. 6E2-90
lcik,l
2-WAY ICM
CONNECTOR ENGINE
CONTROL
MODULE(ECM)
BYPASS
IGNITION CONTROL
SIGNAL
REF HIGH
REF LOW
I
BJIB2I~1I
3-WAY ICM
CONNECTOR
•
Page 841 of 1928
DRIVEABILITV AND EMISSIONS 6E2-145
CHART C-40-2
ELECTRONIC IGNITION (EI) MISFIRE UNDER LOAD
CD • IF ENGINE MISFIRES AT IDLE ONLY, SEE CHART C-4D-1. • IGNITION "OFF"
• DISCONNECT ONE SPARK PLUG LEAD AT A TIME AND,
INSTALL SPARK TESTER (ST-125) J-26792 OR EQUIVALENT.
• OBSERVE SPARK TESTER WITH ENGINE IDLING. REPEAT THIS TEST FOR ALL PLUG LEADS. SEE CAUTION* • SPARK SHOULD JUMP TESTER GAP ON ALL LEADS, WITH
ENGINE IDLING, DID IT?
~ $
• WITH IGNITION "OFF", GROUND THE OPPOSITE PLUG CHECK FOR: LEAD OF THE AFFECTED COIL AT SPARK PLUG. -
FAUL TV, WORN OR CRACKED SPARK PLUG(S). • SPARK SHOULD JUMP TESTER GAP WHILE CRANKING -PLUG FOULING DUE TO ENGINE MECHANICAL FAULT. ENGINE. DOES IT? IF SPARK PLUGS CHECK OUT OK, SEE "CUTS OUT,
MISSES" IN SYMPTOMS SEe'l'tO'I'Q' "B".
~ $
• CHECK THE RESISTANCE OF EACH PLUG WIRE OF THE COIL REPLACE THE SPARK PLUG FOR THE LEAD WHICH
WHICH DID NOT FIRE THE SPARK TESTER. WAS JUMPERED TO GROUND. IF MISFIRE IS STILL
• WIRE RESISTANCE SHOULD BE LESS THAN 30,000 OHMS EACH PRESENT, START MISFIRE TEST AGAIN AT STEP 1. AND WIRES SHOULD NOT BE GROUNDED. ARE WIRES OK?
~ $
• REMOVE COIL RETAINING NUTS AND REMOVE COILS. REPLACE FAUL TV WIRE(S). I ® • COILS SHOULD BE FREE OF CARBON TRACKING. ARE THEY?
$ $
• SWITCH A NORMALLY OPERATING COIL WITH REPLACE IGNITION COIL. ALSO CHECK FOR THE COIL FROM PROBLEM CYLINDER. FAUL TV PLUG WIRE CONNECTION(S) AND • SPARK SHOULD JUMP TESTER GAP WITH WIRE
NIPPLE(S) FOR CARBON TRACKING.
ENGINE IDLING. DID IT?
:r ~ ORIGINAL IGNITION
I
REPLACE ELECTRONIC IGNITION MODULE. COIL IS FAUL TV.
*CAUTION: When handling secondary spark plug leads with engine running, insulated pliers must be used and care exercised to prevent a possible electrical shock.
CLEAR
DIAGNOSTIC TROUBLE CODES AND CONFIRM "CLOSED LOOP" OPERATION AND NORMAL "CHECK ENGINE" MALFUNCTION
INDICATOR LAMP OPERATION.