door lock ISUZU TROOPER 1995 Owner's Guide
[x] Cancel search | Manufacturer: ISUZU, Model Year: 1995, Model line: TROOPER, Model: ISUZU TROOPER 1995Pages: 1928
Page 1351 of 1928
CHASSIS ELECTRICAL 8-161
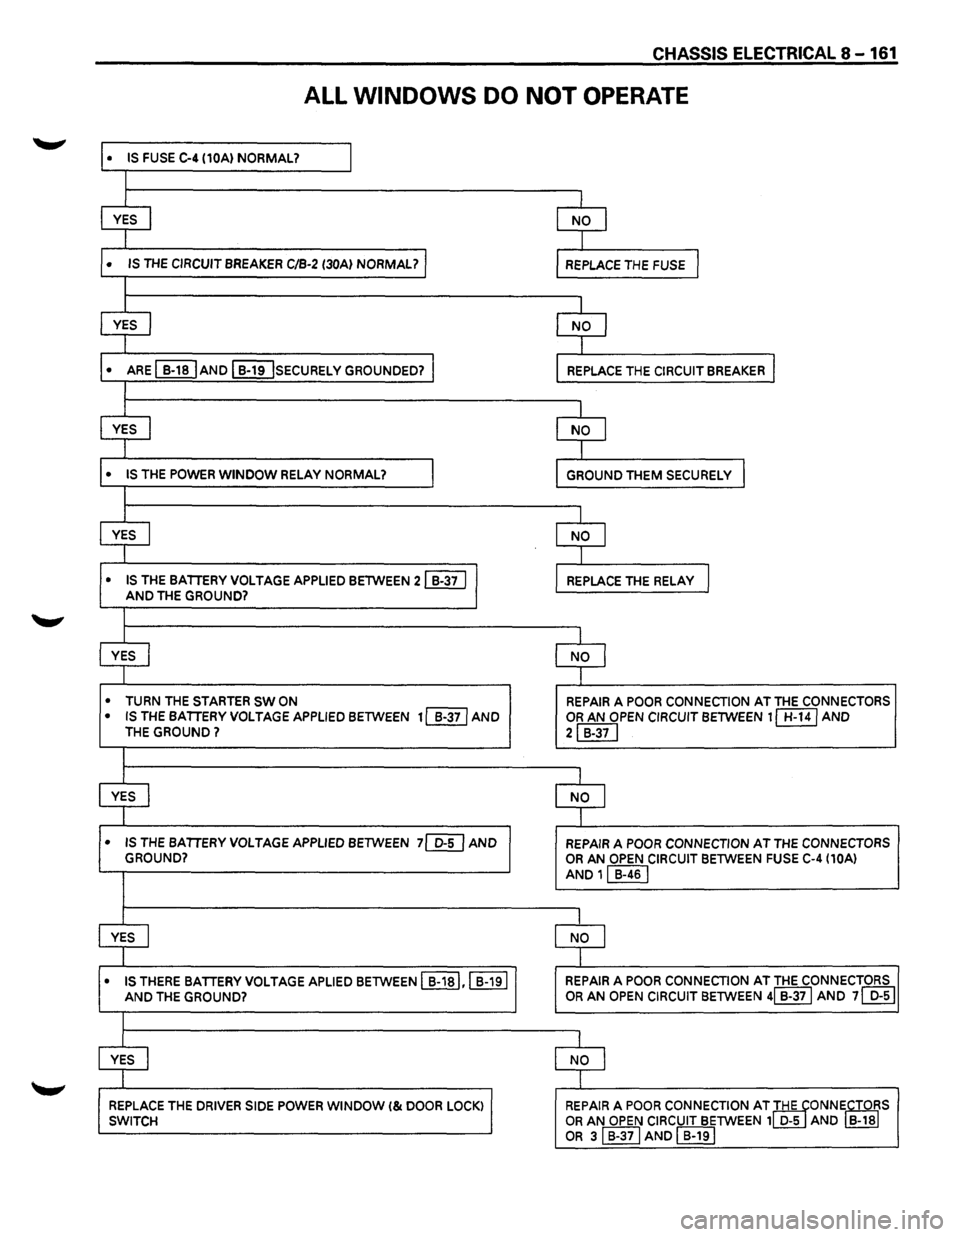
ALL WINDOWS DO NOT OPERATE
• IS FUSE C-4 (10A) NORMAL? I
I
YES I NO I
I
• IS THE CIRCUIT BREAKER C/B-2 (30Al NORMAL? I REPLACE THE FUSE I
I
YES I NO I
I
• ARE ~AND I B-19 !sECURELY GROUNDED? J REPLACE THE CIRCUIT BREAKER I
I
YES I NO I
I
• IS THE POWER WINDOW RELAY NORMAL? I GROUND THEM SECURELY I
I
YES I NO I
I
• IS THE BATTERY VOLTAGE APPLIED BETWEEN 21 B-37 I J REPLACE THE RELAy I AND THE GROUND?
I
YES I NO
I
I
• TURN THE STARTER SW ON REPAIR A POOR CONNECTION AT THE CONNECTORS
• IS THE BATTERY VOLTAGE APPLIED BETWEEN 11 B-371 AND OR AN OPEN CIRCUIT BETWEEN 1 CB:BJ AND THE GROUND? 2IB-37I
I
YES j NO I
I
• IS THE BATTERY VOLTAGE APPLIED BETWEEN 7[@ AND REPAIR A POOR CONNECTION AT THE CONNECTORS
GROUND? OR AN OPEN CIRCUIT BETWEEN FUSE C-4 (10A)
AND 11 B-461
I
YES I NO J
I
• IS THERE
BATTERY VOLTAGE APLIED BETWEEN I B-1sl,l B-191 REPAIR A POOR CONNECTION AT THE CONNECTORS
AND THE GROUND? OR AN OPEN
CIRCUIT BETWEEN 41 B-371 AND 71 D-51
I
YES I NO I
I
REPLACE THE DRIVER SIDE POWER WINDOW I& DOOR LOCK) 1 SWITCH REPAIR A POOR CONNECTION AT IHE TONNiCTOiS OR AN OPEN
CIRCUIT BETWEEN 1 D-5 AND B-18
OR sl B-371 AND I B-191
Page 1352 of 1928
8-162 CHASSIS ELECTRICAL
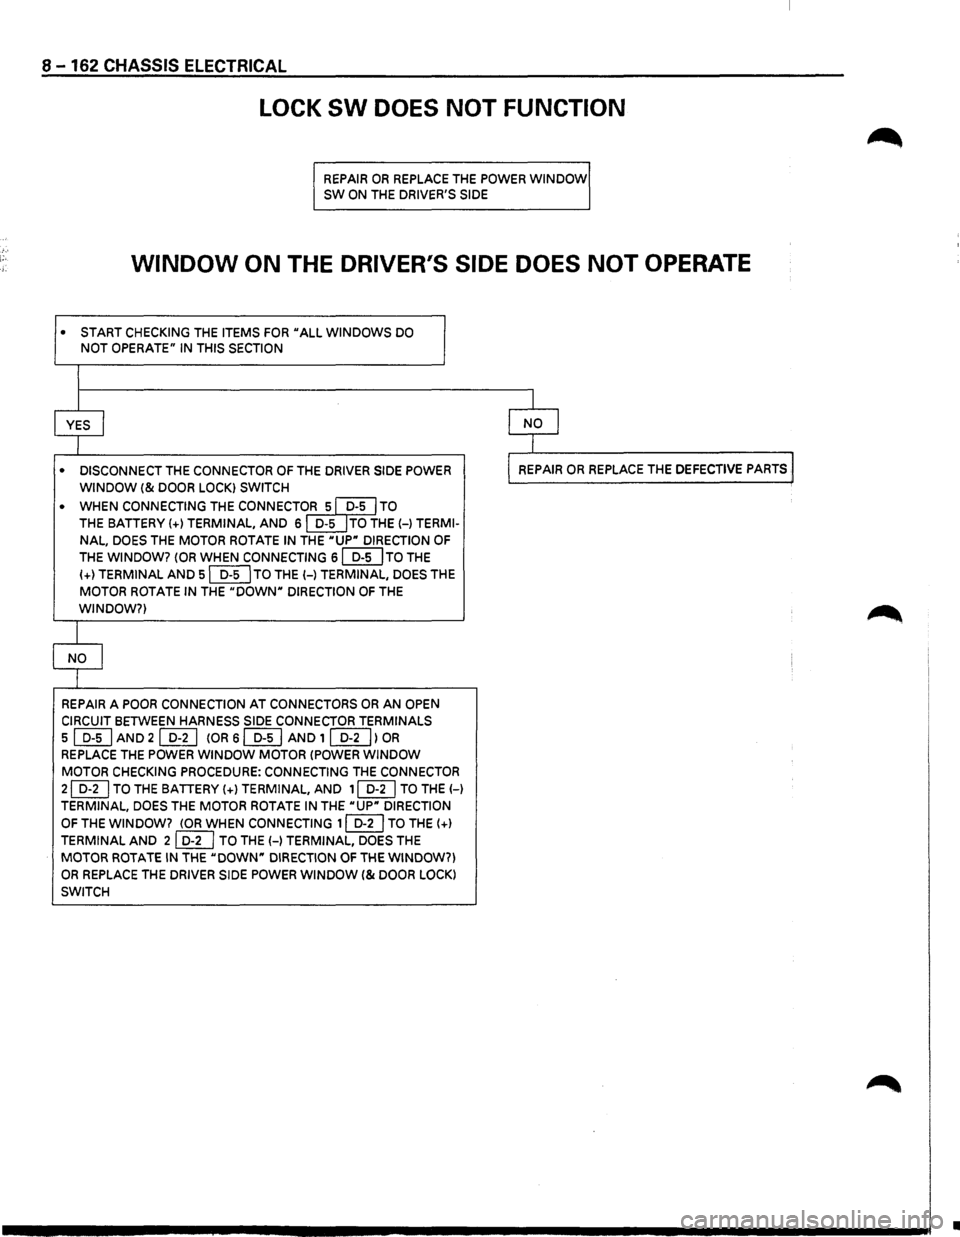
LOCK SW DOES NOT FUNCTION
REPAIR OR REPLACE THE POWER WINDOW SW ON THE DRIVER'S SIDE
WINDOW ON THE DRIVER'S SIDE DOES NOT OPERATE
• START CHECKING THE ITEMS FOR "ALL WINDOWS DO
NOT OPERATE" IN THIS SECTION
YES
I
• DISCONNECT THE CONNECTOR OF THE DRIVER SIDE POWER
WINDOW (&DOOR LOCK) SWITCH
•
WHEN CONNECTING THE CONNECTO~ TO
THE BATTERY(+) TERMINAL, AND 6 ~HE(-) TERMI
NAL, DOES
THE MOTOR ROTATE IN THE "UP" DIRECTION OF
THE WINDOW? (OR WHEN CONNECTING 6 ~TO THE
(+)TERMINAL AND 5 [QTITO THE(-) TERMINAL, DOES THE
MOTOR ROTATE IN THE "DOWW DIRECTION OF THE
WINDOW?)
NO
j
REPAIR A POOR CONNECTION AT CONNECTORS OR AN OPEN
CIRCUIT BETWEEN HARNESS SIDE CONNECTOR TERMINALS
5 [ill AND 2 ~ (OR 6 [QlJ AND 1 [Q}J) OR
REPLACE THE POWER WINDOW MOTOR (POWER WINDOW
MOTOR CHECKING PROCEDURE: CONNECTING THE CONNECTOR
2 (QTI TO THE BATIERY (+)TERMINAL, AND 1 ~TO THE(-)
TERMINAL, DOES THE MOTOR ROTATE IN THE "UP" DIRECTION
OF THE WINDOW? (OR WHEN CONNECTING 1 [[_[]TO THE(+)
TERMINAL AND 2 [ill TO THE(-) TERMINAL, DOES THE
MOTOR ROTATE IN THE "DOWN" DIRECTION OF THE WINDOW?)
OR REPLACE THE DRIVER SIDE POWER WINDOW (&DOOR LOCK)
SWITCH
I
I NO I
I
l REPAIR OR REPLACE THE DEFECTIVE PARTS .I
•
Page 1353 of 1928
CHASSIS ELECTRICAL 8 -163
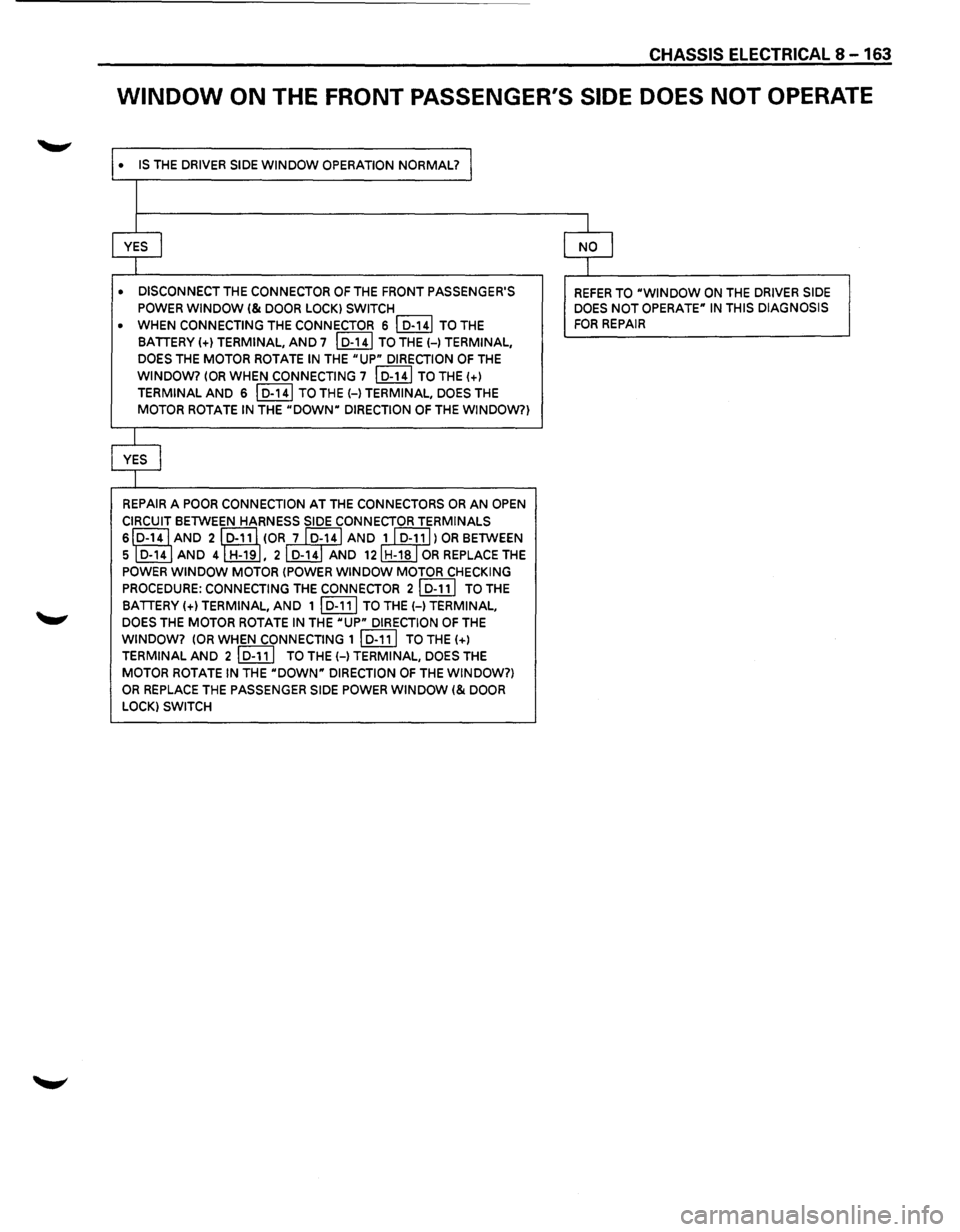
WINDOW ON THE FRONT PASSENGER'S SIDE DOES NOT OPERATE
• IS THE DRIVER SIDE WINDOW OPERATION NORMAL? I
YES I
• DISCONNECT THE CONNECTOR OF THE FRONT PASSENGER'S
POWER WINDOW I& DOOR LOCK) SWITCH
•
WHEN CONNECTING THE CONNECTOR 6 I D-141 TO THE
BATIERY (+)TERMINAL, AND7 I D-141 TO THE H TERMINAL,
DOES
THE MOTOR ROTATE IN THE "UP" DIRECTION OF THE
WINDOW? lOR WHEN CONNECTING 7 I D-141 TO THE(+)
TERMINAL AND 6 I D-141 TO THE(-) TERMINAL, DOES THE
MOTOR ROTATE IN THE "DOWN" DIRECTION OF THE WINDOW?)
YES
I
REPAIR A POOR CONNECTION AT THE CONNECTORS OR AN OPEN
CIRCUIT
BETWEEN HARNESS SIDE CONNECTOR TERMINALS
slr14I(ND 2 (Q;1il (OR~ AND ~)OR BETWEEN
5 D-14
AND 4 ~. 2 ~NO 12lliJ.ilQR REPLACE THE
POWER
WINDOW MOTOR (POWER WINDOW MOTOR CHECKING
PROCEDURE: CONNECTING
THE CONNECTOR 21 D-111 TO THE
BATIERY (+)TERMINAL, AND 1 ~ TO THE H TERMINAL,
DOES
THE MOTOR ROTATE IN THE "UP" DIRECTION OF THE
WINDOW? lOR WHEN CONNECTING 1 (Q;11] TO THE(+)
TERMINAL AND 2 I D-111 TO THE H TERMINAL, DOES THE
MOTOR ROTATE IN THE "DOWN" DIRECTION OF THE WINDOW?)
OR REPLACE THE PASSENGER SIDE POWER WINDOW I& DOOR
LOCK) SWITCH
I
NO I
I
REFER TO "WINDOW ON THE DRIVER SIDE DOES NOT OPERATE" IN THIS DIAGNOSIS
FOR REPAIR
Page 1457 of 1928
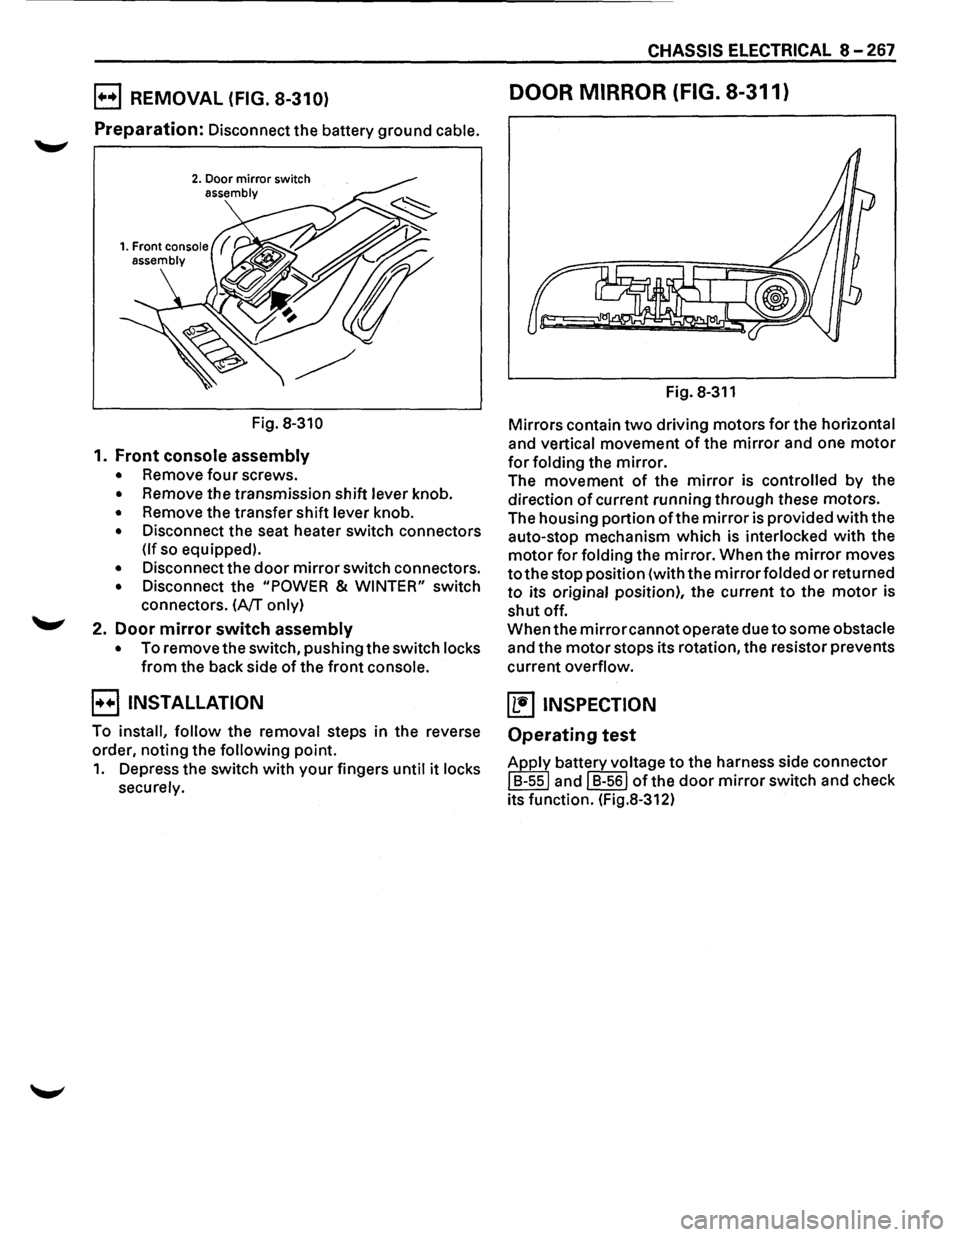
E) REMOVAL (FIG. 8-310)
Preparation: Disconnect the battery ground cable.
2. Door mirror switch assembly
Fig. 8-310
1. Front console assembly
• Remove four screws.
• Remove the transmission shift lever knob.
• Remove the transfer shift lever knob.
• Disconnect the seat heater switch connectors
(If so equipped).
• Disconnect the door mirror switch connectors.
• Disconnect the "POWER & WINTER" switch
connectors.
(A/T only)
2. Door mirror switch assembly
• To remove the switch, pushing the switch locks
from the back side of the front console.
B INSTALLATION
To install, follow the removal steps in the reverse
order, noting the
following point.
1. Depress the switch with your fingers until it locks
securely.
CHASSIS ELECTRICAL 8-267
DOOR MIRROR (FIG. 8-311)
Fig. 8-311
Mirrors contain two driving motors for the horizontal
and vertical movement of the mirror and one motor
for folding the mirror.
The movement of the mirror is controlled by the
direction
of current running through these motors.
The housing portion
ofthe mirror is provided with the
auto-stop mechanism which is
interlocked with the
motor for folding the mirror. When the mirror moves
to the stop position (with the mirror folded or returned
to its original position), the current to the motor is
shut off.
When the
mirror cannot operate due to some obstacle
and the motor stops its rotation, the resistor prevents
current
overflow.
~ INSPECTION
Operating test
Apply battery voltage to the harness side connector
I B-ssl and I B-561 of the door mirror switch and check
its function. (Fig.8-312)
Page 1460 of 1928
8-270 CHASSIS ELECTRICAL
ANTI-THEFT SYSTEM
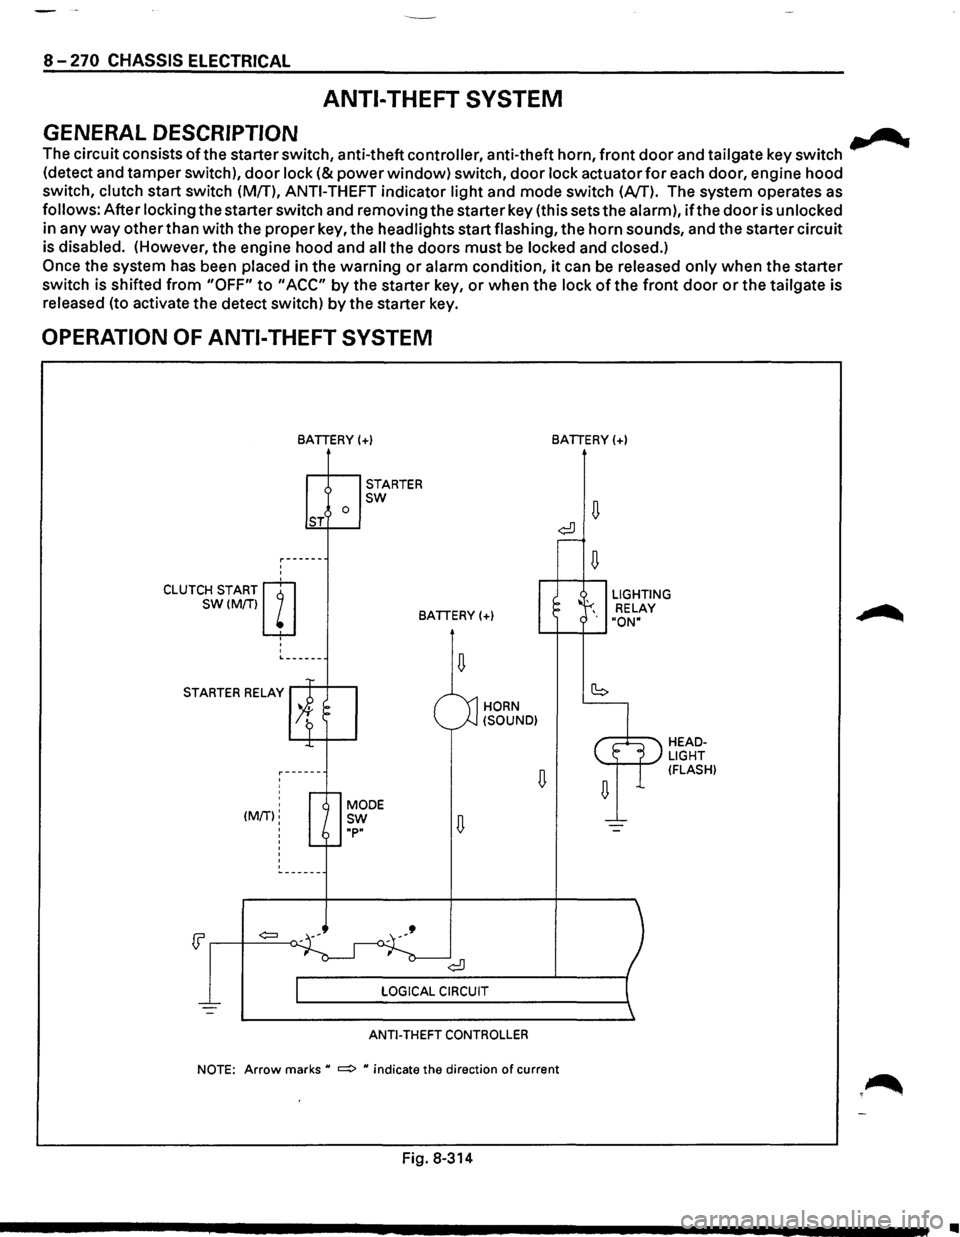
GENERAL DESCRIPTION .......
The circuit consists ofthe starter switch, anti-theft controller, anti-theft horn, front door and tailgate key switch
(detect and tamper switch),
door lock (&power window) switch, door lock actuator for each door, engine hood
switch, clutch start switch (MfT),
ANTI-THEFT indicator light and mode switch (AfT). The system operates as
follows: After locking the starter switch and removing the starter key (this sets the alarm),
ifthe door is unlocked
in any
way other than with the proper key, the headlights start flashing, the horn sounds, and the starter circuit
is disabled. (However,
the engine hood and all the doors must be locked and closed.)
Once the system has been placed in the warning or alarm condition, it can be released only when the starter
switch is shifted
from "OFF" to "ACC" by the starter key, or when the lock of the front door or the tailgate is
released (to activate the detect switch)
by the starter key.
OPERATION OF ANTI-THEFT SYSTEM
'
'
CLUTCH START m
SW(M/Tiw
' '
'
BATIERY(+)
0 ST
STARTER sw
BATIERY(+)
L------
STARTER RELAY
' ' (MIT):
'
'
'
HORN
(SOUND)
ANTI-THEFT CONTROLLER
BATIERY(+)
LIGHTING
RELAY
"ON"
HEADLIGHT (FLASH)
NOTE: Arrow marks u ~ u indicate the direction of current
Fig. 8-314
•
Page 1461 of 1928
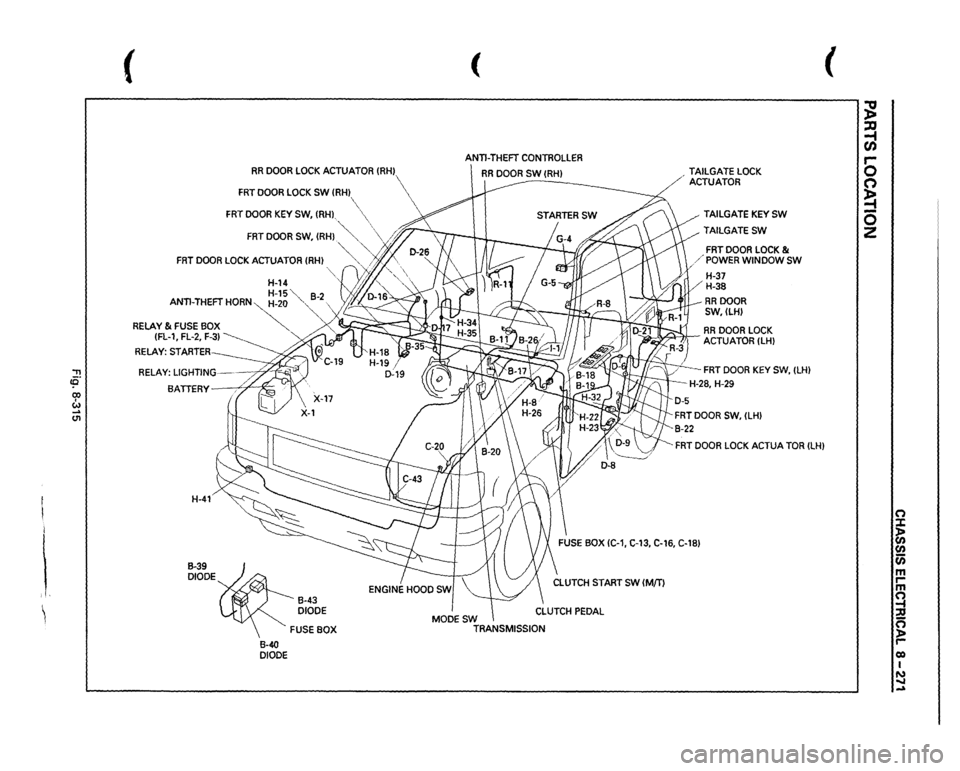
'"T1 !fl' co I w _. (11
I i i, ~
(
RR
DOOR
LOCK
ACTUATOR
{RHJ
FRT
DOOR
LOCK
SW
(RH
FRT
DOOR
KEY
SW,
(RH),
( ANTI-THEFT
CONTROLLER
RR
DOOR
SW
(RHJ
-------
FRT
DOOR
SW,
(RH)
.~""··
\
/;'~
~
"'··
FRT
DOOR
LOCK
ACTUATOR
(RH)
'-, ..,/j.
',
H-14
'L
y'JIJ.
"·,
H-15"
82
ANTI-THEFT
HORN~-20
"-,
-
RELAY
& FUSE
BOX
~
{FL-1,
FL-2,
F-3)
~
RELAY:
STARTER BATTERY
X::
H-41 B-39 DIODE
B-40 DIODE
B-43 DIODE FUSE
BOX MODESW
TRANSMISSION ,
TAILGATE
LOCK
ACTUATOR
TAILGATE
KEY
SW
TAILGATESW
FRT
DOOR
LOCK
&
/'POWER
WINDOW
SW
H-37 H-38 RRDOOR SW,(LH)
.
RR
DOOR
LOCK
-~ACTUATOR
{LHJ
FRT
DOOR
KEY
SW,
{LH)
-H-28,
H-29
FRT
DOOR
LOCK
ACTUA
TOR
(LH)
(
;g ~ C/) 5 C') ~ 0 z
n :X: ~ (/) 0 m rm ~ n ):a r-0) I N ..... -
Page 1462 of 1928
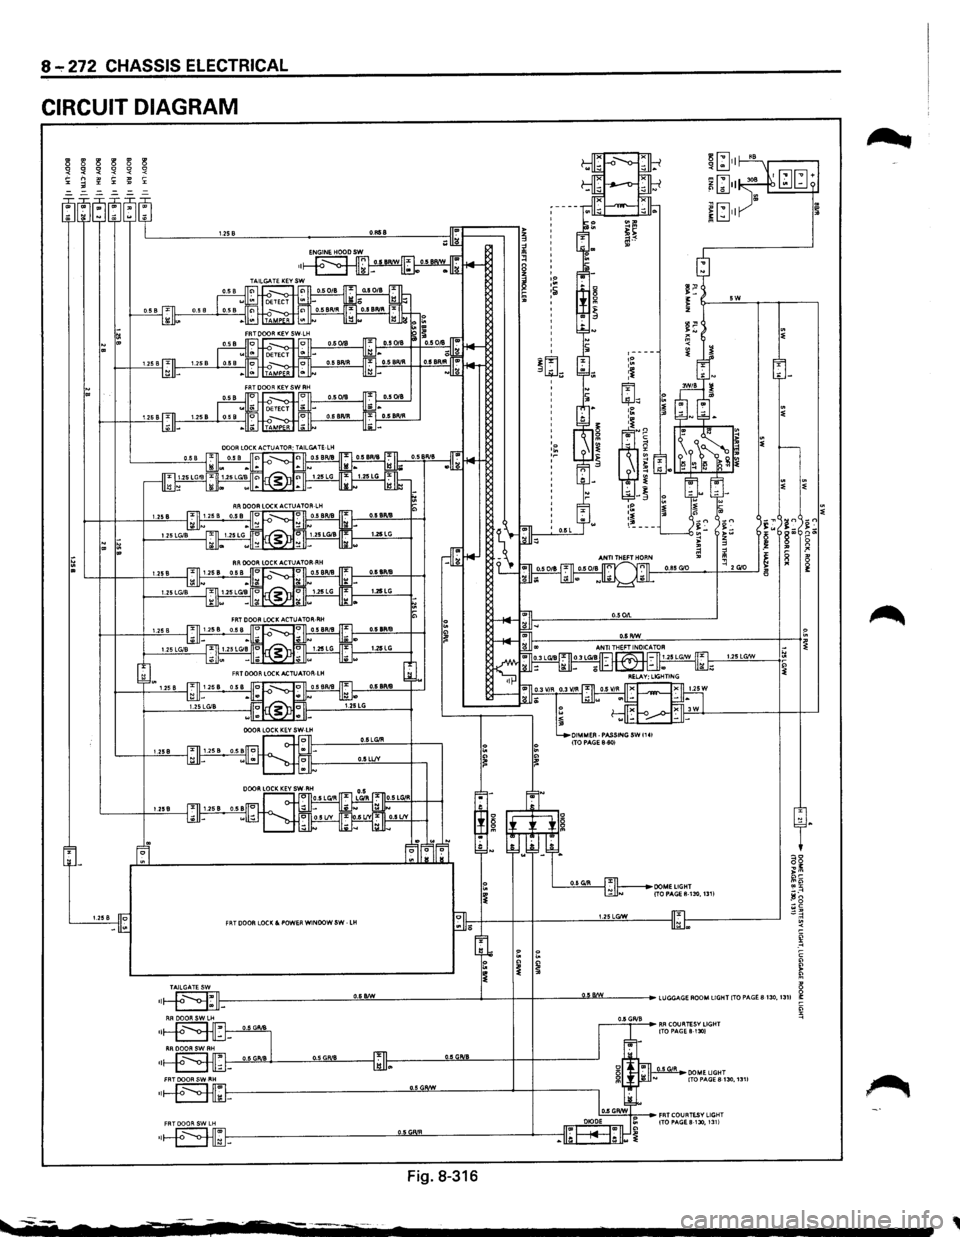
8-:-272 CHASSIS ELECTRICAL
CIRCUIT DIAGRAM
3 3
3 3 3 3 !1 !1
!1 !1
!1 '< '< ~ ~ '< ;:: "' =-=-=-=-
=-
1.258 O.Rti8
5W
tl ~ ~ '" ,----.~ :j ' ~ ~1 :~
~'
~
g ~ ~ ~ ~ -~ ,p 1.258 .~
~~ ---~= ~= in ~~ >w i5 r ~ tl z g ~ .! .. ~ ?' ~ ~ ~ 1! .. 0.85G'O ~ 2 G'O 0 U!iB 1'1 1:
1.25LG/W
0.6LGIR 1.258 0.5LLIV
l.l!iB
1.258 FRT DOOR LOCK&. POWER WINDOW SW -LH 1.25LGIW
~ -~ c
~ 8 II-----------_!!,!!..!!!!..._ ________ .__-+-+---~!.ML---•LUGGAGEROOMUGHTITOPA.GE8130,13U i:
Fig.
8-316
~----
•
~_:;::_;:= ... RR COURTESV LIGHT ITO PAGE&-1301
DOME LIGHT ITOPAGES-130,1311
~
,
Page 1465 of 1928
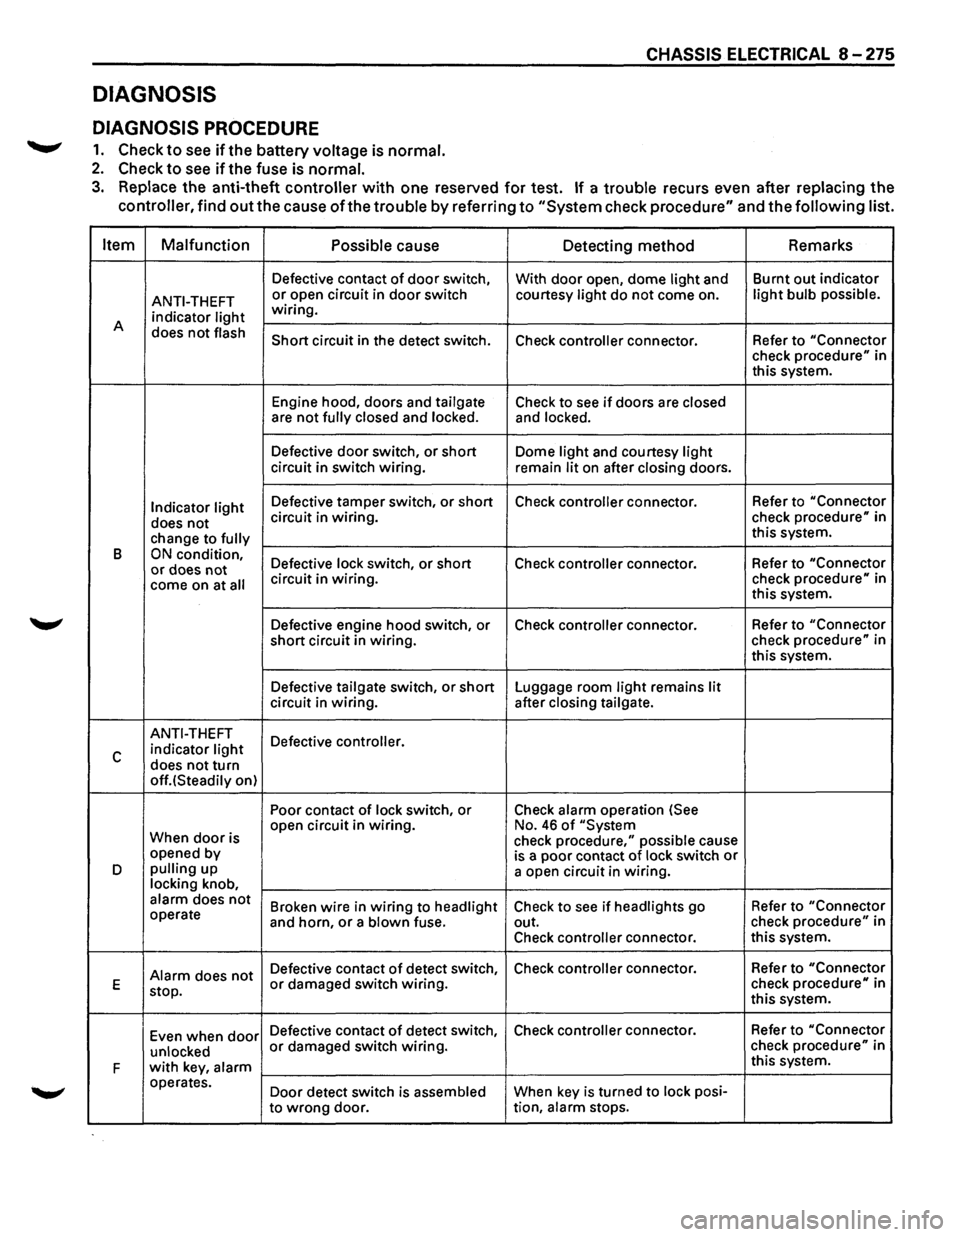
DIAGNOSIS
DIAGNOSIS PROCEDURE
.......,. 1. Check to see ifthe battery voltage is normal.
2. Check to see if the fuse is normal.
CHASSIS ELECTRICAL 8 -275
3. Replace the anti-theft controller with one reserved for test. If a trouble recurs even after replacing the
controller, find
out the cause of the trouble by referring to "System check procedure" and the following list.
Item Malfunction
Possible
cause Detecting method Remarks
Defective
contact of door switch,
With door open, dome light and Burnt
out indicator
ANTI-THEFT or open circuit in door switch courtesy light do not come on. light bulb possible.
indicator light wiring.
A does
not flash Short circuit in the detect switch.
Check controller connector. Refer to "Connector check procedure" in
this system.
Engine hood, doors and
tailgate Check to see if doors are closed are not fully closed and locked. and locked.
Defective door switch, or short Dome light and courtesy light circuit in switch wiring.
remain lit on after closing doors.
Indicator light Defective tamper switch, or short Check controller connector. Refer
to "Connector
does not circuit in wiring. check procedure" in
change to
fully this system.
B
ON condition, Defective lock switch, or short Check controller connector. Refer
to "Connector or does not come on at all circuit in wiring. check procedure" in
this system.
Defective engine hood switch, or Check
controller connector. Refer
to "Connector
short circuit in wiring. check
procedure" in
this system.
Defective
tailgate switch, or short Luggage room light remains lit circuit in wiring. after closing tailgate.
ANTI-THEFT
Defective controller.
c indicator light
does not turn off.(Steadily on) Poor contact
of lock switch, or Check alarm operation (See
When
door is open
circuit in wiring. No. 46 of "System
check procedure," possible cause
opened by
is a poor contact of lock switch or D pulling up
a open circuit in wiring. locking knob, alarm does not Broken wire in wiring to headlight Check to see if headlights go Refer
to "Connector operate
and horn, or a blown fuse. out. check procedure" in
Check
controller connector. this
system.
Alarm does not Defective contact of detect switch, Check controller connector.
Refer to "Connector
E
stop. or damaged switch wiring. check procedure" in
this system.
Even when
door Defective contact of detect switch, Check controller connector. Refer
to "Connector
unlocked
or damaged switch wiring. check procedure" in
F
with key, alarm this system.
operates. Door detect switch is
assembled When key is turned to lock posi-
to
wrong door. tion, alarm stops.
Page 1467 of 1928
------------- -
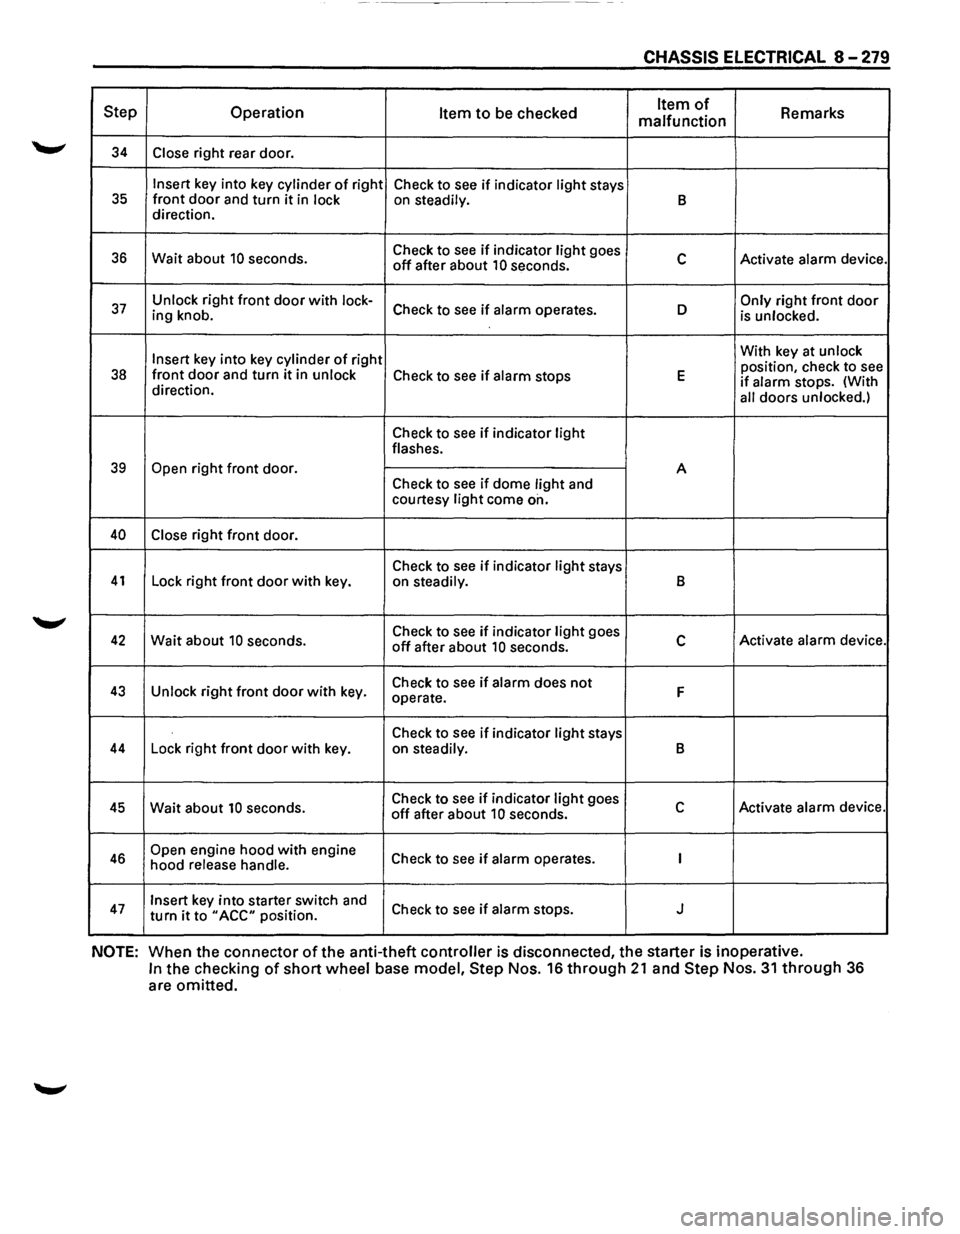
CHASSIS ELECTRICAL 8-279
Step Operation Item to be checked Item of Remarks
malfunction
34 Close right rear door.
Insert key into key cylinder of right
Check to see if indicator light stays 35 front door and turn it in lock on steadily. B direction.
36 Wait about 10 seconds. Check
to see if indicator light goes c Activate alarm device. off after about 10 seconds.
37 Unlock right front door with lock-Check to see if alarm operates. D Only right front door ing knob.
is unlocked.
Insert
key into key cylinder of right With
key at unlock
position, check to see 38 front door and turn it in unlock Check to see if alarm stops E if alarm stops. (With
direction.
all doors unlocked.)
Check to see if indicator light flashes.
39 Open right front door.
A
Check to
see if dome light and
courtesy light come on.
40 Close right front door.
Check to
see if indicator light stays 41 Lock right front door with key.
on steadily. B
42 Wait about 10 seconds. Check
to see if indicator light goes c Activate alarm device. off after about 10 seconds.
43 Unlock right front door with key. Check
to see if alarm does not F operate.
Check to
see if indicator light stays 44 Lock right front door with key.
on steadily. B
45 Wait about 10 seconds. Check
to see if indicator light goes c Activate alarm device. off after about 10 seconds.
46 Open engine hood with engine
Check to see if alarm operates. I hood release handle.
47 Insert key into starter switch and
Check to see if alarm stops. J turn it to "ACC" position.
NOTE: When the connector of the anti-theft controller is disconnected, the starter is inoperative.
In the checking of short wheel base model, Step Nos. 16 through 21 and Step Nos. 31 through 36
are omitted.
Page 1468 of 1928
8-280 CHASSIS ELECTRICAL
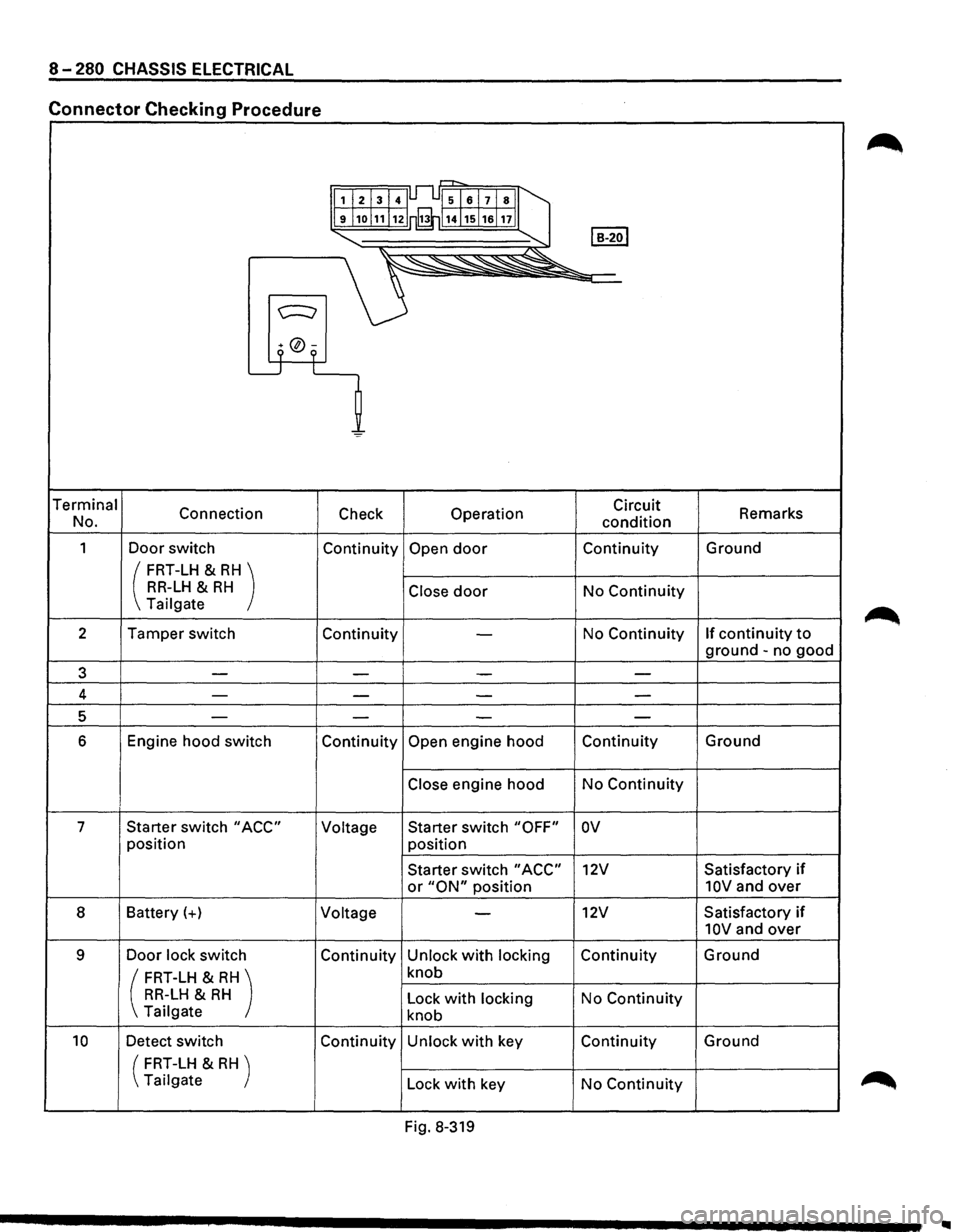
Connector Checking Procedure
r=-r-,
1I213141Jl..l51al7lsll
9j1ol11!12 rfi114j15j1alnll
I B-2ol "-... ~
~~"'--~~"
c:::::::;
9 °9 L_j L
=
Terminal
Connection Check Operation Circuit
Remarks
No.
condition
1 Door switch Continuity Open door Continuity Ground
( FRT-LH & RH) RR-LH & RH Close door No Continuity Tailgate
2 Tamper switch
Continuity
-No Continuity If continuity to
ground -no good
3 -
-I - -
4 ---
-
5 ----
6 Engine hood switch Continuity Open engine hood Continuity Ground
Close engine hood
No Continuity
7 Starter switch
"ACC" Voltage Starter
switch "OFF" ov
position
position
Starter switch
"ACC" 12V Satisfactory if
or "ON" position 10V and over
8 Battery(+)
Voltage -12V Satisfactory if
10V and over
9 Door lock switch Continuity Unlock with locking Continuity Ground
( FRT-LH & RH) knob
RR-LH & RH Lock with locking No Continuity
Tailgate knob
10 Detect switch Continuity Unlock with key Continuity Ground
(
FRT-LH & RH )
Tailgate Lock
with key No Continuity
Fig. 8-319
..